
10 USER INTERFACE PROTOTYPING
The architect’s two most important tools are: the eraser in the drafting room and the wrecking bar on the site.
Frank Lloyd Wright (quoted in Jacobs, 1965)
INTRODUCTION
In previous chapters, we have repeatedly mentioned the importance of prototyping: it is an essential part of the iterative user-centred design process. In this chapter we describe exactly what we mean by a prototype. We examine the different sorts of prototype, such as electronic and paper prototypes, and we identify the difference between a prototype and a sketch. We also clarify the term wireframe. We discuss the applicability of different sorts of prototype in different situations.
LEARNING OBJECTIVES
After reading this chapter you will be able to:
|
Understand |
|
|
Apply |
|
WHAT IS A PROTOTYPE?

Definition: prototype
Representation of all or part of an interactive system, that, although limited in some way, can be used for analysis, design and evaluation (ISO 9241-210, 2019)
People sometimes use the word ‘prototype’ in a restricted sense: for example, to indicate only representations that are created using electronic technology, as opposed to mockups, that can be paper-based; or to include only evolutionary prototypes as opposed to throwaway prototypes (see below). In this book, we follow the ISO 9241-210 definition, given above, which is very broad and encompasses all types of representation created for the purpose of analysis, design and evaluation. This includes:
- Interactive electronic prototypes and paper prototypes
- Evolutionary and throwaway prototypes
- Horizontal and vertical prototypes
- High-fidelity and low-fidelity prototypes
- Mockups
- Wireframes
The one distinction we do make is between prototypes and sketches.
Sketches

A sketch is not a prototype!
Sketching is an essential part of what designers do. It is a way of developing ideas, which has been described as ‘thinking with a pencil’. A sketch is not suitable for using as a prototype. A prototype needs to be something that the user can understand and interact with in some way.
Although we do refer to the activity of drawing a paper-based prototype by hand as ‘sketching’, we consider a sketch to be something that a designer creates as part of their own private process. They may share it with other designers, but it is not intended for discussion or evaluation with users.
PURPOSE OF PROTOTYPING
The purpose of prototyping is to generate successive design solutions which can be evaluated with users so that the team learns more about the problem or its solution, and moves towards delivering a useful and usable system. As we saw in Chapters 3 and 6, user-centred design is a cyclical activity that involves continual experimentation. Almost all of the ‘design solutions’ that we use for these experiments are prototypes of varying kinds. Prototyping is an essential part of the process. For prototyping to be successful, the key point is to articulate clearly the learning objectives of every prototype: what are we planning to learn, and how?
Not only do we create potentially different kinds of prototype at different stages of a project, but we should also try at each stage to create alternative prototypes, so that they can be compared with each other. By comparing the alternatives, we will usually come up with better ideas.
Always make more than one
One of the most tempting mistakes, in any field of design, is to seize upon the first solution that seems like a good one, and stop looking for others at that point. As you proceed down that path, you soon start to become attached to the idea and lose the ability to see the comparative benefits of alternative approaches, or even to recall the drawbacks that were obvious to you when the idea first came to you. Always try to come up with several different ideas at every stage, and carefully compare their relative strengths and weaknesses before you get too attached to one of them.
CHOOSING THE RIGHT SORT OF PROTOTYPE
There is a natural progression in the kind of prototypes produced during the life of a project. Early efforts will be more orientated towards testing out rough ideas. Later prototypes will focus more on details.
Evolutionary and throwaway prototypes
An evolutionary prototype is one where the same software code base is gradually expanded and improved to take in more and more functionality. Contrast this with a throwaway prototype, which is coded as a one-off task specifically in order to carry out a particular experiment, and is then discarded.
The evolutionary approach is often emphasised on Agile projects, either for the sake of speed, or from a belief that evolutionary prototyping is the correct method to use for incremental delivery. However, an incremental approach to delivering business value is not incompatible with throwaway prototyping. Throwaway prototypes can often be built efficiently, making use of existing code where possible, and can allow better focus on the problem being investigated and a wider range of design hypotheses. Besides, as discussed below, prototypes do not necessarily have to involve any coding at all.
Horizontal and vertical prototypes
A horizontal prototype is useful for exploring how well our product might support users in achieving all their goals. It focuses on showing the user the full range of functionality, usually without providing much interactivity at a detailed level.
Conversely, a vertical prototype allows the designers to test out detailed ideas for how the product will support users in carrying out a narrow range of tasks or achieving one specific goal.
An interactive prototype can be built using the product’s target technology, or with a special-purpose prototyping tool. Interactive prototypes do not necessarily have to be electronic, as we will see below. Interactive models allow us to test sequences of pages and complex interactions in a way that is impossible with static mockups. However, not only does an interactive prototype take longer to create, but it focuses attention onto the dynamic behaviour of the interface and away from general consideration of the product scope. A good approach is to start prototyping as early as possible, and keep prototypes as low-tech as they can be for as long as possible.
Paper prototypes
Paper prototyping is the user experience specialist’s secret weapon. It is an under-used technique that allows the design team to try out ideas from a very early stage of the project. User research should always come first, but as soon as the team has some understanding of the users, their environment and their goals, then paper prototypes can be produced to explore functionality with users.
A paper prototype can be created using large sheets of paper, such as A3. You can draw page elements using felt-tip pens. These can be drawn directly onto the main sheet of paper, or you can take a more modular approach, building up parts of the interface from smaller pieces of paper and sticky notes, which allows you to model interactivity by moving and replacing parts of the interface. Build the prototype so that a user can interact with it in an appropriate way. For example, interaction with a mouse and keyboard-based GUI can be simulated by having the test participant tap with their finger to represent a mouse click, or write on a sticky note, transparent paper or acetate to represent typing.
To run a test with a paper prototype, you will ideally have three people as well as the user themselves:
- The test moderator, who talks the user through the test.
- The ‘computer’, who moves the pieces of paper around in response to the actions the user takes.
- The scribe, who records observations. If each of these is written on a sticky note, then the findings can be taken straight into an affinity diagramming session after the testing has taken place.
Even though it is possible for one person to play two or even all three roles, this will almost always slow down the session and make it harder to maintain the test participant’s interest.
Fidelity
Fidelity refers to the degree to which the appearance of the prototype matches the proposed appearance of the finished product. A high-fidelity prototype appears very similar to the final system; a low-fidelity prototype has some characteristics of the target system but is otherwise simple, usually in order to produce the prototype and test broad concepts quickly.
If it is to be interactive, a high-fidelity prototype is generally produced using the product’s target technology. High-fidelity non-interactive mockups are often produced using graphics or photo editing software. High-fidelity prototypes are usually produced towards the later stages of a project, although there can be good reasons for producing them earlier; for example, if aesthetic and hedonic (pleasure-related) aspects of the user experience play a very important part in the product’s value to the user. Usually, however, a focus on the details of visual design should be left as late as possible and it is a mistake to waste time on it too early (Figure 10.1).
Figure 10.1 High fidelity prototype

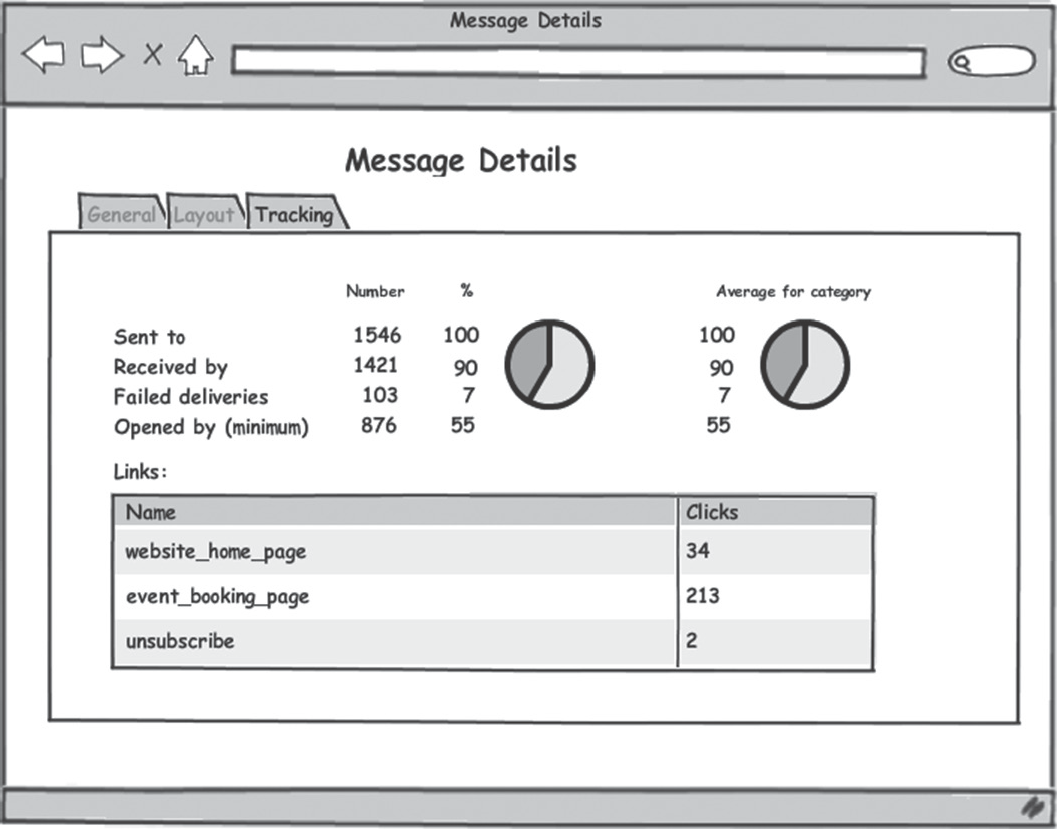
A preference for low-fidelity techniques is becoming more widely accepted as a fruitful way of learning about a product by getting quick feedback. We saw in Chapter 5 how ‘quick and dirty’ approaches to journey mapping and persona description are more generative than highly finished documentation. This is even truer when prototyping the user interface itself. When a prototype has an unfinished appearance, users and other stakeholders intuitively understand that they are participating in its ongoing design and refinement. This psychological effect is immensely helpful, and is exploited by electronic tools such as Balsamiq, which deliberately draw mockups so that they look as if they have been drawn by hand (Figure 10.2).
Figure 10.2 Mockup created in Balsamiq
A standard technique for mapping out the structure of a user interface display is the wireframe. This is a stylised low-fidelity drawing of the display that shows all the logical elements but without any distracting features of visual design such as colour, fonts or images. Images are replaced by boxes of the right dimensions but containing only two diagonal lines. Meaningless text (‘lorem ipsum’ or greeking) is substituted for any paragraphs of meaningful text that could distract attention from the structure. Wireframes are traditionally done with a focus on layout, and have precisely correct proportions, but their value is largely in the way they help users and the project team to think about what is on each page and how it can support the user in carrying out their tasks by forming part of a coherent and consistent user journey. The term ‘wireframe’ is increasingly being used to refer to practically any mockup.
SUMMARY
A prototype is any kind of partial representation of a solution that can be used for evaluation with users. We can contrast this with a sketch, which is a vehicle for, and by-product of, visual thinking. A prototype should be associated with a learning objective. The more alternative prototypes are generated, the better the result is likely to be.
Evolutionary prototypes build on work already done, whereas throwaway prototypes are one-off products. Throwaway prototypes allow the team to explore a wider range of ideas. Vertical prototypes focus on a specific task or set of tasks in depth, whereas horizontal prototypes provide a broader view of the system in context.
Mockups, paper prototypes and other low-fidelity prototypes do not attempt to mimic details of the final product and are the most useful approaches in a project’s early stages. Interactive and high-fidelity prototypes can be used later to explore details that are hard to replicate with low-fidelity approaches.
REFERENCES
ISO 9241-210:2019 (2019) Ergonomics of Human-System Interaction – Part 210: Human-Centred Design for Interactive Systems. International Organization for Standardization (ISO), Geneva.
Jacobs, H. (1965) Frank Lloyd Wright: America’s Greatest Architect. Harcourt, Brace & World, New York.
FURTHER READING
Buley, L. (2013) The User Experience Team of One. Rosenfeld Media, Brooklyn, NY.
Buxton, B. (2007) Sketching User Experiences: Getting the Design Right and the Right Design. Morgan Kaufmann, San Francisco, CA.
Greenberg, S., Carpendale, S., Marquardt, N. and Buxton, B. (2011) Sketching User Experiences: The Workbook. Elsevier, Waltham, MA.
Snyder, C. (2003) Paper Prototyping: The Fast and Easy Way to Design and Refine User Interfaces. Morgan Kaufmann, San Francisco, CA.
EXAMPLE EXAMINATION QUESTIONS
1. What are the benefits of low-fidelity prototypes?
1. They can be used to design user interface animations
2. They encourage the design team to explore alternative designs
3. They can be tested and refined quickly
4. They can be used to assess technical feasibility before any code is written
5. They can be developed by non-programmers
a. 2, 3 and 4 only
b. 2, 3 and 5 only
c. 1, 2 and 5 only
d. 1, 4 and 5 only
2. You are in the early stages of the design of an in-car entertainment system that will allow passengers to download and view movies. What would be your first step?
a. Encourage the design team to think of various potential solutions to prevent them from becoming fixated on one design idea
b. Explore the technical feasibility of using multi-touch, speech and head-up displays within an in-car environment
c. Visit potential users to understand their current needs for such a system
d. Create a paper prototype of a potential user interface and test it with users
3. You are at the early design stage of a new system that will make significant changes to the way users carry out their work. The design team would like feedback on three alternative design ideas. Which user research technique would be MOST suitable?
a. Carry out a structured interview with existing users
b. Carry out a usability test with a high-fidelity prototype
c. Run an online survey with existing users
d. Carry out a usability test with a low-fidelity prototype
4. A researcher asks a participant to carry out tasks with a hand drawn interface, where the participant uses his finger as a mouse. What technique is the researcher using?
a. Paper prototyping
b. Sketching
c. Retrospective protocol analysis
d. Design studio
ANSWERS TO EXAMPLE QUESTIONS
1. The correct answer is (b).
Choice (1) is wrong because realistic animations are impossible to replicate with a paper prototype. Choice (4) is wrong because paper prototypes cannot assess technical feasibility. It is only option (b) that has the other choices, excluding (1) and (4).
2. The correct answer is (c).
The purpose of this question is to make sure candidates realise that the first step in a project is not to prototype or think of design solutions at all, but to speak with users without any preconceptions about how the design might look. This makes (c) the best answer. (a) and (d) are sensible steps to take once the design process has begun, but neither should be the first step. Similarly, (b) will be important once the user’s need for the service has been established, but there is no point exploring the technical feasibility until the users’ needs have been uncovered.
3. The correct answer is (d).
(a) and (c) are wrong because they will collect opinion data: this will almost certainly be overwhelmingly negative because users are being asked to work differently. An additional problem with (a) is that the interviews will be ‘structured’, which omits the possibility of discovering findings outside the team’s current way of thinking. What’s needed here is some indication of the problems (if any) that people will have with the new approach, so some kind of behavioural observations are called for. This leaves (b) and (d) as the possible choices. Since we are at the early stages of design, and since the design team have three alternative designs, a test of a low-fidelity prototype would make more sense than a test with a high-fidelity prototype because the prototypes can be created more quickly. The low-fidelity prototype has the additional advantage that the systems will not look too ‘finished’, which means users are more likely to see the designs as early concepts and not finished designs.
4. The correct answer is (a).
(b) is wrong because sketching is the process of generating ideas and sketches are rarely suitable for paper prototyping. (c) is wrong because this technique requires the participants to view a video of themselves using the system and narrate what they were doing. (d) is wrong because a design studio is a collaborative sketching activity attended by designers. This leaves (a) as the correct answer.