
2. Managing Windows and Panels
In this chapter, you learn how to maximize your work area by applying good window and panel management, and how to save and recall your favorite workspace environments.
As a layout artist, it’s important to make the most of your precious screen real estate. You’ll be happy to know that your work area onscreen won’t be eaten up by panels in InDesign CS5. You can use the resizable side wells located on the right and left sides of your screen to store individual panels, docked panel groups, or stacked panel windows. While docked in the side wells, panels can be minimized to display a small, labeled icon or just the icon itself. It has never been easier to collapse or dock panels, while still maintaining quick access to all the tools you need.
Panel Controls
Before you begin working with panels, it’s a good idea to familiarize yourself with the general panel window structure. Figure 2.1 shows a breakdown of the controls found in all InDesign panels that are used to manage the panels’ location or content.
Figure 2.1. Free-floating panels in OS X (left) and Windows (right).
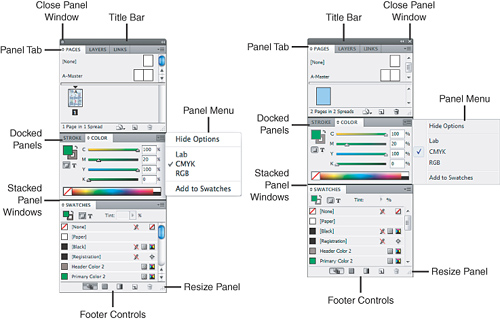
The following list describes the controls and what they do. You’ll put them to work in the sections that follow.
• Close Panel Window: Click this button to close the panel window and all panels docked inside.
• Title Bar: Click and drag the title bar to reposition the panel window on your screen. Double-click the title bar to collapse the window.
• Panel Tab: Click and drag to dock the panel in another window or side well. Single-click the tab to bring a docked panel to the front of a group. Double-click the tab to collapse the panel.
• Docked Panels: Every panel window contains a well to dock other panels in. Panel tabs are positioned side by side in the well for easy access.
• Panel Menu: Click to access specific panel options. The menu button always appears in the upper-right corner of the window.
• Stacked Panel Windows: Panel windows (with or without multiple panels docked inside them) can also be connected in a vertical column, as shown here.
• Footer Controls: Various panel-specific action buttons are located at the bottom of the panel window.
• Resize Panel: Not all panels feature this option, but for those that do, click and drag the icon in the bottom-right corner to resize the panel window.
Organizing Panels
To conserve screen space, you can regroup panels by docking them together. You can also stack panel windows into a vertical column. Panels and panel groups can also be collapsed vertically to create more room for you to work. In addition, InDesign enables you to dock panels into resizable side wells on either side of your screen, and even reduce them to icon size. The following sections show you how some simple workspace reorganization can improve your ability to get things done.
Regrouping Panels
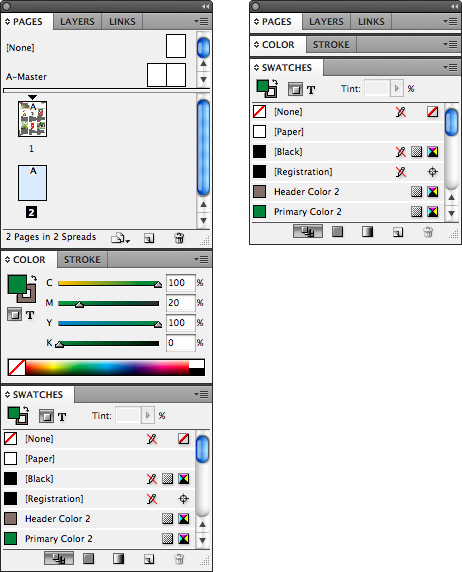
One efficient way to save screen space is to regroup your most frequently used panels together. By doing so, you can essentially combine multiple panels into one compact group (see Figure 2.2).
Figure 2.2. Keeping a lot of individual panels open can eat up a lot of your screen (top), but regrouping your most frequently used panels creates a lot more room to work (bottom).

![]() LET ME TRY IT
LET ME TRY IT
Grouping and Ungrouping Panels
Follow these steps to group and ungroup panels:
- To group individual panels, click the tab of one panel and drag it into another.
- Hold the mouse button down until a blue outline appears around the panel window into which you are dragging; then release. The panels become grouped inside the same window. Click a grouped panel’s tab to bring that panel to the front of the group.
- To ungroup a panel, click the tab, hold the mouse button down, and drag it out of the window.
- Release the mouse button to place the free-floating panel somewhere else on your screen, or group it into another window or side well.
Collapsing Panels
Another great way to save screen space is to collapse panel windows. Collapsing panels hides everything except for the panel tabs (see Figure 2.3). This is the best way to clear your screen.
Figure 2.3. InDesign’s panels can take up a large portion of the screen (left), but collapsing them gives you much more room to work (right).

InDesign offers several ways to collapse panel windows when free-floating onscreen or docked in a side well:
• Double-click the title bar to reduce the panel window to icon size.
• Double-click a panel tab to collapse the panel (or panel group) within the window.
• Click the Collapse Window button (the arrow icon) in the upper right of the panel window to reduce it to icon size.
Stacking Panels
One other way that you can save screen space is to stack your panel groups together. Doing so allows you to reposition all the panels at once or collapse groups within the stack (see Figure 2.4).
Figure 2.4. Panel groups can also eat up a lot of your screen (left), but stacking them enables you to reposition and collapse each group (right).
To stack panel windows together, click the tab of one panel, hold the mouse button down, and drag the panel over the bottom edge of another. Release the mouse button when a thick blue line appears at the bottom edge of the window you’re docking to. The panel windows become docked in a vertical column.
Using the Panel Side Wells
The resizable side wells located on the right and left sides of your screen enable you to store individual panels, docked panel groups, and stacked panel windows.
Adding a Panel to a Side Well
To add a panel window to either side well, follow these steps:
- Click the title bar and drag it to either side of your screen.
- Hold the mouse button down until a vertical blue line appears in the well, and then release for the panel window to snap into place.
- Double-click the title bar at the top of a docked panel column and the column collapses to display only small panel icons and panel names (see the left side of Figure 2.5).
Figure 2.5. Docked and labeled icon panels (left) and docked icon panels (right).

- Minimize the column even further to display just the icons by clicking the gray area at the top or side of the column and dragging it in toward the side of the screen (see the right side of Figure 2.5).
Click once on a collapsed panel icon to expand the panel from the side well (see Figure 2.6). The expanded window snaps into position next to the well and can be resized by clicking and dragging the bottom of the panel up or down.
Figure 2.6. A collapsed panel expanded from the side well.
Point-Counterpoint: Media 2.1—Auto-collapsing Iconic Panels
![]()
Access this video file through your registered Web edition at my.safaribooksonline.com/9780132174541/media.
Note that you can also add multiple columns of docked panel windows in the side wells at one time (see Figure 2.7). To do so, click the title bar and drag it to the side of the screen. Hold the mouse button down until a vertical blue line appears on the outside of the column, and then release for the panel window to snap into place.
Figure 2.7. Multiple side docks positioned on the right side of the screen.
Here are some more helpful tips for working with the side panel wells:
• You can reposition a docked panel vertically in the well, whether expanded or minimized to an icon, by clicking and dragging up or down. When you see a thick blue horizontal line appear, release the mouse button to drop the panel into place.
• When repositioning an expanded panel into a docked icon group, the panel minimizes to an icon and snaps into place.
• You can add more panels to a docked panel group by dragging them over the icons or the expanded panels in the well.
• At any time, docked panels—expanded or minimized—can be undocked and repositioned anywhere on the screen by clicking and dragging the icon or panel tab out of the well.
Customizing Your Workspace
InDesign enables you to save your workspace environment so that you don’t have to spend time repositioning panels on the screen every time you launch the application. You can create and save a custom workspace for every type of layout work you do. For instance, a production-oriented job might require a totally different set of panels than a design-oriented one. No problem! InDesign lets you save a workspace for each.
![]() LET ME TRY IT
LET ME TRY IT
Saving a Workspace
To save your preferred work environment, follow these steps:
- Choose Window, Workspace, New Workspace.
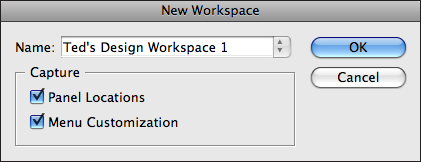
- When the New Workspace dialog box appears, enter a name for your workspace and click OK (see Figure 2.8).
Figure 2.8. Enter a name for your custom workspace in the Name field of the New Workspace dialog box.
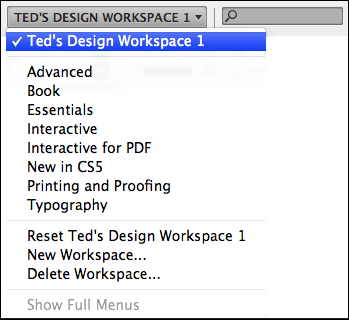
- You can now restore your workspace whenever you like by selecting it under the Window, Workspace submenu or from the Workspace drop-down list in the Application Bar (see Figure 2.9).
Figure 2.9. You can access your favorite workspace environments quickly and easily from the Application Bar drop-down list.
- To save changes made to your custom environment, choose Window, Workspace, New Workspace, and enter the name of the workspace you want to update. Click OK when the dialog box asks whether you want to replace the workspace.
Deleting a Workspace
Custom workspaces are such a cool feature, and so easy to use, that you may find yourself saving dozens of them in no time at all. But after a while, you may realize that you use only a handful of them. No problem. You can always delete a saved workspace by choosing Window, Workspace, Delete Workspace. When the Delete Workspace dialog box appears, select the workspace that you want to delete from the list (you can only delete one at a time) and then click Delete.
Show Me: Media 2.2—Customizing the Control Panel
![]()
Access this video file through your registered Web edition at my.safaribooksonline.com/9780132174541/media.
Working with the Tools Panel
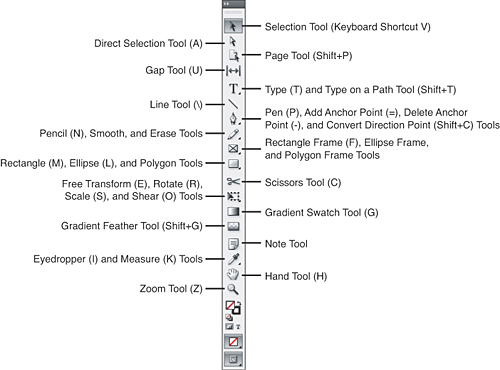
The Tools panel contains all the tools available to you; each one is represented by a descriptive icon displayed in the panel (see Figure 2.10). Most of these icons are easy to identify, but if you’re ever unsure what tool you’re viewing, hover the cursor over its icon in the Tools panel and refer to the ToolTip description that appears.
Figure 2.10. The Tools panel displayed in the default, single column format.
You can display the Tools panel on your screen in three ways. The default preference displays it in single-column format and docked in the left side well. You can change the default display by choosing InDesign, Preferences, Interface (Mac) or Edit, Preferences, Interface (Win) and selecting Double Column (see Figure 2.11) or Single Row (see Figure 2.12) from the Floating Tools panel drop-down list.
Figure 2.11. You can also display the Tools panel in double-column format...

Figure 2.12. ...or in single row format.
![]()
You can activate a tool by clicking its icon or by typing its assigned keyboard shortcut (which is also displayed in the ToolTip). Any icon showing a small arrow in the bottom-right corner indicates an available toolset—more tools are “hidden” under the one shown. Clicking and holding the icon reveals a flyout menu of additional tools.
You can also change the Tools panel display by double-clicking the gray title bar or by clicking the Expand Panel button (the arrows) at the top of the panel. When the Tools panel is docked in a side well, double-clicking its title bar or clicking the Expand Panel button only enables you to toggle between single- and double-column displays. Double-clicking its title bar or clicking the Expand Panel button when the panel is free floating enables you to toggle between all three display modes.
Arranging Document Windows
When you open more than one document in InDesign, the default behavior is to display them as tabs in a single document window (see Figure 2.13). You must click a document tab to bring it to the front of the tabbed group.
Figure 2.13. Multiple documents tabbed in a single window.

You can reposition the order of documents in the window by clicking and dragging the tabs, or you can drag a tab out of the well and view a document in its own floating window. To tab a floating document, drag its title bar over the tab well until you see a blue horizontal line appear, then release the mouse button.
InDesign also contains Arrange commands that enable you to control how your document windows are displayed.
• To display the forefront tabbed document in a floating window, choose Window, Arrange, Float in Window.
• To display all tabbed documents into floating windows, choose Window, Arrange, Float All in Windows.
• To tab all open document windows, choose Window, Arrange, Consolidate All Windows.
You can display floating windows side-by-side onscreen by choosing Window, Arrange, Tile (see Figure 2.14). To display floating document windows in front of each other with each document’s title bar visible, choose Window, Arrange, Cascade (see Figure 2.15).
Figure 2.14. Multiple documents tiled.
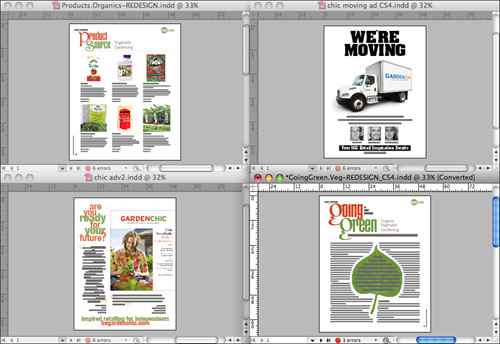
Figure 2.15. Multiple documents cascading.
Show Me: Media 2.3—Using the Application Frame in Mac OS X
![]()
Access this video file through your registered Web edition at my.safaribooksonline.com/9780132174541/media.
Changing Screen Modes
InDesign also features several screen modes in which you can view your layout documents. You can access these screen modes from a drop-down list by clicking the Screen Mode button in the Application Bar or at the bottom of the Tools panel.
• Normal mode is the default, which allows you to see all your guides, frame edges, and any items positioned off the Pasteboard (see Figure 2.16).
Figure 2.16. A layout displayed in Normal mode.

• Preview mode hides all guides and frame edges and fills the entire area surrounding the Pasteboard with gray (see Figure 2.17).
Figure 2.17. The same layout displayed in Preview mode.
• Bleed mode also hides all guides and frame edges, but reveals any areas where color prints (or “bleeds) to the edge of the page, while filling the rest of the area surrounding the Pasteboard with gray.
• Slug mode previews your document in the same way as Bleed mode, but also allows you to view any additional “slug” areas where you can insert printing instructions or comments.
• Presentation mode displays the active document in full-screen mode with all application menus, panels, guides, and frame edges hidden. By default, the area surrounding the Pasteboard is filled with gray. Press B to change the surrounding color to black; press W to change it to white. Note that unlike the other screen modes, you cannot edit the document in Presentation mode. Use the arrow keys or the spacebar to move forward or backward though the document. Press Esc to exit presentation mode.