5. Working with Frames and Shapes
In this chapter, you learn the various ways you can work with frames and shapes in InDesign.
All page layouts in InDesign are made up of frames and shapes. Frames are containers that you use for displaying placed images and bodies of text (also known as stories). Shapes (or paths) can be drawn and used as design elements or converted into frames that can hold graphics or text.
It’s fun to experiment with the flexibility of frames and shapes in InDesign. Placing graphics and text into custom shapes can certainly jazz up a layout. It’s also possible to allow frames and shapes to contain even more frames and shapes through a process called “nesting.”
By combining the versatility of frames and shapes with applied fills, stroke styles, transparency, and corner effects, you can take your layout designs to a whole new level of creativity.
Understanding Frames Versus Shapes
The frame/shape relationship can be confusing to new InDesign users, especially those coming over from QuarkXPress. I can’t tell you how many times I’ve been asked, “Why does the Tools panel have two rectangles? Which one is for text and which one is for graphics? How do I draw a text box?”
By definition, a frame is a container that holds either an image or a body of text. A shape is not intended to be a text or image container, but can be converted into one.
In Quark language, this means that the box tool with the X in it (the Rectangle Frame tool) is used to draw picture boxes. The box without the X (the Rectangle tool) is used for drawing shapes. Finally, text boxes can be drawn with the Type tool.
In InDesign, both rectangle tools (frame and shape) can be used to draw a picture box or a text box. Frames can be shapes and shapes can be frames, and you do not have to draw a box first before placing an image. Despite this flexibility, you should be aware of some differences when working with the frame and shape tools.
Frames
Frames are containers that can hold either a placed image or a body of text. If you prefer to draw frames first before placing content in them, you can do so with the Rectangle, Ellipse, or Polygon Frame tools, and also with the Type tool. If you prefer to paste content first and resize frames later, you can place graphics (or text) by applying the File, Place command (Cmd-D or Ctrl+D). When you do so, InDesign automatically draws a frame for you when you click the loaded cursor anywhere on the page.
Figure 5.1. The loaded graphics cursor (left) and the loaded text cursor (right).

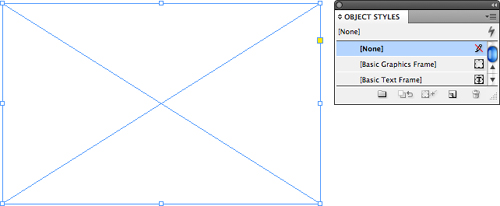
You can also apply saved attributes, called object styles, to newly drawn empty frames (see “Working with Object Styles,” later in this chapter). By default, whenever you create a frame using any of the Frame tools, InDesign automatically applies the None object style to it.
Figure 5.2. A selected rectangle frame with the default, non-editable None object style (neither graphic nor text frame) applied to it.
Shapes
You draw shapes using the Rectangle, Ellipse, or Polygon tools. You can draw custom shapes by using the tools available in the Pen toolset, or draw freeform shapes with the Pencil tool.
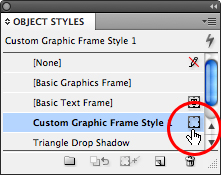
You can save assigned shape attributes as object styles and later apply them to other shapes or frames (empty or with content). InDesign also enables you to select an object style from the Control panel Object Styles drop-down list, or from the Object Styles panel, and apply it to a shape as you draw it with the tool (see “Working with Object Styles,” later in this chapter). This is something you cannot do when working with frames.
Figure 5.3. A selected rectangle shape with a saved object style applied to it.

Whenever you create a shape using any of the Shape tools, InDesign automatically applies the document default object style to it. When you first launch InDesign, the default object style is [Basic Graphic Frame]. To select a different object style to use as the document default, deselect all objects (Edit, Deselect All) and click an object style name from the Object Styles panel or from the Control panel Object Styles drop-down list.
Combining and Converting Frames and Shapes
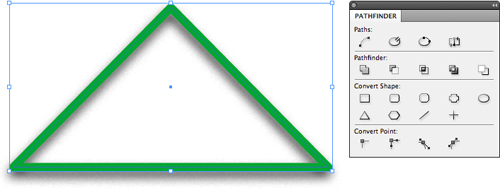
You can combine two or more frames or shapes in various ways using the Pathfinder panel controls. You can also change the appearance of a selected shape or frame by applying the Convert Shape commands found under the Object menu or by clicking the Convert Shape controls located in the Pathfinder panel (Window, Object & Layout, Pathfinder) (see Figure 5.4).
Figure 5.4. This is the rectangle shape from Figure 5.3 after converting it into a triangle, which was accomplished by clicking the Convert Shape button in the Pathfinder panel. Whenever possible, shapes retain any applied object style attributes after conversion.
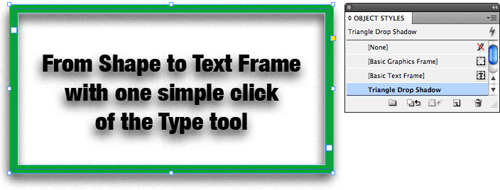
To convert a converted frame, shape, or path into a text frame, click inside it with the Type tool. The object retains any applied object style attributes even after adding text (see Figure 5.5).
Figure 5.5. A rectangle frame with an object style applied to it and some text inserted.
Selecting and Editing Frames and Their Contents
To move, scale, rotate, or shear a frame—or apply any object formatting attributes, such as drop shadow or transparency effects—you must select the frame first. The same rule also applies when editing a frame’s path or when working with frame contents, such as a placed graphic. InDesign includes two tools for making these types of selections: the Selection tool and the Direct Selection tool.
The selection tools in InDesign behave very much like the selection tools in Adobe Illustrator. You can use the Selection tool to select, move, and resize an entire path. The Direct Selection tool enables you to do so as well; however, it also enables you to select and move individual points on a path.
Placing Images and Text
Both the Selection and Direct Selection tools can be used to place images or text using the File, Place command: Cmd-D (Mac) or Ctrl+D (Win). You can either place an image or a body of text into a selected frame or click the loaded place icon anywhere on the page. When you click the loaded graphics cursor, InDesign automatically creates a frame and fits the image at 100% of its actual size. When you click the loaded text cursor, InDesign fills the column with the imported text.
Selecting and Transforming
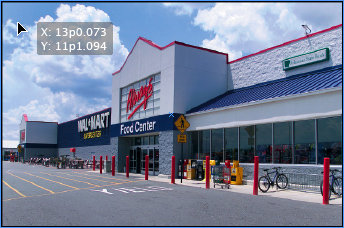
Click any frame (text or graphic) with the Selection tool to select it and its contents (see Figure 5.6). To select multiple objects, hold down Shift as you click. You can also hold down Shift and marquee over an area that includes the objects you would like to select. You can tell that the objects are selected when the boundary nodes appear. Shift+click again to deselect.
Figure 5.6. Click and drag with the Selection tool to move both the frame and the image.
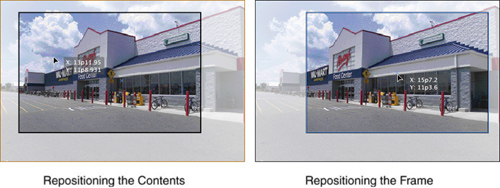
Unlike the Selection tool, the Direct Selection tool enables you to select a single frame edge or corner node of any text or graphic frame (see Figure 5.7). Doing so enables you to modify the shape of a frame by moving its selected edge or node. To select all nodes of a frame with the Direct Selection tool, you must click its center point. Note that doing so with a graphic frame does not automatically select its contents.
Figure 5.7. Click and drag with the Direct Selection tool to move the image inside the frame (left), or click and drag the center point of the frame to move it independently from its contents (right).
The Direct Selection tool also enables you to select the contents of a graphic frame, separate from its container. When you hover the cursor directly over a placed image, the Direct Selection tool’s icon changes to display a hand. This indicates that after you click to select the frame’s contents, you can move the image around within the confines of the graphic container.
You can select the contents of multiple frames by Shift+clicking with the Direct Selection tool. By continuing to hold down Shift as you click, you can also add other objects to a selection, such as text frames, shapes, and lines.
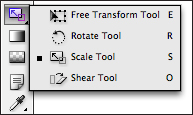
After you select multiple objects (including points on a path), you can move them simultaneously by dragging the mouse or pressing the arrow keys. To resize the selected objects, press Cmd (Mac) or Ctrl (Win) and drag with the Selection tool, or press S to switch to the Scale tool, then click and drag. You can also use the Rotate, Shear, and Free Transform tools to edit multiple selected objects simultaneously, without grouping them first (see Figure 5.8).
Figure 5.8. Use any of the transformation tools (Free Transform, Rotate, Scale, or Shear) to transform multiple selected objects simultaneously.
Resizing Frames and Contents
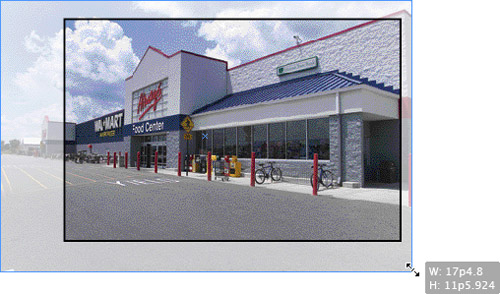
Use the Selection tool to resize the frame (and not the image contents) by clicking and dragging one of the frame nodes (see Figure 5.9). Hold down the Shift key to constrain proportions of the frame as you drag.
Figure 5.9. Resizing a frame but not its contents.
Use the Direct Selection tool to resize the image inside the frame. Click directly on the image itself and then click and drag one of the content nodes (see Figure 5.10). Hold down the Shift key to constrain overall image proportions as you drag.
Figure 5.10. Resizing image contents within its frame container.
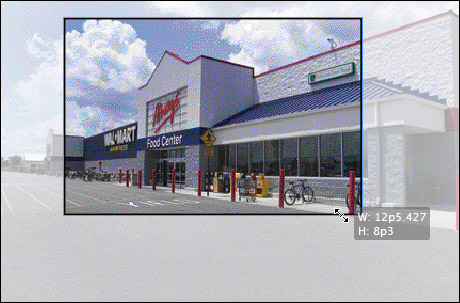
Use the Selection tool to resize the frame and image together by clicking the Auto Fit button in the Control panel and clicking and dragging one of the frame nodes (see Figure 5.11). You can also press Cmd (Mac) or Ctrl (Win) and click and drag one of the frame nodes without having to enable the Auto Fit option. When using the latter method, hold down Shift as you drag to constrain overall image proportions.
Figure 5.11. Resizing a frame and its image contents simultaneously.

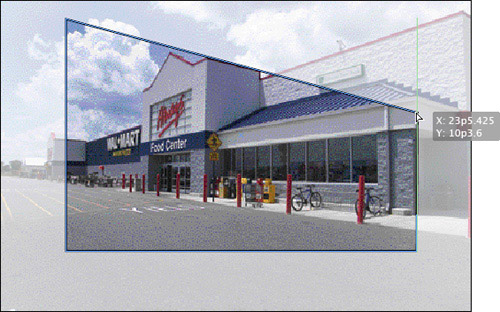
Use the Direct Selection tool to select, reposition, or even delete the nodes of a frame (see Figure 5.12). Click directly on the frame edge, and then click and drag one of the nodes to reposition it. Press Delete (Mac) or Delete/Backspace (Win) to remove a node or edge from the frame and create an open path.
Figure 5.12. Editing the shape of the frame with the Direct Selection tool.
Tell Me More: Media 5.1—Scaling Editable Text with the Selection Tool
![]()
Access this video file through your registered Web edition at my.safaribooksonline.com/9780132174541/media.
Selecting Type
To select editable type characters, you must use the Type tool. Click an insertion point in any text frame with the cursor, and then highlight the characters by clicking and dragging over them (see Figure 5.13).
Figure 5.13. To select individual type characters, click and drag over the text with the Type tool.

You can also select editable text by clicking with the mouse:
• Double-clicking selects a single word.
• Triple-clicking selects a line if the Triple-Click to Select a Line option is enabled in Type Preferences; otherwise, it selects the entire paragraph.
• Clicking four times selects the entire paragraph if the Triple-Click to Select a Line option is enabled; otherwise, it selects the entire story.
• Clicking five times selects the entire story when the Triple-Click to Select a Line option is enabled in Type Preferences.
Working with Shapes
The shape tools in InDesign enable you to create rectangles, ellipses, and polygons. You can also create lines with the Line tool and draw freeform shapes with the Pencil tool. To create custom paths and shapes, you can draw and edit points using the tools available in the Pen toolset.
Drawing Lines with the Line Tool
You can access the Line tool by clicking its icon in the Tools panel or by pressing the back slash key (). InDesign enables you to draw both diagonal and vertical or horizontal lines with the Line tool. Hold down Shift as you draw to create a straight, horizontal or vertical line, or to draw at 45° increments. To draw lines at other angles, just click and drag in any direction.
Lines drawn with the Line tool are easy to work with in that they have only two points (one on each end). You can adjust a point by selecting it with the Direct Selection tool and repositioning it. You can also add points to a line by clicking it with the Pen or Pencil tools.
In addition, you can move lines with the Selection tool, rotate them with the Rotate tool, and scale them with—yes, you guessed it—the Scale tool.
Drawing Rectangles, Ellipses, and Polygons with the Shape Tools
To draw a rectangle, ellipse, or polygon, choose the appropriate frame or shape tool and click and drag. If you hold down the Shift key as you draw, it constrains the overall proportions of the shape, making a rectangle a perfect square and an ellipse a perfect circle (rather than an oval). Holding down Option (Mac) or Alt (Win) enables you to draw the shape starting from its center point.
There are two ways to create rectangles, ellipses, and polygons with the shape and frame tools—by drawing them with the tool or by entering Width and Height settings into the respective tool’s dialog box (see Figure 5.14). You can access the settings dialog box by clicking once on the Pasteboard with the tool. After you enter the preferred settings in the dialog box, click OK for the shape to appear in the same spot that you clicked with the tool.
Figure 5.14. The Rectangle dialog box.

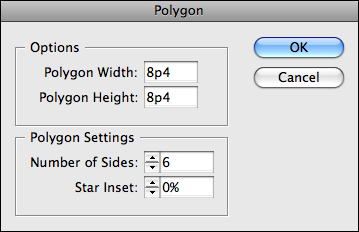
The Polygon dialog box (see Figure 5.15) contains additional settings for specifying the Number of Sides and a Star Inset value. Enter the number of sides and an inset percentage for creating a star shape. You can access and adjust these default settings by double-clicking the tool icon in the Tools panel. (The shape dialog boxes are used to set parameters for a newly drawn shape, not for adjusting a selected shape.)
Figure 5.15. The Polygon Settings dialog box.
InDesign automatically applies default stroke settings to your shape, but you can adjust them in either the Stroke panel or the Control panel. You can also add a fill, place a graphic, add some text, apply an object style, or use the Pathfinder controls to merge with other shapes. If you’d like to change your shape entirely without having to redraw it, use the Convert Shape commands located under the Object menu or in the Pathfinder panel.
Drawing Custom Shapes with the Pen Tool
Using the Pen toolset, you can create custom drawn shapes just as you would in applications such as Adobe Illustrator or Corel Draw (see Figure 5.16).
Figure 5.16. A custom shape drawn with the Pen toolset.
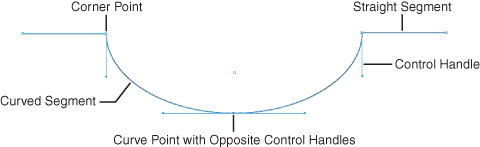
To start, press P to access the Pen tool, then click and drag to create a series of connecting points that result in a custom-drawn shape. Clicking with the Pen creates a point, and dragging with the mouse creates its curve in relation to the previous and next points placed on the path. Every curve contains its own set of control handles that you can also adjust. Using the Direct Selection tool, you can move and modify points, segments, and control handles.
You can create a corner point by clicking an anchor point of a curved path with the Pen tool immediately after drawing it. Then press the Option/Alt key and drag to create a new control handle that is facing in a different direction. Click and drag again to create the next curved segment of the path.
Drawing Freeform Shapes with the Pencil Tool
To create a freeform shape using the Pencil tool, press N to access it from the Tools panel and begin drawing. As you draw, InDesign calculates where the points should fall on the path and places them for you. You can then switch to the Pen toolset and adjust the placed points, or use the Smooth and Erase tools to edit the path.
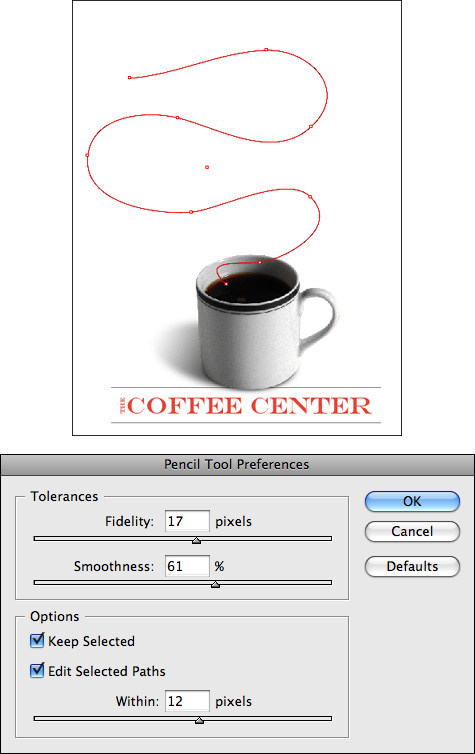
If you enter specific settings in the Pencil Tool Preferences dialog box before you begin drawing, you can eliminate the need for editing and smoothing of points later. To access the dialog box, double-click the Pencil tool icon in the Tools panel (see Figures 5.17 and 5.18).
Figure 5.17. Lower Fidelity and Smoothness values result in jagged paths.
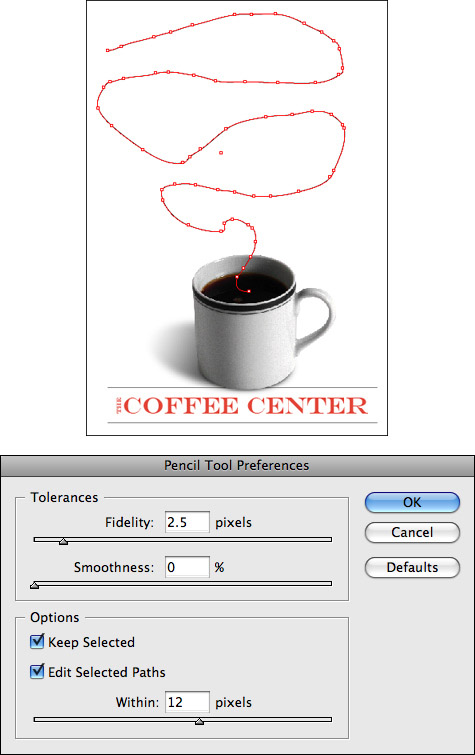
Figure 5.18. Higher Fidelity and Smoothness values result in cleaner paths.
The Smooth tool has a similar set of preferences that you can access by double-clicking the Smooth tool icon in the Tools panel.
By drawing with the Pencil tool, it’s easy to create open path shapes. To close a path quickly, select it with either selection tool and choose Object, Paths, Close Path, or click the Close Path control located in the Pathfinder panel.
Modifying Paths and Frames
You can change the appearance of a frame or shape by editing points along the path with the Pen toolset. To further enhance a shape or frame, you can add, smooth, or erase points using the tools in the Pencil toolset. You can also add a fill, place a graphic, add some text, apply or save an object style, or use the Pathfinder controls to merge with other shapes. You can also change the shape entirely by applying one of the Convert Shape commands or controls located under the Object menu or in the Pathfinder panel.
Modifying Paths with the Pen Tool
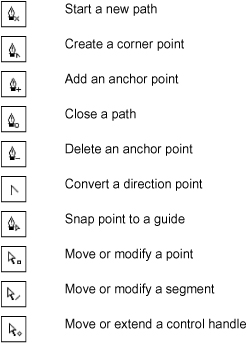
The cursors for the Direct Selection and Pen tools change as you position them over different points and segments of a path, as described in Table 5.1.
Table 5.1. Path Cursors
You can add points to a path or frame using the Add Anchor Point tool. Doing so allows you to add intricate curves, corners, and bends to a shape or frame. Click anywhere along the path to add a new point.
You can delete points using the Delete Anchor Point tool. To do so, click any existing point. But keep in mind that deleting points can drastically change the appearance of a shape or frame.
It is also possible to delete an anchor point by selecting it with the Direct Selection tool and pressing the Delete/Backspace key. Note that doing so creates an open path, whereas removing a point with the Delete Anchor Point tool does not.
Use the Convert Direction Point tool to change the direction of a selected point’s curve on an existing path. Click any existing point to reset the curve handles. Click and drag the handles to change the curve. You can also click any of the Convert Point buttons in the Pathfinder panel to convert a selected point to a plain, corner, smooth curve, or symmetrical curve point.
Use the Scissors tool to cut points and lines on a path. You can create open paths, divide symmetrical shapes such as half-circles or diamonds, or remove pieces of a path or frame to create interesting design effects.
Show Me: Media 5.2—Joining Two Line Segments
![]()
Access this video file through your registered Web edition at my.safaribooksonline.com/9780132174541/media.
![]() LET ME TRY IT
LET ME TRY IT
Applying Live Corner Effects
To apply “live” corner effects to any rectangular frame or shape, follow these steps:
- Select any rectangular shape or frame with the Selection tool and choose a corner-effect option from the drop-down list in the Control panel (leave the option set to None to apply a traditional, rounded corner effect).
- Click the yellow square positioned in the upper-right side of the frame. When you do, InDesign displays a yellow diamond in every corner of the frame.
- Click and drag any of the yellow diamonds to adjust the size of the chosen corner effect on all four corners simultaneously. To adjust the size of a single corner effect, hold down Shift as you click and drag the yellow diamond (see Figure 5.19).
Figure 5.19. The live corner effects feature enables you to apply corner effects on the fly by clicking and dragging.

You can also apply corner effects by entering settings in the Corner Options dialog box. To do so, select the object with either selection tool and choose Object, Corner Options (see Figure 5.20). When the Corner Options dialog box appears, choose Fancy, Bevel, Inset, Inverse Rounded, Rounded, or None from the four corner-effect drop-down lists. Clicking the link icon in the center of the dialog box enables you to apply different corner effects to each corner of the object.
Figure 5.20. You can apply corner effects by entering settings in the Corner Options dialog box.
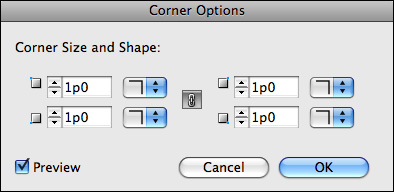
Enter an amount in the Size field for each corner, or press the up-arrow or down-arrow keys to adjust the current value. Check the Preview box to see the effect before you apply it. When you’re ready, click OK to apply the corner effect.
Applying corner effects does not permanently change an object. You can change the size, try a different effect, or turn them off at any time. To turn off corner effects for a selected object, select None from the effect drop-down list in the Control panel or from the drop-down lists in the Corner Options dialog box.
Corner effects generally work best with rectangle frames and shapes. But if you’re feeling extra creative, try applying any of these effects to a triangle or polygon shape.
Show Me: Media 5.3—Applying Live Corner Effects
![]()
Access this video file through your registered Web edition at my.safaribooksonline.com/9780132174541/media.
Applying and Editing Compound Paths
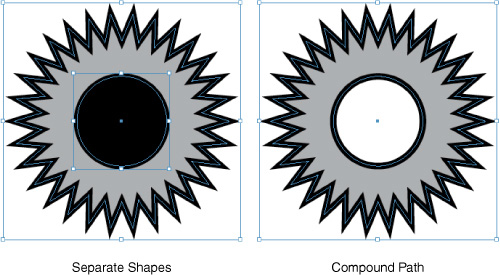
You can create a compound path by placing two objects on top of each other and merging them together, allowing any overlapping areas to become transparent (see Figure 5.21). In basic terms, this means that you can convert two overlapping shapes (with separate fills) into one shape with a transparent area inside it. When you bring the compound path to the front, you can see any underlying objects through the transparent area.
Figure 5.21. Two selected shapes—each with different fills—placed on top of each other (left). Both shapes combined into a single compound path (right).
To create a compound path, select two overlapping frames, shapes, or paths and choose Object, Paths, Make Compound Path, or press Cmd-8 (Mac) or Ctrl+8 (Win).
You can edit compound paths just like any other object. InDesign enables you to move, scale, shear, or rotate the entire shape after you select it with the Selection tool. In addition, you can select individual points with the Direct Selection tool and reposition or delete them (see Figure 5.22).
Figure 5.22. You can move the individual points of a compound path by selecting them with the Direct Selection tool and nudging them with the arrow keys.

To revert a compound path, select it and choose Object, Paths, Release Compound Path, or press Option-Cmd-8 (Mac) or Alt+Ctrl+8 (Win). Doing so reverts the two shapes back into separate objects, but may not include all previously applied attributes, such as fill color, stroke width, or drop-shadow effects.
Creating Custom Shapes with Pathfinder
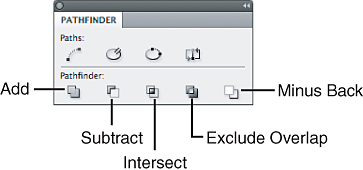
With the Pathfinder panel, shown in Figure 5.23, InDesign enters into Illustrator territory by enabling you to combine selected frames, shapes, and paths. Although the Pathfinder panel in InDesign does not contain all of the same functions as the one found in Illustrator, the basics are all here.
Figure 5.23. The Pathfinder panel contains several buttons you can click to combine overlapping shapes.
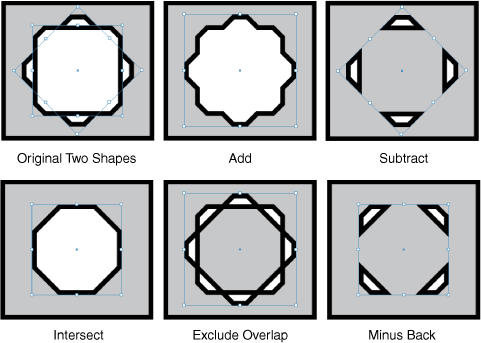
Combining objects with Pathfinder is a quick, easy way to create icons or design elements for use in your layouts. All you need to do is select two or more overlapping shapes, frames, or paths and click one of the Pathfinder controls in the panel (see Figure 5.24).
Figure 5.24. Some examples of the various shapes you can create by clicking the Pathfinder controls: original two shapes (top left), Add (upper middle), Subtract (upper right), Intersect (lower left), Exclude Overlap (lower middle), Minus Back (lower right).
Nesting Objects with the Paste Into Command
InDesign allows you to nest objects inside one another to create interesting design effects. You can nest objects as deep as you like (an object placed inside an object and then placed inside an object, and so on), but you cannot nest multiple objects without grouping them first (see “Grouping and Ungrouping Objects” in Chapter 6, “Working with Objects”).
You can create a nested object by copying and pasting a graphic frame, text frame, or path into another graphic frame, text frame, or path.
Select an object with the Selection tool (graphic frame, text frame, or path) and copy or cut it to the Clipboard (Edit, Cut or Edit, Copy). Then select another object and choose Edit, Paste Into for the object to appear nested inside the selected frame or path.
To select an object after it has been pasted into another frame or path, click the nested object’s frame edge with the Direct Selection tool and then press V to switch to the Selection tool. You can then resize the frame, move it, or nudge it with the arrow keys. Switch back to the Direct Selection tool to resize, move, or nudge the nested components. Switch to the Type tool to select and edit nested text.
Figure 5.25. Shown here are two separate objects: a body of editable text with a gradient applied to it and some bold characters that have been converted to outlines, made into a compound path, and filled with black (left), and the gradient text frame nested inside the compound character path (right). For more on applying gradients to text and converting to outlines, see Chapter 8, “Formatting Text.”

Applying Fills
With InDesign, you can apply a solid color, tint, or gradient fill to any frame, shape, open path, or text object.
Filling with Solid Colors
You can use several methods to apply fill colors in InDesign. The easiest method is to select any frame, shape, or open path (or any combination thereof) and click the arrow next to the Fill swatch in the Control panel. Doing so displays the Swatches panel in a flyout window (see Figure 5.26). Click directly on a swatch name from the flyout panel to apply it as a fill.
Figure 5.26. You can access the Swatches panel directly from the Control panel.

For all other fill methods listed next, you must first bring the Fill swatch to the forefront by clicking it in one of three places: at the bottom of the Tools panel, at the top of the Swatches panel, or in the Color panel. Then proceed to select the object(s) with either selection tool and apply the fill color by doing any one of the following:
• Click directly on a swatch name in the Swatches panel.
• Create a color using the Color panel.
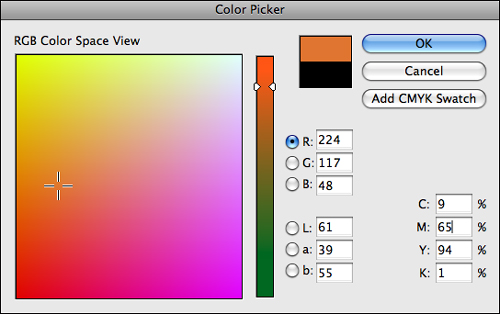
• Double-click the Fill icon to display the Color Picker, shown in Figure 5.27. Choose a color with the Color Picker and click OK.
Figure 5.27. InDesign’s Color Picker enables you to select a specific color build. To do so, enter values in the RGB, LAB, or CMYK fields, or click anywhere inside the color ramp.
Shift+drag to move the color sliders in the Color panel or Swatch Options dialog box in tandem.
• Choose and apply a sampled color with the Eyedropper tool (this also samples and applies all other object style attributes).
• Click the Apply (Last Used) Color button located at the bottom of the Tools panel, or press the comma key.
In every instance, the chosen Fill color is applied to all selected objects.
Filling with Gradients
As with solid color fills, you can use several methods for applying a gradient fill color in InDesign. If you have gradient swatches saved in the Swatches panel, the easiest method is to select the object(s) and click the arrow next to the Fill swatch in the Control panel. Doing so displays the Swatches panel in a flyout window, where you can select a gradient swatch name and apply it as a fill. For more on saving gradient swatches, see Chapter 13, “Working with Color.”
For all other gradient fill methods listed below, you must bring the Fill swatch to the forefront by clicking it in one of three places: at the bottom of the Tools panel, at the top of the Swatches panel, or in the Color panel. Then select the object(s) and apply the gradient using any one of the following methods:
• Click directly on a gradient swatch name in the Swatches panel.
• Create a gradient using the Gradient panel.
• Choose and apply a sampled gradient with the Eyedropper tool (this also samples and applies all other object style attributes).
• Click the Apply (Last Used) Gradient button located at the bottom of the Tools panel, or press the period key.
• Apply a gradient selected from the Swatches panel or created in the Gradient panel by clicking and dragging with the Gradient tool (see Figure 5.28).
Figure 5.28. You can apply the same gradient across multiple selected objects by clicking and dragging over them with the Gradient tool.

In every instance except the last, the chosen gradient fill is applied to all selected objects separately. To apply the same gradient across multiple selected objects, use the Gradient tool method described in the last bullet.
Filling Text
You can use several methods for applying a fill color to text. How you apply the color depends on how you select the text.
• To apply a fill color or gradient to all the text in a story, select any text frame (or frames) with either selection tool, and click the Formatting Affects Text button located in one of three places: at the bottom of the Tools panel, at the top of the Swatches panel, or in the Color panel (see Figure 5.29).
Figure 5.29. Click the Formatting Affects Text button to apply the fill color to the entire story.

• To apply a fill color to specific characters within a story, you must first highlight them with the Type tool cursor.
After you select the type, the easiest way to apply a fill color is to click the arrow next to the Fill swatch in the Control panel. Doing so displays the Swatches panel in a flyout window, where you can select a solid color or gradient swatch and apply it as a fill.
For all other text fill methods, you must bring the Fill swatch to the forefront by clicking it in one of three places: at the bottom of the Tools panel, at the top of the Swatches panel, or in the Color panel. Then apply the fill using any one of the following methods:
• Click directly on a color or gradient swatch name in the Swatches panel.
• Create a color or gradient using the respective panels.
• Double-click the Fill icon to display the Color Picker. Choose a color with the Color Picker and click OK.
• Choose and apply a sampled color or gradient fill with the Eyedropper tool. (This also samples and applies all other object style attributes.)
• Click the Apply (Last Used) Color or Gradient button located at the bottom of the Tools panel, or press the comma key (color) or period key (gradient).
Applying Strokes
With InDesign, you can apply a solid color, tint, or gradient stroke to any frame, shape, line, open path, or text object.
Applying Strokes to Frames, Shapes, and Paths
The easiest way to apply a stroke to a frame, shape, or path is to select the object and click the arrow next to the Stroke swatch in the Control panel. Doing so displays the Swatches panel in a flyout window (see Figure 5.30). Click directly on a swatch name from the flyout panel to apply the stroke color. If you have not already applied a stroke weight to the object, InDesign automatically applies a stroke weight of 1 pt.
Figure 5.30. You can access the Swatches panel directly from the Control panel.

There are also several other ways to apply a stroke to an object. To do so using any of the following methods, you must first bring the Stroke swatch to the forefront by clicking it in one of three places: at the bottom of the Tools panel, at the top of the Swatches panel, or in the Color panel. Then proceed to select the object(s) with either selection tool and apply the stroke color by doing any of the following:
• Click directly on a color or gradient swatch name in the Swatches panel.
• Create a color or gradient using the respective panels.
• Double-click the Fill icon to display the Color Picker. Choose a color with the Color Picker and click OK.
• Choose and apply a sampled color or gradient fill with the Eyedropper tool. (This also samples and applies all other object style attributes.)
• Click the Apply (Last Used) Color or Gradient button located at the bottom of the Tools panel, or press the comma key (color) or period key (gradient).
In every instance, the chosen color or gradient is applied to the stroke of all selected objects.
Applying Strokes to Text
You can use several methods for applying stroke color to text. How you apply the stroke color depends on how you select the text.
• To apply a stroke color or gradient to all the text in a story, select any text frame (or frames) with either selection tool and click the Formatting Affects Text button located in one of three places: at the bottom of the Tools panel, at the top of the Swatches panel, or in the Color panel.
• To apply a stroke color to specific characters within a story, you must first highlight them with the Type tool cursor.
After you select the type, the easiest way to apply a stroke color is to click the arrow next to the Stroke swatch in the Control panel. Doing so displays the Swatches panel in a flyout window, where you can select a solid color or gradient swatch and apply it to the stroke.
For all other methods, you must bring the Stroke swatch to the forefront by clicking it in one of three places: at the bottom of the Tools panel, at the top of the Swatches panel, or in the Color panel. Then apply the stroke color using any one of the following methods:
• Click directly on a color or gradient swatch name in the Swatches panel.
• Create a color or gradient using the respective panels.
• Double-click the Fill icon to display the Color Picker. Choose a color with the Color Picker and click OK.
• Choose and apply a sampled color or gradient fill with the Eyedropper tool. (This also samples and applies all other object style attributes.)
• Click the Apply (Last Used) Color or Gradient button located at the bottom of the Tools panel, or press the comma key (color) or period key (gradient).
• In every instance, the chosen color or gradient is applied to the stroke of all selected type characters.
Figure 5.31. InDesign enables you to apply strokes to editable text.

Aligning Strokes
You can choose a specific alignment when applying a stroke to a frame, shape, open path, line, or editable text. To align a stroke to the center, inside, or outside a selected object, click one of the three alignment buttons located in the Stroke panel (see Figure 5.32).
Figure 5.32. A 10-point stroke aligned to the center (left); a 10-point stroke aligned to the inside (middle); and a 10-point stroke aligned to the outside (right).

Applying Stroked Path Start and End Styles
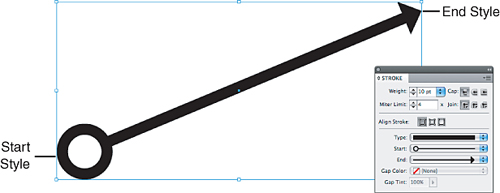
To apply a stroke start and end style to a selected line or path, open the Stroke panel and choose from the Start and End drop-down lists. The chosen style is immediately applied. You can apply a start style without an end style, and vice versa—or apply both—so have fun experimenting with different combinations.
Start and end styles can be applied with any chosen stroke type but cannot be saved as part of a Stroke Style. However, they can be saved as part of an object style.
Keep in mind that you can apply stroked path start and end styles to any open freeform drawn paths and lines, which makes it possible to get really creative with your design elements.
Figure 5.33. Shown here is a 10 pt. diagonal line with Circle start style and Triangle-Wide end style applied.
![]() LET ME TRY IT
LET ME TRY IT
Saving and Applying Custom Strokes
One of the hidden features of InDesign is the capability to create, save, and apply custom stroke styles. To create a custom stripe, dash, or dotted stroke style, follow these steps:
- Click the menu button on the Stroke panel and choose Stroke Styles. The Stroke Styles dialog box appears and displays a list of non-editable default stroke styles.
- Click the New button to create a whole new stroke style.
- When the New Stroke Style dialog box opens, click the stroke Type menu and choose Stripe, Dash, or Dotted. Each stroke type has its own set of controls (see Figure 5.34).
Figure 5.34. The Type and Preview sections of the New Stroke Style dialog box change when you make a selection from the stroke Type menu.

- Enter the preferred settings and refer to the area below to see a preview of how the stroke will look after it is applied.
- When you’re ready to save your style, enter a name for it and click the Add button.
- InDesign displays your new styles at the bottom of the Styles list in the Stroke Styles dialog box. When you’ve finished creating and editing stroke styles, click OK.
- To apply a stroke style, select any frame, shape, or path with either selection tool and choose it from the Stroke panel Type list.
InDesign also enables you to save and load custom stroke styles for use with other InDesign documents. To save a custom stroke style, click the Save button in the Stroke Styles dialog box. In the Save As dialog box that appears, enter a name for the style in the Save As field, then browse to a save location on your disk and click Save. To import the stroke style in another open InDesign document, click the Load button in the Stroke Styles dialog box. In the Open a File dialog box that appears, browse to the .lnst file and click Open. The imported stroke style is added to the Stroke panel Type list.
Applying Gap Color to Open Stroke Styles
Open stroke styles contain gaps between stripes, dashes, or dots. These gaps can be filled with solid colors, tints, or gradients. Try experimenting with this feature, and you’ll find that combining gap color with stroke color can create some very interesting effects.
To apply gap color to an open stroke style, select the stroked object with either selection tool and choose a color or gradient from the Gap Color list located in the Stroke panel. The Gap Color list contains the same colors and gradients as the Swatches panel. After you make your choice, InDesign applies the color or gradient immediately.
To apply a tint to a chosen gap color, enter a value in the Gap Tint field located at the bottom of the Stroke panel or use the slider control. Note that a tint can be applied only to solid colors, not to gradients.
Figure 5.35. A rectangle frame with a custom, dashed stroke style applied. Gap color is set to 20% opaque black and stroke color to 100% black. Notice the custom dash and gap settings located at the bottom of the Stroke panel.

Working with Object Styles
Object styles are used to format shapes and frames rather than text. They are structured the same way as character and paragraph styles, allowing you to create, apply, edit, and override styles, as well as create parent/child relationships. You can apply them to objects, groups, graphic frames, and text frames. You can stylize fill color, stroke, text wrap, drop shadow, and transparency settings, and even include paragraph styles.
Creating and Saving Object Styles
You can set up an object style in three ways: from scratch, by basing the new style on an object you’ve selected, or by basing it on an existing style:
• To create an object style from scratch, with no attributes already set, make sure you do not have any objects selected on the page and that you do not have any styles selected in the Object Styles panel. Then Option-click or Alt+click the Create New Style button at the bottom of the Object Styles panel, or choose New Object Style from the panel menu.
• To create an object style that starts out inheriting all the attributes that have been applied to an object, select it with either selection tool, then Option-click or Alt+click the Create New Style button. InDesign adds all the formatting applied to the selected object to the new style (except paragraph styles, which stays turned off by default). This is probably the easiest way to create a new style.
• To create an object style that starts out inheriting all the attributes of another style, make sure you do not have any objects selected on the page, then highlight the existing style in the Object Styles panel and click the Create New Style button or choose New Object Style from the panel menu.
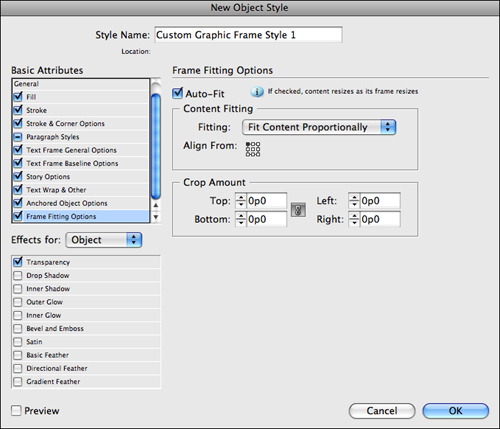
In all three cases, you’re presented with the New Object Style dialog box, where you can enter your preferred settings for the style (see Figure 5.36). Each of the panels in the New Object Style dialog box mirrors the formatting controls located in the corresponding panel or dialog box.
Figure 5.36. You can access a panel in the New Object Style dialog box by clicking its name in the menu to the left.
Type a name for the style and add or remove any formatting attributes using the different panels of the dialog box or by checking or clearing any of the attribute options listed in the menu. Click the category arrows in the Style Settings portion of the General panel to display a summary of applied attributes. Click OK when you’ve finished defining the style.
To edit an existing object style’s definition, double-click the style name in the Object Styles panel or choose Style Options from the panel menu; the Object Style Options dialog box includes the same set of category panels as the New Object Style dialog box.
Applying Object Styles
To apply an object style, select an object (including frames, shapes, lines, or grouped objects) and click the style name in the Object Styles panel, or choose one from the Control panel Object Styles drop-down list.
You can also drag and drop the style from the Object Styles panel onto the selection. Note that when you apply an object style to a group, the style is applied to every object in the group.
After you apply the style, it is linked to the object and can be removed only by choosing Break Link to Style from the Object Styles panel list or by applying the None style. When you break an object style link, all stylized attributes become local and are not removed from the object (they are treated as overrides to the None style). To remove the style and its applied attributes, apply the None object style rather than breaking the link.
Using Default Object Styles
Every document contains three default object styles: Basic Graphics Frame, Basic Text Frame, and None. By default, InDesign applies the Basic Text Frame style to any new text frame that you create with the Type tool; it applies the Basic Graphics Frame style to any new shapes you draw with Shape, Pen, and Pencil tools; and it applies the None style to any new frame that you draw with the Frame tools.
To change the object style defaults for the document, choose Default Text/Graphic Frame Style from the Object Styles panel menu and select a different style from the submenu list. You can also change defaults by dragging the object type icon (text or graphics) in the Object Styles panel from the current default style to another style in the list.
Figure 5.37. To change the document default text or graphics object style, drag the object type icon from the current default style to another style in the list.