
3. Working with Documents
In this chapter, you explore all aspects of document management.
InDesign documents can contain multiple pages and sections, and can even include different page sizes. To manage documents more efficiently, you must learn how to use document presets, master pages, and the various controls in the Pages panel.
Creating New Documents
Your first step when starting a new layout project in InDesign is to create a new document. To get started, choose File, New, Document, or press Cmd-N (Mac) or Ctrl+N (Win). When the New Document dialog box opens, enter your preferred page settings and click OK.
Figure 3.1. The New Document dialog box.
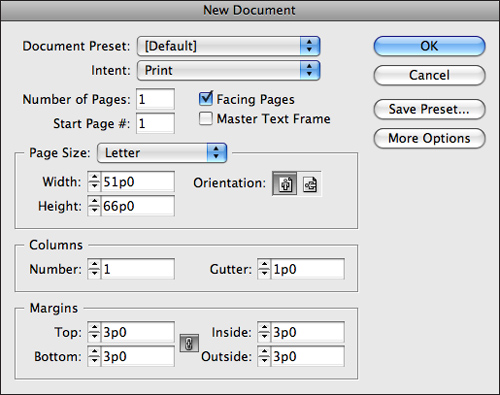
The first option you can set is the Document Preset. Here you can choose from document presets that you have created and saved. Most likely your choice here will be Default, unless you do a lot of the same type of work and will be using the same settings each time. (See the next main section, “Saving Document Presets,” for more information.)
From the Intent drop-down list, choose whether the document is intended for Print or Web output. When you do, InDesign changes the default measurement units from inches (Print) to pixels (Web).
The next step is to enter the number of pages you’d like to include in the document. To do so, enter a value in the Number of Pages field. You can also enter the page number to apply to the first page of the document in the Start field.
Enable the Facing Pages option to allow document pages to face each other in “reader spreads” (when this is unchecked, Inside/Outside values in the Margin section read Left/Right).
To place an automatic text frame on the A-Master page of the new document, enable the Master Text Frame option. All pages in the document automatically have the A-Master applied to them (see Chapter 4, “Working with Master Pages”).
Next, choose a default page size from the Page Size drop-down list, or enter custom width and height settings in the corresponding data fields. Click either the Portrait button (left) or Landscape button (right) to apply the preferred page orientation.
In the Columns field, enter the preferred number of column guides to apply to the pages of the document. Then in the Gutter field, enter the preferred gutter width amount to apply between column guides.
In the Margins section of the dialog box, enter the preferred amount of spacing to apply to top, bottom, inside, and outside margin guides. Margin spacing is applied from the outer edge of the document in. Click the chain icon to link or unlink the data fields. A solid-chain icon indicates that all settings are made the same and changing one changes them all equally. A broken-chain icon indicates that you can apply separate settings to each data field.
To access Bleed and Slug options, click the More Options button. Doing so displays the Bleed and Slug settings at the bottom of the dialog box. Enter the preferred amount of spacing to apply to the top, bottom, inside, and outside bleed and slug areas. Bleed spacing is applied around the outer edges of the document to accommodate colors that print to the page edge. Slug spacing creates an extra area outside the page edge to include document notes or printing instructions. Click the chain icons to link or unlink the respective Bleed and Slug data fields.
Tell Me More: Media 3.1—Create a New Document Using Previous Settings
![]()
Access this video file through your registered Web edition at my.safaribooksonline.com/9780132174541/media.
Saving Document Presets
If you think you might want to use the settings you’ve entered in the New Document dialog box more than once, you should save them as a document preset. Before clicking OK to close the dialog box and start working in your new document, click the Save Preset button. When the Save Preset dialog box appears, enter a name for the settings that will help you remember what they are for, and then click OK (see Figure 3.2). The new preset will then appear in all document preset menus.
Figure 3.2. Enter a name for the preset in the Save Preset As field of the Save Preset dialog box.

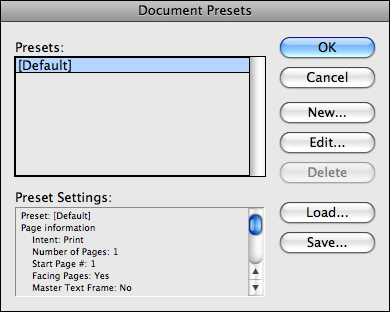
You can also save a preset at any time while working on a document by selecting File, Document Presets, Define. When the Document Presets dialog box opens, click the New button to launch the New Document Preset dialog box and enter your preferred settings (see Figure 3.3). When you’re finished, click OK to add the new preset to the menu list.
Figure 3.3. To create a new document preset, click the New button in the Document Presets dialog box.
Show Me: Media 3.2—Saving a Print Document Preset
![]()
Access this video file through your registered Web edition at my.safaribooksonline.com/9780132174541/media.
Opening InDesign Documents
To open an existing InDesign document, template, book file, or library file, choose File, Open or press Cmd-O (Mac) or Ctrl+O (Win). When the Open a File dialog box appears, browse to a compatible file on your system and click the Open button (see Figure 3.4).
Figure 3.4. The Open a File dialog box.
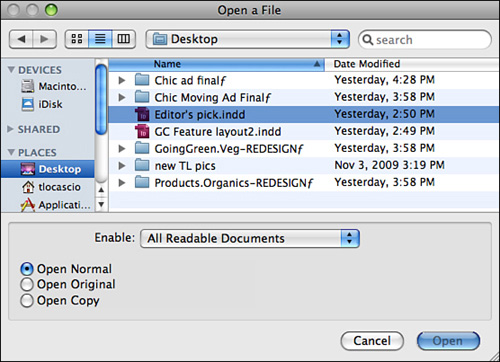
At the bottom of the Open a File dialog box, you’ll find three option buttons:
• Open Normal is the default setting. InDesign opens the document in a new window.
• Open Original allows you to open and edit documents that have been saved as InDesign templates.
• Open Copy allows you to open a copy of the selected file.
You can also open InDesign documents by double-clicking them in the Content Panel of the Adobe Bridge application or by double-clicking them in the Content area of the Mini Bridge panel. In Mac OS X, you can also open InDesign documents by dragging the document thumbnails from Bridge or the Finder over the InDesign CS5 icon in the Dock.
Saving Documents
As you create your documents in InDesign, it is important to save your work. You can update a document by applying the Save command, but to create an alternative version of a document, you must apply the Save As command.
Save Versus Save As
To save an InDesign document, choose File, Save or press Cmd-S (Mac) or Ctrl+S (Win). If you’re saving the document for the first time, the Save As dialog box appears. Browse to where you’d like to save the file on your system and click the Save button. To update a previously saved document to include any changes or edits you’ve made, choose File, Save again or press Cmd-S or Ctrl+S.
To save an alternative version of an open document without saving over the original, choose File, Save As or press Shift-Cmd-S (Mac) or Shift+Ctrl+S (Win). Browse to where you’d like to save the file on your system and click Save (see Figure 3.5).
Figure 3.5. The Save As dialog box.
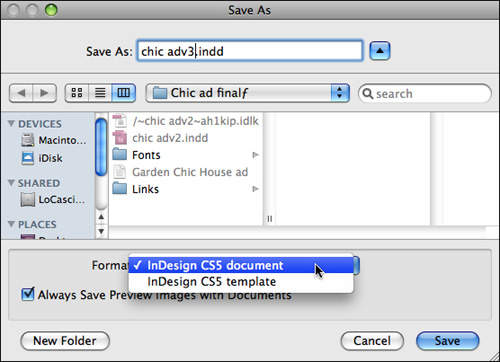
Another way to save an alternative version of an existing document without saving over the original is to create a template from which to work. By saving a template, you can create new documents from it that automatically adopt the predefined settings and formatting. To save a document as a template, choose File, Save As, and then choose InDesign CS5 Template from the Format (Mac) or Save as Type drop-down list (Win).
Saving Backward with IDML Export
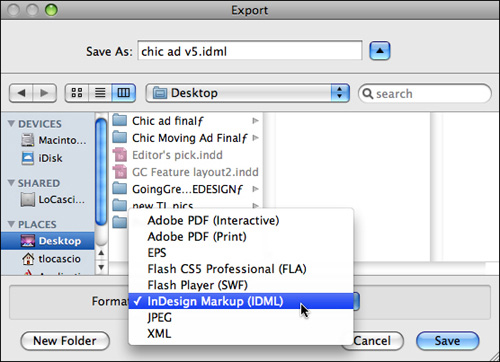
You can save InDesign CS5 documents “backward” for use with InDesign CS4 via the IDML (InDesign Markup Language) export feature. This can be useful when collaborating with another layout artist who has not yet upgraded from CS4 to CS5. To do so, open the InDesign CS5 document you want to save backward, and then choose File, Export or press Cmd-E (Mac) or Ctrl+E (Win). When the Export dialog box appears, browse to where you’d like to save the .idml file, and then choose InDesign Markup (IDML) from the Format menu (Mac) or Save as Type menu (Win)—see Figure 3.6. You can then open the .idml file in InDesign CS4, but not in InDesign CS3 or earlier.
Figure 3.6. Exporting an InDesign CS5 document as an InDesign Markup (IDML) file.
Keep in mind that when saving backward, the features added in InDesign CS5 are not available in CS4 (multiple page sizes, metadata captions, color labels for page thumbnails, and so on).
Working with Document Pages
InDesign offers several ways to add, arrange, and delete pages in a document. You can add a single page or multiple pages at once using the Pages panel. You can also save multiple sized pages within a single document.
Adding Pages to a Document
There are three ways to add a single page after the page you currently have selected in a document:
• Choose Layout, Pages, Add Page.
• Press Shift-Cmd-P (Mac) or Shift+Ctrl+P (Win).
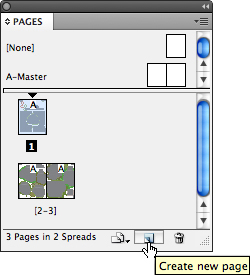
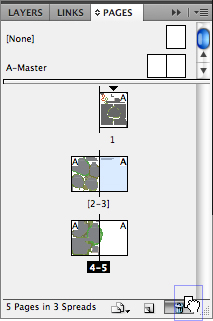
• Click the Create New Page footer control located at the bottom of the Pages panel (see Figure 3.7).
Figure 3.7. One of the quickest ways to add a single page is to click the Pages panel footer control.
You can also add single or multiple pages to a specific area of the document using the controls in the Insert Pages dialog box (see Figure 3.8). You can access the Insert Pages dialog box by doing any of the following:
• Choose Layout, Pages, Insert Pages.
• Click the Pages panel menu button and choose Insert Pages.
• Option-click (Mac) or Alt-click (Win) the Create New Page footer control located at the bottom of the Pages panel.
Figure 3.8. The Insert Pages dialog box.
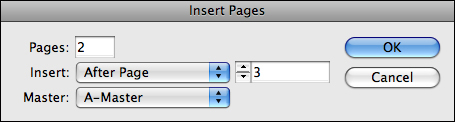
In the Insert Pages dialog box, enter the number of document pages you’d like to insert in the Pages field. Choose from the options in the Insert drop-down list to indicate where you’d like to insert pages: before or after the document page indicated in the neighboring data field or at the start or end of the document. In the field next to the Insert drop-down list, enter the page number indicating where you’d like to insert pages before or after. Choose a master page style in the Master drop-down list to apply to the inserted pages. To apply no master page style, choose None from the Master list.
Arranging Pages in a Document
You can move pages around in a document using either the Move Pages dialog box or the Pages panel. You can apply the Move Pages command by selecting Move Pages from the Layout, Pages submenu or from the Pages panel menu.
Using the Move Pages Dialog
To move pages within a document using the options in the Move Pages dialog box, follow these steps:
- In the Move Pages field, enter the page number(s) currently assigned to the page(s) you’d like to move (see Figure 3.9).
Figure 3.9. The Move Pages dialog box.
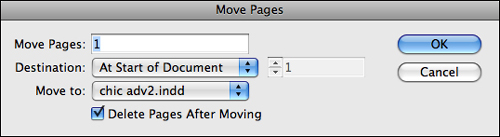
- Click the Destination drop-down list and choose where you’d like to move pages: before or after the page indicated in the neighboring data field or at the start or end of the document. In the field next to the Destination drop-down list, enter the page number indicating where you’d like to move the pages before or after.
- From the Move To drop-down list, choose whether to move the page(s) to a location within the current document or to another document that you have open.
- Select the Delete Pages After Moving checkbox if you want to remove the pages from the current document after moving them into another open document.
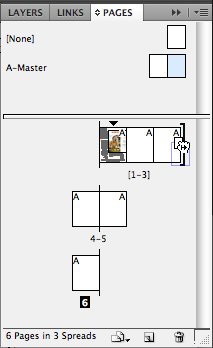
To move a page from within the Pages panel, select it by clicking its thumbnail in the panel, and then drag it to another location in the thumbnail layout. The black arrows indicate where the page will be placed after you release the mouse button.
Figure 3.10. You can rearrange pages in a document by repositioning the thumbnails in the Pages panel.
Deleting Pages from a Document
You can delete pages from a document by choosing Layout, Pages, Delete Page(s) (or Delete Spread(s), if you have facing pages selected in the Pages panel). You can also access the Delete Page(s) command from the Pages panel menu.
The easiest way to delete pages is to Cmd-click (Mac) or Ctrl+click (Win) their thumbnail icons in the Pages panel; and then either click the trash icon at the bottom of the panel or drag the selected pages over it (see Figure 3.11).
Figure 3.11. You can delete pages by dragging the selected thumbnails to the trash icon in the Pages panel.
If any of the selected pages contain objects, InDesign displays a warning dialog box before deleting them. Click OK if you still want to delete, or click Cancel if you think you may have selected the wrong pages. If you do accidentally delete the wrong pages, you can retrieve them with the Edit, Undo command (Cmd+Z (Mac) or Ctrl+Z (Win)), as long as you don’t close the document first.
Be aware that moving, adding, and deleting pages can sometimes cause problems in a publication that is set up using reader spreads, especially if it contains specific left and right page margins. Always be careful when adding, deleting, or moving pages in a document containing facing pages, because doing so may require that you reapply left/right master page styles to any pages that shift (which can result in a mess of duplicated master page items). In this situation, it is best to add or remove an even number of pages at a time.
![]() LET ME TRY IT
LET ME TRY IT
Creating Same-Size Multi-Page Spreads
With InDesign, you can create what is known as a “gatefold” spread. Gatefolds contain more than two adjoining pages and are commonly used for projects such as large brochures or ad designs that feature multiple folds. To create a gatefold spread with multiple pages of the same size, perform the following steps:
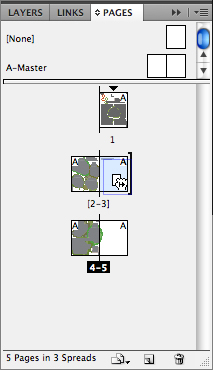
- Select a page (single-sided document) or a spread (facing pages document) and click the Pages panel menu button.
- Choose Allow Selected Spread to Shuffle, which disables this option. Notice that the page number(s) for this page or spread appear in brackets in the Pages panel thumbnail display.
- In the Pages panel, click and drag a document or master page thumbnail into the bracketed spread (see Figure 3.12). Continue to add additional pages to the spread as needed.
Figure 3.12. Drag page thumbnails into the bracketed spread. The black arrows indicate where the page will be placed in the spread after you release the mouse button.
Including Multiple Page Sizes in a Document
With CS5, InDesign enables you to save different page sizes within a single document. This can be useful for creating gatefold spreads (explained earlier in this chapter), magazine or book covers, or managing multiple items within a single campaign (such as letterhead, envelope, and business cards).
![]() LET ME TRY IT
LET ME TRY IT
Resizing Pages with the Page Tool
To save different page sizes within a single document, you must resize the pages that already exist. If the current document contains only one page, you must add or insert pages using any of the methods described earlier in this chapter. With multiple pages in place, you can resize them using the following steps:
- To access the Page tool, click the Page tool icon in the Tools panel or press Shift+P.
- Select the page you would like to resize by clicking its thumbnail in the Pages panel. To resize multiple pages at once, Shift+click adjacent thumbnails, or Cmd-click or Ctrl+click nonadjacent thumbnails.
- To resize the selected pages, enter new settings in the Width and Height fields of the Control panel (see Figure 3.13). You can also choose a size preset from the Control panel drop-down list.
Figure 3.13. You can resize pages by selecting them with the Page tool and entering new width and height values in the Control panel.
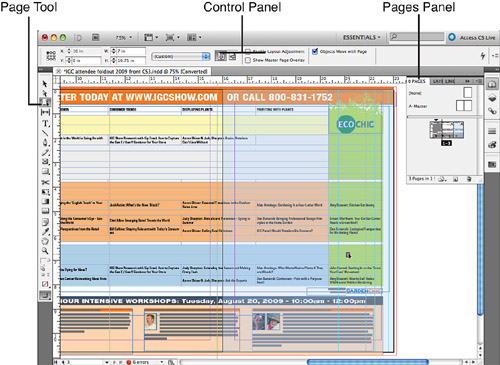
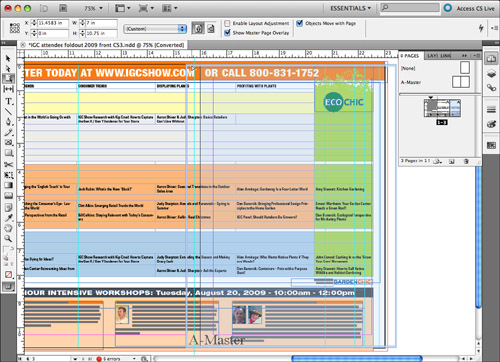
- To change page orientation, click the portrait or landscape buttons in the Control panel. The Control panel also includes Page tool options for enabling the Layout Adjustment feature (described in the Working with Grids and Guides section of this chapter), moving objects with the page, and displaying a Master Page Overlay.
- With the Show Master Page Overlay option enabled, InDesign displays the applied master page (and its contents) as an overlay above the resized document page. This can help you determine whether the position of the master page needs to be adjusted. If so, you can reposition the master page by clicking and dragging the blue overlay border (see Figure 3.14).
Figure 3.14. Reposition the applied master page by clicking and dragging the blue overlay border.
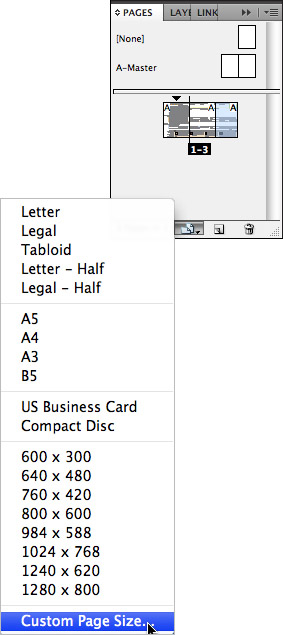
You can also resize pages without having to select them with the Page tool. To do so, select the page thumbnails in the Pages panel and choose one of the preset sizes from the Edit Page Size drop-down list, which is accessible from the bottom of the panel. To apply a custom size, choose Custom Page Size from the Edit Page Size list (see Figure 3.15) and enter the new width and height values in the Custom Page Size dialog box that appears. Click OK to resize the pages.
Figure 3.15. By choosing a preset size from the Edit Page Size drop-down list, you can resize pages without having to select them with the Page tool.
Show Me: Media 3.3—Including Multiple Page Sizes in a Document
![]()
Access this video file through your registered Web edition at my.safaribooksonline.com/9780132174541/media.
Targeting and Selecting Pages
A targeted page or spread is the one you are working on in the document window. However, a page can also be selected by clicking its thumbnail in the Pages panel without actually making it the target page (see Figure 3.16). You can then apply formatting that does not require you to view the page as you do so (such as adjusting margins and columns or moving the page). Being able to apply these kinds of uniform edits without having to target each page is a valuable time saver.
Figure 3.16. You can tell that a page is selected when its page thumbnail (not its page number) appears highlighted in the Pages panel.
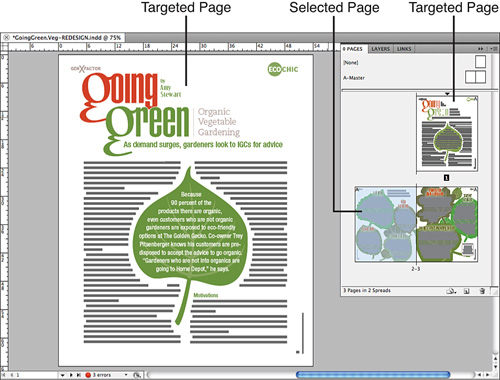
You can select and edit multiple pages by Cmd-clicking or Ctrl+clicking the page thumbnails in the Pages panel (Shift+click to select multiple adjacent pages). To target a selected page, double-click the page thumbnail for it to appear centered in the document window.
Applying Color Labels to Page Thumbnails
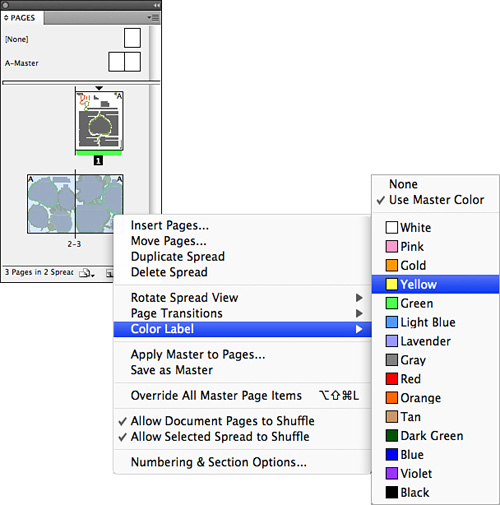
New to InDesign CS5 is the capability to apply colored labels under the thumbnails in the Pages panel. By applying these labels, you can communicate the design status of the pages to the other team members in your project workflow.
To apply a color label, you must first select the thumbnail(s) from the Pages panel. Then click the Pages panel menu button and choose a color from the Color Label submenu (see Figure 3.17). You can also access the Color Label submenu from the contextual menu by right-clicking or Control-clicking (Mac) the thumbnails.
Figure 3.17. Apply color labels to the Pages panel thumbnails to communicate their status to the other team members of your workflow.
Show Me: Media 3.4—Applying Color Labels to Page Thumbnails
![]()
Access this video file through your registered Web edition at my.safaribooksonline.com/9780132174541/media.
Rotating a Spread Using the Pages Panel
Another useful feature you’ll find in the Pages panel is the capability to rotate the view of a page spread, as shown in Figure 3.18. For example, if you are working on something like a vertical calendar or a gatefold poster layout, you would ordinarily be forced to turn your head to the same orientation as the page. However, a better alternative is to select the thumbnails in the Pages panel for the spread you would like to rotate. Then click the Pages panel menu button and choose a rotation option from the Rotate Spread View submenu. Options include 90° CW, 90° CCW, and 180°.
Figure 3.18. InDesign displays a rotation icon next to the rotated spread in the Pages panel.
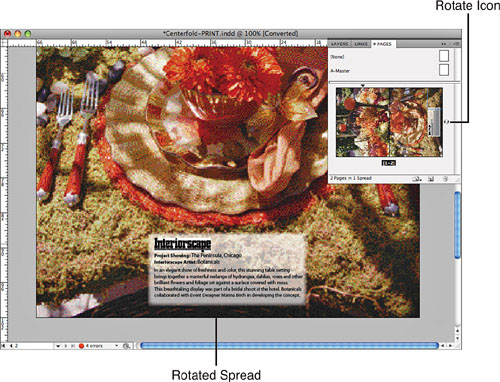
Rotating a spread does not affect printing or output. However, to avoid confusing the other members of your design team when collaborating on the spread design, you should return it to its original orientation after you complete your edits. To do so, choose View, Rotate Spread, Clear Rotation, or choose the command from the Pages panel menu or contextual menu.
Working with Grids and Guides
Grids and guides are nonprintable rules to which you can snap objects, which can be very helpful when positioning and aligning objects on the page. You can use several types of grids and guides, including margin and column guides, ruler guides, the baseline grid, and the document grid.
Adjusting Margin and Column Guides
You can set margin and column guides in the New Document dialog box when starting a new project. However, you also can edit them at any time while working in the document. To do so, choose Layout, Margins and Columns (see Figure 3.19).
Figure 3.19. The Margins and Columns dialog box.
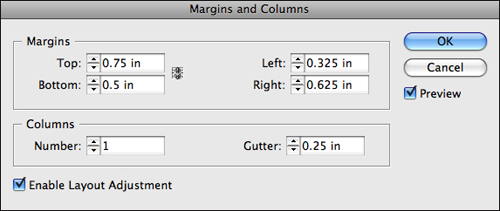
InDesign enables you to edit the margin and column settings for individual document pages—not just master pages. Note that the margin and column guides on a master page are applied to a document page just like any other master page item, but they can be edited in the document page using the Margins and Columns dialog box.
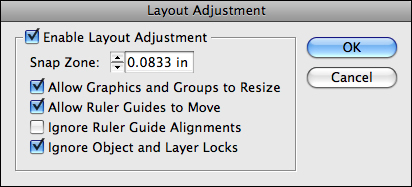
When resizing a document, you can allow InDesign to automatically resize or reposition any object that is aligned to a margin, column, or ruler guide. To do so, you must enable the Layout Adjustment feature, which is located at the bottom of the Margins and Columns dialog box (see Figure 3.20). You also can enable this option from the Layout Adjustment dialog box, which is accessible under the Layout menu.
Figure 3.20. The Layout Adjustment dialog box contains additional options for automatically resizing and repositioning objects that are aligned to guides.
Adding Ruler Guides
Some designers find ruler guides extremely helpful when setting up initial page layouts and templates. You can use guides to line up page items evenly and snap them into place. By default, guides are not printable—they are visible only onscreen. It is easy to move, lock, snap to, add, or delete guides, and you can even assign them different colors and place them on different layers.
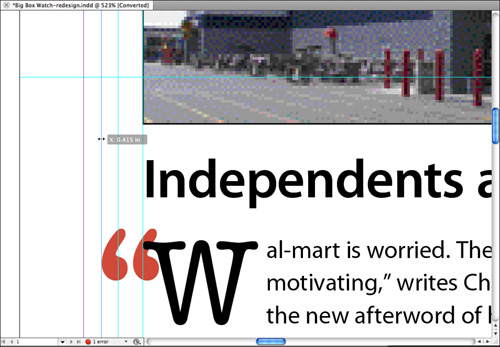
You can click and drag a new guide out from the horizontal or vertical rulers and onto the targeted page (or master page) at any time, no matter what tool you are using (see Figure 3.21). After the guide is placed, you can select it with either selection tool by hovering over it and clicking. To select multiple guides, Shift+click or marquee over them with either selection tool.
Figure 3.21. When you click to select a ruler guide, the arrow cursor changes shape and the ruler guide changes color. Click and drag to move the guides vertically or horizontally.
You can also choose to Hide/Show, Lock/Unlock, or Snap To guides under the View, Grids & Guides submenu, or in the contextual menu by right-clicking or Control-clicking (Mac) anywhere on the Pasteboard. To access the Ruler Guides dialog box, choose Layout, Ruler Guides, or choose it from the contextual menu (see Figure 3.22).
Figure 3.22. The Ruler Guides dialog box enables you to apply different colors to guides that are positioned on the same layer.
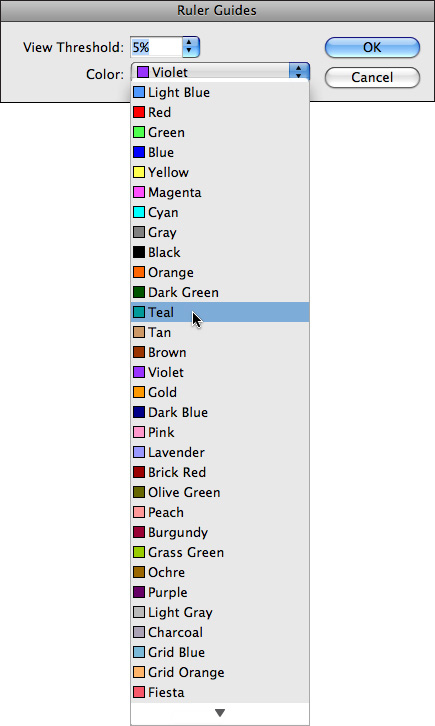
Different colors can be applied to selected guides by accessing the Ruler Guides dialog box and choosing an alternative color from the Color drop-down list. You can also set a View Threshold amount in this dialog box.
To delete guides, select the ones you want to remove and press Delete.
Using Smart Guides
You can use Smart Guides to help you align objects with each other on the page (see Figure 3.23). As you reposition an object or create a new object with frame, shape, or pen tools, InDesign displays temporary guides that indicate when the object is aligned with a neighboring object’s center or edges.
Figure 3.23. Smart Guides automatically appear as you reposition or create objects on the page.
Smart Guides are enabled by default. If you find them distracting, you can disable them by choosing View, Grids & Guides, Smart Guides, or by pressing Cmd-U (Mac) or Ctrl+U (Win).
Aligning Text to the Baseline Grid
By aligning multiple columns of body text to the baseline grid, you can greatly improve the overall appearance of a document.
![]() LET ME TRY IT
LET ME TRY IT
Aligning Text to the Baseline Grid
To display the baseline grid, apply the following steps:
- Choose View, Grids & Guides, Show Baseline Grid, or press Opt-Cmd-’ (Mac) or Alt+Ctrl+’ (Win).
- Press Cmd-K (Mac) or Ctrl+K (Win) to access the Preferences dialog box.
- In the Grids panel of the Preferences dialog box, enter the leading amount you’re using for body text in the Increment Every data field, and click OK.
- Select the text frame with either selection tool and click the Align To Baseline Grid control in either the Paragraph panel or the Control panel.
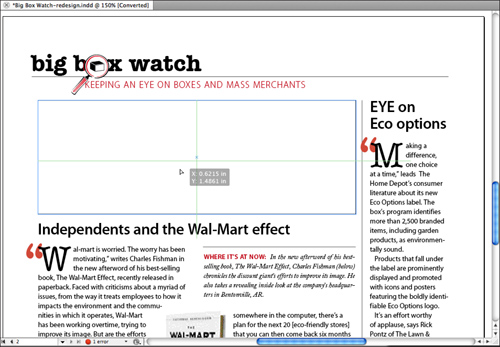
Figure 3.24. Before snapping to the baseline grid.
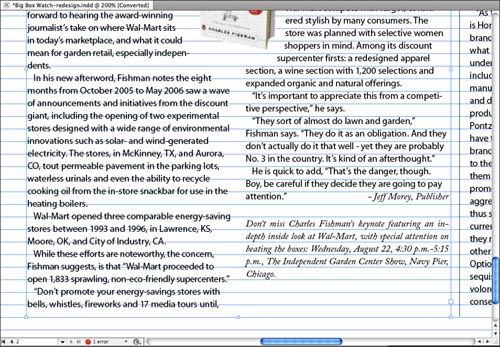
Shown in Figure 3.25 is an example of how snapping the paragraph text to a “leading grid” can improve the look of your page.
Figure 3.25. Paragraph text after it has been snapped to the baseline grid.
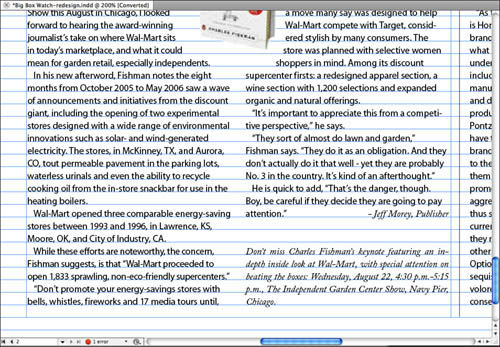
Snapping Objects to the Document Grid
InDesign enables you to align objects evenly on the page by snapping them to the document grid (see Figure 3.26). However, one downside to doing so is that when the grid is visible, it can be very distracting to work with—even when placed in back with a lighter color applied to it. Thankfully, you can still snap to the document grid even when it is hidden.
Figure 3.26. An example of how you can align objects in your layout by snapping them to the document grid.

Document Grid color settings and gridline options are accessible in the Grids panel of the Preferences dialog box. To align graphic frames and other objects with the top and bottom lines of paragraph text, enter gridline subdivision values in Grids Preferences that coincide with the baseline grid.
To snap objects to the document grid, select View, Grids & Guides, Snap to Document Grid, or Control-click or right-click anywhere on the Pasteboard and select the command from the contextual menu.