7. Working with Text
In this chapter you learn how to import, flow, view, and edit text. You also learn how to use the Story Editor, the Check Spelling feature, Find/Change, Find Font, and the dialog boxes for importing text.
In many ways, text can be the most important part of a layout. Colorful graphics and images can certainly attract a reader’s attention, but the text is what usually communicates the message. Therefore, it is essential to learn and understand the many ways of working with text in InDesign.
Choosing Text Frame Options
Text frames hold the text you create and edit in InDesign. Every text frame has its own set of options that can affect the way text is displayed in a document. To access these options, select a text frame with either selection tool (or click it with the Type tool), then choose Object, Text Frame Options or press Cmd+B (Mac) or Ctrl+B (Win).
General Text Frame Options
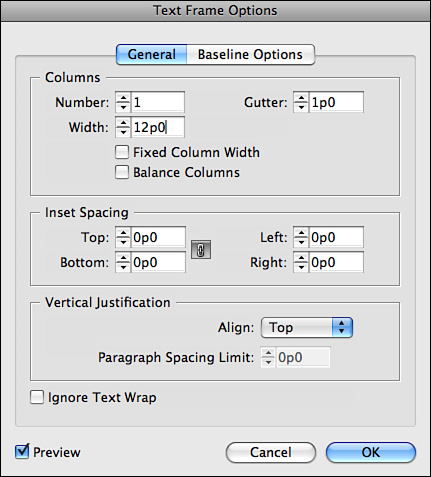
The General panel is the first panel you see when you open the Text Frame Options dialog box (see Figure 7.1). The options in this panel are divided into three sections: Columns, Inset Spacing, and Vertical Justification.
• Number of Columns: Set the number of columns for a new or selected text frame.
• Column Width: Applies a text frame column width.
• Gutter: Applies an amount of space between columns.
• Fixed Column Width: Enable this option to maintain specified column and gutter width settings when the frame is scaled, or made wider or narrower.
• Balance Columns: Evenly distributes text across columns in a multiple column text frame.
• Inset Spacing: Applies a specific amount of inset spacing at the top, bottom, left, or right of each column in the text frame.
• Vertical Justification—Align: Applies Top, Center, Bottom, or Justified vertical text alignment in the frame.
• Paragraph Spacing Limit: Applies a limit for paragraph spacing when using Justified vertical alignment. It sets the maximum amount of space allowed between paragraphs in the text frame when justified. InDesign adjusts the leading of each line to up to the amount entered. Enter higher values to prevent a change in leading.
• Ignore Text Wrap: Check this box to allow a text frame to not be affected by surrounding text wraps.
Figure 7.1. Click the General tab at the top of the Text Frame Options dialog box to access the General panel.
Baseline Options
You can access the Baseline Options panel by clicking the Baseline Options button at the top of the Text Frame Options dialog box (see Figure 7.2). This panel includes options for setting the first baseline offset and using the baseline grid.
Figure 7.2. Click the Baseline Options tab at the top of the Text Frame Options dialog box to access the Baseline Options panel.
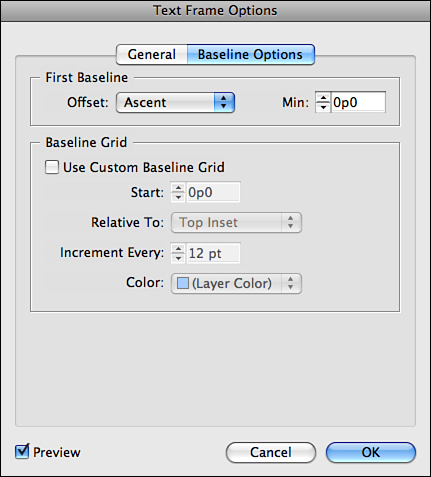
• First Baseline Offset:
• Ascent: The character “d” in the font you are using falls underneath the top inset of the text frame.
• Cap Height: The distance between the top of the uppercase letters and the top inset of the text frame.
• Leading: Measures from the baseline of the first line of text and the top inset of the frame using the text’s leading.
• X Height: “X” character height of the font falls underneath the top inset of the frame.
• Fixed: Enter a specific value for the distance between the baseline of the first line of text and the top inset of the frame.
• Minimum Offset Amount: Apply a minimum distance amount for use with the Fixed First Baseline Offset option.
Show Me: Media 7.1—Choosing First Baseline Offset Options
![]()
Access this video file through your registered Web edition at my.safaribooksonline.com/9780132174541/media.
• Use Custom Baseline Grid: Check this box to enable Custom Baseline Grid options.
• Start: Indicates the distance the first line of the baseline grid should be placed relative to the top of the page, margin, frame, or inset.
• Relative To: Choose Top of Page, Top Margin, Top of Frame, or Top Inset. The Relative To option affects where the grid line Start point will fall (see the “Start” description above).
• Increment Every: Indicate the uniform distance to place between grid lines. Generally, you should enter the default leading amount here.
• Color: Choose a baseline grid display color. To apply the color currently assigned to the selected layer, choose Layer Color (located at the very top of the menu list).
Importing Text
Although you can add text to an InDesign layout by typing with the Type tool, you may also find yourself importing text from outside sources. It is not uncommon for an editor or a client to send you a text document that has been created in an outside application such as Microsoft Word or BBEdit. InDesign lets you import text files in .doc, .txt, and .rtf formats.
You can import text into an InDesign document from an outside source in one of two ways: by copying and pasting, and by using the Place command just as you would with a graphic link.
Copy and Paste
You can copy and paste text from just about any outside source, including other applications, emails, and web browsers. By default, InDesign ignores any text formatting when copying and pasting.
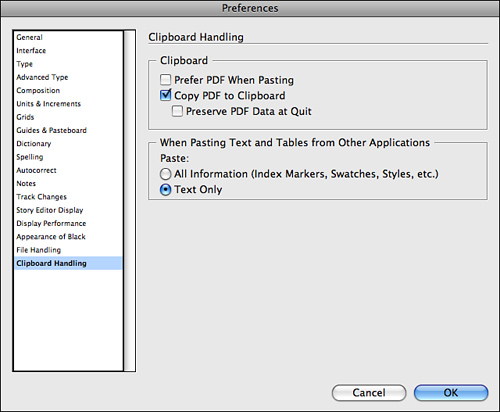
However, if you’d like to preserve formatting when copy/pasting text from an outside source, choose All Information in the When Pasting section of the Clipboard Handling Preferences (see Figure 7.3).
Figure 7.3. In the Clipboard Handling panel of the Preferences dialog box, the When Pasting Text and Tables from Other Applications preference is set to Text Only by default.
Importing Microsoft Word and RTF Text
Another way to bring existing text into a document is to import it using the Place command.
![]() LET ME TRY IT
LET ME TRY IT
Importing Text
Follow these steps to import text from a Microsoft Word or Rich Text Format (RTF) document:
- Choose File, Place and select the file located on your disk.
- In the Place dialog box that appears, check the Show Import Options button in the lower-left corner, and then click Open.
- Click in your document to place the text file.
The Microsoft Word Import Options and RTF Import Options dialog boxes are divided into three sections: Include, Options, and Formatting (see Figure 7.4).
Figure 7.4. The Microsoft Word Import Options dialog box enables you to control how the Word text is imported into your InDesign layout.
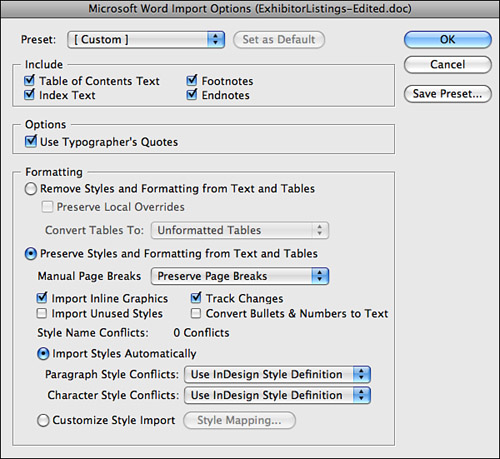
Under Include, check the items you’d like to import: Table of Contents Text, Index Text, Footnotes, and Endnotes. It is also recommended that you check Use Typographer’s Quotes under Options, because this is standard for most InDesign layouts. This will give you typographer’s quotes (curled) instead of generic quotes (straight).
In the Formatting section, you can choose to either remove or preserve text formatting on import. There are several additional options for preserving formatting, including Manual Page Breaks, Import Inline Graphics, Import Unused Styles, Track Changes, and Convert Bullets & Numbers to Text.
You can choose to import styles automatically or use a customized style import. When selecting automatic import, InDesign handles style conflicts according to the paragraph and character definitions chosen in the dialog box menus. Options include Use InDesign Style Definition, Redefine InDesign Style, and Auto Rename.
• Use InDesign Style Definition applies the InDesign style when a style name conflict occurs.
• Redefine InDesign Style applies the imported Word or RTF style and changes it without changing its name.
• Auto Rename changes the InDesign style to match the imported Word or RTF style and also assumes its name.
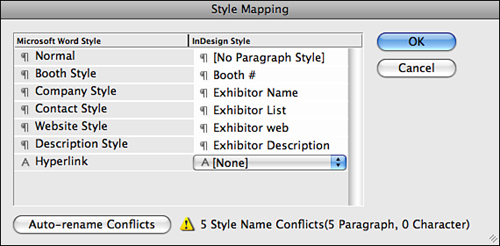
Customized Style Import allows you to map InDesign styles to imported Word/RTF styles (see Figure 7.5).
Figure 7.5. The Style Mapping dialog box enables you to map preexisting InDesign styles to the Microsoft Word styles that are applied to the text.
Show Me: Media 7.2—Style Mapping
![]()
Access this video file through your registered Web edition at my.safaribooksonline.com/9780132174541/media.
Filling with Placeholder Text
If you’ve ever had to wait until the last minute for an editor or client to submit text for a layout, you’re not alone. This happens all the time. What most people don’t realize is that text plays an important role in the look of your layout—and trying to design without it is like stumbling through the dark!
Thankfully with InDesign, you don’t have to let late text submissions hold up your design work. While you’re waiting for the real text to arrive in your inbox, go ahead and create a layout using text frames that are filled with placeholder text.
Click a frame with either selection tool or the Type tool, and choose Type, Fill with Placeholder Text. InDesign immediately fills the entire text frame or series of threaded frames with fake-Latin gibberish (see Figure 7.6).
Figure 7.6. When zoomed out, the placeholder text appears normal—but a closer look reveals the fake-Latin gibberish.

You can also apply character and paragraph styles to placeholder text, if needed to complete a preliminary design. When the real text arrives, copy and paste it into the preexisting frames, and it assumes the formatting already applied.
Threading and Unthreading Text Frames
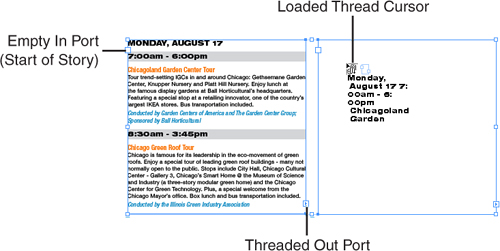
When adding text to a document that will not fit on a single page, threading the text allows it to flow throughout the document. InDesign does not require you to use a special tool to thread and unthread text frames. All you need to do is click the in or out port of a text frame with the Selection or Direct Selection tool.
The in port is located at the upper left of the text frame, and the out port is at the bottom right of the text frame. Any frame containing text with an empty in and/or out port indicates the text is at the beginning or end of the story, respectively.
A port that contains a triangle indicates that the story is linked to another text frame. An out port containing a plus sign (+) indicates that the text frame contains “overset” text, meaning that there is additional copy to flow. To display the rest of the story, you can either increase the size of the current text frame or thread the overset text into another text frame.
To thread overset text, click the in or out port of a selected text frame with either selection tool. The cursor changes to display a loaded text place icon. Click the loaded place cursor anywhere on the page to allow InDesign to draw a frame for you automatically, or click and drag to draw a frame manually (see Figure 7.7). In each instance, the overset text flows into the new frame.
Figure 7.7. Click a frame with the loaded thread cursor to flow the overset text.
If you have an existing text frame that you’d like to thread into, hover the mouse over it until the cursor changes once more—this time into a chain link icon (known as the text thread icon). Click the frame and the overset text from the first frame flows into the second.
If you decide to thread the story into a different text frame (and not include the current frame), you must unthread it. To unthread, click the in or out port of a text frame with either selection tool. When you do, the cursor again changes to display the loaded text place icon. Hover the cursor over either text frame until the cursor changes yet again—this time into a broken chain link icon, known as the text unthread icon. Click either frame to unthread the story and return the overset set text to the original text frame.
Flowing Text
When placing imported text with the File, Place command, you can flow text into a document using several methods: Manual Text Flow, Semi-Automatic Text Flow, Automatic Text Flow, or Super Autoflow.
Manual Text Flow
Choose File, Place. In the Place dialog box that appears, browse to the text document that you’d like to import and click Open. To allow InDesign to automatically create a text frame, click the loaded text place cursor anywhere in the document. You can also click and drag to draw a frame with the cursor, or click an existing frame or a series of threaded frames.
The Manual Text Flow cursor changes its appearance when you hover over a frame or guide/grid snap point (see Figure 7.8).
Figure 7.8. Shown here are the Manual Text Flow cursor (left); the Manual Text Flow cursor when placed over a frame (middle); and the Manual Text Flow cursor when placed over a guide/grid snap point (right).
![]()
Semi-Automatic Text Flow
With Semi-Automatic Text Flow, InDesign reloads the text place cursor when a placed story does not end in a drawn or clicked frame (or series of frames). To flow placed text semi-automatically, hold down Option (Mac) or Alt (Win) as you click or draw with the loaded text place cursor.
The Semi-Automatic Text Flow cursor also changes its appearance when you hover over a frame (see Figure 7.9).
Figure 7.9. Shown here are the Semi-Automatic Text Flow cursor (left) and the Semi-Automatic Text Flow cursor when placed over a frame (right).
![]()
Automatic Text Flow
With Automatic Text Flow, InDesign adds as many threaded text frames as necessary to fit a story into the existing pages of a document. To flow placed text automatically, hold down Option-Shift (Mac) or Alt+Shift (Win) as you click or draw with the loaded text place cursor (see Figure 7.10).
Figure 7.10. The Automatic Text Flow cursor.
![]()
Super AutoFlow
With Super Autoflow, InDesign adds as many threaded text frames and pages as necessary to fit an entire story into a document. To Super Autoflow placed text, hold down Shift as you click or draw with the loaded text place cursor (see Figure 7.11).
Figure 7.11. The Super Autoflow cursor.
![]()
Show Me: Media 7.3—Flowing Text
![]()
Access this video file through your registered Web edition at my.safaribooksonline.com/9780132174541/media.
Editing Text with the Story Editor
The Story Editor displays all the text for a selected story in a separate, easy-to-read, single-column window (called a “story window”). Unlike the layout window (a.k.a. the document window), the story window does not display any applied line breaks or text formatting (other than bold or italic fonts). To open the Story Editor, select the story with either selection tool and choose Edit, Edit in Story Editor, or press Cmd-Y (Mac) or Ctrl+Y (Win).
The only tool available when using the Story Editor is the Type tool—all other tools appear grayed out in the Tools panel. With the Type tool, you can select and edit text in the story window just as you would in Layout view, only without the eyestrain. As you edit or add text in the story window, InDesign updates the story in the layout.
As with a document window, you can expand, minimize, and close a story window—the controls work the same. Under the Story Editor Preferences, you can change story window display options, such as font, text size, line spacing, and background color.
You can also choose to hide or show the Style Name column and Depth ruler under View, Story Editor (see Figure 7.12). The Style Name column displays all applied paragraph style names to the left of the story. When visible, the Depth ruler also appears in this column and is used to measure the vertical depth of text in the layout. You can adjust the amount of horizontal space the Style Name column uses in the story window by dragging the vertical divider left or right.
Figure 7.12. The Story Editor displays all the text for a selected story in a separate, easy-to-read, single-column window.
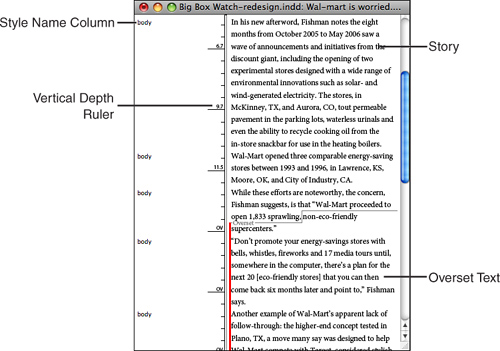
One of the best features of the Story Editor is the capability to view and edit any overset text without having to refer back to the layout window. The story window displays a horizontal divider line with the word “Overset” placed before it to indicate where the overset text begins. It also places a colored line along the left side of the ensuing paragraphs to indicate how much text is overset.
Tracking Text Changes with the Story Editor
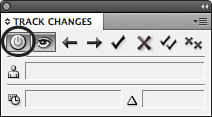
InDesign’s Track Changes feature enables you to monitor all edits that are made to a story and approve or reject them. To use this feature, insert the Type tool cursor anywhere in the story and choose Type, Track Changes, Track Changes in Current Story (see Figure 7.13). You can also enable this feature from the Track Changes panel. To display the panel, choose Window, Editorial, Track Changes.
Figure 7.13. To enable Track Changes, click the Enable Track Changes in Current Story button in the upper-left corner of the Track Changes panel.
When you enable Track Changes, InDesign keeps track of all text revisions, additions, and deletions by highlighting them in the Story Editor (not in Layout view). InDesign automatically assigns a different highlight color for each user’s changes (see Figure 7.14). This enables you to easily identify who has edited the story. InDesign displays name of the user in the User Name field of the Track Changes panel. It also displays the date and time when the change was made in the Change Time field, and the type of change that was made in the Change Type field.
Figure 7.14. InDesign tracks changes in the Story Editor by highlighting them with user defined colors.

To accept or reject a change, insert the Type tool cursor inside the highlighted text and choose Type, Track Changes, Accept/Reject Change. You can also click the Accept Change or Reject Change buttons in the Track Changes panel (see Figure 7.15), or Control-click (Mac) or right-click and choose either command from the contextual menu.
Figure 7.15. Click the accept/reject buttons in the Track Changes panel.
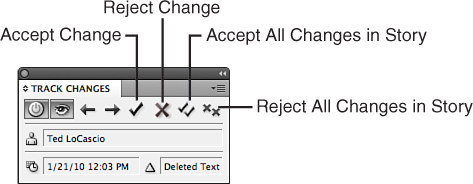
To accept or reject all changes at once, choose Type, Track Changes, Accept/Reject All Changes, In This Story, or In This Document. You can also click the Accept/Reject All Changes in Story buttons in the Track Changes panel.
To select the next or previous change in the story, choose Type, Track Changes, Next/Previous Change, or click the Next/Previous Change buttons in the Track Changes panel.
Changing Case
Change Case changes the case of any text that is selected.
![]() LET ME TRY IT
LET ME TRY IT
Changing the Case of Type
- Highlight the text with the Type tool and choose Type, Change Case, or select the command from the contextual menu by Control-clicking (Mac) or right-clicking (Win).
- Select Uppercase, Lowercase, Title Case, or Sentence Case from the submenu. Title Case capitalizes the first letter of every word, and Sentence Case capitalizes the first letter of every sentence.
- To change case of all text, (including overset text), select the frame with either selection tool and apply the Change Case command.
- To change case for an entire story that is contained in a series of threaded frames, place the Type tool cursor in any one of the threaded frames and choose Edit, Select All, and then apply the command.
Using the Show Invisibles Command
When editing text in a document, it can help to view any “invisible” characters that are present (see Figure 7.16). Certain hidden characters, such as forced line breaks, multiple tabs, or extra spaces, can often create an awkward text flow. By activating the Show Hidden Characters command, you can see where they are placed in the layout and delete them if necessary.
Figure 7.16. By enabling the Show Invisibles command, you can identify unwanted hidden characters within the text.
To show or hide invisible characters, choose Type, Show/Hide Hidden Characters, or press Opt-Cmd-I (Mac) or Alt+Ctrl+I (Win) and the characters appear in blue within the text. You can also access this command from the contextual menu by Control-clicking (Mac) or right-clicking (Win) anywhere on the page when working with the Type tool.
Using the Check Spelling Feature
To check spelling with the Check Spelling panel, choose Edit, Spelling, Check Spelling or press Cmd-I (Mac) or Ctrl+I (Win). You can also access this command from the contextual menu by Control-clicking (Mac) or right-clicking (Win) anywhere on the page when working with the Type tool.
At the bottom of the Check Spelling panel, choose a search option from the Search drop-down list (see Figure 7.17). You can choose to search for misspelled words in a selected story, document, text selection, to the end of a selected story, or in all open documents (if you have more than one open). From the Add To drop-down list, select from a list of user dictionaries (if you’ve created more than one) to add words to.
Figure 7.17. The Check Spelling panel enables you to locate and correct misspelled words.
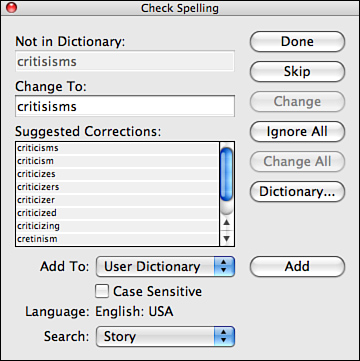
After you select a search option from the Search menu, click Start. Any words that are misspelled, uncapitalized, unknown, or not in the dictionary appear at the top of the panel. The panel also checks the spelling of any overset text when searching a story or document and will also show you whether any words at the beginning of a sentence are not capitalized.
In the Change To data field, enter the correct spelling or choose from the list of suggested corrections (if available). Click the Change button to correct the word in the document and continue the spelling check. To correct every occurrence of the word within the search parameters, click Change All.
If the Check Spelling panel finds a word that is spelled correctly but that is not recognized by the dictionary (such as a proper name or abbreviation), click Skip. To ignore every other occurrence of this word within the search parameters, click Ignore All. You can also add the word to a chosen user dictionary so that it does not come up in future spelling checks. To do so, click Add.
Using Dynamic Spelling
You can also enable the Dynamic Spelling feature, which underlines any found spelling-check errors in assigned colors when you import the text or as you type (see Figure 7.18). You can turn this option on or off by choosing Edit, Spelling, Dynamic Spelling or by checking/unchecking the Enable Dynamic Spelling preference in the Spelling panel of the Preferences dialog box.
Figure 7.18. The Dynamic Spelling feature underlines any found spelling-check errors in assigned colors.

Using Autocorrect
To allow InDesign to automatically correct misspelled words as you type, enable the Autocorrect feature. You can enable this feature by choosing Edit, Spelling, Autocorrect or by checking/unchecking the Enable Autocorrect preference in the Autocorrect panel of the Preferences dialog box. Autocorrect fixes misspelled words that are added to the list in the Autocorrect panel of the Preferences dialog box.
Working with the Dictionary
Proper names, technical terms, abbreviations, and various other slang words are not included in InDesign’s default dictionary. To avoid having these words show up repeatedly when running a spelling check, you can add them to a saved user dictionary.
Editing the Dictionary
You can add words to a user dictionary as you’re running a spelling check. To add words as the Check Spelling panel locates them, select a user dictionary from the Add To drop-down list and click the Add button. To access and edit user dictionaries with the Dictionary panel while performing a spelling check, click the Dictionary button.
You can also open the Dictionary panel (see Figure 7.19) by choosing Edit, Spelling, Dictionary or by Control-clicking (Mac) or right-clicking (Win) and choosing the command from the contextual menu.
Figure 7.19. The Dictionary panel enables you to add and remove words from a chosen user dictionary.
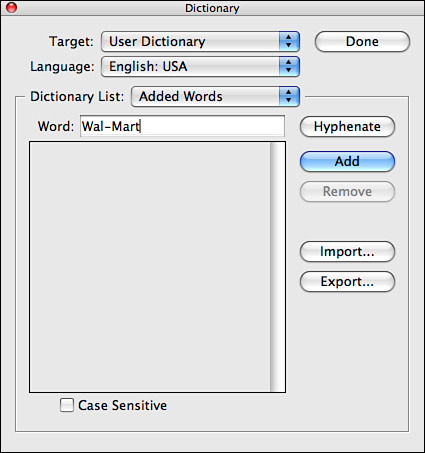
Choose a dictionary to edit from the Target drop-down list located at the top of the Dictionary panel. You must also choose a language to work with from the Language drop-down list. From the Dictionary List, choose to display Added Words, Removed Words, or Ignored Words.
Dynamic Spelling and the Check Spelling panel cannot locate Added Words unless they are spelled incorrectly. Removed Words are erased from the dictionary but can always be added back. Ignored Words remain in the dictionary but go unnoticed by the Check Spelling panel or Dynamic Spelling.
To add a word to any one of the dictionary lists, enter it in the Word field and click the Add button. To remove a word from a dictionary list, select it from the display window and click Remove.
Click the Hyphenate button to view hyphenation points for a word (indicated by a tilde (~). A single tilde ~ indicates the best hyphenation point, whereas a double tilde ~~ indicates second best and a triple tilde ~~~ third best. You can edit hyphenation points by adding tildes to or deleting them from the word displayed in the Word field.
Working with Fonts
You can apply any font that you have activated on your system to a text selection via the Type, Font submenu or the Character panel/Control panel Font menus (see Figure 7.20).
Figure 7.20. With the Type tool selected, you can access the Font menu and Type Style list from the Control panel.

The Font menu list displays a PostScript, TrueType, or Open Type icon before each font name to indicate what the font type is (see Figure 7.21). InDesign also displays a sample preview to the right of each font name in the list. You can choose what size to display the sample previews (small, medium, or large) in the Type panel of the Preferences dialog box.
Figure 7.21. The Font menu list also displays the font type and a font sample next to each font name.

PostScript fonts have the PostScript file format encoded in the font information.
InDesign features full Open Type font support. Open Type fonts are cross-platform (usable in Mac OS X and Windows) and offer many additional characters (called glyphs) and typographical features, such as ligatures and contextual alternates (combined characters), swashes (fancy versions of a letter), and fractions. Some of the Open Type fonts that come with InDesign include Adobe Caslon Pro, Adobe Garamond Pro, and Caflisch Pro.
TrueType fonts give you the best quality on your computer screens and printers, and they are very easy to use.
Using Find Font for Missing Fonts
Anytime you try opening an InDesign document that uses fonts that are not currently activated on your system, a warning dialog box appears to let you know which fonts are unavailable.
When this happens you can do one of three things:
• Activate the fonts on your system.
• Click OK and let InDesign substitute the missing fonts.
• Click the Find Font button and replace missing fonts with something else that you currently have activated on your system.
If you have the missing font, the smart choice would be to stop what you’re doing and activate it on your system.
If you don’t have the font, you can always choose the second option and click OK to deal with this inconvenience later. Any text that contains missing fonts appears highlighted in the document, but only if the setting in the Composition panel of the Preferences dialog box is set to highlight substituted fonts (the default setting).
![]() LET ME TRY IT
LET ME TRY IT
Finding and Replacing Missing Fonts
If you don’t have the font, or if the font you were provided with is not compatible with your system, you can always replace it with something else.
- Click the Find Font button in the warning dialog box, or if you’ve already clicked OK, choose Type, Find Font. The Find Font dialog box displays a list of all the fonts being used in the document (see Figure 7.22). Missing fonts appear alphabetically at the top of the list with a warning icon displayed to the right of each font name.
Figure 7.22. You can replace fonts using the controls available in the Find Font dialog box.
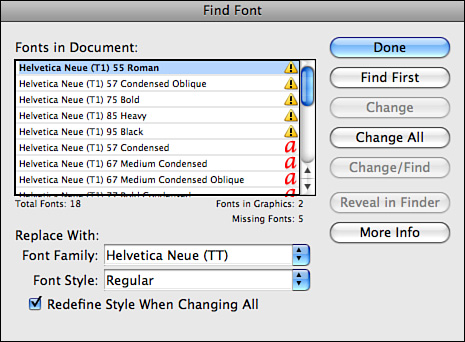
- Click the name of the missing font and choose a replacement font and style from the Font Family and Font Style drop-down lists.
- Click the Find First button to view the first occurrence of the missing font in the document window.
- Click the Change button to replace it with the selected font.
- Click the Change All button to replace every occurrence of the missing font in the document.
- Click Change/Find to locate and replace every occurrence of the missing font with each click of the mouse.
- The bottom of the Find Font dialog box displays information about the font that you currently have selected from the Fonts in Document list. Click the Less Info button to hide this portion of the dialog box. Click the Reveal In Finder button (Mac) or the Reveal In Explorer button (Win) to browse to the font’s location on your disk.
Tell Me More: Media 7.4—Using the Document Fonts Feature
![]()
Access this video file through your registered Web edition at my.safaribooksonline.com/9780132174541/media.
Utilizing the InDesign Fonts Folder
Located in the InDesign application folder is a Fonts folder. Any fonts that you place inside this folder are managed from within InDesign instead of the operating system. Fonts that do not load properly through the operating system (such as multiple master fonts in OS X) may work in InDesign by placing them in the Fonts folder located in the InDesign application folder.
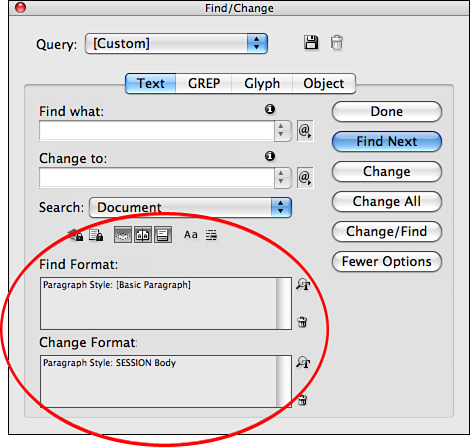
Applying Find/Change
To locate specific text characters within a document and change them to something else, choose Edit, Find/Change or press Cmd-F (Mac) or Ctrl+F (Win). When the Find/Change panel appears, click the Text button at the top of the panel (see Figure 7.23). Proceed to enter the character(s) you’d like to change in the Find What field. Then proceed to enter the character(s) you’d like to replace them with in the Change To field.
Figure 7.23. The Find/Change panel enables you to locate every instance of a specific text character in a document and change it to something else.

If either of these characters is invisible (or hidden), you can select it from the fly-out menu associated with each field. When you do, the metacharacter code for the hidden character is automatically entered into the Find What or Change To field.
From the Find/Change panel Search list, choose to search by document, selected story, text selection, to the end of a selected story, or in all open documents (if you have more than one open). To find/change whole words or characters that are case sensitive, check either option in the panel. There are also options to include the following in your search: footnotes, master pages, hidden layers and objects, locked stories (find only), and locked layers and objects (find only).
Click the Find Next button to locate the first occurrence of the character in the search area specified. Click the Change button to replace the character with the Change To character. Click the Change All button to replace every occurrence of the character within the search parameters. Click Change/Find to locate and replace every occurrence of the character with each click of the mouse. When the action is complete, InDesign displays a dialog box with the Find/Change results.
You can also use Find/Change to locate and replace applied character and paragraph styles and formatting. Click the More Options button located in the Find/Change panel to display the Find/Change Format settings options (see Figure 7.24). For both sections, click the button to the right of the field or click the field itself. When the Find/Change Format Settings dialog box appears, select the character and/or paragraph style settings to locate and replace in the document(s) and click OK. Click the Change, Change All, or Change/Find buttons to replace the formatting.
Figure 7.24. The Find/Change panel also enables you to locate and replace applied character and paragraph styles and formatting.
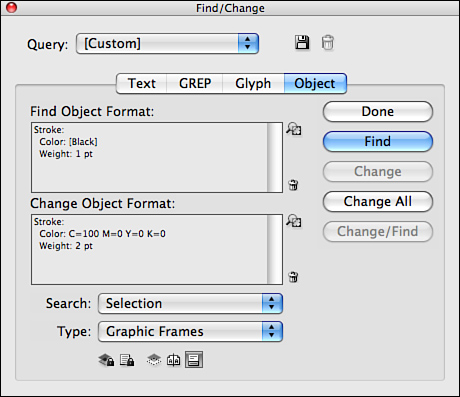
Find/Change also contains buttons at the top of the panel that enable you to search for and replace glyph characters, object formatting, such as stroke weight and color, and drop-shadow effects (see Figure 7.25), and GREP expressions. When using Find/Change with GREP expressions, InDesign searches for patterns within the text. Some examples of common GREP expressions are phone numbers, text placed inside quotation marks, and specific word groupings.
Figure 7.25. The Find/Change panel also enables you to locate and replace applied object formatting.