
10. Working with Graphic Links
In this chapter you learn how to import images of all kinds into your InDesign documents and how to manage links and embed images using the Links panel.
A page layout wouldn’t be a page layout without including some placed graphics. To add visual interest to a layout, you’ll most likely include a few photographs. You can also create custom-drawn logos and shapes in InDesign, and you can add graphics created in other vector-based drawing applications, such as Adobe Illustrator.
Importing Graphic Objects
You can import graphics into an InDesign document in several ways:
• Use the File, Place command.
• Drag a graphic into the InDesign document from programs such as Bridge, the Mini Bridge panel, Photoshop, Illustrator, Finder (Mac), Explorer (Win), or from another open InDesign document.
• Copy and paste a graphic from the Clipboard.
Understanding Adobe Bridge
Adobe Bridge is a separate media manager application that lets you organize, browse, locate, and view your images and other file assets. Bridge provides centralized access to your images. You can use Bridge with any of the Creative Suite applications.
![]() LET ME TRY IT
LET ME TRY IT
Importing Graphics from the Mini Bridge Panel
With CS5, it is now possible to import graphics into an InDesign document using the Mini Bridge panel. This panel enables you to access graphic links, including those placed in other InDesign documents, just as you would with the Adobe Bridge application, but without having to leave InDesign.
- To display the Mini Bridge panel, choose Window, Mini Bridge.
- Click the Browse Files button to display the Bridge Content panel in Mini Bridge.
- Click the icons in the navigation bar at the top of the panel to browse to the graphic(s) you would like to import (see Figure 10.1).
Figure 10.1. You can place graphics by dragging and dropping them from the Mini Bridge panel.
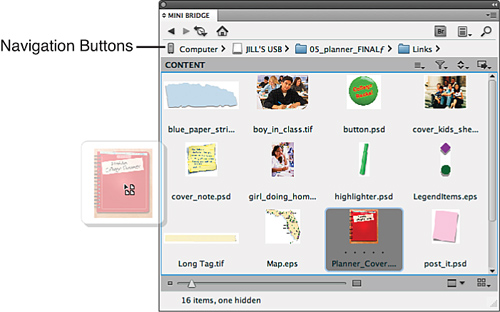
- Select the graphic(s) and from the Tools drop-down list, choose Place, In InDesign, or drag and drop from the panel into the document (refer to Figure 10.1).
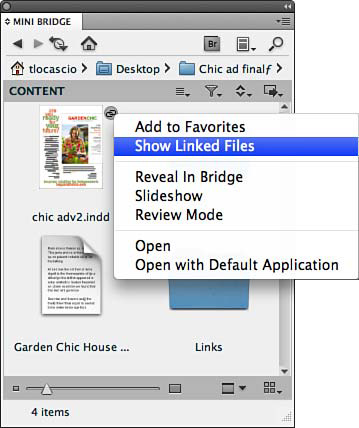
- If you’d like to access graphic links that are placed in a separate InDesign document, browse to the InDesign file (.indd) in Mini Bridge and Control-click (Mac) or right-click (Win) the link’s icon in the upper right of the thumbnail.
- Choose Show Linked Files from the contextual menu to display all the linked graphics from the separate InDesign file in Mini Bridge (see Figure 10.2).
Figure 10.2. Control-click (Mac) or right-click (Win) the thumbnail links icon and choose Show Linked Files from the contextual menu.
Show Me: Media 10.1—Importing Graphics from Mini Bridge
![]()
Access this video file through your registered Web edition at my.safaribooksonline.com/9780132174541/media.
Copying to and from Adobe Illustrator
In addition to placing native .AI (Adobe Illustrator format) files, you can copy and paste or drag and drop vector artwork that was created in Illustrator into an InDesign document. It is possible to edit simple objects in InDesign that have been copied from Illustrator, and vice versa.
To edit Illustrator objects in InDesign, you must disable the Prefer PDF When Pasting option in InDesign’s Clipboard Handling preferences. After this preference is disabled, you can edit Illustrator paths using InDesign’s drawing tools. Note that when you’re copying and pasting or dragging and dropping an Illustrator graphic into InDesign, the paths are automatically grouped. InDesign indicates this by displaying a dotted line around the graphic (see Figure 10.3). You can edit grouped paths using the Direct Selection tool (see Chapter 6, “Working with Objects”).
Figure 10.3. An Illustrator graphic showing grouped paths when pasted into InDesign.

Some limitations exist to the kinds of objects you can copy and paste and the kinds of edits you can make. For example, InDesign converts editable text copied from Illustrator into objects that can be transformed but not edited with the Type tool. However, InDesign enables you to edit colors and simple gradients that are copied from Illustrator by using the controls in InDesign’s Color and Gradient panels.
To copy and paste or drag and drop editable paths from InDesign into Illustrator, enable the Copy PDF to Clipboard option in InDesign’s Clipboard Handling preferences.
Importing Graphics with the Place Command
To import a graphic, choose File, Place or press Cmd-D (Mac) or Ctrl+D (Win). When the Place dialog box appears, select a graphic that is located on your disk and click the Open button. You then use the loaded place cursor to click and place it in a frame, or click once anywhere on the page and let InDesign place the graphic automatically for you (see Figure 10.4).
Figure 10.4. You can place graphic images with the loaded place cursor.

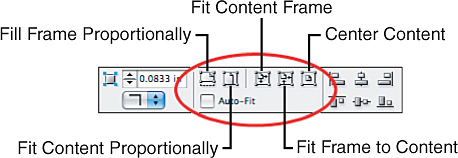
When you click an existing frame with the loaded place cursor, InDesign places the graphic at 100% of its size, which could result in part of the graphic being cropped away. To fix this, you can resize the graphic inside of the frame. Apply one of the fitting commands from the Object, Fitting submenu, or click one of the Fitting buttons in the Control panel. Using one of these commands allows you to view the entire image inside the frame (see Figure 10.5).
Figure 10.5. Click any of the Fitting buttons in the Control panel to change how the graphic is displayed.
![]() LET ME TRY IT
LET ME TRY IT
Applying Fitting Commands
Follow these steps to apply a Fitting command:
- Select the graphic frame by clicking it with the Selection tool or the Direct Selection tool.
- Select the Fill Frame Proportionally command from the Object, Fitting submenu, or click its button equivalent in the Control panel (refer to Figure 10.5). Doing so resizes the image to fill the entire frame while maintaining its overall proportions. The frame’s dimensions are not changed (see Figure 10.6).
Figure 10.6. The results the various Fitting commands can give you.
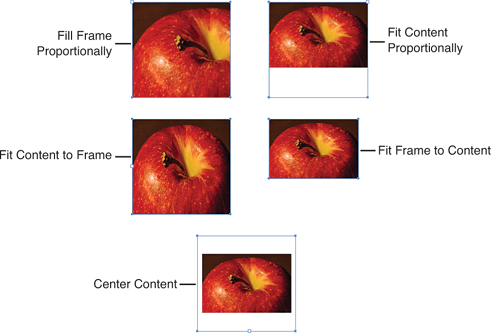
- Select the Fit Content Proportionally command from the Object, Fitting submenu, or click its button equivalent in the Control panel (refer to Figure 10.5). Doing so resizes the image to fit the frame while maintaining its overall proportions. The frame’s dimensions are not changed. If the image and frame have different proportions, some white space will result (refer to Figure 10.6).
- Select the Fit Content to Frame command from the Object, Fitting submenu, or click its button equivalent in the Control panel (refer to Figure 10.5). Doing so scales the image to fit the frame without maintaining overall image proportions. The frame’s dimensions are not changed (refer to Figure 10.6).
- Select the Fit Frame to Content command from the Object, Fitting submenu, or click its button equivalent in the Control panel (refer to Figure 10.5). Doing so resizes the frame to fit the image. The image dimensions are not changed (refer to Figure 10.6).
- Select the Center Content command from the Object, Fitting submenu, or click its button equivalent in the Control panel (refer to Figure 10.5). Doing so centers the image inside the frame. The frame and image dimensions are not changed (refer to Figure 10.6).
You can also import multiple graphics at one time using the File, Place command. Cmd-click (Mac) or Ctrl+click (Win) multiple images from your disk via the Place dialog box, and then click Open. InDesign stores all the graphics in the loaded Place cursor and displays a preview of each graphic before you place it (see Figure 10.7).
Figure 10.7. InDesign displays a number next to the loaded place cursor to indicate how many images it currently has stored.

![]() LET ME TRY IT
LET ME TRY IT
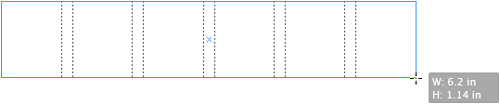
Placing Graphics in a Grid Format
To place the graphics in a grid format, follow these steps:
- Click and drag to create a single frame with the loaded place cursor.
- As you click and drag, click the right-arrow key to add a column; click the up-arrow key to add a row. Continue clicking the arrow keys to add as many columns and rows as you like.
- Click the left-arrow key to remove a column; click the down-arrow key to remove a row. When you release the mouse button, InDesign places the graphics in the grid and fits each one proportionally (see Figure 10.8).
Figure 10.8. To create a grid, press the arrow keys as you click and drag with the loaded place cursor.
Show Me: Media 10.2—Gridify Imported Graphics
![]()
Access this video file through your registered Web edition at my.safaribooksonline.com/9780132174541/media.
Choosing Import Options
InDesign accepts all graphic file formats that are commonly used for print output, including TIFF, PDF, and EPS as well as native file formats such as AI (Adobe Illustrator format), and PSD (Photoshop document).
To access additional import options, click Show Import Options at the bottom left of the Place dialog box, or press Shift as you click Open. Next you will see the Image Import Options dialog box, which contains specific options related to that file type. Import options vary depending on the type of file you are importing.
Using the Image Import Options Dialog Box
If the image you are importing contains a Photoshop clipping path or alpha channel, the Image panel of the Image Import Options dialog box enables you to apply and edit the path in InDesign. By applying either, you can display a portion of the image in your layout. For example, if set up properly in Photoshop ahead of time, you can use a clipping path or alpha channel to mask away the background of an image placed in InDesign. Many stock images come equipped with paths and channels that you can apply in InDesign. To do so, check the Apply Photoshop Clipping Path box or choose an alpha channel from the drop-down list (see Figure 10.9). To edit the Photoshop clipping path, select the Direct Selection tool, and then click the clipping path that surrounds the graphic.
Figure 10.9. The Image panel of the Image Import Options dialog box enables you to apply a Photoshop clipping path or alpha channel.
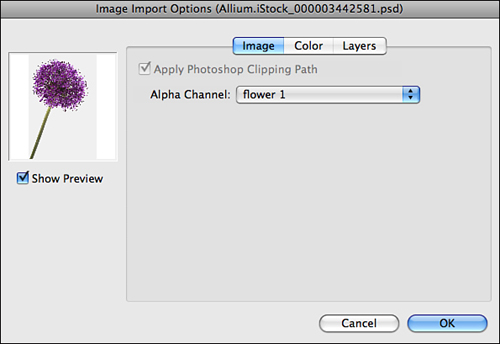
You can always choose Object, Clipping Path, Options and enable the Apply Photoshop Clipping Path option later in the Clipping Path Options dialog box if you decide to leave it off during import.
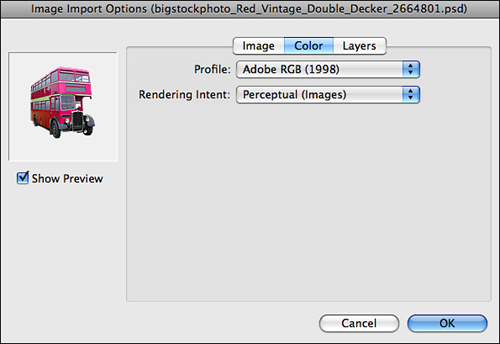
The Color panel of the Image Import Options dialog box enables you to specify how you would like to color manage the image you are importing. Select a color profile and rendering intent from the lists provided.
Every device that captures or displays color can have its own color profile. A color management system calibrates color differences among devices so that you can be sure of the colors you output when printing the file. Viewing the color accurately onscreen enables you to make accurate color decisions as you work with your document (for more about color management, see Chapter 13, “Working with Color”).
Choose a rendering intent for each type of graphic in your document (see Figure 10.10). Choose one of the four intents for each graphic: Perceptual (Images) accurately represents colors in photographs; Saturation (Graphics); Relative Colorimetric and Absolute Colorimetric options are both good for areas of solid color but they don’t reproduce photographs very well.
Figure 10.10. The Color panel of the Image Import Options dialog box enables you to choose color management settings for the graphic.
The Layers panel of the Image Import Options dialog box appears only when you import a Photoshop PSD with layers. In the Show Layers section of the panel, an eye icon appears next to each layer’s name; click the icon to turn the layer’s visibility on or off. If the image contains Photoshop layer comps, you can choose to display one in InDesign by selecting it from the Layer Comp drop-down list (see Figure 10.11).
Figure 10.11. The Layers panel of the Image Import Options dialog box enables you to control layer visibility for the graphic you are placing.

When you edit a placed PSD in Photoshop and update the link in InDesign, you have the option to keep the layer visibility choices that you made when you first imported the image, or to view layers as they are currently saved in the PSD; select either option from the When Updating Link drop-down list.
Using the EPS Import Options dialog box
The EPS Import Options dialog box contains several options for you to choose from. Enable the Read Embedded OPI Image Links option if you are using InDesign in an OPI workflow. An Open Prepress Interface (OPI) workflow lets you place low-resolution EPS graphics that retrieve high-resolution versions from an OPI server during output.
Enable the Apply Photoshop Clipping Path option if the EPS image you are importing contains a Photoshop clipping path that you’d like to apply in InDesign. Note that unlike clipping paths that are applied to TIFFs or PSDs, you cannot edit an EPS Photoshop path in InDesign.
To use the preview image that is already embedded in the EPS, select Use TIFF Or PICT Preview from the Proxy Generation drop-down list. To create a preview in InDesign, select Rasterize the PostScript.
Using the Place PDF Dialog Box
In the General panel of the Place PDF dialog box, you have several general import options to choose from.
You can choose to import a specific page, all pages, or a range of pages from a PDF document into InDesign. It is also possible to select which page you would like to import by entering a page number or clicking the left or right arrows under the preview window and selecting the Previewed Page option.
From the Crop To drop-down menu, you can choose how much of the page you would like to import. Select from Bounding Box (Visible Layers), Bounding Box (All Layers), Art, Crop, Trim, Bleed, or Media.
Enable the Transparent Background option to allow imported PDFs containing transparent backgrounds to remain transparent in InDesign.
The Layers panel of the Place PDF dialog box has the same functionality as the Layers panel of the Image Import Options dialog box, with the exception of layer comps, which does not apply to standard PDF files (see “Using the Image Import Options Dialog Box,” earlier in this chapter).
Working with the Links Panel
When you place a graphic into a document, InDesign retrieves the image data from its current location on your disk rather than embedding it into the file. By doing so, InDesign can display and output the image properly while keeping the overall document size manageable. This process is referred to as linking.
Graphic links must remain in their current system location after you place them or InDesign will flag them as missing and will not be able to output the graphics properly. In addition, any links that you edit in another application outside InDesign will appear as modified and must be updated.
The controls in the Links panel enable you to update missing and modified links, go directly to a link in the document, embed or unembed a graphic, and open a graphic in its native application for editing. You can also access specific link info, such as file size, color space, and actual versus effective ppi via the Link Info pane.
Updating Missing and Modified Links
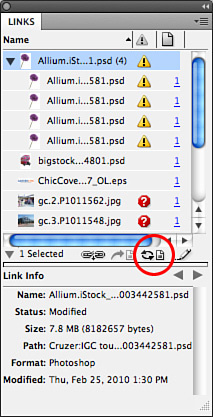
The Links panel enables you to update and relink modified and missing links. When you edit a link in another application outside InDesign (such as Photoshop or Illustrator), it becomes “modified.” When you move a link from its previous location on your disk, it becomes “missing.” In either scenario, InDesign displays a missing or modified warning icon next to the link name in the Links panel (see Figure 10.12).
Figure 10.12. When a link is missing or modified, InDesign displays a warning icon next to the link name in the Links panel.
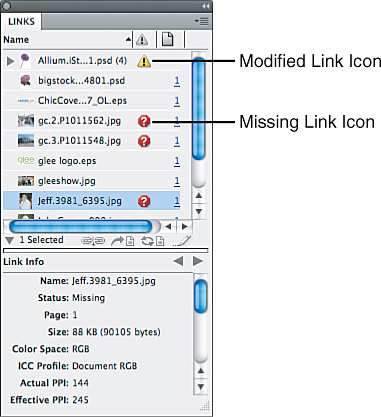
To display missing and modified links at the top of the Links panel list, click the Status warning icon at the top of the panel. You can reverse the sorting order by clicking the icon again. By clicking the Page icon, you can sort the links by the page number they appear on in the document. To sort the links alphabetically, click Name.
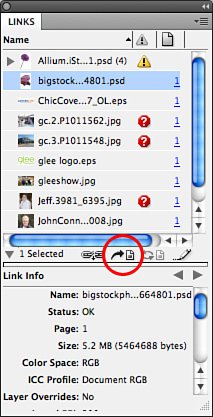
To update a modified link, select the graphic in the Links panel and click the Update Link button located in the panel footer controls (see Figure 10.13). You can also choose Update Link from the panel menu. To update several modified links at once, Option-click (Mac) or Alt+click (Win) the Update Link button or choose Update All Links from the panel menu.
Figure 10.13. Click the Update Link button to update a modified graphic.
![]() LET ME TRY IT
LET ME TRY IT
Relink a Missing Graphic
To relink a missing item, follow these steps:
- Select the missing item in the Links panel and click the Relink button located in the panel footer controls, or choose Relink from the panel menu (see Figure 10.14).
Figure 10.14. Click the Relink button to relink a missing graphic.

- When the Locate dialog box appears, browse to the link on your disk and click Open.
- To update several missing links at once, Option-click (Mac) or Alt+click (Win) the Relink button.
Locating a Linked Graphic in a Document
To locate where a link is placed in a document, select the link in the Links panel and click the Go to Link button located in the panel footer controls, or choose Go to Link from the panel menu (see Figure 10.15).
Figure 10.15. Click the Go to Link button to go directly to the graphic in the layout.
Editing a Linked Graphic
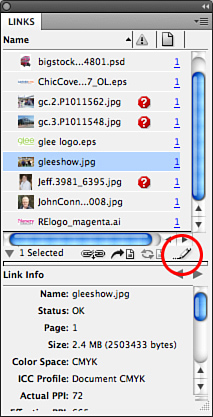
To open and edit a linked graphic in its native application (such as Photoshop or Illustrator), select the graphic from the Links panel and click the Edit Original button in the panel footer controls, or choose Edit Original from the panel menu (see Figure 10.16). You can also press Option (Mac) or Alt (Win) and double-click the graphic in the layout. When you do, the linked graphic automatically opens in its native application where you can apply your edits. After you save and close the graphic in its native application, InDesign automatically updates the link in the InDesign document.
Figure 10.16. Click the Edit Original button to open and edit the graphic in its native application.
Showing and Hiding Link Info
The Links panel also enables you to display additional information about graphic links, such as file size, color space, and effective ppi (see Figure 10.17). By default, the Link Info pane is visible in the Links panel; however, you can show or hide it by choosing Utilities, Show/Hide Link Information Pane from the panel menu.
Figure 10.17. Click the left or right arrows at the top of the Link Info pane to view info about the previous or next item in the Links panel list.

You can specify what items to display in the Link Info pane by choosing different Links panel options. To do so, choose Panel Options from the Links panel menu. In the Panel Options dialog box, choose what you would like to display in the Show in Link Info column and click OK (see Figure 10.18).
Figure 10.18. Check the items you’d like to display in the Link Info pane from the Show in Link Info column.

Embedding and Unembedding Images
The more pages you add to a layout, the more graphics you are going to place. As the links to images add up, keeping track of all the images on your disk can be very difficult. However, you can embed the smaller links into the document to make the task of keeping track a little easier.
When you embed an image it becomes part of the document, thereby eliminating the need to refer to a separate file on your disk. However, embedding images adds to a document’s file size, so it is best to embed only smaller graphics, such as end mark icons and small vector graphics.
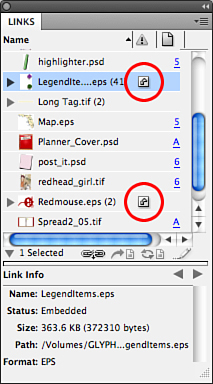
To embed an image (or multiple images), select them in the document, or click the link names in the Links panel, and choose Embed Link from the panel menu (see Figure 10.19).
Figure 10.19. After you embed a file, an Embedded icon appears in the Links panel next to the link name.
To unembed a file and link it to the document instead, select the object and choose Unembed Link from the panel menu. As with embedding, you can also select and unembed several links at once by selecting multiple objects and choosing the Unembed Link command.
After you choose the Unembed Link command, InDesign displays a warning dialog box that asks if you’d like to relink to the original file or create a new file. Click Yes to relink to the original file, or click No if you’d like InDesign to create a new file.
When relinking an embedded graphic, InDesign always remembers the original file location (unless you moved the graphic to a new location on your disk). When creating a new file, you must select a file location from the Choose a Folder (Mac) or Browse for Folder (Win) dialog box and click Choose.
Object Layer Options
When you import layered Photoshop PSDs, PDFs, Adobe Illustrator files (AI), and InDesign (INDD) files, you can control the visibility of each layer in that file. Adjusting the graphic’s layer visibility in InDesign enables you to control its appearance in your layout without having to edit the file in its native application.
![]() LET ME TRY IT
LET ME TRY IT
Adjusting Layer Visibility
To control the layer visibility for a placed graphic, follow these steps:
- Select the placed PSD, AI, INDD, or PDF file with the Selection tool and choose Object, Object Layer Options; this displays the Object Layer Options panel.
- In the Show Layers section of the panel, an eye icon appears in the visibility column next to each layer’s name; click the visibility column to turn the layer’s visibility on or off (see Figure 10.20).
Figure 10.20. To control layer visibility for placed images in InDesign, click in the visibility column of the Object Layer Options dialog box.
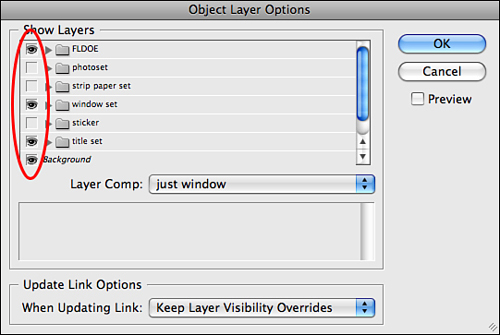
When you edit a layered graphic in its native application and update the link in InDesign, you have the option to keep the layer visibility overrides that you chose upon import. To view layers as they are currently saved in the PSD, select either option from the When Updating Link drop-down list.
Check the Preview option to view your changes in the document as you make them. When you finish, click OK to close the dialog box and apply your changes.
Show Me: Media 10.3—Utilizing Object Layer Options
![]()
Access this video file through your registered Web edition at my.safaribooksonline.com/9780132174541/media.
Object-Level Display Settings
InDesign can let you control how graphics that are placed in your document are displayed on your monitor. You can change the display settings for the entire document or for individual graphics. You also can change a setting that either allows or overrides the display settings for individual documents.
![]() LET ME TRY IT
LET ME TRY IT
Applying Object-Level Display Settings
If applying the High Quality Display setting to a large document slows down your computer, consider switching the document setting to Typical Display and applying High Quality Display overrides only to specific objects as needed. Follow these steps to apply the High Quality Display override to a selected object:
- Enable the Allow Object-Level Display Settings option in the View, Display Performance submenu.
- With the document display option set to Typical Display, select an object (or objects) with either selection tool and choose Object, Display Performance, High Quality Display. You can also set object-level display settings via the contextual menu (see Figure 10.21). To do so, Control-click (Mac) or right-click (Win) the selected object.
Figure 10.21. You can choose object-level display settings from the contextual menu.
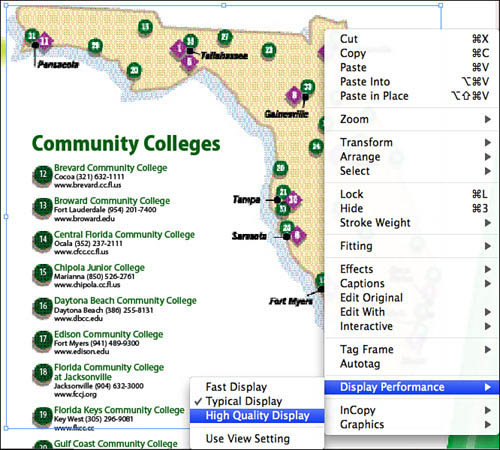
- Proceed to choose the object-level display setting from the Display Performance submenu.
You can change object-level display settings at any time. To clear local display settings for a selected object (or objects), choose Object, Display Performance, Use View Setting. To clear all object-level display overrides, select View, Display Performance, Clear Object-Level Display Settings.
Applying and Editing a Photoshop Clipping Path in InDesign
If the TIFF, JPEG, or PSD you are importing contains a Photoshop clipping path, you can apply it via the Image panel of the Image Import Options dialog box or via the Clipping Path dialog box. You can then edit the Photoshop path using InDesign’s path editing tools. Any edits made to a Photoshop clipping in InDesign are not applied to the original file; they affect the graphic only as it appears in InDesign.
To apply a Photoshop path when placing an image, enable the Apply Photoshop Clipping Path option in the Image Import Options dialog box.
To apply a Photoshop path after the image has been placed, select it with either selection tool and choose Object, Clipping Path. At the top of the Clipping Path dialog box, choose Photoshop Path from the Type drop-down list. If the graphic contains more than one Photoshop path, you can select which one to apply from the Path list below (see Figure 10.22). To see the path as you are applying it, enable the Preview option.
Figure 10.22. You can choose a Photoshop path from the Type list in the Clipping Path dialog box.
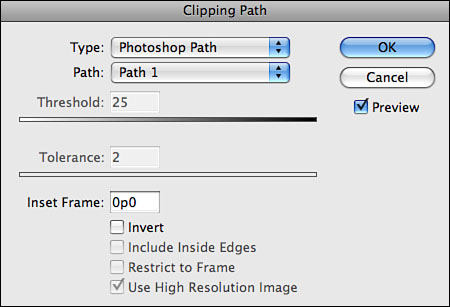
To remove any extra black or white edges from the path, you can contract it by entering a value in the Inset Frame field. You can also invert a Photoshop path so that the image areas outside the path are made visible and the areas inside are hidden. To do so, click the Invert check box.
To redefine the image crop and improve the edges of the Photoshop clipping path, you can select and alter them using the Direct Selection tool. To add points, delete points, or convert point direction, you can use the path editing tools available in the Pen and Pencil toolsets. You can also cut a Photoshop clipping path using the Scissors tool.
The downside to using clipping paths to extract images is that they can take a long time to draw, and their edges can often appear too sharp. To avoid this, try extracting your images in Adobe Photoshop and placing them as transparent PSDs in InDesign. It’s quicker, easier, and produces better-looking images overall.
Creating and Editing an InDesign Clipping Path
You can also extract an image from it’s background to use it in your layout by creating a clipping path inside InDesign; however, the InDesign clipping path controls can be clumsy and not very precise. It makes more sense to create a clipping path in Photoshop and apply it to the graphic in InDesign. However, if all you need to do is remove a simple solid-color background, an InDesign path will suffice.
![]() LET ME TRY IT
LET ME TRY IT
Creating a Clipping Path in InDesign
- Select a placed graphic with either selection tool and choose Object, Clipping Path to open the Clipping Path dialog box (see Figure 10.23).
Figure 10.23. You can generate a clipping path in InDesign by entering settings in the Clipping Path dialog box.
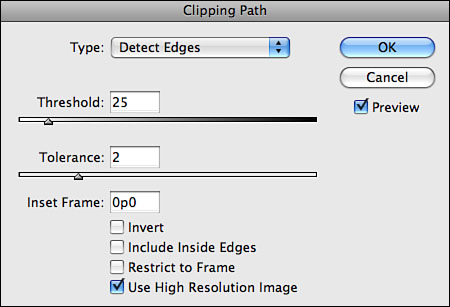
- At the top of the Clipping Path dialog box, select Detect Edges from the Type menu.
- Adjust the Threshold and Tolerance settings by entering values in the respective fields or dragging the sliders. The Threshold slider in the Clipping Path dialog box determines how close a color must be to white before you can remove it. Apply a lower value to drop out a light color background and a higher value to drop out a dark background. The Tolerance slider determines how close a pixel must be to the Threshold value in order remove it with the clipping path. After you set the Threshold and Tolerance values, you can remove any black or white edges by entering a value in the Inset Frame field.
- To see the path as you are applying it, enable the Preview check option.
- To allow the clipping path to recognize any areas inside of an image as defined by the Threshold and Tolerance settings, enable the Include Inside Edges feature. You can also invert an InDesign path by clicking the Invert check box.
- Select the Restrict to Frame option to limit the clipping path to include only the image areas that are within the graphic frame and not the areas cropped outside. With this option on, adjusting the crop means re-creating the path. Therefore, in most cases it is best to leave this option off.
- Enable the Use High Resolution option to calculate transparent areas of the image using the actual file rather that the screen display. Doing so ensures maximum precision.
You can also edit an existing InDesign clipping path. Select the graphic and choose Object, Clipping Path. In the dialog box that appears, adjust the Threshold and Tolerance settings or turn off the path entirely by choosing None from the Type drop-down list.