
4. Working with Master Pages
In this chapter, you learn how to create and apply master pages.
By creating a master page, you can save a commonly used layout and apply it to other pages in a document, thereby eliminating the need for repetitive page formatting. Items that reoccur in a publication, such as page numbers and folios, are perfect candidates for master page items. Master pages can also contain elements that appear on every page of a document, such as page numbers, a corporate logo, or even a draft watermark to denote a work in progress.
One of the benefits to using master pages is that when they are applied to document pages throughout a document, all the master page items are placed in the same position simultaneously. What a relief not to have to place them all individually on each document page! Another benefit to working with master pages is that when you edit the master page elements, InDesign automatically updates each instance of the object throughout the document wherever the master is applied.
![]() LET ME TRY IT
LET ME TRY IT
Creating Master Pages
Before you can apply master pages to a document, you need to create them. To create a master page, follow these steps:
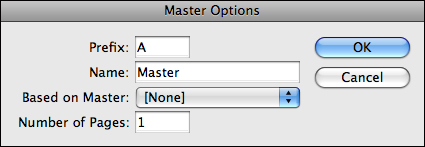
- Open the Pages panel menu and choose New Master.
- When the dialog box opens, choose a prefix, name, and number of pages to apply.
- To base the new master on another master (creating a parent/child relationship), choose a master from the Based on Master drop-down menu (see Figure 4.1).
Figure 4.1. Specify the master page settings in the New Master dialog box.

- Click OK for the master page to appear in the document window.
- You can then place the master page items that you’d like to appear on any document page to which the master is applied.
Show Me: Media 4.1—Creating Master a Page
![]()
Access this video file through your registered Web edition at my.safaribooksonline.com/9780132174541/media.
Duplicating Master Pages
In certain instances, you might want to base a master page layout on an existing master page without creating the parent/child relationship. With parent/child master pages, the page elements automatically update when you edit them on the parent master page. However, if you choose to duplicate a master page instead, you can work with the same elements independently. For example, you might want to try creating two or more slightly different master page layouts in the early stages of a project, and then choose one later to implement. Ultimately, you will use only one master layout for the project; therefore, the parent/child relationship is not necessary.
To duplicate an existing master page, select it from the master pages portion of the Pages panel and then choose Pages, Duplicate Master Spread from the Layout menu or from the Pages panel menu. The duplicate master page automatically appears in the Pages panel with the word “copy” placed at the end of its name.
To rename, change the prefix, add pages to, or base the duplicate on an existing master, choose Master Options from the Pages panel menu and enter the appropriate settings in the dialog box (see Figure 4.2).
Figure 4.2. You must access the Master Options dialog box to edit the duplicate master page settings.
Converting Document Pages to Master Pages
You created the perfect spread to use as the formatted layout for an entire publication. The only problem is—you forgot to create it on a master page!
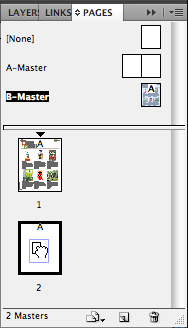
No problem. To convert a document page into a master page, select its thumbnail from the document pages portion of the Pages panel and then choose Save As Master from the panel menu. The converted master automatically appears at the bottom of the master page list with the next available prefix (A, B, C, and so on) applied to its name.
As if that isn’t easy enough, there’s an even easier way to convert a document page into a master page. Just select the page or spread thumbnail in the document pages portion of the Pages panel and drag it into the master pages portion (see Figure 4.3).
Figure 4.3. You can turn any document page layout into a master page by dragging its thumbnail into the master pages portion of the Pages panel.

Applying Master Pages
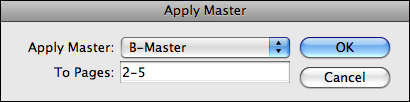
To apply a master page to specific document pages, choose Apply Master to Pages from the Layout, Pages submenu or the Pages panel menu.
If you select the document page thumbnails from the Pages panel before choosing the Apply Master command, the page numbers automatically appear in the To Pages field of the Apply Master dialog box (see Figure 4.4). If you do not select the pages first, you can enter the page numbers in the To Pages field, separated by commas. Click OK to apply the master.
Figure 4.4. The Apply Master to Pages dialog box.
When you apply the master page to the document pages, all items placed on the master page are now placed on the document pages. Doing so enables you to keep the positioning of your master page objects consistent throughout the layout. However, there are always exceptions to the rule. For example, if your layout requires that one page be slightly different from the rest, it doesn’t make sense to create a separate master just for one document page. In this instance, you can manipulate the master page items in the document layout by overriding them. Overriding enables you to apply edits to the master page object without affecting the other instances of it throughout the document. To do so, Cmd-Shift-click (Mac) or Ctrl+Shift+click (Win) the object with one of the selection tools.
You can also apply a master page by selecting it from the master pages portion of the Pages panel and dragging it over a document page thumbnail. Position the cursor over the document page or spread thumbnail until a thick black line appears around it; then release the mouse button to apply the master (see Figure 4.5).
Figure 4.5. You can apply master pages by dragging thumbnails in the Pages panel.
Tell Me More: Media 4.2—Applying Master Pages to Multiple Document Pages at Once
![]()
Access this video file through your registered Web edition at my.safaribooksonline.com/9780132174541/media.
Deleting Master Pages
To delete a master page or spread, select its thumbnail from the master pages portion of the Pages panel and choose Delete Master Spread from the Layout, Pages submenu or the Pages panel menu.
You can also delete a master page by selecting its thumbnail from the master pages portion of the Pages panel and dragging it over the Delete Pages footer control (the trash can icon) (see Figure 4.6). Or—if you like clicking better than dragging—select the master page thumbnails and click the trash icon without having to drag the pages down.
Figure 4.6. You can delete selected master pages by clicking the trash can icon or by dragging their thumbnails over it.

InDesign displays a warning dialog box if the master page you are deleting is applied to a page in the document. Click OK if you’re sure you still want to delete the master. Upon deleting, all the page items that were placed on the master no longer appear in the document.
Creating and Applying Parent/Child Master Pages
InDesign enables you to create master pages that are based on an existing master page. When you do this, all shared master page items change dynamically when the “parent” master is edited. This feature enables you to create and edit slightly different versions of a master layout easily. Just as with document pages, all parent master page items that are applied to child masters cannot be edited unless overridden. To do so, Cmd-Shift-click (Mac) or Ctrl+Shift+click (Win) the item with one of the selection tools.
![]() LET ME TRY IT
LET ME TRY IT
Creating a Child Master Page
To create a new master that is based on an existing “parent” master, follow these steps:
- Click the Pages panel menu button and choose New Master.
- When the New Master dialog box appears, choose a prefix, name, number of pages, and a parent master to base the new child master on from the menu.
- Click OK for the child master page to appear in the document window (see Figure 4.7).
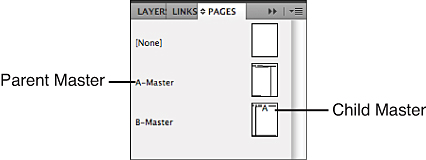
Figure 4.7. It’s easy to identify parent/child masters in the Pages panel; the child master page thumbnails always display the prefix letter of the parent master.
You can also create parent/child masters by selecting the master page thumbnail of a chosen parent and dragging it over the page thumbnail of a chosen child. This applies all parent master page items to the child master.
Show Me: Media 4.3—Creating a Child Master Page
![]()
Access this video file through your registered Web edition at my.safaribooksonline.com/9780132174541/media.
Overriding Master Page Items
As explained earlier in this chapter, by applying master pages, you can ensure that all items placed on the master page are now placed on the document pages. Doing so enables you to keep the positioning of your master page objects consistent throughout the layout; however, there are always exceptions to the rule. When faced with those exceptions, you must override the master page items to change their position in the document layout.
Overriding master page items enables you to edit the item on the document page only. Any edits you make do not affect the original item on the master page.
Note that even if you override a master page item on a document page, it is still linked to the item on the master page. For example, if you were to change the fill color of a master page item on a document page by overriding it, any edits other than fill color that you make to the item on the master page are still applied to the master item on the document page. To unlink an overridden master page item from the original, select it on the document page, open the Pages panel menu, and choose Detach Selection from Master.
![]() LET ME TRY IT
LET ME TRY IT
Overriding Master Page Items on a Document Page
To edit a master page item that is applied to a document page, you must override it. You can override just one master page item or all master page items on a document page. To do so, follow these steps:
- To override one master item, press Cmd-Shift (Mac) or Ctrl+Shift (Win) and click the item on the document page.
- To override all master page items on a selected page or spread, choose Override All Master Page Items from the Pages panel menu, or press Cmd-Opt-Shift-L (Mac) or Ctrl+Alt+Shift+L (Win).
- To undo any overrides made to selected master page items on a page or spread, open the Pages panel menu and choose Remove All Local Overrides.
You can also detach overridden objects so that any changes to the master no longer affect the objects. To detach all overridden objects on a document page from the Master object, choose Detach All Objects from Master from the Pages panel menu.
Show Me: Media 4.4—Overriding Master Page Items
![]()
Access this video file through your registered Web edition at my.safaribooksonline.com/9780132174541/media.
Adding Page Numbers and Sections
With InDesign, you can apply auto page numbering and also create more than one numbered section in a document.
When you insert the special Auto Page Number character on applied master pages, the folios automatically number themselves. Learn to use this feature, and you’ll never have to correct any page numbering when adding, deleting, and moving pages in a document.
On a master page or spread, create a text frame where you’d like the page numbers to appear and then choose Type, Insert Special Character, Auto Page Number (see Figure 4.8), (or press Option-Shift-Cmd-N (Mac) or Alt+Shift+Ctrl+N (Win)). Apply the master to the document pages and watch the page numbers automatically appear. It’s like magic!
Figure 4.8. Insert the Auto Page Number character into a text frame on the master page or spread.

To start a new numbered section within a document, select a page in the Pages panel where you’d like it to start, and then choose Numbering & Section Options from the Layout menu or the Pages panel menu. Click the option button for Start Page Numbering At, and enter a page number in the data field. After they are applied, Auto Page Numbering characters recognize any changes made in the Numbering & Section Options dialog box.
By changing the settings in the Numbering & Section Options dialog box, you can also apply a custom prefix, a numerical style (Arabic, Roman numeral, letters, and so on), or a section marker (section number, chapter name) to the page numbering scheme.