
7. Using iPhoto ’11’s Simple Photo Editing Features
Learn how to edit your photos using the “quick fixes” built into iPhoto ’11 that can dramatically improve the look of your images in minutes.
One of the most useful features of iPhoto ’11 is its capability to quickly edit images using a collection of extremely powerful tools that are easy to use and quick to implement. Using these tools, you can improve upon or fix many of the most common photo problems with a few clicks of the mouse.
The editing and photo enhancement tools offered by iPhoto ’11 have been vastly improved over previous versions of the software. Clicking on the Edit command icon located in the lower-right corner of the iPhoto ’11 screen opens a collection of editing and photo enhancement tools divided into three main sections: Quick Fixes, Effects, and Adjust.
This chapter focuses on iPhoto ’11’s collection of six Quick Fixes editing tools and explains how to use them to improve the appearance of your digital images, allowing you to fix problems and give all your photos a more professional look.
Finding Quick and Easy Ways to Improve Your Photos
After you’ve imported your digital images into iPhoto ’11 and have organized them into Events and/or Albums, you might want to edit or enhance them before sharing them with friends and family.
As you’ll discover, the basic editing features offered by iPhoto ’11 allow you to improve upon or fix common problems in your photos, such as red-eye and lighting issues, with just a few clicks of the mouse.
These editing features, however, also allow you to perform tasks, such as reframing your image after the fact, so you can better position your main subjects in your photos, zoom in on your subjects, and take full advantage of the photo composition techniques you learned in Chapter 5, “Taking Professional-Quality Photos,” and Chapter 6, “Overcoming Common Mistakes and Mishaps.”
Note
iPhoto ’11 was designed to address the everyday needs of amateur photographers. Although the photo editing tools available to you are both powerful and easy to use, they’re not as extensive or robust as what you can find in some other highly specialized photo editing applications designed for serious photography hobbyists and professional photographers.
Depending on your goals, you can spend less than a minute editing a photo using iPhoto ’11 to fix basic problems or quickly improve its overall appearance. However, if you’re willing to spend more time editing and enhancing each of your images, you can utilize some of the program’s more advanced tools and ultimately wind up with some extremely impressive results.
Tip
Go ahead and experiment using the various photo editing and enhancement tools built into iPhoto ’11. If you use a tool that generates an undesired result, simply use the Undo command (under the Edit pull-down menu) or click on the Undo command icon to remove whatever edit or enhancement you just made. Or, if you want to start all over again editing that image, click on the Revert to Original command icon at the bottom of the Edit window or use the Revert to Original command under the Photos pull-down menu.
Even though it’s possible to revert any photo back to its original appearance using iPhoto ’11, it’s still a really good idea to create a backup of your images immediately after you import them from your digital camera (or whatever source they came from).
![]() To learn more about your photo backup options, see Chapter 18, “Burning Photos to CD or DVD from iPhoto ’11,” and Chapter 19, “Photo Backup Solutions.”
To learn more about your photo backup options, see Chapter 18, “Burning Photos to CD or DVD from iPhoto ’11,” and Chapter 19, “Photo Backup Solutions.”
Aside from maintaining a full backup of all your images, if you plan to make drastic alternations, edits, or enhancements to a single image, you might want to use the Duplicate command (under the Photos pull-down menu) to create an exact copy of that original image first. This way, you can have a copy of the original image and the newly created edited/enhanced image stored in the same Event folder or Album.
When you use the Duplicate command, the copy of the image is given a filename that begins the same as the original but ends with a version number. So, if the filename for the original image was FloridaSunset.jpg, when you use the Duplicate command, the newly created copy is called FloridaSunset-Version 2.jpg.
As you’ll discover, some of the editing and enhancement tools built into iPhoto ’11 allow you to drastically change the overall appearance of your images. For example, you can use the Crop feature (explained later in this chapter) to really zoom in on your main subjects and eliminate unwanted background (which serves the same purpose as the camera’s zoom lens while you’re shooting, except that you can do this after the image has been shot). You can also add some impressive special effects to an image, making it look totally different from the original.
Exploring iPhoto 11’s Edit Screen
The editing process in iPhoto ’11 begins when you select and highlight an entire Event or Album, or an individual photo, and then click on the Edit command icon located in the lower-right corner of the screen. You can also use the Edit Photo command under the Photos pull-down menu or press the Command + E keyboard shortcut. All three of these methods result in iPhoto ’11 displaying its Edit screen (see Figure 7.1).
Figure 7.1. iPhoto ’11’s main Edit screen.
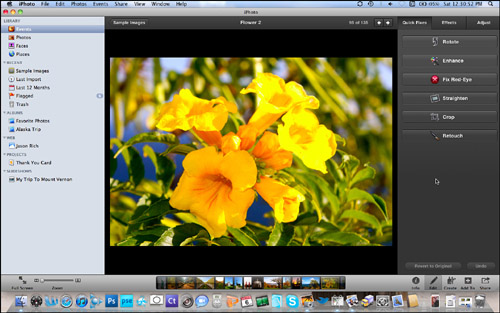
At the top of this screen, iPhoto ’11’s pull-down menus are still present (unless you switch to full-screen mode). Likewise, the Source list is displayed on the left side of the iPhoto ’11 screen (again, unless you switch to full-screen mode).
What’s new on the iPhoto ’11 Edit screen, however, is the Edit window, which appears on the right side of the screen, giving you access to all the program’s photo editing and enhancement tools and features.
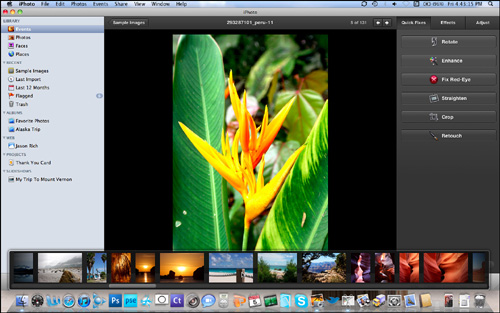
When you’re looking at a single image on the Edit screen, you’ll also discover the new Filmstrip feature displayed at the bottom center of the screen. It allows you to see other photos stored in the same Event or Album while you’re editing a single image in the main image viewing area. It also allows you to select and edit one of the photos displayed in the Filmstrip with a click of the mouse.
To enlarge the thumbnails displayed in the Filmstrip, simply drag your mouse over any of the Filmstrip images (shown in Figure 7.2). You can quickly access a single image from the Filmstrip to begin editing it by clicking on its thumbnail. When you do this, any changes made to the image you were previously working on are automatically saved.
Figure 7.2. The thumbnail images displayed in the Filmstrip at the bottom of the screen can be enlarged and selected by clicking the mouse on any image in the Filmstrip.
Using Full-Screen Mode When Editing
Utilizing iPhoto ’11’s new full-screen mode when editing offers several advantages. First, the main image you’re actually editing appears larger on your Mac’s screen, allowing you to see it with more detail. Second, there is less clutter on the screen because the pull-down menus and Source list are no longer displayed.
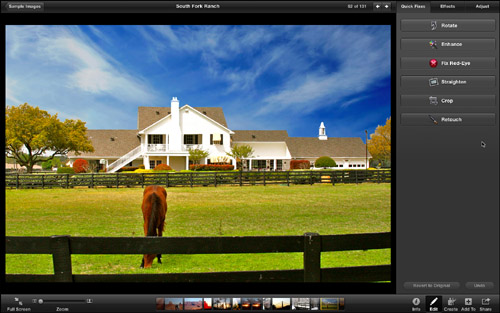
To access the full-screen mode when editing images like those shown in Figure 7.3, click on the Full Screen command icon or use the Full Screen command under the View pull-down menu. As you can see, editing in full-screen mode still gives you onscreen access to all the program’s editing tools and features in the Edit window, as well as at the bottom of the program screen.
Figure 7.3. Editing images in full-screen mode offers less onscreen clutter and allows you to see your image larger and in greater detail.
Improving Your Onscreen View with the Zoom Feature
Whether or not you’re in full-screen mode, you can really zoom in on various areas of the photo you’re currently editing or enhancing. You use the Zoom slider located in the lower-left corner of the screen to do this.
Move the slider to the extreme left (the default position), and your image is displayed as large as possible but so that it still fits on the screen (see Figure 7.4).
Figure 7.4. When the Zoom slider is to the extreme left, the entire image is displayed in the main image viewing area of iPhoto ’11.
As you move the Zoom slider to the right, however, the image is enlarged. When you do this, an additional Navigation window appears on the screen and can be moved around by the user. This Navigation window, shown in Figure 7.5, offers a thumbnail image of the entire photo you’re viewing. The small box in the window highlights the portion of the photo that’s currently visible in the large image viewing area.
Figure 7.5. When you use the Zoom slider, the small Navigation window appears in the main image viewing area.
Place the mouse in the Navigation window and move this box around by holding down the mouse button to reposition the portion of the enlarged image that’s currently visible in the main image viewing area.
The ability to zoom in on an image as you’re editing it allows you to pay close attention to its detail and adjust or fix minute details in the photo as you’re editing.
Regardless of which editing or enhancement features you plan to use, the ability to zoom in and get a close-up look at various areas of your images is extremely helpful.
Tip
Although you can use the Zoom slider to zoom in on any image (in regular viewing mode or in full-screen mode) as you’re editing, this feature also works when you’re simply viewing an image using iPhoto’s Events, Photos, Faces, or Places viewing modes.

SHOW ME Media 7.1—Using the Zoom mode when editing photos
Access this video file through your registered Web Edition at http://www.quepublishing.com.
![]() LET ME TRY IT
LET ME TRY IT
Using the Zoom Mode When Editing Photos
As you’re editing or enhancing your photos, sometimes being able to zoom in and get a very close-up look at a particular part of that image is helpful, especially if you’re using the Retouch or Fix Red-Eye editing features, for example. Follow these steps to utilize the Zoom while you’re editing a photo:
- Select and highlight the photo you want to edit from an Event, Album, or folder. Double-click on its thumbnail so you can view that single image in iPhoto’s main image viewing area.
- Click on the Edit command icon located in the lower-right corner of the screen. The Edit screen is displayed, with the photo you want to edit displayed in the main image viewing area. The entire image is visible (and resized accordingly to fit on the screen).
- Move the cursor over to the Zoom slider located in the lower-left corner of the screen. Using the mouse, hold down the mouse button and drag the Zoom slider to the right to zoom in on the image.
- As you move the Zoom slider, the small Navigation window appears on the screen.
- Use the Zoom slider to adjust how close up you want to view the image.
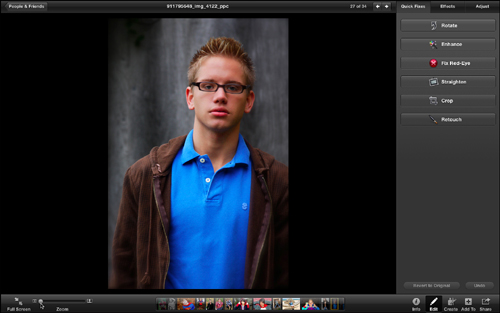
- Reposition the mouse so it’s inside the Navigation window, hold down the mouse button, and move the small box around to reposition the portion of the larger image that’s being viewed in the main image viewing area. For example, you can position the box in the Navigation window over the subject’s face in the photo to get a close-up view of his or her eyes.
- With a portion of the photo being viewed in much greater detail, you can utilize the various editing features and tools, such as Fix Red-Eye or Retouch, and fine-tune even the most minute details in a photo.
- When you’re ready to return the image to its normal viewing size, return the Zoom slider back to its default position (to the extreme left).
Using iPhoto 11’s Edit Window
One of the most notable changes in iPhoto ’11 (compared to previous versions) is the look and functionality of the Edit window, which appears on the right side of the screen when you access iPhoto ’11’s redesigned Edit screen.
At the top of the Edit window are three heading tabs, labeled Quick Fixes, Effects, and Adjust. Quick Fixes, which is the focus of this chapter, grants you access to six powerful editing tools, including Rotate, Enhance, Fix Red-Eye, Straighten, Crop, and Retouch.
If you click on the Effects tab at the top of this window, you’ll notice the content of the Edit window completely changes, giving you access to a variety of tools for adding effects to your images.
![]() To learn more about the Effects options, see Chapter 8, “Adding Effects to Your Images.”
To learn more about the Effects options, see Chapter 8, “Adding Effects to Your Images.”
If you click on the Adjust tab once again, the Edit window takes on a totally different appearance, giving you access to a wide assortment of more advanced image editing and enhancement tools.
![]() To learn more about the advanced editing and photo enhancement tools under the Adjust heading of the Edit window, see Chapter 9, “Advanced Photo Editing with iPhoto ’11.”
To learn more about the advanced editing and photo enhancement tools under the Adjust heading of the Edit window, see Chapter 9, “Advanced Photo Editing with iPhoto ’11.”
This chapter focuses on the Quick Fixes tools available from the Edit window. Regardless of which edit tools you’re working with, at the bottom of the Edit window, two command icons are always present.
The Revert to Original command icon allows you to restore an edited or enhanced image back to its original appearance, meaning that all the edits or enhancements you’ve made thus far to that image are removed and deleted.
The Undo command icon allows you to undo just the last editing or enhancement step you took.
Using the Quick Fixes Editing Tools
The six tools under the Quick Fixes tab in the Edit window are clustered together because they include the most commonly needed resources to quickly fix a problem with a photo or improve its appearance.
Each of these six tools is designed to be used in a minute or less to help you achieve professional-looking results when editing your images without putting in too much time and effort.
Note
You can use each of the six tools available under the Quick Fixes tab independently to achieve a specific result, or you can use several of these tools, one at a time, on the same image. You can also mix and match the enhancement and editing tools you need from the Effects and Adjust menus and use each tool in whatever order you desire to improve the appearance of each image you edit.
SHOW ME Media 7.2—See demonstrations of the Quick Fixes editing features
Access this video file through your registered Web Edition at http://www.quepublishing.com.
![]() LET ME TRY IT
LET ME TRY IT
Using the Six Quick Fixes Editing Features
To quickly improve the overall look of your images by fixing common problems or adjusting their overall appearance, follow these steps:
- Select and highlight a photo you want to edit from an Event, Album, or folder. Double-click on its thumbnail so you can view that single image in iPhoto’s image viewing area.
- Click on the Edit command icon located in the lower-right corner of the screen. The Edit screen is displayed, with the photo you want to edit displayed in the main image viewing area. The entire image is visible (and resized accordingly to fit on the screen).
- If it’s not already being displayed, click on the Quick Fixes tab at the top of the Edit window to display the six Quick Fixes command icons: Rotate, Enhance, Fix Red-Eye, Straighten, Crop, and Retouch.
- Click on one of these six Quick Fixes icons to use that editing feature on the photo you’re currently editing. Start with the Enhance command, for example, to automatically adjust an image’s contrast, coloring and other related elements with a single click of the mouse.
Rotate
The purpose of the Rotate command icon in the Edit window is straightforward. Each time you click on this icon, the image you’re editing (that’s displayed in the image viewing area) is rotated to the left by 90 degrees. So, if you want the photo rotated 180 degrees, you click this icon twice.
When you exit iPhoto ’11’s Edit mode or start editing another image, all changes, edits, or enhancements made to the current image are automatically saved. The filename for the edited image remains the same, unless you manually change it.
Tip
If you have two images that look very similar and you want to view and edit both of them simultaneously, select and highlight them both before clicking on the Edit command icon. When you do this, both images appear side by side in the main image viewing area as you edit your photos. You can, however, edit only one image at a time. The image you’re currently working with (the active image) is surrounded by a white box. To remove one of the images from the main image viewing area, click on the small, circular X icon located in the upper-left corner of the white box surrounding the active photo.
Enhance
The auto Enhance feature is useful for quickly improving the lighting (exposure), contrast, color vibrancy, and other qualities of an image, literally with a single click of the mouse. When you use this feature, iPhoto ’11 automatically analyzes the image and makes whatever adjustments it deems are necessary to improve the overall look of your photo.
When you click the Enhance command icon, within a few seconds, the changes that are automatically made to your photo are displayed in the main image viewing area. Most of the time, you see a noticeable improvement in the look of your photos. However, if you don’t like the results, simply click the Undo command icon located in the lower-right corner of the screen.
Tip
To view a “before” and “after” version of the photo you’re editing in the main image viewing area, after you execute some type of edit, with the image still visible in the main image viewing area, press and hold down the Shift key on the keyboard to see the “before” version. To return to that “before” version and not save the changes just made, click on the Undo command icon. Otherwise, when you leave the editing mode or start editing another image, your changes are saved.
Even if you like the outcome when you click on the Enhance command icon, you can still fine-tune various settings to further improve your image using the editing features available in the Effects and Adjust sections of the Edit window.
Fix Red-Eye
One of the most common problems photographers have when using a camera’s flash is that it causes red-eye on the living subjects in their photos. In Chapter 6, you learned several strategies for overcoming this problem while shooting. However, if the photos you’ve imported into iPhoto ’11 suffer from the red-eye effect (and the people in your photos look as though they’ve been possessed by the devil), you can use the Fix Red-Eye feature to quickly eliminate this problem.
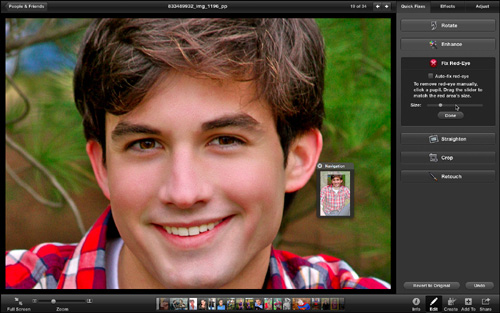
When you click on the Fix Red-Eye command icon, the Edit window expands, as shown in Figure 7.6, to include additional options. You can have iPhoto ’11 automatically try to fix the red-eye problem in your photo by using the mouse to place a check mark in the box titled Auto-Fix Red-Eye (if it’s not already checked by default). This approach works between 80% and 90% of the time to remove the red-eye problem from your photos.
Figure 7.6. You can have iPhoto ’11 fix the red-eye problem automatically, or you can fix it manually.
If using the Auto-Fix Red-Eye option doesn’t work, you can manually fix the problem in less than 30 seconds. Start by unchecking the “Auto-Fix Red Eye” option. With the Fix Red-Eye options displayed in the Edit window, move the cursor to the main image viewing window, close to your subject’s eyes. Notice that the cursor is now shaped like a round target.
Using the Size slider displayed back in the Edit window’s Fix Red-Eye section, move the slider left or right until the target cursor is the same size as the currently red eyeballs of your subject in the photo displayed in the main viewing area.
After you adjust the target cursor to the right size, move the cursor over each eyeball so the circular target fully surrounds the eyeball and click the mouse button once. Repeat this step for each eye affected by red-eye.
Tip
As you’re manually fixing red-eye within a photo, it’s often helpful to use the Zoom feature to get an extreme close-up view of each subject’s eyes, allowing you to more accurately size the Fix Red-Eye target cursor and place it over each eyeball. If the target isn’t properly centered over the eyeball, the “fix” won’t look right. In this case, click the Undo command icon and try again.
Straighten
In Chapters 5 and 6, you learned that it takes a steady hand to shoot crystal-clear and well-framed, properly composed images. However, there are plenty of situations when holding the camera perfectly still (and level) simply isn’t possible.
For example, you may try snapping photos in a moving car, boat, or bus or while chasing after your kids. Whatever the reason, if you happened to snap a photo while not holding the camera level, this too is an easy fix after the fact using the Straighten tool built into iPhoto ’11.
Tip
Some tripods actually have a leveler built in, so you can determine (before snapping a photo) if the camera is perfectly level.
If your photo appears crooked, click on the Straighten command icon. When you do this, two things happen. In the main viewing area, the image you’re editing is overlaid with a yellow grid composed of straight horizontal and vertical lines. These gridlines are added to help you straighten your photo and are only temporary. They automatically disappear when you’re done using this feature.
You’ll also notice that in the Edit window, the Straighten command icon has expanded and now displays a slider labeled Angle. While holding down the mouse button, move this slider slowly to the left or right to straighten your image. Moving the Angle slider to the left rotates the image slightly to the left. Likewise, moving the Angle slider to the right rotates the image in a rightward direction.
Use the yellow grid that’s displayed in the main image viewing area to help determine when your image is straight. After you make the proper adjustments, click on the Done icon located directly below the Angle slider to finalize your edits. Alternatively, click the Undo icon to return the image to its original crooked appearance and try again.
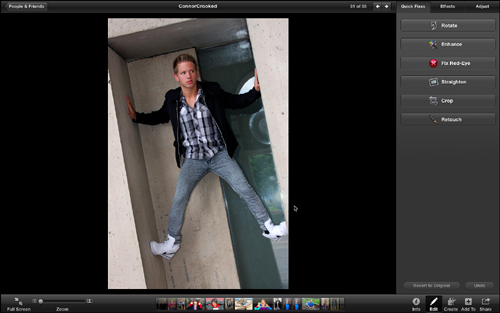
Figure 7.7 shows an example of a crooked photo before iPhoto ’11’s Straighten feature was used. This crooked image was caused because the photographer didn’t hold the camera level when snapping the photo. In Figure 7.8, you can see the newly straightened image after the Straighten feature of iPhoto ’11 was used.
Figure 7.7. When this photo was shot, the photographer didn’t hold the camera level, resulting in this crooked image.

Figure 7.8. Using the Straighten tool in iPhoto ’11, you can easily fix crooked images.

Tip
Make very slow and subtle movements as you’re adjusting the Angle slider while using the Straighten feature. Pick something displayed in the image itself that’s straight and use the yellow gridlines as guides to make your adjustments.
Sometimes, you can add some really interesting visual effects by purposely making an image look crooked (either by holding the camera at a strange angle while shooting or making the adjustments after the fact using the Straighten tool in iPhoto ’11). Figure 7.9 shows an example of a photo that looks more visually interesting when rotated slightly (on purpose) using the Straighten command. In this case, the feature was used to unstraighten the image.
Figure 7.9. Sometimes, making an image look crooked adds an interesting visual or artistic element to the photo.
Crop
The main purpose of the Crop feature built into iPhoto ’11 is to allow you to remove unwanted areas of a background from an image and put more attention on your main subject.
However, this feature can also work instead of (or in addition to) a camera’s zoom lens and allow you to choose your subject in a photo that’s already been shot and really zoom in on that subject, creating a close-up image (see Figure 7.10). This feature works particularly well if you’re using a high-resolution digital camera, and the shot itself was taken using the highest resolution possible for that camera.
Figure 7.10. The Crop tool can be used to zoom in on a subject and create a close-up image featuring that subject.
Caution
If you attempt to zoom in too closely on a subject in an image that wasn’t shot using a high enough resolution digital camera, you’ll notice that unwanted pixelation occurs. You can clean up some of this “digital noise” using the De-Noise feature under the Adjust tab of the Edit window, or you may have to zoom in less on your intended subject using this method.
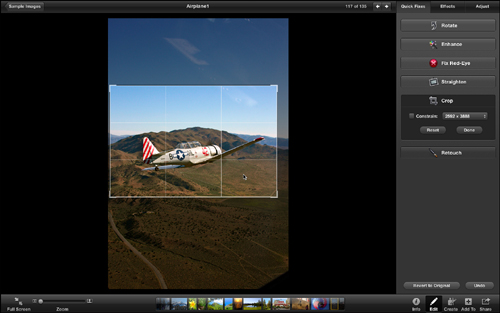
Another use of the Crop feature is to reframe an image after the fact, allowing you to take the “Rule of Thirds” into account. Figure 7.11 shows how you can cut out some unwanted background, reposition your main subject, and reframe an image after it’s been shot.
Figure 7.11. You can use the Crop tool to reframe an image, allowing you to incorporate the “Rule of Thirds” after the fact.
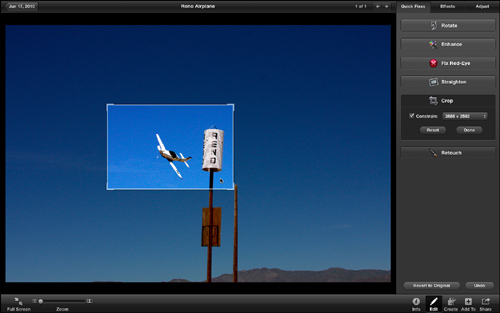
In this case, the photographer zoomed in on the main subjects, the airplane and the pylon (see Figure 7.11), and positioned these two subjects more toward the right side of the frame (keeping the “Rule of Thirds” in mind). The photographer also took into account the direction the airplane was traveling and allowed plenty of sky on the left side of the image to add a sense of motion. People viewing the photo can imagine where the airplane is headed.
What started as a wide shot with little of interest for someone to focus on (and lots of blue sky) wound up as an interesting close-up image that is nicely framed using the photo composition techniques covered in Chapters 5 and 6.
The Crop tool has several uses when editing digital images, each of which can dramatically improve or change the overall appearance of a photo.
Putting the Crop Feature to Use
To begin using the Crop feature, click on the Crop command icon located in the Edit window. It’s one of the Quick Fixes options. After you click on this icon, additional Crop options are displayed in the Edit window (see Figure 7.12). For example, you have the option to place a check mark next to the Constrain label and then adjust the size of the image.
Figure 7.12. This is what the Edit window looks like after you click on the Crop command icon.
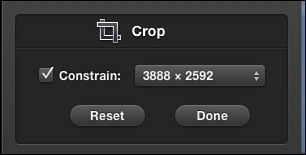
Adding a check mark here is important if you plan to create hard-copy prints of your images in a standard size, such as 4" × 6", 5" × 7″, or 8" × 10". If you don’t constrain your crops, the image size and shape you end up with won’t be appropriate for printing in a standard size print. So, as a general rule, add the check mark next to the Constrain label.
As for the image size option located next to the Constrain label, the default is the image’s current size. Unless you know specifically how you’ll be using the image later, leave the default option alone.
However, if you know you’ll want to create an 8" × 10" print, generate a 20" × 30" poster-size enlargement, or display the image as a wallpaper on your iPhone, for example, you can choose one of the other image size options.
When you click on the Constrain check box and a check mark appears, in the main image viewing area, you see a white box, which you can resize using the mouse. What you see in the white box determines how you’ll crop your image (and cut away unwanted background). What appears in the white box is exactly what the image will look like after it’s cropped.
Notice that each corner of the white box is highlighted. While holding down the mouse button, go to any corner of this white box and move the entire box inward or outward, on a diagonal, to resize the box and/or zoom in on a subject in your photo.
If you place the mouse anywhere in the white box (as opposed to at one of the corners) and hold down the mouse button, you can reposition the box anywhere in the current photo. When you do this, a white “Rule of Thirds” grid appears to help you reframe your image.
Remember, whatever you see in the white box is what your image will look like after the Crop is finalized. After you resize and/or reposition the white box in your image, click on the Done icon in the Edit window to save your edits. Your newly cropped image is displayed in the image viewing area.
Tip
If you make a mistake when cropping your image, you can reset the size of the white box by clicking the Reset command icon that appears in the Edit window, or you can use the Undo command.
Not placing a check mark next to the Constrain label in the Edit window allows you to alter the size and shape of the white box any way you desire. For example, you can move the mouse to any edge or side of the white box and move it inward or outward. The result, however, is an odd-shaped or nonstandard size image that may be difficult to print in a standard size. For other purposes, such as online viewing, cropping an image without the Constrain option checked works fine.
SHOW ME Media 7.3—See how to crop an image to create a close-up of your subject
Access this video file through your registered Web Edition at http://www.quepublishing.com.
Cropping an Image to Create a Close-Up
One of the uses of the Crop feature is to be able to really zoom in on a subject, eliminate much of the ancillary background, and create a close-up of your subject. Follow these steps to do this:
- Select and highlight the photo you want to crop from an Event, Album, or folder. Double-click on its thumbnail so you can view that single image in iPhoto’s image viewing area.
- Click on the Edit command icon located in the lower-right corner of the screen. The Edit screen is displayed, with the photo you want to edit displayed in the main image viewing area.
- Click on the Crop command in the Edit window. It’s one of the Quick Fixes options.
- Place a check mark next to the Constrain label by clicking the mouse on the check box.
- When the white box appears in the main image viewing area, resize the box around your subject, so you can zoom in on just that main subject and get rid of unwanted background (see Figure 7.13).
Figure 7.13. Use the Crop feature to select an object in a photo and create a close-up image featuring that subject.
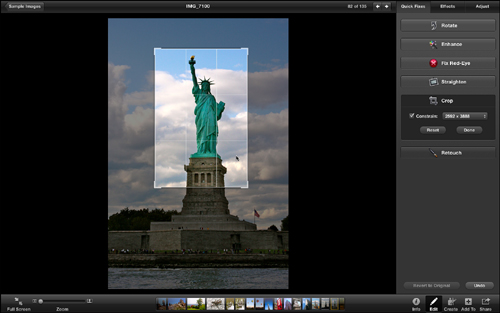
- Reposition the box to frame your subject in the image.
- Click on the Done icon in the Edit window.
Retouch
The Retouch command enables you to remove unwanted blemishes or small objects from a photo. It works like a magical paintbrush that simply erases what you don’t want and then re-creates a new background in that area to blend in with the rest of the photo.
You can use Retouch to remove wrinkles, pimples, or scars from someone’s face or body in a photo or to get rid of some other small object that appears in the photo.
Warning
The Retouch tool built into iPhoto ’11 is useful for removing small unwanted items or objects within a photo, but if you want to keep the photo looking natural, you should use this tool sparingly and only in small areas. For example, you might use it to remove a blemish on someone’s face within a portrait.
When editing a photo, to use the Retouch tool, click on the Retouch icon, which is one of the Quick Fixes options in the Edit window. When you do this, a slider labeled Size appears. It controls the size of the Retouch tool you use when you move the cursor over to the main image viewing area.
Notice the cursor takes on a circular appearance when you move the mouse cursor into the main image viewing area. The size of this circle is determined by the Size slider adjustments you make. Move the slider left to shrink the size of the circular cursor or move it to the right to enlarge the cursor’s size.
Tip
As you’re using the Retouch tool, it’s often helpful to use the Zoom feature to get an extreme close-up view of what you’re trying to remove from that photo.
Based on what you’re trying to remove from the photo, adjust the Retouch cursor size accordingly. Then position the cursor directly over whatever you want to remove, press and hold down the mouse button, and make slight up-and-down or small circular movements around the area of the object you want to remove, as if you’re using a pencil eraser.
When you release the mouse button, iPhoto automatically erases whatever object you attempted to retouch and replaces it with a background that matches whatever surrounded that object, creating a seamless blend that you won’t even notice.
Depending on the object you’re trying to retouch and the complexity of the background in the photo, the level to which this feature works well (and keeps the photo looking realistic) varies. You might need to repeat the Retouch procedure a few times, slightly adjusting the size of the Retouch tool with each attempt to create a natural look as you attempt to erase something from the photo.
When you achieve the results you desire, click the Done icon located directly under the Size slider in the Edit window to save your edits. Alternatively, use the Undo command to erase the edit you just made and redo it.
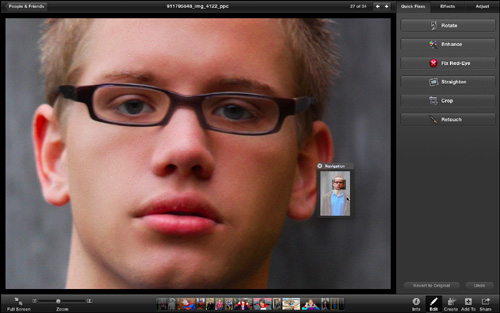
Figure 7.14 shows how you can easily edit someone’s face and remove unwanted blemishes, pimples, or wrinkles, for example. In this figure, the Duplicate command was used to make two copies of the same image. Both images were selected and highlighted before the Edit command icon was clicked so they would appear in the main image viewing area simultaneously (for demonstration purposes).
Figure 7.14. Removing blemishes from a portrait of someone’s face is easy using the Retouch tool in iPhoto ’11.
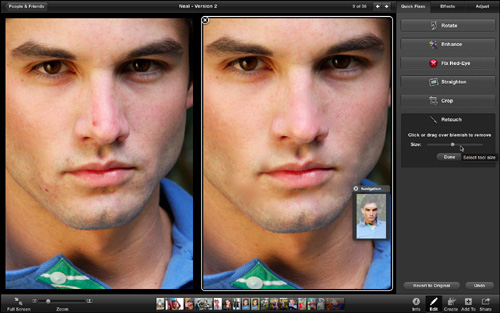
The Retouch tool was then used on the photo located on the right, after the Zoom feature was used to move in close on the subject’s face to see the area to be retouched in greater detail. The Retouch command was used to clean up the subject’s complexion and remove unwanted blemishes. To accomplish this, the Retouch tool was used to paint over what needed to be removed from the subject’s nose and mouth area. When you compare the “after” image on the right with the “before” image on the left, you can see how useful the Retouch tool can be.
Out of all the editing tools offered in iPhoto ’11, this one takes the most practice to use correctly (and to make your retouch edits look natural in the photo), yet how to use it is a relatively straightforward process.
Note
If your editing needs go beyond what the Retouch tool is capable of doing when it comes to removing something unwanted from a photo (such as an entire background or a large object that’s in front of a highly detailed background), you probably need to use alternate photo editing software, such as Apple’s Aperture 3, Adobe’s Photoshop Elements 9 ($79.99, www.adobe.com/products/photoshopel), or the professional-level Adobe Photoshop CS5 ($699.00, www.adobe.com/products/photoshop). For editing portraits of people and making the subjects look flawless in just minutes, the Portrait Professional 10 ($49.95, www.portraitprofessional.com) is an incredibly easy-to-use yet very powerful editing program.