
12. Creating Prints Using a Professional Photo Lab
Learn how to order prints directly from iPhoto ’11 or use another photo processing service.
While you’re viewing your photos in iPhoto ’11, with a few clicks of the mouse, you can order custom prints of your favorite images without ever leaving the program. Your photos are automatically uploaded to Apple’s photo lab, printed, and shipped directly to your door within a few days. After you input your credit card information once, ordering prints becomes a fast and convenient process.
Aside from Apple’s own photo lab, however, there are literally hundreds of online photo processing services that allow you to upload your image files and have prints shipped to your door. The prices for these services are as varied as the print sizes and product quality offered. Plus, many different additional products and services are provided by these online-based photo labs.
By exporting your images and saving them onto some type of portable media, such as a flash drive, CD, or DVD, you can also take your digital images into a local one-hour photo processor or professional photo lab and have prints created while you wait.
This chapter focuses on using a professional photo lab or photo processing service to create standard-size prints (4" × 6", 5" × 7", or 8" × 10", for example) from your digital images and discusses your various options based on what services are available (as well as their convenience factor, processing time, quality, and cost).
Using the Order Prints Feature in iPhoto ’11
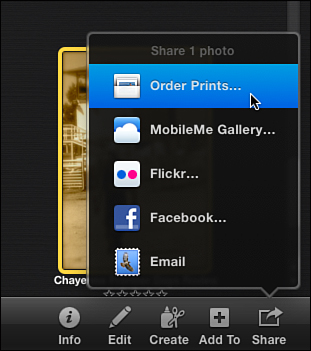
As you view your photos in any of the viewing modes of iPhoto ’11, at any time you can highlight and select one or more images, click on the Share command icon (located in the lower-right corner of the screen), and choose the Order Prints option (see Figure 12.1). You can also use the Order Prints command under the File pull-down menu.
Figure 12.1. Order prints in iPhoto ’11 using the Order Prints command available when you click on the Share command icon.
If you want to use this feature, your Mac must be connected to the Internet, and you need a debit or credit card to set up an Apple ID account and pay for your online orders.
When you view the Order Prints screen, shown in Figure 12.2, it displays a thumbnail of each image you selected on the left side of the screen. Here, you can manually enter the number of wallet-size, 4" × 6", 5" × 7", 8" × 10", 16" × 20", or poster-size 20" × 30" prints you’d like to order of each image. The price per image is also displayed on this screen.
Figure 12.2. The Order Prints screen.

In the upper-right corner of the screen is a Quick Order field. From the pull-down menu, select the print size you want. Use the tiny up- or down-arrow icons next to the pull-down menu to determine how many of each size print you want to order. Your selections are automatically entered into the main Order Prints screen, and your order subtotal is calculated. This feature is particularly useful if you’re ordering the same number of prints (in the same size) of multiple images. Prices for prints range from a few cents to around $15, depending on size.
Note
Although Apple’s prices for prints are extremely competitive, there is an additional shipping and handling fee of at least $2.99 per order; plus, local sales tax is added.
After selecting what size prints you want to order and how many copies of each size print you want, click on the Buy Now icon located in the lower-right corner of the Order Prints screen. To cancel your order and exit this option, click on the Cancel icon located to the left of the Buy Now icon.
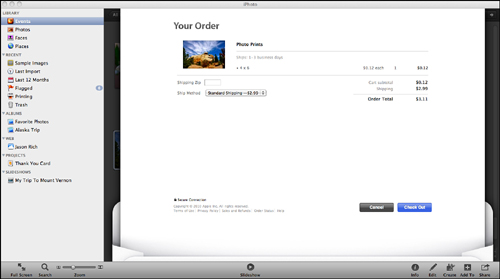
The Your Order screen replaces the Order Prints screen when you click on the Buy Now icon (see Figure 12.3). This screen displays a summary of your order, automatically adds Apple’s shipping and handling fee to the subtotal, and prompts you to enter the ZIP Code for the address where the order will be shipped so that the local sales tax can also be added to the subtotal.
Figure 12.3. The Your Order screen.
To continue processing your order, click on the Check Out icon located in the lower-right corner of the screen. The Sign In screen then appears. If you already have an iTunes or Apple ID account set up, enter your iTunes or Apple ID username under the Returning Customer prompt on the left side of this window, followed by the password associated with the account. Click the Sign In icon (located below the Password field) to continue processing your order.
![]() If you don’t yet have an iTunes or Apple ID account set up, see the “Setting Up Your Apple ID Account” section later in this chapter.
If you don’t yet have an iTunes or Apple ID account set up, see the “Setting Up Your Apple ID Account” section later in this chapter.
The final step in the Print ordering process involves reviewing your order from the Confirm Order Details screen and manually entering the security code associated with the credit or debit card you have on file.
From this Confirm Order Details screen, you also have the following options: Edit Shipping Information (change the address where the order will be shipped), Edit Payment (change the credit card used to pay for the order), Edit Order (modify which prints or the number of prints you want to order), or Enter Promo Code (used if you have an Apple-approved discount available to you). To adjust any of these settings, click on the applicable blue-colored link displayed in the Confirm Order Details screen.
To finalize and process your order, click on the Place Order icon located in the lower-right corner of the Confirm Order Details screen. Your order is automatically processed, printed, and shipped within a few business days.
Within a few minutes after finalizing your order, you’ll receive an email from Apple confirming the order. Another email will be sent within one to three business days, informing you when your order has shipped. Then, within a few more days, your prints will arrive at your door (sooner if you paid for express shipping).
Note
All prints smaller than 8" × 10" ordered from Apple’s photo lab directly in iPhoto ’11 are printed with a glossy finish, and the prints do not include borders around them. Larger-size prints are given a matte finish. Customers are not currently able to customize this option. Full print customization is available from other online photo processors, however.

SHOW ME Media 12.1—See how to use the Order Prints command in iPhoto ’11
Access this video file through your registered Web Edition at http://www.quepublishing.com.
Ordering Prints in iPhoto ’11
Follow these steps to quickly order prints in iPhoto ’11:
- Select and highlight one or more images in iPhoto ’11 for which you want to order prints. You can do this from the Events, Photos, Faces, or Places viewing mode or from any Album or Folder.
- Click on the Share command icon and choose the Order Prints command.
- From the Order Prints screen, enter the number of prints you want that corresponds with the print sizes listed. Leave the quantity field for unwanted print sizes set at zero. Click on the Buy Now icon to continue.
- When viewing the Your Order screen, enter the ZIP Code for where the order will be shipped and choose between the standard or express shipping method. Click the Check Out icon to continue.
- From the Sign In screen, enter your iTunes or Apple ID account information into the Returning Customer section of this window. If you’re a new customer, click on the blue Create Apple ID link now (it’s located on the right side of the screen, under the New Customer? heading).
- When the Confirm Order Details screen appears, enter the security code for the credit or debit card you have on file. You can also click on any of the blue-colored links on the screen to make adjustments to the order. These links include Edit Shipping, Edit Payment, Edit Order, and Enter Promo Code.
- Click on the Place Order icon in the lower-right corner of the Confirm Order Details screen to finalize and process your order. Your order will be shipped within one to three business days.
Tip
To learn more about the Print products available from Apple via iPhoto ’11, visit www.apple.com/ilife/print-products.html.
Setting Up Your Apple ID Account
With an Apple ID account, you can quickly place orders for prints, as well as for any other Photo Projects you create in iPhoto. The same Apple ID can be used for making purchases in iTunes, or from the online Apple Store, iWork applications, other iLife applications, or Apple’s MobileMe service.
An Apple ID account needs to be set up only once. When you set up the account, you are asked to create a username and password for the account and enter all your personal information, including your full name, address, phone number, email address, and credit card (or debit card) information.
Your Apple ID account information is kept securely by Apple, so you can quickly place orders without constantly having to re-enter your personal information and credit card details.
Setting up an Apple ID takes just minutes. When placing an order for the first time in iPhoto ’11, click on the Create Apple ID link under the New Customer? heading when you see the Sign In screen. Fill in the prompts when the Create an Apple ID window appears.
Note
If you already use iTunes on your Mac (possibly in conjunction with your iPhone, iPad, or iPod), you may already have an Apple ID account established.
Exporting Your Images and Uploading Them to Another Online-Based Photo Lab
Ordering prints from Apple’s photo lab in iPhoto ’11 offers convenience, but this isn’t a full-service photo lab. Your print choices are limited to just six popular print sizes, and you cannot decide on a custom print finish (such as matte, semi-gloss, glossy, or luster), nor can you choose whether you want a thin white border to appear around each of your prints. When you order smaller-size prints from Apple, your prints will have a glossy finish. Images printed larger than 8” × 10” will have a matte finish.
If you want more options when ordering your prints, you can export your images from iPhoto ’11 and then upload them to any online-based photo lab. See Appendix A, “Digital Photography Websites,” for a partial listing of these services.
Each of these online services offers a different selection of print products and product options (such as print sizes and paper finishes), charges different prices, and offers a different level of quality. Ultimately, you should visit a few of these services on the Web, have a few sample images printed, and decide which you’d like to order prints from over the long term.
To use any of these online-based photo labs, first export your images into .JPEG or .TIFF files using the highest resolution and file size possible. How to do this is explained in Chapter 10, “Exporting Your Images.” Next, visit the online photo service’s website and follow the provided directions for uploading and ordering prints. You order prints and visit the lab’s website using your Mac’s web browser (such as Safari). This can’t be done in iPhoto ’11 unless the photo service offers an iPhoto ’11 plug-in (described in Chapter 11, “Printing Photos Using Your Own Home Photo Printer”).
Tip
In addition to being able to order prints, you can order a wide range of photo products from these online photo labs, including mouse pads, posters, T-shirts, calendars, buttons, magnets, wall clocks, blankets, greeting cards (including custom-printed holiday cards), and dozens of other products that can be imprinted with your full-color photos.
Taking Your Digital Images to a One-Hour Photo Processor
If you’re impatient or just in a hurry to have prints created from your digital images, you have the option of exporting your images from iPhoto ’11 to some type of portable media, such as a flash drive, CD, or DVD, and then taking those digital images into any one-hour photo lab or professional photo lab in your area to have prints made while you wait.
The benefits to using one-hour photo labs include the following:
• They’re local—Most large pharmacies, including Walgreens, Rite Aid, and CVS, for example, have one-hour photo labs, as do most Target and Walmart locations. If you live or work near a mall, chances are there’s a Ritz Photo or another one-hour lab there as well.
• You can wait for your prints—A one-hour photo lab generally takes 60 minutes or less to create prints from your digital images, so you can wait for them.
• You can see the results quickly—You don’t have to wait more than one hour to have the prints in your hands and see the finished results. If there’s a problem, you can have the one-hour processing service fix it immediately.
• There are no shipping and handling charges—All the online-based photo services charge a shipping and handling fee of at least several dollars. If you need only one or two prints made, the cost of the prints might be under $0.50 each, but you wind up having to pay several dollars extra for shipping.
• Sometimes, you can print the photos yourself—Many one-hour photo labs, as well as FedEx Office locations, tourist attractions, and pharmacies, for example, have do-it-yourself photo kiosks, like the Kodak Picture Maker. You can insert your camera’s memory card, a flash drive, CD, or DVD that contains your digital images and then use the kiosk’s touch screen to pick and choose your print options. You can have prints created in standard sizes up to 8.5" × 11" in less than five minutes. (To find a Kodak Picture Kiosk location near you, visit www.Kodak.com, select the Kodak Store pull-down menu, and choose the Kodak Picture Kiosk option.)
Caution
Although one-hour photo processing locations are fast and inexpensive, you almost always wind up with higher-quality prints if you take your digital images to a professional photo lab instead. The one-hour photo processors use a completely computerized processing system, with little human interaction. Thus, there’s nobody to fine-tune or adjust the processing equipment and perform manual color correction based on the needs of your particular images. Your prints typically receive more personalized attention if you use a professional photo lab. However, you pay more.
Taking Your Digital Images to a Professional Photo Lab
Instead of taking your photos to a one-hour processor to have prints created, you almost always wind up with higher-quality results if you have your digital images processed by a professional photo lab.
To find a professional photo lab in your area, check the Yellow Pages or do a Google search using the phrase “Professional Photo Lab, [your home city].” These labs are staffed by trained personnel who manually check the quality of your images as they’re being processed. These labs also typically use higher-quality inks and photo paper and give you a broader range of options in terms of print sizes and photo paper finishes.
Using a professional photo lab to create prints from your digital images almost always costs a bit more, but from a quality standpoint, it’s worth the expense. Plus, most labs can create prints while you wait or within a few hours.
Many photography specialty stores also offer professional photo lab services, and many are independently owned and operated by highly skilled photographers.
