
Chapter 15
Case Study
This case study brings together all the principles established in the rest of the book. It covers the RTL design of a synchronous system, the design of test benches to test it and the results from those tests.
The example is a low-pass digital filter and the case study shows how the original specification is gradually converted into an RTL design suitable for logic synthesis, with an exploration of the design space to find an optimum data representation and precision for the filter calculations.
The example also shows how test benches are written for this design that explore the frequency response of the filter and verify that the specification has been met.
The specification is a Low-Pass digital filter with the following characteristics:
Maximum Frequency: 80 kHz;
Cut-off Frequency: 20 kHz;
Transition Bandwidth: 10 kHz;
Stop-band Attenuation: 18 dB.
The maximum frequency is the highest input frequency that the filter can handle.
The cut-off frequency is the end of the pass band and the frequency at which the gain should start to drop off.
The transition bandwidth is the frequency gap between the cut-off frequency at the end of the pass band and the beginning of the stop band.
The stop-band attenuation is the reduction in signal power for frequencies in the stop-band.
For this example the cut-off frequency is set at 20 kHz, the transition bandwidth is 10 kHz, so the stop band starts at 30 kHz at which point the specification requires at least 18 dB attenuation.
This is illustrated by the pass-band diagram in Figure 15.1.
Figure 15.1 Pass-band diagram for the low-pass filter.

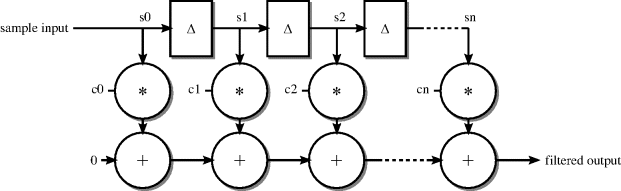
The implementation of this filter will use a simple Finite Impulse Response (FIR) digital filter design.
An FIR filter is expressed by a simple formula whereby the current output zn is calculated from the current input sample xn and previous samples xn−1, xn−2, etc. combined with the filter coefficients c0, c1, c2, etc.
![]()
This formula can be simplified by replacing the samples with the contents of a delayed sample store such that si is the stored input sample from i samples earlier. Thus, s0 is the current sample, s1 is the previous sample and so on. In other words, si stores the value xn−i. At each new sample, the stored samples move so that the new value becomes s0, the previous s0 becomes s1 and so on. Using this simplification the formula becomes:
![]()
This is illustrated by the block diagram in Figure 15.2.
Figure 15.2 Block diagram of the FIR filter.
Digital filter theory is beyond the scope of this book. The theory behind this system-level design is explained further in an online tutorial (Robin,).
The first system-level design decision to be made is which window function to use when choosing filter coefficients. The window function does two things. First, it imposes a limit on the number of coefficients, otherwise the theoretical number of coefficients is infinite. Secondly, it optionally applies a taper so that older samples contribute less to the output than recent ones. This tapering gives the filter a flatter pass band and a higher attenuation in the stop band than a design without the taper. There are a number of window functions with different tapers that result in different filter characteristics. However, the price of tapered window functions is that they add more stages to the filter. For this example, to keep the design simple, a rectangular window function will be used. This is the simplest window function of all that limits the number of stages but does not apply a taper. It has the disadvantage that the pass band is not completely flat: there can be about 1–2 dB variation in the frequency response across the pass band. Also, a rectangular window filter is limited to a maximum of 21 dB attenuation in the stop band, but that is sufficient for this design.
The next stage is to determine the number of stages in the filter, known as the order of the filter. The order N is directly related to the window function and the two key frequencies: the maximum frequency Fmax and the transition bandwidth FT.
![]()
The value k is a scale factor that depends on the window function.
So, rearranging this to get a formula for N:
![]()
For the rectangular window function, k = 1.84. Substituting the design objectives for this filter we get:
![]()
The filter order must be an even number, so to meet this specification we need N to be at least 16. This results in 17 coefficients, since the calculation uses the current sample plus 16 previous ones.
The final stage of the system-level design is to calculate the coefficients. This is a complex calculation involving a Fast-Fourier Transform (FFT). So, for this example an online filter-design program (Robin,) was used that did this step automatically. The program gave the coefficients listed in Table 15.1.
Table 15.1 Filter coefficients for the low-pass filter.
| Stage | Coefficient |
| 0 | 0.0368626 |
| 1 | 0.019574609 |
| 2 | −0.023181587 |
| 3 | −0.05903686 |
| 4 | −0.04914286 |
| 5 | 0.02388607 |
| 6 | 0.13902785 |
| 7 | 0.2445255 |
| 8 | 0.28715014 |
| 9 | 0.2445255 |
| 10 | 0.13902785 |
| 11 | 0.02388607 |
| 12 | −0.04914286 |
| 13 | −0.05903686 |
| 14 | −0.023181587 |
| 15 | 0.019574609 |
| 16 | 0.0368626 |
Note that the coefficients have a mirror symmetry around coefficient 8. For example, coefficient 0 is the same as coefficient 16. This is a consequence of using a rectangular window function.
The next stage is to decide how this theoretical system-level design is to be implemented as an RTL design. The basic calculation for the filter is a 17-stage multiply-accumulate calculation. In designing the hardware, a key decision is how many multipliers to use because we know that multipliers are large circuits. For a high-performance design, it might be necessary to have several, even as many as 17, multipliers. For a low-performance design it is almost certainly worth using only one.
From the maximum frequency we can immediately deduce one of the design characteristics:
Minimum Sample Frequency: 160 kHz.
This is because, for DSP applications, the minimum sample frequency is always twice the maximum frequency of the system. Since the maximum frequency in the specification is 80 kHz, it follows that the minimum sample frequency is 160 kHz. This is a low sample frequency for even an FPGA-based design and suggests that the design can easily be implemented by one multiplier.
15.3.1 Block Diagram
The calculation of the output sample requires the storing of 17 samples. Each calculation is in three phases.
1. shifting in a new sample;
2. a 17-stage multiply-accumulate loop;
3. output of the result.
The samples will be stored in a shift register. When a new sample comes into the filter, all the values are shifted along the register. All the registered values will be available for the accumulation cycle, not just the last element.
The multiply-accumulate loop can be carried out over 17 clock cycles using a single multiplier and an accumulator register. The inputs to this multiply-accumulator will be multiplexed from the 17 stored samples and the 17 coefficients.
The output needs to be held steady during calculation of the next output, so needs to have a separate output register.
Figure 15.3 shows the basic block diagram of the filter hardware.
Figure 15.3 Block diagram of the filter hardware.
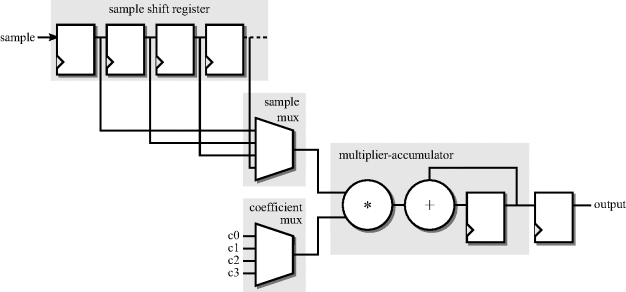
The whole will need a controller to co-ordinate the various components.
From these design parameters we can see that the whole process of generating an output from a sample will take at least 19 clock cycles, which gives us an initial estimate of the minimum clock frequency.
In order to meet the design requirements, the filter must process samples at the rate of 160 k samples/s.
![]()
The basic filter algorithm requires 19 clock cycles to process a sample. The filter goes into a waiting state between samples, so can have any number of clock cycles between samples as long as its at least 19. So the filter can be adapted to other clock frequencies. The minimum clock frequency is:
![]()
This is a very slow clock for a modern device and confirms the one-multiplier decision made earlier.
15.3.2 Interface
The next stage is to design the interface to the filter circuit. This means choosing what the inputs and outputs will be and also choosing what types to use to represent the data.
This design is a good candidate for using the fixed-point synthesis types described in Section 6.5. All calculations will be performed using fixed-point arithmetic.
Both the input sample and the filtered output are required to be in the range −1 to +1. This means that a signed type is needed and that the integer part is 2 bits wide. Note that this range excludes the actual value +1 but includes the value −1. If the actual value +1 is needed, then the integer part would need to be 3 bits. To allow this to be changed if necessary, the integer part will be made generic. Also, at this stage the size of the fraction part of the datapaths will not be decided but will also be made generic. The circuit will be designed so that different precisions can be tried and compared so that a suitable trade-off between precision and noise can be made. That is, the lower the precision, the greater the error introduced by rounding and this error will appear as output noise. To be able to adjust the precision of the samples means the design's noise characteristics can be measured for different precisions and the best trade-off chosen as a result of that analysis.
The design will use handshaking. That is, the circuit driving the filter will indicate using a single-bit input when a sample is ready. The filter will read the sample in response to that signal. When the next output value has been calculated, the filter will indicate that it is ready by raising a single-bit output signal for one cycle.
So, in the interface, there needs to be a clock input, a reset input, a sample input and a filtered output. In addition, two handshake signals are needed, one input telling the filter when a sample is ready and one output to indicate when a result is ready.
This results in the following entity:
entity low_pass_filter is
generic (integer_bits : integer; fraction_bits : integer);
port (clock : in std_logic;
reset : in std_logic;
sample : in sfixed(integer_bits-1 downto -fraction_bits);
sample_ready : in std_logic;
output : out sfixed(integer_bits-1 downto -fraction_bits);
output_ready : out std_logic);
end;
Note that this has been called low_pass_filter because that is what it does. This is preferable to calling it fir_filter which is how it is implemented. Entity names and ports are best chosen using conceptual or black-box names with no indication of the implementation.
The usual context clauses for using the fixed-point package will be needed:
library ieee;
use ieee.std_logic_1164.all;
use ieee.numeric_std.all;
use ieee.fixed_float_types.all;
use ieee.fixed_pkg.all;
This needs to be placed before the entity.
15.3.3 Outline Architecture
At this stage an outline architecture can also be written:
architecture behaviour of low_pass_filter is
constant order : natural := 16;
constant counter_bits : natural := 5;
begin
end;
The first constant, order, is the order of the filter, which is used to give the size of the sample store. Because of the slightly odd conventions for denoting the filter's order, the sample store is one element larger than the order. That is, a filter with order 16 uses 17 samples in the output calculation and therefore needs a 17-element sample store indexed from 0 to 16. The second constant, counter_bits, is the number of bits needed in a counter to be able to index the sample store and therefore must be able to count from 0 to order.
The datapath of the design is the same width throughout, so a subtype can be declared in the architecture that can then be used to define all variables and signals used in the datapath:
subtype datapath_type is
sfixed(integer_bits-1 downto -fraction_bits);
This subtype has the same range as the sample and output ports of the entity.
15.3.4 Coefficient Store
The floating-point filter coefficients calculated in Section 15.2 need to be converted into fixed-point before incorporating them into the design. Since the precision decision is being deferred, the coefficients need to be converted at the highest precision that they are likely to be needed. They can then be rounded down to the required size at the point of use. A 2-bit integer part and 32-bit fractional part was chosen as the highest precision, giving a signed 2.32 bit (i.e. 34-bit) fixed-point representation.
This conversion from floating-point to fixed-point cannot be done in the synthesisable model, because floating-point values are not synthesisable. So the coefficients must be converted separately and the resulting fixed-point values used in the design. The conversion from floating-point to fixed-point is extremely difficult to do by hand, so it is easier to use a VHDL model to perform the calculation for us. Because the model is only used to do this calculation and is therefore not required to be synthesisable, it can use the floating-point to fixed-point (i.e. real to sfixed) conversion provided in fixed_pkg. The following architecture was used to perform this calculation:
library ieee;
use ieee.std_logic_1164.all;
use ieee.numeric_std.all;
use ieee.fixed_float_types.all;
use ieee.fixed_pkg.all;
use std.textio.all;
entity low_pass_filter_calculator is
end;
architecture info of low_pass_filter_calculator is
type coeff_array_type is array (natural range <>) of real;
constant coefficients : coeff_array_type :=
(
0.0368626,
0.019574609,
-0.023181587,
-0.05903686,
-0.04914286,
0.02388607,
0.13902785,
0.2445255,
0.28715014,
0.2445255,
0.13902785,
0.02388607,
-0.04914286,
-0.05903686,
-0.023181587,
0.019574609,
0.0368626
);
begin
process
variable l : line;
begin
for i in coefficients'range loop
write(l, i);
write(l, string'(":"));
write(l, coefficients(i));
write(l, string'(":"));
write(l, to_sfixed(coefficients(i), 1, -32));
writeline(output, l);
end loop;
wait;
end process;
end;
This uses TextIO to print the converted filter coefficients to the standard output of the simulator. Running this model in a simulator gave the output in Table 15.2, which has been reformatted as a table for readability.
Table 15.2 Conversion of real coefficients to fixed-point.
| Index | Real | Fixed-point |
| 0 | 3.686260e-002 | 00.00001001011011111101001111001101 |
| 1 | 1.957461e-002 | 00.00000101000000101101011101110001 |
| 2 | −2.318159e-002 | 11.11111010000100001100010110000010 |
| 3 | −5.903686e-002 | 11.11110000111000101111010111011001 |
| 4 | −4.914286e-002 | 11.11110011011010110101111110100000 |
| 5 | 2.388607e-002 | 00.00000110000111010110010111000001 |
| 6 | 1.390279e-001 | 00.00100011100101110101010001000101 |
| 7 | 2.445255e-001 | 00.00111110100110010011100100100010 |
| 8 | 2.871501e-001 | 00.01001001100000101010101111101100 |
| 9 | 2.445255e-001 | 00.00111110100110010011100100100010 |
| 10 | 1.390279e-001 | 00.00100011100101110101010001000101 |
| 11 | 2.388607e-002 | 00.00000110000111010110010111000001 |
| 12 | −4.914286e-002 | 11.11110011011010110101111110100000 |
| 13 | −5.903686e-002 | 11.11110000111000101111010111011001 |
| 14 | −2.318159e-002 | 11.11111010000100001100010110000010 |
| 15 | 1.957461e-002 | 00.00000101000000101101011101110001 |
| 16 | 3.686260e-002 | 00.00001001011011111101001111001101 |
So, it is now possible to paste these values into the design of the coefficient store that can then be added to the declaration part of the architecture:
subtype coeff_type is sfixed(1 downto -32);
type coeff_array_type is
array (natural range 0 to order) of coeff_type;
constant coefficients : coeff_array_type :=
(
B"00_00001001011011111101001111001101",
B"00_00000101000000101101011101110001",
B"11_11111010000100001100010110000010",
B"11_11110000111000101111010111011001",
B"11_11110011011010110101111110100000",
B"00_00000110000111010110010111000001",
B"00_00100011100101110101010001000101",
B"00_00111110100110010011100100100010",
B"00_01001001100000101010101111101100",
B"00_00111110100110010011100100100010",
B"00_00100011100101110101010001000101",
B"00_00000110000111010110010111000001",
B"11_11110011011010110101111110100000",
B"11_11110000111000101111010111011001",
B"11_11111010000100001100010110000010",
B"00_00000101000000101101011101110001",
B"00_00001001011011111101001111001101");
The fixed-point coefficients have been converted into bit-strings and an underscore is used to show where the binary point is.
15.3.5 Sample Store
The sample store is a shift-register with 17 registers. It uses a similar array type to the coefficient store. However, the width of the sample store registers is the datapath width rather than the coefficient width:
type sample_array_type is
array (natural range 0 to order) of datapath_type;
signal samples : sample_array_type;
The register bank uses the template for register banks described in Section 12.3. The following process is used for the register bank:
process
begin
wait until rising_edge(clock);
if samples_shift = '1' then
samples(0) <= sample;
for i in 1 to order loop
samples(i) <= samples(i-1);
end loop;
end if;
end process;
So, the standard registered process template is used. Within that, the shift operation is controlled by the input control signal samples_shift:
signal samples_shift : std_logic;
This follows a common convention that the control signals for a structure have the structure name as the first part of the signal name. This makes it easier to understand what signals are doing in the design.
When this signal is low, nothing happens and the register bank simply preserves its contents. When the control signal goes high, the shift register operates, capturing the current sample in register 0 and moving all the existing samples along one register. The control signal will be generated by the controller. The design of the register bank requires this control to go high for just one clock cycle, since if it stays high for longer, the shift register will shift again. This requirement of the shifter becomes a design constraint on the controller.
15.3.6 Calculation and Accumulator
The next stage is to design the accumulator circuit. This is based on an accumulator register that is declared as a signal with the same width as the rest of the datapath:
signal accumulator : datapath_type;
The calculation for each cycle of the multiply-accumulator sequence is done within a registered process using intermediate variable assignments:
sample := samples(to_integer(address));
coefficient :=
resize(coefficients(to_integer(address)), coefficient);
product := resize(sample * coefficient, product);
To simplify and clarify the calculation, intermediate variables have been used.
The first variable assignment simply gets the addressed sample from the sample store. No resizing takes place because it is already the correct width for the datapath. This temporary variable was used just to clarify the address indexing. Note how the unsigned address is first converted to integer using the to_integer function at the point of use, as recommended in Section 6.1, then used to index the sample store array.
The second variable assignment gets the coefficient from the coefficient store using the same array indexing technique as for the sample. The coefficient is resized to the datapath width from its maximal size. This is a reduction in the fractional part only, so overflow cannot happen but underflow is possible. The default underflow behaviour has been used for the resize, meaning that the value will be rounded.
The third variable assignment performs the multiplication. It forms the product of the sample and the coefficient using the ∗ operator, which will generate a double-sized result. This is wrapped in a call to the resize function to reduce it down to the datapath size. The default overflow and underflow parameters have been used and, since both are possible, this means that the product will overflow by saturating and underflow by rounding.
This calculation now needs to be wrapped in a registered process with control signals that determine when to reset the accumulator and when to perform the accumulation. Once again, the design will assume that the controller will generate the appropriate control signals in the right order. There are two controls needed: a signal to reset the accumulator to zero and a signal to enable the calculation. In addition, the address generator will also generate the address used to access the sample and coefficient stores. It is the controller's responsibility to synchronise the address counter with the accumulator control signals.
So, the accumulator is a registered process with a synchronous reset:
process
variable coefficient : datapath_type;
variable sample : datapath_type;
variable product : datapath_type;
begin
wait until rising_edge(clock);
if accumulator_clear = '1' then
accumulator <= (others => '0'),
elsif accumulator_calculating = '1' then
sample := samples(to_integer(address));
coefficient :=
resize(coefficients(to_integer(address)),
coefficient);
product :=
resize(sample * coefficient, product);
accumulator <=
resize(accumulator + product, accumulator);
end if;
end process;
The reset branch is simple, setting the accumulator to zero using an aggregate with an others clause. It would not be possible to use a string literal here because the datapath is of unspecified width controlled by the generic parameter. The aggregate will adjust to the width of the accumulator.
In the calculation branch of the main if statement, a single accumulate step is calculated. The calculation of the product was explained earlier. The full process also includes the accumulation step, which is also wrapped in a resize call.
15.3.7 Address Generator
The address generator is required to count up from 0 to 16 (the filter's order) on demand from the controller. It is used by the multiply-accumulator block to access the coefficient and sample stores.
The address signal is an unsigned value and can count over the range of the samples store and coefficients store. Its size is controlled by the generic parameter counter_bits:
signal address : unsigned(counter_bits-1 downto 0);
The address generator is a simple counter register that holds its value when disabled and counts upwards when enabled. It has a synchronous reset to set the address to zero:
process
begin
wait until rising_edge(clock);
if address_clear = '1' then
address <= (others => '0'),
elsif address_counting = '1' then
address <= address + 1;
end if;
end process;
The counter is controlled by two control signals generated by the controller. There is no need for the address counter to stop counting when it gets to the top of the range; it is the controller's responsibility to stop the count on completion of the multiply-accumulate calculation by disabling address_counting.
15.3.8 Output Register
The output register stores the result from the accumulator at the end of the calculation so that it can be held steady for the whole sample period. It also generates an output handshake signal to indicate when the output has changed.
The convention is to use internal signals for registers and to have a combinational assignment to the out port separate from the rest of the design. So, an internal signal is created to form the register that will hold the output value and the handshake signal:
signal result : datapath_type;
signal result_ready : std_logic;
The output ports are then connected to these internal signals:
output <= result;
output_ready <= result_ready;
The output register is then defined entirely in terms of the internal signals:
process
begin
wait until rising_edge(clock);
result_ready <= '0';
if result_save = '1' then
result <= accumulator;
result_ready <= '1';
end if;
end process;
The behaviour of the output register is quite simple although complicated slightly by the extra result_ready signal. When the controller sets the result_save signal, the register stores the output of the accumulator in result. The rest of the time it just preserves the value. The process also includes the logic for the handshake signal. When the new result is saved to the output register, an extra one-bit register result_ready is set to high for just one clock cycle. Actually, it is set high for as long as the result_save signal is high, but the controller ensures that this only happens for one cycle. By registering the result_ready signal rather than decoding it combinationally, it is synchronised with the output register.
15.3.9 Controller
The final stage in the design is to design the controller. The filter goes through a sequence of states, so it makes sense to design the controller using a finite-state machine (FSM) as described in Section 12.2. The FSM will use the two-process model: a registered process to update the state and a combinational process to decode the logic for both the next state and the control signals.
There are six states:
waiting
the default state, waiting for a sample. When a sample arrives, move to sampling state.
sampling
stays in this state for one cycle only while the samples shift-register is shifted, capturing the new sample. Then moves immediately to the calculating_first state.
calculating_first
starts the calculation by clearing the accumulator and address register and allowing one cycle for the first product to be calculated. Moves immediately to the calculating state.
calculating
performs the accumulation and enables the address counter to step through the samples. Stays in this state until the penultimate step of the calculation, then moves to calculating_last state.
calculating_last
disables the address counter but keeps accumulating for one last cycle to capture the last product in the result. Moves immediately to the outputting state.
outputting
stays in this state for one cycle only while the output register is updated. Then moves back to the waiting state.
State transitions are made on clock edges because the state signal is registered.
Notice that there is a sampling state when the input sample gets captured. It takes a single clock cycle for the FSM to move from the waiting state to the sampling state. This means that the sample is captured one clock cycle after the sample_ready signal goes high. In order to capture the sample in the same cycle as the sample_ready signal, the shift-register enable would have to be decoded combinationally from a primary input and this would be a potential glitch hazard.
The three states used in the calculation reflect the different timings for the address register and accumulator. Both need to be reset to zero before the calculation starts. Then, the calculation takes place, enabling the address counter but allowing a clock cycle to elapse between setting the address and accumulating the calculation of that sample. This one-cycle delay means that the address counter is stopped when it reaches the last sample, but the accumulator needs to continue for one more cycle to accumulate the last product.
The state is stored in a registered signal using an enumerated state type for readability and to enable FSM inference:
type state_type is
(waiting,
sampling,
calculating_first, calculating, calculating_last,
outputting);
signal state, next_state : state_type;
The following process describes the registered process of the FSM:
process
begin
wait until rising_edge(clock);
if reset = '1' then
state <= waiting;
else
state <= next_state;
end if;
end process;
This process includes a synchronous reset. This design follows the convention in RTL design that the system is reset by resetting the controller. It also follows the convention that resets should be synchronous unless there is a really compelling reason to use asynchronous reset.
The second process in the controller is the combinational decoding of these states into the control signals for the other filter components:
process(state, address, sample_ready)
begin
samples_shift <= '0';
address_counting <= '0';
address_clear <= '0';
accumulator_calculating <= '0';
accumulator_clear <= '0';
result_save <= '0';
case state is
when waiting =>
if sample_ready = '1' then
next_state <= sampling;
end if;
when sampling =>
samples_shift <= '1';
next_state <= calculating_first;
when calculating_first =>
accumulator_clear <= '1';
address_clear <= '1';
next_state <= calculating;
when calculating =>
address_counting <= '1';
accumulator_calculating <= '1';
if address = order-1 then
next_state <= calculating_last;
end if;
when calculating_last =>
accumulator_calculating <= '1';
next_state <= outputting;
when outputting =>
next_state <= waiting;
result_save <= '1';
end case;
end process;
Note that only state changes are conditional on the inputs and all control outputs are dependent only on the state itself. This makes it a Moore machine (see Section 12.2) and ensures that all internal control signals are synchronised to the clock. The style of the decoder follows a common convention in which all the control outputs are initialised low before the case statement, but then overridden with a high value under the appropriate conditions.
The state-transition logic implements the state transitions described earlier. The reset puts the FSM into its waiting state. When a sample is input, the controller detects the sample_ready signal going high and triggers a state transition into sampling state. It stays in that state for just one clock cycle while the sample store shifts in the new value. It then moves unconditionally to the calculating_first state, where it resets the accumulator and the address counter. It then moves to the calculating state, starting the address generator and enabling the accumulator to start the calculation of the next output. It stays in the calculating state until the address generator gets to one short of the end of its count, when it moves into the calculating_last state. This disables the address counter but continues the accumulation of the last product. This then transitions unconditionally outputting state. It stays in that state for just one cycle, enabling the output register so that the accumulator output is captured, unconditionally making a state transition to the waiting state again.
Note that the filter only responds to the sample_ready signal when its in the waiting state. The rest of the time the input is ignored and therefore cannot interrupt a calculation.
This controller takes 22 clock cycles to process a sample. This is different from the original estimate of 19 since extra cycles have been added to enable the controller to be a simple, synchronous design. This leads to a revision of the minimum clock frequency of the system to meet the specification:
![]()
In principle, if the design had to be as fast as possible, the controller could be optimised to eliminate these extra cycles by overlapping the accumulator reset with sampling and the start of the accumulator calculation. The result register could also be overlapped with the next sample. This would reduce the controller to 19 cycles. However, in this case the design does not need to be as fast as possible and the controller design is adequate for the task
At this point the design was tested by compiling into both the simulator and synthesis systems to see if any errors were detected by either system before moving on to writing simulation test benches.
Bear in mind that the design of the filter is generic. So to synthesise the design, a non-generic top level was needed. Here's a 16-bit filter using a single instance of the generic filter:
library ieee;
use ieee.std_logic_1164.all;
use ieee.numeric_std.all;
use ieee.fixed_float_types.all;
use ieee.fixed_pkg.all;
entity low_pass_filter_16 is
port (clock : in std_logic;
reset : in std_logic;
sample : in sfixed(1 downto -14);
sample_ready : in std_logic;
output : out sfixed(1 downto -14);
output_ready : out std_logic);
end;
architecture behaviour of low_pass_filter_16 is
begin
LPF16 : entity work.low_pass_filter
generic map(2,14)
port map (clock, reset,
sample, sample_ready,
output, output_ready);
end;
This design was then synthesised.
The design compiled successfully, but the synthesis phase generated warnings that the controller required latches. This was not expected since the intention was to design a purely synchronous decoder. Specifically, the next_state signal needed latches, indicating that it was not being assigned to under all circumstances in the combinational controller process. This was causing latch inference to be invoked as explained in Section 8.6. Latches can only be inferred from combinational processes, so this knowledge helps to narrow down the search for the error to the FSM's combinational process.
On examination of that process it was clear that some branches of the decoding logic for the state machine make the state transition conditional without an else clause or a default value. This implies storage between process executions. This was an error in the design.
The intended behaviour is that the state should remain the same unless a state transition is required, default behaviour that can be added by having an assignment to the next_state signal just before the case statement:
next_state <= state;
case state is ...
Then, within the case statement, this default behaviour is overridden under those circumstances when a state transition is required.
This modified design was re-synthesised and this time the result was purely synchronous as intended. Of course, all the test benches were run again to ensure this change didn't introduce another error.
This is an illustration of the use of synthesis as well as simulation to detect design errors. Simulation would not have detected this error because signals in VHDL do preserve their previous value unless assigned. However, the synthesised circuit would not have been as intended. The existence of latches in the synthesised circuit indicated that the design had an error.
It is good practice to determine in advance whether latches are desired and if so how many are expected in the design. Then, the synthesis reports can be checked to make sure that the expected number were actually generated. It is also good practice to perform trial synthesis runs as early as possible in the design process to catch this kind of synthesis-specific error.
The design will be tested using a series of test benches. The first will test the basic functioning of the circuit, iron out any bugs in the design and verify that the circuit is behaving as intended. This will be followed by a more complex test bench to measure the noise characteristics of the filter so that an optimum design can be selected.
Each test bench is implemented as a different architecture of the same empty entity.
The basic framework is:
library ieee;
use ieee.std_logic_1164.all;
use ieee.numeric_std.all;
use ieee.fixed_float_types.all;
use ieee.fixed_pkg.all;
use ieee.math_real.all;
entity low_pass_filter_test is
end;
Then, each architecture adds a test to the test set. Note that the package math_real has been added to the use clauses. This has not been introduced before because it is completely unsynthesisable, but it will prove very useful for writing these test benches, as will become clear later. It is listed in Appendix A.13.
One common denominator is the clocking scheme.
In order to meet the design requirements, the filter must process samples at the rate of 160 k samples/s.
![]()
This gives us a sample period of:
![]()
The basic filter algorithm requires 22 clock cycles to process a sample. The filter goes into a waiting state between samples, so can have any number of clock cycles between samples as long as its at least 22. So the filter can be adapted to higher clock frequencies. The minimum clock frequency is:
![]()
This gives us a maximum clock period of:
![]()
For the tests, a clock generator will be used that clocks at least this fast, but that is independent of the sample generator that will work at exactly 160 k samples/s.
Just to get an idea of how the frequency response of the filter relates to the sample frequency, the following calculations can be useful for reference:
- Cut-off frequency of 20 kHz is equivalent to a full sine wave in 8 samples.
- Stop-Band frequency of 30 kHz is equivalent to a full sine wave in 5.3 samples.
- Maximum frequency of 80 kHz is equivalent to a full sine wave in 2 samples.
The first stage is to develop a test bench that will test the basic functionality of this design.
15.5.1 Basic Test
This test bench just checks the basic functionality of the filter. It simply sends samples to the filter so that the internal signals can be monitored and checked against the expected behaviour.
The first stage is to create the basic architecture with the circuit under test in place along with the signals to connect to it:
architecture basic_test of low_pass_filter_test is
constant integer_bits : natural := 2;
constant fraction_bits : natural := 32;
subtype datapath_type is
sfixed(integer_bits-1 downto -fraction_bits);
signal clock : std_logic;
signal reset : std_logic;
signal sample : datapath_type;
signal sample_ready : std_logic;
signal result : datapath_type;
signal result_ready : std_logic;
begin
CUT : entity work.low_pass_filter
generic map (integer_bits,fraction_bits)
port map (clock, reset,
sample, sample_ready,
result, result_ready);
end;
The intention in this design is to drive the filter clock independently of the sample generation so that they can run at different and independent speeds. So there will be two separate generator processes.
The clock generator will run until stopped by a stop signal from the sample generator, so that when all samples have been produced, the whole simulation stops.
process
constant clock_period : time := 250 ns;
procedure generate_clock_cycle is
constant high_time : time := clock_period / 2;
constant low_time : time := clock_period - high_time;
begin
clock <= '0';
wait for low_time;
clock <= '1';
wait for high_time;
end;
begin
reset <= '1';
generate_clock_cycle;
reset <= '0';
while clock_running loop
generate_clock_cycle;
end loop;
wait;
end process;
The process generates a reset signal for one clock cycle, then continuously generates clocks until the control signal clock_running goes false. The calculation of the high and low times ensures that the clock period doesn't get changed due to rounding errors if the period is an odd multiple of the resolution limit.
The control signal is boolean:
signal clock_running : boolean := true;
The sample generator for this test produces sine waves at different frequencies across the whole frequency range of the filter.
This process is quite complex so it will be broken down into parts.
The basic outline of the process is:
process
constant sample_period : time := 6.25 us;
begin
... perform tests
clock_running <= false;
wait;
end process;
The sample period results in samples at the rate of 160 k samples/s. In this case we first need a procedure that manages the sending of a sample, setting the sample_ready flag high for a fixed time period and then setting it low for the rest of the sample period. This is similar to the clock generator procedure:
procedure generate_sample(value : real) is
constant ready_time : time := 500 ns;
constant wait_time : time := sample_period - ready_time;
begin
sample_real <= value;
sample_ready <= '1';
wait for ready_time;
sample_ready <= '0';
wait for wait_time;
end;
This declaration is placed in the process declarative part so that it has access to the sample_period value.
The procedure generates a sample on a signal of type real:
signal sample_real : real;
This is easier to generate than the fixed-point value and is also easier to view since most simulators have a way of displaying real values as waveforms, whereas the fixed-point types used in the filter design cannot be viewed yet by most simulators.
The real sample is then assigned to the fixed-point input to the filter by a concurrent signal assignment in the architecture body:
sample <= to_sfixed(sample_real, sample);
Similarly, to make it easier to view the filter output as a waveform, the output signal will also be converted from fixed-point to real by another concurrent signal assignment:
result_real <= to_real(result);
The next stage is to generate samples at a range of frequencies. To do this a pair of nested loops is used. The outer loop steps through the test frequencies, then the inner loop generates a series of samples at that frequency.
for f in 1 to 40 loop
step := real(f) * math_pi / 80.0;
for i in 1 to 160 loop
generate_sample(sin(step * real(i)));
end loop;
end loop;
The outer loop frequencies are measured in kHz from 1 kHz to 40 kHz. There are 160 samples generated per frequency, representing a millisecond of real time. Each sample is generated by the sin function from math_real. This calculates the sine of its input in radians.
Package math_real provides common mathematical operations such as sine and cosine on real numbers, it is totally unsynthesisable but sometimes of use in writing test benches as in this case and is listed in Appendix A.13.
To work out the step between samples the frequency is converted into a rotation angle per sample. The first step is to convert the frequency f into an angular velocity R measured in radians per second, where:
![]()
So, for a sample frequency of fs, this equates to an angular distance between samples ΔR measured in radians per sample of:
![]()
This calculation for the step size can be seen in the outer loop. The inner loop then generates the samples by multiplying the step size by the sample number.
In order to test the frequency response, it would be possible to examine the waveform on the screen of a simulator and try to find the maximum output for each frequency. However, it is easier to get the test bench to calculate it. The idea is to keep a running tally of the largest magnitude output for each frequency. This is done by adding the following code around the inner sample loop:
minmax := 0.0;
for i in 1 to 160 loop
generate_sample(sin(step * real(i)));
if i > 50 then
minmax :=
realmax(minmax, sign(result_real) * result_real);
end if;
end loop;
write(l, f);
write(l, string'(" kHz = "));
write(l, minmax);
writeline(output,l);
The minmax value is a variable of type real. So, before the inner loop, the minmax value is initialised to zero. Then, within the loop it is updated if the current result from the filter has a larger magnitude than the current value of minmax. The formula:
sign(result_real) * result_real
generates the absolute value of a real number – the sign function from math_real returns −1.0 if negative and 1.0 if positive (and 0.0 if zero). Multiplying this by the sample gives a positive number equal to the magnitude.
The test for maximum magnitude is delayed for 50 samples to allow the filter to settle down after a frequency change. When the frequency changes there is a sharp change in the input waveform that can generate an impulse on the output that takes a few cycles to settle down.
Finally, after the inner loop has finished running, TextIO is used to output the result for that frequency.
The result is a series of text outputs from the simulator like this:
1 kHz = 9.502971E-01
2 kHz = 9.449322E-01
3 kHz = 9.369100E-01...
The output magnitudes were converted to a power gain in dB by the formula:
gain = 20*log10(magnitude)
The gain values were plotted as a graph, overlaid on the pass-band diagram as shown in Figure 15.4.
Figure 15.4 Actual frequency response of the low-pass filter.

This completes the basic functionality test bench.
15.5.2 Noise Calculations
In this section a second test bench will be written to measure the effect on varying the precision of the fixed-point representation on the noise characteristics of the circuit. In this case, the noise we are interested in is that introduced by rounding during the calculation of the output.
So, the main objective of the test bench is to measure the output noise of the filter for different precisions. In order to perform a comparison, two circuits under test will be used, one at maximum precision and one under reduced precision. This will allow the outputs to be compared and a relative noise figure produced.
The test bench uses the same clock and sample generator as the basic test above. However, it has two circuits under test so that they can be compared:
reference_sample <= to_sfixed(sample_real, reference_sample);
reference : entity work.low_pass_filter
generic map (2,reference_fraction)
port map (clock, reset, reference_sample, sample_ready,
reference_result, reference_result_ready);
reference_real <= to_real(reference_result);
actual_sample <= to_sfixed(sample_real, actual_sample);
actual : entity work.low_pass_filter
generic map (2,actual_fraction)
port map (clock, reset, actual_sample, sample_ready,
actual_result, actual_result_ready);
actual_real <= to_real(actual_result);
difference <= actual_real - reference_real;
So, the sample is converted to fixed-point by a concurrent signal assignment. The reference sample is 2.32 bits, the maximum allowed for the design. The actual sample can have its fraction bits varied for each run. The last line calculates a difference between the outputs of the two filters, which is assigned to the difference signal so that it can be viewed in a simulation waveform viewer.
There are, of course, corresponding duplicate signal declarations:
constant reference_fraction : integer := 32;
signal reference_sample :
sfixed(1 downto -reference_fraction);
signal reference_result :
sfixed(1 downto -reference_fraction);
signal reference_result_ready : std_logic;
signal reference_real : real;
constant actual_fraction : integer := 16;
signal actual_sample : sfixed(1 downto -actual_fraction);
signal actual_result : sfixed(1 downto -actual_fraction);
signal actual_result_ready : std_logic;
signal actual_real : real;
signal difference : real;
The actual_fraction constant controls the fraction part size of the actual filter and can be varied between runs. All signals attached to the actual filter are scaled accordingly.
In the main sample generator loop, code is added that records the maximum difference for the whole run. The sample generation loop therefore becomes:
minmax := 0.0;
for f in 1 to 40 loop
step := real(f) * math_pi / 80.0;
for i in 1 to 160 loop
generate_sample(sin(step * real(i)));
minmax := realmax(minmax, sign(difference) * difference);
end loop;
end loop;
write(l, actual_fraction);
write(l, string'(" = "));
write(l, minmax);
writeline(output,l);
The final part prints the size of the actual fraction part and the maximum error detected.
This can then be compiled as a table, one result per simulation run and with different fraction sizes for each run. Each value has been calculated to 2 significant digits as shown in Table 15.3.
Table 15.3 Maximum error for different fixed-point sizes.
| Size | Error | Signal/noise (dB) |
| 2.16 (18) | 0.000077 | 82 |
| 2.14 (16) | 0.00025 | 72 |
| 2.12 (14) | 0.0013 | 58 |
| 2.8 (10) | 0.020 | 34 |
| 2.6 (8) | 0.080 | 22 |
So, even a 12-bit fraction part (i.e. using 2.12 bit signed fixed-point format) results in an error of 0.0013, representing 0.13% of the range or a signal-to-noise ratio of 58 dB. Adding four bits to give a 16-bit fraction (i.e. using 2.16 bit signed fixed-point format) increases the signal-to-noise to 82 dB.
It was stated at the start of the chapter that the filter should be a fixed-point design. However, to explore whether this statement was a good design decision, the design was converted to use the synthesisable floating-point package described in Section 6.6.
The conversion was simple: first the entity was converted to use different generic parameters and to have float ports sized by those parameters:
library ieee;
use ieee.std_logic_1164.all;
use ieee.numeric_std.all;
use ieee.fixed_float_types.all;
use ieee.fixed_pkg.all;
use ieee.float_pkg.all;
entity low_pass_filter_float is
generic(
exponent_bits : natural;
fraction_bits : natural);
port(
clock : in std_logic;
reset : in std_logic;
sample : in float(exponent_bits downto -fraction_bits);
sample_ready : in std_logic;
output : out float(exponent_bits downto -fraction_bits);
output_ready : out std_logic);
end;
Then, within the architecture, the type used to define datapath signals was changed:
subtype datapath_type is
float(exponent_bits downto -fraction_bits);
Finally, the coefficients were converted into bit-string values in 8:23 float format using a modified version of the coefficient calculator model used to generate the fixed-point coefficients:
subtype coeff_type is float32;
type coeff_array_type is array (natural range 0 to order)
of coeff_type;
constant coefficients : coeff_array_type :=
(
0 => B"0_01111010_00101101111110100111101",
1 => B"0_01111001_01000000101101011101110",
2 => B"1_01111001_01111011110011101010000",
3 => B"1_01111010_11100011101000010100010",
4 => B"1_01111010_10010010100101000000110",
5 => B"0_01111001_10000111010110010111000",
6 => B"0_01111100_00011100101110101010001",
7 => B"0_01111100_11110100110010011100101",
8 => B"0_01111101_00100110000010101011000",
9 => B"0_01111100_11110100110010011100101",
10 => B"0_01111100_00011100101110101010001",
11 => B"0_01111001_10000111010110010111000",
12 => B"1_01111010_10010010100101000000110",
13 => B"1_01111010_11100011101000010100010",
14 => B"1_01111001_01111011110011101010000",
15 => B"0_01111001_01000000101101011101110",
16 => B"0_01111010_00101101111110100111101"
);
The only other change required was to the multiplier-accumulator that now uses operators from the floating-point package. The difference with floating-point compared with fixed-point is that the result of an operation is the same size as the arguments, so no resizing is needed to give a fixed datapath width. The modified calculation is:
sample := samples(to_integer(address));
coefficient :=
resize(coefficients(to_integer(address)), coefficient);
product := sample * coefficient;
accumulator <= accumulator + product;
Both of the test benches were also converted to floating-point in the same way.
The frequency response of the floating-point version was identical to the fixed-point version. However, the noise characteristics were different. Table 15.4 shows the noise measurements for different datapath sizes:
Table 15.4 Maximum error for different floating-point sizes.
| Size | Error | Signal/noise (dB) |
| 6 : 9 (16) | 0.0027 | 51 |
| 4 : 11 (16) | 0.00088 | 61 |
| 6 : 7 (14) | 0.012 | 38 |
| 4 : 9 (14) | 0.0029 | 51 |
Different trade-offs between exponent size and fraction size have been used and show that a shorter exponent with a longer fraction tends to give a lower noise value for the same word size. Interestingly, the fixed-point version has a lower noise factor for the same word-length in every case. For example, a 2:14 (16-bit) fixed-point filter had a signal-to-noise ratio of 72 dB, whereas the two 16-bit floating-point versions had noise factors of 51 dB and 61 dB, respectively.
Since this is a case study, it was decided to implement several versions of the filter. Four variants were chosen using all the permutations of fixed-point or floating-point with either a 16-bit or a 32-bit sample. All four were synthesised to the same FPGA technology so that they could be compared.
This means that four top-level designs were created to instantiate the chosen generic filter circuits with the required generic parameters. These top-level designs also reduced the interface to the simple types std_logic and std_logic_vector according to the convention for synthesisable top-level circuits explained in Section 6.10 to ensure that the post-synthesis netlist has the same interface.
As an example, here's the 4:11 (16-bit) floating-point variant:
library ieee;
use ieee.std_logic_1164.all;
entity low_pass_filter_float_16 is
port (clock : in std_logic;
reset : in std_logic;
sample : in std_logic_vector(15 downto 0);
sample_ready : in std_logic;
output : out std_logic_vector(15 downto 0);
output_ready : out std_logic);
end;
use ieee.numeric_std.all;
use ieee.fixed_float_types.all;
use ieee.fixed_pkg.all;
use ieee.float_pkg.all;
architecture behaviour of low_pass_filter_float_16 is
begin
LPF16 : entity work.low_pass_filter_float
generic map(4, 11)
port map (clock => clock,
reset => reset,
sample => to_float(sample, 4, 11),
sample_ready => sample_ready,
to_slv(output) => output,
output_ready => output_ready);
end;
Note the type conversions on the array ports.
All four designs were generated in the same way and then synthesised. Table 15.5 gives the statistics for the four designs.
Table 15.5 Synthesis results for the low-pass filter.

As can be seen from these statistics, the floating-point variants were about half the speed and 3–4 times the number of logic cells of the fixed-point variants. Yet the floating-point variants have inferior noise performance for a particular word size. This confirms that the choice of fixed-point arithmetic was the right choice. However, it also confirms that it is realistic to synthesise floating-point arithmetic operations.
The synthesiser reported a maximum clock frequency for this design of 67 MHz for the targeted technology, if the 16-bit fixed-point version is used, and this is well within the design requirement of 3.52 MHz. Even allowing for a pessimistic view of the synthesiser's timing estimator, this would suggest the filter could be run at over 10 times the target frequency if desired.
This design implements a specific filter with a specific set of coefficients. However, the core multiply-accumulator circuit and its controller is general-purpose and can be converted into a generic filter design. To do this, the coefficient store must be made external to the design and extra ports provided for accessing this external coefficients store. This reorganisation of the design allows different sets of coefficients to be used with different designs but using the same filter core.
In fact, this means the core can be used to implement low-pass, high-pass and band-pass filters given the right coefficients to do so. For this reason a more general name will be chosen so the entity will be called filter_core.
The first stage is to define the interface for the generic core of the filter:
library ieee;
use ieee.std_logic_1164.all;
use ieee.numeric_std.all;
use ieee.fixed_float_types.all;
use ieee.fixed_pkg.all;
entity filter_core is
generic(
integer_bits : natural;
fraction_bits : natural;
counter_bits : natural;
order : natural);
port(
clock : in std_logic;
reset : in std_logic;
sample : in
sfixed(integer_bits-1 downto -fraction_bits);
sample_ready : in std_logic;
coefficient_address : out
unsigned(counter_bits-1 downto 0);
coefficient : in
sfixed(integer_bits-1 downto -fraction_bits);
output : out
sfixed(integer_bits-1 downto -fraction_bits);
output_ready : out std_logic);
end;
This entity has two more generic parameters to control the order of the filter and the size of the counter for the coefficient store address.
This entity also has two extra ports, the address output for the coefficient store and the coefficient input from the coefficient store.
To create the architecture, the existing architecture is copied and also renamed:
architecture behaviour of filter_core is
Then, the existing design for the low-pass filter is copied into this architecture as the starting point for the design. The coefficient store is removed and the two new ports incorporated into the design. So, the calculation becomes:
sample := samples(to_integer(address));
product := resize(sample * coefficient, product);
accumulator <= resize(accumulator + product, accumulator);
Note how the calculation of the product now uses the coefficient input port rather than the local coefficient variable that is removed. Also, the address counter must be connected to the coefficient address output using a simple concurrent assignment at the end of the architecture:
coefficient_address <= address;
Now, a new version of the low-pass filter can be created that uses an instance of this generic filter core. The coefficient store is incorporated into this level and connected to the core via the two new ports. The architecture now looks like:
architecture behaviour of low_pass_filter is
constant order : natural := 16;
constant counter_bits : natural := 5;
-- coefficient store
subtype coeff_type is sfixed(1 downto -32);
type coeff_array_type is array (natural range 0 to order)
of coeff_type;
constant coefficients : coeff_array_type :=
(
B"00_00001001011011111101001111001101",
B"00_00000101000000101101011101110001",
B"11_11111010000100001100010110000010",
B"11_11110000111000101111010111011001",
B"11_11110011011010110101111110100000",
B"00_00000110000111010110010111000001",
B"00_00100011100101110101010001000101",
B"00_00111110100110010011100100100010",
B"00_01001001100000101010101111101100",
B"00_00111110100110010011100100100010",
B"00_00100011100101110101010001000101",
B"00_00000110000111010110010111000001",
B"11_11110011011010110101111110100000",
B"11_11110000111000101111010111011001",
B"11_11111010000100001100010110000010",
B"00_00000101000000101101011101110001",
B"00_00001001011011111101001111001101"
);
-- internal signals
signal address :
unsigned(counter_bits-1 downto 0);
signal coefficient :
sfixed(integer_bits-1 downto -fraction_bits);
begin
filter : entity work.filter_core
generic map(integer_bits, fraction_bits,
counter_bits, order)
port map (clock, reset,
sample, sample_ready,
address, coefficient,
output, output_ready);
coefficient <=
resize(coefficients(to_integer(address)), coefficient);
end;
Note how the coefficient is selected from the coefficient store using the address output from the filter.
This design was re-simulated with all the test benches and re-synthesised to confirm that no errors were introduced in the re-organisation.
The design process has been stopped after the first stage of synthesis. The fitting of the circuit to a device, specifying pin-outs, etc. is very tool and technology specific and is a matter for the user manual for the synthesis tool.
This design is a simple work-through of a digital filter, which is itself a simple circuit. Only four possible implementations of the design were tried varying only in the type and size of the datapath operators. There are many other permutations of this design that could be tried:
- For higher frequency of operation, more than one multiplier could be used.
- The symmetry of the coefficients could be used to halve the number of multiplications and therefore the number of clock cycles required to perform the accumulation.
- The multiplier-accumulator could be pipelined to increase the throughput, with a pipeline register between the multiplier and the accumulator.
- It was assumed that overflow should use Saturate Mode. Saturation mode prevents an overflow from being turned into an abrupt change from very positive to very negative due to wrapping. Nevertheless, in a performance-critical design it might be an acceptable trade-off to use Wrap Mode.
- It was assumed that underflow should use Rounding Mode. This minimises the noise generated by rounding errors. However, no experiments were performed to calculate the noise factor in Truncate Mode. It might yield a higher-performance design to truncate the result and then compensate for the noisier output by adding 1–2 more fraction bits.
- Some of the controller states could be overlapped to reduce the number of cycles per calculation.
Digital filters scale proportionately with sample rate. For example, given the same set of coefficients, this filter could be used with the following specification:
Sample Frequency: 1.6 M samples/s;
Maximum Frequency: 800 kHz;
Cut-off Frequency: 200 kHz;
Stop Band: 300 kHz;
Stop Band Attenuation: 18 dB;
Minimum Clock Frequency: 35.2 MHz.
The design implemented in this case study is capable of running at this speed.
This also illustrates why the sample rate must be controlled accurately. If the input is sampled at any speed other than 160 k samples/s, the pass band moves in proportion to the sample frequency.