Most of what we have discussed in previous chapters has dealt with live or live-to-recording multi-camera productions shot in a studio environment. However, many productions are shot totally or partially in out-of-studio locations, often with just one camera. Dramas and documentaries can be shot entirely on location and then edited. News and public affairs programs have material that is shot, edited, and used as a roll-in for a program that is mainly assembled as a studio shoot.
The technique of shooting with a single camera is often called film-style shooting, because traditionally motion pictures are filmed with one camera that takes shots one by one from all the various angles employed in multiple-camera shoots. When the shooting is done for news, it is usually called electronic news gathering (ENG). A more generic term is electronic field production (EFP), because the shooting takes place in the field rather than in a studio.
Studio production and field production share many similarities, because both use much of the same equipment. But techniques and disciplines differ to some degree because of the lack of control that exists outside of the studio.
Increased portability of equipment has led to the so-called “one-person band” in video production, a single individual who shoots, reports, and edits stories without additional help. For the most part, however, this chapter assumes use of a field crew made up of three or more people. Understand, however, that it is quite likely you will find yourself in field production situations with a smaller crew—or perhaps even alone—and so many of the duties described here will be combined.
Introduction
Field production, like studio-based work, requires both discipline and technique. It involves both the development of a professional attitude and knowledge of equipment and aesthetics. (See Chapter 1.)
One of the reasons techniques are so important is that miles away from “home base,” you cannot turn to a technician (or your instructor) when you have a problem. This means that all crew members must know how to operate the equipment well. You and other crew members must also be well-grounded in aesthetics, because you cannot see the finished product as you are recording the individual shots. You must be able to visualize how the shots will edit together.
You must plan thoroughly for all eventualities and expect the unexpected. You can find yourself working in undesirable conditions such as inclement weather or a mosquito-infested swamp rather than the pleasantly climate-controlled studio environment. Teamwork, combined with a cooperative spirit, is a must. People are usually together for longer periods of time in the field than they are in the studio, especially if they commute back and forth together or stay in one location for several days.
Cast and Crew
Discipline is important because crews for field productions are usually smaller than for studio productions, so it is hard to cover for anyone who is not dependable. Techniques are important because individual crew members may need to undertake a variety of duties so that all the little things that need to be accomplished actually are.
Crew Size
One reason crews are smaller in the field is that much less gear is involved. With only one self-contained camcorder, there is a need for only one camera operator who will also double as the video operator. No one is needed to operate a switcher because there is no need to cut between two or more cameras. Prompters, because they are bulky, are not normally taken to shoots (although portable prompters that hook up to laptops are available). Graphics are generally added during postproduction, not during shooting.
Because there is no control room, the director is on the location set in the midst of all the action, thus eliminating the need for a stage manager. Because timing is usually not crucial for scenes that are later going to be edited, an associate director can also be superfluous at a field shoot. However, often a person called a script supervisor is on set to keep notes and watch for continuity problems, such as whether the same amount of water is in a glass for the close-up as was there in the long shot and whether the same people are in the background of a shot each time it is recorded. This person also makes notes on the script that help the editor put the shots together effectively.
Cleanup
One of the absolute essentials that crew members on a field shoot must handle carefully is cleanup. Everything must be conscientiously disassembled, coiled, stowed away, and neatly packed—in part as a courtesy to the next people who use the equipment and in part because such care adds to the life of the equipment. Thorough cleanup also minimizes the impact on the area you are using. Not only is it respectful, but it can also ensure that you are welcome to use the space again in the future.
Nonsequential Shooting
One of the hardest parts of film-style shooting is that scenes are often shot out of order. This can create continuity problems and difficulties for performers. Sometimes, it is necessary for an actor to switch emotions on and off for the convenience of a shooting schedule. Often, two scenes will be shot back to back because they are at the same location, and the emotional content of two shots may be diametrically opposed. The actor might be called upon to portray the emotion felt about the death of a friend two days before the death has been acted out.
Even within one scene, lines are sometimes shot out of order. When actors’ close-ups are shot, the actors deliver their lines often without benefit of cues and other lines in the rest of the scene. Frequently, the characters they are supposedly talking to are not even on the set. Actors may find themselves professing passionate love—to a camera. Most professional actors have learned to perform well in these challenging situations. Crew members should be aware of letting them have their “space” so that they can build up to the required emotions.
Recording out of order can present challenges in nondramatic shoots as well. For example, you may be part of a local news crew that has the opportunity for a one-on-one interview with a political or business dignitary. You may have only five minutes to complete the entire interview before the dignitary rushes off to her next stop. In these situations, you will usually position the camera to get a head and shoulders shot of the guest as questions are asked and answered. Because the camera is on the guest, the interviewer’s face will not be seen. Then, after the guest leaves, you will reposition the camera and shoot the interviewer asking the questions again. You might also show some reaction shots of the interviewer to use as cutaways during the interview, such as him raising his eyebrows in surprise or nodding in agreement. These shots will show only the interviewer, so it won’t matter that the guest has actually left. This technique allows you to later edit the questions and answers together, and make it look like you had two cameras on the shoot.
This brings up a related ethical problem that news reporters, in particular, must face. You need to be sure that the wording and intonation of the questions asked after the interview match those asked during the interview. If the wording or intonation is changed, the guest’s answer may take on an entirely different meaning. Networks and stations have policies regarding the need to keep the questions the same. One way to do this is to have someone on the crew jot down the exact wording of the questions that are asked while they are being asked. Of course, the interviewer may also replay the camera footage so that he or she can phrase the questions the same as the original questions. There are also, of course, ethical issues involved in editing in the reporter’s reaction shots if they give an impression of disbelief or agreement with a controversial point.
Producing
As with studio shoots, producers are in charge of the overall organization of a field shoot (see Chapter 2). They may not be in charge of the entire program but rather just the segment of it that is shot at a particular location. In this capacity, the field producer makes sure the segment finishes on time and on budget.
Scripting
The same forms of scripts can be used for field shooting as for studio shooting—two-column scripts, rundowns, outlines, film-style scripts, and storyboards (see Chapter 3). For most types of field production, a finished script is absolutely essential before planning or production can take place. More than one student production team has found that all those great ideas they thought of back in the studio just seemed to disappear into thin air once they arrived at the shooting location. The very act of writing or typing up ideas is an important test of the feasibility of the operational plan.
There are times in field production, however, when it is appropriate not to use any script at all. The most obvious example is when covering breaking news stories. But even then, you can undertake some research ahead of time or on the way to the story. Newspeople usually keep track of the number of crimes that have been committed in a certain area, the backgrounds of the major political figures, the actions being taken by the local city council, and similar items. Facts about a town can be brought up or story archives accessed and reviewed through the use of smartphones, laptops, or tablet computers.
Location Logistics
Producing a location shoot is similar to producing a studio program in that all elements must be in the right place at the right time. However, this is usually much more complex for a field shoot, because everything is out of its usual habitat. Equipment logistics, travel arrangements, power supplies, and coordination of props and talent all require extraordinary consideration.
Selecting a Location
One of the crucial initial steps in the producer’s job is to make sure someone selects and surveys the production location. For large dramatic productions requiring many locations, a person given the title of location scout will undertake the job of finding, visiting, and winnowing down the possible production sites. The location scout might find ten homes where a 1940s murder mystery could be shot, but some might be a great distance from where other scenes are being shot, some might be in noisy locations, and one may have a porch that doesn’t look quite right. The location scout will narrow down the choices and present them to the producer and/or director. At this point, most directors and some producers like to visit the potential sites to make the final selection. Having the camera operator along to give input on these location-scouting trips can also prove invaluable.
Surveying a Location
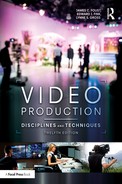
For other types of programs, you know approximately where you will be shooting, and you visit mainly to see the lay of the land. If, for example, you are interviewing a doctor about a new medical breakthrough, you will want to shoot at the hospital where the instruments used for the procedure will be available. You can go there ahead of time to see the size of the room you will be shooting in, find out where the electrical plugs are, determine how best to cut out background noise, and so on. When you go to a location, it is wise to have a list of things you want to check. Figure 12.1 shows a general location survey checklist, but you should consider additional elements specific to each production.
Fast-breaking news stories are another matter. Obviously, it may not be possible to check out the location for these ahead of time. However, some places where news is likely to occur, such as the city council chambers or the police station, can be “cased” ahead of time and notes made so that crews going there have some idea of what they will face.
One of the first things you should do in a location survey is obtain the name of a person who is in charge—the individual who gives you the permission to shoot at the facility, who you can contact when you arrive with equipment and refer to when any unexpected problems crop up. Who has the keys? Who do you contact when you trip a circuit breaker? You may wish to draw up a floor plan of the location and take digital still or video shots to share with other crew members and to remind you of important details as you plan specific shots.
If you will be shooting outdoors, or shooting indoors with natural light, you will want to scout the location at the same time of day you will be shooting so you can see exactly what you will have to deal with in terms of sunlight, shadows, and windows.
What about possible interruptions and conflicts? Do scheduled events at the location conflict with the shoot? Are airplanes taking off? If you are shooting on campus, for example, will the end of a class period send large numbers of people walking through the shot? Make note of these items so that you are not in the middle of a take when any of these distractions occur. Listen for continuous extraneous noises, such as an air conditioner or telephones ringing, that will interfere with your audio. Try to obtain permission to turn them off while you are shooting. If you cannot, plan to work with more directional and less sensitive mics closer to the talent.
Attending to Legalities
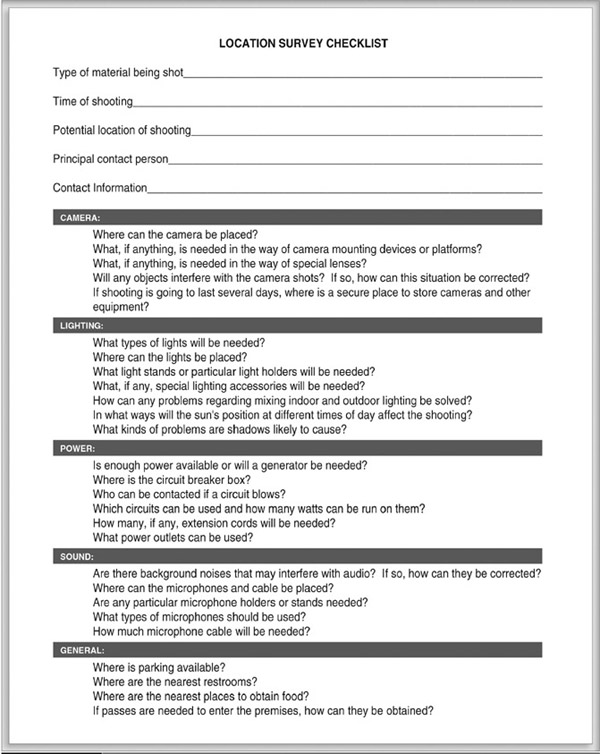
Whenever you use a location that belongs to an organization or a private individual, you should make sure you have your legal bases covered. Before shooting, have the person in charge fill out a form that gives you permission to shoot (see Figure 12.2). If someone comes along while you are shooting and objects to what you are doing, you can show them the signed form.
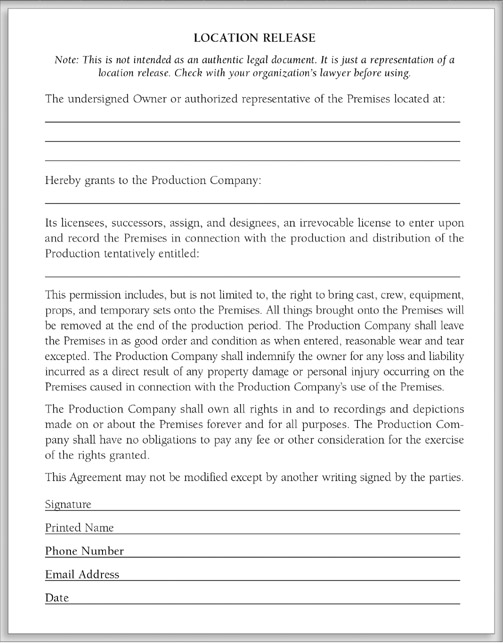
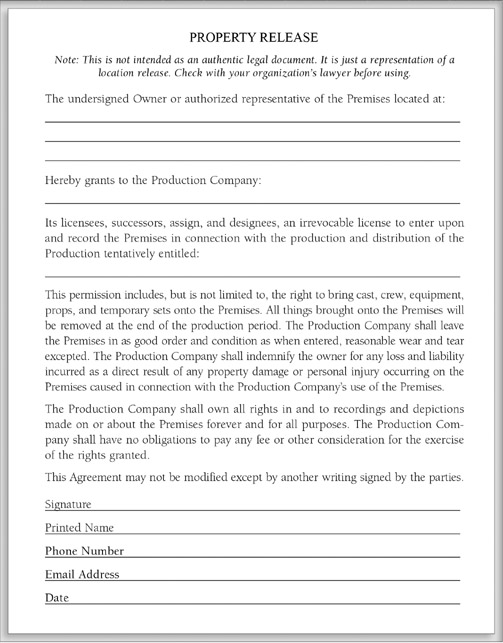
After the shoot, have someone in authority fill out a property release (see Figure 12.3). This form indicates that you left the property in good order. Otherwise, someone may come back to you, even months later, and demand that you fix something that you didn’t break.
Substituting for a Location
Some productions require shots in difficult or expensive locations—an airplane that has crashed on a remote mountainside, a koala bear asleep in a tree. Sometimes, these shots can be obtained from previously prerecorded material. However, it is important to reiterate the discussion of copyright discussed in Chapter 3. Although you may be able to find usable footage by just searching YouTube or another video sharing site, you must assume that any footage posted there is protected by copyright, meaning you cannot use it without the copyright owner’s permission. Most professional producers turn to commercial sites, such as iStockphoto, that supply copyrighted stock footage for a fee. News departments carefully index their old news stories on computers and file most of what they shoot for possible later use.
Students who cannot afford professional stock footage should first examine the resources of their own university. University librarians or archivists may have specialized footage that could come in handy for a production. Large companies and government departments that produce public relations films often allow use of footage if you give them a credit. For an example, take a look at the various lists of U.S. government video at USA.gov. You can also search video sharing sites, but be careful to use only videos that are licensed under Creative Commons (which in some cases allows use and copying without payment) or that are in the public domain. In all cases, you should contact the person who posted the video to confirm its copyright status before using it in a production.
Budgeting
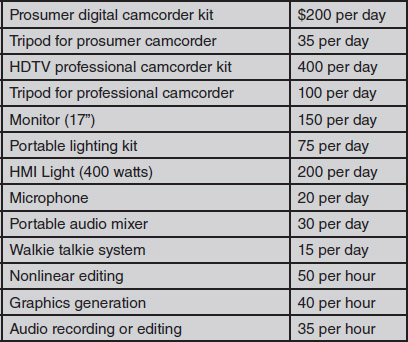
Preparing a budget for field production work is very similar to budgeting for studio productions, in that budgets include above-the-line and below-the-line categories (see Chapter 3). The main variation is that different equipment will be used and a greater emphasis will be placed on editing. Figure 12.4 gives some typical equipment rental figures to help you budget for field shooting; keep in mind, however, that rental rates can vary based on your location, specific equipment needs, and time of year.
Conceptualization and Preproduction Planning
Before most programs or segments of programs are recorded on location, you should conceive them in their entirety. How each individual shot is planned and executed depends on how it will be used in the final edited program. In other words, both planning and camera work must be carried out with the eventual editing process in mind.
To aid in this process, video producers have developed a number of different forms. Some of the same paperwork used for studio production is used for field production. For example, you should ask performers to sign performance releases, and you should clear any music and other copyrighted material that is going to be used for the final edited production. However, because field productions usually involve a variety of locations and their inherent uncertainties, the producer must examine the script very carefully to determine production needs and schedules.
Breakdown Sheets
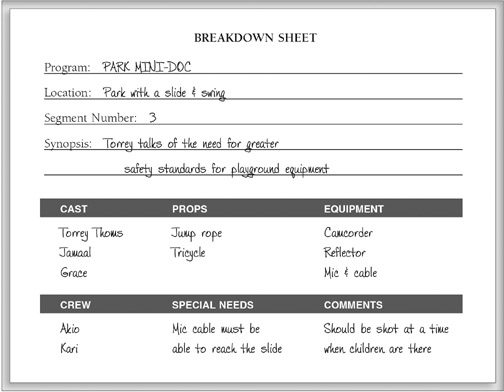
If you are planning to shoot a complex production that involves a number of individual scenes shot in different locations, breakdown sheets are indispensable. For each scene to be shot, they list a synopsis of the scene, the location, the people who will be needed, the props, and any special considerations. (See Figure 12.5.)
As previously mentioned, program material in extensive field productions is almost always shot out of order. The breakdown sheets will help you juggle your production shooting and determine the order in which scenes will be shot. Usually, the primary element for determining shooting order is location: All scenes occurring in the park will be shot at one time, even though they will be interspersed at various points throughout the program. However, sometimes, the primary element for determining shooting order is the talent; if someone who is crucial to the production can only work one day, all the shots involving that person will have to be shot on that one day, even if this means traveling all over town. On rare occasions, shooting order may be determined by a prop; if you need to rent a vintage automobile, you might want to shoot all scenes with it on one day so that you can cut down on rental fees.
Sometimes, it is wise to make lists of props, costumes, cast members, and so forth from these breakdown sheets. These lists are similar to what you might make for a studio shoot (see Chapter 3), but usually you will need more lists for field production because the elements are more complex. For example, one list might include all the locales that the location scout needs to find; other lists might include all the animals or all the automobiles needed.
Shooting Schedule
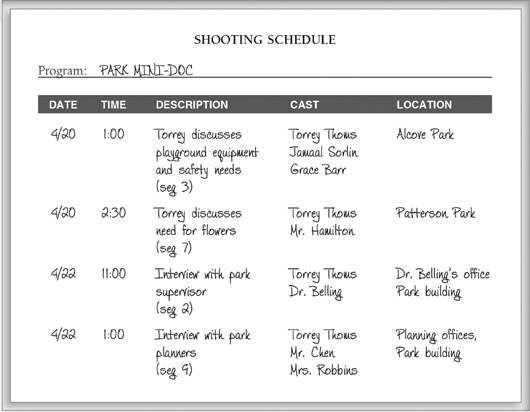
Once you have assembled all the breakdown sheets in order, you can develop a shooting schedule. This lists everything that is to be shot during each day, giving the description, the cast, and the location. It is used throughout the shooting and, of course, must be revised if production falls behind schedule. (See Figure 12.6.)
Stripboards
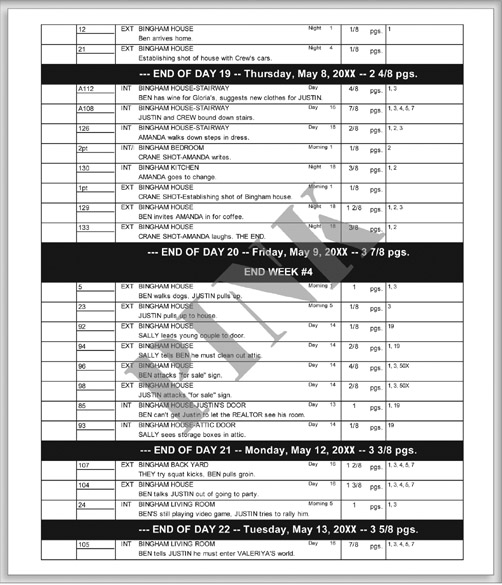
Many producers (or their assistants) use stripboards to aid them with their shooting plans. Sometimes, these are actual boards that can hold long strips of paper indicating the locations and characters needed each day but most are computer generated (Figure 12.7).
In addition, you can devise your own lists, forms, schedules, or drawings to help conceptualize and organize your material. As with a major multiple-camera studio production, every hour you spend in preproduction planning and scripting will save countless hours of valuable crew time on the shoot. Careful script preparation and preproduction are perhaps the most crucial disciplines involved in single-camera field production.
Directing
Directing in the field is quite different from directing in the studio, mainly because the director is on the set rather than in the control room. However, a director’s duties during preproduction are similar to those for a studio shoot—becoming familiar with the script and planning for equipment, cast, and crew (see Chapter 4). In addition, the director is usually quite involved with finding locations.
Rehearsals
Rehearsing for a field shoot should involve the same procedures as rehearsing for a studio program (see Chapter 4). However, because the amount of time you can use a remote facility is often limited, you often do not have the luxury of rehearsal in the field; you may have to come up with creative alternatives. Can you at least have a dry run with the primary talent to familiarize them with the actual location? How about rehearsing in a substitute location, such as a large hall or your living room?
Production Processes
Since equipment will have to be packed and transported for a field production, the director must make sure that all crew members double-check that everything needed is packed and in working order. If you are planning to use lavaliere mics and you get to a location site without any lavaliere mics, you are in big trouble.
Laying Bars
The recording procedure itself is quite different from that in a studio. At least 30 seconds of color bars should be recorded before anything else. This will allow the director or the editor to adjust controls that will enable the footage to be played back with proper color balance during the editing sessions.
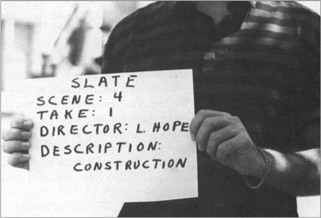
Slating
Each shot must be slated. Before the shot itself is recorded, one of the crew members should hold a cardboard sign, small chalkboard, or professionally prepared slate in front of the camera. The slate should indicate the scene number, take number, director’s name, and a description of the shot.
The scene number should be the same as that on the script, and the take number is the number of times that same material has been shot—take 1 for the first attempt, take 2 for the second, and so on. While this written slate is being recorded, the person holding it should read the information into an open mic so that both a video and an audio slate are recorded. (See Figure 12.8.)
Recording
Once the slate is recorded, with the camera still rolling, the director says “Action,” and, after waiting several beats, the talent should begin. After the segment is recorded, all talent on camera should hold their positions for at least five seconds while the camera continues to record. These beginning and ending procedures are crucial for the editing function in that they provide adequate pad for maintaining proper pace. If the director is satisfied with the take, the crew can proceed to the next scheduled shot.
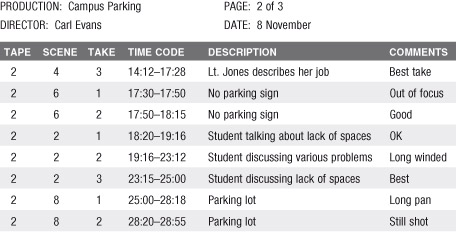
Logging
A script supervisor or other crew member should keep a careful production log of every shot. This should include the scene number (which should be the same as the scene number on the script and the slate), take number, description, length of shot, and any special comments. (See Figure 12.9.) The script supervisor should indicate if a take is bad so that the editor does not bother looking at it. Often, particularly if the recording procedure is hectic, this logging is done after shooting is complete.
Continuity
In a complicated shoot, such as a drama, the director usually has a script supervisor close at hand. This person’s job includes making sure the director actually shoots all the material in the script and keeping track of continuity. He or she makes notes concerning what the actors were wearing, where certain props were set, and which hand actors used to make certain gestures. If the actor was wearing a tie when he knocked on the door in the scene shot on Monday, he should be wearing that same tie when he enters the living room in the scene shot on Thursday. If an interviewee’s hand is clutching a book during a long shot, his hand should be clutching the book for the close-up that will be edited into the shot.
Shot Variety
One of the most important production techniques associated with field shooting is making sure enough varied shots are taken, so that they can be used during editing to present a meaningful story and to create cutaways that will cover jump cuts. For example, when a director shoots a dramatic scene, it is customary to record a cover shot of all the action in the scene (e.g., a man and woman arguing). The director also records close-ups of the man delivering his lines and the woman delivering hers. These shots may be followed by reaction shots of both characters listening to what the other is saying and perhaps close-ups of some items pertinent to the argument—the clock, a baby’s toy.
Handling Talent
A common problem in many news or documentary shoots is that some people do not want to be on television. Usually, these are people who are in the news in a negative or controversial way and, as a result, try to avoid being interviewed. The degree to which these people should be pursued depends on the nature of the assignment, the context and reputation of the program, and the personalities of all involved. Some people do not want to be on TV because they know they come across poorly. If these people are not crucial to obtaining the intended message, they should not be used—their fears may be self-fulfilling prophecies.
At the other end of the spectrum is the common problem of unwanted talent. When a shoot is being conducted on a city street or other public location, the curious are bound to appear. If a drama is being taped, crew members (or off-duty law officers) are often hired for crowd-control purposes—placed at the edges of the scene to keep onlookers out of the shot. But there is no guaranteed way to keep people out of shots that involve fast-breaking news stories. Those who strut around in the background and make faces or gestures at the camera can be a real nuisance. If the director deals with these people in a firm but pleasant manner, such behavior can sometimes be stopped.
Handling Crew
As with a studio shoot, the director must work to build camaraderie among the crew members. Poor interpersonal relationships can damage a field shoot, because people usually cannot get away from each other. In some instances, they are stuck together for days or weeks.
Because the director is on the set at a location shoot, he or she cannot give commands (zoom in, pan left) during recording, because they would be picked up on the mic. The director and the crew must instead work out shot composition and other details ahead of time.
Editing Aesthetics
Most of the aesthetic principles regarding studio camera shots (see Chapter 4) apply in field shoots. Some of them even take on increased importance. For example, the concept of axis of action must be watched even more closely in the field because so many shots are taped out of order. The director must be able to envision shots that will be edited together, even though they may not be recorded immediately after one another. For example, if a long shot of someone running is recorded before lunch and a close-up of the person running is shot after lunch, the camera must not cross the line of the long shot when it is used for the close-up. Otherwise, when the two shots are cut together, the person will appear to change direction.
Cameras
The aesthetic principles of picture composition apply in the field as well as in the studio, as do the principles of f-stops, depth of field, focusing, and filters (see Chapter 5). However, when working in a field environment, camera settings will need to be monitored and changed more often than when working in the studio.
White Balancing
Because the white balance control adjusts the video to suit the type of light that is available for an individual shot, white balance must be reset frequently as lighting conditions change. As the sun peeks in and out of clouds, the light source changes and white balance needs to be readjusted. This can be done as described in Chapter 5. If you are going to adjust the white balance manually, remember to bring something white to the shoot to be used for reference white—a piece of paper or a white sweater, for example.
Filters
A related item, very easy to forget in the process of field shooting, is changing the filter on the camera filter wheel. As mentioned in Chapter 5, many cameras have three filters—one for indoor 3,200 degree K light (which also works for outdoor sunrise and sunset), one for sunny daylight, and one for cloudy outdoor shooting. When you move from outdoors to indoors, or vice versa, you must change the filter, or your footage will have an orange or blue cast.
Power
Another issue in the field is the power source for the camera. Most cameras can be operated either on regular AC (household alternating current) or on batteries. AC is more reliable, but cameras add wattage to electrical circuits that may already be taxed from your portable lights.
Batteries have a disadvantage in that they run out of charge—often when in the middle of shooting an important scene. If you use batteries, make sure they are fully charged before the shoot. Some cameras have a standby position that keeps the electronics operational but reduces drain on the battery. This should be used while shots are being set up and rehearsed. Cameras differ as to how they conserve battery power, so be sure to find out when the battery is and is not engaged on your particular camera.
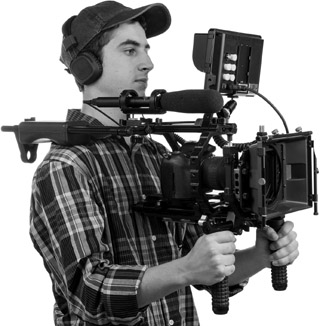
Camera Mounts and Movement
Keeping the picture steady on a portable camera can be challenging. In the field, you usually do not have the luxury of the sturdy pedestals and cranes available in a studio. What you are more likely to have is a three-legged tripod and/or the camera operator’s shoulder. A variety of innovative body braces are also available for using DSLR cameras in the field, many of which incorporate mounts for ancillary equipment, such as microphones, audio recorders, and lights. (See Figure 12.10.)
Many cameras have a built-in image stabilization feature that operates either digitally or optically. Digital image stabilization magnifies part of the image and tracks it during camera movement. It then compensates for the movement and keeps the picture steady, even if the operator’s arms are moving. Optical systems have a gyro sensor that detects camera movement and then adjusts the path of incoming light. Image stabilization does not, however, handle large variations in movement.
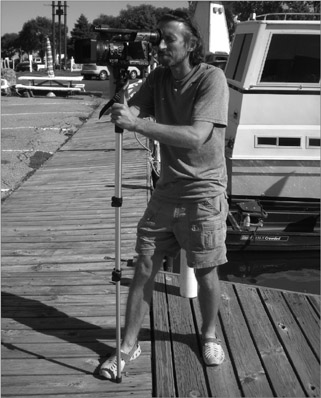
You can also use other techniques to steady a hand-held camera; many of these skills are based on building upper body strength or learning ways to “cheat,” such as steadying yourself using a wall or other object. For smaller cameras, a light and easy-to-carry monopod can provide for better-looking shots. (See Figure 12.11.) Although pans, tilts, and zooms can be executed very effectively on a tripod, movements such as trucks and dollies require the human body to simulate wheeled movement. Dollies and trucks can sometimes be improvised with wheeled conveyances such as a child’s wagon or a grocery cart.
Camera Care
Care of the camera must be a high-priority item for the camera operator. The intense activity and unanticipated problems on any location production occasionally result in the violation of standard precautions taken to ensure the safety of the equipment. Cameras are very vulnerable to the careless treatment they may receive on a field shoot. The lens should be capped between scenes and whenever the camera is moved to prevent stray objects such as pebbles from accidentally striking it. If you are operating the camera, you should realize that you are in charge of a delicate piece of equipment that must remain operational for many future projects.
Lighting
Although lighting in the field is difficult, it has one distinct advantage over recording-live lighting—it generally allows each shot to be lit individually. When a studio program is shot with three cameras simultaneously, lighting must be general enough that it provides acceptable illumination for any camera shot. This means that compromises have to be made in setting the lights in a multi-camera studio environment. With most location shooting, however, the camera is stopped after each shot, and the lights are reset to light the next shot optimally.
Both the basic three-point lighting approach and the flat lighting method are appropriate in the field as well as in the studio. Likewise, contrast ratio, color temperature, and other principles of lighting (see Chapter 6) apply, at least in theory, to location work. Once again, problems can occur when you are dealing with uncontrolled situations. However, the problems associated with lighting indoors are quite different from those found outdoors.
Indoor Location Lighting
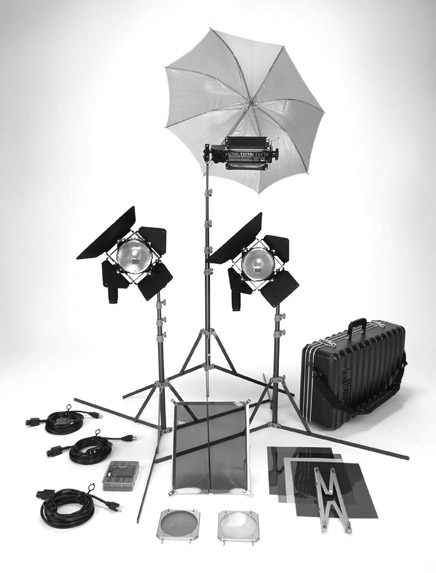
Because lighting is usually not optimal in field locations, the crew must bring portable lighting apparatus to the shoot. Portable lights are usually mounted on stands that can be placed in appropriate positions to yield the needed effect. The rise of LED lighting—which is lighter and consumes less power than traditional incandescent lighting—has been especially beneficial to field production. (See Figure 12.12.)
Flat lighting is fairly easy to accomplish in the field. Lights can be placed on the same plane as the camera. In fact, sometimes—particularly for news shoots—a light or ring of lights is placed directly on the camera. Sometimes, the easiest way to create general, overall flat lighting is to aim a light at the ceiling in such a way that diffused light bounces back onto the set.
Three-point lighting with a key, fill, and backlight is often difficult to accomplish in field production because of lack of space or because the light stands will show in the camera’s picture. The backlight is particularly tricky, because it is often impossible to position it correctly without having the stand visible in a long shot. Occasionally, a clip-on light may be clamped onto a door or a tall piece of furniture to serve as a backlight.
The lighting instruments taken on a field shoot are usually limited. Scoops, ellipsoidal spots, and even Fresnels are too bulky to lug along. The portable lights most commonly used are broads (see Chapter 6), but their beams are somewhat difficult to control.
Lighting Control
Lack of a dimmer board adds to the control problems in the field. To increase or decrease the intensity of a light, the stand must be moved in accordance with the inverse square law (see Chapter 6). However, space limitations may hinder this. Often, you can use scrims, barn doors, flags, and other devices to help diffuse or shape the light. Also, LED lights may have brightness controls that can be adjusted.
Power
Another major problem is securing adequate electrical power. A studio is specially wired in anticipation of the power that will be needed to meet extensive lighting demands. Homes and offices are not. Lighting properly with all lights plugged into one circuit is almost guaranteed to blow the circuit breaker.
For this reason, it is particularly important to learn ahead of time where the circuit breakers are, how many amps each circuit is rated for, and which outlets are on which circuit. You should also become familiar with the basic formula watts = volts × amps. (This is often referred to as the “West Virginia” formula: W = VA.) The wattage will be written somewhere on the lamp of your lighting instrument—such as 250 or 500 watts. Amperes should be indicated on the circuit breaker—usually 10, 15, or 20 amps. Voltage is regulated by the power company and in most ordinary circumstances is 110 volts. (In industrial settings, it may be 220 volts.) Therefore, if the circuit breaker is rated for 10 amps and the voltage is 110, you can plug in lights totaling 1,100 watts on that circuit. To be on the safe side, use a figure of 100 for the voltage (this also makes the math easier). So a 20-amp circuit could handle 2,000 watts.
However, you cannot assume your lights can use the whole circuit. You must take into account the total wattage of all appliances and devices on the circuit. The office copier or the home refrigerator may be using the same circuit. One group of students taping at a factory had been recording without problems for an hour when suddenly the circuit breaker tripped and the lights went out. It was lunchtime and the employees began using the microwave that was on the same circuit as the lights.
Usually, you must plug lights into at least two separate circuits, and generally this means using outlets in two different areas. In many homes and offices, outlets in one room are all on the same circuit, and you may have to go several rooms down the hall to use a different circuit. This means you must take along extension cords.
Safety
The use of extension cords raises the additional issue of safety. First of all, make sure that the extension cords you plan to use are rated for the electrical load you expect them to carry. Using cords that are not heavy-duty will trip the circuit breaker—or worse yet, start a fire.
Also, electrical cable strung across the floor is likely to cause people to trip, often unplugging the light and/or bringing down the light stand, as well as causing bodily injury. Where cords must be laid along the floor, cover them with wide tape to ensure that they will not be tripped over. Ideally, you should run the cords along the walls and up over doorjambs. For this purpose, you must bring along heavy-duty tape—preferably something that has a very strong adhesive, such as duct tape. Where cords must be taped to painted surfaces, it is best to use masking tape that will not peel the paint off when it is removed.
Lights also create a safety problem because of their heat. They should not be placed where someone is likely to bump into them accidentally. Also, they should not be placed where they are touching curtains or paper, which could start a fire. At the end of a shoot, the lights should be turned off first and packed away last. This gives them time to cool down before crew members handle them.
Available Light
Existing lights in an indoor environment can sometimes be used, but they may also cause problems. If at all possible, turn off all regular lights and just use the lights from your portable lighting kit. However, existing lights can be used for general illumination if they are of a color temperature close to 3,200 K (see Chapter 6). Regular incandescent light bulbs can usually be used, but office or home fluorescents should definitely be turned off. Not only may they give the recording a blue tint, they may also create a hum or buzz on the soundtrack.
Outdoor light coming through windows should also be avoided, if at all possible, because it is about 5,500 K—far bluer than the 3,200 K quartz lights. The problem is not with the outdoor light itself but with the fact that you are mixing types of light—daylight and quartz. If you set the camera’s filter for 3,200 K light and some of your light source is from daylight, your footage will look blue. If you set the filter for daylight, the footage will be orange. Gels are available to place on windows to change the color temperature of the outdoor light, but they are expensive and difficult to install. A simpler solution is to avoid mixing the types of light. If you cannot shoot in a windowless room, close the window drapes or shades.
Outdoor Location Lighting
If you are shooting outside, your main source of light is the sun. This has both advantages and disadvantages. You do not need to worry about light stands or power requirements. However, you have no control over the sun. It changes position; it can be overly intense; it hides behind passing clouds. Its color temperature changes as the day progresses so that scenes shot at noon will not match scenes shot at 5 p.m. Not only will these scenes have a color difference, but they are also likely to show different lengths of shadows, different molding of facial features, and different amounts of glare. This is a particular problem if long shots are taped at noon while close-ups that are to be intercut are not shot until 5 p.m.
Additional Lights
Sometimes the sun is so bright that you need extra lights. This seeming contradiction results from the fact that a bright sun can wash out facial features and create overly dark shadows. It acts, in essence, like a very bright key light. To counteract this, you add artificial lights to create the effect of a fill. Of course, these lights have to be the same color temperature as daylight.
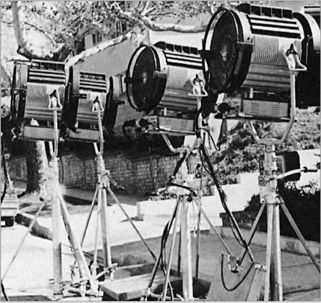
One way to do this is to cover the quartz lights used indoors with special filter gels that convert the 3,200-degree K light to 5,500-plus degrees K. However, the filters cut down on the efficiency of the light, so more lights than normal are needed. Another way is to use HMI or fluorescent lights that are made to produce 5,500-degree K light. To minimize problems from the sun passing behind clouds and from changing color temperature as the day wears on, you can use large HMI or fluorescent floods to create an artificial source of sunlight, even for interior scenes. (See Figure 12.13.)
If auxiliary lights are needed outdoors, getting power to them can be a problem. Powerful battery-operated lights do exist, but they are uncommon and expensive.
Reflectors
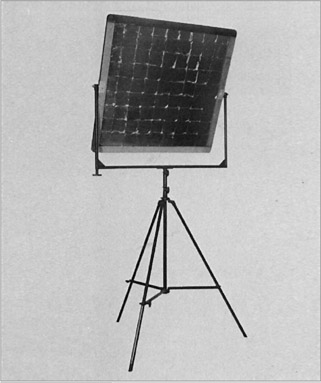
Another alternative for obtaining light from a different direction from the sun is to use a reflector. A large foil reflector can be used to bounce sunlight onto a subject’s face from almost any direction. And if the sun is behind the subject (functioning as a backlight), you can place the reflector in front of the subject to provide a satisfactory key light. If a professional reflector is not available, you can use any large piece of white material (a white poster board, for example) to provide some light from a complementary direction. (See Figure 12.14.) Obviously, the more highly polished or reflective the surface of the reflector is, the more efficient it will be.
Audio
As with other technical components, many of the elements of field production audio are the same as those for studio audio; differences are caused primarily by the uncontrollable elements of the outside world. As a starting point, ask the same questions concerning frequency, amplitude, pickup pattern, construction, and positioning for both studio and field productions (see Chapter 7). Sometimes the answers are different.
Microphones
Generally, microphones need to be more directional for field locations because of extraneous noise. Mics that are less sensitive (and therefore need to be located closer to the talent) are desirable because they will pick up less background noise. Also, because of the transportation jolts and rough handling that field equipment is subjected to, mics for location shoots usually are of a more rugged design—dynamic rather than condenser. Quality and frequency response often have to be sacrificed for dependability and ruggedness.
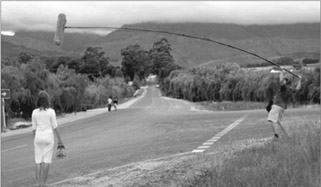
Fishpoles and hand mics tend to be used most frequently in the field. Fishpoles (see Figure 12.15) are commonly used for dramas, where the mic should not be seen in the picture. Hand mics are common in interview situations, where the presence of the mic is accepted. Another type of mic, the shotgun, is used in situations where the subject being recorded is far from the camera and cannot be miked easily (such as a lion in the jungle or a man on a horse). Shotgun mics are highly directional and can pick up sound from long distances. However, because of their high directionality, they must be pointed at the subject accurately so that they pick up the desired sound. Wireless mics come in very handy when subjects need to move around a great deal.
At times you may want to attach the microphone to the camera so that no one has to hold it. This is usually not a good idea if you are recording speech, because the camera is located at some distance from the person talking and the mic will likely pick up noises close to the camera much more efficiently than it picks up the talent. If you are picking up crowd noises or other nonspecific sounds, then a camera mic is acceptable.
Control Equipment
The sophisticated control-room equipment that produces clean, well-balanced sound is not available at a remote site. Hence, audio on a location shoot is only transduced, recorded, and monitored. Channeling, selecting, and altering (see Chapters 1 and 7) are all accomplished in postproduction, and yet great care must be taken to keep recording levels within a consistent range so that they can be matched when edited. Any differences in the levels of sounds will become obvious when different shots are assembled in the editing process.
An automatic gain control (AGC) that raises the volume of sounds that are soft and lowers the volume of loud sounds is available on most audio recorders. However, AGC is not usually a good way to keep audio levels within a consistent range. This is because AGC cannot distinguish between desired and undesired sound; it boosts anything that is low. Therefore, when no one is speaking, the level of the background noise is automatically amplified, producing a hissing or roaring effect. Because the AGC circuitry takes a second or so to adjust to sound changes, the effect is most noticeable at the beginning of segments or during long pauses. Usually it is better to turn off the AGC and control levels manually. If one person has a soft voice and the other has a booming voice, you can try to create balance by recording each on a separate mic onto a separate track; then the two volumes can be matched in postproduction.
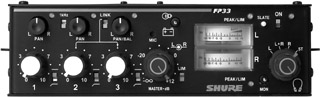
To control a large number of different audio sources that need to be recorded at the same time, you will need to take a portable audio mixer on location with you. (See Figure 12.16.) You can then feed several mics through the mixer, set their levels individually, and record this mix-down on the video. However, setting up such an audio mixer takes additional space and time, both of which are often unavailable on a field shoot. If the shoot is taking place in a small area, you must be careful to listen for phase problems caused by placing the mics too close together.
Another way of creating more control is to record the audio on a separate recorder, such as a DAT. An audio operator can then give undivided attention to the audio being recorded on that DAT, something that a person operating a camcorder cannot do. During editing, the sound from the DAT can be synced with the picture and incorporated into the edit along with music and sound effects. As noted in Chapter 5, a DAT is often used in productions involving DSLR cameras because of their limited audio capabilities.
Wildtrack
Audio operators on location should generally record some separate wildtrack sound—background sound from the location recorded with no specific voices. Sometimes, this is done for a definite purpose. For example, a narrator may be standing next to a machine that is important to the story line, and the machine has a distinctive sound. In the final edited program, shots that include the machine are to have a voice-over narration, which is to be recorded later in the studio. If the director wants to have the sound of the machine as part of the background under the narration, then a wildtrack of that sound must be recorded for a later audio mix.
At other times the wildtrack sound simply provides general background noise that can be used to cover abrupt transitions during postproduction editing. Good sound operators make a practice of recording numerous pieces of wildtrack as protection against unforeseen editing problems.
Extraneous Noise
The audio operator must listen carefully to the sound that is occurring and being recorded while a take is being shot. The human brain subconsciously filters out unwanted sound. The noise of an airplane flying overhead, for example, often goes unnoticed by two people engaged in conversation; they effectively hear only each other. But this selective attention principle does not work with recording equipment. An unnoticed airplane recorded on an audio track will come through loud and clear on playback. For that reason, the audio operator must listen intently and stop production if an unwanted noise becomes too pronounced.
Graphics and Sets
Graphics and sets receive less attention in field shooting than in studio shooting. Graphics are usually added after the fact, and “sets” are determined by the nature of the location.
Graphics
Some consumer cameras have built-in character generators so titles can be included during taping, but these are generally used only for slating or identification purposes, if at all. In fact, graphics in a camera can actually be a problem: More than one student has forgotten to turn off the day/date function of a camcorder and had it appear, very inappropriately, on all the footage shot for a drama.
Occasionally, you may need to shoot a chart that appears on a wall or some similar graphic to use as a cutaway, but these are not likely to be designed for television, so the camera operator must frame them as well as possible under the circumstances. If actual physical charts or illustrations are to be included in a program, they are better shot in a studio where lighting can be controlled. Most graphics, of course, are computer generated (see Chapter 8). All of these will be incorporated into the program during postproduction editing.
Sets
Sets in the traditional sense do not usually exist in the field. One reason you go on a location shoot is to obtain realistic scenery and settings that are not possible with constructed sets in a studio. However, unless the people you are dealing with are very cooperative or you are willing to pay a great deal of money, you cannot change much in a location setting. You can clean up someone’s desk so that the clutter will not be visually distracting, but you cannot readily change the color of the walls, the location of trees, or the placement of windows.
When shooting interior scenes, windows present a particular problem because they cause glare and interfere with proper lighting. The best advice is to avoid shooting into windows. However, it’s not always possible to avoid a passing shot of a window; perhaps the talent is walking across the room and passes in front of a window. In such a situation, consider disabling the camera’s automatic iris control; set the f-stop manually for the best interior (non-window) lighting, and keep it consistent as the talent passes in front of the window. This will result in an overexposed background through the window, but the alternative (if the automatic iris is left on) will cause the talent to turn into a silhouette when passing in front of the window.
In one sense, the setting is much easier and less expensive to deal with on location than in a studio because very little, if anything, needs to be constructed. However, an improper setting can totally destroy the concept and atmosphere of your program. You can wind up with the wrong colors, architecture, traffic flow, and so forth. Therefore, you may have to spend many hours scouting and searching for just the right setting.
Real locations are invariably much “busier” than studio sets; they have a lot of elements that are extraneous to what you will be shooting—furniture, wall coverings, appliances, and so forth. As a result, you must pay particular attention to make sure you do not wind up with shots that have light switches or flower pots that look like they are growing out of someone’s head.
Video Recording
As discussed in previous chapters, the majority of video recording is now done using tapeless technologies. These media have particular advantages for field use because they enable the camcorders to be lighter, less power hungry, and more rugged.
Setup and Connections
Although the camera and recorder are one unit, connections still must be made to it. For example, the audio should be routed separately from an external mic whenever possible because, as discussed previously, the microphone should be as close as possible to the talent. The camcorder input for a microphone may be an XLR, phone, RCA, or miniphone connector (see Chapter 7). Check before you leave for the location to confirm that the connector on the end of the microphone cable is the same as that required by the camcorder. You will also want to connect headphones into the earphone output on the camcorder, usually with a miniphone connector.
A monitor is sometimes attached to the recorder so that the director can see what the camera operator is framing. Possible connectors for this include BNC, or HDMI (see Chapter 10), so, again, you should be sure the proper cables and connectors are brought to the location to connect the recorder and monitor. Monitors can be unwieldy because, when they are connected to the camcorder, they must be moved if the camera is moved, thus inhibiting the camera operator’s flexibility. If it is truly important for those other than the camera operator to see the shot, wireless devices may be employed to send the signal from the camera to the monitor. Another solution is to use the viewfinder of the camcorder as a viewing device. After something is shot, the director can check it by playing it back through the viewfinder. This takes time, however, so many field shoots take place without monitoring. This requires trust and good communication between the director and the camera operator.
A good approach to the discipline of field production is to lay out all of the cables and connectors you will need for your particular assignment and then plug everything together and operate it before you leave the checkout area, to make sure you have everything you will need.
Recording Procedures
The camcorder operator should set the audio level and check all controls before recording begins. It is good practice to run the camera for at least 10 seconds before anything crucial is recorded and, likewise, to keep it running for about 10 seconds after the shot is completed.
The person in charge of recording must closely watch all the vital signs, most of which appear on indicators in the viewfinder monitor—media full warning, battery condition, low light, and so forth. In most instances, this person will also be framing shots and listening to the headphones to make sure the audio is recording properly—unless, of course, the audio is being recorded on a separate recorder. Because the operator is performing so many tasks, he or she must be extra careful to make sure the recorder part of the camcorder is operating properly. The best shot will be useless if it is not recorded properly.
Editing
Many of the options and operations of editing are the same for multi-camera and field production (see Chapter 11). What is different, however, is the emphasis placed on the editing process and the expanded role of audio editing.
The Editing Process
Because much of the editing done in conjunction with studio-based production is intended to correct mistakes made during production or to put together short roll-ins to be played during production, the editing can usually be accomplished rather quickly. Such is not the case with material shot film-style. The program is literally put together during postproduction—a process that is often long and drawn out. Much of the strength—and discipline—of a good director is an ability to generate the sense of momentum and enthusiasm needed to complete a production. In live television, the relentless clock focuses everyone’s attention; in single-camera postproduction, the constant pressure of a knowledgeable guiding hand is crucial.
Although many professional editing sessions involve only the producer or the director working in conjunction with the editor (or even the editor working alone with only a detailed set of notes), student postproduction sessions should, as much as possible, become a learning process for the entire team. The important thing is that someone must be in charge. This may be the producer, the director, or the editor, but it should be someone who understands the basic structure of the project.
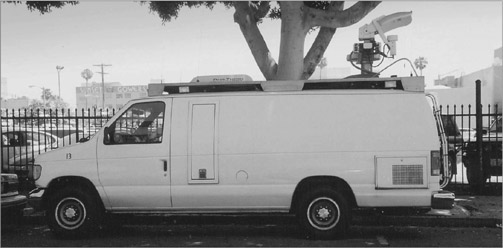
Although the editing connected with field production is done with nonlinear editing systems as discussed in Chapter 11, it is not always completed in an editing suite. ENG footage, for example, has for years been edited in the vans that the reporters and camera operators travel in. These vans also often have the capability to send the edited package back to the station or broadcast it live using a microwave or satellite transmitter. (See Figure 12.17.) Increasingly, a reporter can simply edit the footage and assemble a package using laptop computer-based nonlinear editing software and then send it to the station via a wi-fi or other digital connection. Even for more advanced types of productions (dramas, documentaries, etc.), an on-set editor may use a laptop computer to edit a series of shots that have just been recorded. The director can look at the edit to see if additional material needs to be shot in order for the scene to work effectively.
Audio Editing
For a studio production, audio is usually mixed while the program is being recorded. Music is brought in at the beginning and end of the show, and sound effects are incorporated as the production is under way. Single-camera productions shot without benefit of a sophisticated audio board do not lend themselves to audio mixing during the production phase. Obtaining good dialogue, interview comments, or on-camera narration is all that can really be expected in the field.
As a result, audio editing for professional single-camera productions is sometimes undertaken separately from video editing. While one person is editing the picture and the principal dialogue shot in the field, other people are attending to music and sound effects. Dramatic productions are the most complicated from an audio point of view. Someone, often the director, must first determine where audio elements are needed. Where will the music be brought in and taken out? What sound effects are appropriate? Which sounds recorded in the field need to be rerecorded because they are not good enough? Once all this has been decided, a musician may be asked to compose the music, someone obtains effects from sound-effects CDs or websites, and sometimes members of the cast are brought back into a studio to record their lines over again—a process known as automatic dialogue replacement.
After all the sounds have been gathered, they are imported into the program being used to edit audio. Here the sounds are positioned where they are needed during the production. They are also mixed together so they are in a proper volume relationship with each other—the music is lowered when an actor is talking, the gunshot’s volume is raised so it stands out from the rain in the background. The average TV drama, commercial, documentary, or top-flight industrial production has a final soundtrack that is the result of the skilled mixing of anywhere from 16 to 32 or more separate soundtracks.
Although most student productions do not incorporate this many tracks, it is no less important that the preparation for the soundtrack start with the very first plans for the project. The director and producer should question each other continually as to the exact details of how each sound or combination of sounds (on-camera narrator, voice-over narrator, background noise, music, sound effects, and so forth) is to be achieved. Some of the sound work can be accomplished while production is under way. For example, if you know you are going to need the sound effect of a dog barking, you can find it well ahead of the day you need to mix it with other sounds.
Remote Truck Productions
Productions undertaken from large remote trucks bear resemblance to both field production and studio production. They also have unique characteristics of their own.
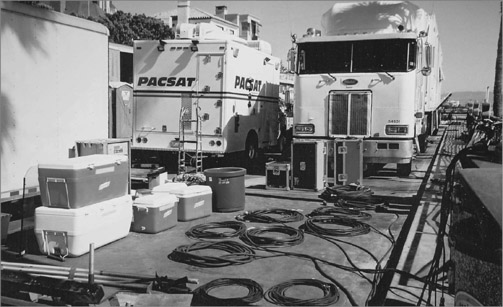
The crew is often larger than for either studio or field productions. There are cables, mounting devices, lights, and many other things to carry and position. Cleanup is an extensive operation because all cables must be coiled and everything must be packed neatly. (See Figure 12.18.) Space is at a premium in the truck, so there is no room for sloppiness. A truck often has both microwave and satellite dishes on its roof so that it can send and receive signals. If the event is being broadcast live, there may be crew members to make sure the signal is getting to the station or the satellite. In addition, someone may be needed to oversee the generator if that is what is providing the power for the truck.
The event that is covered with trucks often is not generated by the network or station; rather, it is a football game, parade, concert, or other event that would go on even if there were no TV coverage. In fact, the TV entity must usually pay for the right to televise the event and must abide by certain requirements of the responsible agency—requirements that often add to the work of the TV producer. Preproduction is very important so that all the elements needed will be at the right place at the right time. Sketches of the location are valuable for determining camera and microphone placement. Producing a truck shoot can involve not only making lists but making lists of lists.
The director’s job in a truck shoot is similar to the job in the studio in that there are multiple cameras. But the work can be more intense because many truck broadcasts are live and there is no chance to edit, even if the mistake is blatant. The director is stationed a long way from the camera operators—in the truck, which is outside the stadium with no overall view of the playing field, or at the beginning of the parade with no direct view of the parade route. A simple intercom system often isn’t adequate. The director and crew members may need walkie-talkies and cell phones.
A truck shoot is likely to have a number of associate directors preparing different types of shots for the director. One AD may be assessing all the cameras that have crowd shots, looking for those with particular human interest. Another AD might be setting up the instant replays, while another is overseeing cameras that have been assigned to get close-ups of the coaches. The chatter that goes on among the ADs and the director may sound like bedlam, but it is usually a well-organized pattern established by people who have worked together often. Even with help from ADs, the director must pay very careful attention to a vast array of monitors and quickly select the most appropriate shot for the moment.
A truck shoot is more likely to involve more cameras than a studio shoot. The area of action is usually vast, and since the event is unscripted, cameras need to be situated in many places to cover whatever happens. Most of the cameras are connected to the truck through cables. Some facilities that host events frequently (such as sports stadiums or concert halls) have permanent wiring within the walls so that trucks can be hooked up outside the facility and cameras can be connected within the facility. In other instances, all the cable must be strung from truck to camera positions. HDTV signals need greater cable capacity, so a number of venues have rewired with fiber optics in order to accommodate this technology. Often, however, it is the broadcasters who must run the fiber optics. Camera operators who move around the facility getting close-ups of the action may have cameras that send their signals back to the truck using wireless technology. This gives the camera operators greater mobility.
Lighting for truck shoots is more likely to resemble field production than studio production, because the lighting used is available light or special lighting brought by the TV crew. Often it is impossible to control the lighting to the extent you can in field production, however. Trying to diffuse sharp sunlight over an entire baseball field would be an exercise in futility. Weather is a factor that definitely affects lights and other aspects of production. Finding a method for getting up-to-date weather reports is often part of the preproduction process for truck shoots.
A truck shoot is likely to involve many microphones, some of which must be positioned in unusual places. There is often the need to pick up crowd noises, the referee, and the band as well as the people who are announcing the event. Sometimes you need to tie into the public address system that the event organizers are using so that your TV coverage can include such things as official race results or a concert. You may need to send out live audio in many different forms—surround sound for the HDTV broadcast, stereo for the Internet, mono for an international feed. The graphics operator on a truck remote is usually very busy, especially during a sports event. Many statistics can be prepared before the telecast and then brought up as needed, but it is impossible to predict all the graphics needs, so the operator usually needs to build graphics during the telecast. Routine information—balls and strikes, first downs, time remaining—also requires constant updating.
The technical director keeps very busy at the switcher. It is rare that a remote covered by a truck can undergo any rehearsal, so although the technical director can plan for some events, he or she doesn’t really know what to expect—and neither does the director. Remote broadcasts are usually laden with special effects, so the director and the TD must develop an effective shorthand that enables the shots the director wants to get on the air.
Even if an event is broadcast live, it is also usually recorded so that it is available for future use. For example, many of the highlights that appear in the sports part of a newscast are from the recording of the game. In addition, short bits are recorded for instant replay during the telecast, and often material recorded earlier (interviews with celebrities, background information on the performers) is played back during the broadcast.
It is not uncommon for parts of the telecast to be edited so they can be shown later in the broadcast. Halftime highlights, reviews of basketball shots by one particular player, or crowd reactions to a particular song are often edited as the taping is in progress. This, of course, means that an editor must be a member of the crew. Adrenaline flows freely during most truck shoots, but that is part of what makes them a satisfying, bonding experience for members of the crew.
Focus Points
After reading this chapter, you should know . . .
- The reasons for a greater need for discipline in the field.
- The different cast and crew members needed in the field as well as varying tasks that are undertaken on location.
- The organizational duties a producer must perform to ensure a smooth production.
- How to direct on location.
- How cameras are used in the field.
- Lighting techniques for both indoor and outdoor locations.
- How to handle audio problems in the field.
- The lesser role that graphics and sets play in many field shoots.
- The functions of the recording part of the camcorder.
- The greater role editing plays in single-camera shooting.
- How remote truck production is similar to and different from both studio and field production.
Review
- What are the main differences between lighting in a studio and lighting on location, both for a field shoot and for a remote truck shoot?
- Describe the advantages and disadvantages of a large crew versus a small crew on a location shoot.
- How is a director’s job different in the field, on a truck, and in the studio?
- How do the challenges audio operators face in the field compare to those in the studio?
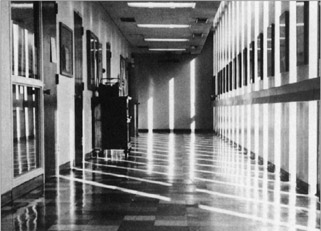
- Imagine you are scouting a hallway for a shoot. You find the one in Figure 12.19. How many problems can you spot if you plan on using this hallway? How will the mixture of indoor and outdoor light affect color temperature? What can be done about the potential glare? How will the automatic iris function as the talent walks along the corridor, moving in and out of extremely bright spots? What will be the safest angle to use?
On Set
- List all the equipment available for remote shooting at your school’s facility. Note the characteristics of each piece of equipment, such as directionality for microphones, formats for video recorders, power requirements for lighting kits, types of connectors for cables, and so forth.
- Using the “Location Survey Checklist,” scout a location on campus, such as the bookstore, the main lobby of the student center, or the football stadium. Answer the survey questions and decide what you would need to do to ensure a successful shoot.