Reduced to its most basic definition, editing is the process of combining video and audio elements from various sources into a coherent whole. For example, you may have one piece of video recorded in the field that shows the mayor waving to a crowd and then walking into his office and another piece of video from an interview with the mayor recorded in the studio. Through editing, you can combine these video and audio sources, discarding material you don’t need.
Using a switcher in a studio production situation, as discussed in Chapter 9, is a form of editing in real time. Here, too, you are selecting various sources of video (cameras, satellite feeds, graphics, and so forth) at appropriate times to create a coherent production. Postproduction editing, however, is a more deliberative process, in which more time is taken in selecting and combining various sources of video. As its name implies, postproduction editing takes place after the video material has been gathered. A postproduction editor may take many hours to create a finished product that is only a few minutes in length.
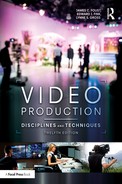
Until the mid-1990s, nearly all postproduction was done with linear editing, which used videotape both as the source of the footage to be used and as the recording medium. In essence, linear editing is recording from one videotape onto another. However, in the ensuing years, nonlinear editing has become the exclusive method of postproduction editing in professional video production. In nonlinear editing, all of the video footage is stored in digital form and edited using a computer (see Figure 11.1).
The disciplines of editing include thorough planning before the editing begins and attention to aesthetic considerations. The techniques of editing differ according to the equipment being used but always involve general practices, such as planning, aesthetic considerations, and ethical practices, which are addressed in this chapter.
Editing Basics
Editing is an integral part of single-camera productions such as dramas, commercials, music videos, and documentaries. In these projects, camera footage usually includes multiple takes of individual segments, often shot out of sequence and at different locations. The editing process essentially starts from scratch, with editors assembling the program from these diverse video elements. This type of editing—on a much less sophisticated scale—is also used in news-gathering situations when a journalist shoots the various parts of a news story (such as interviews, reporter stand-ups, and footage) and then edits them together into a story called a package. These packages, which are edited onto a video server, are then used in the live production of the nightly newscast.
The newscast itself is produced in a manner similar to the studio-based productions described above, and the recorded packages are played during the show as roll-ins (see Chapter 12). For example, the news anchor will say, “Joe Smith has the story about the mayor’s visit to France,” and then the package of the mayor’s visit will be played. Shows like Entertainment Tonight and 60 Minutes use the same technique. The term roll-in comes from the concept of rolling videotape, and it is still used even though server systems have replaced tape machines.
Editing can also be used in conjunction with purely studio-based productions. For example, daytime soap operas and some prime-time situation comedies are shot using a multiple-camera technique. These programs are recorded to tape or a video server while the director calls the shots as if it were a live production. At the same time, each camera is connected, or “slaved,” to its own recorder, which records everything that camera shoots during the production. Then, if there is a problem during the production involving a poor shot or a switching mistake, it can be corrected by editing in shots from one of the slaved cameras. For example, if the director calls for camera 1 but the technical director accidentally takes camera 2, the correct shot from camera 1 can be edited in afterward. If one of the performers flubs a line, it might be possible to edit in the correct line from a dress rehearsal, or additional pickup shots might be recorded at the end of the production. Correcting and improving shots and sound from the “live” studio-based production in this way is called sweetening. When a camera used in a multi-camera production is slaved to its own recorder, it is often called an iso camera (short for “isolated”).
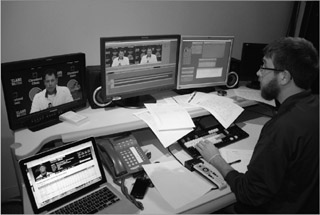
Another type of live editing takes place during many sports productions. As noted in Chapter 10, a live slow motion (LSM) server system can simultaneously record several different cameras used in the production. So, in effect, the LSM records everything shot by all or some of the cameras. Then, the EVS operator (named for EVS, the company that makes the most commonly used LSM equipment) can quickly recall any of the recorded footage from one or more cameras (see Figure 11.2). LSMs use a specialized control unit that looks like a small switcher with a control knob and lever, along with a computer screen. The EVS operator can also edit together multiple shots or angles, add animated graphic elements, and create slow- or fast-motion effects.
Two sports examples illustrate the ways LSMs are commonly used. First, in a baseball game, after the pitcher strikes out a batter, we might want to show the previous sequence of pitches. In this situation, the EVS operator would mark the footage from the center-field camera on each pitch as it is thrown and assemble the pitches into a sequence. Then, after the batter strikes out and on the director’s command, the EVS operator can play the edited sequence. Second, in a football game we might want to show various camera angles of a touchdown catch to see if the receiver’s foot landed out of bounds. In this situation, the EVS operator will access the footage shot by several different cameras and edit them together. Thus, we could see the view from the camera in the stands, the camera on the sidelines, and perhaps a camera on the goalpost. The EVS operator could also slow down some or all of these angles so viewers can get a better look.
LSMs have fundamentally changed the way live productions—especially sports—are presented. To get a sense of this, watch a recent production of a game and compare it to archive footage of a game from the 1980s or 1990s. In the older game, you will likely see far fewer replays, and certainly not from the number of different angles in the more recent game. Today’s viewers have come to take these live-edited elements for granted, but they are only possible as the result of new server and controller technologies and the skill of seasoned EVS operators.
Off-line and On-line Editing
In the days of videotape editing, the terms off-line editing and on-line editing had definite and discrete meanings. However, with the ascendance of computer-based nonlinear editing systems, their definitions are now somewhat blurred. If the purpose of the editing is to create a rough cut, a basic representation of what the finished program was supposed to look like, the process is generally called off-line editing. If the purpose is to create a finished product, the process is generally called on-line editing. On-line and off-line editing are often both done on the same equipment.
On occasion, you will hear people make distinctions between on-line and off-line work that are not based on the purpose of the editing. Some people, for example, consider off-line editing as that done on lower-quality equipment than what is used for on-line editing. Others might use the terms to refer to the quality of the finished product, saying that work produced for the Internet is off-line and work produced for broadcast is on-line. For our discussions, however, we will use the purpose of the editing as the criterion for distinguishing the two terms: If the purpose is to create a rough cut, that’s off-line editing; if the purpose is to create a finished product, that’s on-line editing.
Project Interchange Files
Transferring an editing project among different workstations, such as moving from off-line to on-line work, is facilitated by the use of project interchange files. A number of different interchange formats are used, although as of yet none has emerged as a de facto standard. These formats include Open Media Framework Interchange (OMFI), Advanced Authoring Format (AAF), Material eXchange Format (MXF), and Apple’s Final Cut Pro XML Interchange Format. In theory, you could edit a project using one editing system (say, Final Cut Pro) and then export a project interchange file that would include enough information for you to continue editing on a different computer using a different editing program (provided that computer also had access to the audio and video files used in the project). In the days of linear-only editing, an edit decision list (EDL), which kept a record of each edit, including what tape the shot originally came from, where the shot is on the tape, and the length of the edited shot was used. It also showed transitions and which video and audio channels were edited. Although EDLs can still be useful in some situations, they cannot save enough information about transitions and other effects to be truly useful in the nonlinear world.
Compression
The use of compression, as discussed in Chapter 10, makes video signals less resource-intensive. However, issues involved in how signals are compressed can have a direct bearing on the editing process.
Remember, there are two main types of compression: intraframe compression, in which each frame of video is treated as a discrete unit, and interframe compression, in which frames are analyzed in groups, and information that doesn’t change from frame to frame (such as the plain white background behind a person) is discarded.
As discussed in Chapter 10, interframe compression systems make the video signal more compact because most of the video frames they send are not complete. For the first frame of this video, the compression system will create the entire frame, containing all of the information in the original signal. These frames are called intracoded or “I” frames. However, the next several frames are not likely to be complete; instead, they will contain only the portions of the frame that changed from the “I” frame (such as the person’s moving lips and eyes). These frames are called predicted or “P” frames, and they are created by essentially predicting what the picture will contain based on previous frames. (There are also bidirectional or “B” frames, which are predicted by looking at both previous and succeeding frames.) In a group of ten frames, then, there may be only two or so complete “I” frames, containing all of the information needed to create the frame.
This can affect editing because if we get a complete frame only once every five or ten frames, frame-accurate editing becomes more challenging. For example, we might want to make an edit at time code 01:05:06:11, but the nearest “I” frame is at 01:05:06:18. In a case like this, the editing program will have to attempt to re-construct the complete frame, which can create subtle quality issues and also affect playback in the editing program.
We can also encode our video specifying more “I” frames, but this, of course, comes at the price of a lower compression ratio. Interframe compression does not make precise frame editing impossible by any means, but you need to be aware of its potential challenges.
Editing Preparation
Preparation for editing should begin long before you sit down to edit together a program. Taking time to prepare properly will pay off once the actual editing begins, and the extra time you spend in the pre-editing phase is likely to be more than made up for in the time you will save during editing. In fact, you should begin preparing for editing before the first shot is recorded, and you should consider the editing process in each step of the production process.
There are a wide variety of different scenarios when it comes to where the raw material for your editing project will come from. You may have shot all of your footage on removable digital media, such as SD cards, or your footage may have been saved directly to a media server. You may also have a mix of footage on removable media and on a server. If the footage was recorded on removable media, one of your very first steps should be making a back-up of the footage by copying the files and folders to a hard disk or media server. That way, if you lose the removable media or the files become corrupted or damaged in some way, you will not have to re-shoot your project.
Despite the wide variety of editing scenarios, the basic process of editing preparation is the same.
Reviewing
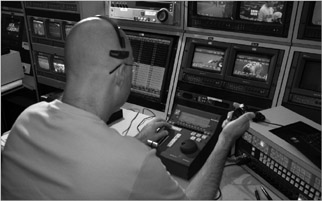
Once all of the footage has been shot, you should critically and systematically examine the material. In the review stage, you are familiarizing yourself with the available footage if you did not shoot it, or taking a more critical look at it if you did shoot it. The specifics of reviewing the footage will depend on how you have saved your footage as described above, but you will need to be able to see the time code on each individual clip. Since some video player programs cannot display time code, you may have to review your footage using your video editing program. As an alternative, you can create a time code burn-in that displays the time code of clips over the video, as shown in Figure 11.3. Most editing programs allow you to assemble footage together quickly and create a time code burn-in, which can then be output as a file, DVD, or Blu-ray. Once you have this, you can use any video player program to review your footage.
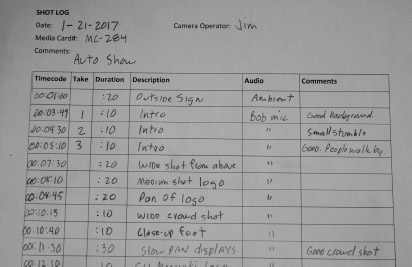
During the review phase, you should create one or more shot logs that list all of the shots you have recorded (or at least the ones that are potentially good enough to use in the final production). Each separate storage device you used to shoot (such as SD card) should have its own shot log. As shown in Figure 11.4, the shot log should indicate the name of the file, time code, the take number, a brief description, audio content, and comments for each shot.
Decision Making
Once you have finished making shot logs, you can begin making decisions about how the footage will be edited. This includes picking shots and deciding which takes of particular scenes will be used in the finished product. Although some final shot selection decisions will have to wait until editing actually begins, during the review and decision-making phases you will assemble a preliminary edit decision list by hand, noting which shots will be used, along with time code points.
Nonlinear Editing Techniques
The most popular nonlinear editing systems are those made by Avid, Apple’s Final Cut Pro, and Adobe’s Premiere Pro. At the most basic level, however, all systems are really nothing more than computers with specialized software (and sometimes hardware) to perform the editing functions. Some programs are designed for Mac computers, while others are for Windows-based PCs.
The basic variables among nonlinear systems have to do with speed, quality of output, formats of video, graphics, audio accepted, input options, storage capacity, and sophistication and quality of special effects. Not surprisingly, the more features, speed, and quality you desire, the more you will have to pay. The $100 software that turns your home computer into a nonlinear video editor may be fine for putting together vacation videos, but to do professional-quality work, you’ll need something better.
Because such a wide variety of systems are available, and because each system has its own particular operating methods, this section will discuss nonlinear editing in general terms. When we do incorporate specific examples, we will use Premiere Pro for demonstration, but keep in mind that other systems operate in a similar manner, although they may look a little different or have different names for windows or processes. In fact, different versions of Premiere Pro may look different from the examples. The idea is to go over the basic functions and operations that are common to all nonlinear editing systems. And, of course, the only way to really learn how to use any nonlinear editing system is to devote time to hands-on practice. This section is intended to give you a running start.
File Management
Since the central element of a nonlinear editing system is a computer, considerations relating to managing data files are extremely important to the editing process. Depending on the setup of the particular editing system you’re working with, files may be saved in one of several different places. For example, your system may save files onto the computer’s main hard disk, an auxiliary hard disk, or a remote server networked to the editing system. In an academic environment, you may need to save the files onto your own portable disk drive. The key point is that all of the files you need for a given project should be saved in one place and that you need to have a clear sense of exactly where that place is. Normally, it’s a good idea to make a folder for each project on an appropriate disk and save everything in that folder. Your school may have specific rules for naming files, but it is always a good idea to give all folders and files descriptive names—containing your last name, if possible. For example, the name “Foust Assignment 1 project” tells you (and others) a lot more about what the data is than a name like “My test 1” or “Untitled Project.”
Before you begin editing, you will create a project file that will hold general information about what you’re working on. As you work on the project, other files will be created to save data contained in browsers and sequences (as will be discussed later in this section), as well as other information. The browser, sequence, and other files become associated with the project file, meaning that when you open the project file later, the other files will automatically open along with it.
As with your raw footage, make sure your project data are backed up or copied to a second location. If you have a project that you’ve devoted many hours to and you experience a hard disk crash or other mishap, you can lose all of your work. For that reason, you should save your data files frequently and be sure to make regular backups.
Capturing and Importing Raw Material
Once you’ve set up your project, with an appropriate name and saved in an appropriate folder, you can begin bringing your video footage and its accompanying audio into the project. This process is called importing or capturing depending on what kind of medium the footage is on. If the footage is being taken from tape or a live camera, we usually use the term capture; if it is on a tapeless medium, we use the term import.
To import digital video files into your project, you simply select the import command, which is usually located under the video editing program’s “File” menu. Then, navigate to the location where your raw video files are saved, and select the appropriate files. Of course, you will probably not want to import all of your footage—just the parts you have designated in your pre-edit planning. Once you’ve imported the files, you should see icons for them in your bin or browser. You can use the same technique to import other types of files that may be used in editing projects, such as graphics files or audio files.
In some cases, your camera may record video in a format that is incompatible with the editing software. In these cases, you will need to transcode the files—meaning in effect that you re-encode them in a format the software recognizes. The editing software may have transcoding capabilities built-in, or you may have to purchase separate software to perform the transcoding. Adobe’s Premiere Pro, for example, includes the Adobe Media Encoder software that can convert digital video files to different formats. After you convert your files, you can then import them into your editing project.
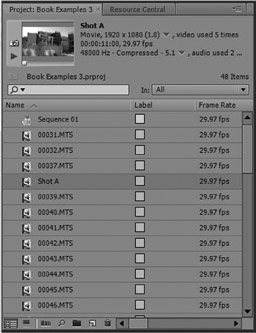
Once pieces of video and audio are brought into the project, they are called clips and will appear as icons in a window called the browser or the bin. Similarly, audio-only files, graphics, animations, and other media to be used in a project will appear in the browser as well (see Figure 11.5).
The Editing Workspace
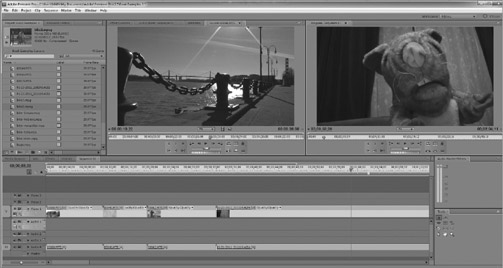
The series of windows and tools that appears when you start an editing program is called the workspace. Most editing programs have built-in workspace layouts designed for certain tasks, such as editing or creating special effects. However, on most editing programs, the workspace is highly configurable, allowing you to arrange the various parts to your liking. You can also save and recall workspace configurations. For basic editing, you will want to have three main windows available on your workspace: the browser, which, as discussed, holds the individual media clips; the source monitor (or viewer), which is used to manipulate clips; and the sequence (or timeline), where individual clips and other media elements are edited together. Associated with the sequence is an additional window similar to the source monitor that allows you to view and manipulate edited footage in the sequence. On Final Cut Pro this window is called the canvas. (See Figure 11.6.)
You can open additional windows to perform other types of operations, such as audio equalization, graphic design, and transitions. Monitoring windows for audio level and video quality, such as a vectorscope and waveform monitor, are also available. You also can choose to have more than one browser or sequence. The use of multiple browsers allows you to organize an editing project either according to media type (audio, video, and graphics) or according to parts of a program. Having more than one sequence allows you to edit more than one version of a program simultaneously—perhaps one version is being edited with a soundtrack in English while another is being edited with a soundtrack in Spanish.
Editing Individual Clips
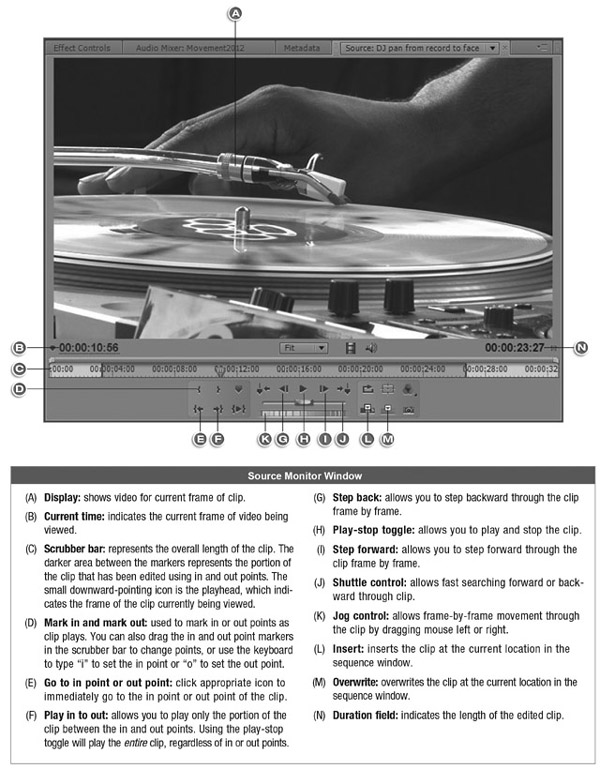
Double-clicking on a clip in a browser causes the clip’s content to be shown in the source monitor, which allows you to make changes to it. Figure 11.7 shows some of the most commonly used controls in Premiere Pro’s source monitor window. You can change the length of a clip by dragging in point or out point locators, which correspond to the beginning and end of the clip, respectively. You can also change in and out points by using the keyboard to type in a specific time code address, then clicking the mark in or mark out buttons, or you can just click mark in or mark out at an appropriate point as you play the clip.
In this way, individual clips can be precisely edited, a process called trimming. It is important to note that when you trim a clip using the source monitor, you do not lose any parts of the clip you edit out—the entire original clip is still there, and you can restore it if you change your mind later by simply re-setting the in and out points. This is one of the central concepts of nondestructive editing, which means that the original source material you use for an editing project is not affected by changes made in the editing program. The unused portions of a clip that you trim out are often referred to as handles, and having them on your clips is critical to using advanced features such as transitions and the tools discussed later.
You use the trimming process to cut down longer clips into shorter versions containing only the parts of the clips you really want to use. For example, one clip in its original form may contain a historian talking for two minutes about Abraham Lincoln, but what you really want is the ten seconds near the end when she says, “Abraham Lincoln was the most influential President in history because he managed to preserve the Union.” Or a clip shot in the field may have some camera shake at the beginning or end. By trimming, you can preserve just the portion of the clip you want to use. You can also make a copy of a clip in the browser, then set up the copy differently from the original. For example, you might make a copy of the historian clip discussed above, then set up one as described above and the copy to a different soundbite earlier in the clip.
By clicking the name of a clip in the browser, you can change what the clip is called. It is a good idea to go through your clips and give them appropriate names that describe what the clips are. You also can apply special effects, such as color manipulation or slow motion, to a clip. Depending on the sophistication of the nonlinear system, the effects may be instantly applied, or they may have to be computed in a process called rendering. When you have finished manipulating the clip, the new version of it is saved in the browser.
Editing on the Sequence
While the source monitor is used to manipulate individual clips, we use the sequence to put individual clips and media elements together. Figure 11.8 shows some of the most commonly used parts of Premiere Pro’s sequence window. The sequence is set up like a timeline—which is why it is often referred to as the timeline—with multiple video and audio channels. We place items on the timeline from left to right in the order we wish for them to be seen and heard. The actual time of an edited project is indicated by times at the top of the sequence window, while the playhead indicates the portion of the sequence currently being played.
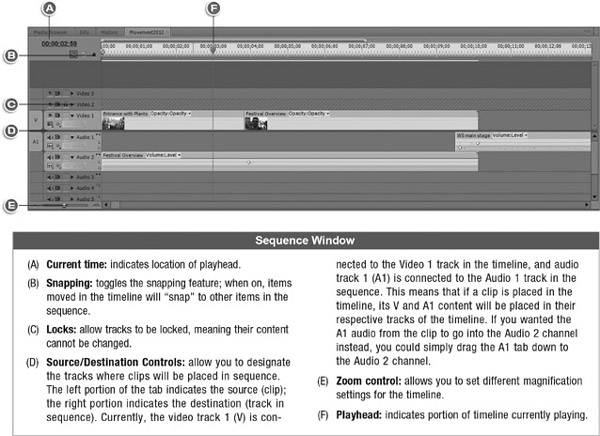
A sequence can be set up to have multiple audio and video channels; while multiple sounds in different audio channels will be mixed together, a video clip placed in a video channel above other video channels will cover content in the lower channels. For example, if you place a video clip of a tree in video channel 1, and a video clip of a dog in video channel 2 at the same time location, the dog video in essence covers up the tree video and causes it not to be seen. However, having multiple video channels becomes useful in advanced editing to create effects such as superimposing a graphic over part of a video clip, or having two video clips play simultaneously in a split-screen format.
To begin editing in the sequence window, simply drag a clip from the browser or source monitor onto the sequence’s timeline, then drag and place subsequent clips in the same manner. Clips can also be dragged over the program monitor window, which places them in the sequence at the point where the playhead is currently positioned. Alternately, with a clip displayed in the source monitor, you can click either the insert or overwrite button (see Figure 11.7) or select a menu command to add the active clip to the sequence at the point where the playhead is currently positioned. When placing clips using the source monitor, you can change the channels clips are assigned to by manipulating the source/destination controls, as shown in Figure 11.8. Once a clip is on the timeline, you can also change its audio or video channel by dragging the audio or video portion of the clip up or down into a new channel. Clips that contain video and audio will appear in the appropriate channels on the program line; a clip that is audio only, for example, will appear only in an audio channel.
Once you have clips on the timeline, you can move them by dragging them with the mouse. Clicking and dragging near the edge of a clip will change the clip’s length; clicking the left side of the clip changes the in point, and clicking the right side changes the out point. Figure 11.9 shows a portion of an edited project consisting of several video clips.
You can play the entire sequence or a portion of it at any time in the editing process by pressing the space bar, which toggles between playing and pausing sequence playback. To play just a portion of the program, drag the playhead to the place you want to begin. You can adjust the sequence window for how much of the program you want to see by dragging the zoom control. To perform editing functions in precise detail, set the sequence to show a much smaller portion of the program by dragging the zoom control to the right. Dragging the zoom control to the left will allow you to see more of the program. Keep in mind that these changes affect only how you view the program clips in the sequence window; they don’t actually change the length of the clips or the program itself.

Synchronizing and Unsynchronizing clips
Clips that have both audio and video are said to be synchronized, meaning the audio and video portions are locked together. Changing the length of a synchronized clip changes both the audio and video for example, while moving a synchronized clip moves both channels. Normally, you want clips to be synchronized; a person’s lip movements should match the audio of her voice, for example. However, at times you may want to unsynchronize the audio—if you want to remove the audio portion of a clip but leave the video, for example. To do this, you first select the clip on the timeline, and then select Edit >> Unlink from the menu, or right-click (CTRL-click on a Mac) the clip on the sequence and select Unlink. You can then manipulate individual portions of a clip independently. For example, you can shift the position of the audio portion of the clip while leaving the video portion unchanged.
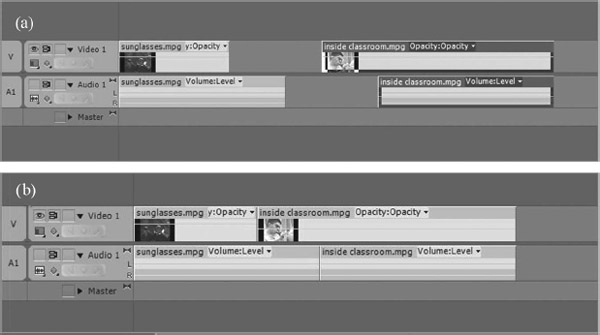
You can also use this technique to create a split edit, in which the audio and video portions of a clip have different in or out points. For example, say you want to cut from a clip called “Sunglasses” to a clip called “Inside Classroom,” but you want to see the video of the second clip before you hear its accompanying audio. You would simply unlink both clips, move the out point of the video portion of the Sunglasses clip back, and move the audio portion of the Inside Classroom clip ahead. This creates two L-shaped clips, as shown in Figure 11.10a. The clips could then be dragged together to create the split edit, as shown in Figure 11.10b. When you play back this sequence, you will see the video from the Inside Classroom clip before you hear its audio. During this period, the audio from the Sunglasses clip will be heard.
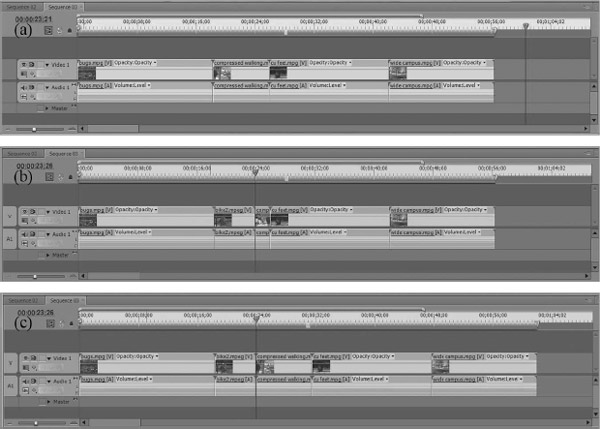
Inserting and Overwriting
Although you will often build video presentations linearly in a sequence by assembling clips one after the other, you can also go back and add new clips to portions of the presentation that have already been assembled. In these situations, it is important to understand the difference between overwrite and insert. When you add a new clip to the middle of an edited presentation using overwrite, the new clip’s audio and video components replace the existing material. However, when you add a clip using insert, a space opens up for the new material and pushes all of the following material forward on the timeline (a process called ripple). An insert does not erase any existing material on the timeline. Another way to understand the difference is that an overwrite edit will not change the overall length of an edited program while an insert edit will make the program longer by the length of the inserted clip. This difference is illustrated in Figure 11.11. You choose whether to insert or overwrite an existing clip by clicking the appropriate button on the source monitor window, as shown in Figure 11.7.
Advanced Timeline Editing Techniques
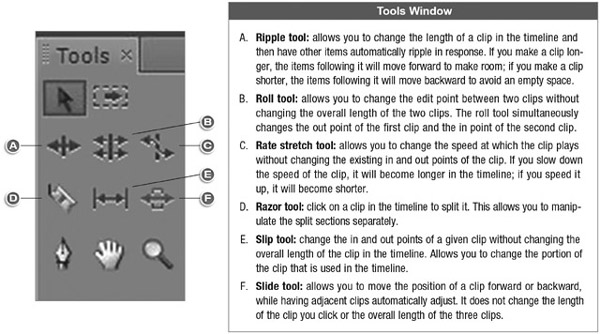
Most nonlinear editing programs also offer a series of advanced tools for adjusting clips after they have been assembled on the timeline. For example, let’s say you want to alter a clip near the beginning of your program that is three seconds long and shows dolphins jumping in and out of the water. The portion of the clip you have used does not have as much action as a later portion of the clip that shows more dolphins coming out of the water. Using the slip tool you can click and hold the mouse over the clip in the timeline, and then drag to the left or right. Doing this allows you to change which three seconds of the clip you are using without changing the overall length of the clip. Thus, you can drag to use the later portion of the clip that shows more action. Figure 11.12 shows some of the other advanced editing tools along with a brief explanation of how they work.
It is important here to revisit the concept of handles as discussed previously. The scenario above works only if the clip you are using the slip tool on has been trimmed down to three seconds from an longer original length. In other words, if the original clip of the dolphins in the browser was only three seconds long to begin with and you used the entire clip on the timeline, the slip tool will not work. If you think about this, it makes perfect sense—the slip tool cannot allow you to see something that wasn’t there in the first place. Thus, having handles on all your clips is critical to being able to use the tools shown in Figure 11.12.
Transitions
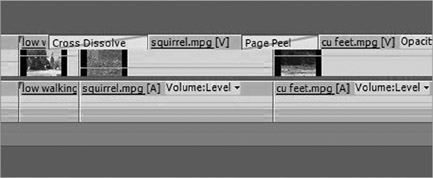
To perform a transition other than a cut, simply drag the desired transition over the spot in the timeline where two shots meet. In Premiere Pro, you can access different transitions by clicking the “Effects” tab in the browser window. Figure 11.13 shows a cross dissolve transition applied between the “low walking” and “squirrel” clips, and a page peel between “squirrel” and “cu feet.” Once the transitions are placed, they can be adjusted for length and other attributes. Nonlinear editing systems normally offer a variety of transitions, similar to those discussed in Chapter 9. Depending on the type of transition and the sophistication of the nonlinear system, the transition may have to render or may be immediately viewable.
Most nonlinear editing systems also have on-board graphics and titling capabilities. Using the title editor, you can make full-screen graphics or graphics that can be keyed over video. These titling editors usually work in a manner similar to those described in Chapter 8.
Output
While you are editing, the computer will be creating data to keep track of what you’ve done. This data will be saved in a project file, as discussed earlier in this chapter. The project file allows you to save all the editing work you have completed and lets you resume work on a production at a later time by re-opening the project file. However, the project file and the associated clips, browsers, and sequences do not allow you to use or view your finished production outside of the editing program. To actually save a copy of your finished product, you need to use the export function.
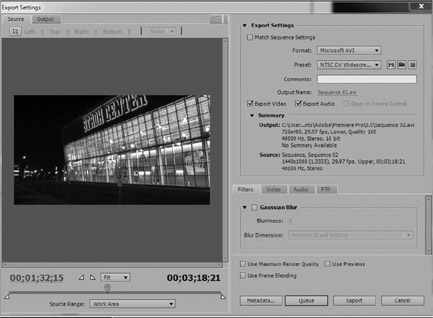
To export, you simply click on the sequence window, then select File >> Export >> Media. This will bring up the Export Settings dialog box, as shown in Figure 11.14. As noted in Chapter 10, this dialog box is essentially the same as that used in Adobe Media Encoder, and, in fact, the program will use Adobe Media Encoder to export the file in your desired format. From this dialog box, you can define the settings for your finished video file, which are discussed in more detail in Chapter 10. Once you have your settings the way you want them, you click “Encode” to save a file in the format you desire.
Editing Aesthetics
A finished program—be it a live talk show, a sitcom, a game show, a documentary, or a news program—should create for the viewer an uninterrupted sense of visual and aural progression. As discussed in Chapter 4, this consistent and unobtrusive “flow” is called continuity, and it is a function of several aesthetic considerations. In fact, most video professionals say the best edits are the ones the viewer doesn’t even notice.
Continuity allows you to create a sense of uninterrupted flow not only in real time productions such as talk shows and live sports programs but also in programs where time and space are fluid. For example, a documentary may contain footage shot over a period of days, months, or even years, and in several different locations. In a television drama, you may want to create the impression that the actor puts on his jacket, leaves his house, gets in his car, and drives away as one continuous action, despite the fact the scene was in reality shot in several different takes over a period of several hours. In that same drama, you may at another time want to travel smoothly to another time or place—ten years ago or a city located hundreds of miles away. Skillful editing can make all of these actions unobtrusive and believable to the viewer.
Regardless of how you are editing, whether linear, nonlinear, or in real time using a switcher, achieving continuity is as much a function of the shots you have available as how they are put together. Indeed, the degree of continuity you are able to achieve is often determined in the preproduction and editing-preparation stages of a project. This is, once again, another reason that planning is so important in television production.
Of course, continuity considerations are often violated for effect, especially in music videos and commercials, where smooth flow is frequently abandoned for attention-grabbing, disjointed editing. It is important that the loss of continuity serves a creative purpose and is appropriate to the production. It is usually not appropriate, for example, to violate continuity in a documentary or a live studio production. Still, television production is a creative endeavor, so principles of continuity should be considered guidelines and not necessarily rules.
When to Edit: Information and Action
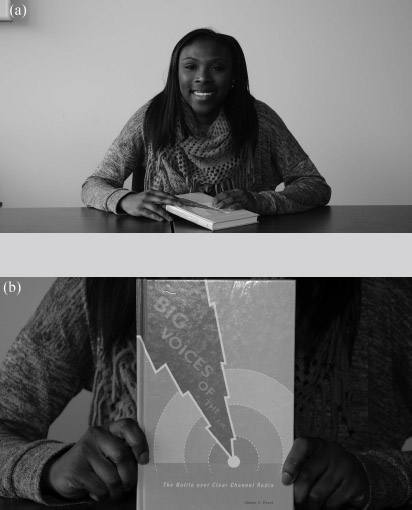
In general, you should change from one shot to another only when there is a specific reason for doing so. Broadly, these reasons fit into two categories: cutting for information or cutting on action. Cutting for information means that the second shot reveals information that the first shot did not. (See Figure 11.15.) For example, you may cut from a medium shot of a show host holding a book to a close-up of the book so that the viewer can see the title or a detail of the artwork on the book’s cover. During a discussion show, you would want to cut from a shot of the host to a shot of a guest when that guest starts talking. If what the guest says elicits an enthusiastic round of applause from the audience, you might want to cut to a wide shot of the audience.
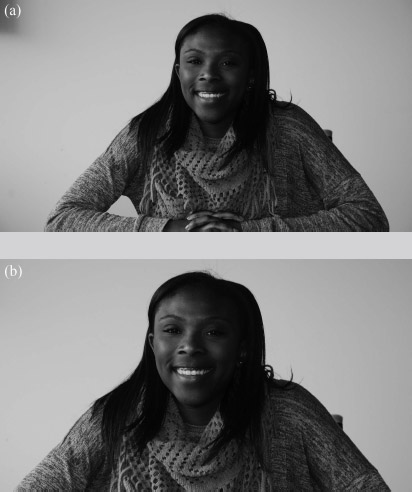
Do not make a video edit if that edit does not reveal any significant information. For example, cutting from the medium shot in Figure 11.16a to the slightly tighter medium shot from a similar angle in Figure 11.16b serves no purpose. You are not giving the viewer any new information of significance, so it is best not to make the cut.
Cutting on action means the edit is triggered by an action of a subject in the picture or some other specific event. For example, if we start on a medium shot of an actress awaiting an important phone call, when the phone rings we could cut to a close-up of the phone, as shown in Figure 11.17. Similarly, if we are on a medium shot of a police officer questioning a witness to a crime and a gunshot rings out, the police officer is likely to spring to attention and perhaps draw his gun. This would be an appropriate time to cut to a tighter shot of the police officer as he turns his head in the direction of the gunshot, then perhaps cut to a wide shot of a suspect hurrying away down the alley.
It is important to note that the action not only triggers the edit; it also provides the temporal point for the edit. The edit, then, should take place just before the action occurs, or in some cases just after. Either way, the edit point needs to be in very close temporal proximity to the action. Cutting to the second shot in Figure 11.17 two seconds after the phone rings, for example, destroys the logical sense of making the cut created by the action.

Pacing Cuts
Pacing refers to the overall speed at which shot changes are made in a production. A fast-paced production will have a lot of edits, and individual shots will be on the screen for only a short period of time. There is no right number of edits to make in a production, nor is there a set time between edits; the most important things are that the pacing be appropriate to the particular production and that the individual edits themselves be motivated by logical information and action cues. A music video, for example, is likely to have a much faster pace than a documentary. It is important not simply to edit formulaically, such as changing pictures every three seconds. This can give an impersonal, automated feel to a presentation. Instead, edits should be made at appropriate points—at the end of a sentence on the narration track in a documentary, for example, or on the beats of the music.
Jump Cuts
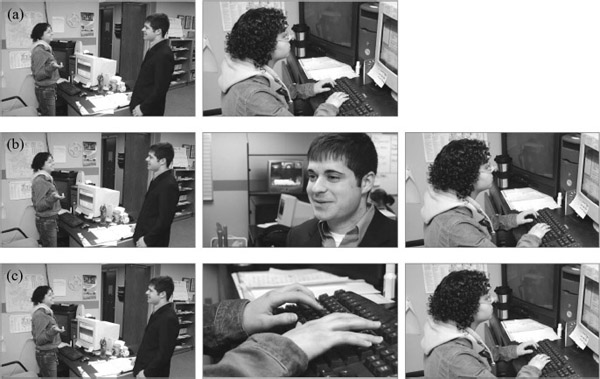
One of the goals of continuity in editing is creating the notion in the mind of the viewer that she or he is watching action occurring in real time, even if it is not. Perhaps the most glaring violation of continuity is the jump cut, in which a person or object changes in two successive shots. For example, if you edit a shot of a person typing at a computer immediately after a shot of that same person standing, as in Figure 11.18a, you have created a jump cut. Such an edit confuses the viewer, as it is physically impossible for a person to go instantly from standing to sitting at a computer.
A jump cut also can occur in less-glaring forms. For example, if you cut from a shot of a man sitting on a chair with his left leg crossed over his right leg to another shot in which his right leg is crossed over his left leg, this is in effect a jump cut. Similarly, it is a jump cut if a person’s clothes change from one shot to the next or if an object sitting on a table is gone in the next shot. Many of these types of problems can be so minor that they go unnoticed; still, every effort should be made to avoid them. If you watch movies or television dramas very closely, you can usually see a number of minor (and sometimes major) jump cuts like these.
As you might guess, jump cuts such as those just described are a much greater problem in postproduction editing than in live editing. Laws of physics prohibit someone from changing position from one shot to the next in a live production. Still, many people consider an edit such as the one in Figure 11.16 to be a jump cut. The person has not changed position, but the effect is so jarring that it seems as if the camera itself has “jumped.”
A jump cut can be avoided by using a cutaway shot, a shot that does not include the person or object in question that is inserted between the two original shots. In Figure 11.18, you could put a shot of the person to whom the subject is speaking between the two shots, as shown in Figure 11.18b. Jumps also can be avoided by changing angles or shot type. You could in this way effectively cut from the shot of the person standing to a close-up of the person’s hands on the computer keyboard to the medium shot of the person at the computer, as shown in Figure 11.18c. Even though the first edit is technically a jump cut, the dramatic effect created by cutting to the close-up shot masks the violation of continuity for the viewer.
Another way to avoid jump cuts is to allow subjects to leave or enter the frame. If you started by showing a shot of the person walking and allowed him or her to walk out of the frame, you could then cut to the shot of the person sitting at the computer. Since the person actually leaves the picture (if only for a brief moment), your next shot will not create a jump cut. Similarly, if you cut from a shot of the person standing away from the computer, then cut to a shot of the computer and allow the person to walk into the picture, sit down, and start typing, you have not created a jump cut.
Axis of Conversation/Axis of Action
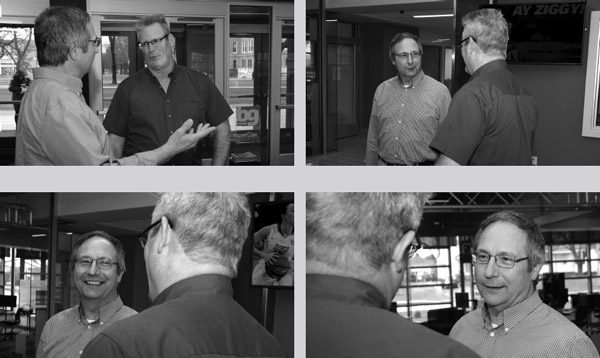
The axis of conversation is an imaginary line drawn between two people who are facing each other. In shooting a conversation, all camera positions should be kept on one side or the other of the line. Doing so maintains consistent screen direction, the direction in which a person (or object) is facing. As shown in the first three frames of Figure 11.19, this maintains the sense that the two people are actually talking to each other. In editing shots in this sequence, you would make sure that the man in the long-sleeved shirt was always facing right and the man in the short-sleeved shirt was always facing left. By crossing the line, or moving to the other side of the axis of conversation, you disrupt the consistency of screen direction, as shown in the last frame (lower right) of Figure 11.19. It is important to note that there is no universally correct side of the axis of conversation from which to shoot; the point is that once you’ve selected one side or the other, you should stay there.
Similarly, the axis of action applies to moving persons or objects. If you are shooting a car, once you’ve established that the car is moving in a particular direction (left to right, for example), you should only edit shots in which the car is moving in that same direction. Editing from a shot in which the car moves left to right to one in which it moves right to left creates a jarring effect and violates continuity. If you must edit together shots in which a subject changes direction, you can insert a neutral shot—or head-on shot—between the two shots, as shown in Figure 11.20.
Special Transitions
The majority of edits are simply cuts, where one picture is instantaneously replaced by another on-screen. The reason for this widespread use is that the cut is the only transition effect that does not normally call attention to itself (unless it is a jump cut or other continuity violation). However, other transitions can and should be used in appropriate situations. The dissolve is most often used to indicate the passage of time, such as dissolving from a Vietnam War photograph of a soldier to a contemporary shot of the same person. Dissolves also can be used to connect two images visually; changing from a shot of the soldier riding on a train to a shot of his wife back home holding his picture connects the two images more forcefully than a cut. A dissolve to or from black, typically referred to as a fade, indicates a strong separation. It is usually used to end a sequence or program.

Wipes and special effects such as page turns call even greater attention to themselves and thus should not be used when a subtle transition is needed. These transitions can be used to create interest and action in a presentation, however, and are often used (and many would say used too much) in commercials. In general, if you do not have a specific creative reason for using a dissolve, wipe, or special effect, you should just use a cut.
Ethics of Editing
The ability to edit sound and pictures gives the editor tremendous power to shape what the audience sees. Editing can be used to distort reality (such as by instantly transporting the viewer through space or time), create illusions, and—at its most extreme—create alternative realities (such as computer-generated animations). This tremendous power carries with it an ethical responsibility not to mislead the audience in inappropriate ways.
This ethical responsibility is most important in the production of nonfiction programs, such as news, news features, and documentaries. Viewers expect and accept the distortion of reality in entertainment programming, but they do not expect distortion in programs that claim to present reality. Common techniques used in the production of entertainment programming—such as staging events, giving cues to actors, and editing to create illusions—should not be used in nonfiction programs. Such programs should reflect reality, and—as much as possible—the production and editing process should not interfere with or distort this reality.
It also is unethical to use editing to create false impressions in nonfiction programming. It is unethical to edit soundbites so that the person seems to say something he or she really didn’t mean. It is also unethical to edit together shots that do not belong together to create an inaccurate impression (such as following a soundbite from a politician with raucous applause from the audience, when the audience of the actual soundbite didn’t respond that way).
The evolving technologies of video editing give the producers of nonfiction programs tremendous new capabilities and artistic possibilities. It is important to remember, however, that these capabilities should not be used to mislead the audience.
Focus Points
After reading this chapter, you should know . . .
- The types of editing situations, including the difference between on-line and off-line editing, and specialized editing such as using LSMs.
- The importance of planning and making decisions about editing before entering the editing suite.
- The basic process of nonlinear editing, including importing, editing, and exporting.
- The importance of editing aesthetics, including continuity, and ethical considerations.
Review
- If you were to begin shooting a large video project tomorrow, what things would you do in the pre-editing stages to help facilitate the editing process?
- Familiarize yourself with the editing program used in your class by examining the user manual or tutorials online. If it is not Premiere Pro, how do the workspace and basic editing processer differ from Premiere Pro?
On Set
- Record a television commercial. After watching it several times, write a two-page analysis of its editing aesthetics. Your analysis should describe the transitions and various forms of continuity along with other aesthetic considerations.
- Try editing some simple programs using your school’s editing equipment. How is the equipment/software similar to or different from the systems described in this chapter?
- Prepare a shot log for some footage you have shot for a project. How does this process help you envision the finished product?