Lighting has two general functions. The first is base light: the overall illumination of the image. A minimum amount of light is needed for any camera to operate, and more than the minimum is often desirable for proper exposure, depending on the image being recorded. The second function is creative light: lighting in a way that enhances mood and style and reveals shape and texture. Lighting can also enhance perspective and focus attention within the frame.
Many techniques have been developed over the years to create appropriate lighting. At the end of the day, though, lighting is a creative process, and usually there is no one right way to light a set. The techniques serve as a starting point that may then be fine-tuned.
Lighting can be time-consuming and sometimes dangerous, but it can also be exhilarating when a scene looks just right. The discipline needed to plan and execute lighting safely cannot be overemphasized. Likewise, the techniques to interpret scripts and programs through light and to plot and set lights quickly to save time and money are paramount. When the discipline and techniques of lighting are well planned and executed, a scene can come to life.
Types of Light: Incident and Reflected
All light that reaches our eyes is energy in one of two different forms. When light comes directly from a source, such as the sun or a lightbulb, it is called incident light. As important as this light is, it conveys little beyond the fact that we are looking at a car headlight or a neon sign, for example. Most of what we see is largely the result of reflected light, which is light that has bounced off a material surface and is then reflected into our field of vision. This interaction between light and surface tells us much about the objects we see, such as color, structure, and texture. For example, the even, shiny quality of light reflected from a wooden table denotes a hard, uniform, brown surface. We can perceive the texture of heavy cloth material by the many tiny shadows created in the weave.
Illumination for video production is an art that involves the proper use of lighting equipment to control the light that is reflected from the subject into the camera lens. The way we shape and control this reflected light determines what the camera perceives as a picture. The result creates an illusion of three dimensions on the viewing surface of a screen.
Technical Lighting Objectives
W hen the lighting director (LD) (might be the Director of Photography—DP—in a field production) designs the lighting plan for any type of video production, he or she must address two interacting concerns: the specific artistic needs of the program (e.g., dark drama, bright game show) and the need for general illumination to meet the technical requirements of the cameras. To achieve good illumination, the lighting director needs to measure the light for intensity and consistency, consider the contrast ratio of the scene, and make sure the color temperature is correct.
Intensity and Consistency
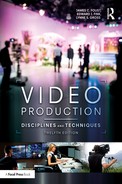
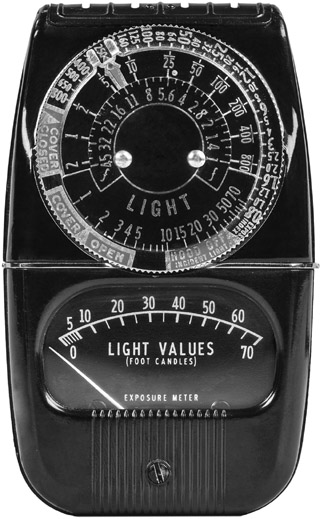
At the most basic level, a scene must have enough light for the camera to record a picture. This is not much of a problem with modern cameras because they can record in low light. In fact, night vision cameras have been designed to “see” in the dark to a greater extent than human beings can. Still, the presence of light enhances the quality of the camera’s picture. To determine how much light is on the set, lighting directors often use a light meter, a device that measures the intensity of light in foot-candles (fc).1 Light meters have either an analog scale with a needle that indicates the foot-candle reading or a digital readout of the number of foot-candles. (See Figures 6.1a and 6.1b.) Some smartphone apps can turn a handheld device with a camera lens into a light meter, such as the American Society of Cinematographers (ASC) Toland ASC Digital Assistant app (named after Gregg Toland, legendary cinematographer for Citizen Kane and other films).
During the lighting setup, the LD uses the light meter to make sure there are enough foot-candles for the camera to operate optimally. The LD also uses the light meter to check for balanced light within the set. For most productions, the amount of light at the left side of the set should be similar to that in the middle and at the right side. If this consistency is not maintained, the scene will look very different when the director switches from a camera capturing a straight-on angle to one that is pointing toward the right of the set.
The lighting director also needs to take into acc- ount what will be photographed. All surfaces absorb and reflect light—but, generally, the darker the surface, the more light it absorbs, and the lighter the surface, the more light it reflects. Lighting should look approximately the same regardless of whether the person on camera is light-skinned or dark-skinned. Similarly, someone walking onto the set in a bright dress should not make the lighting look different.
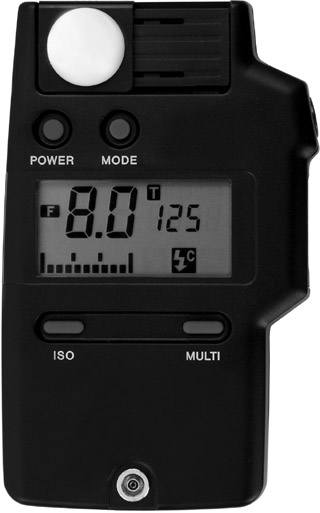
The LD checks for intensity and consistency by measuring light two different ways. Incident (source) light is measured by holding the meter very near the subject and pointing it directly toward the light source. This light measure tells how much light arrives at a given point. Reflected light is measured by pointing the light meter directly at the subject from the perspective of the camera. The meter should be held close to the subject, but without casting any sort of a shadow on the subject. This reading indicates how much light is reflected from the surface areas into the camera lens. (See Figure 6.2.) Additionally, many LDs use a spot meter to measure the reflected light coming from a small area, or spot, of the image, such as a person’s face in front of a setting sun or a special photograph among other photos on a fireplace mantel. While light meters may be used as spot meters to measure the reflected light from a small part of an overall image, many spot meters are built into cameras, allowing photographers to read the light from a single spot within the overall image on the viewfinder, such as a forehead or a flower petal.
As you would expect, incident and reflected light produce different intensity readings. Reflected light is less intense because some of the incident light is absorbed by the surface of the object, leaving less light to be reflected, and the reflecting ability of surfaces varies considerably. The two different meter readings are generally used for different purposes. In the primary stages of setting up lighting, the LD measures incident lighting to look for general levels of intensity and consistency in area coverage as generated by the main source lights. When dealing with the more subtle aspects of lighting, the LD works with the reflective qualities of the texture and color of a surface. Only reduced amounts of the original source light are reflected back to the cameras, but this is the light that really matters. A light-green knitted dress might reflect 30 to 40 percent of the illumination falling upon it, whereas a black knitted dress might reflect less than 10 percent. The LD uses measures of reflected light to fine-tune the lights and the elements of the set.
A properly calibrated monitor is also helpful for assessing intensity and consistency. It shows the actual camera output, so the LD and director can gauge consistency and avoid hot spots. It is important that each monitor be calibrated to match its camera; otherwise, what you see on the monitor is not necessarily what the camera is actually generating.
Contrast Ratio
The human eye can accept a contrast ratio of up to 100 to 1. In other words, within your range of vision, the brightest element can be 100 times brighter than the darkest element, and your eye allows you to see both extremes, as well as everything in between. A conservative but safe figure for a television camera would approach a ratio of 30 to 1. This means that the brightest area of a picture should not be more than 30 times brighter than the darkest area. This disparity between the eye and a video camera requires that some care must be taken in designing lighting that falls within the safe parameters of the camera.
Different elements of the set can produce large variations in the amount of light reflected back to the camera. The reflected light readings tell the LD when the contrast ratio for a given camera has been exceeded. The contrast ratio is determined by dividing the brightest reflected light reading by the darkest reading. For example, if the brightest spot in a camera’s picture is 800 foot-candles and the darkest spot is 20 foot-candles, the ratio is 40 to 1, which is beyond the conservative 30-to-1 ratio of most cameras. When the contrast ratio is too high, either the bright hot spots must be toned down or the darker areas must receive more light.
As an example, imagine an evenly lit living room scene on a wide shot. A performer wearing a white raincoat enters and steps into a brightly lit area at the left of the shot. This sends much more light into the camera lens than is expected, and several rather drastic things immediately happen. The camera’s automatic iris (see Chapter 5) reacts to the introduction of the very bright area by closing down. Without either the lighting or the camera controls being adjusted manually to compensate, the right three-quarters of the picture suddenly become much darker. The raincoat becomes an out-of-focus blur, and the person’s face becomes a dark spot. Stated in simple terms, the acceptable range of contrast between the brightest and darkest elements of the picture has been greatly exceeded. The light level that was previously sufficient for a picture has been distorted by the introduction of an overpowering amount of light. The best solution is to have the actor wear a different coat—a gray one or a green one. If the white coat is necessary to the story, a lighting plan must be devised that minimizes light to the performer’s entrance area but still allows for a small light to cover the performer’s face. Additionally, the “white” coat should be a gray tone that appears or “reads” as white on camera.
As students learn balanced lighting techniques, they often commit a common error. Consider a picture in which the faces appear to be darker than the background. In an attempt to solve the problem, the novice LD adds more light. If this light, aimed toward the dark faces, also falls on an already too brightly lit background, the problem becomes worse. As this additional light illuminates the background, the camera’s automatic iris reacts by “stopping down” to compensate for the now brighter video, and that adjustment darkens the entire picture. The faces remain dark in relation to the brighter background. The solution is to use equipment (described later in the chapter) that provides additional light on the faces while blocking the light falling on the background, and maybe also to decrease the intensity of the background light.
Color Temperature
For colors to remain true throughout a scene, all lights should have the same color temperature. This is measured on a scale of Kelvin (K) degrees. The Kelvin scale measures neither heat nor brightness but the frequency of the light wave. One rule of thumb to remember is that the redder the light source, the lower the Kelvin temperature frequency; the bluer a source, the higher the Kelvin temperature. (See Kelvin scale table on the Video Production website.) Color will not be true if the Kelvin varies greatly from one light source to another.
Most studio lights register about 3,200 degrees K, which is on the lower, more amber range of the visible light spectrum. The eye perceives this light as warmer than higher, bluer Kelvin temperatures. Amber light is also closer to skin color and is more flattering for skin tones. If a light is connected through a dimmer board that allows for gradual changes in applied voltage, the light-wave frequency and color temperature decrease as the light voltage is decreased. A lighting element that produces a white light of 3,200 degrees K when operated at full intensity gradually becomes reddish as voltage is decreased and gives performers and set pieces a slight red tint. This distortion is not readily perceived by the naked eye, but the camera is very sensitive to any drop in color temperature over a few hundred degrees Kelvin. As a result, most lights used for TV production are not dimmed unless they are part of a special lighting effect or fade-out.
Color temperature is a much greater problem outdoors, where lighting cannot be controlled as well as it is in a studio. Outdoor light for many daylight situations registers about 5,600 degrees K and is quite blue, with mid-day sunlight reaching up to 10,000 K. Conversely, outdoor light at sunrise and sunset goes down to a red of about 2,000 K. Haze and clouds also affect color temperature. If the color temperature changes, video cameras should be adjusted by changing the built-in color temperature filter and/or by resetting the white balance (see Chapter 5). If this is not done, shots recorded at one time of day might not edit together well with shots from another time of day.
Creative Lighting Objectives
As a creative or artistic factor in video production, lighting can be said to have four main purposes, which are to:
- define the shape and texture of physical form and, by extension, create a sense of depth and perspective within the elements of the set or location;
- imitate the quality of light that is characteristic of a situation or setting in reality;
- establish and enhance the psychological mood of a performance or setting;
- focus attention on a performer or aspect of the production.
Although this last concept usually has a specialized application, the other three purposes should be thought of as principles that can be simultaneously applied within a given production. The same light that gives shape to a person’s features can also provide emotional context and at the same time relate to the setting itself. For example, a beam of sunlight coming through a window can illuminate a woman’s face while establishing the room setting and enhancing her pensive mood.
Shape, Texture, and Perspective
When a light source is placed right next to a camera and pointed directly toward the subject, the light waves reflected back into the lens are of a generally uniform quality. The illumination fills the hollows and curves that are the distinguishing features of the subject, so it is difficult to discern specific characteristics. When the light source is moved so that the beam comes from an angle to the subject, the resulting shadows etch the features so that the eye perceives depth and texture. The art of creating the illusion of depth on a flat video screen is largely a matter of accentuating the illumination patterns that influence our normal process of vision.
An experienced lighting director knows that often the manipulation of shadows, rather than direct illumination, most effectively adds form and texture to any object. Light coming from the side or below an object throws shadows in certain shape-defining ways. Extreme side lighting (at right angles to the camera position) emphasizes textural quality by exaggerating shadows, making any object look more textured than it would normally.
The heightened sense of perspective of the video picture is simply an application of this basic concept: Adjusting the angle of the light relative to the camera also adjusts the appearance of the image—the shape, texture, and perspective of the subjects in the shot. This is most useful to separate performers and foreground objects from the background: Adjust the angle and intensity of the light beam to create a slight highlight effect.
Reality and Non-reality
Light operates on our conditioned responses in other equally important ways. We all have tuned in to the middle of a television show and watched a series of close-up shots. Either consciously or unconsciously, we are soon aware of being indoors or outdoors and of the time of day by the quality of light on the actor’s face. It is probably outdoors and near noontime if the light is relatively bright and if there are definite shadows under the actor’s eyebrows, nose, and chin. If the scene has been shot inside a studio, the imitation of reality is a product of the lighting.
Other specific shadow and lighting effects suggest certain kinds of realistic situations. Shadows of venetian blinds or prison bars cast on the rear wall of a set help suggest a particular locale. Other off-camera lighting effects help pinpoint a setting: A low-angle flickering light indicates a campfire or fireplace; a flashing red light indicates the presence of an emergency vehicle. Other effects help propel the dramatic narrative: A shaft of light coming from under the door of a previously unoccupied room indicates the presence of an intruder; a flashlight probing around a darkened room suggests a burglary in progress.
While most movies and TV shows use realistic sets and lighting, sometimes a scene calls for a nonrealistic style, such as the surrealism of a dream or the impressionism of a flashback or the expressionism of an obsession. In these cases, in addition to the changes in sets, costumes, camera angles, and so on, the lighting also reflects these nonrealistic styles. For example, hard side lighting exaggerates facial shadows as a serial killer plots his next victim; changes in lighting color can suggest a switch to a different historical era.
Mood
Similarly, the psychological mood of a performance or production can be reinforced by the quality of light and its abundance or absence. High-key lighting refers to overall bright lighting with few, if any, shadows. Sets are often rimmed with soft lights of high intensity. High-key lighting is generally used for game shows and talk shows that require even light for an upbeat mood (even when the talk-show guests reveal dark secrets). Comedy is usually bright and also uses this lighting scheme. High-key lighting generally equates to daytime.
Conversely, low-key lighting refers to overall darker lighting with many shadows. A few hard lights are strategically aimed where needed (usually on the actors’ faces), and they might be positioned at extreme angles. Little or no other lighting fills in the scene; this creates deep shadows. Dramatic and tragic scenes are usually played in low-key lighting for a darker mood. Low-key lighting generally equates to nighttime.
Such techniques are not limited to drama. Some successful game shows use very general illumination of the host and participants, but in the final playoff round the lighting changes dramatically. The background grows darker, and the main lights on the participants are switched to a steep angle almost directly above them. The host’s light becomes intense. The audience may not be consciously aware of the changes, but they feel the increased tension.
Specific dramatic moods can be reinforced by special lighting effects: A flashing neon sign outside a sparsely furnished hotel room suggests a seedy part of town; lightning flashes create an eerie mood. Sometimes, lighting changes within a show because the mood changes. An actor in a daytime soap opera might go through most of the day with fairly basic lighting, but, for a certain shot, there might be special needs for that actor. For example, a particular scene could reveal that the character is sinister. For this revelation, a light could be placed at a low angle (sometimes called “up lighting”), giving the character a foreboding, unnatural appearance. (See Figure 6.3.)
Focus of Attention
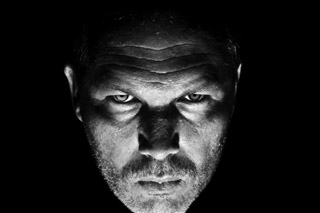
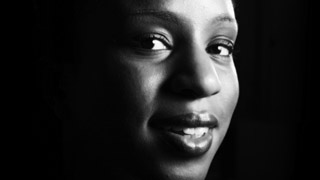
When a high contrast exists between the light on a subject and the light on the background area, the eye is drawn to the subject. The most obvious example is the use of a follow spot, where the light follows a performer in a musical or variety show as he or she moves from one place to another. A variation of this technique is limbo lighting, where the subject is placed “in limbo” against a softly lit, nondescript, neutral background.
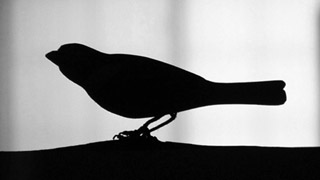
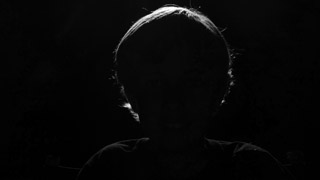
Another way to focus attention is with cameo lighting—the performer is lit, but the background is completely dark. (See Figure 6.4.) A silhouette effect—with the performers kept in darkness but outlined against a brightly lit background—might be desirable for a dance routine or other special situation. (See Figure 6.5.) A single shaft of light can be used to accent a contestant in the suspenseful climax of a game show. The host of a documentary might be accented with a strong light from the back or side. Subtle lighting highlights can be used in many other dramatic and nondramatic settings to control focus of attention.
So, above and beyond the necessity of using enough light for basic illumination, the lighting director must also plan creative lighting to add shape, texture, and perspective; heighten the illusion of a realistic or nonrealistic style; create and enhance a specific mood; and focus attention.
Lamps
The apparatus used to light a set generally consists of a lamp with a lightbulb or light-emitting diode and a housing in which the lamp is placed. Both of these are important in determining the characteristics of the light. Different lamps have varying characteristics and are used for different situations.
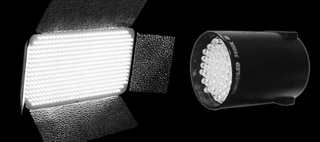
LED
The most popular “lamp” in lighting today is actually not a traditional lamp but a light-emitting diode (LED), which uses a semiconductor rather than a filament to generate luminescence electronically, a principle called electroluminescence. (See Figure 6.6.) LED lights are prized for their small size, high efficiency, low power consumption, accurate color temperature, and lack of heat emission. LED lamps can be manufactured for indoor (3,200 K) or outdoor (5,600 K) color temperatures (or other colors, for that matter), making them flexible indoors and outdoors. Specially-made bi-color lamps can be changed from 3,200 K to 5,600 K at the flip of a switch or turn of a dial. The “bulbs” (i.e., diodes) last up to 100,000 hours and—because of their relatively small, thin profile—can be positioned on a set in places where other lamps do not fit.
Dimming LED lights can be a little tricky. For one thing, not all LED lamps are dimmable. If you need lights whose intensity can be raised or lowered, be sure to purchase LEDs that are labelled “dimmable”: They have different circuitry than standard LEDs. For another thing, even dimmable LEDs might not work well with all dimming boards or switches. As the voltage is lowered, the LED might flicker, and it might also go out before the switch is down all the way because the very low voltage might not be enough to keep the diode’s circuit operating. It is recommended that you try each dimmable LED with your dimming switch or lighting board to make sure both are compatible. Some LEDs come with a professional circuit controller that assures smooth dimming; however, these can be costly.
To produce different colors of light, the casing around the diode can be colored, or traditional color gels can be placed in front of the lamp. LED instruments can also be powered by batteries, so they can be located where cables are not practical. Their main disadvantage is that they are more expensive than other lightbulbs, but, like most electronic devices, they continue to come down in price as the technology improves and market demand increases.
Fluorescent
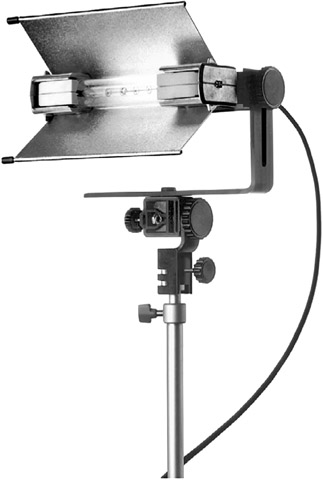
Another type of lamp is the high-frequency fluorescent, also referred to as high-speed fluorescent. (See Figure 6.7.) Traditional fluorescent lights such as those used in offices and schools are not satisfactory as studio lights. There are many different colors of fluorescent lights; some tend toward blue, while others give off a yellow tint and others are greener. Color temperature is inconsistent, and most of them do not contain much red. As a result, people lighting for TV have been well advised to turn off the fluorescent lights and use lamps more amenable to television picture reproduction.
Unlike regular fluorescent lights, high-frequency fluorescent lamps were developed to put out a consistent color temperature; in fact, like LEDs, they can be manufactured to be any color temperature: 3,200 K, 5,600 K, or other. These lamps also emit low heat and consume very little energy because they operate through a chemical reaction that involves phosphors, and they last for about 10,000 hours—not as long as LEDs but longer than quartz. They produce a soft, diffused light that does not create harsh shadows, but the light is harder to control (spot and trim) than quartz-generated light. High-frequency fluorescent lights became popular some decades ago, but now they are giving way to the more energy-efficient LEDs.
Quartz
Few quartz lights are manufactured for television today. Title III.B of the Energy Independence and Security Act (EISA) of 2007 requires greater energy efficiency in lighting: 200 percent more efficiency by 2020 over 2007. This has had the effect of almost eliminating traditional quartz and incandescent lights, though some are manufactured with greater energy efficiency. LED lights are still more efficient than quartz or incandescent, and, with the ever-decreasing cost of LEDs, television lighting has taken a major shift away from quartz in favor of LED technology. That said, many studios still have quartz lights in their inventories.
Very early television used the lightbulb that was available: incandescent. However, as anyone with an incandescent lamp at home knows, the bulb darkens over time as the filament generates heat to create light, causing electrons on the filament to break off and stick to the inside of the glass bulb, making it dark. The industry needed a bulb that produced a consistent color and quality of light, so the quartz lamp was soon developed. Also referred to as a quartz-halogen or tungsten-halogen lamp, this bulb is made of quartz glass that is filled with halogen gas and has a tungsten filament. (See Figure 6.8.) As the tungsten heats up to create light, the halogen gas works to keep the electrons on the filament, rather than having them break off and darken the glass. Halogen needs extreme heat to do this, so the glass bulb is smaller than an incandescent bulb to keep the heat closer to the filament, and, to withstand the heat, the glass has to be quartz.
Quartz lamps give off light that is 3,200 K, and this color temperature stays the same for most of the life of the lamp. These lamps are easy to control in a well-defined area. The disadvantages of quartz lights are as follows: They are hot; they consume a great deal of energy and therefore are rarely manufactured except for a few energy-efficient varieties; the quartz glass has to be handled with clean gloves, or wiped clean if handled with bare fingers, to avoid impurities on the glass that can weaken it or cause it to explode when it gets too hot; and the bulbs are relatively short-lived, burning out in about 400 hours.
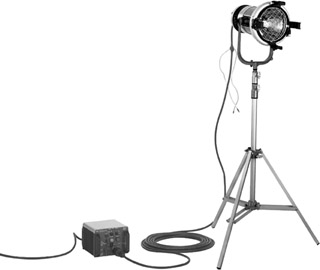
HMI
The HMI (short for hydrargyrum medium-arc iodide, aka mercury vapor) light has been used for many years. (See Figure 6.9.) Its color temperature is 5,600 K, so it looks like outdoor light with a bluish tint. Its main use, in fact, is to supplement light outdoors, but it can also be used in a studio when a set is to look like it is outdoors (e.g., a patio, a street). Each HMI lighting instrument needs a ballast unit (a high-voltage power supply) to produce a consistent, flicker-free light. The bulkiness of the ballast setup and the high power consumption of the light make it less popular than it used to be now that there are other alternatives for 5,600 K lamps, especially LED lights.
Other Lamps
New lamps that are cool and use little power are constantly being developed. One is a ceramic bulb that produces 3,200 degrees K with only a fourth of the power required by a tungsten lamp. Another is the high-intensity discharge (HID) lamp, which yields 5,600 degrees K light and is more efficient than tungsten. Depending on the lighting situation, a lighting director might use a variety of lamps, such as fluorescents for broad illumination across a set and LEDs focused through convex lenses for more controlled light on individual subjects. It is important for LDs to understand the different kinds of lamps and light they produce to make the best decisions for each lighting situation.
Housings
Housings in which lamps are placed allow for the light to be projected in varying ways. They generally fall into two categories: spotlights and floodlights.
Spotlights
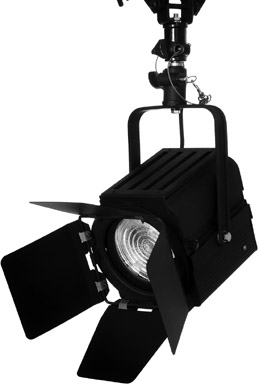
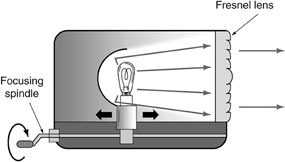
A spotlight has a controlled beam that is highly directional, can be shaped and focused to cover a narrow area, and casts a definite shadow. Its chief characteristic is the ability to throw a variable-sized spot of light on an area or performer. One of the most common forms of spotlight is referred to as a Fresnel (pronounced fruh-NELL, without the s), although some manufacturers have a different name for it.2 Though they are constructed in a number of different ways, the basic concept of spotlights is that shown in Figures 6.10 and 6.11.
The Fresnel type of lamp has a special structure of step lens rings to help dissipate the heat and direct the light. Another distinguishing feature is the movable assembly that allows the illuminating unit (bulb and reflector) to move back and forth between the front and rear of the instrument. With the bulb in the rear pinned position, the light rays focus in a narrow beam of high intensity, perhaps spreading no more than 10 degrees. As the bulb moves forward in the housing, the beam becomes spread, and its intensity is diminished. In its full-forward spread position, the beam forms approximately a 60-degree angle. Fresnels come in different sizes that are often described by the diameter of the lens—6-inch, 8-inch, 10-inch, and so forth. They also come with bulbs (older lamps with quartz; newer ones with LED) of different wattages or intensities, ranging from several hundred watts to several thousand.
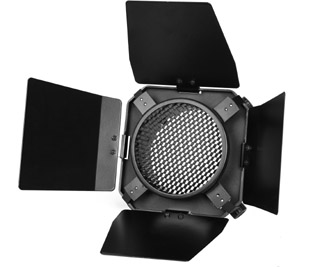
Some spotlights do not have a lens on the front. Technically, these are not Fresnel lights, because a Fresnel is distinguished by the step lens. The generic term for these lights is variable spotlight because, like a Fresnel, the light beam varies in the amount it can be spotted down or spread out. Although these open-face spots allow the lamp to be moved back and forth, they do not have the same degree of beam control as the Fresnel; they also weigh less. (See Figure 6.12.) Open-face, or variable, spots and Fresnels often have four movable panels extending from the front of the instrument, as seen in Figures 6.10 and 6.12. These are called barn doors and are used to block off selected areas of the projecting light beam.
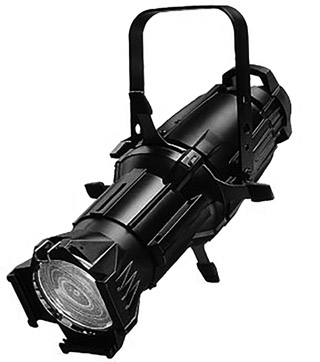
Although the Fresnel and the open-face housing are the most common spotlights in TV studios, occasionally other types of spotlights are used. For example, when an intense directional beam is needed, the ellipsoidal spotlight, or leko, might be called into duty. (See Figure 6.13a.) This light consists of a curved, fixed reflecting mirror at the back of the unit, a long tube, and a focusing lens. These elements enable it to project a beam that has a well-defined edge. The beam can be further shaped by movable metal shutters located inside the lamp housing behind the lens. At the point where all the reflected light rays are in sharp focus, you can insert a patterned metal design cutout called a gobo (because it “goes between” the bulb and the end piece of glass). Another way to create a lighting pattern is with a cucalorus (alternate spellings cucoloris or cokuloris), or cookie or kook. This is a flag-sized piece of solid material (e.g., metal, foam board, cardboard) with a pattern cut into it, which is mounted on a C-stand and placed in front of a spotlight to cast the desired pattern onto a background for added visual interest. (See Figure 6.13b.)
Floodlights
A floodlight has a diffused beam that produces soft illumination, spreads out over a wide area, and casts very little shadow. The purpose of this light source is to soften and thereby control the shadows that are created by the angle of the focused spotlight. To achieve this effect, the floodlight does not use a lens. Floodlights, like spotlights, are available in various power levels, ranging from hundreds to thousands of watts.
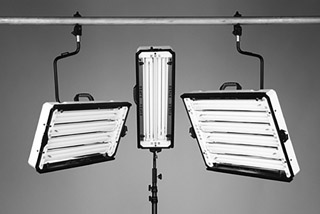
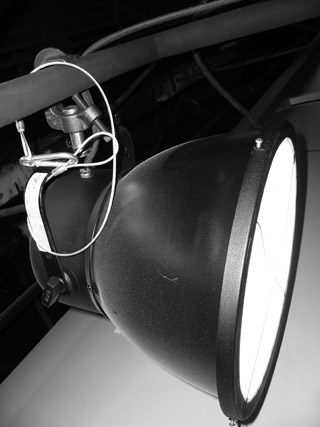
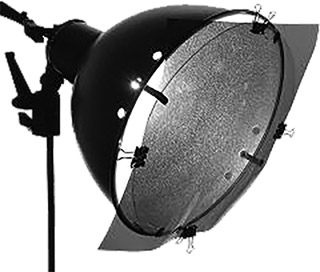
A popular type of floodlight is a panel of LEDs: a larger panel to light a broader area and a smaller panel to light a more intimate area. (Review Figure 6.6.) Another model of floodlight is the bowl-shaped structure known as a scoop. Its large reflecting area is made of a light-diffusing material that spreads the illumination in a non-focused, scattered pattern. (See Figures 6.14a and 6.14b.)
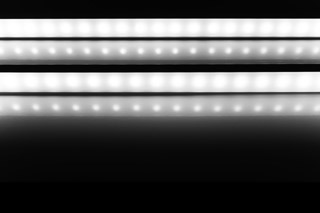
Another type of floodlight is rectangular in shape and known as a pan or broad. (See Figure 6.15.) Some allow the degree of spread to be controlled. Their square shape makes the use of barn doors possible. When bulbs or panels of bulbs are constructed in a continuous side-by-side row or series, they are called strip lights. (See Figure 6.16.) They are used frequently with colored gels in lighting a cyclorama (tightly stretched cloth) or other large set surfaces (see Chapter 8). Sometimes, the front of a scoop or pan floodlight is covered with a scrim—a soft, spun-glass filter or other translucent piece of material that further diffuses the light. (See Figure 6.17.)
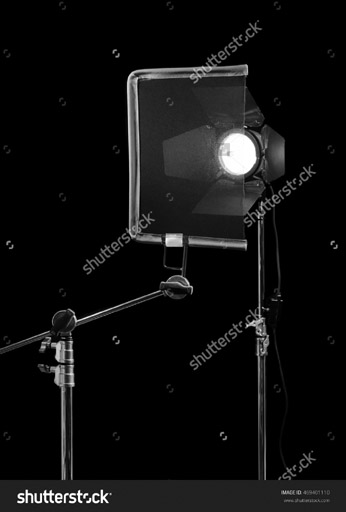
Another type of floodlight is the soft light, or reflected light instrument. It is constructed with the bulb or bulbs positioned so that the light points at the back of the lamp instead of out the front. The light is reflected off the shiny back surface of the housing before leaving the instrument. The reflective material diffuses the light coming from the bulb, making it especially soft and useful for images with very little or no shadow, such as baby portraits and commercial product shots (e.g., shampoo bottles) or images with lots of curved, reflective surfaces (e.g., cars).

This brief review of lighting instruments barely suggests the scope and variety of available options. Many special-purpose housings are available, and manufacturers are constantly developing new equipment. For example, some are exploring the concept of a “light engine” (akin to a fiber optic Christmas tree), where one instrument generates white light off to the side of a studio or in an adjacent room, and fiber optics carry the light to various positions on the set or lighting grid, where glass and gels shape and color the light as needed, thereby replacing the need for many separate lighting instruments that each require power. To see the vast array of lighting instruments available, visit the websites of some of the major lighting equipment companies, such as ARRI SkyPanel, CineLight, FloLight, LightPanels, Lowel, Mole-Richardson, and Philips Strand Lighting.
Lighting Styles
Different circumstances require different styles of lighting. Comedy is usually brighter than drama; limbo lighting may be needed for a nondescript background. The classic style of lighting, used as the starting point for light that is supposed to make things look realistic, is three-point lighting. This is the most-often-used style, though there are many variations, depending on the look that the director and lighting director (LD) want to achieve: adding or removing lights, changing angles, adjusting brightness ratios, and so on. Still, three-point lighting is the starting place for those who want to learn lighting. It is the standard from which other forms of lighting developed.
Three-Point Lighting
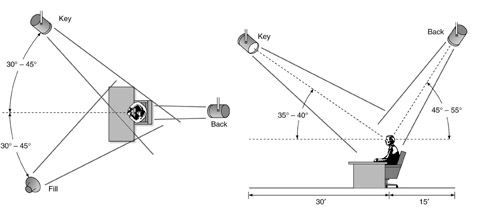
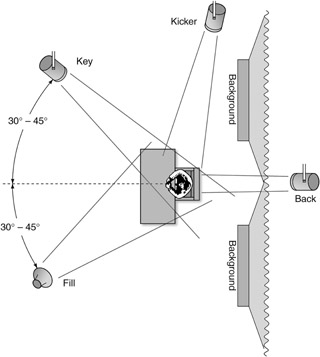
Three-point lighting, as its name implies, involves the use of three different light sources: the key light, the fill light, and the backlight. Each has a separate effect upon the subject being lit, due to its relative angle or direction, level of intensity, and the degree to which it is either focused or diffused. Taken together, the cumulative effect is that of a balanced and aesthetic unity—what Rembrandt called a “golden triangle” of light. For this reason, this lighting scheme is also called triangular lighting.
Figure 6.18 illustrates how the three sources are used in a typical situation. The effect of three-point lighting is very natural and mimics natural lighting. With modifications to one or another of these three sources, the LD can achieve his or her creative vision of form and texture, reality, mood, and focus of attention.
Key Light
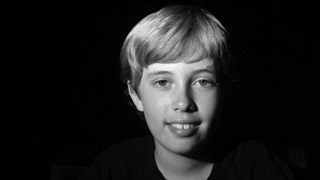
The key light is the most prevalent source of the light hitting the talent and provides the majority of the light that is reflected back into the camera lens. (See Figure 6.19.) A spotlight is often used for the key light because its strength and directional beam emphasize the contrast of light and shadow, defining the shape and texture of the subject. The use of the key light brings out the features of the face and illuminates that most dramatic feature, the eye itself. Sometimes, soft lights are also used as keys when the lighting director wants a softer look with less shadow. For example, sets for news, talk shows, game shows, and cooking shows, as well as portrait photographs, often use soft light for the key (and fill, as discussed below).
While more-extreme angles can produce special dramatic effects, the optimum result is achieved by placing the key to one side of the subject’s face, at an angle between 30 and 45 degrees off the axis between the talent and camera. The height of the key depends to some extent upon the talent’s facial contours. It should be placed high enough to produce a slight shadow under the chin and nose, yet low enough to get the light directly into the eye sockets. (If the talent has deep-set eyes and the key light is at too steep an angle, the unflattering result is two dark shadows under the eyebrows.) A good rule of thumb is that the key should be placed at a 30- to 45-degree angle above the subject’s vision line. (If the key is too low, it is difficult for the talent to read the prompter.) A quick way to determine the position of the key light is to stand or sit where the talent will stand or sit, facing the camera, and then look and point “up and over” 30 to 45 degrees. Follow the imaginary line from your pointing finger to the lighting grid, and that is about where you should hang the key light.
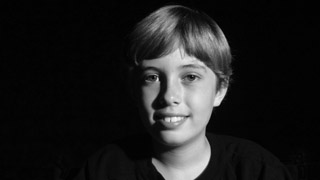
Fill Light
In order to “fill in” the dark side of the face or object being lit, a fill light is needed. It should come in at an angle on the mirror-opposite side from the key. That is, if the imaginary line between the talent and camera were a mirror, the fill has the same position as the key, but on the other side of the axis. (Refer to Figure 6.18.) It is “up and over” 30 to 45 degrees on the other side of the camera from the key.
Ordinarily, a floodlight (such as an LED panel, scoop, or broad) is used, although a spotlight in its spread position can be effective, as well. In any case, a soft, diffused light is desired. (See Figure 6.20.) Fill light is used to soften the shadows and give some illumination to the less illuminated side of the face or object. Fill light should not be as strong or directional as key light; it should not compete in creating shadows or countering the shaping qualities of the key. An exception might be a news, talk, game, or cooking show if the look is to be an even “wash” of light across the set rather than “modeling” of individual faces with some shadows; in this case, both the fill and the key lights may be of equal softness and intensity.
Backlight
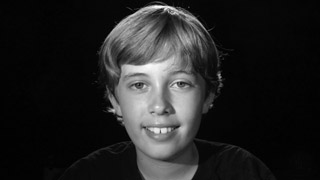
As the name implies, backlight comes from behind and above the subject (not to be confused with background light, discussed below). A spotlight is often used so that the light can be directed and focused like the key. The backlight, sometimes called a hair light, falls on the subject and accentuates such features as hair, shoulders, and top surfaces of set elements. (See Figure 6.21.) This highlighting effect separates the talent visually from the background, adding to the illusion of depth within the total picture. Without adequate backlight, the subject appears flat and tends to blend in with the background.
Backlight requirements vary with the background and some characteristics of the subject. Hair color and texture are especially crucial. For example, blonds require relatively little backlight. Their natural hair color separates them from the background. In contrast, darker or tightly curled hair generally needs extra backlight because it does not reflect light well. The effect of a person’s clothes must also be observed.
Ratios
The key, fill, and backlight should relate to each other in terms of degree of illumination when measured for incident light at the point where the light strikes the subject. A good starting point is to have the fill light register half of the foot-candles of the key light and have the backlight register 1.5 times the key. In other words, if the key light by itself creates 100 foot-candles of incident light, the fill light should register 50 foot-candles by itself and the backlight should register 150 foot-candles. When you turn on all the lights, you will not have a total of 300 foot-candles (100 + 50 + 150), because, when all the lights are turned on, they will overlap to give the well-balanced lighting of the three-point technique. (See Figure 6.22.)
Once you have lit with the ratio of key = 1, fill = .5, and back = 1.5, you need to make adjustments so that the object looks right. Perhaps you need to put a scrim over the flood you are using for the fill light because it overly washes out the shadows; or perhaps you need to change the spotlight you are using for the backlight to one with less wattage because the person being lit is blond.
Additional Light Sources
One of the most important additional illumination sources used in conjunction with three-point lighting is the set light or background light (not to be confused with the backlight). This is the major source of lighting for the background set behind the performers. It can give form and texture to the setting, provide a sense of reality, or suggest mood. Sometimes, the amount of light on the background is hard to control because the set tends to catch the wash of a lot of other lights being used for other purposes. Too much light may reach the set if the lighting director has not kept an eye on things as lights are being turned on.
In one function or another, most types of lighting instruments can be used appropriately for background lighting. Floodlights (panels, scoops, pans, or strip lights) are often used for general illumination of a flat space. Spotlights can be used to highlight certain areas or present dramatic lighting effects (e.g., strong diagonal slashes of light). The ellipsoidal spot (aka leko) can be used with a variety of gobo or cucalorus patterns for various shadow effects.
Another auxiliary light often used on a set is the kicker. Its illumination comes from the side, usually over the camera left shoulder of the subject. (See Figure 6.23.) It can work on the side of the face without really disturbing the basic three-point effect. It is often used to create facial sculpting when people will be turning their faces to talk to each other. Other lights can be added to the three-point lighting style, depending on the needs of the particular production.
Multiple-Camera Lighting and Movement
Keep in mind that the three-point lighting model was perfected as an ideal for still photography where a single camera shoots the subject or subjects from only one angle. In a TV studio situation, multiple cameras shoot from various angles; in addition, performers usually move about the set. The underlying concept of three-point lighting must be modified to apply to multiple-camera, continuous-action video production.
In the talk-show format, for example, the host or hostess moves through the audience, and the cameras must shoot from many angles. The solution to this lighting situation is to create an overall wash of illumination throughout the audience area. Many soft fill lights (fewer keys) are used from all possible camera angles. Individuals in the audience are not sculpted as they would be if each were lit with three-point lighting, but the fills are a workable solution.
Some situation comedies and soap operas shot with multiple-camera techniques have had substantial success in overlaying the three-point lighting within a set that has general illumination. Working together, the TV director and LD select points within the scene where the actors will remain in place for a period of time. In these locations, careful three-point lighting can be used for close-ups. When portions of the scene contain physical movement, the action is picked up by the cameras on wider shots, where the general lighting will be good enough. It is a compromise, but it works fairly well.
To conserve on lights and not have too much light falling on the set when multiple cameras are in use, lighting directors often use one light for multiple purposes. For example, one fill light can sometimes cover several people, and a light that is used as a backlight for one person can be a key for another person, a concept that is known as cross-keying, dual-purpose lighting, or economy of lighting. (See Figure 6.24.) By the same token, a light that is a key from one camera angle might be a backlight for a different camera position, or a fill light used when a person is standing by a sofa might still be able to function as a fill when that person moves to a nearby desk.

Flat Lighting
Flat lighting does not create the shadows inherent in three-point lighting. It is a wash of soft illumination across the set, usually created by a rim of lights around the perimeter, often banks of LED strips pointing at the set. Its use is possible because newer cameras can pick up images realistically with very little light. In fact, in some instances the sharp shadows created by the key light or hair highlights created by the backlight can look corny or artificial when seen through a top-quality camera. Flat lighting also softens the features of the face, something desired by actors and anchors. Flat lighting does not look as three-dimensional as three-point lighting, but some people consider the three-dimensional look to be dated and prefer the flatter look.
Many LDs still want three-dimensionality, however, and find ways to incorporate it into flat lighting. For example, a news set that has light within it, such as the light that reflects from TV screens placed behind the anchors to show logos or stories, creates a three-dimensional feel. Small LED lights can be placed on background scenery that is partitioned, making layers upon layers of scenery light up. Spotted lights can be used to highlight certain elements of scenery so that they look like they are standing forward. (See Figure 6.25.)
The banks of LED or fluorescent lights used to create the flat lighting can be manipulated so that they lend character to the scene without creating deep shadows. One bank of lights—for example, a panel to the right of the talent—can be placed closer to the talent than another bank that is to the left. This creates a bit of a key-fill effect, but one that is much softer than that of three-point lighting. Combining fluorescent and LED lights with a few traditional quartz lights can lend character to particular performers in a pleasingly subtle manner.
Flat lighting has always been part of studio lighting because, as mentioned above, some shots involve moving cameras and moving people. To light everyone for all camera angles, general flat illumination has always been a necessity for wider shots with movement, complementing three-point lights for closer shots. Still, three-point lighting was dominant in the past; now it is gradually yielding to more flat lighting schemes, especially as HDTV cameras improve.
Specialized Lighting
In a sense, all lighting is specialized because no two lighting situations are exactly the same. But some forms of lighting require styles quite different from either three-point lighting or flat lighting. Two that have been previously mentioned are cameo and silhouette lighting. Cameo lighting is created by placing a spotlight directly or almost directly above a person or an object. (Review Figure 6.4.) The light is pointed downward so it creates a circular pool of light on the floor. The background is not lit at all. When a person stands within the pool of light, he or she is the only object visible on the screen. This type of lighting is frequently used for commercials: The product being advertised is cameo lit so that it is the center of attention. If the object is large, such as an automobile, or if the person is going to move, then more than one spotlight can be mounted from above, and the pools of light should overlap.
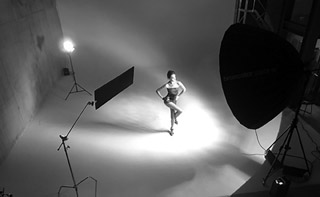
For silhouette lighting, the subject is not lit, but the background is evenly lit. (Review Figure 6.5.) This is accomplished by placing the subject at some distance in front of the background. Then all the lights are placed far enough to the rear of the stage that none of the light from them hits the subject; it all falls onto the background. Although the subject is not lit, it is still the focus of attention because it is black against a lit background. Silhouette lighting is often used in news broadcasts when a person is willing to talk to the reporter but does not want to be identified.
Another specialized lighting is chroma key (see Chapter 9), which is used when a background behind a person (usually a blue or green screen) needs to be replaced electronically with a different background (e.g., a photo of a remote location). Chroma key lighting is commonly used for weather reports. The weathercaster stands in front of a green or blue wall. When the image goes through the switcher, the green or blue drops out, and the technical director inserts various weather maps instead. (See Color Plate E on the Video Production website.) For this to work, the colored background must be uniformly lit; that is, the same number of foot-candles must register across the entire wall. If there are bright spots or dark spots, these do not drop out to the same degree as the rest of the wall, and the inserted picture breaks up, or the original color bleeds through it. The best way to light the chroma key wall is with soft, flat lighting. Then you should light the weathercaster separately, using the key, fill, back principle, but you must make sure that none of this light spills onto the background. To accomplish this, have the weathercaster stand at some distance from the wall and set up the key, fill, and backlights so they are at a steeper angle than usual.
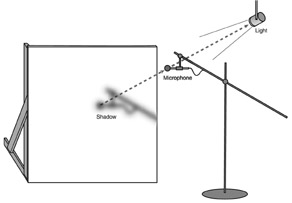
Sometimes, unwanted shadows get in the way, and you have to undertake special techniques to get rid of them. The element likely to give the most trouble is a microphone boom (see Chapter 7). The normal position for a boom mic is above and slightly to the front of the talent’s head, angled so it can pick up the talent’s voice. This position is likely to be in the path of the key light or background light, and that light causes the boom to cast a shadow onto the talent or the set. This shadow is particularly disturbing if the boom must be moved to capture the sound of talent walking around the set. A shadow moving across a person’s face or a set piece can ruin the dramatic effect.
To correct the problem, you must first find the light causing the shadow. If you stand in the shadow and look at the microphone, you should be able to see the offending light directly behind the mic. (See Figure 6.26.) You can try turning it off, but that will probably affect other lighting considerations. You can ask the boom operator to move the mic slightly and see if the shadow moves to a less obvious part of the set, such as a leafy plant that can more easily absorb the shadow without it being noticed. A third option is to move the light slightly. Sometimes, moving the light so that it is at a slightly higher angle causes the shadow to be cast onto the floor where it is less noticeable.
Another shadow problem often occurs with people who wear glasses. The shadow from the upper part of the frame falls across the person’s eyes, obscuring them from view. The easiest way to deal with this problem is to lower the key light angle so that the shadow falls on the eyebrows rather than the eyes. Lowering the light can also help prevent reflections from the glasses. Additionally, you can try having the talent tilt his or her glasses enough so the frame shadow is off the eyes but the glasses still appear to sit normally.
Many other objects can cause undesirable shadows. There is no way to eliminate shadows from a set completely. However, if the shadows are annoying, try to work with both the objects and the lights so that the shadows fall where they will not be seen.
Mounting Lights
With very few exceptions, lightbulbs and their housings are useless without mounting hardware. In some situations a lamp housing is simply set on the floor or held by a production assistant, but for the most part lights must be mounted on or supported by hardware. The two main ways to accomplish this are by hanging them from above on the grid or mounting them on a floor stand.
Hanging Mounts
Nearly every television studio is equipped with a lighting grid for mounting lights above the staging area. The grid is composed of battens, or pipes, and supporting mechanisms that allow the lights to be placed at the proper angles while leaving the studio floor uncluttered for the cameras, talent, and set elements. In its simplest form, the grid is a rigid arrangement of pipes positioned several feet beneath the studio ceiling. Generally, lighting crew members use a ladder to move the lights.
Some studios have a movable batten system. The pipe grid can be raised and lowered by a counterweight system or an electric motor so that lights can easily be worked on from the studio floor and then raised again to ceiling height. Other studios have a catwalk above the grid so that crew members can access the lights by walking or crawling near them. Some batten systems are semi-robotic: The lights can be moved and adjusted by remote control. Sometimes, lights are connected to a pole, and then the pole is attached vertically to the grid. The light can then be slid up or down the pole if it needs to be raised or lowered.
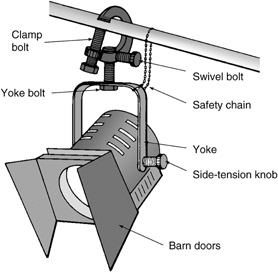
The lighting fixture is connected to the grid by a C-clamp that is attached to the light fixture’s yoke. The clamp has a bolt to clamp to the grid and another bolt to allow the fixture to swivel to the right or left. (See Figure 6.27.) The clamp is always used in conjunction with a safety chain that prevents the light from falling if the C-clamp is accidentally disconnected. The fixture can be tilted up or down with the aid of the side-tension knob.
Floor Stands
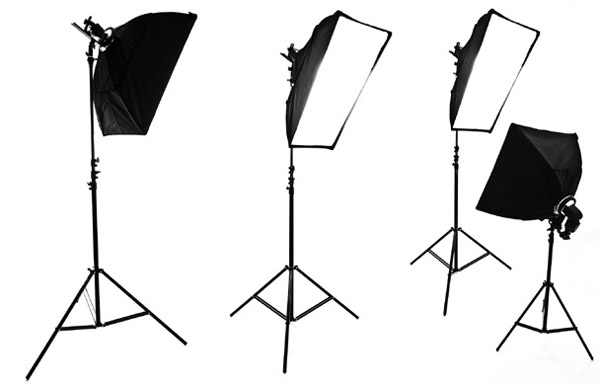
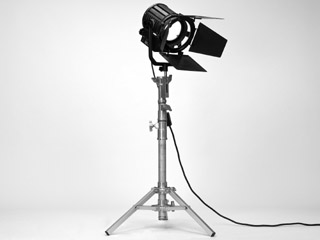
In some studio arrangements, the suspended lights are supplemented by lights mounted on floor stands. (See Figure 6.28.) Although too many floor stands tend to clutter the studio and get in the way of other production elements, they offer a degree of flexibility and simplicity of setup. Sometimes, it can be impossible to position a light properly except on a floor stand.
Floor stands in studios usually have a heavy metal base for stability or are weighted with sandbags. They come in a variety of weights and sizes capable of handling many different types of lighting instruments. For productions that shoot on location, the portable floor stand is indispensable. Nearly every location shoot includes lighting instruments on stands.
Lighting Control Factors
To achieve the artistic and technical objectives of lighting, the lighting director must work within four separate yet interrelated parameters: the level of intensity, the degree of focus or diffusion, the shape of the projected beam, and the color quality.
Intensity
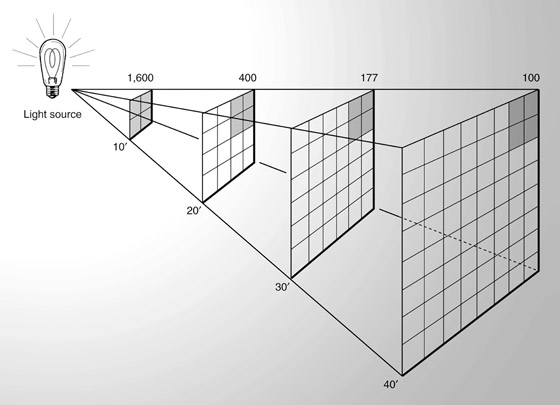
Previously, we described how the beam from a Fresnel lamp can be spread to lessen its intensity while covering a wider area. Whether a beam is diffused or focused, another factor has important implications in terms of intensity: distance. Although it is not easily apparent to the naked eye, variations in the distance between a source light and the subject create large differences in intensity. These differences follow the inverse square law, which states:
As the light-to-source distance is doubled, the intensity is reduced to one-fourth of its previous strength.
Conversely, the light’s intensity is multiplied by four as the distance is cut in half.3 The inverse square law occurs because of the increasing surface area being covered by the same amount of light energy: the greater the surface area, the less illumination per surface unit. For example, a light that produces 1,600 foot-candles at a distance of 10 feet is reduced to only 400 foot-candles at 20 feet because it covers four times the area. (See Figure 6.29.)
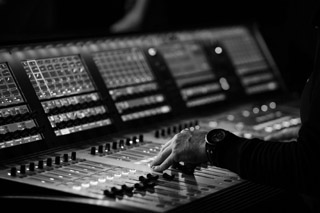
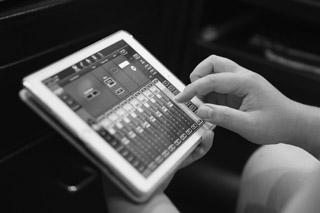
Intensity can also be controlled by a dimmer board, sometimes called a lighting console. It is usually located some distance from the actual lighting instruments, either in a corner of the studio or in a separate control room, because it creates both heat and noise. Dimmer boards work in conjunction with patch bays, also called patch boards. While a variety of manufacturers make dimmers, most use a lighting control protocol called DMX. This standard connects lights, consoles, controllers, and ancillary equipment so it all interfaces flawlessly. For example, many LED fixtures are controlled by DMX signals. Although dimmer boards vary in size and capacity, they all function on the same general principles.
Most lighting consoles have both dimmer and non-dimmer circuits. Many lights are patched through non-dimmer circuits because they are to be used at full intensity: left at their maximum brightness throughout the production, such as game shows and talk shows. Any lessening of power not only dims the light but also drops the color temperature into more reddish tones. Additionally, some instruments (such as standard, non-dimmable LEDs and fluorescents) can only be turned on or off, so they are best patched into non-dimmer circuits. However, some lights might be patched through dimmer circuits so the lighting director can vary their intensity and also fade them out completely if desired. The lighting console has a fader bar, or potentiometer (pot), for each dimmable circuit, and the light intensity for the instrument patched into that circuit can be increased or decreased by raising or lowering the fader, respectively.
The patch bay serves to connect numbered lights on the grid with similarly numbered cables in the control area, which are then connected to either dimmer or non-dimmer circuits on the dimmer board. For rapid control of a group of lights, the cables for a number of lights can be brought through one circuit on the lighting console. Some consoles are computer assisted so that settings can be preprogrammed and lights can be brought up automatically. (See Figures 6.30a and 6.30b.) For example, one preset bank of lights might be for the news anchor desk, and another preset might be for the weather area.
Diffusion
Diffused light is created and controlled in several ways. The level of diffusion can be adjusted by moving the bulb forward or backward in a variable spotlight, such as a Fresnel. Also, the farther a light is from its subject, the more the light diffuses as it travels through space. A light can also be turned and reflected back on a subject for diffusion. Umbrella lights work this way: The instrument points away from the subject into a highly reflective, shiny silver umbrella, and soft light reflects back on the subject. In the absence of an umbrella or a reflector, a light can be bounced off a white card or even a white wall or ceiling. White or near white is important so the color of the light remains white (unless a colored effect is desired).
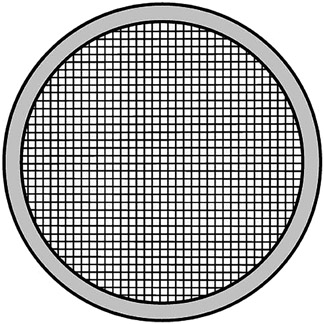
In addition to lighting umbrellas and reflectors, other diffusion materials are an important item in the LD’s toolbox. The most common is a scrim, which is a wire mesh or spun-glass filter shaped to fit the front of the lighting instrument. (See Figures 6.31a and 6.31b.) Scrims work by scattering the beam and cutting the intensity of the light. They can be added to both hard and soft lighting instruments. When added to an already soft light, such as a scoop or broad, they produce very soft and diffused lighting.

Shape
One of the main difficulties in controlling the overlap of multiple lights in the three-point lighting scheme is that the overlap causes hot spots. Fortunately, a number of shaping devices can modify and block parts of the beam. The most common is a barn door, the set of shutters that attaches to the front of a light. (Review Figures 6.10 and 6.12.) Used in pairs or sets of four, these hinged plates provide an adjustable edge to the beam. By moving the shutters, both the height and the width of the projected light can be limited. Most barn doors can be rotated to provide flexibility in adjustment.
Sometimes, the LD needs to create a small area of reduced intensity within a projected beam. For this a flag is used. Flags are rectangles of varying size made either of metal or of frames covered with black cloth. They can be hung from the lighting grid or mounted on a floor stand (called a C-stand) in a position to block out light to a specific area. (See Figure 6.32.) For example, a flag can cast a slight shadow on the top of the head of a person with thinning hair who otherwise might appear almost bald in the bright light of a close-up shot.
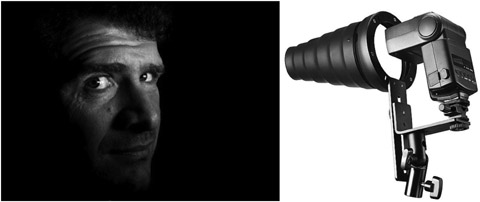
Occasionally, an added amount of light must be pinpointed at a particular area of the set. If barn doors cannot project quite as precise a pattern as needed, a snoot can do the job. (See Figure 6.33.) A snoot is a circle that ranges in diameter from about 2 to 12 inches. It is inserted in the same frame designed to hold the barn doors. It pins down the light, reducing the spotlight’s beam to a smaller, clearly defined circle without increasing the intensity of the spot.
Color
On some occasions a set or other location needs some color. Perhaps more warmth from red-brown earth tones is needed, or possibly the cool effect of green and blue is desired. To achieve these tones, various colored gels may be used to add color to the set lights and, if desired, to the lights focused on the performers themselves.
A gel is a thin, transparent, celluloid material that is available in a wide variety of colors. It can be cut to fit a specially designed holder that slides into the frame of a light, such as a scoop (see Figure 6.34), or the frame of a spotlight that holds the barn doors. Using gels to improve a scene can be tricky, however. They affect the entire shot, so although you might find that a particular green gel enhances a costume, it might be very unflattering to a person’s face. Two particularly useful gel colors are “Color Temperature Blue” (CTB) and “Color Temperature Orange” (CTO). CTB approximates exterior daylight (5,600 K) and can be used on a 3,200 K lamp to raise the color temperature to match daylight. CTO approximates interior light (3,200 K) and can be used on a window or 5,600 K lamp to lower the color temperature to match 3,200 K instruments.
Gels are most effective for creating particular effects, such as when they are used with strip lights (review Figure 6.16) to color a cyclorama. A wide variety of color combinations and effects can be achieved. For example, red and green gels can enhance the look of a Christmas set, or a continually changing dawn effect can be created with the background shifting from a deep violet through various reds and pinks to a light blue during the shooting of a scene.
Setting up Lights
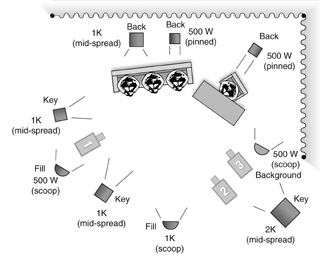
Lighting a set takes a long time. It is expensive time because it ties up a studio that could otherwise be producing programs. For that reason, lighting directors try to plan as much as they can on paper and/or on a screen before entering the studio. The main planning device is a light or lighting plot, which can be drawn by hand or created with light plotting software or apps, such as Lighting Diagram’s Creator, Strobox’s plotting app, or LXFree (it’s free), or using graphing or plotting software, such as Autodesk’s AutoCAD®, Vectorworks® Spotlight, or DPlot. A lighting plan shows the major set pieces, the cameras, and the various lights to be used. A light plot usually indicates the types of lights, their use, their power, their location, and the direction of their beam. (See Figure 6.35.)
Armed with the light plot, the LD and crew members can enter a studio and set up lights efficiently without unnecessary experimentation. No doubt a few changes will need to be made, but an experienced LD who has met with the producer and director and knows the script or program rundown can adjust lighting quickly for the situation. The crew starts by hanging the lighting instruments in the positions they are needed. This usually means climbing a ladder or going out on a catwalk, undoing the C-clamp and safety chain from the grid, moving the light to its proper location, and refastening the C-clamp and safety chain. With a movable batten system, the crew members lower the batten, work on the lights at studio level, and then raise the batten.
Many professional studios have enough lights filling the grid that very few of them need to be moved. Some lighting instrument is probably in the right location and simply needs to be turned or tilted. Having many lights speeds up the setup process and also saves wear and tear on the instruments.
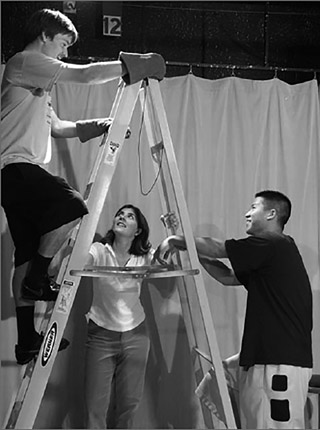
Once the light fixtures are in position, do not turn on all the lights at once. That would be very confusing. The usual procedure with three-point lighting is to turn on the key light first, aim it where the illumination needs to fall, measure its intensity with a light meter, and look at the picture it is creating through a camera signal sent to a high-quality monitor. Then the key light is turned off, and the fill and backlights are turned on, aimed, measured, and viewed in turn. If someone notices an unforeseen effect in the monitor, or if the ratio among key, fill, and back is not correct, then adjustments can be made. For example, you might need to tilt the key down slightly so it covers its target more accurately or move in the barn doors of the backlight so the light does not spill into a camera lens. Making minor adjustments is referred to as trimming the lights and is generally undertaken at the grid level by someone on a ladder. (See Figure 6.36.) Once the key, fill, and backlights are settled, other lights, such as background (set) lights and kickers, are turned on and adjusted.
A similar procedure is followed for flat lighting. The basic fill lights are turned on first, followed by lights that are part of the set and lights used for highlights. Then minor adjustments are made.
Of course, once all the furniture, equipment, and performers are in place, more trimming might be needed. Do you need to change the lighting for the chair because a yellow chair was substituted for a black chair at the last minute? How can you get rid of the boom shadow that shows when one of the actors crosses to the doorway?
Many shows do not change their lighting setups on their stock sets very often. For example, a sitcom might have three or four stock sets (e.g., kitchen, living room, bedroom, office), and there might be one preset lighting configuration for daytime and another for nighttime. News, talk, game, and cooking shows usually have one set with one light plot. In cases where fixed lighting schemes are rarely altered, there is little for the LD to do on a day-to-day basis except turn on the lights and make sure none of the bulbs are burned out. This can be undertaken by another crew member, such as the stage manager or the person who operates the robotic cameras.
Sometimes, universities have preset lights because lighting takes so long; within a class period, students would not have time to light a set and also produce a program. In this case, a technician sets lights before the semester begins and groups them into the lighting console in a way that offers both functionality and flexibility. For example, students can raise dimmers one through three if they want lights preset for a talk show; they can raise dimmers four through six for a news program’s preset lights; and they can use dimmers seven through nine for the sitcom set.
Safety Precautions and Disciplines
Lighting can be very dangerous. Always “think overhead.” Are all lights, mounts, and other equipment securely fastened? When heavy equipment is moved or repositioned overhead, is everybody warned and the area below cleared out? In addition, crew members should “think electricity.” Is all equipment turned off before it is moved or inspected? Is the circuit turned off before it is plugged into an instrument? Everyone should also “think hardware.” Has the item of equipment been thoroughly checked out, and is it ready for use? Has everything been connected? Tightened?
Whenever a lighting assistant (or an electrician or gaffer) is moving or trimming lights using a ladder, at least one person should serve as the spotter, steadying the ladder from below and assisting as needed, such as holding a lighting instrument after the gaffer removes it, climbs down, repositions the ladder, and climbs back up to hang the light. The person on the ladder should always carry a wrench that is tied to the ladder or to his or her wrist to prevent dropping it on people or equipment below. The gaffer can then tighten any lamps that might have become loose from excessive aiming, focusing, or spotting. While adjustments are being made on any lighting instrument, the safety chain must always remain fastened, securing the light to the grid.
When moving a light, always make certain that no one is below the working area. Be certain the power to the lamp is off. Just because no light is being emitted does not mean no power is coming through the cord. Damaged lights, burned-out bulbs, and short circuits are all potential dangers. Again, be sure the power is off at the lamp’s new location before plugging it into the grid outlet. When you are moving an instrument from one location to another, the safety chain is always the last item to be unfastened and the first thing to be hooked up when the instrument is repositioned.
When focusing lights, never look directly into them. A light that measures 200 foot-candles at 30 feet may approach 100,000 foot-candles at the source. Studio lights are bright enough to damage the naked eye permanently. Lights also create a dangerous amount of heat, even lights such as LEDs that are cooler than older lights. Most studio lamps have handles for you to use. Lighting technicians should always have heavy-duty, heat-resistant gloves. Special caution must be used when adjusting barn doors, because they are only a few inches from the light source and absorb a large amount of heat.
In addition to the lighting technician on the ladder and the spotter below, a third person should be at the lighting dimmer console. That person must communicate with the gaffer on the ladder, making sure the electricity is off (dimmer switch is down) for the circuit where the gaffer is working, and turning the light on only when the gaffer has safely hung and positioned the light, is not looking into it, does not have his or her hands on any hot elements, and gives the board operator the OK to turn on the light.
If you are working with quartz (tungsten-halogen) bulbs, make sure never to touch the surface with your bare fingers, even when the bulb is cold. Always use gloves or some other cloth between your hand and the globe. A small amount of finger oil or acid on the face of the globe will interact chemically to weaken the glass and may even cause it to explode. For lights on floor stands, take care to avoid tripping over cables and pulling over the stands.
Safety is the responsibility of everyone connected with a television production. Unsafe situations can be avoided if everyone uses common sense and observes basic precautions. Part of the discipline of television production is the habit and attitude of thinking safety. Every crew member, whether part of the lighting team or not, should be disciplined to think in terms of avoiding or correcting hazardous conditions.
Focus Points
After reading this chapter, you should know . . .
- The difference between incident and reflected light.
- General illumination principles, such as intensity, contrast ratio, and color temperature.
- How and when to use a light meter and monitors.
- How to accomplish creative lighting objectives, such as shape, reality, mood, and focus of attention.
- The different types of lamps used in lighting instruments, such as LEDs, high-frequency fluorescents, quartz, and HMIs.
- The differences in the housing elements of spotlights and floodlights.
- The key, fill, and backlights needed for three-point lighting and their approximate ratios.
- Principles for multi-camera with movement, flat, and high-definition lighting.
- Specialized lighting, such as cameo, silhouette, chroma key, and shadows.
- How to mount lights.
- Equipment principles used to create intensity, diffusion, shape, and color.
- How and why to use a light plot.
- How to set up lights.
- The importance of safety.
Review
- Assume a production situation where two people sit on a couch and talk, and then one of them moves to another area of a set and does a stand-up comedy routine. What lighting would you suggest for this type of situation?
- As a lighting director, what steps should you go through before you start lighting the set? What are the first several things you should do when you are actually lighting the set?
- What lighting safety precautions should you be aware of in your own studio?
On Set
- Design a light plot (see Figure 6.35 for an example) for a three-person talk show as it might be laid out in your school’s studio. Make sure the plot indicates the type of light (scoop, Fresnel, etc.), the purpose of each light (key, back, fill, etc.), and the power (1K, 2K, etc.).
- A modern dance number is going to be recorded in your school studio. The set consists of a curtain in the background and two pillars around which the performers will dance. Design a light plot (see Figure 6.35 for an example) showing how you might light this production.
- In your school studio, set up a basic three- point lighting situation (see Figure 6.18). Alternately take out and replace the three light sources one at a time and then two at a time. Next, use a series of subjects to see the differences created by variations in hair, skin color, and clothes. Determine what adjustments, especially with the backlight, need to be made for blond hair, dark skin, a light shirt, and so forth.
Notes
1One foot-candle (fc) is the amount of light that falls upon a surface placed at a distance of 1 foot from an established theoretical source approximating the brightness of one candle. In many European countries, light is measured in lumens or lux (approximately 10 lux = 1 foot-candle; exact is 10.76 lux = 1 fc, or 1 lux = 0.09 fc). Twenty years ago, cameras required 200 foot-candles to get a picture that wasn’t as good as what modern cameras get with 70 foot-candles.
2Augustin-Jean Fresnel (1788–1827) was a nineteenth-century scientist who did important research into the nature of light and for whom the light was named.
3The inverse square law is fine for sources of light with little width, but it is not accurate for large-size sources such as soft lights.