
If we’re singers, we modulate the tone and timbre of our voice. If we’re writers, we temper our choices of words and phrases. And if we’re shooter-storytellers, we control our images’ look and feel.
For shooters using the simplest consumer camcorders, this chapter may seem moot because these models lack the rudimentary setup options. The cameras’ imaging parameters—exposure, white balance, and focus—are controlled automatically according to the pre-proscribed dictates of omniscient engineers in far-off lands.
The demands imposed by the mass market have had a profound effect on the capabilities of entry-level cameras. In past generations, Kodak was said to have designed its popular Kodachrome® films with the assumption that mindless vacationers would leave the film in a car’s hot glove box. This expectation of less-than-intelligent behavior played a key role in the product’s engineering, and
the same can be said for many consumer cameras today. Most low-end models are designed to require as little user brainpower as possible.
It’s as if shooters want the technology to do the storytelling for them! Auto-focus, auto-exposure, auto–white balance—these aren’t so much features as they are gimmicks, because relegating such choices to an automated process does not a gifted video shooter make!
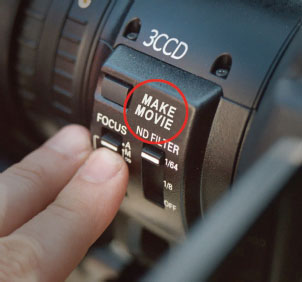
FIGURE 8.1
Push this button. See what happens. The most compelling stories need a bit more of your input and guidance.
The major camera manufacturers are finally transcending the auto-everything notion by enabling increased manual control of focus, white balance, exposure, and audio levels. Some cameras go further, allowing shooters to tweak gamma, detail correction, and the color matrix.1 For the shooter coming to grips with the latest generation cameras, the creative options can be overwhelming and paralyzing.
AUTO-EVERYTHING: WHO NEEDS IT?
Auto-focus, auto-exposure, auto–white balance—what silly notions! How is any camera able to know what should be in focus, what normal exposure looks like, or how much red is supposed to be in a scene?
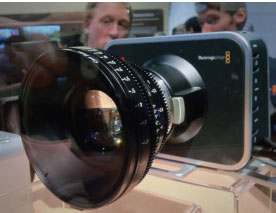
FIGURE 8.2
Capturing compelling visual stories requires rigorous control of your camera’s imaging capabilities. Look for a camera that offers extensive manual control.

FIGURE 8.3
This menu toggle may have saved the manufacturer a few pennies, but its flimsy feel will drive you nuts, especially with gloved hands. Your camera must be rugged enough for your intended application.

FIGURE 8.4
The auto-everything toggle on the side of your camera is there for a reason—to be switched off!
Exposure is critical to establishing the desired mood, but what constitutes proper exposure? Correct exposure is ultimately a creative choice since deliberate underexposure can often add desired drama and mystery to a scene. Intentional overexposure can also play an effective storytelling role, say, in a sci-firomance on the surface of Venus or of a traveler dying of thirst in the Gobi desert. The camera’s auto functions generally preclude such treatments, so unless your story happens to demand a uniform middle gray, the camera’s auto-exposure should be disabled. Consider the most annoying of all telltale amateur defects—the breathing of the camera’s auto iris, as it continuously adjusts and readjusts mid-scene. When set to auto-exposure, your camera will interpret the world and everything in it as 18% gray. A solid white wall will be captured as gray even though it is not. A solid black wall will also register as gray even though it clearly is not. C’mon, engineers, get with the program! The world is a rich and vibrant place full of color and nuance. It is not 18% gray!
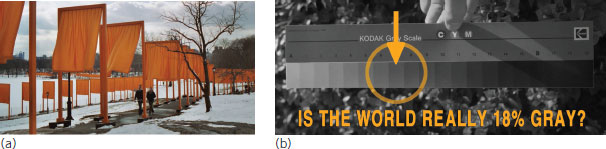
FIGURE 8.5
The world may be full of color, but your camera’s auto-exposure assumes otherwise. Many shooters record a color strip or gray scale at the beginning of every setup. This can save time and money by providing a valuable grading reference later.
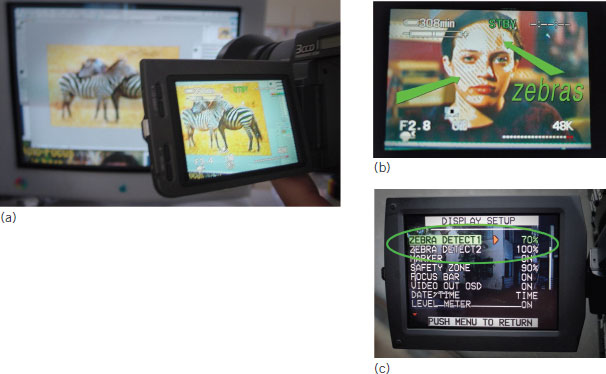
FIGURE 8.6
Earn your stripes! Your camera’s zebras can help determine proper exposure. When set to 70%, a smidgen of stripes should be visible in a Caucasian face. Some cameras feature two sets of zebras with the ability to input custom values for each herd.
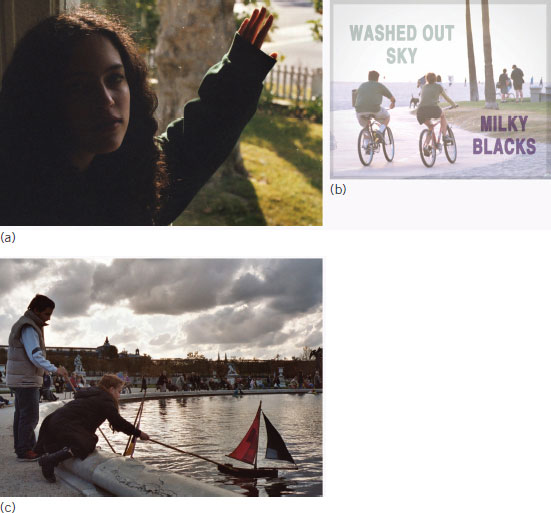
FIGURE 8.7
(a) Underexposure deepens shadows and buries the detail in the darker tones. (b) Overexposure produces washed-out blacks and a loss of detail. (c) Deliberate underexposure can add drama and intrigue to otherwise lackluster scenes.

FIGURE 8.8
When shooting in low light, try to include a strong source such as this freeway caution light to distract the viewer from the swirling noise in the unlit shadows.
YOUR CAMERA-S ISO
A camera’s ISO2 rating is dependent largely on a shooter’s tolerance for noise. Like film grain, some noise may be acceptable in one context but not another, and so a camera’s ISO must necessarily be subjective. Some cameras including most Sony models apply substantial noise reduction, which may lead shooters to assess a higher ISO.
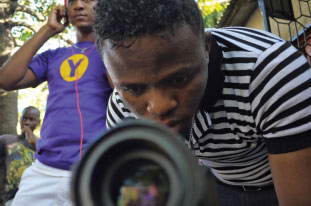
FIGURE 8.9
A camera’s “native” ISO is fanciful at best because digital shooters, in effect, create their own virtual film emulsion from a long list of menu options.
Camcorders that seem to exhibit a high ISO are usually tweaked for maximum shadow detail. In general, most cameras today may be rated at ISO 320, although some models with larger imagers relative to their resolution (such as the Panasonic AF100) may be rated higher. Standard-definition camcorders with relatively large pixels usually exhibit lower noise and a higher ISO—about two stops better on average than HD models.
ISO is influenced by user-inputted values like gamma and gain that impact a scene’s gray scale. The rating suggests a camera’s relative ability to produce a comparable image on film given the same exposure parameters.
For years, the China Girl—who knows who she was or is, whether she’s married or single, or actually more than one person—provided filmmakers with a common reference for Caucasian skin. The fact that a large part of the world’s population is not Caucasian apparently eluded the designers of most motion picture films. The same bias apparently applies to video engineers who, like their film brethren, mostly live and work in countries in the northern latitudes, where the facial tones of the China Girl are the norm.
I’m not about to dwell on the political correctness of film emulsions, CCD or CMOS sensors, or the camera designer’s cultural proclivities. Suffice it to say that a camera’s auto-exposure is trying its hardest to render every face as though we all shared the flesh tones of the China Girl. 3

FIGURE 8.10
This gal may not be from the Far East, but for decades, the flesh tones of an Asian woman served as a visual guide for filmmakers and laboratory technicians.

FIGURE 8.11
The Caucasian reference presumed by camera engineers fails to consider the range of skin colors in diverse populations.
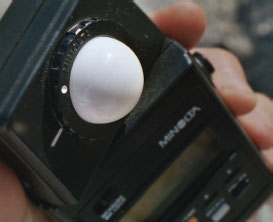
FIGURE 8.12
The ethnocentric white globe of a professional cinematographer’s exposure meter.

FIGURE 8.13
Note to humanity: We all share the same skin color regardless of race or ethnicity. The relative brightness of our skins, however, can vary considerably.
It used to be that a waveform monitor could only be found in a broadcast control room. Today, in many cameras and monitors, shooters have access to a simple waveform, which can warn of clipping or detail loss in a scene’s brightest highlights. For green screen, a waveform is useful to ensure an even illumination.
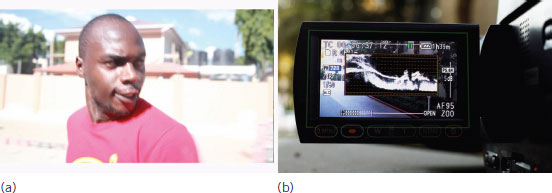
FIGURE 8.14
The loss of detail in clipping highlights (a) contributes substantially to an overall amateur look. The waveform (b) built into some cameras can help fight this scourge.
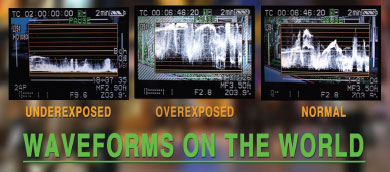
FIGURE 8.15
From left to right: a dark scene possibly underexposed; a hot, “clipped” scene possibly overexposed; and a “normal” scene with a wide dynamic range that is possibly what you want. Any of the waveforms may be correct for the story you intend to tell!
Most video cameras have two shutters: a course variety for selecting the time: 1/25th, 1/50th, 1/100th second, and so on and a fine shutter for synching with a computer monitor or discharge lighting like fluorescents or neon when shooting overseas. With a slow shutter, shorter than 1/60th second, the increased blurring may add a slightly surreal look, whereas a faster shutter, greater than 1/60th second, produces a sharper image but with increased risk of stutter or strobing between frames. Varying the shutter speed (or angle) can have a dramatic impact on your visual story.

FIGURE 8.16
The motion blur induced by the slow shutter helps capture the hyperactivity of a New York City street.

FIGURE 8.17
By eliminating motion blur a fast shutter can produce an objectionable stutter, especially at 24p. Capturing this scene with a fast shutter and a higher than normal frame rate eliminates the risk.
THE STAGECOACH WHEEL EFFECT
Progressive video produces a series of still images that when played back quickly create the illusion of motion. If a wagon wheel spins at the same speed as the camera shutter at 24 FPS the wheel strobes and appears to be standing still. If the wheel turns at twice the rate of the camera, at 48 FPS, the wheel also appears to be stationary. However, the wheel spinning at, say, 45 FPS appears to be moving backward, because the slower wheel has not yet completed two full shutter rotations.
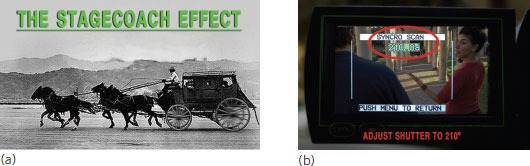
FIGURE 8.18
Some scenes are troublemakers. To avoid stutter or strobing when capturing a speeding stagecoach or when panning across a picket fence, use a slower shutter or wider shutter angle. A 210º shutter is usually sufficient to reduce the strobing risk (normal shutter = 180º).

FIGURE 8.19
The shutter can be a powerful creative tool. Some cameras express shutter “angle” in degrees, a reference understood by shooters accustomed to the mechanical shutter of a traditional film camera.
The camera’s fine shutter, aka synchro or clear scan, enables shooters to capture out-of-sync TVs, monitors, and other displays without the rolling bars and convulsions that can disrupt a visual story.
When shooting abroad, we may encounter a flicker in television screens, neon signs, and other discontinuous light sources. The shooter should be especially mindful of flicker from the fluorescent lights in supermarkets and many public places, as the noxious defect may not be readily apparent in a camera’s tiny viewfinder.
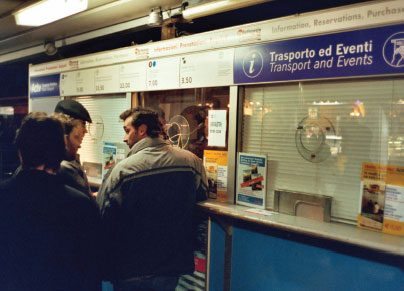
FIGURE 8.20
A 1/100th second shutter eliminates the flicker from fluorescent sources when shooting 24p in 50-Hz countries. A shutter setting of 172.8º accomplishes the same goal without resorting to a faster shutter and concomitant loss of exposure.4
Frame rate and the visual story go hand in hand. After determining the resolution (720, 1080, etc.), we select a reference frame rate. If we’re shooting a feature intended for digital cinema, DVD, or Blu-ray, 24p is usually the best choice, from image capture through postproduction and output to optical disc. If our subject is news or sports and is destined for broadcast or the Internet, then 25p, 30p, or 60p makes sense, owing to the Web’s 15 FPS de facto standard and the relative ease of down-converting material to that rate.
In high-end cameras that employ intraframe compression, 60p capture is usually limited to 720 resolution; there is no standard yet for 1080p60 acquisition, although cameras like the Panasonic AF100 are able to capture at this frame rate and resolution in a compressed format like AVCHD.
I mostly use non-standard frame rates in subtle ways, for example, when shooting a mood piece I may overcrank slightly by one or two frames to add weight to an actor’s performance or to impart a dreamlike quality. Conversely, if shooting a car chase, I will undercrank by two or three frames to increase the apparent speed and peril of the pursuit. In either case, the effect is restrained and the viewer is quite unaware of the manipulation.

FIGURE 8.21
At high magnification, this flamingo would appear to move unnaturally fast if shot at “normal” speed. Capturing the scene at 40 FPS for 24 FPS playback produces a more natural look.
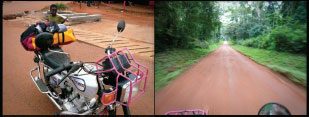
FIGURE 8.22
Slightly undercranking the camera can increase the drama of a chase. Shooting at 20 FPS or 22 FPS accelerates the action just enough to reinforce the peril while not making the scene appear artificially treated or comical when played back at 24 FPS.
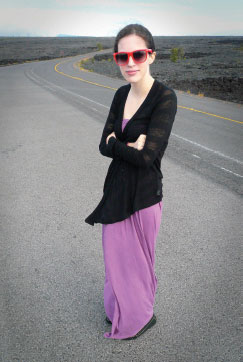
FIGURE 8.23
Shooting at a slightly higher than normal frame rate can impart a dreamlike quality. This scene of my daughter at Mauna Loa, Hawaii, was shot at 30 FPS for 24 FPS playback. The extra frames slowed her turns and movements, adding weight to her performance.
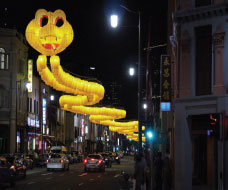
FIGURE 8.24
A lower frame rate at night may help capture stunning cityscapes. The undercranked camera can dramatically improve a camera’s low-light performance!
It would be easy to rant about the pointlessness of auto-focus—it’s idiotic, intended for amateurs, it’s the scourge of mankind—and for the most part, these comments are accurate. A camera’s auto-focus should be avoided like Neil Diamond’s 1992 The Christmas Album.5 Selective focus and the appropriate guiding of the viewer’s eye inside the frame is vital storytelling business, too important to leave to guileless engineers.
For some unknown reason, engineers believe that the center of the frame should always be in focus. Never mind the insights of the Old Masters and the Rule of Thirds. In most cameras, the shooter is saddled with this illogical conceit without the ability to target an alternative area of the frame.
Focus is fundamental to our craft. When we switch the camera from AUTO to MANUAL, we are affirming who we are as craftsmen and human beings. We must never surrender our craft to a soulless machine! Not now! Not ever! To focus manually we zoom in and bring the image into sharp glorious focus, then we pull back to frame our shot. We do this even in cameras without a dedicated focus ring by momentarily depressing the AUTO button. Just be sure to reframe afterward in a manner consistent with your storytelling goals and greater humanity.
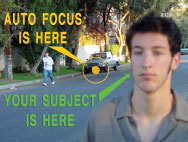
FIGURE 8.25
Most cameras are designed to maintain focus at center-frame, which runs counter to many artists’ notion of a compelling composition. As shooters, we direct the viewer’s eye inside the frame by assigning relative importance to in-focus or out-of-focus objects. Only you the inspired shooter can make this determination!

FIGURE 8.26
Switch to MANUAL to avoid an irritating nonstop search for focus in the middle of scenes.
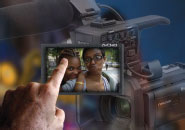
FIGURE 8.27
This camcorder’s touch screen lets shooters target the desired auto-focus region of the frame.
The Society of Operating Cameramen has a slogan: We see it first! With the advent of HD cameras with miniscule viewfinders, one frustrated member half-jokingly suggested a new more appropriate motto: We see it worst!
In the HD trenches, we often struggle to find focus on a tiny low-resolution screen. Embarrassingly, our audiences will likely see the same image on a much bigger screen, perhaps in a theater at high magnification. It is truly disconcerting to think that our audiences have a clearer view of the scene than we do!
As craftspeople, it is critical to see what we’re doing. One would think this should be a given in a business where seeing is everything, but it’s clearly not the case. Heck, we will discuss to no end the merits of shooting 2K, 4K, or 6K resolution but something practical like the size and the quality of a camera’s viewfinder and our eyes grow dim. It seems the fantasy of capturing great images is more appealing than actually having the means to do so.
New LCD and OLED 6 viewfinders are clearer and brighter but the challenge remains for shooters struggling with clumsy 1- or 2-inch screens. Manufacturers are aware of the focusing challenge and are trying various strategies to address the issue. Some cameras employ an expanded view, bar, or histogram as a graphical focus assist. The latter systems detect the high-frequency detail around objects in sharp focus. JVC camcorders utilize a three-color system, which serves up a monochrome image with in-focus objects peaking7 and displaying a color fringe. All of these approaches share the same disadvantage: they are impractical for run-and-gun documentary applications.
To facilitate critical focus, most camera viewfinders feature a peaking function that boosts sharpness. Thepeaking level has no effect on the camera’s recorded or output signal.
For this kind of work, I use a simplified zone system and refer to the rangefinder readout in the camera’s LCD. When shooting handheld, I support the camera from below and extend my forefinger to engage the focus while setting the approximate distance in the viewfinder rangefinder. Operating this way is fast and efficient, because I need not be concerned with critical focus except when fully zoomed in, or in very low light.
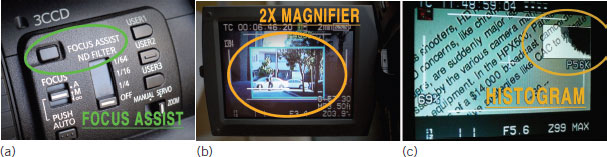
FIGURE 8.28 a,b,c
HD focusing on a tiny 1 or 2-inch screen is tough! Most cameras have a focus assist.
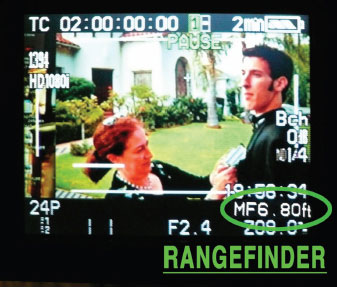
FIGURE 8.29
For documentaries, it is fastest and most effective to set focus by referring to the camera’s rangefinder. Support the camera firmly on the palm of the hand and extend the forefinger to engage the focus ring.
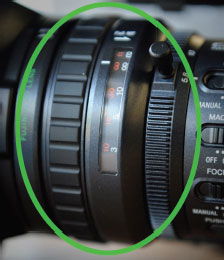
FIGURE 8.30
The focus rings on older cameras were completely useless, spinning endlessly in both directions with little or no effect. Recent cameras like this one with a mechanical ring allow setting repeatable focus points—a welcome capability!
DON’T GET BURNED!

FIGURE 8.31
Beware! The midday sun can destroy your camera’s viewfinder in a matter of seconds!
For years, low- and no-budget shooters were hobbled by the inability to reliably follow-focus. When considering a follow-focus rig, look for a model with a large knob that can be easily grasped by a harried, rain-soaked assistant. Also look for a white marking disc that can be removed and recalibrated for other cameras.
High-quality accessories such as a precision follow-focus do not come cheap. Such a unit can easily run $1,500 or more, with the support rods, mounting plate, and drive gear.
So is it worth it?
I believe so. Top-end accessories such as a matte box and tripod will last for decades long after your shiny new camera du jour is relegated to a doorstop. If you’re a serious shooter and intend to remain one for a while, it makes sense to invest in the best support gear you can afford. The superior craft that comes with proper support will serve you well long into the future. 8
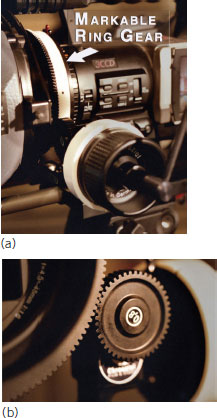
FIGURE 8.32
The typical follow-focus engages a geared ring specific to a camera and lens.
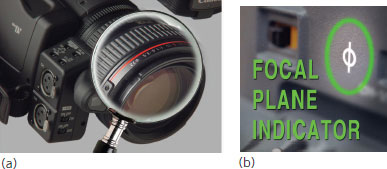
FIGURE 8.33
The focal distance for the Canon lens is measured from the red ring—not the imager plane!

FIGURE 8.34
The rocker control in many cameras is balky, making tasteful zooms difficult or impossible. This pro-grade controller enables well-feathered takeoffs and landings without the backlash or slop typical of cheaper units. Of course, the smart shooter refrains from zooming without a compelling reason to do so!
Our eyes can be remarkably adaptive perceiving white. We enter a supermarket lit by banks of fluorescents and don’t notice the noxious green hue. We blow out the candles on our birthday cake and don’t notice the warm orange cast. These out-of-balance scenes appear white because our brains do a lot of compensating—the green of the fluorescents is offset by a heavy dose of magenta, the orange of candlelight is infused with copious blue—all done without us ever being aware.

FIGURE 8.35
Excessive warmth may not be apparent to the eye. The camera is much less forgiving.
That is the question. For most documentary work, I recommend utilizing the camera’s 3200 ºK preset for interior tungsten and near-tungsten conditions and 5600 ºK for daylight and near-daylight conditions. 9 Remember that white balance is a creative choice. Shooting under fluorescent lights is supposed to look a bit green. Shooting at sunset is supposed to look a bit red. Don’t white balance these nuances out of your story!
In general, we need not be overly consumed with tweaking a camera’s white balance. The popular editing tools from Apple, Adobe, Avid, and others, all have superb color correction capabilities that can perform minor tweaks and adjustments. Dramatic shifts in color, however, from day to night or from night to day are an entirely different matter because the massive boosting of an individual color channel can introduce noise and lots of it. 10
MORE ABOUT WHITE BALANCE
To facilitate setting white balance under “average” conditions, most cameras feature presets for interior and exterior conditions. The interior setting is intended to capture scenes illuminated by standard studio lighting at 3200 ºK, 11 the color temperature of a glowing tungsten filament suspended inside an airless glass bulb. This is the type of lamp used in pro lighting instruments from ARRI, Lowel, and others. The metal tungsten is used because when heated to 3200 ºK, it emits an even spectrum of color—a near-perfect white light.

FIGURE 8.36
Tungsten lamps produce a near-perfect white light at 3200 ºK. Your camera’s sensor and processor are designed to respond ideally under this type of illumination.
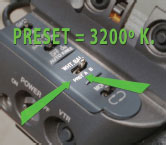
FIGURE 8.37
A typical white balance toggle features A and B position settings in addition to the interior/exterior preset.

FIGURE 8.38
Scenes recorded under a clear blue sky may exhibit a noticeable cool cast, especially in the shadows. In winter, the color temperature in the shade may exceed 20,000 ºK!
In nature, we find few light sources at 3200 ºK. Incandescent household lamps exhibit a color temperature between 2600 and 3000 ºK, which means scenes will appear unnaturally warm if the camera’s tungsten preset is used with no further adjustment or filtration. Balancing the camera to a white reference in such cases adds the appropriate blue offset, which may or may not be what you want.
For exteriors, the camera applies a standard conversion by assuming a mixture of skylight and sunlight at a color temperature of 5600 ºK. Fundamentally, the direct sun adds warmth, whereas the light reflected from a clear blue sky adds a noticeably cool cast.

FIGURE 8.39
Mixed illumination may be integral to a scene so you’ll want to preserve the feeling. In most cases, the camera’s white balance preset is the best way to handle it.
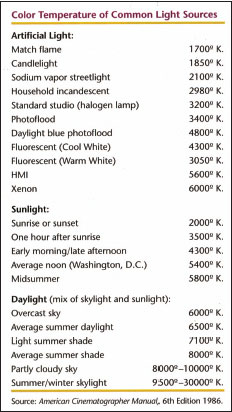
FIGURE 8.40
One way or another we must inform the camera what white looks like in our scene. To white balance manually, we can use as a reference any white surface such as a plain piece of paper or the back of a show card. Zoom in to fill the frame, then press and hold the camera’s white balance button or dial. An icon in the viewfinder will blink, then go steady as the camera applies the requested compensation.
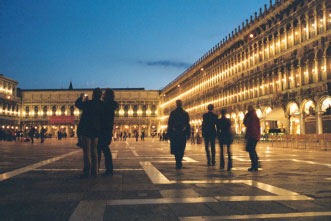
FIGURE 8.41
When balancing San Marco Square at dusk, we should compensate enough to alleviate the excessive warmth, but not so much as to remove all sense of place and drama. It’s worth repeating: We don’t balance our whites at the expense of the story!
Our cameras are getting smarter, but how can any camera know what is supposed to be white in a scene? Left in auto mode the camera will continuously “correct” whether warranted or not. Warm sections of scenes will be corrected by adding blue. Cool scenes will get the opposite treatment, receiving an injection of red. We can imagine how the endless shifting color can wreak havoc in postproduction as we struggle to build a visually coherent sequence.
Auto-white is an anathema to good storytelling craft. We control how the camera sees the world, and the last time I checked, the world was not a morass of dull neutral tones. Yes, we must inform the camera what white looks like, use the correct preset, or set the white balance manually. However, we do it; remember that the white our story requires may well have a dash of warmth or coolness in it.
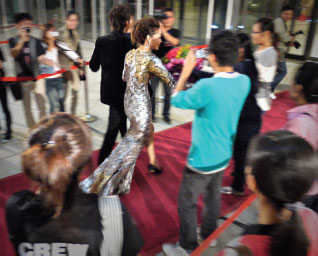
FIGURE 8.42
White balance goes a long way to communicate story. Warm or cool? Which is correct for this celebrity? This scene is from the 1st Annual Vietnam International Film Festival in Hanoi 2010.
The savvy shooter understands that white balance like other aspects of our craft is driven by the story imperative. Shooters for shows like Access Hollywood have become adept at capturing celebrities coming up the red carpet, rewhiting quickly in advance of a particular star by adding warmth or coolness to the star’s look in accordance with the dictates of that evening’s gossip mill.
Whiting the camera to a blue-tinted reference infuses the subject with a warm flattering glow. White balancing to a reddish source has the opposite effect, instilling a cool cast on an actor who may be playing a villain in his or her latest movie.
At first, the references carried by shooters were scraps of colored construction paper to match the particular stars. This is the Cameron Diaz. This is the Angelina Jolie. You get the idea.
Today we can purchase ready-made cards in a range of warm and cool tints. It’s an easy and inexpensive way to control white balance and mood.

FIGURE 8.43 a,b,c
(a) Warm-hearted Julia Roberts. (b) Cool bad-guy Charlie Sheen. (c) Icy bad Nazi guy.

FIGURE 8.44
A tinted reference helps the shooter achieve a white-balance consistent with the desired story and mood. The effect may also be applied, albeit less conveniently, in the camera setup menu.

FIGURE 8.45
A camera’s built-in vectorscope can alert the shooter to an overly warm or cool scene. The image at right might or might not be correct—depending on the story imperative.

FIGURE 8.46
Auto Black Balance (a) ensures that proper color and shadow detail is recorded for each channel. In some cameras ABB can also help mask damaged pixels by borrowing data from adjacent undamaged photosites. ABB is usually initiated by a front toggle (b). In compact camcorders, ABB is performed automatically during start up or in tandem with Auto White Balance (AWB).
Automatic Black Balancing (ABB) should be performed periodically to ensure that blacks are free of color and are reproduced accurately. ABB resets the primary RGB colors to zero and is performed with the iris closed or lens capped. Many professional cameras close the iris automatically before executing ABB.
It is not necessary to perform ABB before every setup. However, the camera should be black balanced after a long period of inactivity, when the ambient temperature shifts substantially, when the shutter has been turned off, or if the camera is switched between progressive and interlaced scanning modes.
ABB should also be performed after a long flight as this may help mask dead or damaged pixels inflicted by high-altitude cosmic rays. This only applies to CCD cameras; CMOS or MOS models are not susceptible to cosmic ray damage, or at least not in the same way.
There is usually little to gain from increased gain. In CCD cameras the gain applies to the amount of signal amplification from the sensor. 12 When gain is raised the camera’s ability to capture detail and grayscale in low light may improve, unfortunately, along with the background noise. When compressing later for output to the Web, DVD, or Blu-ray, this noise will be compounded potentially producing a maelstrom of ugly artifacts because the encoder is unable to separate the unintended noise from the intended image detail.
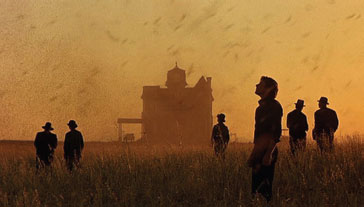
FIGURE 8.47
Undercranking the camera can create amazing images in low light. In Terrence Malick’s iconic Days of Heaven 13 (1978), the actors slowed their movements to accommodate a 6 FPS camera for 24 FPS film playback.
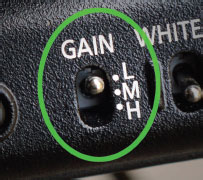
FIGURE 8.48
Gain values ranging from –3dB to +18dB can be assigned to a camera’s L/M/H toggle. I usually set the camera low gain to–3dB, middle gain to 0dB, and high gain to +3dB. Not all cameras feature a negative gain option.
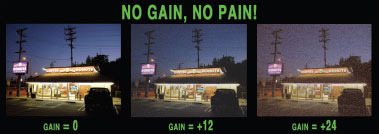
FIGURE 8.49
Be wary of shooting with high gain as this can dramatically increase noise and detract from the visual story. Some cameras including many Sony models apply noise reduction to offset the effect of elevated gain.
When shooting in low light, increased gain should be the last resort in order to achieve an acceptable range of gray tones. Most cameras offer gain up to +18dB, the noise at this level producing scenes usually suitable only for news or surveillance applications.
Each +6dB increase in gain nets a one-stop advantage in exposure. In cameras with a digital super gain up to +48dB, the camera boosts the signal in the digital domain where the noise can be more effectively isolated from the picture data.
Some shooters prefer working with negative gain, which may help obscure the noise in weaker shadow areas. Shooting at –3dB or –6dB has no effect on contrast or dynamic range; it simply reduces a camera’s overall sensitivity, the equivalent in film-speak of employing a lower ISO.
When shooting in very low light, I often undercrank the camera, that is, record at a slower than normal frame rate. 14 The strategy doesn’t apply so much to dialogue scenes, but it can work well with newer generation camcorders that record discrete frames to solid-state memory. Undercranking at 12 FPS and slowing the scan rate of the imager effectively doubles a camera’s low-light sensitivity (ISO).
Although it’s impossible to eliminate noise entirely, there are ways to reduce its visibility through proper camera setup, strategic use of physical and software filters, and controlled lighting.
Noise may be defined as random single-pixel bits of picture data that are always present but not necessarily apparent. Standard definition cameras with large pixels usually exhibit better shadow integrity with less noise than comparable-class HD cameras. In Chapter 9, I discuss how lowering the Master Pedestal can deepen the shadows and help conceal noise. The crushed look can be punishing, but if noise is the number one villain in your life, the victory-at-all-costs approach may be a way to go.
Dialing down a camera’s master detail (DTL) helps reduce noise by blurring the edges of noisy pixels and rendering them less noticeable.
Raising a camera’s detail coring can also help reduce noise by targeting and defocusing the pixels specifically in the deepest shadows where noise is most apparent. In some camcorders, the increased detail coring and noise reduction is applied as part of routine processing. This approach has its advantage, as images appear calmer without a shooter’s direct input.
We must be careful, however, not to push detail coring too far because image detail is suppressed along with the noise residing in the same shadowy neighborhood. Use only enough coring to be effective, but not so much to render the shadows sterile and devoid of life. Note that raising the detail coring has little effect if the camera’s DTL is already low. The coring option really only works at normal or elevated DTL settings.
Shadow noise can be especially objectionable in the faces of actors. For this reason, a lower skin detail level may be desirable to tamp down noisy pixels and reduce unwanted texture in the flesh tones. Of course, any substantial reduction in skin detail must be done with care to avoid an unflattering mushy look.
In news and documentaries, it is usually best to avoid the cine gamma modes that stretch the blacks and further exacerbate the noise in underlit conditions. Remember well-filled scenes are happy scenes where noise is not a concern or a serious storytelling impediment.

FIGURE 8.50
No guts, no glory! Shooting in low light opens yourself up to capturing your best stuff! Don’t be afraid of the dark!
Timecode provides a practical means of referencing and synchronizing audio and video throughout a production. In the PAL television system 15 used across Europe, Asia, the Middle East, and Australia, timecode is simple: Video moves along at 25.00 FPS, and timecode accounts for each frame on 1:1 basis. In the NTSC system, we deal with two timecode standards, owing to the discrepancy between the 30 FPS nominal frame rate and the 29.97 FPS actual rate. Drop frame (DF) and nondrop frame (NDF) timecodes have been around for decades, and they continue to be the source of misery and woe.

FIGURE 8.51
Beware of the timecode swamp. Timecode consists of four fields: hours, minutes, seconds, frames. A semicolon in software applications denotes drop-frame timecode.

FIGURE 8.52
Just as the earth doesn’t spin precisely at 24 hours per day, NTSC does not operate at exactly 30.00 FPS. Drop-frame timecode compensates for NTSC’s actual frame rate of 29.97 FPS by omitting 00 and 01 in the count every minute (except every 10 minutes). No video frames are actually dropped! As for the calendar, we compensate (with a few exceptions) every 4 years by adding an extra day—February 29.
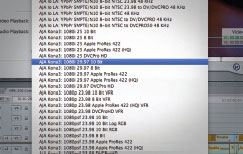
FIGURE 8.53
The timecode swamp has sadly permeated the HD world. To enable easy conversion to standard definition, it is customary to shoot HD 29.97 FPS or 59.94 FPS with drop-frame (DF) timecode. When shooting 24p, the frame rate of 23.976 FPS and nondrop frame timecode usually applies.
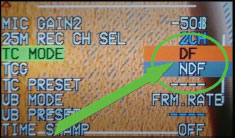
FIGURE 8.54
Broadcasters cuing programs for air usually prefer the running time accuracy of DF timecode. For closed-captions or subtitles, NDF timecode is the better choice, owing to the uninterrupted frame count. It doesn’t matter which timecode mode is used as long as the workflow consistently reflects one or the other.
It was the best of times. It was the worst of times. Timecode arrived with the space program in the 1950s in order to reference flight anomalies beamed back from space. It made sense given the mission of the day: to divide timecode into hours, minutes, seconds and frames. The 1:1 system of counting frames over 24 hours associated each frame of video with a moment in real time. The system did not account for NTSC’s actual 29.97 frame rate, however, which meant the timecode did not reflect actual elapsed time, a matter of critical importance to broadcasters looking to accurately cue programs and commercials in an era of live TV. Thus, the demand for an alternative timecode scheme based on the 29.97 FPS rate, instead of the 30 FPS approximation used by NASA and others up to that point.
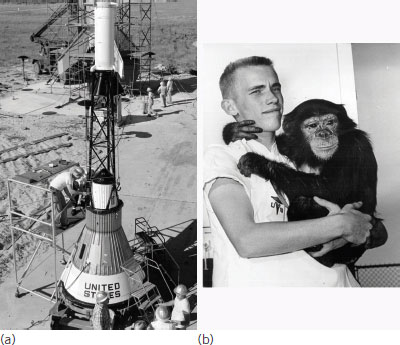
FIGURE 8.55
The 1950s ushered in an era of space exploration—and timecode. To track anomalies in flight mission controllers embraced a 24-hour 30-FPS counting system.
WHEN YOU’RE FEELING OUT OF SYNC
When troubleshooting an out-of-sync condition always first suspect the matter of mismatched timecodes. Capturing DF footage as NDF or vice versa will result in program audio drifting out of sync at a rate of 3 seconds 17 frames per hour. This insight will save you hours and potentially earn you thousands of dollars as a troubleshooter over the course of your career. Please send your grateful payment to …
RUNNING FREE
When synchronizing multiple cameras the Free Run (F-RUN) setting continuously advances the timecode whether the camera is running or not. For single camera, the Record Run (R-Run) option is more practical because timecode only advances when actually recording.
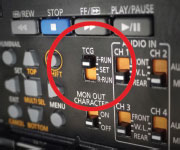
FIGURE 8.56
Free Run (F-RUN)/Record Run (R-RUN) selector at side of camera.
SERIAL DIGITAL VERSUS HIGH-DEFINITION MULTIMEDIA INTERFACE
HDMI (High Definition Multimedia Interface) was originally designed to facilitate the interconnection of consumer devices and peripherals. In its many incarnations, HDMI interweaves uncompressed audio and video in a single cable at 8-bits per channel in the sRGB 16 color space. Although the reduced bandwidth and lack of timecode limits the applicability of the interface for serious production, many professionals utilize HDMI to connect to a monitor or wireless transmitter.
HDMI cables are notoriously flimsy and do not normally provide a solid connection due to the lack of a bayonet or other locking system. Secure HDMI connectors are available, 17 however, and can work in any ordinary HDMI camera socket, so be sure to look for them!
The more professional SDI (Serial Digital Interface) also outputs an uncompressed multiplexed18 signal but, unlike HMDI, is not limited to 8-bits. This makes SDI or HD-SDI suitable for an all 10-bit workflow from origination in-camera through postproduction, color correction, and final output.
Circumventing the sometimes crippled capabilities of a camera’s internal recording system the SDI output enables capture of superior images to an external device albeit not necessarily at 10-bits. The Panasonic AF100, Sony EX3, and Canon C300, output only 8-bits via SDI, leading to potentially compromised results. On the other hand, the 10-bit SDI output from cameras such as the Panasonic HPX255 or Sony F3 is capable of producing very high-quality recordings in a KiPro, a nanoFlash, or a similar unit.
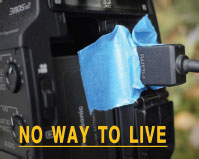
FIGURE 8.57
This is no way to live! Locking HDMI cables are available.
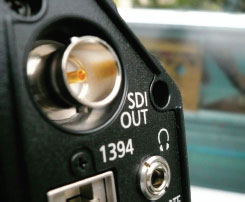
FIGURE 8.58
A single SDI cable supports timecode, machine control, audio, and 10-bit video up to 1,485 Mbps-twice the bit rate of HDMI. A newer SDI variation dubbed 3G-SDI provides even greater bandwidth at 2,970 Mbps.
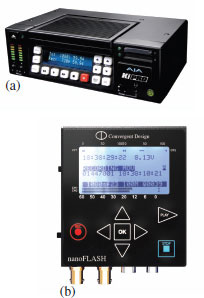
FIGURE 8.59
The AJA Ki Pro (a) is a versatile recorder capable of capturing uncompressed audio and video while up-, down-, or cross-converting from one HD or SD format to another. The popular nanoFlash (b) records SDI or HDMI signals to Sony XDCAM HD 422 using Compact Flash (CF) media.
INTERCONNECTIVITY AND STREAMING
The transition to a file-based workflow has been dramatic, jettisoning videotape for solid-state memory, foregoing Firewire in favor of USB, and capturing discrete frames of data instead of video streams.
The camera has become a media hub and a server as interconnectivity via WiFi, USB, and Gigabit Ethernet grows in relevance, and content creators no longer need to offload video and metadata 19 for editing and processing. Camcorders are increasingly relying on remote control to accomplish this, employing proxy files in tandem with an Internet-enabled device like an iPad to transfer camera footage and edited programs via an FTP server.
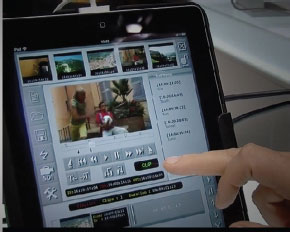
FIGURE 8.60
The camcorder server allows wireless streaming, metadata support, and in-camera editing via a laptop or tablet. The editor utilizing the proxy video uploads the assembled program to a satellite truck or FTP.
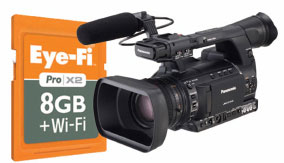
FIGURE 8.61
This camcorder records to an SD card in Slot 1 while transmitting video in real time via the Eye-Ficard in Slot 2.
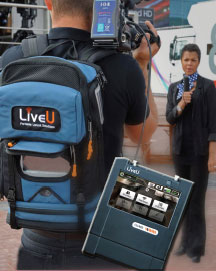
FIGURE 8.62
LiveU utilizes a wireless transmitter in combination with a cellular network to broadcast live video from almost anywhere in the world.
For most applications, an external monitor is essential for checking focus, color balance, framing, and composition. Achieving a solid black has been the bête-noire of LCD displays, because the fluorescent backlight projected through a liquid panel produces a murkiness that interferes with proper assessment of color and contrast. The newest displays reduce the murkiness by inserting a moment of black in the refresh cycle. This is a key advantage of doubling a monitor’s refresh rate to 120 Hz, the improved shadows, deeper blacks and reduction in motion blur being advantageous for sports and other high-motion applications.
Organic light emitting diodes have dramatically improved the quality of images in camera view-finders, monitors, and big-screen TVs. OLEDs utilize a shutter and series of filters with a response time of virtually zero, enabling near-absolute black with a wide color gamut and a contrast ratio of more than 1,000,000:1!
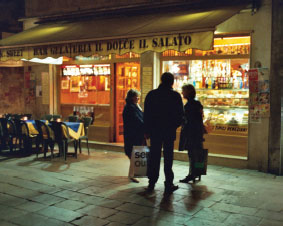
FIGURE 8.63
In low light or at night, an external display may offer the only clue to what you’re actually capturing.
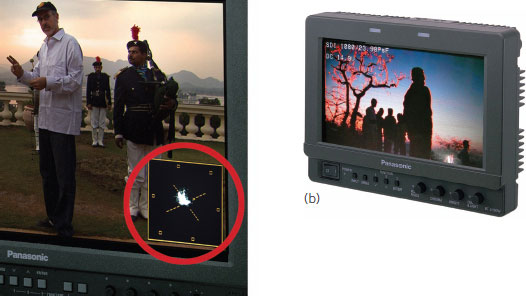
FIGURE 8.64
Some monitors offer a built-in waveform and vectorscope, with focus-in-red peaking (b) to assist finding critical focus.
Lithium-ion batteries are very efficient. Although they rarely last more than 5 years or 500 charging cycles, they’re easy to maintain and don’t lose much charge sitting in our travel cases or on a shelf waiting for the next call to duty. That’s an advantage for the itinerant shooter; the self-discharge rate for lithium-ion batteries is half that of nickel-type batteries.
In every type of gadget and gizmo if it beeps, burps, or percolates, it’s probably powered by a lithium-ion battery. From cell phones to cordless drills to the video cameras that pay our bills, we live in an era of lithium-powered everything. We like lithium. Go lithium!
But wait. Our friend who serves us so well has an onerous side. In 2006, a Wisconsin man went to bed one night and left his cell phone charging. The lithium battery in it overheated, exploded, and burned his doublewide to the ground!
A few years later, Fletcher Camera in Chicago replaced its entire inventory of lithium-ion batteries with NiMH batteries 20 after a thermal runaway wreaked havoc at a local sound stage. The flames from the exploding battery packs were said to have shot 10 feet into the air at a temperature of more than 1,000 ºF!
Lithium-ion batteries can be especially hazardous aboard aircraft because superheated debris thrown off by a burning lithium cell can and has melted through the walls of aircraft cargo holds.
A battery may discharge in a slow trickle over a period of weeks or months, in a more moderate, controlled way as in the normal running of a camera or in an instantaneous release that could result in an explosion or fire. The latter result might be due to an internal short circuit, or the battery could be overcharged or physically damaged in some way. But once a cell goes thermal, there is no extinguishing agent that can stop it. As each cell breaks down, it fuels the next explosion. Given the number and size of batteries we pack for travel, a fire in one could quickly spread to others in the same case with disastrous consequences if this were to occur aboard an aircraft in flight.
Lithium-ion batteries require proper care. Running a battery too low prematurely ages the seals of the cells, which increases the explosion risk because a fully depleted battery coming back up quickly can produce enormous heat.
THE RULES ARE UP IN THE AIR

FIGURE 8.65
The rules regarding lithium-ion batteries aboard aircraft are in flux. Current regulations in the United States specify that spare batteries up to 100 watt-hours may only be carried on board; they are not allowed in checked baggage. Spare batteries should be placed in plastic ziplock bags or kept in the manufacturer’s original packaging to protect against short circuits.
See the Transportation Security Administration or Department of Transportation websites for the latest updates.
http://www.tsa.gov/travelers/airtravel/assistant/batteries.shtm
http://www.iccnexergy.com/regulatory-updates/1195/us-dot-lithium-battery-rulemaking-overview

FIGURE 8.66
Full-size cameras in North America usually feature an Anton Bauer Gold Mount whereas cameras in Europe and Asia are generally fitted with a V-Mount. Simple adapters are available. The compact camcorder batteries from Sony and Panasonic are not interchangeable.
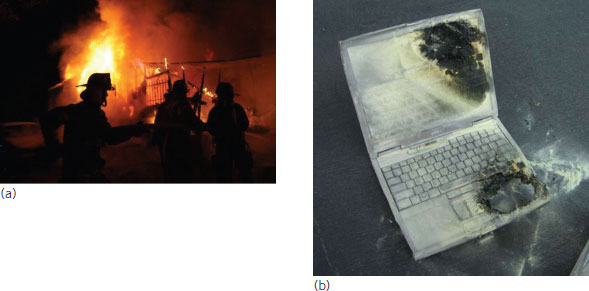
FIGURE 8.67
To avert a potential fire never completely exhaust a lithium-ion battery. Batteries from rental houses may be more prone to failure because they are likely abused and left on charge for long periods.

FIGURE 8.68
When not in use, your battery should live here. The trickle feature helps maintain optimal battery health, diminishing the risk of a calamity.
Focal distance, zoom percentage, date and time, battery condition, and umpteen other things all contribute to viewfinder clutter. Indeed, there is no shortage of miscellany that can obscure the image and the edges of the frame.
I prefer a clean view with only the essential functions: FIZ (focus, iris, zoom), timecode, battery level, record time, frame rate, and audio level. A frame outline or action safe is especially crucial to ensure accurate framing and sufficient headroom. The action safe specifies a 10% cut-in from each side of the frame; the title safe indicates 20%. The notion of title and action safe zones is outdated, because it assumes that a portion of the transmitted image will be cut off in a 1950s-era home television. Modern viewing environments including laptops with thin frames seldom intrude on more than one or two percent of the picture area, so the 20% title safe seems like way overkill.
For reasons previously fathomed, the rangefinder is an integral part of my modus operandi as the RF can greatly facilitate finding focus when shooting in run-and-gun environments. Shooters of narrative-style programs will often note the zoom position for each setup in order to match the frame size in a reaction shot or to ensure continuity in case of a reshoot. The zoom setting may be expressed in millimeters or percentage.
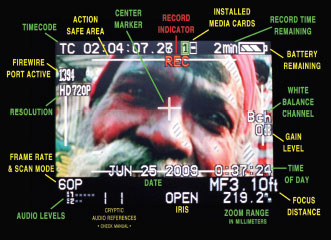
FIGURE 8.69
Everything but the kitchen sink. A camera’s viewfinder is supposed to facilitate framing, focus, and composition. The clutter here appears to work against that imperative.

FIGURE 8.70
For close-ups, the center marker placed at or over the nose is usually correct.
DON’T LAUGH. IT COULD HAPPEN TO YOU!
Always verify the REC indicator is lit when recording! In the heat and fervor of battle, it is not uncommon for a camera operator to forget to press RECORD! It has happened, especially with solid-state cameras that operate silently!

FIGURE 8.71
Single-frame animation and time lapse is a staple in today’s programming from nature documentaries to flashy eye-candy bumpers for the evening news. The intervalometer is best utilized subtly to increase the apparent speed, say, of clouds streaming inland from the sea or the sun’s rays peeking around a building corner. The typical intervalometer can be set for times ranging from one frame every half-second to one frame every 10 minutes.
Determining the correct interval requires experience, arithmetical prowess, or the right iPhone app that can do the figuring for you. A robust tripod is imperative, as is sufficient power to cover an interval spanning potentially days, weeks, or months. Auto-exposure in this case may also be useful to accommodate a wide fluctuation in light levels.
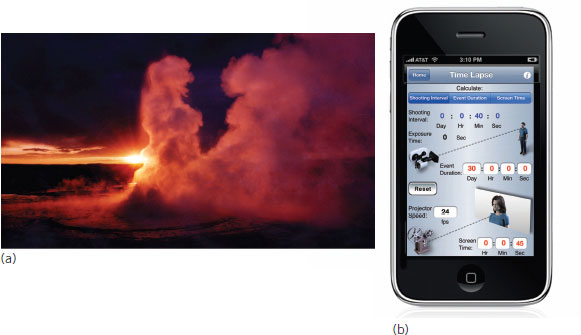
FIGURE 8.72
Show me a world I haven’t seen before! The pCam app for iPhone (right) calculates the desired interval for time-lapse applications.
Seemingly out of The Twilight Zone, the pre-record (PRE_REC) function captures picture and sound several seconds before the shooter presses RECORD. The PRE_REC capacity varies from 3 seconds to 15 seconds depending on a camera’s internal buffer and recording format. 21
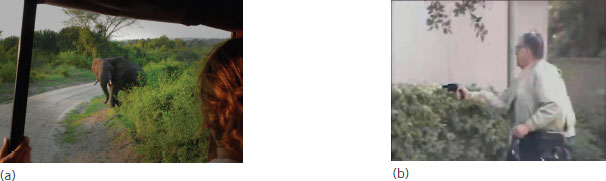
FIGURE 8.73
PRE_REC enables capture of unforeseen events like an elephant emerging from a forest or an attempted assassination in front of a California courthouse. With the camera pointed and uncapped, focused, the last several seconds of video is captured to an internal buffer then offloaded to the recording medium once the shooter presses RECORD.
The LOOP function enables continuous recording to the memory card or the hard disk. It is not other wise possible to overwrite existing files captured to P2, SXS, SD, and CF recording media.

FIGURE 8.74
Waiting for Godot? The LOOP RECORD function keeps the camera rolling indefinitely, capturing over previously recorded material if necessary to capture his arrival.
SHOOTING IN EXTREME CONDITIONS
From time to time, shooters must face extreme conditions, from snow and rain, to revolution in the streets and unruly wildlife.
Excessive camera vibration can often be dampened sufficiently by engaging the Optical Image Stabilization (OIS). The in-camera OIS can be quite effective when shooting handheld or from a moving vehicle. OIS must be used with care, owing to the increased resistance when attempting to pan or tilt the camera normally. OIS should be disabled unless specifically warranted.
Shooting in high heat and humidity may be problematic, especially for processor-intensive cameras that produce plenty of heat that must be dissipated. For this reason, video cameras are designed with large heat sinks or fans to draw heat away from the sensor where high temperatures can induce noise and negatively impact performance. High heat around the base of the lens can also affect back-focus and can lead to a softening of the image, a condition that can be especially critical in wide-angle scenes captured at or near full aperture.
Operating in humid conditions requires special care as condensation from moving in and out of an air-conditioned room can penetrate the lens and fog the interior elements. The trapped moisture may increase flare, lower contrast, and promote the growth of a lens-coating-eating fungus. My beloved Zeiss 10–100 zoom was destroyed in the jungles of Central America by one such fungus; a sad and expensive lesson that has since prompted me to exercise greater care when shooting in torrid conditions.
In this respect, solid-state cameras have a major advantage over tape-based models, as the latest camcorders devoid of a mechanical transport are not subject to tape fouling or clogged heads. Extreme cold can also affect camera operation by drawing down the battery just when the camera needs it most to overcome the increased internal resistance. The degraded performance may result in dropped frames and other recording anomalies.
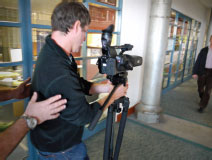
FIGURE 8.75
Optical Image Stabilization (OIS) can help when shooting handheld or out of trains, boats, and moving vehicles. OIS is usually enabled via an external switch on the side of the lens or camera body.
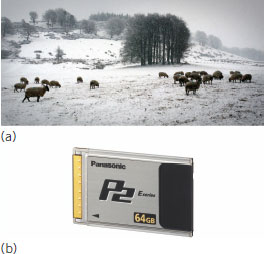
FIGURE 8.76
Although a camcorder may run at temperatures below a manufacturer’s specified minimum, extreme cold can degrade camera performance and shorten the life of internal components. Memory cards are particularly prone to failure in arctic conditions. Panasonic’s P2 card (left) built to military specifications is able to withstand extreme temperatures and environments.
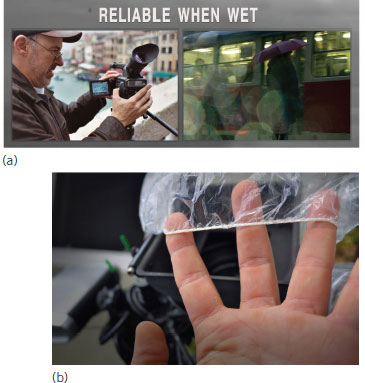
FIGURE 8.77 a,b
Without a fragile tape transport, solid-state cameras are well suited for operating in rainy or humid conditions. Take care to avoid condensation when moving in and out of an air-conditioned environment. To prevent condensation from forming on the camera and lens, place the equipment in a plastic bag, remove as much air as possible, and seal it shut with a twist tie. (b) Use your head! That shower cap lying around your hotel room is there for a reason!

FIGURE 8.78
Older lenses may appear to have a fungus that is actually condensation or evaporation from grease, paint, or adhesive. Lenses that have been exposed to high temperatures will often exhibit an internal haze.
The volume of water is not as much the problem as the humidity. Moving in and out of a vehicle or hotel room the camera will fog and drip like a lemonade cooler. A rain cover can ward off the deluge, while moisture absorption packs under the cover reduce the ambient humidity. The packs may be purchased at a local dive shop.

FIGURE 8.79
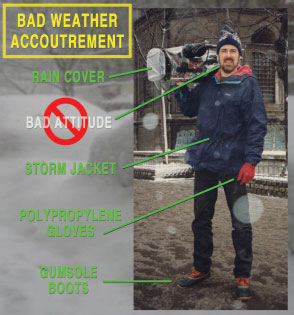
FIGURE 8.80
In winter, thin polypropylene gloves offer protection from contact with frigid metal surfaces while preserving the tactile sensitivity required to operate a camcorder’s tiny buttons.
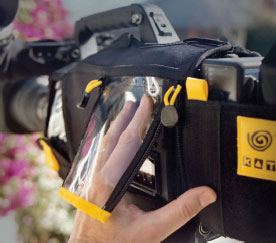
FIGURE 8.81
A camera glove imparts a more robust feel and protects against physical impact damage. Look for a design that allows easy access.

FIGURE 8.82
This inflatable bag protects against overzealous folks jamming their life’s belongings into an airplane’s overhead compartments.
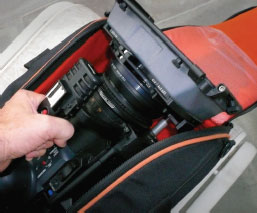
FIGURE 8.83
The ideal case accepts the preconfigured camera with the matte box ready to shoot.
WHEN DISASTER STRIKES: CAMERA FALLS IN SALT WATER!
The effect of caustic seawater is diminished when diluted, so the sooner we get the camera into fresh water, the better. We should power down and keep the camera submerged as we hightail it in for repair. If the dunking occurs out to sea, we can drop the camera into a pickle pail and cover it with fresh water or liquor. Tasteless American beer from a major brewery, which is so awful for drinking, is perfect for this.
SHOOTING WILD LIFE AND WILDLIFE
Whether you’re shooting a concert in Bangladesh, a revolution in the streets of Cairo, or a charging rhino in Zambia, the matter of one’s self-preservation is paramount. In striving to capture a compelling unique story, the documentary shooter often places him- or herself, knowingly or not, in mortal danger. The constrained view inside a camera viewfinder can be hazardous and misleading; the shooter may not recognize a life-threatening peril lurking just outside the frame’s edges.
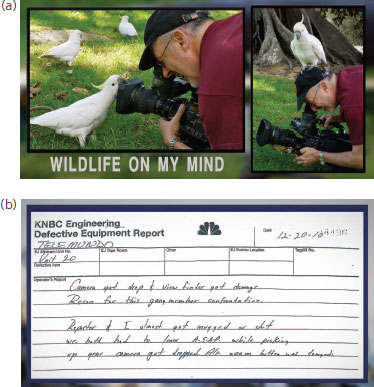
FIGURE 8.84
Our desire to capture compelling stories must be balanced with an equally compelling need to stay alive. Most shooters agree: No single shot is worth dying for. The camera damage report (b) alludes to a gang attack on a news cameraman in Los Angeles.
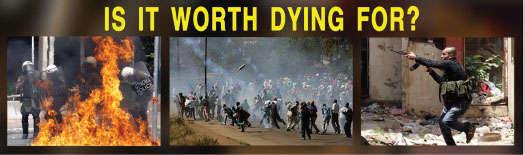
FIGURE 8.85
EDUCATOR’S CORNER: REVIEW TOPICS
1. How do functions such as auto-focus, auto-exposure, and auto–white impair the creative shooter? Identify three (3) instances where an auto function might be helpful.
2. What is the function of a camera’s zebras? What impact might an actor’s skin color have when setting a zebra value?
3. Describe the effect of a fast or slow shutter. At 24 FPS, what precautions can a shooter take to reduce the risk of strobing during fast pans?
4. Consider the impact of frame rate. How might small variations of one or two frames per second contribute to more effective storytelling? Under what circumstances might you shoot at 2 FPS? 10 FPS, 26 FPS, 40 FPS? 60 FPS?
5. Think about your film studies instructor, your dry cleaner, and other notable people in your life. Snap a photo and assign each person a color temperature. Who’s cool at 5000 ºK? Who’s warm at 2850 ºK? This is supposed to be fun. Don’t hurt anyone.
6. Foul weather makes great shooters. Do you agree? Please discuss in the context of this book’s mantras: (a) Exclude! Exclude! Exclude! (b) Make ’Em Suffer! and (c) Show Me a World I Haven’t Seen Before!
7. Why does a 24p camera actually run at 23.976 FPS? In what circumstance would true 24.000 FPS be required? When shooting 25 FPS in 50-Hz countries, what frame rate is the camera actually running at?
8. Oh. One more thing: Are there any shots worth dying for? My Polish friends in the Gdansk Shipyards 35 years ago certainly believed so. Can you envision a circumstance where you might adopt a similar perspective?
1 See Chapter 9 for a discussion of key camera menu setup options.
2 ISO is not an acronym but is in fact derived from the Greek word iso, which means “equal.” The ISO rating reflects a film or video camera’s relative sensitivity to light.
3 In British television, the girl widely used as a reference was reportedly the daughter of BBC’s head of video engineering. She still appears on the U.K. test card; however, she may well have grown up, married, and had children of her own.
4 Shooting 25p in the United States or other 60-Hz country? Set your camera shutter angle to 150º.
5 Diamond, N. (1992). The Christmas Album [CD]. New York, NY: Sony.
6 Organic LEDs offer near-absolute black with a wide color gamut. With refresh rates 1,000 times faster than LCD, OLED viewfinders offer a smooth clear view devoid of lag, approximating the look and feel, it is said, of an optical viewfinder.
7 To facilitate critical focus, most camera viewfinders feature a peaking function that boosts sharpness. The peaking level has no effect on the camera’s recorded or output signal.
8 See “Supporting Your Story” in Chapter 11 for further discussion.
9 Your camera’s white balance preset is not the same as auto white balance, which is to be avoided like the plague.
10 For more on color-correction techniques, check out The Art and Technique of Digital Color Correction, by Steve Hullfish (Burlington, MA: Focal Press, 2008) and Color and Mastering for Digital Cinema by Glenn Kennel (Burlington, MA: Focal Press, 2007).
11 Color temperature is measured in degrees Kelvin after the British physicist who devised a system of quantifying differences in light emitted from objects heated to different temperatures. The Kelvin scale is identical to the Celsius system plus 273º.
12 In CMOS sensors, the gain is applied at the pixel level on the surface of the chip. Regardless of sensor type, there is a concomitant increase in picture noise associated with elevated gain.
13 Brackman, J. (Producer), Schnieder, B. (Producer), Schneider, H. (Producer), & Malick, T. (Director). Days of Heaven [Motion picture]. USA: Paramount Pictures.
14 Shooting at less than normal playback speed (24, 30, or 60 FPS) produces accelerated motion on screen; capturing a scene at higher than normal playback speed, that is, overcranking, produces a slowed effect.
15 Phase Alternating Line (PAL) is a 50-Hz NTSC-like system with a raster size of 720 × 576. Introduced in Europe in 1967, PAL with the higher vertical resolution is superior to NTSC at 720 × 480. However, NTSC operates at a higher frame rate (29.97 FPS rather than 25 FPS) and so delivers more samples per second—a valuable consideration.
16 sRGB is analogous to the more frequently referenced 709 HDTV color space.
17 Accell makes a locking HDMI connector that fits in any standard socket. The connector uses a shell expansion tab that works well. See http://www.accellcables.com/
18 Multiplexing obviates the need for individual cables for video, audio, timecode and machine control.
19 Metadata may be described as data about data.
20 Nickel Metal Hydride (NiMH) batteries are not prone to fire or explosion and are therefore much safer for air travel. NiMH packs of the same physical size are heavier, less able to hold a charge, and produce only 60% as much power as lithium-ion-type batteries. A new generation of NiMH cells is currently in development.
21 PRE_REC may not be possible at all frame rates and capture modes, including 24p. Be sure to check your camera’s operating manual for specifics.