
A show’s look is a powerful storytelling cue. In general, comedies look sharper, bluer, and more immediate. Dramas look more diffused, warmer, and past tense. The shooter’s responsibility is to create a look that is consistent with the program’s intended genre starting with the very first frame.
For many shooters the old mind-set applies: Are we shooting film or video? The two media suggest different sensibilities. In film, the look conveys a dreamier, more transcendent feel whereas video suggests greater immediacy and is thus more appropriate for news and nonfiction programs.
I entertain this mental wrangling before every shoot, as I settle on a look and adjust my camera setup accordingly. Today, given the broad capabilities of digital cameras, we can effectively create a different film emulsion for every project. Although it’s an advantage not to depend on Kodak or anyone else to produce the emulsion for us it can also be a curse for the reasons stated earlier: Too many choices lead to paralysis like too many options at In-N-Out Burger; it does not always make for a happier burger buyer or a more compelling video shooter!
Recall that traditional tape cameras are limited by their mechanical transports that must therefore operate at a constant speed. Apple created Firewire (IEEE 1394) in 1990 as a low-cost serial digital interface enabling easy capture of digital video to a desktop computer. With the advent of more film-like camcorders recording discreet frames to solid-state memory the relevance of Firewire as a video interface has diminished.
A video camera that acts like a film camera has some advantages, notably the ability to capture progressive frames at multiple frame rates. This can greatly expand a shooter’s creative options and reduce by more than 50% the storage requirements of (still) rather expensive memory cards. The flip side is that today’s tapeless cameras are no longer shooting video—they’re capturing data, which requires a file-based IT-centric workflow.
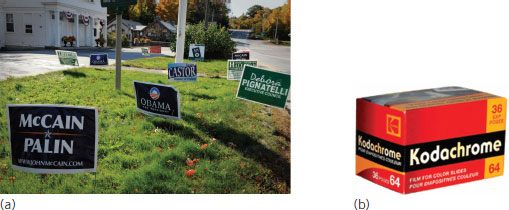
FIGURE 9.1
Too many choices? Today’s cameras can create virtually unlimited custom looks. In the past, the look and feel of a film’s emulsion (b) was determined for you.

FIGURE 9.2
Shooting film or video? The two media convey a different look and mindset. Some cameras organize their menus in this way.
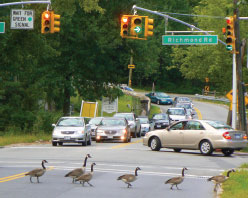
FIGURE 9.3
Many cameras’ default settings contribute to a brassy look. Tastefully tweaking these values can help alleviate the harshness.
The first order of business is setting the camera’s master detail (DTL), which affects perceived sharpness by placing a hard edge around objects. When the DTL is set too high objects acquire a plastic look that folks associate with video. When the DTL is set too low images appear soft and lack definition. Turning the detail off entirely is almost always a bad idea, 1 especially in lower end cameras that tend to struggle anyway to maintain adequate sharpness and contrast.
When considering a proper detail level, we should look at the project’s intended display venue. For small screens—an iPod, a cell phone, and the Web—the visual story can support a higher DTL than programs destined for the big screen, where the crude rimming around objects magnified many times is more objectionable.
When shooting in film-like or cine-gamma modes, the DTL is typically raised to compensate for the lower contrast and apparent loss of sharpness. Many cameras allow reducing the detail specifically in the flesh tones, which help cover imperfections in your favorite starlet’s complexion. Be careful not to dial the skin detail down too far! I know a shooter who leaned on this gimmick a bit too much and transformed a leading actress’s face into a soupy blob. That shooter is now selling shoes for Thom McAn’s on Staten Island.
In new cameras, lowering the DTL should be a priority2 because the elevated values favored by manufacturers contribute to a hard punishing look. One reason camera makers may prefer a high DTL is to compensate for inexpensive optics that lack good resolution and contrast. Some manufacturers may also believe that unsophisticated shooters prefer the pseudo-sharp hyperreal look. I’m told that’s true in Japan. I don’t think it’s the case elsewhere.
In the natural world, we see objects transition gently in high-contrast scenes such as the silhouette of a skateboarder framed against the evening sky. Be conservative when setting the DTL. For narrative projects, consider using a lower setting; for documentaries, leave it at zero for moderate detail or increment it slightly upward. As always, let good taste and the demands of your story be your guide!
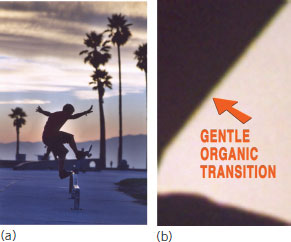
FIGURE 9.4
Smooth transitional boundaries produce more natural-looking images.

FIGURE 9.5
Hard, ugly edges around objects indicate excessive detail.
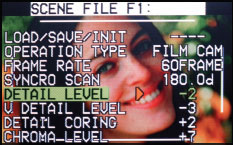
FIGURE 9.6
The master detail (DTL) level may be raised or lowered in the setup menus. In Sony models a –30 value is a good starting point. Note that a “zero” value means average or medium-level detail.

FIGURE 9.7
Reduced skin detail level helps conceal the blemishes in the face and skin of your favorite Hollywood starlet.
MASTER PEDESTAL: WHERE IS BLACK?
While well-gradated images are desirable for most documentaries and corporate programs, a grittier look, with muted colors, may be appropriate for dramas. Black level can be an effective story cue, conveying to an audience the essence of genre, character, and tone.

FIGURE 9.8
Black level has strong storytelling connotations. The low master pedestal in Mdundiko (2012)3 crushes the shadows and imparts a strong sense of foreboding.
THE LEGACY OF STANDARD DEFINITION
Sadly, even in the HD era, we continue to bear the burden of NTSC’s constrained color. Eight-bit HD cameras are fully capable of capturing a full range of values from 0 to 255, that is, where 0 represents pure black and 255 is pure white. Standard-definition NTSC and PAL, recognizing the onetime constraints of the cathode ray tube (CRT), cannot display black values below digital 16 or white values above 235. Exceeding NTSC safe values increases noise, especially in the red channel as the CRT struggles to display the wider gamut. Recording to a 10-bit format such as AVC-Intra offers only a partial solution as the displayed image must be limited to an output range of 64 to 940 (not 0 to 1024) in order to accommodate the standard definition release.
RESPECTING YOUR CAMERA’S DYNAMIC RANGE
Highlight overload or clipping is the hallmark of amateur video. A camera’s dynamic range, its ability to capture tonal gradations from the brightest highlights to the deepest shadows, is expressed in number of stops; a Sony F3 for example is said to capture about 12 stops of dynamic range; an ARRI Alexa, 15 stops; and a Canon 5D MkII, only 8 stops.
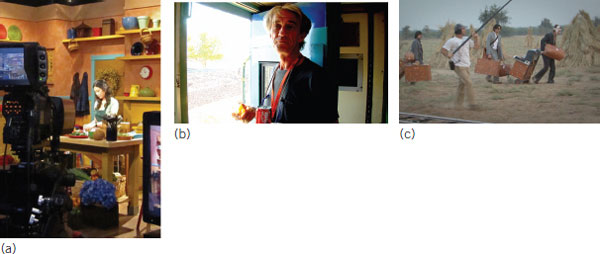
FIGURE 9.9
Virtually any camera is capable of producing superb images under flat trade-show conditions (a). The dynamic range in this scene (b) would put any camera to the test. Shooting at Magic Hour (c) makes life a whole lot easier for you and your camera.
Many entry-level cameras including DSLRs have limited ability to capture extreme luminance values. Unsurprisingly pricier more sophisticated cameras are more versatile; the flexibility of the Alexa and its ability to capture a wide dynamic range being a principal reason why shooters are willing to invest upward of $60,000 in one camera.
The gamma setting determines the range of tones reproducible in the straight-line portion of a camera’s characteristic response curve. A low gamma enables a greater number of tonal gradations so an image retains greater shadow detail with improved dynamic range. The trade-off may be a dull lifeless image because the mid-tones and highlights are lifted along with the shadows. By comparison, an excessively high gamma increases contrast and imparts a surreal waxlike finish to faces and flesh tones. If you’re shooting Invaders From Mars, that may be what you’re looking for!
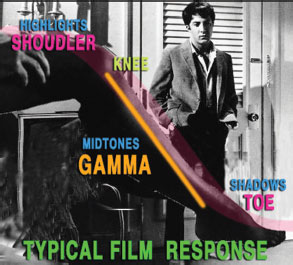
FIGURE 9.10
Although cine gamma is designed to mimic the gentle toe and low knee of motion picture film, the setting may introduce noise in underlit areas of a scene.
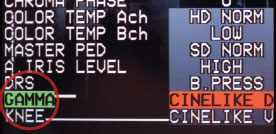
FIGURE 9.11
Many camcorders offer a choice of gamma presets. A cine option with the emphasis on dynamic range maximizes latitude and produces whiter whites, with the increased risk of clipping and shadow noise. Conversely, a cine preset that favors contrast produces images with greater punch compared to the HD normal or standard gamma. I prefer the standard gamma for documentary work, because the setting delivers the best performance with minimal noise under varying conditions.
FIGURE 9.12
In cameras that support numerical gamma many shooters prefer a value of 0.45. I like the increased punch of a slightly higher gamma (0.50) when shooting in film-like or cine gamma modes.
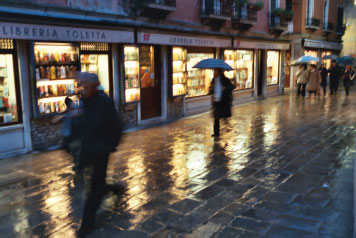
FIGURE 9.13
Selecting a different gamma may help suppress noise in dark scenes especially at night.
Consistent with the look of film, a cine-like gamma lowers the knee point in order to accommodate greater highlight detail. Although the improved highlights suggest a more traditional film look, the cine gamma may produce dingy images, similar to using too little bleach when doing the laundry; the whites never get really white.
Conversely, an elevated knee above 95% produces cleaner whites, but it comes with an increased clipping risk. The clipping of highlights and loss of detail is very difficult to ameliorate in postproduction.
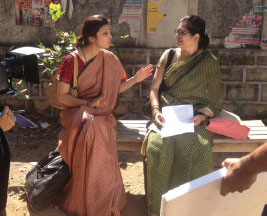
FIGURE 9.14
A cine gamma lowers the knee to accommodate greater highlight detail.
Blown-out highlights are the unmistakable sign of a novice shooter. To forestall this ugly condition, manufacturers dynamically set the knee to retain as much highlight detail as possible.
For most shooters in most cases, this is the wisest and most practical choice. Still, auto-knee has a notable drawback, as it affects the entire frame, pulling down whites even in areas with little risk of clipping. Panasonic cameras address this issue via Dynamic Range Stretch (DRS), which applies auto-knee only to the sections of the frame that need it. Shooting in a sports stadium in bright daylight, for example, when panning from the dark stands to the sunlit field, DRS pulls down the peaking values on the field to ensure a smooth gradient from dark to light and vice versa.

FIGURE 9.15
Auto knee enables capture of greater highlight detail (images courtesy of JVC). The downside of auto knee is less white whites like forgetting to add the bleach on washday.
FIGURE 9.16
The knee setting impacts the amount of detail retained after squeezing the oversampled image into an 8-, 10-, or 12-bit recording format.

FIGURE 9.17
Dynamic Range Stretch (DRS) can help to avoid clipping in high-contrast settings like sports venues in bright sun.
Like black and detail levels, color saturation helps convey the intended story and genre. High chroma is usually associated with comedy or satire, whereas desaturated color or low chroma suggests a story told in past tense, which may be appropriate for a historical drama that takes place in the 1930s. As in all things in the realm of camera craft, color saturation is best applied subtly. Kick it up a click or two to add punch to a scene, or knock it down a few increments to fuel a period saga. A high chroma can increase the apparent sharpness of a scene and help overcome the liabilities of a cheap lens, but the compensation required later to correct the imbalance later may introduce noise. It is usually better during production4 to set up the camera as closely as possible to the desired look. The same look may be achievable later in postproduction, but it won’t be as simple or as free of noise.

FIGURE 9.18
The saturated color of exploding appliances in Zabriskie Point (1970)5 fuels the movie’s counterculture theme.

FIGURE 9.19
The desaturated look of Depression-era America sets the tone in O Brother, Where Art Thou? (2000).6

FIGURE 9.20
Strong vivid color is de rigueur for news magazine shows. Some cameras feature a news gamma preset to facilitate this look.
Under ordinary fluorescent lights, we may not perceive the noxious green cast, but it certainly is there and the camera can see it, especially so. The camera’s matrix function is intended to de-emphasize the green just like the processor in our brain; otherwise, the green could overwhelm a scene if the generic matrix were used instead. Many cameras now offer a custom matrix. Certain colors in a scene can be made more intense while others are toned down to support a storytelling goal.
The shooter may also use the matrix to offset a subtle hue shift due to increased video gain. In low light, hue shifts are common under mercury vapor and similar-type lighting, so a matrix more indicative of human perception under such conditions should be applied. Many cameras offer one or more compensating presets for various lighting conditions.
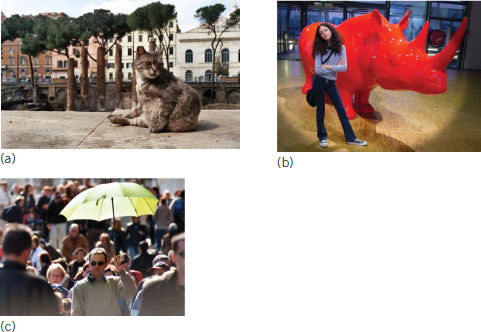
FIGURE 9.21
The muted hues in Rome (a) help meld the scene elements into a unified canvas. In (b), the intensity of the red rhino amplifies its dominant story role. Same in (c) on the steps of Venice where the green umbrella is the story.
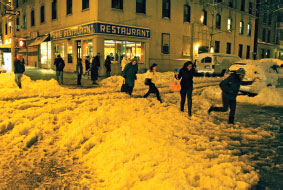
FIGURE 9.22
The skewed output of sodium vapor lamps challenges the shooter’s ability to capture a “normal”-looking image. In this case, the appropriate color matrix can alleviate the strong yellow curse. Changes in the color matrix do not affect the black or white level.
The savvy shooter knows the curse well—the impenetrable blacks, the blown-out highlights, and the plastic edge around objects. For years, these were the hallmarks of low-budget video, and there wasn’t much we could do about them.
Today’s cameras still contribute in their own way to the video curse: inferior optics, hue shifts, and overzealous error correction all play their part. But whatever the reason for lackluster images, if you’re going to derive the best performance from your low-cost HD variant or DSLR, you’ll need to address the techno-aesthetic issues head-on, and that includes the strategic use of a physical or software-based camera filter.
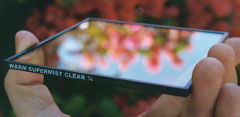
FIGURE 9.23
The complex interplay of light passing through a physical glass filter cannot be re-created precisely in software.

FIGURE 9.24
The latest digital cameras produce video of extraordinary sharpness with a harshness and propensity for noise. Proper image control and filtration can help.
Although most cameras today require only minimal futzing to produce a decent picture, the smart shooter understands the value of a finished image, and to this end, a physical filter may be the most practical way to achieve it. This is because a filter placed in front of the lens optimizes the contrast and detail of an image falling onto the sensor, and thus facilitates the most efficient processing.
Capturing an improper look and hoping to fix it in post is a dubious strategy because the unwanted attributes tend to be amplified downstream after compression and encoding. Compensating in post might not even be possible, as the countermeasures required to remedy any shortcomings are likely themselves to produce objectionable results.
Although many camera filters can be approximated in software, the delicate interplay of light passing through a glass element is not a process that lends itself to a general solution. Consider a beam of light interacting with thousands of tiny lenslets inside a Schneider Classic Soft filter; as light passes through and around the irregularly interspersed elements, it impacts the character, color, and direction of the beam in myriad ways.
The actual impact of a physical glass filter depends on many factors such as lens aperture, the strength of a backlight, and whether the point sources in frame are sharply defined. All of these elements can affect the look and feel of a scene.
The savvy shooter understands that a physical filter should be considered last, not first, after the lighting has been tweaked and diffused, and the camera menu setup options have been addressed.
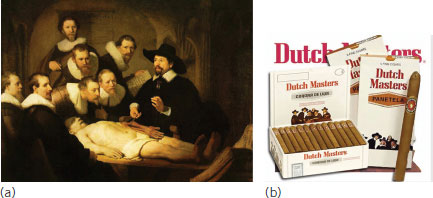
FIGURE 9.25
Consider adding fill light. Rembrandt probably never gave it a thought but his unfilled shadows can be the source of copious noise in digital video. Quiet shadows are happy shadows. Here have a cigar.

FIGURE 9.26
Try reducing the DTL to alleviate the hard edges, especially in close-ups. Lowering the DTL mimics the effect of a diffusion filter.
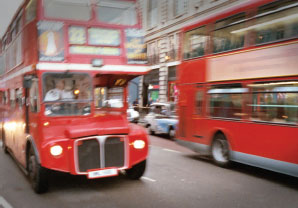
FIGURE 9.27
Turning down the chroma a few notches can obviate the need for a contrast-control filter.

FIGURE 9.28
High detail scenes like my grandfather’s grocery in 1937 may wreak havoc if captured in an interlaced format. Consider de-interlacing such scenes in postproduction or shoot progressively at 24p, 25p, 30p or 60p.
Although camera filters have been around since photography’s first days the advent of tiny chipsets only a few millimeters in diameter has necessitated significant changes in design to accommodate digital’s more stringent demands. Not that a vintage filter or net couldn’t find new life in the digital world. It can. After all, it’s ultimately about the aesthetics, and only you the gifted manipulator of light and shadow can make the appropriate determinations.
Many vintage camera filters utilized a soda lime glass that imparted a green tint, a trivial amount to film shooters, but potentially a more serious issue for digital creators owing to the potential for inaccurate sampling.
Modern filters for digital applications utilize a water white glass that is more like a precision lens and must be manufactured in much the same way. If the filter is not sufficiently flat, it can produce waves of distortion during slow pans. Vintage laminated-type filters should be avoided for the same reason, because they tend to produce tiny focus shifts and banding patterns leading to pixilation in the captured image.
It’s not just glass filters that are the issue. The pattern of a traditional net or silk stocking can interfere with an imager’s grid pattern and lead to serious aliasing artifacts. Older mist-type filters with embedded black or white droplets are also problematic, because some cameras interpret the scattered black or white dots as a dirty lens and ratchet up the error correction to compensate!
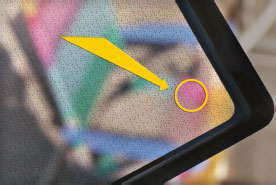
FIGURE 9.29
The tiny droplets in a black mist filter may become visible on screen at full wide angle and/or at small f-stops. Some shooters prefer an alternative filter type without an embedded pattern, such as the Tiffen Soft/FX or Schneider Digicon.
Shooting wide open (or nearly so) is usually a good idea. Filter and net patterns are less likely to be visible on screen, the reduced depth of field helps isolate key story elements, and the low f-stop eliminates the risk of diffraction, image softening, and loss of contrast.
In daylight, shooting with a wide aperture requires a neutral density filter. Most cameras feature built-in neutral-density filters that provide a two- to four-stop advantage, beyond which a supplemental glass filter may still be required to achieve optimum exposure. Neutral density filters are gray in color and do not affect the color balance of a scene.
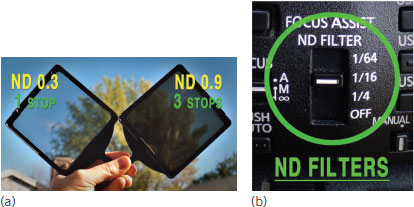
FIGURE 9.30
Neutral density filters are commonly available in a range of densities from 0.3 to 1.2, the equivalent of one to four stops. When shooting exteriors, a camera’s built-in neutral density enables use of a larger f-stop—usually a good thing!
The polarizer is among the most heavily used filters in a shooter’s kit and for good reason: It is the only filter that can increase contrast and resolution. The polarizer is indispensable for shooting exteriors such as land- and cityscapes, which tend to be low in contrast due to a camera’s (usually) small f-stop and the multiple layers of atmosphere through which we often shoot distant and expansive vistas.
A polarizing filter increases contrast by reducing light scatter. This is accomplished by the filter’s horizontal or vertical grid that blocks off-axis waves not consistent with the polarizer’s orientation. Because the northern sky (in the Northern Hemisphere) is already partially polarized, a suitably aligned polarizing filter can darken the sky and increase the impact of clouds against it.
A polarizing filter is most effective at 90° to the sun. One way to determine the area of sky subject to maximum darkening is to point at the sun and note the direction of your thumb. The opposite area of sky is also subject to maximum darkening.
In bright daylight, a polarizing filter may also be used to improve an actor’s skin tone by attenuating a portion of the sun’s glare. At the same time, the increased contrast may also increase the visibility of blemishes, surface veins, and other defects, so a polarizer should always be used with care when shooting actors’ close-ups.
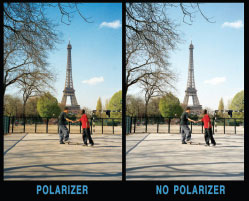
FIGURE 9.31
The polarizer is an easy and cheap way to elevate the perceived quality of a low-end camcorder and lens.

FIGURE 9.32
The polarizer’s directional grid reduces contrast-robbing scatter. Polarizers are available in two varieties: The linear type is more effective but may interfere with a camera’s internal focus system. Most shooters prefer the circular type.
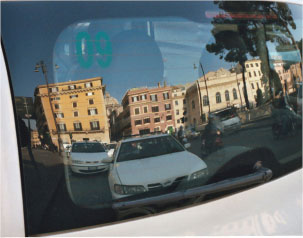
FIGURE 9.33
Polarizers reduce or eliminate window reflections that can add a three-dimensional sense to a scene. Don’t kill reflections and highlights that enhance your visual story!
In daylight scenes, the shooter is frequently challenged by a bright sky that exceeds the dynamic range of the camera. The clipping of the sky and clouds conveys an amateurish feeling and so should be properly addressed. A sky control filter with a soft, hard, or attenuated edge narrows a scene’s dynamic range and helps preserve critical shadow and highlight detail. The soft-edge graduated filter is available in a range of colors; the most popular are the blue, sunset, and the one-, two-, and three-stop neutral density types. In general, we use the soft-edge grad with wide-angle lenses when shooting landscapes; the hard-edge type is usually the better choice when employing telephoto lenses in order to preserve the graduated effect.
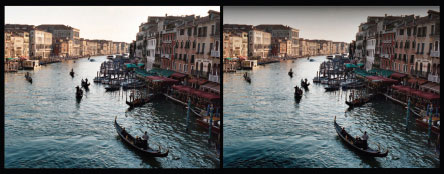
FIGURE 9.34
Effective sky control is critical to avoid clipping and loss of detail. The soft-edge ND 0.9 graduate (right) helps frame the scene and properly direct the viewer’s eye inside the composition.
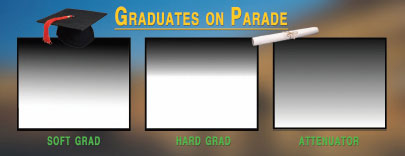
FIGURE 9.35
The soft grad with a feathered transition is ideal for establishing shots with large areas of sky. The hard-edge grad is used with telephoto lenses to maintain a visible gradient in the foreshortened frame. The attenuator is used for more specialized applications, the lack of a dividing line and need to conceal it being a major advantage.

FIGURE 9.36
You want blue sky? I’ll give you blue sky! Tiffen’s soft-edge blue #2 graduated filter.
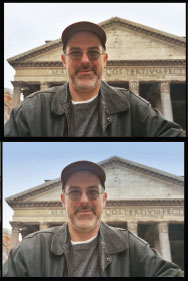
FIGURE 9.37
In this scene, the graduated filter’s soft edge is concealed across the top third of the frame.
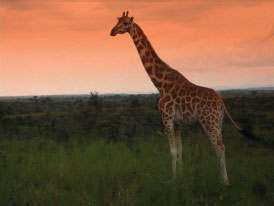
FIGURE 9.38
This fella is sticking his neck out and you should too! A sunset grad adds color and interest to scenes captured late in the Magic Hour.
Maintaining good contrast is the shooter’s top priority, employing most critically high-quality lenses with a lens shade. Shooting in bright sun, however, without silks, fill cards, or reflectors will likely produce too much contrast, so we need a contrast reducing solution as well.
A low-contrast filter works by redistributing surplus values from the highlights into the shadows. The lightening of the shadows allows the overall scene to be darkened, thus pulling down the hottest highlights to prevent clipping.
The increase in dynamic range, however, comes at a price. Blacks may become gray and murky and contribute to a flat, lifeless look. This is because the low-contrast filter does not actually improve the inherent capabilities of the camera; the filter does extend the dynamic range and increase the number of tonal gradations, but it cannot do so while maintaining solid blacks.
The cine gamma in some cameras works similarly, expanding the dynamic range and improving shadow detail while at the same time raising the prospect of grayer, noisier images overall.
Most diffusion filters incorporate a contrast-lowering component, so few shooters will need to invest in a separate series of low-contrast filters. Still, given the smooth, modulated images possible in today’s cameras, a weak, low- contrast filter may be all you need to achieve a satisfactory dynamic range, particularly when shooting under bright uncontrolled daylight conditions.
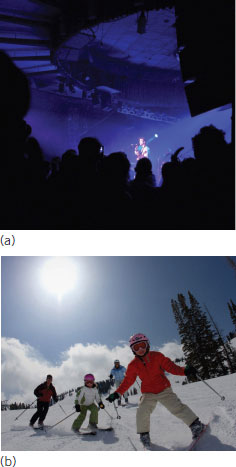
FIGURE 9.39
Shooting scenes of extreme contrast? A low-contrast filter can help achieve a more acceptable dynamic range.
The capture and retention of shadow detail is a key responsibility of the shooter. To achieve the 98%8 reduction in file size demanded by some recording formats, engineers target what they consider redundant or irrelevant picture details. Understanding that humans can’t see well in deep shadow, for instance, engineers tend to look there for disposable pixel data, the result being a significant loss of shadow detail in scenes recorded to HDV, AVCHD, and other highly compressed formats.
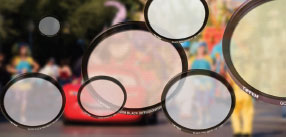
FIGURE 9.40
A diffusion filter helps prevent clipping of the highlights while coaxing greater detail from the shadows. A noble idea but be careful—too little contrast produces images that lack sparkle.

FIGURE 9.41
Weak on-camera diffusion may be used effectively to reduce shadow noise. The lowest strength Tiffen Soft/FX or Schneider Digicon works well. Once again, less is more!
A diffusion filter increases the relevancy of shadow detail by lifting the pixel values, and making the data less likely to be jettisoned during quantization.9 As shooters, we strive to create a mood consistent with the story, and so we need a strategy that serves our greater goals, beyond the pointless UV filter affixed to the front of cameras as a kind of see-through lens cap.
A one-size-fits-all diffusion filter is impractical. Depending on the camera sensor, processor, and menu settings, a filter that works well on one camcorder may work poorly on another.
Manufacturers look principally at three areas when designing a new filter: refraction, diffraction, and scatter. Favoring one parameter over another, certain flaws in a camera’s performance can be addressed and ameliorated. This is what happened years ago when shooters discovered their old Betacam filters did not perform quite so well in the digital realm. The Tiffen Black Pro-Mist, which had reliably served the industry for years, produced a much cruder effect in DV camcorders.
Manufacturers tackled the issue of poorly performing mist filters by effecting changes in the porosity and reflectivity of the embedded black droplets. By reducing the droplet size, the Schneider Digicon achieved a tasteful diffusion without the halation and resolution loss that had formerly been the case with the traditional mist filter.
Of course, no one filter can magically transform a cheap, entry-level camera into an ARRI Alexa, just as no one filter can transform a clueless shooter into Sven Nykvist. Still, most camera craftspeople can benefit from a diffusion filter, and that means facing a bewildering array of choices. In the Tiffen stable alone there’s the Pro-Mist, Black Pro-Mist, Soft/FX, Black Diffusion FX, Gold Diffusion FX, Fogs, Double Fogs, and Softnets. Schneider has its own lineup, including the HD Classic Soft, Warm Classic Soft, Black Frost, White Frost, Soft Centric, and Digicon. Same deal with Formatt, the U.K. manufacturer offering a dozen or more diffusion options. In Table 9.1 it’s clear we have many choices!
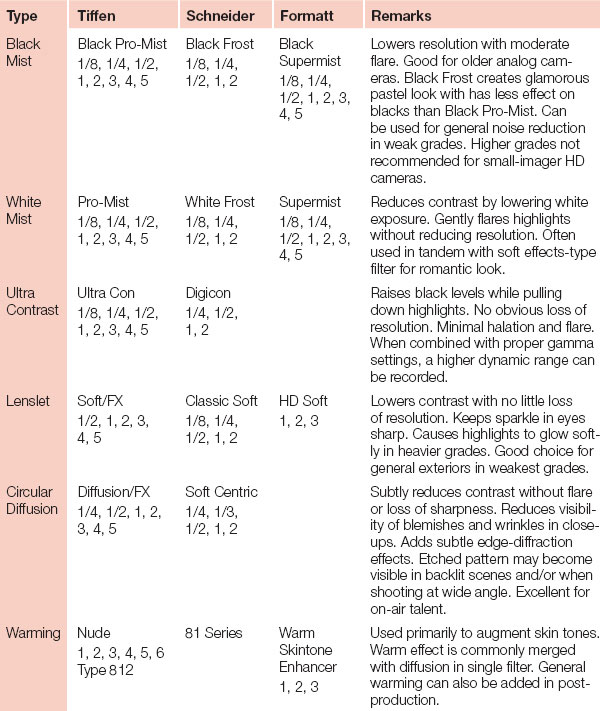
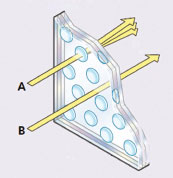
FIGURE 9.42
Akin to water droplets on glass the micro lenslets in the Schneider Classic Soft diffuse small wrinkles and blemishes while maintaining overall sharpness. Light passing through the lenslets (a) is diffused while light passing between the lenslets (b) is unaffected creating a mix of sharp and unsharp pixels.
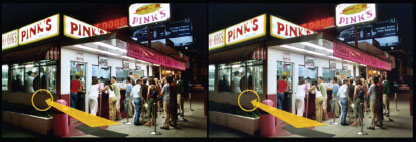
FIGURE 9.43
When shooting cityscapes at night the ultra contrast filter can often obviate the need for additional lighting. The increased detail in the image at right is apparent at the side of the hot dog stand. Scenes illuminated by neon or sodium vapor sources can benefit especially from the ultra con, which lifts dense shadows without producing obvious flare or a pronounced diffused effect.

FIGURE 9.44
Use caution when using any type of net. At wide angle and/or at small apertures its grid pattern may become visible on screen. Some shooters prefer a rear-mounted silk net.
TIffen Soft/FX
A practical all-purpose diffuser the Soft/FX is well suited for shooting high-contrast exteriors. The slight loss of resolution is offset by the generally more pleasing look. Tiffen Soft/FX filters are available in a range of sizes, including screw-in types for consumer cameras.
Tiffen Black Pro-Mist
A light black mist filter can help reduce hue shifts in the shadows and suppress noise. Heavier mist filters are best avoided, owing to a pronounced shower curtain effect.
Tiffen Gold DFX
The Tiffen Gold Diffusion/FX works well for stunning portraits and interviews. Its elegant finish and professional glean is seen frequently in broadcast and commercial applications.
It’s old and no one talks about it anymore, but the Softnet 1B produces a great period look suggestive of a 1930s’ musical. The Softnet 1S (“S” for skin) creates a comparable feeling, but with enhanced flesh tones—a good choice when working with narcissistic celebrities.
Tiffen Ultra Contrast
A terrific choice for cityscapes at night the ultra contrast filter delivers a subtle flare-free feel to cityscapes at night. For low-budget filmmakers, the filter can often eliminate the need for supplemental fill light in dark, high-contrast environments.
Schneider HD Classic Soft
Imparting a tasteful look without loss of resolution the Schneider HD Classic Soft is ideal for shooting talent close-ups. Excellent universal diffusion filter for dramatic applications.
Format HD Soft
Offering a slightly less refined look the HD Soft softens harsh outlines with minimal loss of detail and contrast.
Some shooters don’t like the look of front-mounted diffusion, preferring instead the increased flare from a silk stocking mounted behind the lens. In this case, a section of stocking is stretched across the back element and secured with 1/4-in. double-sided tape or a rubber O-ring. The rear-positioned stocking produces extreme blooming in the highlights, so consider its appropriateness in the context of the story.
Because the stocking color is infused into the highlight glow, I usually prefer a black net because it imparts a neutral cast. On the other hand, a flesh-colored stocking offers the benefit of enhanced skin tones, a potential advantage when working with aged celebrity types.
For years, my stocking of choice has been the Christian Dior Diorissimo No. 4443, still available in Europe’s high-end boutiques. (I acquired my stash several years ago in Paris at the Bon Marché on Rue de Sèvres.) If you go the stocking route, you should resist the temptation to use low-quality hosiery; the effect on screen will appear crude and less flattering.

FIGURE 9.45
A section of silk stocking behind the lens produces a dramatic blooming of highlights, which may or may not be appropriate. After affixing the net and replacing the lens always check the camera’s backfocus! (See Chapter 6.)
The performance of any lens is diminished by stray light striking the front element at an oblique angle. The off-axis rays are reflected internally, bouncing off multiple elements, which increases flare and lowers contrast and resolution.
Screw-in filters offer the advantage of low cost and easy availability, but the fumbling and risk of cross-threading when the chips are down (so to speak) can be disconcerting. Consider the task of screwing in a filter in the face of a charging rhino or a panicked director pleading for one more take before a rapidly setting sun.
The square or rectangular filters used with a professional matte box allow more efficient handling with greater creative options, including more accurate positioning of graduated filters and a polarizer for darkening the sky or to control window reflections.
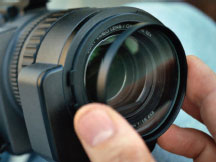
FIGURE 9.46
Awkward and inefficient. Not all professional filters are available in screw-in sizes.
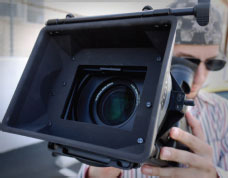
FIGURE 9.47
A professional matte box protects against light striking the lens obliquely and lowering resolution and contrast. This is important! You must use a proper lens shade or matte box!

FIGURE 9.48
Don’t take widescreen lying down! A properly proportioned matte box offers maximum protection!

FIGURE 9.49
A French flag prevents the sun or strong backlight from directly striking the front of the lens. Some matte boxes provide simple mounting of the French flag.

FIGURE 9.50
A clip-on matte box is economical and convenient, but the extra weight may place excessive stress on the front of the lens and impair optical performance. A full-size matte box and follow-focus require a proper rod system to support the weight and ensure smooth operation.
The maintaining of good contrast is critical. Although inferior lenses and the lack of a matte box or shade are contributing factors, the stacking of multiple filters can make matters worse by increasing the number of air-to-glass surfaces and potential internal reflections that lead to contrast loss.
If a warming effect is desired along with diffusion, I usually opt for a combination filter such as a Warm Supermist that merges the two functions. I try not to stack more than two filters in any case, limiting myself, say, to a graduated filter and a polarizer.
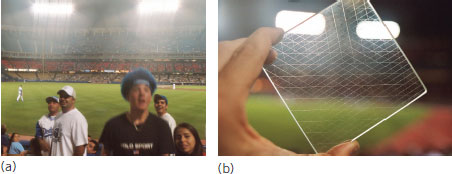
FIGURE 9.51
The star filter was once a favorite of sports and event shooters. A rotating stage in the matte box helps achieve the desired orientation. (b) The Tiffen vector star.
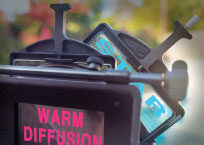
FIGURE 9.52
Sometimes stacking is unavoidable. Here a diffusion filter is used to soften the harshness of the star filter behind it. The position of the star closer to camera reduces the likelihood of its wire pattern appearing on screen.

FIGURE 9.53
We don’t normally think of performing an emulsion test when evaluating a digital camera, but that’s what I do when working with a new or unfamiliar model. Film shooters once routinely tested every new stock to gauge its sensitivity and its ability to retain shadow detail at various light levels. The same logic applies here. By altering the gamma, black level, and fill light, the shooter can gain insight into the camera’s ability to capture and retain detail in a range of shooting conditions.
To conduct the equivalent of an emulsion test find a cooperative subject and light her in a normal way. Referring to a proper monitor, gradually reduce the fill light and note the level of detail and hue shifts at various illumination levels. Understanding how your camera responds prepares you for the inevitable lighting challenges ahead.
A warming filter or skin enhancer fosters intimacy with an audience by helping to convey a character’s humanity. In order to preserve the warming effect, be sure to remove the filter prior to white balancing the camera. The warming effect can also be applied in post.

FIGURE 9.54
A warming filter builds intimacy with the actress’s character and story.
Cinematographers have long used fog filters to add atmosphere to otherwise sterile or lackluster scenes. Whether we’re looking to add a touch of atmosphere or a full-blown marine inversion, there’s a strength and type of fog filter that can make it happen.
Fog filters come in standard and double fog varieties, the double fog type producing a greater sense of actual fog. Close-ups retain their sharpness despite the lower contrast and blooming of highlights. Of course, such effects should be tastefully applied in keeping with our storytelling goals.

FIGURE 9.55
In Venice, the double fog produces a natural effect with minimal flare as evidenced in the warm string lights (left). To the right is the same scene sans filter.
The question arises often: Why not delay filtering and image tweaking decisions until later inside the NLE? Several years ago, I recall a crusty engineer pulling me aside. He insisted that I refrain from using on-camera diffusion because he said it compromised resolution, and in turn the quality of the outputted program.
I’ve noted the complex interplay of light as it scatters, halates, and refracts, through a physical glass filter. I’ve also discussed how the polarizer and the graduated filter add detail to a scene that wouldn’t be present otherwise. How can this detail be magically re-created in post? It can’t.
The same logic applies to a weak diffusion filter that suppresses noisy shadows and helps the camera perform more efficiently. Nevertheless we must admit that post-camera tweaking of images is a fact of life; the shooter is coming under increasing economic and practical pressures to delay imaging decisions until later in a production.

FIGURE 9.56
My overstuffed filter case once contained 125 individual filters. These days, the color effect types no longer see much use. The tweaking of color and color temperature can be performed more easily and efficiently in postproduction.
For the shooter seeking post-camera image control, there are powerful plug-ins available. Plug-ins are mini-software applications that extend the capabilities of a host NLE or compositing tool. Plug-ins offer shooters almost limitless possibilities.
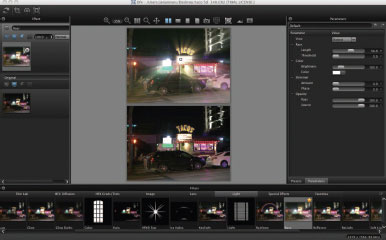
FIGURE 9.57
The Tiffen Dfx suite offers a staggering array of familiar filter types. Such tools may apply an effect to only a portion of the frame.
Tiffen’s Dfx software features a list of presets intended to mimic the look of most popular camera filters, including the main diffusion, graduated, and infrared types. The tool offers the traditional shooter a familiar path from the intuitive world we knew and loved to the more abstract and opaque digital realm.
The Magic Bullet Looks Suite is a tour de force of software design. Beyond the ability to dial in any desired level of diffusion, saturation, and color treatment, Magic Bullet offers a host of distinct and recog-nizable looks. If you want warm and fuzzy like Jerry Maguire,10 there’s a preset for it. If you want a heavy diffused feel like Eyes Wide Shut,11 you just dial it in.
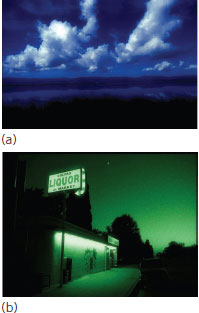
FIGURE 9.58
(a) Day for night. (b) North Hollywood through a night scope.

FIGURE 9.59
Noise Industries’ FxFactory offers numerous diffusion and effects filters for 2D and 3D applications.
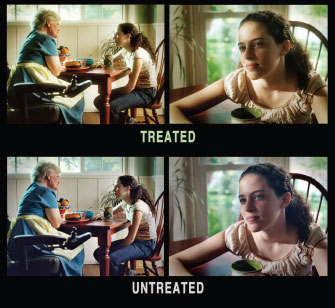
FIGURE 9.60
The Magic Bullet Look Suite features well-recognized looks that are easy to identify and apply. The “Warm and Fuzzy Jerry Maguire” look is at top.
Although not every program will benefit from finishing tools like Magic Bullet, the fact is that nearly every digital production requires color correction. The original image capture likely contains signifi-cant variations in color and density; given the power of today’s color correction tools, it no longer makes much sense to match every scene while on location.
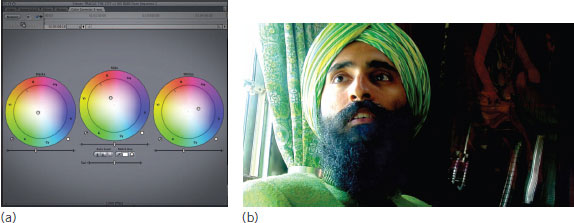
FIGURE 9.61
Final Cut Pro’s three-way color corrector allows adjustment for blacks, whites, and mid-tones and is adequate for most applications. The inky color in (b) is in serious need of toning down!
Beyond establishing a tonal consistency, color correction can impart an overall look suggestive of the story’s tone and genre. We can make the whites whiter, blacks blacker, and flesh tones more natural. We can add warmth, enhance contrast, or add a special color emphasis in keeping with the program theme.
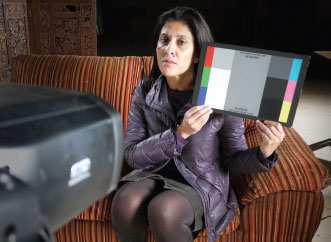
FIGURE 9.62
A color reference captured for each setup can greatly facilitate the post correction process.

FIGURE 9.63
Color correction is best when only partially applied. These New York scenes illuminated by sodium and mercury vapor streetlights should look a bit sick. Fully correcting to produce a more pleasant hue detracts from the authenticity of the visual story!
The practice of finishing one’s images post-camera is a concept that fills some shooters with dread. On the one hand, the shooter ought to be grateful for the creative opportunities afforded by the latest software. On the other hand, the prospect of leaving unfinished images lying around a control room or a media library is a threat to the shooter’s reputation and livelihood. The shooter knows that despite the assurances of producers, clients, and library custodians, his or her untreated (or poorly treated) images will find their way to the public.
The digital world is evolving so quickly that we can no longer be dogmatic about filters and when and where they should be applied. Times have changed, and with these changes, the shooter must fight to retain as much control as possible, a process that only begins with the image captured in-camera but really isn’t complete until the edited program is finalized and output for screening.
Today the shooter must embrace a combination of in-camera and post-camera tools. Remember you are the artist, the painter of light, the Vermeer of the digital age. It’s up to you to decide by what standards you wish to be judged. Do you really want a bleary-eyed editor facing the deadline of his life applying the finishing touches to your images? Of course not! No way!
So, dear shooters, let’s get with the program. Take charge of your images. Polarize them, diffuse them, or add fanciful bursts of color. But most of all—finish them. However you do it—whether in-camera or after—it is your image as a shooter and craftsman that is truly at stake.
EDUCATOR’S CORNER: REVIEW TOPICS
1. Describe the ingredients that go into creating a show’s unique look. Describe how master detail (DTL) and black level can help communicate the intended genre?
2. What is gamma? Cine gamma? Why is cine gamma not always a desirable option?
3. The camera’s color matrix addresses the discrepancy between human and machine perception. Why is such a function useful or necessary?
4. Discuss the merits of physical versus nonphysical camera filters. Explain why sky control and polarizing filters cannot be applied effectively in post.
5. Is there any advantage to utilizing a physical filter for color effects?
6. Why is the use of a matte box or lens shade so critical to maintaining good contrast and resolution?
7. List five (5) physical filters that you consider essential in a basic camera kit. Explain your rationale.
8. Describe the looks that might be appropriate for a romantic comedy, period drama, contemporary ghost tale, or a documentary on the International Money Fund? Consider in terms of camera setup: detail, gamma, black level, and color saturation.
1 Turning off detail is not the same as a detail setting of zero, which means a medium amount of detail, halfway between maximum and minimum.
2 This has been especially true for years in Sony models.
3 Kabirigi, J. (Producer & Director), Riber, J. (Executive Producer). (2012) Mdundido [Motion Picture] Tanzania: Media for Development International (MFDI).
4 Shooting RAW offers maximum versatility in post, albeit with a more complex workflow and much larger file sizes. A RAW file is the digital equivalen of a film negative, containing minimally processed pixel information from the camera sensor. RAW data contains one red, green, or blue value from each pixel location.
5 Ponti, C. (Producer), Starr, H. (Producer), & Antonioni, M. (Producer). (1970). Zabriskie Point [Motion picture]. USA: Metro-Goldwyn-Mayer.
6 Bevan, T. (Producer), Cameron, J. (Producer), Fellner, E. (Producer), Graf, R. (Producer), Cohen, E. (Producer & Director), & Coen, J. (Producer & Director). (2000). O Brother Where Art Thou? [Motion picture]. USA: Touchstone Pictures.
8 This is not a typo. HDV compresses at a ratio upward of 40:1!
9 Quantization is the process of organizing similar value pixels into groups where the values can be rounded off, declared redundant, and subsequently discarded. The main purpose of quantization is to identify and retain only those details readily apparent to the human eye. How aggressively your camera pursues the discarding of “redundant” or “irrelevant” picture information is in part a function of its setup parameters, including black stretch, knee, and gamma. See Chapter 5 for further discussion of compression fundamentals.
10 Crowe, C. (Producer & Director), Brooks, J. L. (Producer), Johnson, B. (Producer), Mark, L. (Producer), Mendel, J. M. (Producer), Pustin, B. S. (Producer), … Stewart, L. (Producer). (1996). Jerry Maguire [Motion picture]. USA: TriStar Pictures.
11 Cook, B. W. (Producer), Harlan, J. (Producer), & Kubrick, S. (Producer & Director). (1999). Eyes Wide Shut [Motion picture]. United Kingdom: Hobby Films.