When we put a frame around the world, we consciously exclude what is not helpful to the visual story. When we choose to de-emphasize an object in a composition or place certain elements out of focus, we are helping the viewer understand what is important to the story and what is less so. Proper lighting craft means applying the same principles. We direct light onto objects that advance the visual story and exclude light from elements that detract from it.
Fundamentally, lighting is the practice of exclusion—remember our mantra: Exclude! Exclude! Exclude! It is integral to our lighting craft because so much time and effort is expended modifying, controlling, and otherwise removing light from a scene. We accomplish this with devices like barndoors, cutters, cookies, and Blackwrap, and by altering the character and direction of light using diffusion, bounce cards, and color gel.
Lighting is an exercise in logic. As in all aspects of craft it is derived from story and the opportunities and limitations that story demands. In many cases, we merely reinforce the direction and quality of light already present. If there is a lamp on a CEO’s desk, we place a light off-camera and direct it to mimic the lamp’s effect. Of course, we may model and diffuse the light to present the CEO in a more flattering way—if that is the story. But it is the lamp on the desk that provides the motivation for the scene; the shooter simply builds on what is already there (or logically could be there) to create a transparent naturalistic setting.
The desire to re-create the world in a naturalistic way is linked to our (usual) goal as a shooter to represent the 3D world as best we can on a 2D canvas. In most cases, our lighting should accomplish two things: (a) to enhance the realistic illusion by maximizing the apparent texture and (b) to properly direct the viewer’s eye to what is important or relevant in the scene.

FIGURE 10.1
Embrace the mantra: Exclude! Exclude! Exclude! Always consider removing light before adding more light to a scene.
On location we are often required to exclude or attenuate a dominant light source, by blocking out large windows, say, that may work against capturing well-modeled subjects. The technique of negative fill may seem like an oxymoron, but it is common industry practice, to achieve the shooter’s goal of rendering proper texture and the illusion of a third dimension.
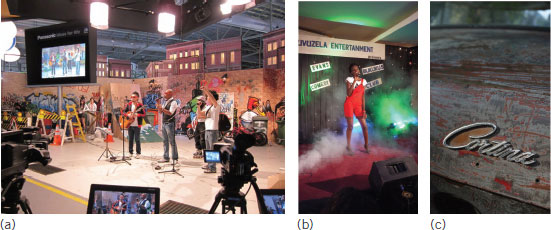
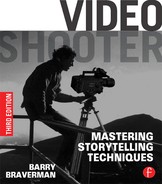
FIGURE 10.2
(a) The goal of lighting is usually to maximize the texture apparent in a scene.
(b) Color and smoke add texture. That texture says the scene is real. It exists. It has depth.
(c) Ditto for the English Ford. The texture revealed in the car’s finish says, “Bring on the paint!”
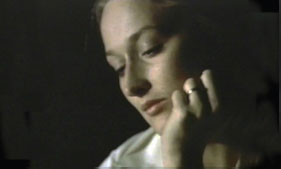
FIGURE 10.3
The minimalist approach to lighting is illustrated in the opening scene to Kramer vs. Kramer (1979). Excluding background context allows the viewer to focus more intensely on Meryl Streep’s pensive gaze and her wedding ring. Folks, this is not a comedy!
You don’t need much instruments to light well. The great cinematographer Néstor Almendros who photographed many notable films including Kramer vs. Kramer (1979)1 and Sophie’s Choice (1982)2 was said to have used only a mirror and a small Fresnel3 to light most scenes. Fewer lights mean easier control and more manageable shadows. It means fewer cutters, C-stands, and gobo arms to control unwanted spill. It also means faster setups, a more comfortable working environment for talent and crew, a larger f-stop for selective focus, and the reduced chance of tripping circuit breakers for productions that must draw power from standard wall outlets on location.
Beyond these considerations, a shooter who works quickly and covers more script pages per day will enjoy many more and better work opportunities.
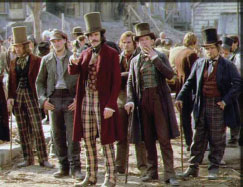
FIGURE 10.4
Michael Ballhaus ASC gained enormous advantage using small instruments on films like The Marriage of Maria Braun (1979) for German director Rainer Werner Fassbinder.4 Later, this simple approach served him well on big-budget productions such as The Gangs of New York (2002).
Your camera’s minimum illumination rating purports to measure the ability to capture satisfactory images in low light. Four factors influence this rating: the f-stop used, the video level, the reflectivity of the test scene, and color temperature. To be meaningful, a minimum illumination value must specify the test conditions used.
Minimum Illumination for Popular HD Camcorders
Note: This is manufacturer provided data. Shooters should look warily at these values since acceptable performance is seldom a consideration.
Canon HF11 |
0.2 lux (Night Mode) |
Canon XL-H1s |
3 lux (24F) |
Canon XL1-S* |
2 lux |
Canon 5D MkII & MkIII** |
Not specified |
Canon C300 EOS |
0.25 lux (no other data specified) |
JVC GY-HM100 |
3 lux |
JVC GY-HM710 |
Not specified |
JVC GY-DV300U* |
2.65 lux (LoLux mode) |
Panasonic AG-HVX200A |
3 lux |
Panasonic AG-HPX250 |
0.2 lx (F1.6, Gain +30 dB, shutter at 1/30s) |
Panasonic AG-HPX370 |
0.4 lx (F1.6, Gain +24dB, shutter at 1/30s) |
Panasonic DVX100A* |
3 lux (Gain +18dB) |
Sony HVR-A1 |
0 lux (Night Mode) |
Sony HVR-Z7 |
1.5 lux (Auto Gain, shutter @ 1/30s) |
Sony PMW-F3*** |
Not specified |
Sony FS100 |
0.28 lx shutter at 1/24s with auto gain enabled |
Sony FS700 |
1.2 lx shutter at 1/24s with auto gain enabled |
Sony PMW-EX1/EX3 |
0.14 lux |
Sony DSR-PD170* |
1 lux (+18dB) |
This is a standard-definition camcorder. |
|
The minimum illumination for HDSLR video is not normally stated. |
|
Manufacturers do not specify a minimum illumination in lux for cameras intended for high-end applications. The numbers listed above are suspect—and most working professionals know it. |

FIGURE 10.5
One lux is defined as 0.0929 foot-candles or the illumination produced by one lumen falling perpendicularly on a surface of a bagel 1 meter square. Bon appétit.
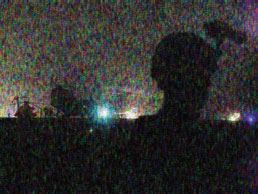
FIGURE 10.6
C’mon, guys. This camera boasts a fabulously low “minimum illumination” rating, but the picture is unusable!
SHOOTERS WHO LIGHT, EDIT, PRODUCE, AND WASH WINDOWS
In an era of tiny or one-person crews, the shooter must wear many hats so the ability to work with simple lighting is crucial. In my own work, I prefer low-wattage focusable Fresnels to high-power open-faced instruments that produce more light but with less control. For The History Channel, I recall shooting entire episodes of Sworn to Secrecy with a four-head 150-watt Fresnel kit!
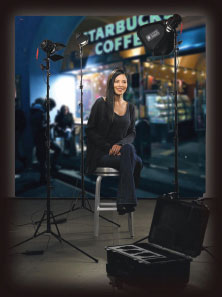
FIGURE 10.7
Think and light small. More gear = less work.
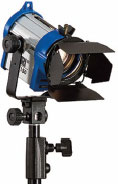
FIGURE 10.8
Fresnels offer precise focus and control, which in conjunction with a four-way barndoor can help reduce the need for flags, cutters, and cumbersome grip gear.
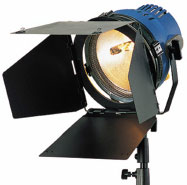
FIGURE 10.9
Open-faced instruments produce a lot of light and so are often used inside a large soft box, through heavy gel, or bounced off a white show card.
There was a time when dinosaurs ruled the Earth and I earned my living shooting industrial films on Ektachrome ASA 25 film. In those years, circa 1975, my travel kit consisted of four open-faced Lowel D lights fitted with 1,000-watt lamps. Such (relatively) high-wattage gear was necessary in order to achieve the required exposure—indeed, in many situations, any exposure at all.
With the advent of today’s sensitive digital cameras the Big Bang approach to lighting is no longer the only or preferred way to go. For some shooters however old habits die hard. I recently witnessed a macabre shoot where the veteran DP dragged two 1,200-watt HMIs, three 4 × 4 bounce cards, three large cutters, two 5-foot meat axes, seven C-stands, and a Western dolly into a 10- by 12-foot windowless room. Never mind the personnel and the hours required to accomplish the Herculean task. What did the DP then do? Flag the lights. Squeeze the barndoors. Drape the heads with black foil and drop in three double-wire scrims. He spent more than 2 hours cutting the lights down to a manageable level. Do you see the logic? I don’t.
The preamble to the Shooter’s Constitution is clear: When in the course of lighting events it becomes necessary (as it usually does) to exclude, exclude, exclude, it sure saves a lot of time and effort if you’re not using ridiculously too much light in the first place.

FIGURE 10.10
An excellent kit for starters: Four small Fresnels: two 300 watt and two 150 watt, with baby stands5 and barndoors.
FIGURE 10.11
A good investment? My “Inky” # 22 manufactured in 1927 has been handed down to me through multiple generations of cameramen. I still use this little guy daily.
Unlike the more esoteric gadgets in a kit, your complement of LED lighting will find many uses, from interiors of automobiles and studio sets to capturing candlelit folk singers in the Hazaribagh section of Old Dhaka. Recently I used a small variable color LED to do exactly that: to shoot an impromptu night concert outside a Bangladeshi mosque in a square packed with the teeming masses.
While my U.K. director demanded that I shoot with existing light, there was in fact very little of it. In fact, she didn’t seem to care. “Hey! Didn’t you say your new camcorder was fabulous in low light?” I replied, “Well, yes, but ‘low light’ doesn’t mean no light!”
That’s when the call went out for candles to distribute to the crowd forming 10 deep around me. Of course even with the lit candles spread liberally about the frame the performers themselves remained woefully underlit. That’s when my little LED entered the picture to fill their faces with a color-correct front light. Tweaking the color and intensity to match the candlelight, I feathered the LED off the singer close to the camera while the surging crowd tugged at my sleeve and demanded their turn to view the scene in the camera viewfinder. Under such pressing conditions, a small, versatile LED is ideal.
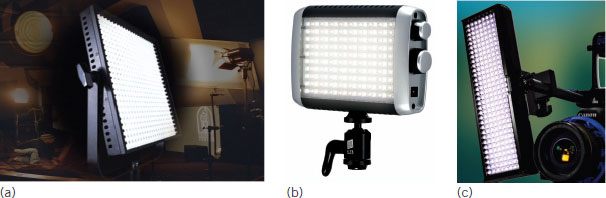
FIGURE 10.12
Today’s LEDs can mimic the HMI look at a fraction of the cost. The Litepanels 1X1 BiFocus (a) can be configured singularly or in a multiple array, outputting a variable hard or soft light. Every shooter can benefit from a small on-camera LED (b) featuring a variable color output from tungsten to daylight. The quality of light from LED instruments can vary widely. The Flolight Microbeam (c) produces an especially flattering beam with a CRI6 rating of 93.

FIGURE 10.13
A 1X1 LED provides a flattering highlight in this striking portrait captured with a Panasonic AF Micro Four Thirds camera and Voightlander 25mm F0.95 lens.
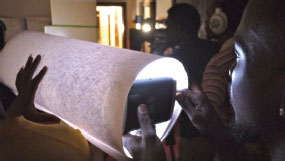
FIGURE 10.14
Lacking a conventional snoot or egg crate this Tanzanian filmmaker uses a rolled-up sheet of card stock to narrow the beam of a mini LED.
Today’s LEDs continue to improve in leaps and lumens, with each new product offering greater punch and color precision. The latest units are amazingly compact and low-cost, drawing little power and producing virtually no heat. The typical small LED can run for 3 to 4 hours on a few AA cells or a small rechargeable camera battery.
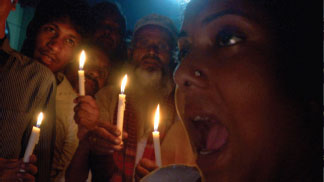
FIGURE 10.15
Capturing these performers at night in front of a mosque in Bangladesh the tiny LED source provides a subtle color-correct fill suggestive of the candles placed around the frame.
LIGHTING IS POWER
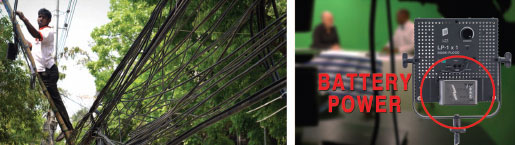
FIGURE 10.16
The lack of reliable power in some parts of the world has increased shooters’ reliance on portable lighting and passive devices such as reflectors and bounce cards.
The increased power and applicability of LED lighting is evident in the Fresnel models designed for cinema and television professionals. This is happening despite many LEDs’ skewed color output, especially when dimmed. Unlike tungsten, LEDs do not output a continuous spectrum, which can produce an unnatural cast despite a nominally correct color rating.
HMI LIGHTING: EXPENSIVE BUT WORTH IT
For years I traveled with a small tungsten Fresnel kit and two 400-watt HMI 7 PARs. An HMI parabolic arc reflector is the shooter’s dream light—strong enough to punch through a 4 × 4 diffusion silk yet efficient enough to plug multiple units into an ordinary household outlet. For interiors, I often bounce a PAR off a white card to simulate a broad window source. For exteriors, I direct the PAR through a silk or grid cloth to produce a flattering key light for talent. The 200- or 400-watt HMI PAR is one of the most useful (albeit pricey) instruments you can own.
HMI lighting instantly elevates the look and feel of one’s images, and unlike other gear that requires a sizable investment, the impact of an HMI source is immediately obvious on screen and thus billable to clients. A small HMI costing thousands of dollars may seem extravagant, but for the working professional, the investment is worth it. Packing 10 times the punch of conventional tungsten lighting, the PAR’s power and versatility can eliminate a trunk full of less useful lighting and grip gear.
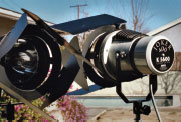
FIGURE 10.17
The proficient use of fewer but higher quality instruments is the key to developing an efficient style. The HMI PAR uses drop-in lenses to define its beam and character.
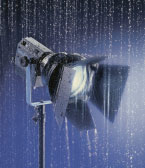
FIGURE 10.18
A shooter’s gear must be rugged to withstand the rigors of a torrential downpour and other calamities.
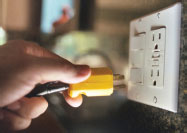
FIGURE 10.19
Low-wattage lighting may be plugged into a standard wall outlet, yet another reason to think small.

FIGURE 10.20
Sometimes thinking small is not enough. HMIs allow lighting of large areas and objects such as jumbo jets.
FLUORESCENTS AND THE GREEN PLAGUE
Fluorescent lighting was once a perilous proposition. The fixtures ran cool, used little power, and threw off tons of light with a sick, ghastly green hue. Facial shadows and dark skin were particularly susceptible to the insidious green spike, requiring shooters to apply a wash of healthy light from an HMI or a comparable source.
I recall shooting at a health club in New York in 1993. Of course, there were the usual banks of fluorescents in the ceiling, all emitting the horrid green pall. Employing the wisdom of the time, I dutifully balanced every 1 of the 120 tubes in the club, fitting each lamp with a full minus green gel. This compensated for the green all right—by bathing the entire club in a deep magenta like a bordello!
Naturally this drew scathing looks from the ad agency rep and the spot’s young director who demanded that I rectify the mess pronto. He couldn’t believe his glamorous workout babes would appear normal on film. I pointed to my Minolta Colormeter II and tried to reassure him, but his eyes kept telling him otherwise.

FIGURE 10.21
The green plague is evident in the fluorescent-lit market at left; at right after adding magenta, i.e., white balancing the camera. When shooting talent close-ups, the overhead fluorescents should be supplemented with a side or frontal fill to avoid dark eye sockets.
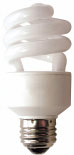
FIGURE 10.22
The fluorescent lamp draws little power and produces plenty of light. Problem is, that light usually comes with a potent green curse.
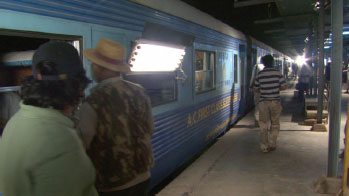
FIGURE 10.23
Large color-correct fluorescents banks are common sights on film sets around the world.
In most cases, as in the health club, the green curse is exacerbated by the fluores-cents’ overhead placement. To satisfactorily capture such scenes the shooter usually employs an eye-level fill by borrowing a few diseased lamps from the ceiling fixtures. The strategy has the advantage of maintaining consistency in the fill light, albeit with the miserable green pall intact.

FIGURE 10.24
Balanced lamps without the dreaded green spike are available in tungsten and daylight types.
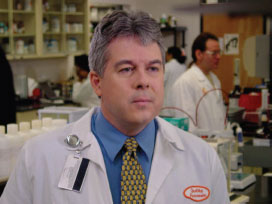
FIGURE 10.25
The balanced light from an HMI, LED, or color-correct fluorescent helps lift shadows and boost flesh tones when shooting under sickly industrial lighting.
Cool White fluorescent lamps are supposed to mimic daylight, which they do, sort of, but only to the unsophisticated eye, which is a lot more forgiving of spectral deficiencies than the sensor in a camera.
The fluorescent’s high efficiency comes at a steep aesthetic price. In the last decade, fluorescent tube makers have developed new phosphors to compensate for the green curse. But as manufacturers drive the lamps harder for greater output, the reviled spike has increased proportionately, necessitating the formulation of yet another generation of compensating phosphors and lamps.
Kino-Flo and other manufacturers produce color-correct fluorescent tubes by mixing a potpourri of phosphors to produce a lamp that appears reasonably balanced to the camera. This should give solace to shooters prone to angry outbursts at the slightest hint of green reflected from an actress’s face or flesh tones.
Beyond the green pall, there is also the potential for flicker, a hazard associated with discharge lighting in general including LEDs. The ugly pulsating is often seen in out-of-sync streetlights and neon signs when shooting at nonstandard shutter speeds or at 24 FPS, for example, in 50-Hz countries.
Today, high-frequency ballasts have largely eliminated the flicker risk in professional lighting, but caution should still be exercised when shooting abroad under fluorescent, neon, or mercury/sodium-vapor streetlights or in regions known to experience to power irregularities.
A large diffused light source is usually desirable to soften facial shadows and suppress unflattering texture in the skin. In lower-end cameras and especially DSLRs, compression anomalies, hue shifts, and shadow noise contribute to a pattern of contours more appropriately found in an open pit mine. This is no way to treat your actors or leading lady!
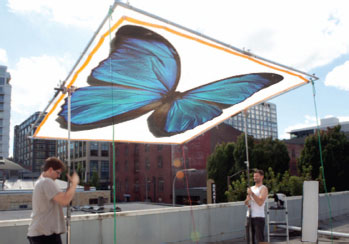
FIGURE 10.26
At midday in many parts of the world, the use of large butterfly or bounce board is imperative.
Striving to create the most three-dimensional images we can, we usually try to maximize texture. This means paying close attention to the smoothness, depth, and direction of shadows, which communicate genre and mood and the essence of the visual story. Remember that shadows lie at the heart of the shooter’s craft, the quality by which we as artists are ultimately judged.

FIGURE 10.27
Blasting hard, undiffused light at your subject is unprofessional, and ungodly. Since soft light dominates the natural, spiritual, and manmade worlds, we usually try to mimic this quality in scenes with gently modulated shadows. O Father, I thee confess: Shadows tell the eternal story. May I treat them always with dignity and respect.
A soft light may be achieved through a diffusion silk or gel, by bouncing off a white card or foam core, or by employing a soft box or fluorescent bank. However you do it, an effective soft light must be a part of every shooter’s working kit.
Color-correct fluorescents provide a convenient solution when shooting aboard moving trains, in airports, in offices, and large public areas. Whereas a Fresnel may project a hard shadow back onto a set or actor, a broad fluorescent produces a near-shadowless beam without the bulk or hassle of a light box or bounce card. Such economy in tight locations such as office cubicles and supermarket aisles is a major benefit of fluorescent multitube arrays like the ubiquitous two and four-bank Kino-Flos.
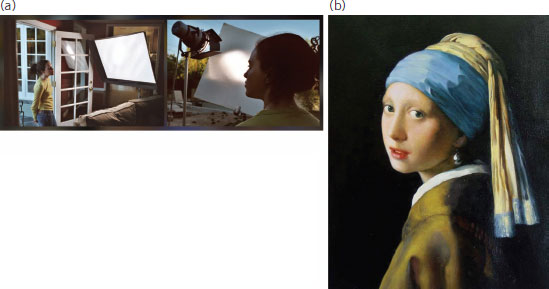
FIGURE 10.28
(a) The Dutch Master painters in their northern-facing ateliers would’ve killed for such a portable source. (b) Vermeer’s 17th-century Girl With a Pearl Earring
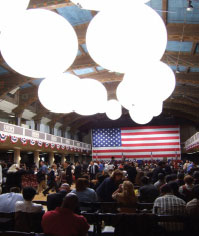
FIGURE 10.29
Multiple lighting balloons or Chinese lanterns can illuminate large areas like a city street or a crowded convention hall. This scene is from Crossing Over (2009).8 (Courtesy of Airstar Space Lighting.)
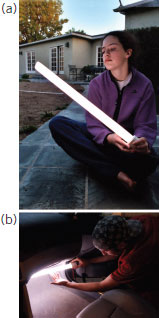
FIGURE 10.30
The Gyoury wand (a) produces a flattering soft source. One or more tubes (b) may be all you need to light a car interior at night.
The Gyoury system is built around the concept of a wand—a tube assembly that may be detached and mounted in hard-to-reach locations—along a bathroom mirror, beneath a computer screen, or inside a refrigerator! The wand inside a China Ball produces a pleasing soft fill for walking shots in feature films, episodic TV, and event-type shows, the portable source producing a natural-looking wash with a professional gleam.
Our mantra Exclude! Exclude! Exclude! demands that we eliminate the light from objects and elements that not helpful to the intended story. One downside of utilizing large sources like a soft box or bounce card is the need to control the copious spill. Usually this requires the placing of one or more flags or cutters. Although a Fresnel with a focusable lens offers better control with less spill, its beam is harsher and more likely to produce an objectionable shadow in confined locations.
Note that shooting in tight spaces requires longer setup times because a larger grip complement is necessary to rein in the unwanted spill. For this reason, many filmmakers prefer to shoot on a sound stage; the errant spill from multiple light sources simply falls off into the void and produces no ill effects. In corporate-, event-, and documentary-style programming, the shooter is afforded no such luxury. The location is what it is—and we have to deal with it.
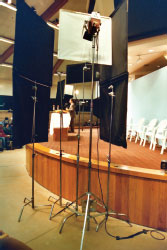
FIGURE 10.31
Large soft lights often require several flags and cutters to prevent unwanted spill. A shooter with many setups per day may prefer Fresnels that are more easily trimmed and controlled.
The adept use of diffusion gel is critical for controlling a light’s character and depth of shadows. There are many types of gel, but most shooters only really need three types: a strong diffuser for fill and keying talent, a moderate diffuser to provide more edge, and a light diffuser to take the curse off hard sources. Diffusion gel may be purchased in long rolls or in 20- by 24-inch sheets at any film and TV supply house.
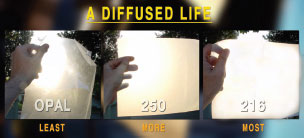
FIGURE 10.32
Opal, #250, #216. Be sure to carry several sheets of each type on every shoot. Lee Filter references are understood widely and are often used generically.
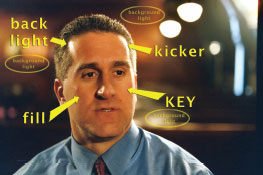
FIGURE 10.33
Keying through a heavy diffuser produces soft gentle shadows.
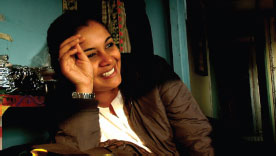
FIGURE 10.34
A light diffuser retains the direction and character of the low-angled sun.
Alternatively if you’re like me you can rummage through the trash of a movie or TV show that happens to be shooting in your neighborhood. The gel discarded each day from a feature film or commercial is enough to supply most shooters for a lifetime.
While scavenging through the trash of Rocky XXII, you may uncover a bounty of useful detritus including forlorn gel. These diverse scraps can help outfit your jelly roll—a 12- or 24-inch elastic pouch containing diffusion, color correction, and various party gel.
I carry CTB 9 gel from one-quarter to full blue, the latter type ostensibly but not quite converting a 3200 ºK tungsten source to daylight. CTB is among the most used gel, as tungsten lighting is often blued when backlighting talent or to represent daylight or moonlight spilling into a scene. Typically I add only a hint of blue, for example, half blue, to reflect a cool source in or out of frame. I don’t completely convert a tungsten source to daylight because I want to preserve the feeling of mixed illumination just as we experience it in life. Conversely when working with HMIs or LEDs under tungsten conditions, a half CTO (orange) gel alleviates the blue curse while still preserving the feel of daylight. I often mix color temperatures in my lighting, painting with blue and orange gel to add texture while maintaining the faithful interplay of light emanating from warm and cool sources.
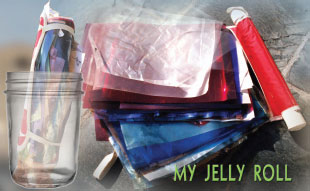
FIGURE 10.35
Sheets of diffusion, color correction, and party gel should be a part of every shooter’s basic lighting kit.

FIGURE 10.36
CTB (blue) increases the color temperature of a source light making it appear cooler; CTO (orange) decreases the color temperature of a source light and makes it appear warmer.
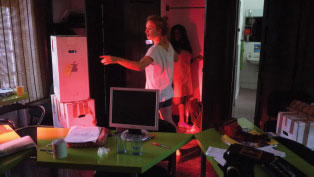
FIGURE 10.37
Red party gel is a staple of the horror genre. Use with care!
Although full CTB is intended to convert 3200 ºK tungsten to daylight, the effect in practice is quite a bit less when compared to actual daylight or the output from an HMI or a color-correct fluorescent. If daylight balance is your goal (and it may well be), a true daylight source is required. Also note that due to high heat absorption, full blue CTB is subject to rapid fading, so be sure to carry extra sheets in your jelly roll.
Beyond routine diffusion and color correction, I use my party gel to add a splash of color to dull sterile scenes. These gels like swatches of paint are especially useful to add visual panache in corporate and industrial settings. The crimson is one of my favorites, injecting intrigue, if not outright alarm. A little goes a long way, so shooters should use such effects sparingly in keeping with one’s storytelling goals.
When shooting an actor or talking head, we usually direct the subject’s gaze at a point between the camera and the key light. The viewer then is peering into the facial shadow, revealing the level of detail and texture that evokes the story. We then may add one or more small Fresnels to highlight an actor’s hair and wardrobe or to achieve a separation from the background. Finally the background is painted with a tightly focused Fresnel fitted with a party gel or cookie to add visual interest. (More on cookies, kooks, and snoots later in this chapter.)
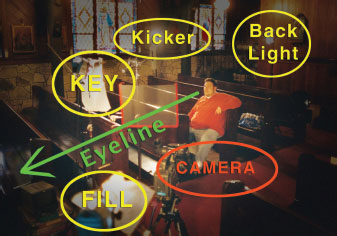
FIGURE 10.38
In a typical setup, the subject directs his look between the camera and key light fitted with a heavy diffuser. The backlight and “kicker” are gelled with lighter diffusion to reveal texture and provide additional edge. The key light raking across the face produces a shadow that evokes the genre and mood of the story.
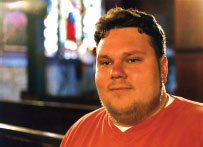
FIGURE 10.39
The kicker from screen left is stronger and more focused, simulating the effect of the window source visible in frame.
To reduce the undesirable texture in an actor’s face and skin, we typically place a diffused light as close as possible to the lens axis. Because frontal light does not produce a visible shadow—the shadow is hidden behind the subject—many defects such as acne scars, wrinkles, and dark lines exhibit less texture and are effectively de-emphasized.
Front light can play a vital storytelling role by placing a strategic point of light in an actor’s eyes. Illuminating (or not) the eyes of an actor, a reporter, or other talent is a critical choice, because the eyes are the viewer’s point of entry into a character’s warmth, credibility, and humanity. Likable characters with whom we identify should have well-illuminated eye sockets and a distinct glint in the pupil of each eye. Conversely, villainous characters have dark, unfilled eyes, which cut off potential viewer sympathies or identification. As a shooter, you must rigorously control this powerful lighting cue, which goes directly to the genre, mood, and effectiveness of your storytelling.
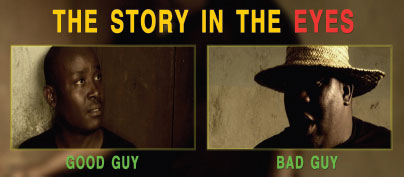
FIGURE 10.40
Illuminating the eyes conveys warmth and intimacy. The lack of front light makes a character appear sinister.
The application of fill light can be tricky. Too little can lead to dark, lifeless shadows and increased noise in the underlit areas. Too much fill imparts a washed-out, unnatural, deer-in-the-headlights look.

FIGURE 10.41a
We want our young starlets to look great but too much fill can produce a glaring unnatural look. Exclude! Exclude! Exclude! It applies to lighting most of all!
Sometimes the passive fill from a bounce card is sufficient to lift the facial shadows. Other times, especially at night, a camera filter like the ultra contrast 10 can transfer surplus values from the highlights to the shadows, potentially eliminating the need for a supplemental fill light.
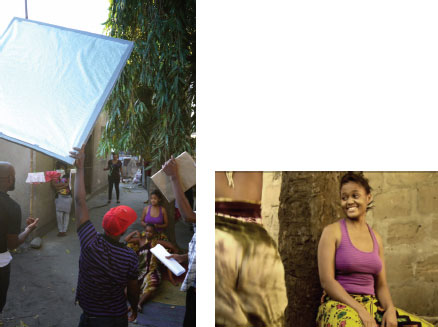
FIGURE 10.41b
A white or silver reflector can add just the right amount of fill. Less is more.
If an on-camera fill is desired, the shooter has several choices—a ring light, a top-mounted LED, or a mini HMI. For maximum versatility, a camera light should pack enough punch to produce a natural wash even through a layer of moderate to heavy diffusion.

FIGURE 10.42
A China Ball at the end of a painter’s pole provides a soft light for a walking shot at dusk.
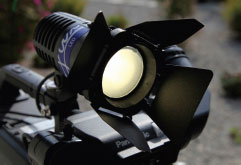
FIGURE 10.43
A small on-camera LED may provide adequate fill out to about two meters (6.6 ft).
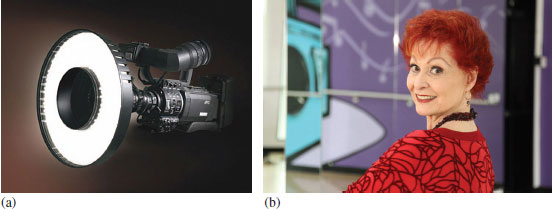
FIGURE 10.44
The wash from a lens-mounted ring light reduces the visibility of wrinkles and age lines—just what you want when shooting a veteran Hollywood entertainer. (b) The great dancer Carol Lawrence is seen here at age 78.
Like every object in the frame, every word in the script, and every scene in the movie, every light has a purpose. We place the key to best model our subject. We light the background to achieve separation and to lift the subject from the canvas. And we light the foreground to properly direct the viewer’s attention and to frame the story inside the frame.
Analogous to a composition in Adobe Photoshop the planes are managed independently, so the shooter can precisely tweak the scene’s look. For example, a hard raking light may be used in the background, while a soft front light at mid-ground suppresses unwanted texture in an actor’s skin.
Lighting in planes can be a challenge to the documentary shooter who works often in confined locations. Because one light can rarely illuminate effectively multiple planes simultaneously, the shooter must constantly look for ways to control the spill and cross-contamination of one plane’s light into another.
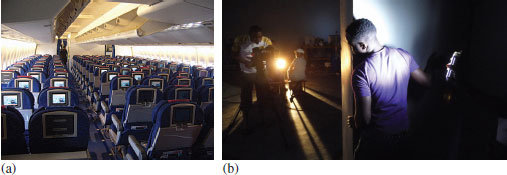
FIGURE 10.45
When shooting in planes, please note the shooter’s credo: One light does one thing.
Many camcorders feature a built-in waveform, a tool with which every serious shooter should be familiar. For green screen, I use the waveform to achieve an even illumination and a vectorscope to verify sufficient saturation. The green screen doesn’t have to be bright, just more saturated than anything else in the frame such as the actor’s wardrobe. I normally reference the waveform to attain a brightness of 55% to 60% and the vectorscope to verify saturation at least 40 units greater than the foreground talent. Using too much or too little light on the green screen makes it difficult to achieve the required 40-point separation in the vectorscope.
For green screen, fluorescent lighting can be an advantage as Kino-Flos fitted with Super Green lamps emit a pure green light, which means less contamination from other colors falling on the screen.
If you don’t have access to a waveform, you can use the camera’s zebras to achieve a reasonably smooth wash devoid of hot spots. Keep in mind that shooting green screen in cramped locations can be challenging because the spill off the screen can contaminate wardrobe and flesh tones. To avoid this, always use the largest green screen available and keep your subject as far from it as possible.
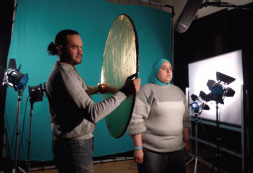
FIGURE 10.46
From traditional studio work to reality TV, green screen has become an integral part of every type of production.

FIGURE 10.47
The waveform monitor (a) facilitates smooth green screen illumination of 55% to 60%. The vectorscope (b) confirms green screen saturation 40 points greater than the foreground actors and objects. In a pinch, the camera zebras (c) set to 60% can facilitate a reasonably even wash.
Green screen is favored over blue screen for several reasons. First, primary green rarely occurs in our everyday world, so we needn’t worry about inadvertently keying out our starlet’s beautiful blue eyes. Of course, if you’re shooting sun-dappled leprechauns in a rain forest in Ireland, you might consider an alternative keying color—red, blue, yellow, amber, white, black—all will work.
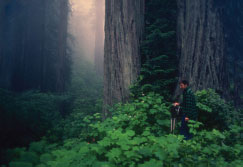
FIGURE 10.48
Engineers understand that humans can see very well in scenes dominated by green. For this reason the green channel in digital video is not compressed because we are likely to notice the missing samples. The detail in scenes bathed in blue or red light is more difficult to discern, so the pixel data in these channels can be more readily discarded—or so the thinking goes.
There is another compelling reason for using green: the green channel in digital video is not compressed. Given that the human eye is especially sensitive to wavelengths in the middle of the visible spectrum, engineers opt not to discard samples in the green or luminance (“Y”) channel because missing or deleted samples that have to be corrected later may be readily apparent to viewers. In DV’s 4:1:1 format, the red and blue channels are sampled only one fourth as often as the green channel (referenced by the number 4), which, left uncompressed, is the best choice for keying with a low risk of noise and artifacts during playback. The absence of compression in the green channel greatly facilitates the extraction of a clean green screen matte.
The 4:2:2 color space in higher end formats such as XD-CAM HD 422 and AVC-Intra offers double the number of blue and red samples, so these cameras should produce keys with smoother edges. Images captured 8-bit 4:2:0 11 in XDCAM EX and AVCHD cameras provide the same red and blue resolution as does 4:2:2 but only on every other line vertically.
My preference for shooting 4:2:2 coincides with the preference of our creator. Our eyes contain rods that measure brightness and cones that assess color. Because our retinas have twice as many rods as cones, the 4:2:2 system that samples luminance at twice the rate of chrominance closely approximates how we actually see the world, all other differences aside.
Case in point: In a dark room, we can discern the shape of an object much more readily than its color. This makes sense from an evolutionary perspective: In the feeble light, we recognize the presence of a threat before we notice the color of dress she is wearing.
In cases of wardrobe or other conflicts when green is not available, the shooter may opt for blue instead. The keying12 of red is not usually feasible, owing to the amount of red in flesh tones. Black or white keying is also possible and may be the only option when a chroma-key screen must be improvised in front of a black or white wall.
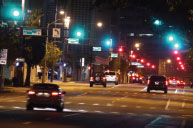
FIGURE 10.49
Green means go! The color is easily seen and recognized by drivers even from a great distance down the road.
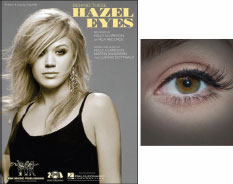
FIGURE 10.50
Halfway through shooting a music video with Kelly Clarkson, she asked me if I could isolate her hazel eyes. No one had thought about bringing chroma green paint so we used opaque black makeup instead to achieve the desired effect.
An alternative to the traditional blue or green screen, the Reflecmedia system utilizes a lens-mounted LED ring light to illuminate a special fabric, which appears gray to the eye but registers as a solid blue or green to the camera. The fabric composed of millions of tiny beads efficiently reflects the ring light source while rejecting stray off-axis light. The system thus requires little to no setup time and eliminates the need for the usual lighting complement of Kino-Flos, umbrellas, flags, cutters, and all the rest.
The ring light allows placement of talent close to the screen, an advantage to shooters working in tight locations, such as a network production trailer or press box.
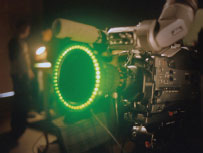
FIGURE 10.51
Reflecmedia’s LED ring light reduces the light for supplemental lighting when shooting blue and green screen. The shooter should take care not to overpower the ring light when setting a camera fill or eye light.
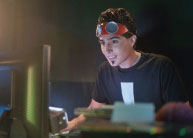
FIGURE 10.52
The green spilling onto the foreground, as seen here on the edge of the computer monitor, is a major drawback of the ring light system.
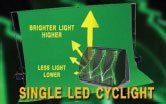
FIGURE 10.53
Flolight’s LED CycLight eliminates the need for a special screen and reduces the risk of errant green falling forward onto the set or talent.
The range of lighting control available underscores our mantra to exclude, exclude, exclude. We use Fresnels, HMIs, LEDs, floods, and fluorescents to pour light into a scene, and we use cutters, cookies, snoots, and Blackwrap to effectively exclude it, trim it, feather it, and craft it—in support of the visual story.
Rigorously controlled lighting communicates to an audience what is essential in the frame. Removing light from a prop, set element, or actor, informs the viewer “Don’t look at this. It’s not important. Nothing to see here.”
I discussed earlier how the eye is drawn naturally to the brightest object in a frame. This is a vestige from our prehuman days as drosophila,13 when we were drawn to and made a nice meal of incandescing lightning bugs. Lighting is predicated on this one salient point: If you want to draw attention to something, you shine a light on it; if you want to direct attention elsewhere, you take the light away.
Every shooter can benefit from a basic grip package, which should consist minimally of four or five C-stands and a medium flag kit. Such a kit is critical to controlling spill, especially at the top, bottom, and edges of the frame.
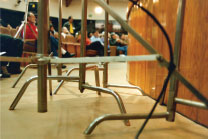
FIGURE 10.54
Watch your step! If you’re serious about lighting, you’ll stumble on this scene often.
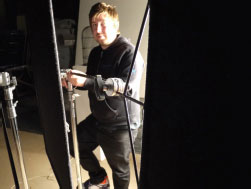
FIGURE 10.55
The C-stand provides solid support for bounce cards, nets, cutters, and other gadgets.
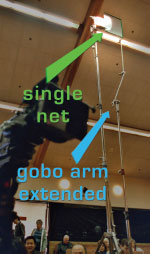
FIGURE 10.56
The net at the end of a gobo arm feathers the light off the edge of a set.

FIGURE 10.57
A double net feathers the light off the priest’s white collar, which might otherwise divert attention from the clergyman’s heartfelt story.
Every shooter with a few notches in his battery belt has reached for a kook to break up a shadowless wall, floor, or flatly lit area. Plywood kooks or cookies14 are available commercially, or they can be improvised by using strips of gaffer’s tape or by poking a few holes in a piece of Blackwrap.
The malleable black foil, referred to generically by the trade name Blackwrap, has almost unlimited uses. Affixed to the back or sides of a light, the free-form shape can help eliminate or reduce unwanted spill. I knew a shooter at NBC who kept the same worn perforated pieces of Blackwrap for his entire 25-year career! Job after job, year after year, he kept pulling out the same tattered old kooks. Not bad for a few pennies (not even that) investment.
Along with the scraps of gel for a jelly roll, you might also find a nice selection of Blackwrap jettisoned from a major production shooting in your neighborhood. Go ahead and avail yourself. You’ll feel on top of the world.
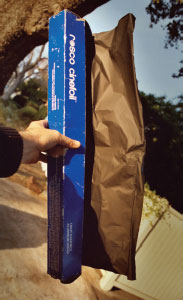
FIGURE 10.58
Aluminized black foil aka Blackwrap or Cinefoil™ is a practical and inexpensive way to control the spill from unruly lights. The use of Blackwrap may reduce the need for C-stands, cutters, and other bulky gear.
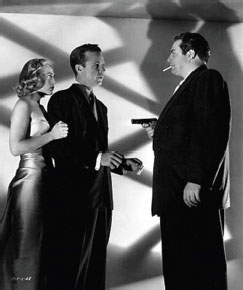
FIGURE 10.59
The shadowy pattern of a cookaloris is the signature effect in film noir movies
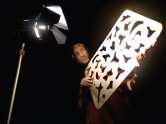
FIGURE 10.60
A cookie may be made of plywood, Blackwrap, or thin tape strips.
A Fresnel fitted with a snoot is used to illuminate individual set elements such as a wall hanging or Ming vase on a dresser. Highlighting objects in this way elevates their story value and adds visual interest to the frame. For self-respecting shooters, commercial snoot sets are available if the scavenged Blackwrap route is too déclassé.
It was something of a status symbol among National Geographic shooters to carry the most beat-up grip gear imaginable. This mantle of status applied particularly to our grip cases and the clamps inside that lasted for eons and bore the imprimatur of experience. Their ratty condition (it was thought) reflected the misery endured in far-flung battle-borne adventures. To this day I carry the same mangled clamps: pipe clamps, Mafer clamps, gator clamps, C-clamps—all beat to heck. My scissor clamps are especially full of personality, these clamps being the darling of every shooter who has ever interviewed a CEO in an office with a suspended ceiling.
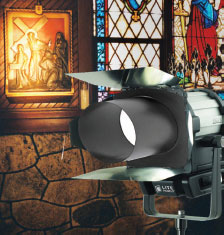
FIGURE 10.61
The snoot’s narrowed beam informs your audience. “Look at this fresco. It has meaning to the story.”
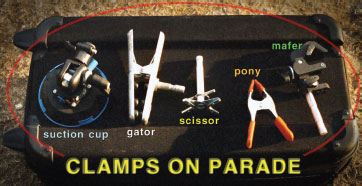
FIGURE 10.62
The resourceful shooter carries an array of clamps to tackle any mounting task. The suction cup is used for mounting a small light on a car hood or other smooth surface.
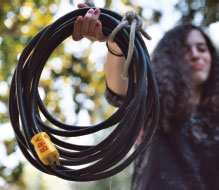
FIGURE 10.63
Professionals still cutely refer to a clothespin as a “C-47,” its onetime Century catalog designation. The extension cord is a “stinger.” An overhanging tree branch placed into a scene is a “Hollywood.” Using proper lingo will increase your perceived prowess as a shooter and contribute to the omniscient halo above your head.
Every shooter must be familiar with a range of industry utility tapes. Camera tape may be safely applied to camcorder bodies and lens barrels without fear of damaging the finish or leaving a gummy residue. The shooter should be sure to have at least one roll of white camera tape on every job. Stay away from the cheap stuff, because it will trash your valuable equipment (or someone else’s) in short order. Professional grade camera tape is widely available online or from any film or video supply house.
Gaffer’s tape is a heavy-duty cloth adhesive definitely not for use on cameras and lenses. Its powerful grip will easily remove the paint from light fixtures, apartment walls, and priceless works of art. Gray or black gaffer’s tape in 1-inch and 2-inch widths is intended for heavy-fisted tasks like sealing shipping cases or covering a rough seam on a dolly board. It must not be used to secure cables to the floors or walls because the sticky adhesive can make a nasty mess. Look for a brand with a high cloth content to keep the potential mess to a minimum. And stay away from the cheap stuff or, worse, duct tape, which is to be avoided like the pink jello at Denny’s! Just say no to gooey, gamey duct tape!
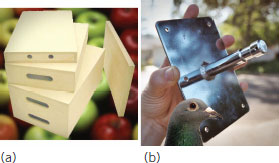
FIGURE 10.64
(a) The apple box can be used to prop up furniture and light stands, for leveling dolly track, or correct the eyeline of actors. apple box heights: full Apple = 8 inches; half apple = 4 inches; quarter apple = 2 inches; pancake or eighth apple = 1 inch. (b) A pigeon plate enables the affixing of a small light to a wall, floor, or apple box.
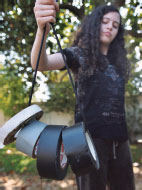
FIGURE 10.65a
The sure sign of a pro are the tapes dangling from his belt. Paper tape is not as strong as gaffer’s, but it is gentler on surfaces and leaves no sticky residue.

FIGURE 10.65b
Keep away! Gooey household duct tape must NEVER be used on or near expensive camera equipment.
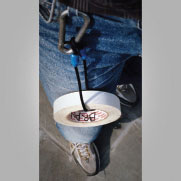
FIGURE 10.66
Use camera tape for marking zoom and focus on a lens barrel or as markers for blocking talent. Hang a roll from a carabiner on your belt and the world will regard you as a seasoned pro.
Every shooter worth his or her lens cap has a ditty bag. I take great pride in mine, having rescued more than a few imperiled productions over the years. From resoldering a camera power cable and replacing a hard drive in a laptop to treatment of a director’s diarrhea, if it’s flowing/not flowing or means trouble, I’m prepared! On many shows your resourcefulness in time of need can earn you hero—almost godlike—status.
THE DITTY BAG
I’ve carried the same ditty bag (more or less) on jobs for the last 30 years. The following is a list of its contents modified slightly for the digital age:
• Small diagonal pliers |
• Velcro strips |
• #1 and #2 Phillips screwdrivers |
• Space blanket |
• 1/2-inch and 1/4-inch flat screwdrivers |
• Soldering gun with lead-free solder |
• Needle-nose pliers |
• Star chart and gray-scale |
• Slip-joint pliers |
• Can opener |
• Wire stripper |
• Corkscrew |
• Jeweler screwdriver set (Swiss) |
• Jeweler Philips screwdriver set (Swiss) |
• Torx screwdriver set T1-T6 |
• Eyeglass repair kit |
• 6-inch vice-grip |
• 3 two-prong adapters |
• 6-inch crescent wrench |
• 2 multitap outlet adapters |
• 8-inch crescent wrench |
• Screw-in bulb socket adapter |
• VOM multimeter |
• 12 C-47s |
• Awl |
• LED flashlight |
• Precision tweezers |
• Ear plugs |
• Assorted Sharpie markers |
• Protective eye gear |
• Dry-erase marker |
• Insect repellent |
• First-Aid kit |
• Cipro (bacteria nuker) |
• Superglue |
• Sunscreen 45 SPF |
• Black electrical tape |
• snot tape15 |
• Screw caps, variety (for joining wires) |
• LCD cleaner |
• 2 or 3 grease pencils |
• Cable ties (various sizes) |
• 1/4 × 20 and 3/8 × 16 hardware |
• Metric/SAE Allen wrench set |
• Metric/SAE nut driver set |
• Rosco and/or Lee gel swatch |
• 8-inch steel ruler |
• Cloth 50-foot tape measure |
• Lens tissue and fluid |
• Lens chamois |
• Spare tripod touch-go plate |
• WD40 lubricant |
• Tube of lithium grease |
• Emery cloth |
• Jeweler’s loupe 10X |
• Pepto-Bismol/Kaopectate |
• Sewing kit (steal from hotel room) |
• Shower cap for lens (also steal from hotel) |
• Safety pins |
• 35mm film core (nostalgic) |
• Carabiner |
• Spare 9V, AA, and AAA batteries |
• Firewire cables: 4-, 6-, 9-pin |
• USB A—B, A → Mini, A → Micro cables |
• Mini plug → Mini plug audio cable |
• DVI → VGA & HDMI adpters Macbook Pro |
• Assorted BNC/RCA adapters |
• LCD screen wipes |
In Uganda a few years back, I was asked to shoot several scenes inside a dark apartment inconveniently located on the upper floor of a building in central Kampala. Capturing the show’s daylight exteriors was tough enough; I could manage the intense equatorial sun with bounce cards and improvised diffusion and by shifting some of the action to earlier or later in the day. But without a single working light kit or a professional instrument, the interiors posed a more serious challenge, as the kitchen and bedroom sets were located high above a parking lot in the deepest recesses of the structure away from any windows or sources of natural light. The reality was apparent: I had far too much light outside and far too little light inside.
So I got to thinking. With no resources to speak of, I was forced to consider what I did have, and that were lots of young African men and women eager to participate and to add their imprimatur to the production. And there were mirrors in Kampala. Lots of mirrors. There was a factory just outside the city.
So that became the solution. Banks of mirrors with two-person teams delivering the sun from the parking lot into the upper windows of the building, then bouncing that light down a dark corridor and into a bedroom, where a final team with a gold reflector filled the space with a magical glow. After all the shenanigans, the light was still too intense, and so I added some diffusion—and the scene looked gorgeous! It couldn’t have been lit better with a 20-ton grip truck, a seasoned Hollywood crew, and a spate of HMIs!
There are great advantages to embracing the simplest of solutions. The sun is a beautiful thing, and in much of the world, there’s lots of it and it’s free—if you can control it, harness it, and deliver it to where you need it.
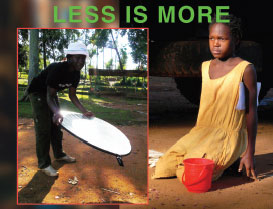
FIGURE 10.67
There is beauty in simplicity. Embrace it. Make it a part of you and your craft.
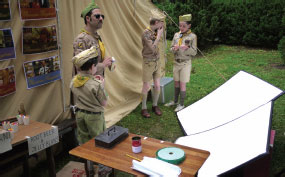
FIGURE 10.68
Regardless of the size movie or budget, simple solutions work best!

FIGURE 10.69
… then reflect it down a long hall into a third mirror and into a back bedroom. Who needs pricey light kits and grip trucks?
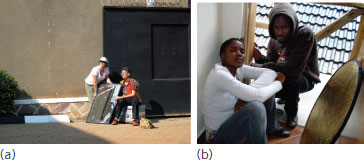
FIGURE 10.70
Mirrors are powerful tools that can deliver an intense blast of sun to interior locations. (b) An interior bounce crew takes a break
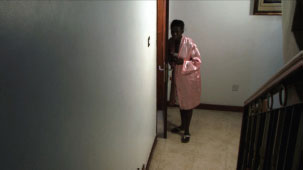
FIGURE 10.71
This windowless interior illuminated by mirrored sunlight is from the Uganda short film Sin of the Parents (2008) directed by Judith Lucy Adong.
EDUCATOR’S CORNER: REVIEW TOPICS
1. Consider our mantra: Exclude! Exclude! Exclude! Describe five (5) ways how we apply this principle to our lighting craft.
2. The notion less is more applies most of all to lighting. How does utilizing fewer and smaller instruments enhance creativity and contribute to a more efficient production?
3. It is often said that the story is in the shadows. Do you agree? Explain.
4. Explore the virtues of hard and sort light. List four (4) ways to achieve a broad soft source. In what story context might hard light be more appropriate?
5. Shooting high-contrast exteriors can pose a challenge. Describe four (4) strategies you might employ to reduce the contrast to a more acceptable range.
6. The illumination of the eyes attests to a character’s humanity. Consider the story implications of different lighting and shadow treatments in the face and eyes.
7. You’re shooting a documentary in Africa that requires you to travel with only two cases. What might compose your lighting kit? LEDs? Fresnels? Collapsible reflectors?
8. Think about the character of light in the environment around you. Is it soft? Is it hard? Warm? Cool? How does the light you experience every day impact the kinds of stories you’re likely to tell? Is there a connection?
1 1 Fischoff, R. (Producer), Jaffe, S. R. (Producer), & Benton, R. (Director). (1979). Kramer vs. Kramer [Motion picture]. USA: Columbia Pictures.
2 Barish, K. (Producer), Gerrity, W. C. (Producer), Starger, M. (Producer), & Pakula, A. J. (Producer & Director). (1982). Sophie’s Choice [Motion picture]. UK: Incorporated Television Company.
3 A Fresnel is a tightly focusable instrument that employs a ridged lightweight lens invented by French physicist Augustin-Jean Fresnel. Originally developed for lighthouses, the Fresnel lens is much thinner than conventional convex lenses, and thus transmits more light, which accounts for its greater efficiency.
4 Brücker, W. D. (Producer), Canaris, V. (Producer), Eckelkamp, H. (Producer), Fengler, M. (Producer), & Fassbinder, R. W. (Director). (1979). The Marriage of Maria Braun [Motion picture]. West Germany: Albatros Filmproduktion.
5 Baby stands are not intended for babies or for the maintenance thereof! The term simply references a common support for mounting an instrument fitted with 5/8-inch stud. The traditional Mole-Richardson ‘baby’ and ‘baby baby’ lights were fitted with 5/8-inch receptacles and thus the infantile name persists.
6 Color Rendering Index (CRI) reflects the ability of a light to reproduce colors accurately in tungsten or daylight conditions. Professional shooters usually look for a CRI of at least 90 for most applications. CRI references a scale that runs from 0 (worst) - 100 (best).
7 HMI (Hydrargyrum Medium-Arc Iodide) lighting uses an arc lamp instead of an incandescent bulb and a ballast to provide ignition and control of the arc. Five times more efficient than tungsten lighting, HMIs, at 5600° K, provide a very high-quality daylight source.
8 Beugg, M. (Producer), Marshall, F. (Producer), Taylor, G. (Producer), Veytia, O. (Producer), Weinstein, B. (Producer), Weinstein, H. (Producer), & Kramer, W. (Producer & Director). (2009). Crossing Over [Motion picture]. USA: The Weinstein Company.
9 CTB = Color Temperature Blue; CTO = Color Temperature Orange.
10 See Chapter 9 for more discussion.
11 4:2:0 color sampling as used in HDV and most XDCAM variants and DVD-Video.
12 Keying or chroma keying is the technique for compositing two video streams together by mapping a specific color range.
13 “Drosophila is a genus of small flies, belonging to the family Drosophilidae, whose members are called fruit flies, pomace flies, vinegar flies, or wine flies. See “Drosophila.” (n.d.) Wikipedia http://en.wikipedia.org/wiki/Drosophila. Shooters talk about irrelevant stuff like this all the time. Get used to it.
14 Kooks, cukes, coo-koos, and cookies are industry jargon for a cookaloris, named, I think, after a gaffer named Mr. Cookaloris in the 1930s. I’m not sure about this. And his family isn’t talking.
15 Snot tape is industry shorthand for 3M Scotch ATG transfer tape, a clear gooey film with the consistency of rubber cement. Roll it into little balls. Use it for gelling windows, 4- × 4-foot diffusion frames, Christmas tree decorations, and so on.