
7. Camera
In This Chapter
Taking Photos and Recording Video
![]() If you have an iPad 2 or later, you can use the Camera app to take still photos and record videos. Your iPad has a camera on the back, as well as a lower-quality (VGA) front camera for self-portraits and FaceTime calls (see Chapter 9). After you take photos and videos, you can view them in the Photos app (see Chapter 19), where you can also edit, share, and print them.
If you have an iPad 2 or later, you can use the Camera app to take still photos and record videos. Your iPad has a camera on the back, as well as a lower-quality (VGA) front camera for self-portraits and FaceTime calls (see Chapter 9). After you take photos and videos, you can view them in the Photos app (see Chapter 19), where you can also edit, share, and print them.
Using the Camera Controls
Its large slab screen makes the iPad an unwieldy camera, but you can use the Camera app to take photos and record video ![]() .
.
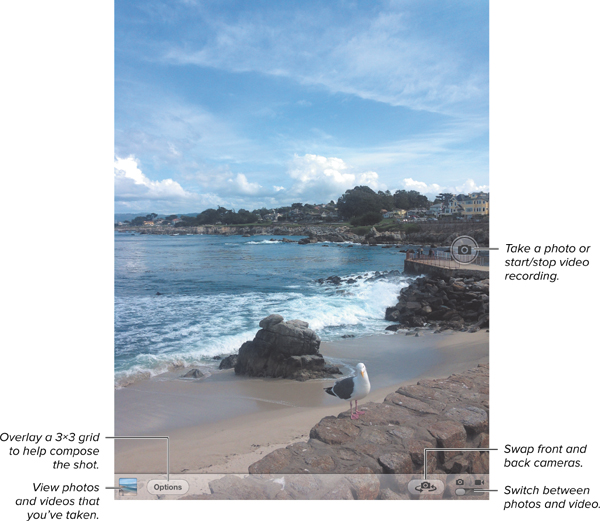
![]() Camera controls.
Camera controls.
Taking Photos and Recording Video
Taking photos and videos with your iPad is little different from taking them with an iPhone or a point-and-shoot camera.
To take a photo:
1. Set the Camera/Video switch to ![]() .
.
2. Line up the shot.
Camera autofocuses, or you can tap to focus (iPad 3 or later).
3. Tap ![]() , or press the Volume Up button.
, or press the Volume Up button.
To prevent blurry photos, which can result when you tap ![]() too hard, touch and hold the icon while you line up your shot, and lift your finger when you’re ready to take the photo.
too hard, touch and hold the icon while you line up your shot, and lift your finger when you’re ready to take the photo.
When you photograph people (or animals), the iPad 3 or later uses face detection to automatically focus on and balance the exposure across up to ten faces. A rectangle appears over each detected face.
To record a video:
1. Set the Camera/Video switch to ![]() .
.
2. Line up the shot.
Camera autofocuses, or you can tap to focus (iPad 3 or later).
3. Tap ![]() , or press the Volume Up button.
, or press the Volume Up button.
The timer in the top-right corner of the screen shows the current length of the video. The microphone on the top-center edge of the iPad records the audio.
4. Tap or press again to stop recording.
You can also take screen shots of whatever is on your iPad’s screen (like the figures in this book). To do so, press and release the Sleep/Wake button and the Home button at the same time. The screen flashes, and the screen shot is added to your Camera Roll album (or, on an iPad 1, to your Saved Photos album).
Using Photo and Video Tools
Camera offers photo and video tools for use before and after the shot.
Overlaying a grid. Tap Options to toggle a 3×3 overlay on the screen ![]() . This grid helps you compose a photo by using the “rule of thirds” guideline, which states that important compositional elements should be placed along the gridlines or their intersections. The grid doesn’t appear for video.
. This grid helps you compose a photo by using the “rule of thirds” guideline, which states that important compositional elements should be placed along the gridlines or their intersections. The grid doesn’t appear for video.
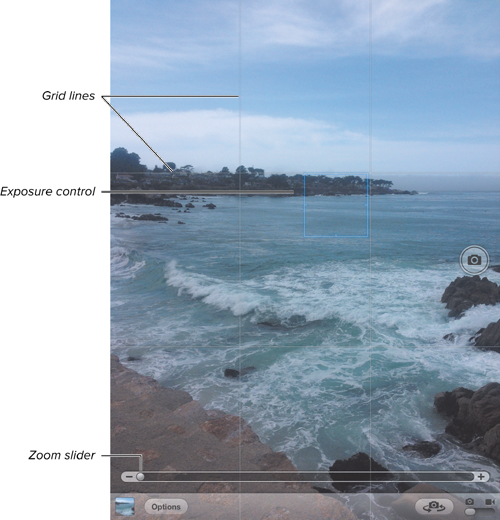
![]() Camera tools help you compose your photo before you take the shot.
Camera tools help you compose your photo before you take the shot.
Zooming in or out. Pinch the screen to show the zoom slider ![]() . Drag the slider left or right to zoom out or in, or pinch or spread two fingers on the screen to zoom. Zoom works for the back camera only and not for video.
. Drag the slider left or right to zoom out or in, or pinch or spread two fingers on the screen to zoom. Zoom works for the back camera only and not for video.
Adjusting the exposure. The iPad lacks a flash, but it lets you adjust the exposure (overall lightness) of a photo. When you line up the shot, tap a person, object, or any other area of the screen. A blue-white square appears briefly as Camera focuses and adjusts the exposure based on that area ![]() . To lock the exposure, touch and hold an area until the square pulses and then lift your finger; the text AE/AF Lock appears at the bottom of the screen (until you tap again). Now take the photo or video.
. To lock the exposure, touch and hold an area until the square pulses and then lift your finger; the text AE/AF Lock appears at the bottom of the screen (until you tap again). Now take the photo or video.
Editing photos. To edit a photo, open the Photos app, view the photo full-screen, tap the screen to show the controls, tap Edit, and then tap an editing tool at the bottom of the screen ![]() :
:
![]() You can rotate, enhance, remove red-eye from, and crop photos.
You can rotate, enhance, remove red-eye from, and crop photos.
• Tap Rotate to spin the photo in 90-degree increments.
• Tap Enhance to improve contrast, color saturation, and other qualities automatically.
• Tap Red-Eye and then tap each eye to correct it.
• Tap Crop, drag the corners of the grid (or tap Constrain to set a grid ratio), drag the photo to reposition it, and then tap Crop in the top-right corner.
When you’re done editing, tap the buttons at the top of the screen to cancel, undo, or save your edits.
Trimming videos. To trim a video, open the Photos app, view the video full-screen, and then tap the screen to show the controls ![]() . Drag either end of the frame viewer to trim the frames from the start or end of a video. Tap Trim Original to replace the original video (permanently deleting trimmed frames), or tap Save as New Clip to save the trimmed version and leave the original video unaffected.
. Drag either end of the frame viewer to trim the frames from the start or end of a video. Tap Trim Original to replace the original video (permanently deleting trimmed frames), or tap Save as New Clip to save the trimmed version and leave the original video unaffected.
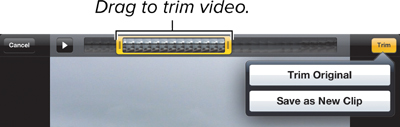
![]() The frame viewer turns yellow when you trim frames from the start or end of a video.
The frame viewer turns yellow when you trim frames from the start or end of a video.
To turn your videos into Hollywood-style movies, try Apple’s iMovie for iOS app, available in the App Store.
Sharing, viewing, and printing. Open the Photos app, view the photo or video full-screen, tap the screen to show the controls, and then tap ![]()
![]() . You can email or copy photos and videos, upload videos to YouTube, tweet or print photos, and more. To delete a photo or video, tap
. You can email or copy photos and videos, upload videos to YouTube, tweet or print photos, and more. To delete a photo or video, tap ![]() .
.
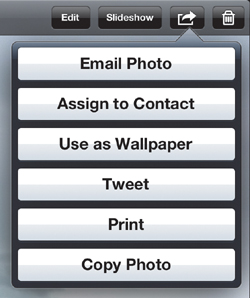
![]() You can share, upload, or use your photos and videos in various ways.
You can share, upload, or use your photos and videos in various ways.
To transfer photos and videos to your computer:
1. Connect your iPad to your Mac or Windows PC.
2. Choose the Import command in your photo-organizer program (iPhoto, Windows Live Photo Gallery, or whatever) to copy your photo and video files to the computer.