Now that you have your project set up as a local GitHub repository, its time to take that code and get it online! The following sections will each cover the process of deploying your application to a few different popular cloud-based hosting providers.
Feel free to explore and experiment with each as most have free or relatively inexpensive plans. Each provider has its strengths and weaknesses, so I'll leave it up to you to decide which to stick with for your particular needs. The services that we cover aren't presented in any particular order.
To get started with Nodejitsu, first visit http://nodejitsu.com and register for a free account. After providing your e-mail address, username, and password, you will be presented with a pricing plan page where you can configure your service. If you just want to create the free account and experiment, simply click on the No Thanks button and the registration process is complete. Once you're finished, simply click on the Login button in the upper right corner to log in and proceed to your Apps dashboard:

Deploying your app to Nodejitsu is going to require a new command-line interface tool, specifically, the jitsu CLI. Clicking on the big blue Deploy an app with jitsu button will take you to the www.github.com repository for this tool. You can skip that step and just install the CLI manually using the following npm command:
$ sudo npm install –g jitsu
Now that the jitsu CLI is installed, you can use this handy tool to log in to your Nodejitsu account, create an app, and deploy your project code. First, let's log in:
$ jitsu login
info:    Welcome to Nodejitsu
info:    jitsu v0.13.18, node v0.10.26
info:    It worked if it ends with Nodejitsu ok
info:    Executing command login
help:    An activated nodejitsu account is required to login
help:    To create a new account use the jitsu signup command
prompt: username:  jkat98
prompt: password:
info:    Authenticated as jkat98
info:    Nodejitsu ok
You can see that after successfully providing your username and password, you are now authenticated with Nodejitsu and ready to go.
Before we can deploy the actual application, we need to first configure the MongoDB database in our Nodejitsu dashboard. Switch back to your browser, and on the Nodejitsu Apps dashboard, switch sections by clicking on the Databases tab:
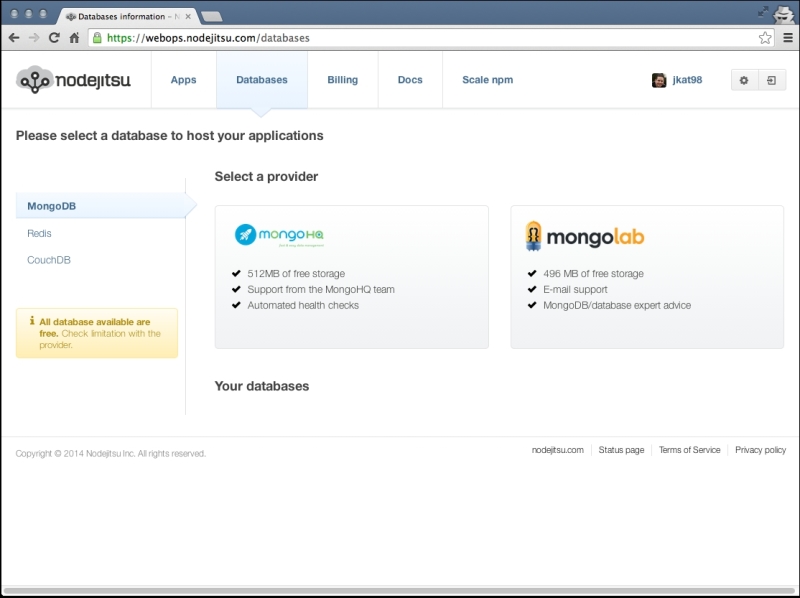
Let's choose MongoHQ for our needs, so click on the large MongoHQ button. You will be prompted for a name for the new database and then it will be listed at the bottom of the screen in the Your databases section. The important part we need is the connection string, and there's a convenient copy link right next to it to copy it to your clipboard.
Edit the server.js file and update the mongoose.connect line to use this new connection string you copied for your Nodejitsu database:
[/server.js]
mongoose.connect('YOUR_NODEJITSU_CONNECTION_STRING_HERE'),
mongoose.connection.on('open', function() {
    console.log('Mongoose connected.'),
});
The only thing left remaining is to open a terminal, change directories to your project home, and execute the following command to package up your app and push it to Nodejitsu:
$ jitsu deploy
info:    Welcome to Nodejitsu jkat98
info:    jitsu v0.13.18, node v0.10.26
info:    It worked if it ends with Nodejitsu ok
info:    Executing command deploy
warn:
warn:    The package.json file is missing required fields:
warn:
warn:      Subdomain name
warn:
warn:    Prompting user for required fields.
warn:    Press ^C at any time to quit.
warn:
prompt: Subdomain name:  (jkat98-imgploadr) imgploadr
warn:    About to write /Users/jasonk/repos/nodebook/imgploadr/package.json
... (a lot of npm install output) ...
info:    Done creating snapshot 0.0.1
info:    Updating app myapp
info:    Activating snapshot 0.0.1 for myapp
info:    Starting app myapp
info:    App myapp is now started
info:    http://imgploadr.nodejitsu.com on Port 80
info:    Nodejitsu ok
After executing jitsu deploy, the CLI first prompts to confirm what the subdomain will be under the www.nodejitsu.com domain. Feel free to change this to whatever you like (it will check to confirm availability). It will then make a few minor modifications to your package.json file, specifically including the subdomain option with whatever value you provided. Finally, it uploads your source code and performs a remote npm install operation. Assuming all went well, the app should be deployed and a confirmation of the URL outputs to the screen. Feel free to open that URL in your browser to view the app online!
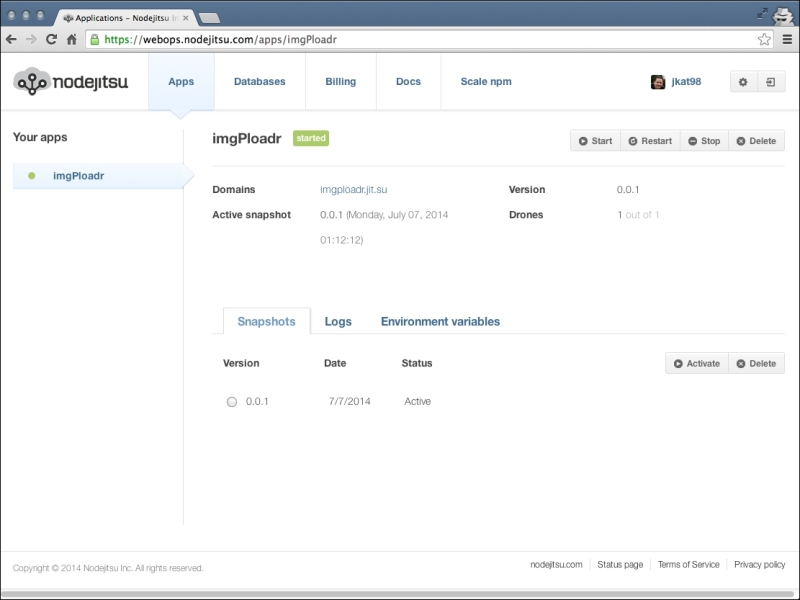
You can also now see that the app is listed in your Apps dashboard:
Now that the application has been successfully uploaded, launch it via its URL and give it a test run by attempting to upload a new image. The first thing you should notice is that attempting to upload an image fails with a fairly useless error (you can see the following error by accessing the Logs tab from your app's dashboard):
400 Error: ENOENT, open '/opt/run/snapshot/package/public/upload/temp/72118-89rld0.png
This error is far from helpful! Basically, what's happening here is that the application is attempting to upload and save the image to the temp folder that doesn't actually exist! We need to add a snippet of code to our application to check for this condition and create the folders if necessary.
Edit the server/configure.js file and insert the following snippet of code right between routes.initialize(app); and return app;:
// Ensure the temporary upload folders exist
fs.exists(path.join(__dirname, '../public/upload/temp'), function(exist) {
    if (!exist) {
        fs.mkdir(path.join(__dirname, '../public/upload'), function(err){
            console.log(err);
            fs.mkdir(path.join(__dirname, '../public/upload/temp'),
                function(err){
                    console.log(err);
                });
        });
    }
});
Here we're using the filesystem fs module to check whether the upload/temp folder exists, and if not, create both the parent upload folder as well as the temp subfolder. Don't forget to require the fs module at the top of the file too:
var connect = require('connect'),
    path = require('path'),
    routes = require('./routes'),
    exphbs = require('express3-handlebars'),
    moment = require('moment'),
    fs = require('fs'),
Note
There is an npm module called node-mkdirp that will perform a recursive mkdir, which basically would accomplish the double mkdir we called in the preceding example. The only reason I didn't include it was for brevity and to not unnecessarily include additional instructions to install the module, require it, and use it. More info can be found at https://www.npmjs.org/package/mkdirp.
With the mentioned changes made to your code, you need to deploy your application again. Simply execute another jitsu deploy and a fresh copy of your code will be uploaded to your instance:
$ jitsu deploy
Open your app URL again, and this time you should be able to interact with the application and successfully upload a new image! Congratulations, you have successfully deployed your application and it is now online using the Nodejitsu hosting service!
Another popular cloud-based hosting provider for Node.js apps is www.Heroku.com. The one thing that sets Heroku apart from other providers is the number of powerful add-ons that are available. Any kind of service you can imagine your application requiring is available as an add-on, including data stores, search, logging and analytics, e-mail and SMS, workers and queuing, monitoring, and media! Each of these add-ons can be quickly and easily added to your service and integrated into your application with ease.
Like Nodejitsu, Heroku allows you to register a free account and work within the confines of their "sandbox" pricing plans. The plans are free, but limited in scope with regard to bandwidth, processing power, and so on. Most, if not all, of the add-ons typically also offer some sort of free sandbox- or trial-based plan. Just like Nodejitsu, one of the add-ons we will be using with our Heroku app is MongoHQ, a cloud-based MongoDB service provider.
To get started, first go to http://heroku.com and sign up for your free account. While registration doesn't require a credit card, in order to include any add-ons with your application, you will have to have a credit card on file (even though it won't be charged unless you choose to scale up the services). After registering, clicking on the link in the confirmation e-mail and providing a password, you will be presented with your Apps dashboard:
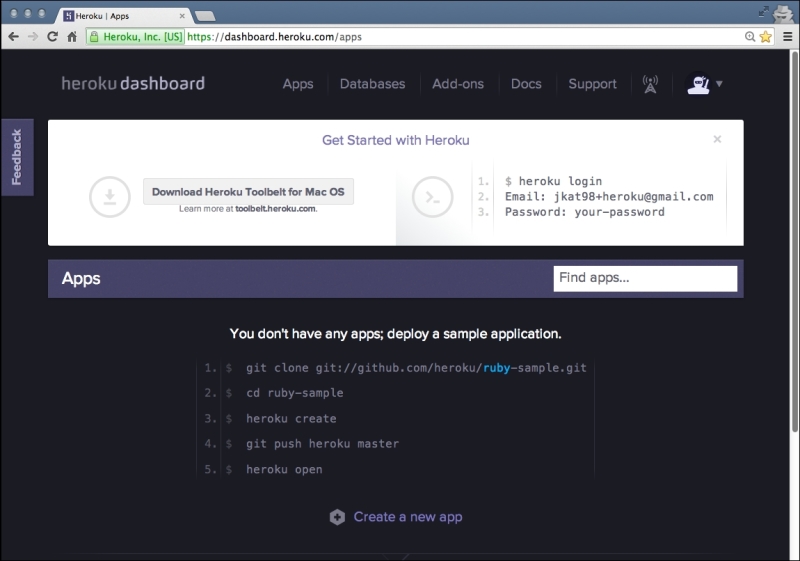
You'll notice that the first thing you need to do is download the Heroku Toolbelt (again, much like the jitsu CLI for Nodejitsu). Click on the download button to download and install the toolbelt. The toolbelt is a CLI, specifically to create and deploy apps to Heroku and gives you the heroku command.
Once you have the toolbelt installed, open a command-line terminal and change directories to your project's root. From there, execute the following command to log in to Heroku:
$ heroku login
Enter your Heroku credentials.
Email: [email protected]
Password (typing will be hidden):
Authentication successful.
Now that you're logged in you can issue commands directly to your Heroku account and use those commands to create an application, install add-ons, and deploy your project.
The first thing you'll want to do is create a new application. Do so by executing heroku create from the command line:
$ heroku create
Creating secret-shore-2839... done, stack is cedar
http://secret-shore-2839.herokuapp.com/ | [email protected]:secret-shore-2839.git
After creating the app, Heroku randomly assigned it a unique name; in my case, secret-shore-2839 (don't worry though as this can easily be changed):
$ heroku apps:rename imgploadr --app secret-shore-2839
Renaming secret-shore-2839 to imgploadr... done
http://imgploadr.herokuapp.com/ | [email protected]:imgploadr.git
Don't forget to update your Git remotes on any local checkouts.
Let's address that last part next. Heroku relies on the Git source control on your machine in order to push your project source code up to your server, unlike Nodejitsu, which uses its own file transfer mechanism. Assuming you followed the directions earlier with regard to Git and www.GitHub.com, your project source code should be all set and committed to the master branch and ready to go. What we need to do next is add a new remote for Git on your machine to point to Heroku and specifically your new app.
Execute the following command to create a new remote for Heroku:
$ git remote add heroku [email protected]:imgploadr.git
Before you can push your source code up to your Heroku account, we need to take care of a few things first.
A special file is required before your application will be able to run on your Heroku server. This file is called Procfile, and it specifically contains the command necessary to launch your application. Create this new file named Procfile (no extension) in the root of your project and include the following line:
web: node server.js
That's it! With that file, Heroku will use that command to launch your application. Now that you have Procfile set up and your project source code ready, there's only one thing left to do—install the MongoHQ add-on and configure your app to use it:
$ heroku addons:add mongohq --app imgploadr
Adding mongohq on imgploadr... done, v3 (free)
Use 'heroku addons:docs mongohq' to view documentation.
With the MongoHQ add-on added, you can now configure the database itself and retrieve the connection string (much like you did earlier with Nodejitsu). Access your http://heroku.com Apps dashboard, and it should look something like the following screenshot:
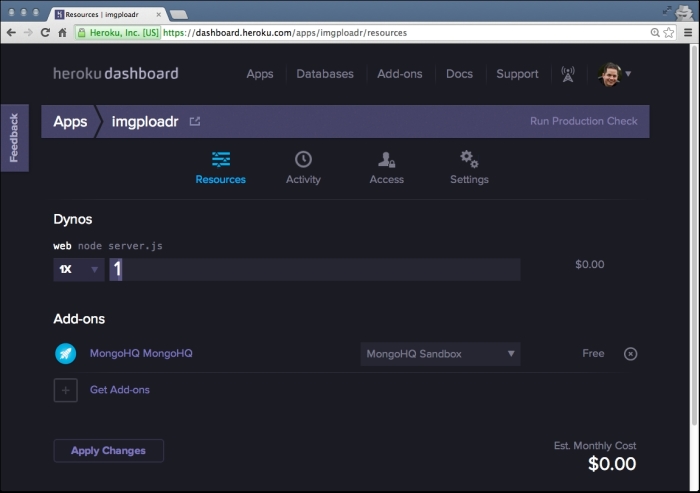
The app's dashboard screen is a great place to get a snapshot of your application and a quick glance at its current cost. Since I'm using the sandbox and/or free plans for my application and add-ons, my current estimated monthly cost is $0.00. However, you can quickly and easily scale your apps should you demand more power. Pay attention, as you can also just as quickly and easily escalate your monthly cost through the roof! (Scaling everything to maximum, I was able to get my estimated cost to roughly $60,000 per month!)
To configure your MongoHQ database, simply click on the MongoHQ link under the Add-ons section of your app's dashboard:
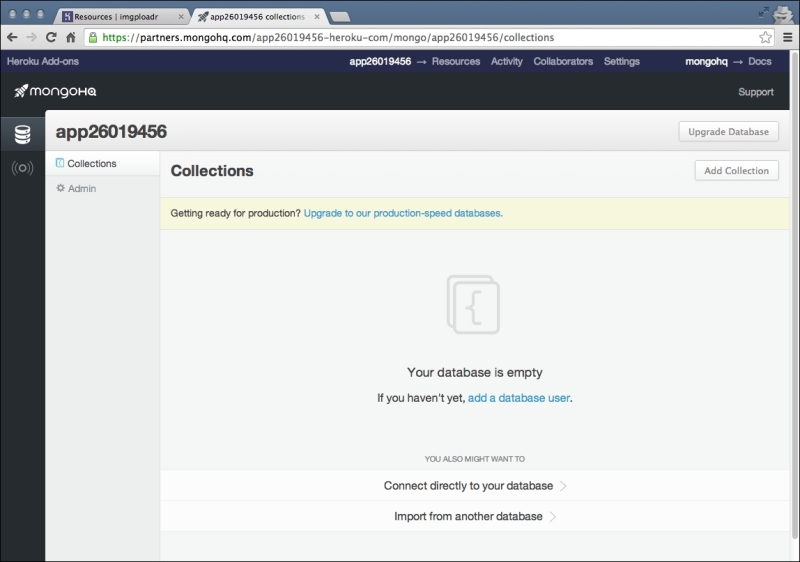
Click on the Admin tab with the gear icon below the Collections tab. Click on the Users tab and provide a username and password that your application will use to connect with your MongoHQ database. I'll create the imgploadrdb username with a secure password. With the new user added, switch back to the Overview tab and copy the Mongo URI string.
Again, just like with Nodejitsu, edit the server.js file in your project and replace the mongoose.connect string with the new URI you just copied. Edit the string and replace <username> and <password> with the appropriate values based on the new user account you just created. The server.js mongoose.connect code should look like the following:
mongoose.connect('mongodb://imgploadrdb:[email protected]:10089/app26'),
mongoose.connection.on('open', function() {
    console.log('Mongoose connected.'),
});
Since you just made changes to your project's source code, you need to remember to commit those changes to your Git repository master branch so that they can get uploaded to Heroku. Execute the following command to permanently commit these changes to your source code and upload your code to your Heroku server:
$ git commit -am "Update mongoose connection string"
$ git push heroku master
Initializing repository, done.
Counting objects: 50, done.
Delta compression using up to 8 threads.
Compressing objects: 100% (43/43), done.
Writing objects: 100% (50/50), 182.80 KiB | 0 bytes/s, done.
Total 50 (delta 3), reused 0 (delta 0)
... npm install output ...
To [email protected]:imgploadr.git
 * [new branch]      master -> master
The final step to get your application up and running is to create an instance of your server (basically the equivalent of turning it on). To do this, execute the following command:
$ heroku ps:scale web=1 --app imgploadr
Scaling dynos... done, now running web at 1:1X.
$ heroku open
Opening imgploadr... done
Success! Hopefully, your browser launched and your website is up and running. Go ahead, give it a try and upload an image! Thanks to the bug we caught during the Nodejitsu deployment, this updated version of the application should work just fine.
While deploying with Heroku seems more complicated than Nodejitsu, this is probably because it uses Git source control to facilitate the transfer of your project files. Also, because Heroku is so flexible with the power of its scaling and add-ons, the toolbelt CLI is a little more robust.
While Nodejitsu and Heroku can be considered developer-level service providers because they are Platforms as a Service, Amazon Web Services (AWS) (and Microsoft Azure) would be considered enterprise-level services because they are more Infrastructure as a Service. The sheer volume of options and services available with AWS and Azure is staggering. These are definitely top-tier services and hosting an application like ours is kind of like using a bazooka to kill a fly!
AWS does provide its own NoSQL database called DynamoDB, but for our purposes, we want to continue to work with MongoDB and use Mongoose in our app. To do this, we can use a third-party MongoDB provider. If you recall, when we originally set up Nodejitsu, one of the MongoDB providers listed was MongoLab. MongoLab provides "MongoDB-as-a-Service", which means we can use their service to host our MongoDB database, but use all of the power of AWS to host our Node.js application (this is not unlike what's already happening with Nodejitsu and Heroku already—they just streamline the process a little better). Remember that AWS is an Infrastructure as a Service provider, so you could also just create another server instance and install MongoDB on it yourself and use that as your data source. That's slightly beyond the scope of this chapter however.
In order to use MongoLab with our app in AWS, we first need to register a new account on http://mongolab.com and create an AWS database subscription. After you register a new account and activate it using the link they send you via e-mail, you can create your first database subscription.
From your main dashboard, click on the Create new button (with the lightning bolt icon):

From the Create new subscription page, configure the following settings:
- Cloud provider:
amazon web services - Location: (whichever region you prefer)
- Plan: Select Single-node (development)
- Sandbox (shared/free)
- MongoDB version:
2.4.x - Database name:
anything_you_want(I chose:imgploadr) - Confirm that the price is $0 per month
- Click on Create new MongoDB deployment
Back at your main dashboard, you should now see that your new database has been created and is ready to go. The next thing we need to do is create a user account that our app will use to connect to the server. Click on the database listed on the main dashboard and then select the Users tab. Provide a new username and password. After the new user account has been added, copy the URI located at the top of the screen (it only appears after a user has been added) that starts with mongodb://.
Now that you have the new URI connection string, we need to update server.js to include this new connection string in our mongoose.connect. Edit the file and update the following code:
mongoose.connect('mongodb://imgploadrdb:[email protected]:61248/imgploadr'),
mongoose.connection.on('open', function() {
    console.log('Mongoose connected.'),
});
Make sure to replace <username> and <password> with the appropriate information from the user account you created on the MongoLab dashboard.
With our application code updated to point to the new MongoLab database connection string, we need to zip up the project files so that they can be uploaded via the AWS dashboard. From your computer's file browser, locate the project root that contains all of your applications' source code files, select all of them and right-click on them to add to an archive or ZIP file. The name of the ZIP file can be whatever you choose. One thing to note is that you shouldn't include the node_modules folder with this ZIP file (the easiest solution might be to simply delete the folder altogether). The AWS online docs has a great write-up on creating ZIP files if you need more information:
https://docs.aws.amazon.com/elasticbeanstalk/latest/dg/using-features.deployment.source.html
Once your source code has been updated to use the new MongoLab connection string and you've created a ZIP file of the entire project (excluding the node_modules folder), you're ready to create the new AWS application and deploy your app.
If you don't already have an account with Amazon, you're going to need one to use their AWS services. Point your browser to http://aws.amazon.com and click on Sign Up (even if you already have an Amazon account). From the screen that follows, you can log in using your existing Amazon account or register for a new account. Once you've registered and logged in, you should be presented with the entire suite of cloud services AWS has to offer.
The primary service we're interested in is Elastic Beanstalk (located under Deployment and Managed with a green icon):

From this screen, click on the Create New Application link in the upper right corner. The screens that follow will walk you through a multistep wizard process where you will configure the environment in which the application will reside. Configure the following settings where appropriate:
- Application Information:
- Application name:
anything_you_want
- Application name:
- Environment Type:
- Environment tier:
Web Server - Predefined configuration:
Node.js - Environment type:
Load balancing,autoscaling
- Environment tier:
- Application Version:
- Upload your own (choose the ZIP file that you created earlier)
- Environment Information:
- Environment name:
anything_you_want - Environment URL:
anythingyouwant(this is the subdomain for your app)
- Environment name:
- Configuration Details:
- Instance type:
t1.micro - The remaining fields can be left blank or at their default values
- Instance type:
- Environment Tags:
- (skip this step—unnecessary for this app)
The final step is to review the configuration settings and then launch the environment (by clicking the blue Launch button). It may take a few minutes for Elastic Beanstalk to configure and launch your environment and application so you might need to sit tight:

With the environment officially launched and the application online, go ahead and open your app (by clicking the link at the top of the page) and give it a test run. Assuming everything went according to plan, your application should be up and running and working just fine!
Microsoft's Azure service is very similar to Amazon's AWS. Both can be considered enterprise-level services and both offer a tremendous level of flexibility and power with a really slick UI. Surprisingly, even though it's a Microsoft product, you can spin up instances of Linux environments using Azure as well host your Node.js and MongoDB apps!
The first thing you're going to need, like any other service, is a registered account at http://azure.microsoft.com. You can use an existing Microsoft Live Login if you have one, otherwise you can register a new account fairly easily. Once you're logged into the Azure service, the first thing you'll be presented with is your primary dashboard. The icons to the left are all of the various services and options available with Azure:

Clicking the +NEW icon at the bottom-left corner will present you with the main dialog you can use to add any new service. For our purposes, we want to add a website:
- Select Compute, Web Site, and From Gallery.
- Select Node JS Empty Site from the long list of gallery options. This will create the necessary environment so that you have somewhere you can put your application.
- On the screen that follows, provide the URL for your app.
- Leave the remaining fields as their default values.
- Click on the checkmark icon to complete the setup process, and your website will be created.
The next step we need to do is set up the database server. Again, very similar to AWS or Nodejitsu, we are going to once again select MongoLab as our database service provider:
- Click on the +NEW icon again and select Store and browse the list until you find and select MongoLab.
- Click on the next arrow and browse through the various plans. For our needs, we will leave Sandbox selected (since it's free).
- Provide a name for your database; in my case, I entered
imgploadrdb. - Click next again to review and confirm the plan and monthly price (should be 0.00 per month).
- Finally, click on the checkmark icon to Purchase this new subscription plan.
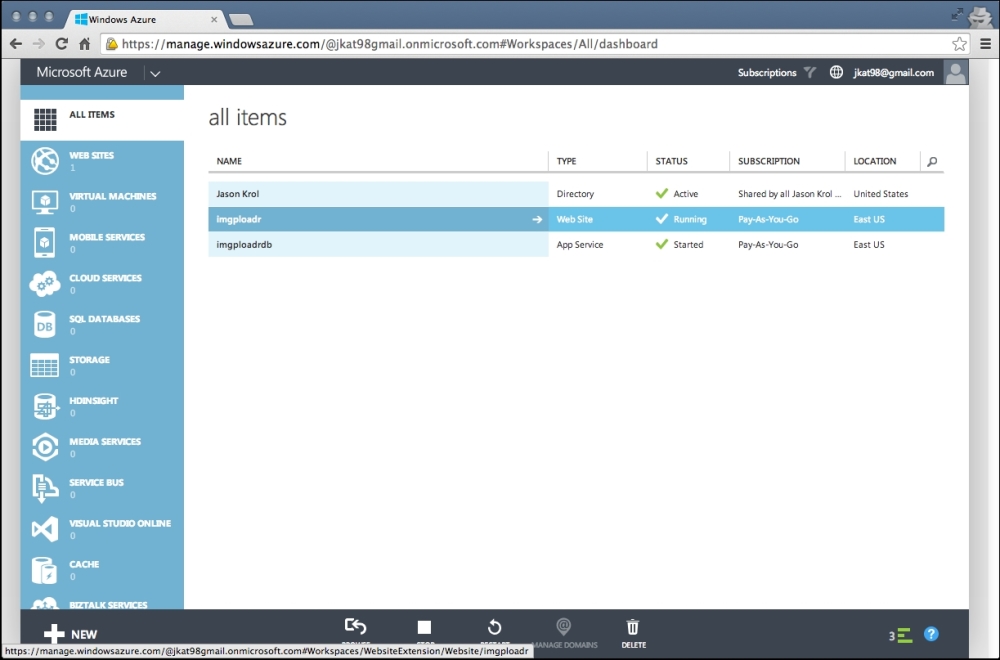
After a few seconds, you should be taken back to your dashboard where you will see entries for both the website and database app service listed:
Now that the database has been created and is ready, we need to include its connection string in our application before we can upload our code:
- Click the database row to select it and go to its overview.
- The bottom of this screen will contain a few icons, one of which is labeled Connection Info (and has an icon that looks like >i). Click on that icon to pop up a modal window that contains the connection string URI for your new MongoLab database server.
- Copy that URI to your clipboard.
- Edit
server.jsin your local app and replace themongoose.connectconnection string with the new string you just copied. No need to updateusernameandpasswordas Azure has already taken care of this for you:mongoose.connect('mongodb://your_specific_azure_mongolab_uri'), mongoose.connection.on('open', function() { console.log('Mongoose connected.'), });
Once that change has been made, save the file and don't forget to update your local Git repository with the change, as we'll be using Git in the next section to push your code to Azure (just like we did earlier with Heroku):
$ git commit -am "Azure connection string"
Back at the Azure dashboard, click on the Web Site in All Items list (or filter by websites using the icons on the left toolbar). From this overview screen, locate the Integrate source control section towards the bottom and click on the Set up deployment from source control link. The following screenshot shows what you should see at this point:

Select Local Git repository and then continue by clicking the next arrow icon.
The screen that follows will present instructions on how to push your local code to the remote Git repository that has just been created for your Azure website. The gist is to add a new Git remote (much like we did earlier with Heroku) that points to your Azure repository and then push your code:
$ git remote add azure SPECIFIC_URL_FOR_YOUR_SERVER
$ git push azure master
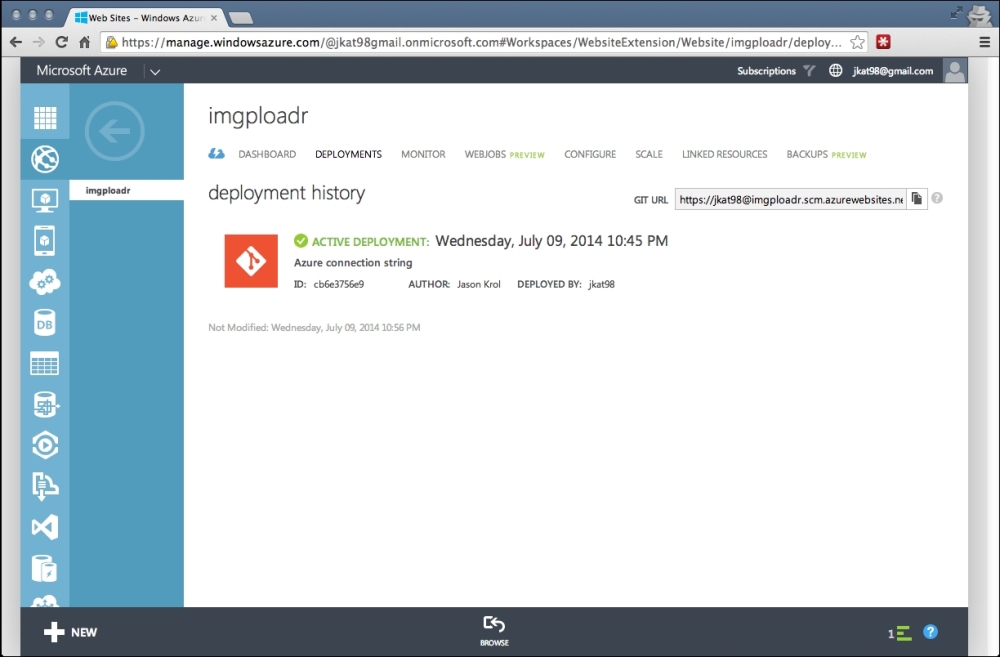
You should notice the Git information screen in your Azure dashboard update in real-time as your code starts to push up after the git push command. From the command line, you will see a lot of remote npm install output as well. Once completed, the deployment history in your Azure dashboard will update showing the information for the last active deployment:
Now that your code has been deployed to your Azure website and your website connection string is pointing to your MongoLab Azure app service, you're ready to give the website a test run! Launch it by pointing your browser to http://yourappname.azurewebsites.net:

Azure does a lot of things right (UI/UX) and has some really powerful options and scaling features available! Taking a quick glance at the dashboard for a website (the preceding screenshot) you can see that there is a lot going on! There are many different configuration options as well as health monitoring and general information (FTP settings, website URL, usage metrics, and so on), so feel free to poke around and explore.
The last service I wanted to mention and briefly take a look at is Digital Ocean http://digitalocean.com. Digital Ocean is a true Virtual Private Server (VPS) service provider and is a good example of a service that gets you just about as "close to the metal" as possible. What this means is that Digital Ocean doesn't really have all the bells and whistles that the other services we've seen offer. What Digital Ocean does offer, however, is direct unfiltered access to the Linux server instance you spin up; in this case, referred to as Droplets:

Digital Ocean allows you to boot up new Linux virtual server instances very quickly. They offer very competitive prices and they're a great service if you need to get a Linux server super fast because you only need one for a short period of time, or you want to boot up your own Linux server that you plan to use to host a production environment. The only "downside" (if I had to refer to it as such) is that you have to be pretty familiar with Linux, specifically administering a server and all the responsibilities that come with that.
You can very easily clone your project using Git on a new Droplet, but an example of the actual raw nature of a new Droplet is that Git is not installed on the server by default. You need to manually install Git before you can clone your repository. Depending on which image you decided to clone when creating a new Droplet, you might need to install and configure Node.js as well as MongoDB. Fortunately, Digital Ocean offers a number of predefined servers you can choose from when creating a new server—one of which includes the MEAN (MongoDB, Express, Angular, and Node.js) stack. Beyond that, actually launching your app will only run as a process during your currently logged in session—once you log out, your application will go down. You would need to further administer the server to configure your app to run as a service.
Digital Ocean allows you to connect directly to your server using the console access tool within the website itself, or using SSH directly from a terminal on your own machine:

I mention Digital Ocean only because a lot of people will find this kind of raw power quite refreshing and want to do their own hands-on kind of configuration and maintenance of their server. Digital Ocean is an awesome service but it's not for everyone. I wanted to talk about it specifically because I feel that it rounds out and completes the list of services we've covered so far.