
Because of the sophisticated nature of single page applications, there exists a growing suite of tools a frontend developer needs to be familiar with to manage many day-to-day, and sometimes minute-to-minute tasks.
A build tool is just what it sounds like, a tool used to build your application. When a frontend developer creates and maintains an application, there could be a number of tasks that need to be repeated literally every time a file is changed and saved. Using a build tool, a developer can free up time and mental resources by offloading the responsibility to an automated task manager that can watch files for changes and execute any number of tasks needed. These tasks might include any number of the following:
- Concatenation
- Minification
- Uglification and obfuscation
- Manipulation
- Dependency installation and preparation
- Custom script firing
- Concurrent watchers
- Server launching
- Test automation
Some of the more popular build tools today include Grunt, Gulp, and Broccoli. Grunt.js has been around for a number of years and is very well-established in the development community. Gulp and Broccoli are fairly new but quickly gaining traction and work a little differently than Grunt. With Grunt you define and manage your tasks using a configuration file whereas with Gulp and Broccoli you write Node.js code and use the raw power of streams. Many developers find working with Grunt's configuration file to be fairly convoluted and frustrating and find working with Gulp to be a refreshing change. However, it's hard to dispute Grunt's history and popularity.
All three feature extensive ecosystems of plugins that help automate literally everything and anything you can think of with your build process.
Here is some sample output from a typical Grunt build command:
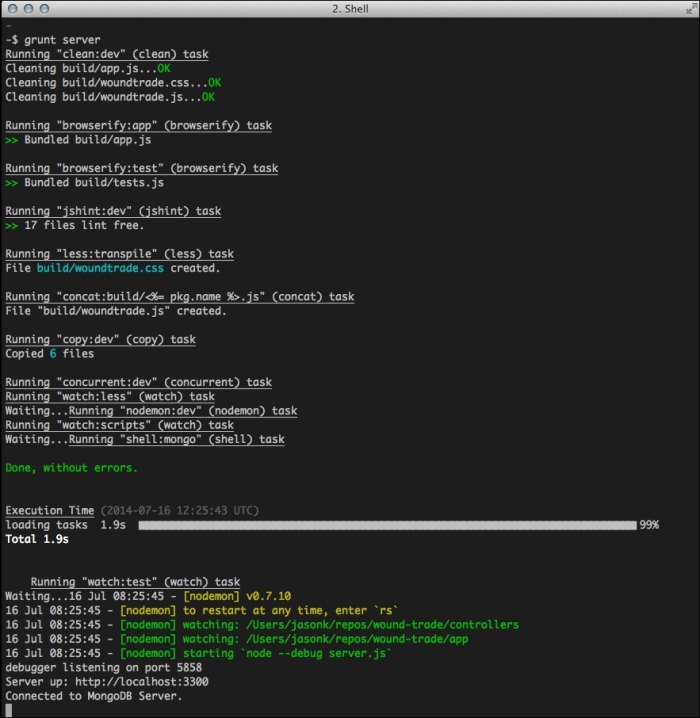
In a typical single page application, the build manager can be responsible for: downloading and installing dependencies, concatenating multiple JavaScript files into a single file, compiling and shimming Browserify modules, linting JavaScript files for syntax errors, transpiling LESS files into production-ready CSS files, copying files to a runtime destination, watching files for changes to repeat any of the tasks again, and finally running appropriate tests any time the code is changed—all from a single command!
Grunt can be installed using npm and should be installed globally. Execute the following command to install the Grunt CLI on your machine:
$ npm install -g grunt-cli
Refer to the getting-started guide on the official Grunt.js website for more information at http://gruntjs.com/getting-started.
Additionally, feel free to check out Gulp and Broccoli as well for more information:
There are literally millions of JavaScript libraries that exist to help you with everything from DOM manipulation (jQuery) to timestamp formatting (moment.js). Managing these libraries and dependencies can sometimes be a bit of a headache. For the frontend, the dependency manager of choice is Bower.io.
Bower works almost exactly the same way as npm. While working on the frontend, and you need a known JavaScript library or plugin (such as underscore, for example), simply execute bower install underscore and the JavaScript files will be downloaded to a local bower_components folder in your project. From there, you can automate the inclusion of those scripts by updating your build process, or simply copy the file, include a script tag in your HTML, and you're all set.
Bower can be installed using npm and should be installed globally. Execute the following command to install Bower on your machine:
$ npm install –g bower
$ bower install jquery
bower cached        git://github.com/jquery/jquery.git#2.1.0
bower validate      2.1.0 against git://github.com/jquery/jquery.git#*
bower new           version for git://github.com/jquery/jquery.git#*
bower resolve       git://github.com/jquery/jquery.git#*
bower download      https://github.com/jquery/jquery/archive/2.1.1.tar.gz
bower extract       jquery#* archive.tar.gz
bower resolved      git://github.com/jquery/jquery.git#2.1.1
bower install       jquery#2.1.1
jquery#2.1.1 bower_components/jquery
Visit the Bower.io website (http://bower.io) for more information as well as the full directory of scripts available to be installed via bower install.
When writing large JavaScript applications, the key is to keep your source code well-organized and structurally sane. Unfortunately, JavaScript doesn't inherently support the idea of modular code very well right out of the box. To solve this problem, two popular libraries exist to allow you to write modular code and rely on only the modules you need within each individual piece of code.
Note
An absolute must-read and incredible resource for frontend design patterns is Addy Osmandi's Learning JavaScript Design Patterns, which you can read for free by visiting the following URL:
http://addyosmani.com/resources/essentialjsdesignpatterns/book/
Require.js and Browserify are two of the most popular module loaders today. Each has a very unique syntax and its own set of benefits. Personally, I've worked with Require.js in the past, and recently I've found that I really like working with Browserify. One of Browserify's strengths is that it uses the same modular pattern as Node.js; so, writing frontend code using Browserify feels identical to that of Node. You use module.exports and require on the frontend, and you don't have to worry about syntax context switching if you go back and forth between Node and the frontend within the same application.
Using a module loader in conjunction with one of the popular MVC frameworks mentioned earlier is almost a requirement because the two go together like peanut butter and jelly!
Fortunately, we've covered the idea of HTML template-rendering engines already throughout the course of this book. The topics and concepts transfer directly to frontend applications as well. There are many different HTML template engines to choose from for use in the browser.
Many template engines will be mustache-based, meaning they use {{ and }} for merge variables. Handlebars is currently my personal favorite, mainly because it works so well in the backend and frontend of an application, and I really like working with its helpers. Underscore.js has a built-in "lite" template-rendering engine for use with Backbone.js, but its syntax uses <% and %> (much like classic ASP or ASP.net MVC Razor syntax). Typically, most frontend MVC frameworks allow you to customize the template-rendering engine and use any engine you want. For example, Backbone.js can be very easily set up to use Handlebars.js instead of underscore.js by default.
Here's just a small sample list of some of the currently available frontend template-rendering engines:
- Underscore.js: http://underscorejs.org
- Handlebars: http://handlebarsjs.com
- Mustache: http://mustache.github.io
- Dust.js: http://akdubya.github.io/dustjs
- EJS: http://embeddedjs.com
Some of these will work at the backend as well as on the frontend.
The idea of using variables and logic within a CSS file sounds like a dream come true, right? We aren't quite there yet (in the browser anyway), however there are a few tools that will let us use variables and logic in our CSS files and compile them during our build step. LESS and SASS are two of the most popular CSS transpilers currently available. They behave almost identically, with only slight differences in syntax and features. The big difference is that LESS was written using JavaScript and Node, whereas SASS uses Ruby; therefore, each has different requirements to get running on your machine.
Here is a sample SASS style sheet file:
$sprite-bg:url("/images/editor/sprite-msg-bg.png");

@mixin radius($radius) {
  -moz-border-radius: $radius;
  -webkit-border-radius: $radius;
  -ms-border-radius: $radius;
  border-radius: $radius;
}

.upload-button {
    border-bottom: solid 2px #005A8B;
    background: transparent $sprite-bg no-repeat;
    @include radius(4px);
    cursor: pointer;
}

#step-status {
    color:#dbdbdb; font-size:14px;

    span.active {
        color:#1e8acb;
    }

    &.basic-adjust, &.message-editor {
        width: 525px;
    }

    .icon {
        height:65px;
        width: 50px;
        margin:auto;
    }
}

@import "alerts";
@import "attachments";
@import "codemirror";
@import "drafts";
Looking at the sample code, you can see that we have a few new elements that wouldn't typically work in a regular CSS file. Some of these include:
- Defining custom variables for use throughout the style sheet
- Defining mixins, which act as pseudo functions for reusable styles (with dynamic parameters)
- Including mixins and variables within our style definitions
- Nesting styles with parent/child relationships
When the previous code is transpiled using LESS (or in the case of the sample code SASS), the output is a standard .css style sheet that adheres to all the normal browser rules and syntax.
For more information on LESS and SASS, check out the following links: