
In this chapter, you will upgrade your site, which so far implements HTTPS with a self-signed certificate, by obtaining an SSL certificate from a certificate authority (CA). As a result, the web browser warnings about an insecure site will not appear, and instead a padlock icon, indicating secure communication, will appear on the left of the URL in the address bar of your browser. To obtain an SSL certificate, you usually need to own a second-level domain (SLD), like httpsserver in httpsserver.eu, as opposed to a name with the second-level domain owned by a DDNS company (like the names used in the previous chapters with the SLD ddns.net ). For this reason, in this chapter, you’ll learn how to obtain a domain name, and I’ll discuss the process to obtain both the domain name and the SSL certificate. The cost at the time of this writing is about $8/year for the domain name and $19/year for the SSL certificate. However, it is not required that you register to run the projects. The source code for the projects used in this and the following chapter can run with the old server configuration; you will just continue to get the browser warnings.
By obtaining an SSL certificate from a CA, you will create a site that provides a login connection. For a system requiring a user login, implementing SSL is an indispensable option because the password and all other sensitive data is transmitted encrypted. In this project, you will also learn how to encrypt the user password when stored in the database.
The user enters the username and the password, and by utilizing PHP sessions, the user will stay connected and can view user-specific data while browsing all the web pages of this site until a logout is issued.
Obtaining Your Own Domain Name
Plenty of companies offer domain name registration. You first have to search the company’s site to see whether the name you want is available. An SLD name such as httpsserver may be available for certain top-level domains (TLDs) such as for eu but be unavailable for another TLD like com. Usually the prices for the domain names are different for the various TLDs.
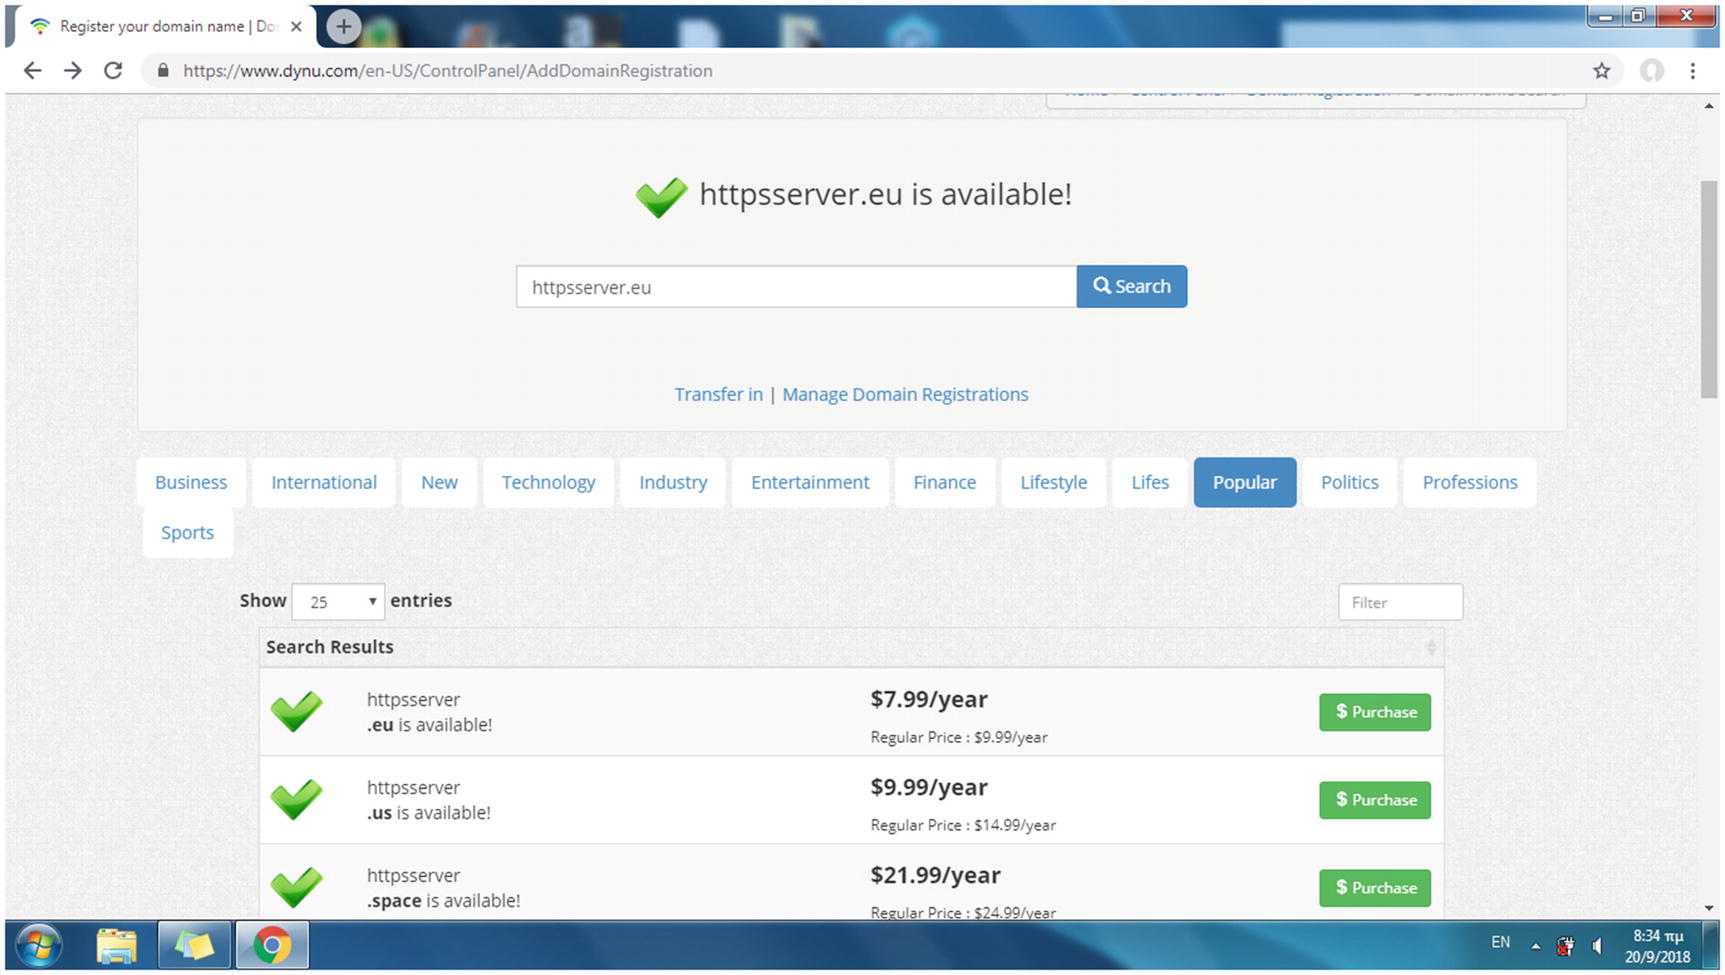
Searching the availability of a domain name
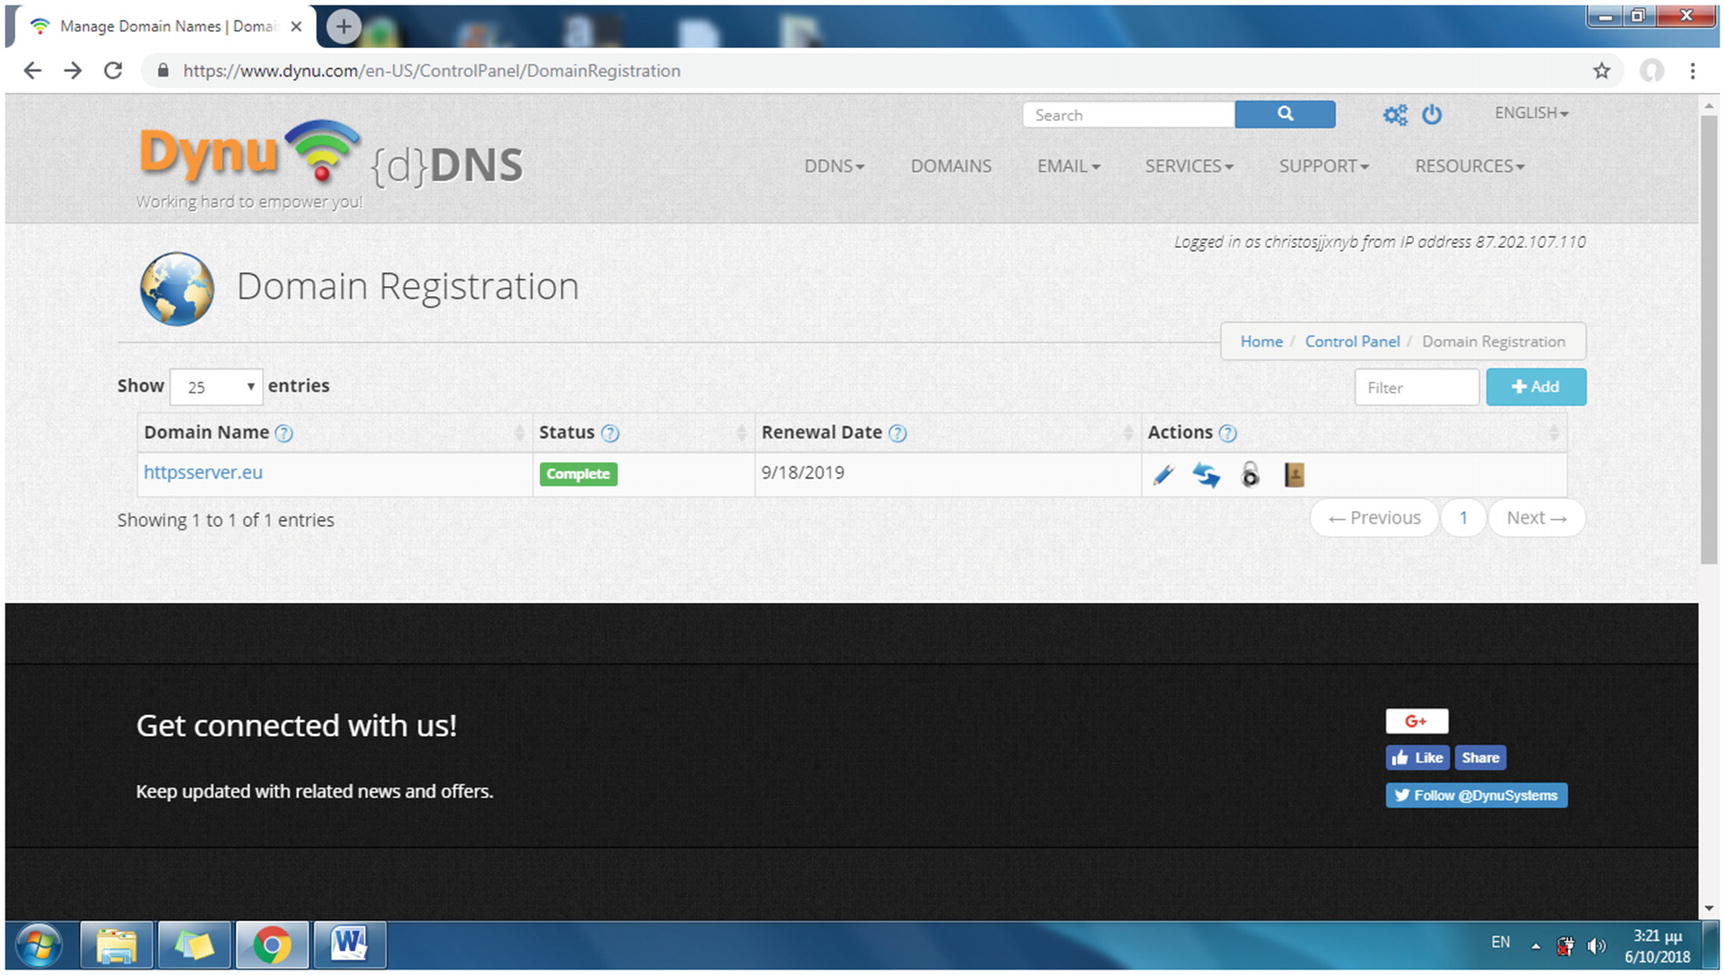
The newly registered domain name is added to the list of your domain names
The next step for running a secure site is to acquire an SSL certificate from a certificate authority for your new domain name.
Obtaining a CA SSL Certificate for Your Domain Name

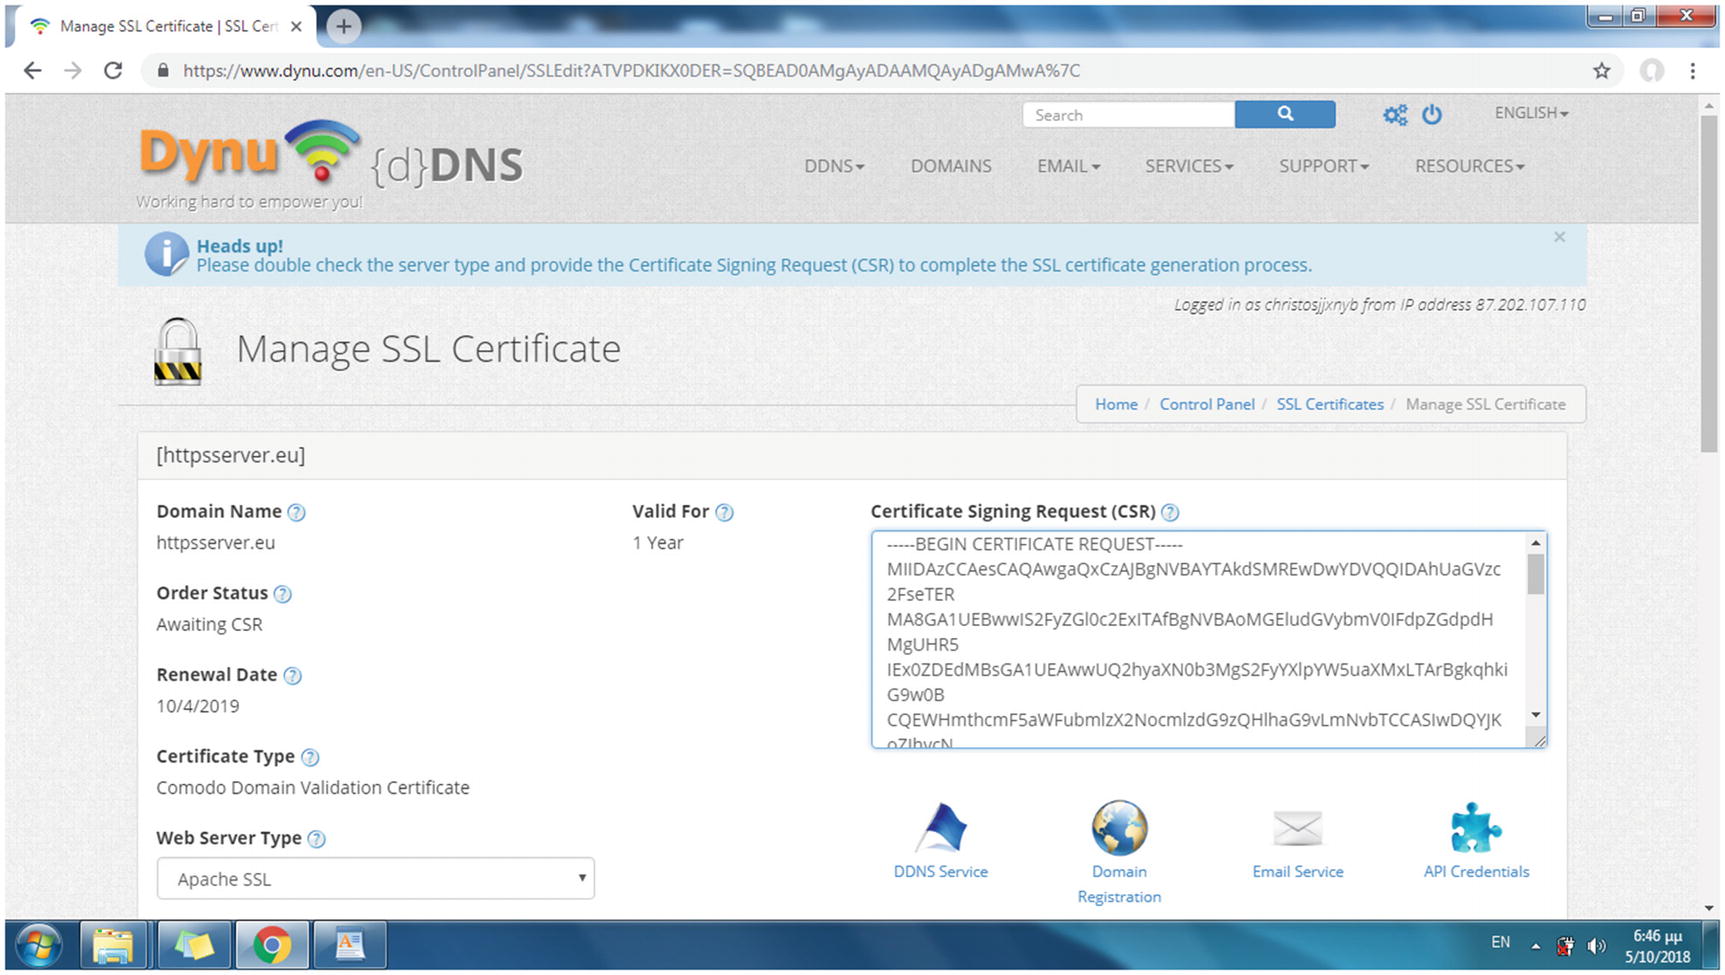
By purchasing an SSL certificate, your domain name status turns to Awaiting CSR
new: Generates a new certificate request
newkey rsa:2048: Generates a new private key, an RSA key that is 2,048 bits in size, as its argument indicates
nodes: Specifies that the private key created will not be encrypted
keyout server.key: Specifies server.key as the file name to write the newly created private key to
out server.csr: Specifies server.csr as the file name of the CSR file
Country name (two-letter code)
State or province name (full name)
Locality name (e.g., city)
Organization name (e.g., company)
Organizational unit name (e.g., section)
Common name (e.g., server FQDN or your name)
E-mail address
A challenge password
An optional company name
Providing the CSR file contents to the CA
In the Web Server Type list, select Apache SSL. Also, in the Approved Email list, select [email protected]. Unless you run a mail server, you probably do not have an e-mail address that uses your domain name. Such an e-mail address is, however, required by CAs for the verification process. SSL certification providers like Dynu.com create a temporary e-mail account for you to receive e-mail from the CA, via the Dynu.com webmail interface. The username and the password for the Dynu.com webmail site are provided by Dynu.com so that you can reply to the CA’s e-mail and thus complete the SSL certificate registration process.
You’ll receive an e-mail from Dynu.com that includes your certificate (e.g., httpsserver.eu_2018.cer) and a bundle file (e.g., httpsserver-eu.ca-bundle) with all the intermediate certificates. For security reasons, the CA uses a chain of trust, where one intermediate certificate signs the next. At one end of the chain is the root certificate, which is the CA identity, and at the other end is your domain certificate, which is the certificate you purchase from a CA.
Hint!
Sometimes the SSL certificate provider sends the root and intermediate certificates instead of a bundle file. You have to copy and paste the contents of the files in the order suggested by the SSL certificate provider into the .ca-bundle file. You can skip this and ask your SSL provider to send you a ready-to-use bundle file instead.
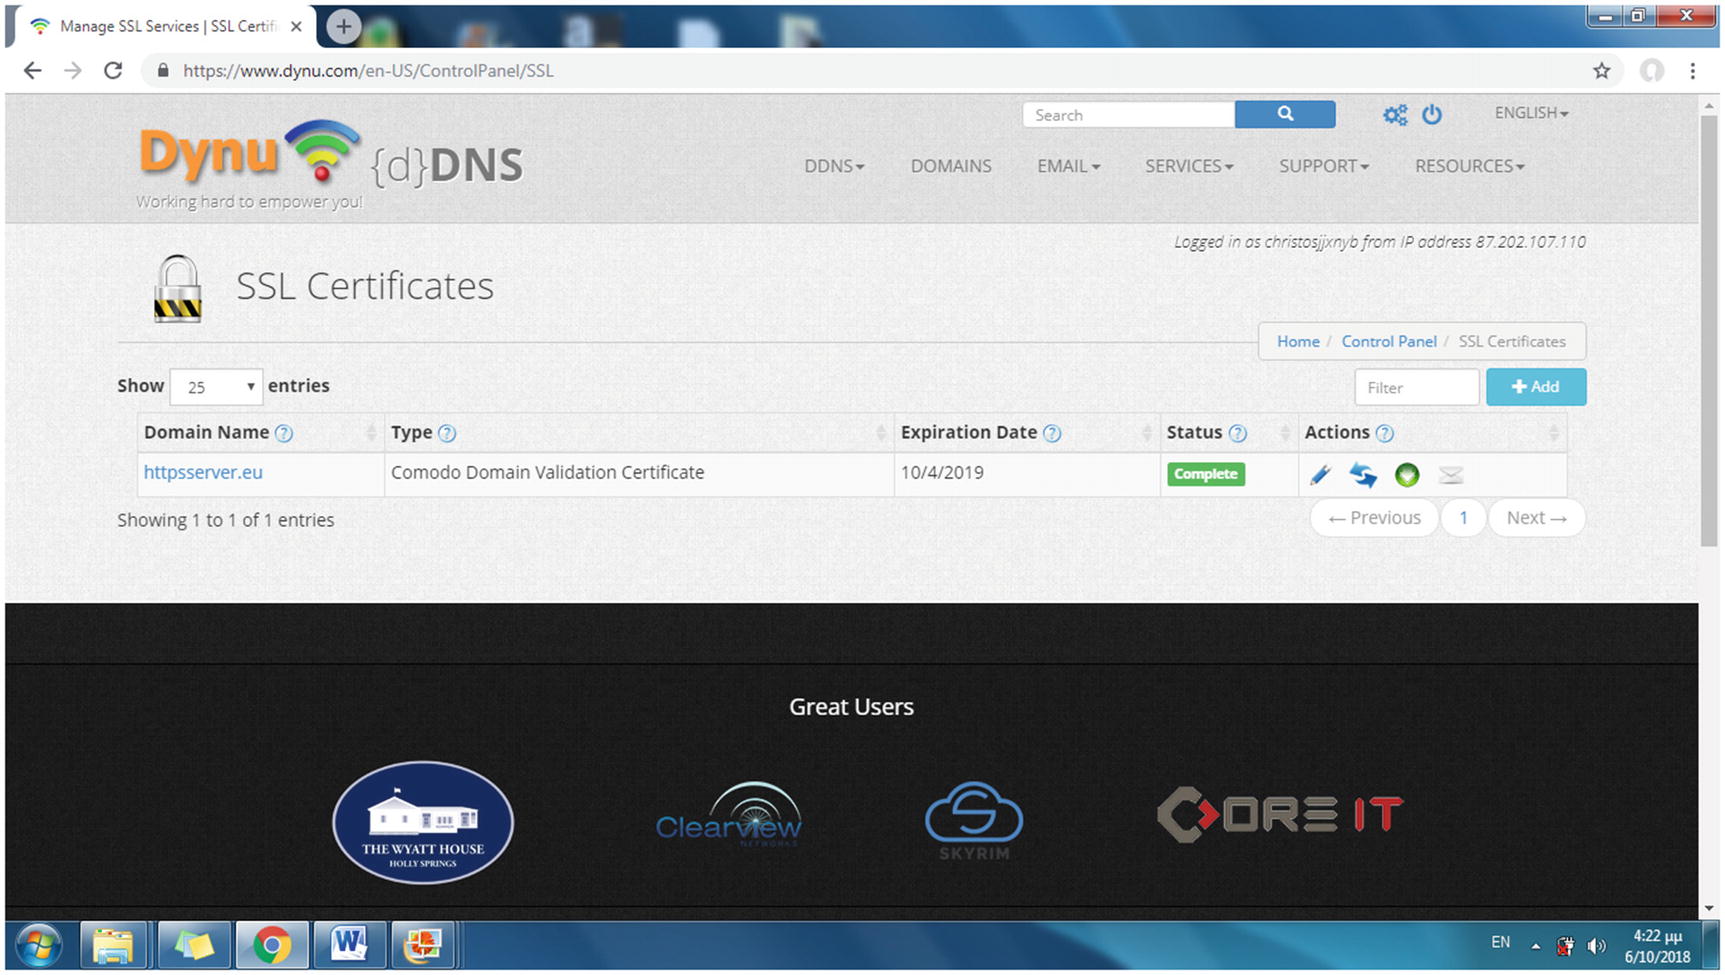
With the SSL certificate granted, the status of the domain name on the SSL Certificates web page becomes Complete
In the following section, you’ll install the SSL certificate on the Apache and Lighttpd web servers so you can have a secure communication for the client login project.
Configuring SSL on the Web Servers
The server’s private key
The SSL certificate for the domain name
The bundle file that includes the root certificate and the intermediate certificates
Installing the CA Certificate on the Apache Web Server
The DocumentRoot directive was also set to /var/www/html/login, which will be the root directory used next in this chapter’s project.
When a URL is entered with the http:// protocol (or no protocol at all), the HTTP status code returned directs the client to a different URL (the connection in this case) with the https:// protocol.
Installing the CA Certificate on the Lighttpd Web Server
Set the document root from /var/www/html/ to /var/www/html/login in the conditional configurations for ports 80 and 443, which will be the one used next in the project.
Testing the SSL CA Certificate
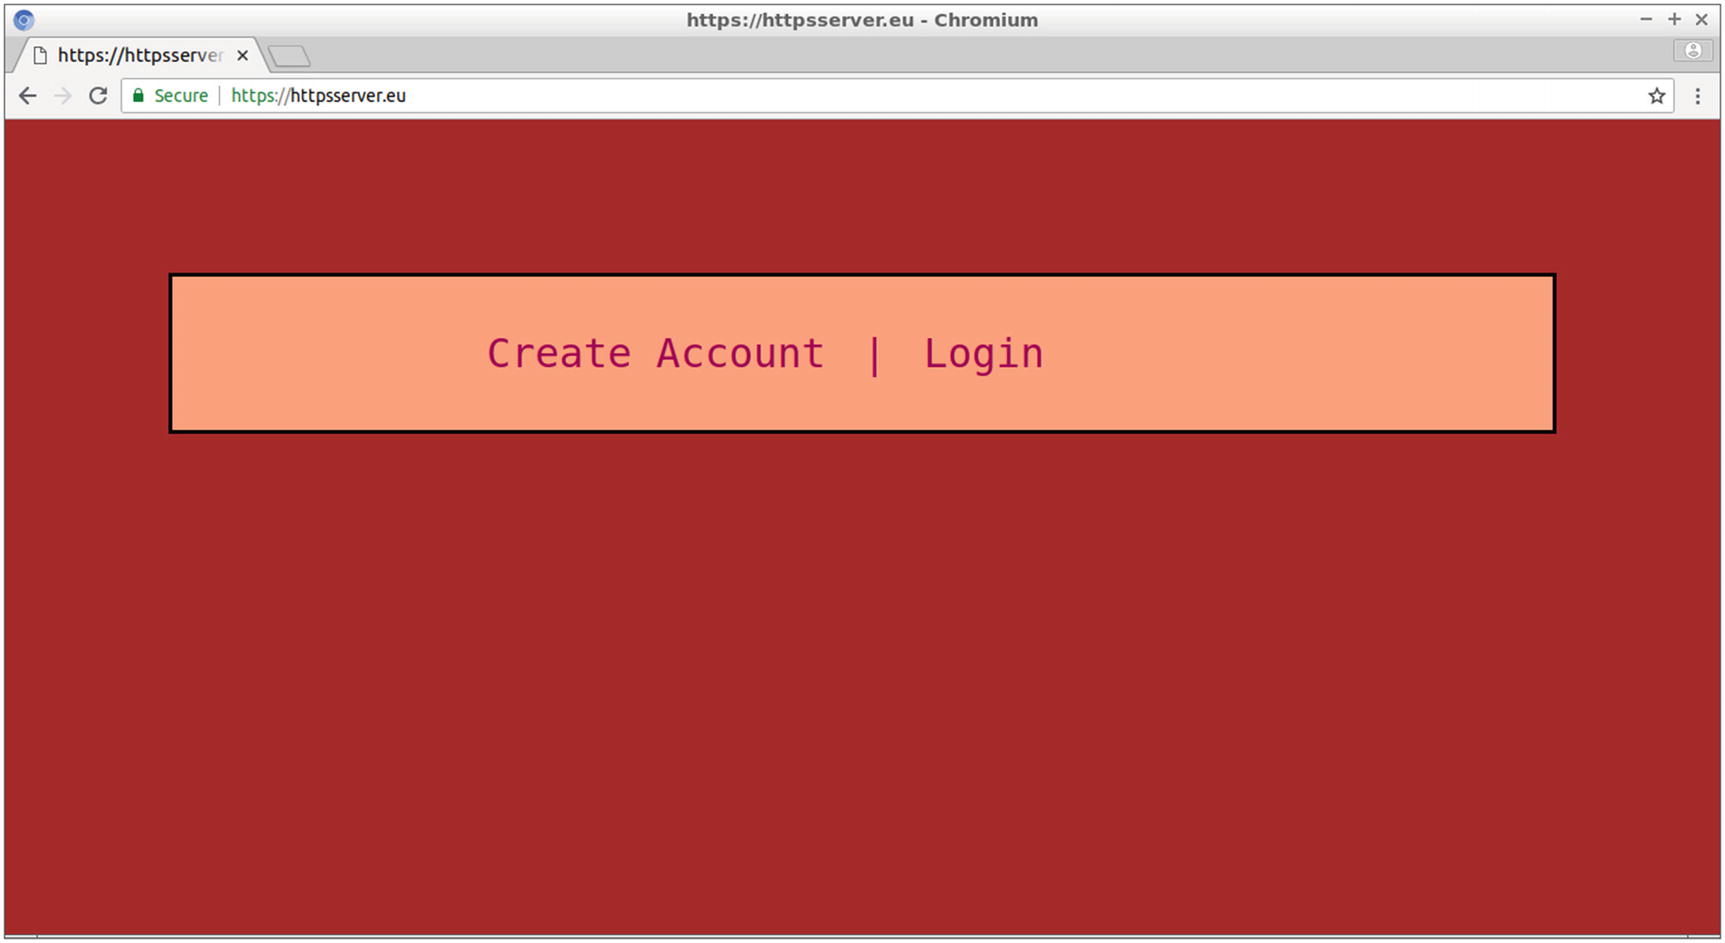
The home web page of the project’s site

Clicking the green padlock allows you to get information about the secure connection
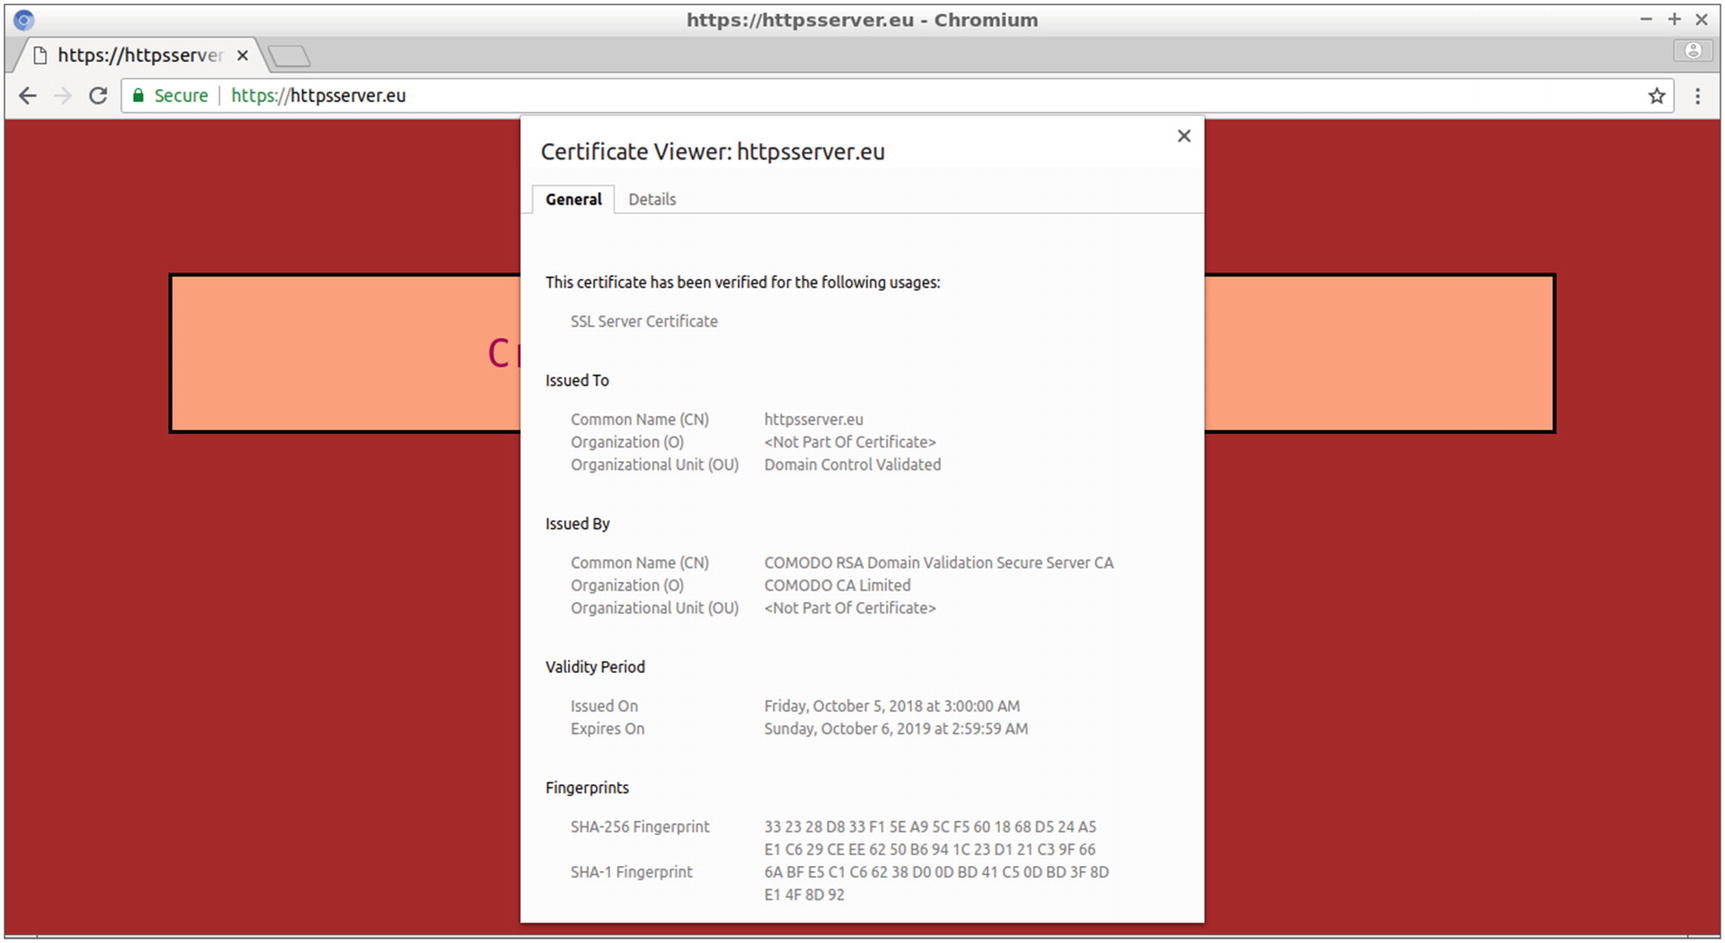
Using the Certificate Viewer in Chromium
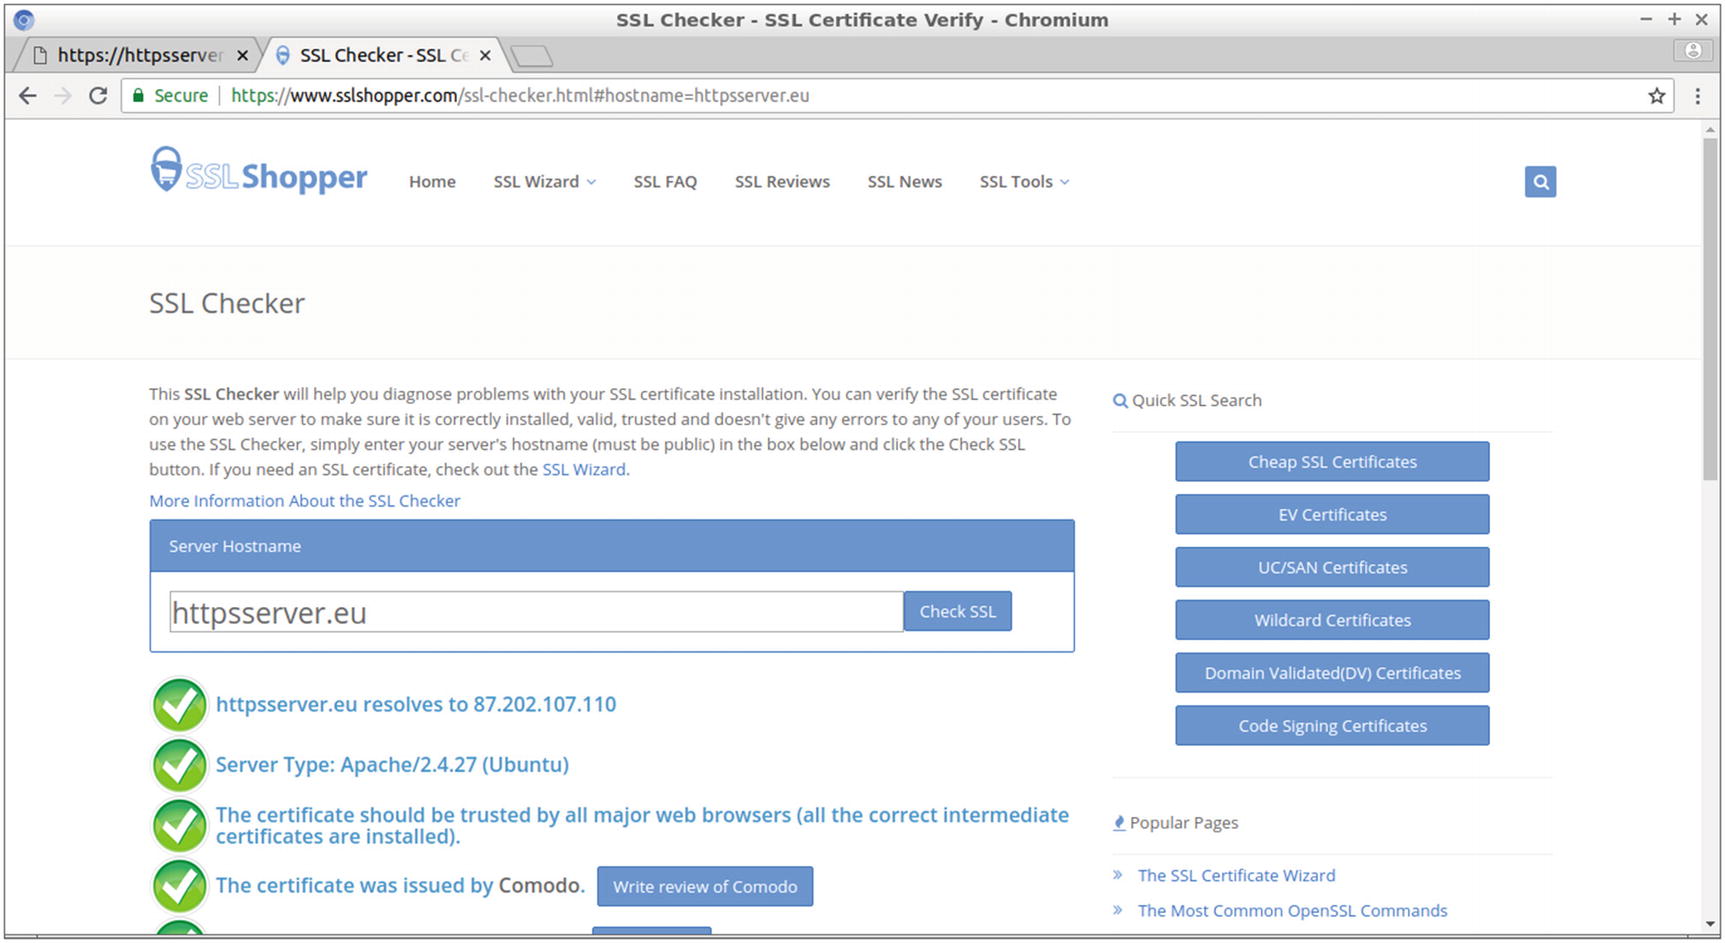
Using an online tool to check your SSL certificate
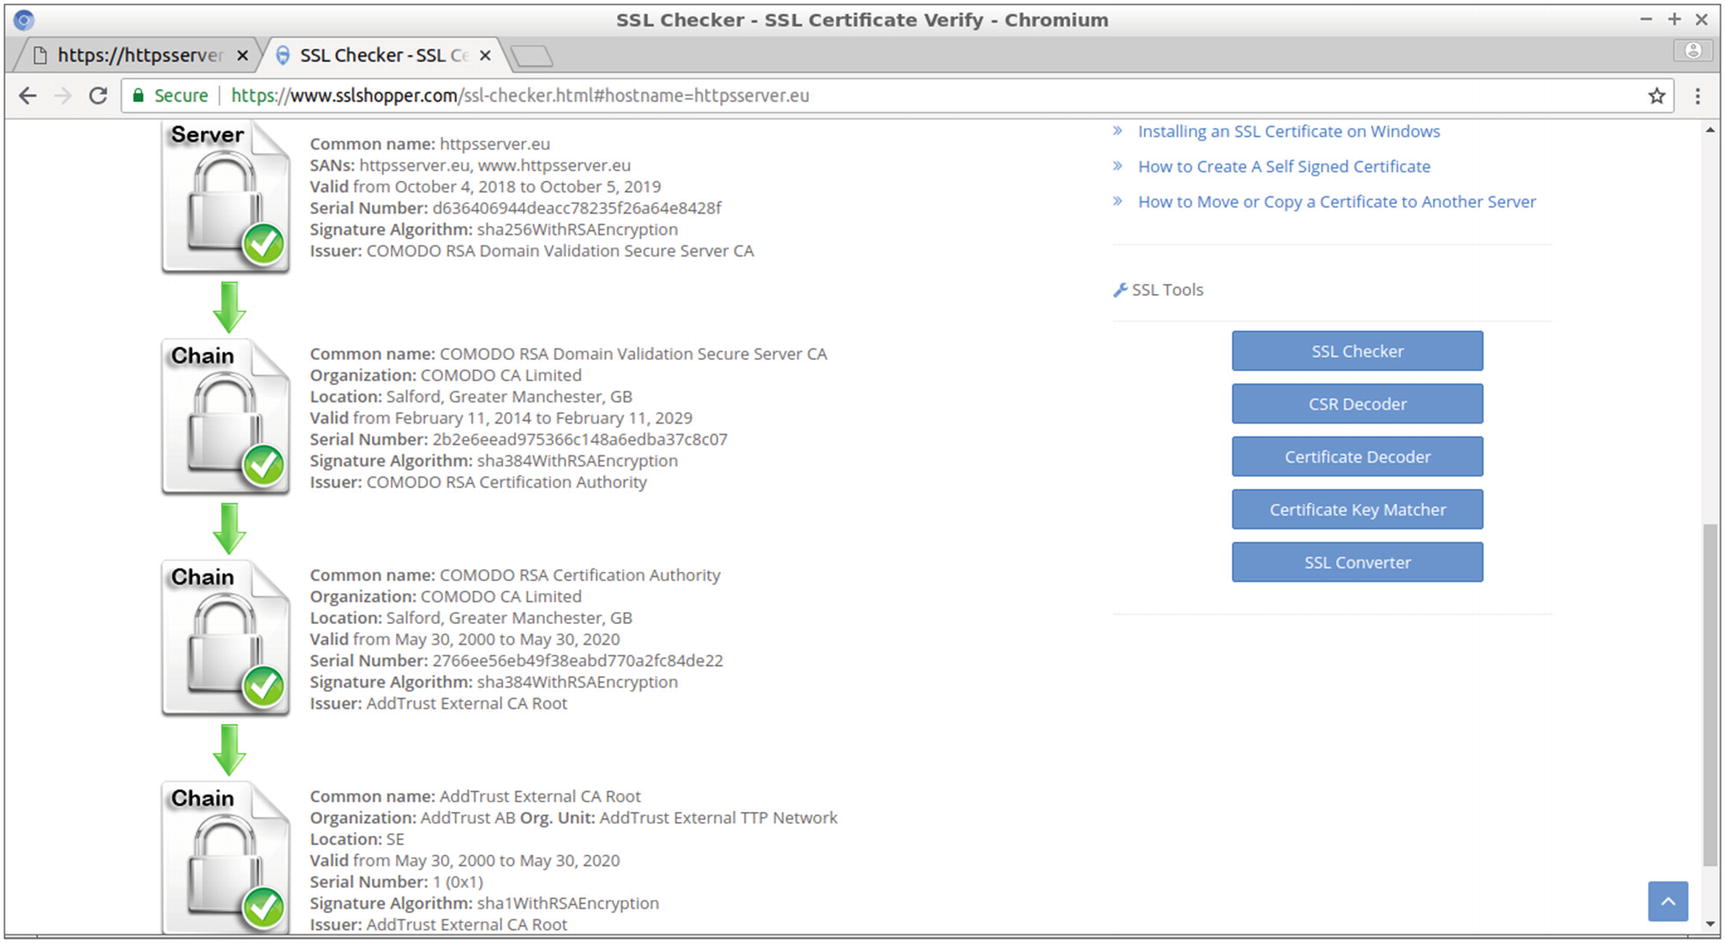
Displaying the chain of trust for your SSL certificate
The chain from your domain name certificate leads, in this example, through two intermediate certificates to the CA root certificate.
You will test your SSL certificate next with the project in the following section.
Project: Securely Logging In to a Site
By enhancing your site with an SSL certificate, obtained from a CA, you can now create a site that securely allows the user to create an account and log in to view some personal information. You do this by implementing a MySQL database that stores all the user accounts. The user can remain connected while browsing the site’s pages until finally logging out. For simplicity, this example will just have one page, but you could expand it to more web pages. By implementing PHP sessions, you’ll allow PHP session variables to be shared between the PHP source code of the site’s web pages. In this project, the session_user variable set by the username when the user logs in successfully is shared among the web pages. In web pages like profile.php, which appears when the user logs in, the session_user value is the ticket to querying a database and displaying user-specific information. This can be extended to other web pages and thus allow the user to access more information while connected.
index.php, the home web page that allows the user to either create an account or connect to the site using this account
account.php, the web page that creates the account
login.php, the web page that logs the user in to the site
profile.php, the web page the user is transferred to after a successful login to view user-specific information
logout.php, the file that uses the PHP code for the logout process, which also transfers the user from profile.php to login.php
Designing the Project’s Site
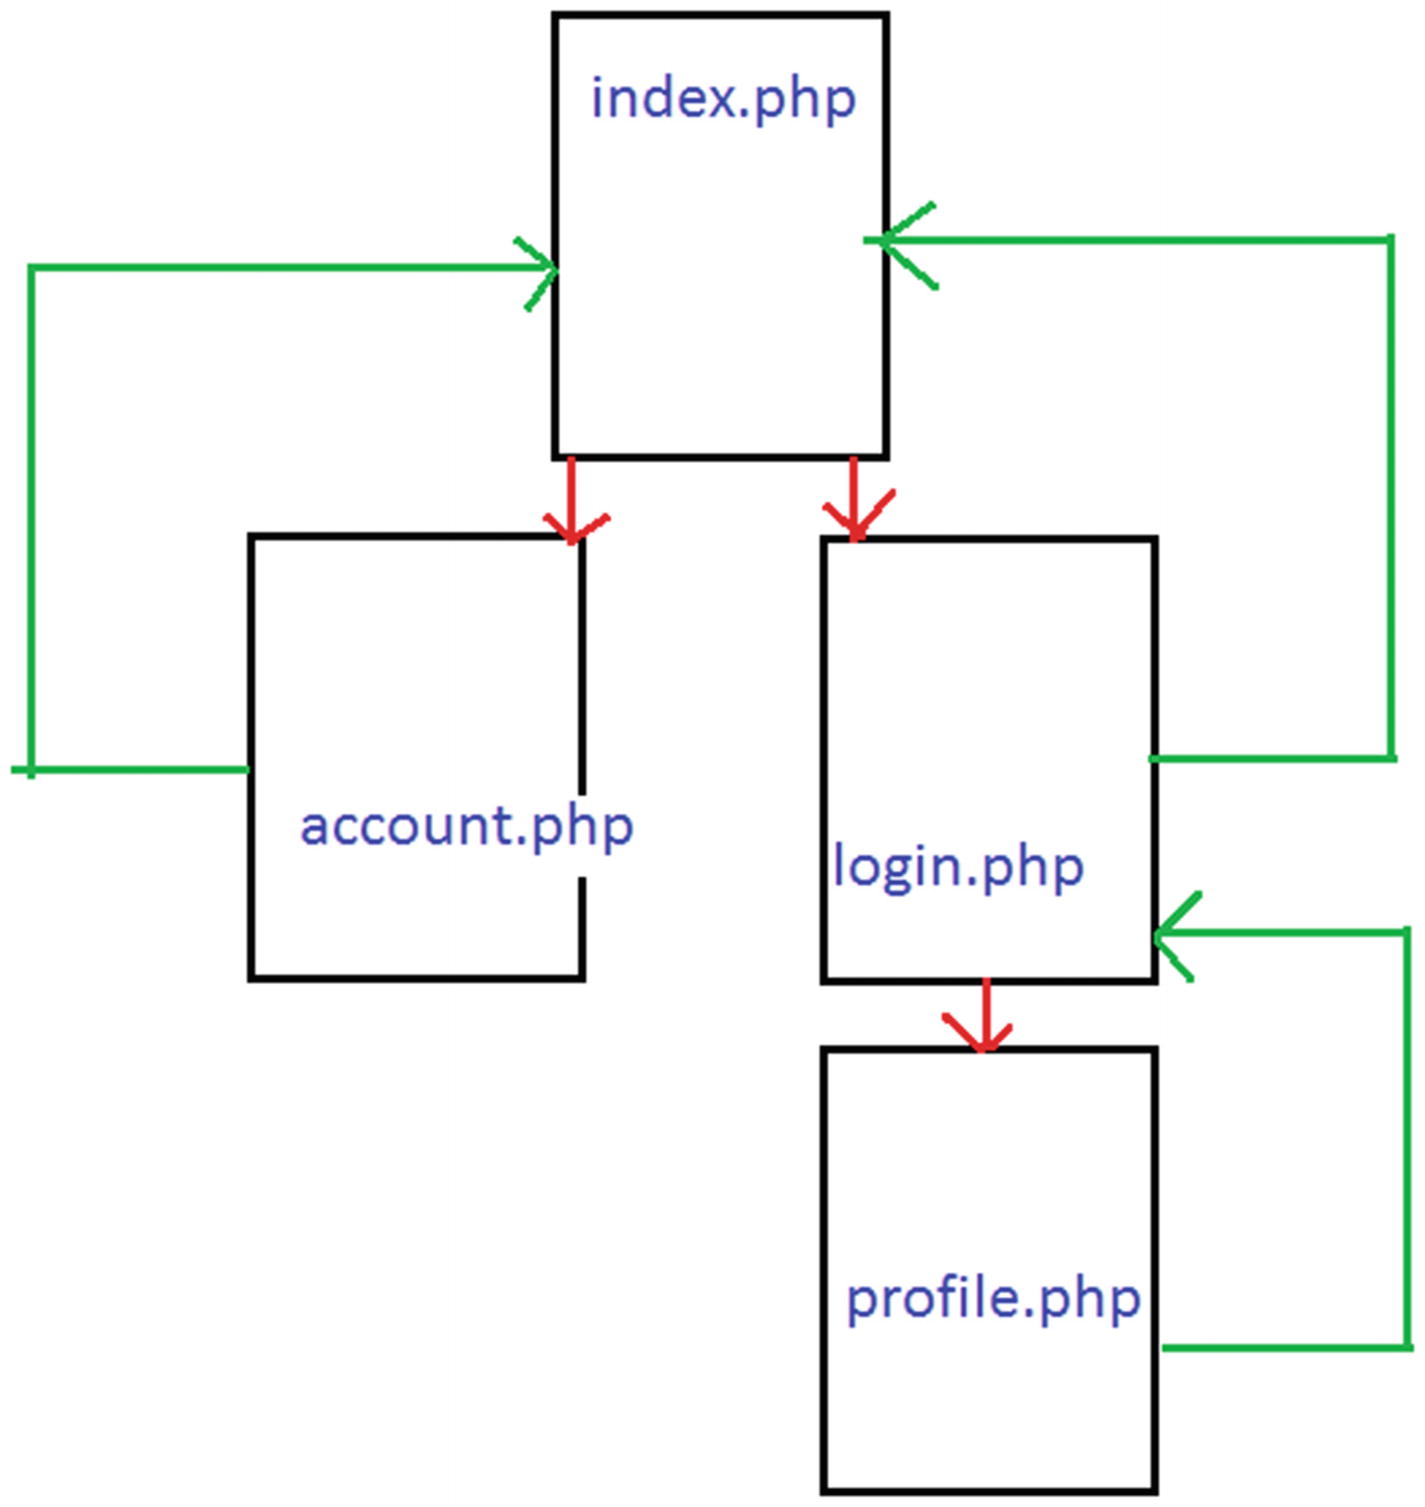
The design of the project’s site
The Source Code for the Home Page of the Site

The home page includes two links for creating user accounts and for user login
Next, you will create two more web pages: account.php and login.php.
The Web Page for Creating the User Account
By following the Create Account link, the user goes from index.php to the account.php page, displayed in Figure 9-13, where the account for the specific web service is created. In this example, the service is about securely logging in to a site, where the user can view some details about the books loaned from a local library.
First
Last name
E-mail address
Username
Password
Password retyped
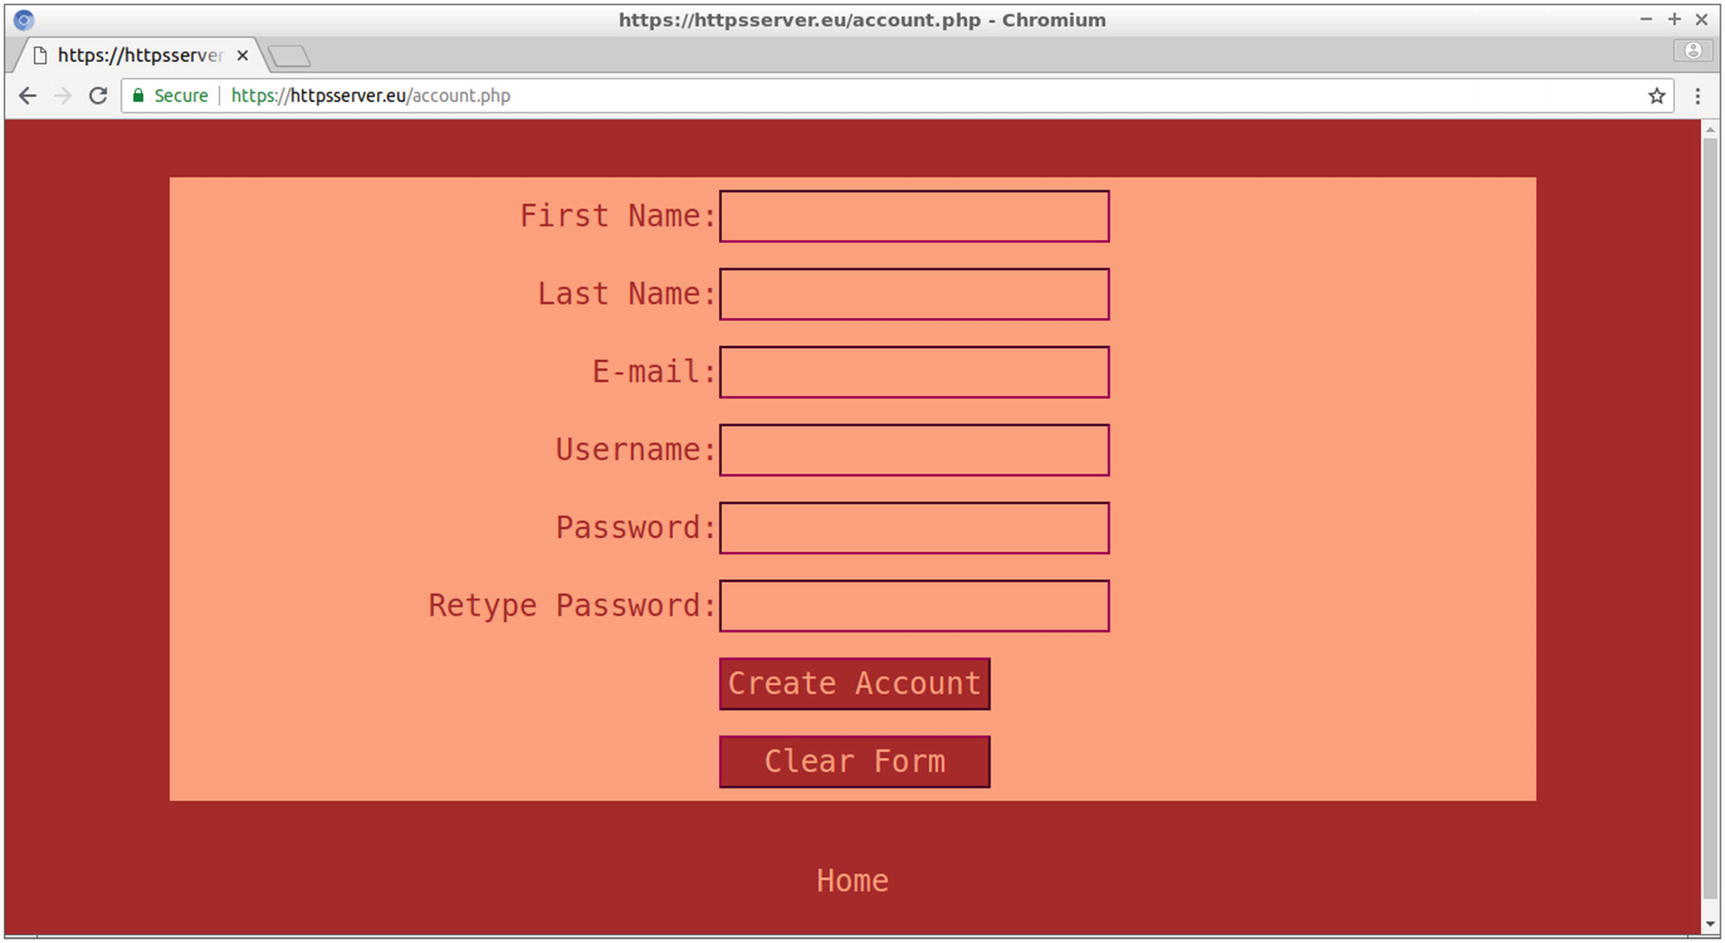
The account.php web page of the site

Error messages are displayed when the form is incomplete or when the password entries are not identical
This if condition checks whether data is submitted by the s1 named button of the form, with the POST method, and therefore whether the $_POST['s1'] PHP global variable is set. Notice that s1 is the name of the form’s submit button. The HTTP request method POST is preferred over method GET to send SSL data, because although the GET data is also encrypted, it may be visible to server logs or the browser’s history. Moreover, GET exposes the data to the URL, so the query string may be visible to anyone standing next to you. Also, GET limits the data sent by applying a maximum data length.
The next lines of the same PHP block assign the variables $first, $last, $email, $user, $pass1, and $pass2 to the corresponding values that the form’s fields send. Two checks are performed with the form validation process. First you ensure that the values sent are not empty and, if all the form data is completed, that the two password fields’ values match. If the checks succeed, the function create_entry() is called with the arguments $first, $last, $email, $user, and $pass1.
All passwords included in the database are therefore hashed to a value with a constant size (e.g., 60 characters when password_hash() is applied with the PASSWORD_DEFAULT argument). Hashed values are theoretically irreversible, which means you can’t obtain the password from the password’s hashed value. What you can do is hash the value of the user’s entry and compare it with the hashed value already stored in the database.
The function mysqli_query() submits the query to the database. If this function returns false, the error with the number 1062 is checked, which indicates a duplicate entry. A duplicate entry for the username is not allowed by the database design, which is discussed in the following section.
In this case, an appropriate message is printed at the top of the window. Also, for other reasons of failure, the corresponding error number is printed.
Creating the Database Used for the Project
In the CREATE TABLE SQL command, the UNIQUE KEY constraint was used for the username column in the user table (displayed with the UNI keyword in the table’s structure) to ensure that there are no two identical usernames. Any attempts to insert a duplicate value is detected in the source code of the function create_entry() in account.php, and an appropriate error message is displayed at the top of the window.
Do not exit mysql yet since the MySQL client connection to the database is required for the next section.
Testing the PHP to MySQL Connection
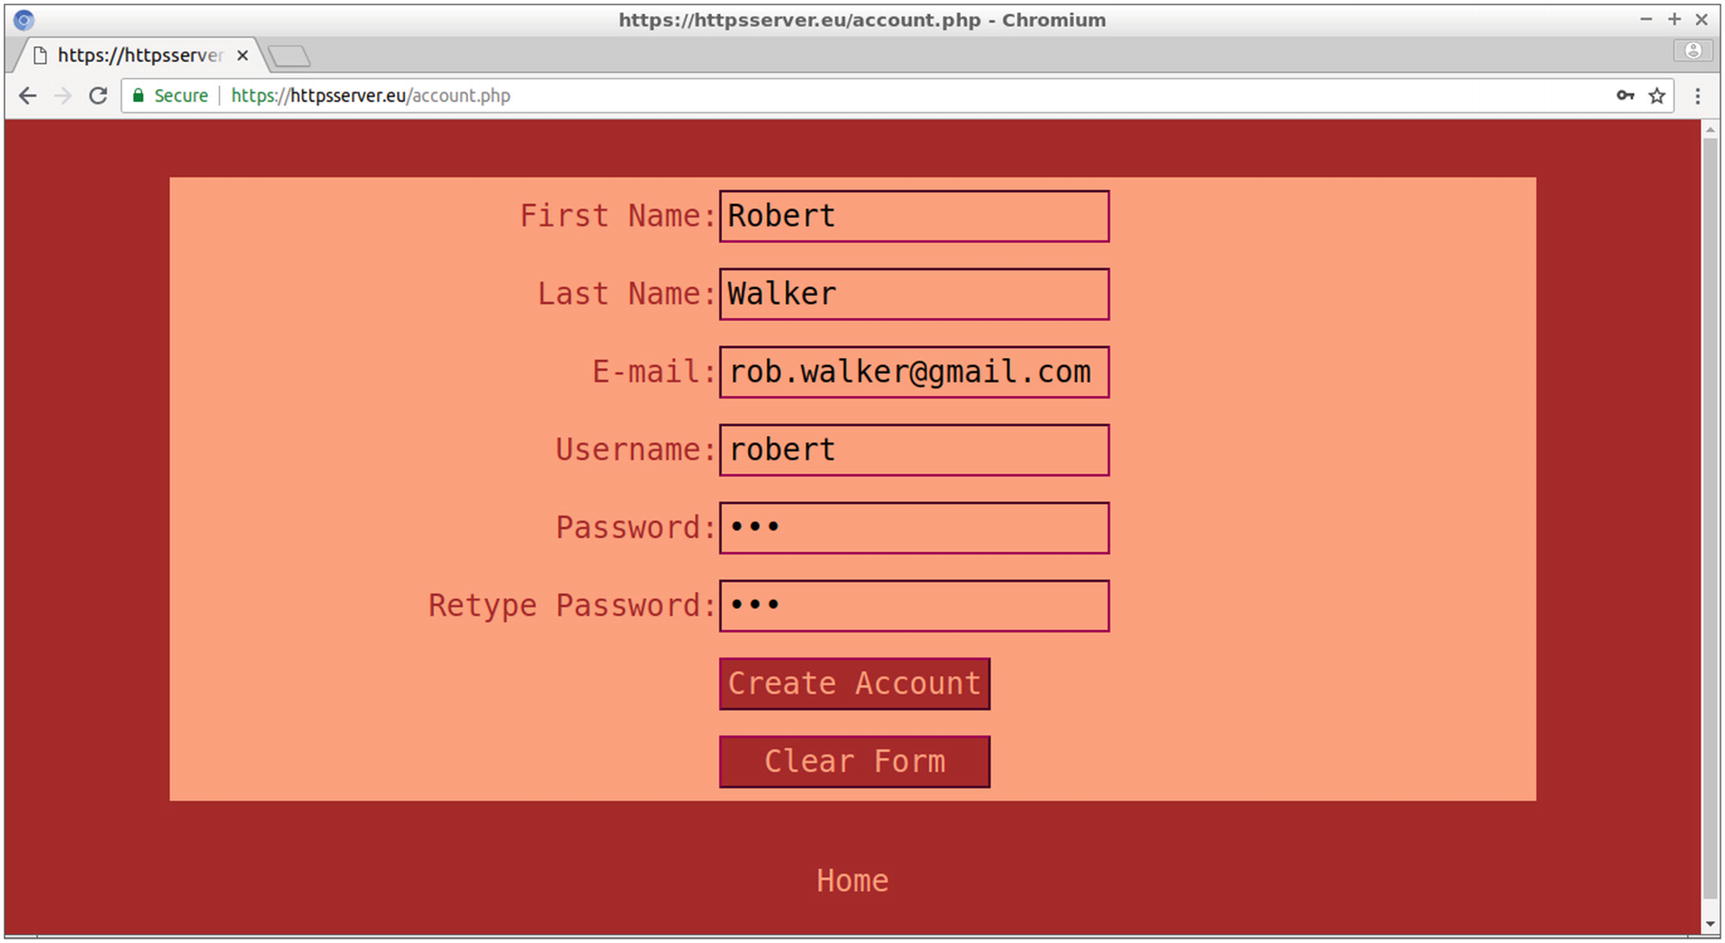
The values entered in the account.php form for user Robert
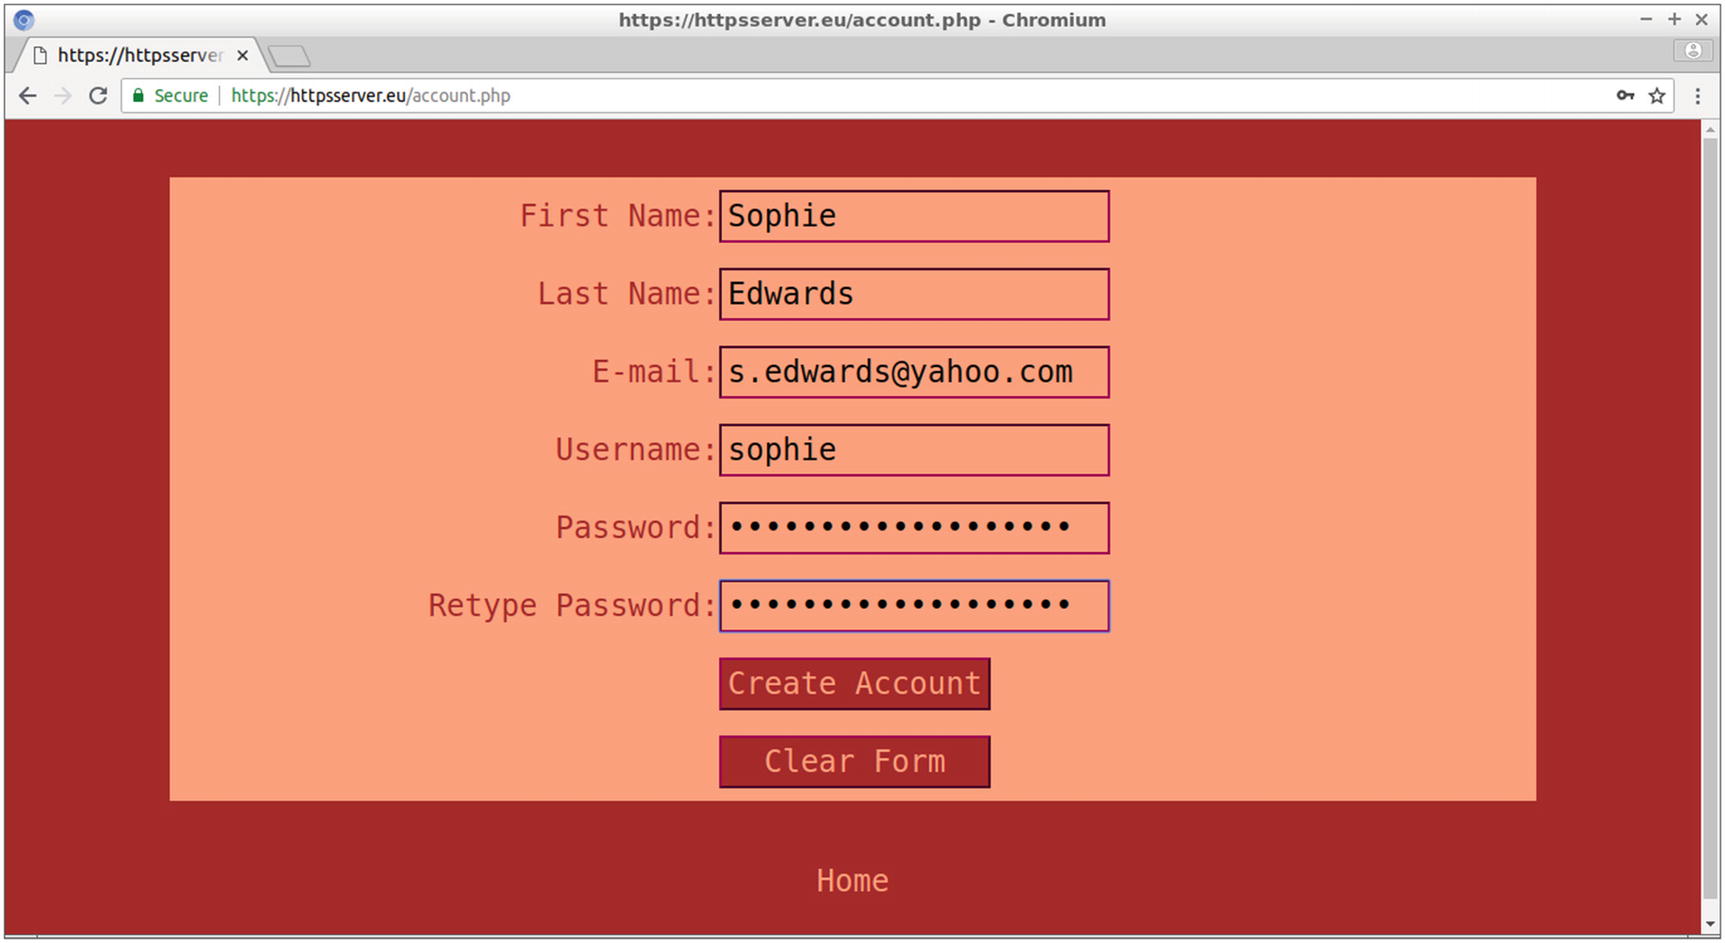
The values entered in the account.php form for user Sophie
$2y$ is the algorithm used, which is the bcrypt algorithm for the PASSWORD_DEFAULT argument of password_hash().
10$ is the algorithm cost.
UWc3eeIjxFlbFj75muUiF. is the salt.
wweL2VSpk7b7ytsApi5rBGQtGLLCLda is the hashed password.
Password hashing is a nice solution for maintaining password security even when the database is compromised. The one-way hashing applied by password_hash() leads to a result that cannot be reversed from the original password. Since the hashed password, and not the original one, is stored in the database, to verify the password of the user who log ins to the site, the entered password has to be hashed and then compared with the stored password.
The hashing procedure is enforced by using a salt. Applying a common hash algorithm to a password always leads to the same result for the given password. This might be proved insecure, since an attacker might try a number of passwords, hashed with the same algorithm until he succeeds. A collection of hashed passwords used for the attack is called a rainbow table . By attaching a salt to the password, which is a random string either generated by the hashing method or provided by the user, the hashing outcome will be different even when the same password is hashed twice. When comparing the stored password with the password entered by the visitor of the site, the latter is hashed with the salt stored in the hashed password of the database.
Before testing the user login functionality of the site, you need to create a second table for the login database with details about the books loaned by the users. Then on login, the personal information will be available for each user at the web page that the login connection leads to.
In the previous commands, the MySQL function NOW() returns the current date and time as a YYYY-MM-DD string.
Therefore, the user with an id value of 1 (user robert) is billed with two books so far. In the next section, this information will be available to Robert, and the information that no books are loaned will be also available to Sophie.
The Source Code of the Login Web Page

The login.php web page allows the user to log in to the site
Before $user is passed to the SQL query, mysqli_real_escape_string() applies to this variable to escape some characters, that is, to prepend a backslash before any special character, taking into account the character set of the current database connection, which appears as the first parameter of mysqli_real_escape_string(). The function mysqli_real_escape_string() is used for security reasons and especially for avoiding SQL injections, that is, executing commands hidden in the SQL query.
As mentioned in the previous section, $pass is the plaintext password (e.g., 123), while $dbstored_pass is the hashed password. The function password_verify() compares the entered password with the stored one after it hashes the former using the salt stored along with the latter.
If the two passwords match, the value of $user is assigned to the PHP session variable session_user. At this point, more session variables could be used if required. Therefore, the username will be available to all other web pages of the site while the user is connected, and its unique value will be the key, which is where all information about the user will be derived from. The session variable, available for all web pages of the site that join the session, is stored on the server side, and the user cannot have any access to it and cannot substitute it with another user’s.
The Source Code for the User Profile Page
In the top-right area of the web page, the message “You are currently logged in as user” appears followed by the username of the logged-in user, provided by the $user value. Next to the name, a Logout link appears. (I’ll discuss later in this section how this link works.)
Under the heading “Books Loaned” is a list with the book ISBNs that correspond to the book_id column of the book_loan table and also the date loaned that corresponds to the loan_date column of the same table. If the user has not currently loaned any books, as in the example with the user Sophie, the message “No results found” appears instead.
This time, data from two tables is required, and an inner join between the two tables is formed. With the inner join, a new result table is created that selects only the rows from the two tables that match the join condition. In the previous SQL command, the join condition is equality among the primary key of table user and the foreign key of table book_loan. This type of join based on equality is often referred as equijoin , and this is often used to denormalize data. The term normalizing refers to the process of storing data in different tables. With the denormalizing process, data from different tables can be retrieved.
With the previous SQL command, the book_id and loan_date columns from the book_loan table are selected for the matching columns of user_id (of table book_loan) and id (of table user) from the rows where the username column (of table user) is the value of $user (e.g., robert). The query depends therefore on the PHP session variable session_user, whose value is assigned to the PHP variable $user.
The user-specific data is thus displayed. In the following section, you’ll create the web page that logs the user out.
Allowing the User to Log Out
On profile.php, the PHP session is maintained, and the session variable session_user indicates the user who logged in and provides information specific to this user. Other web pages of the site could also be used to access the session_user variable and allow the user to stay connected and view user-specific data while visiting the site.
The previous PHP source code snippet uses the function session_start() to join the current session and then deletes the cookie from the user’s browser by setting the expiration time to a value in the past. By setting the expiration time to 100, you indicate value 100 as a Unix timestamp, which corresponds to the number of seconds after the Unix epoch, which is January 1, 1970 00:00:00 UTC. The session variable session_user is destroyed with the function unset(), and the PHP session is terminated by calling the function session_destroy(). With the header() function , the web page redirects to login.php.
Testing the User Connection to the Site
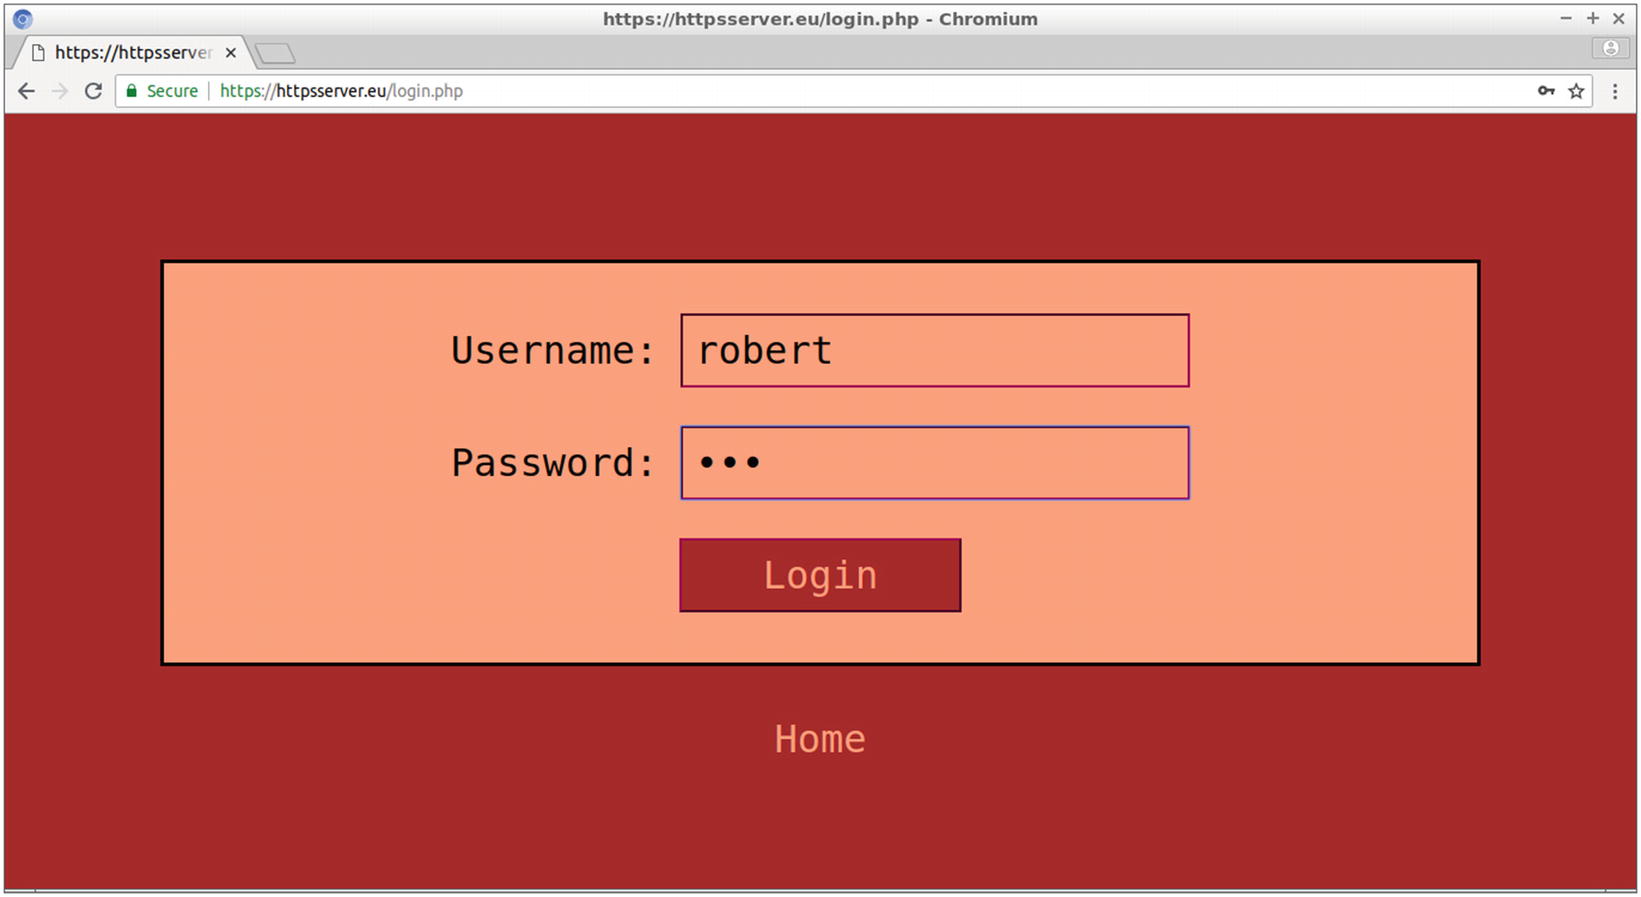
Testing the site by connecting as Robert
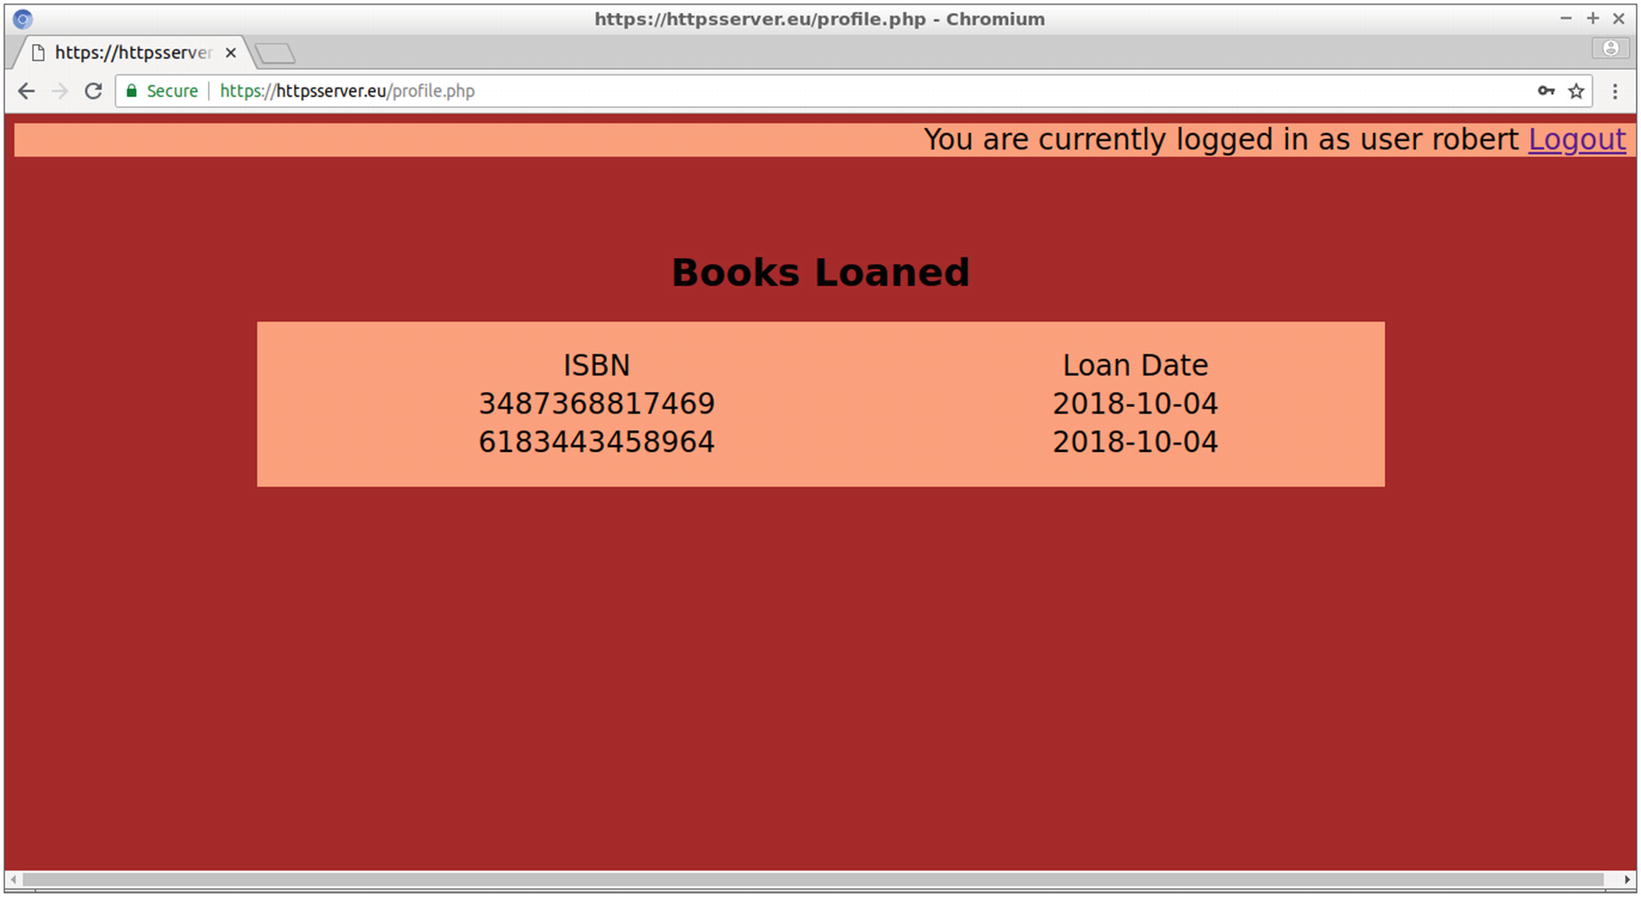
The profile web page for Robert, displaying the ISBN and loan date of loaned books
For books currently loaned to user Robert, the ISBN and loan date appear.
The Logout link leads to logout.php, where its evaluated PHP source code logs out the user by terminating the current session. The user then gets transferred back to the login.php web page.
Improving the profile.php Web Page
l, a full textual representation of the day of the week
j, the day of the month without leading zeros
F, a full textual representation of a month
Y, a full numeric representation of a year

The new version of profile.php includes a Due Date column
Summary
In this chapter, you obtained an SSL certificate from a certificate authority to enable your site to implement cryptography without getting any browser warnings, just like well-known commercial sites.
You also created a project that allows the users to log in and remain connected to your site until they log out. While connected, they can view user-specific data provided by the site.
The most common ways to exchange data between the client-side JavaScript and server-side PHP language are discussed in the next chapter.