In this chapter, you’ll create a site that provides a form for the user to submit keywords to the web server, query a database, and view the results. The results page will list hyperlinks that lead to web pages related to the keywords entered.
To do this, you will utilize the PHP language to make the connection to the MySQL server via the MySQL-PHP interface routines.
Instead of having the query results appear on a single page, you’ll implement pagination to group the results on separate web pages, with images (buttons) used to switch back or forth from one web page to another.
Also, you’ll implement an automated procedure, based on the cron daemon, that executes scheduled commands to update the MySQL database with the contents of the web pages included in the site.
Search-Enabled Site Overview
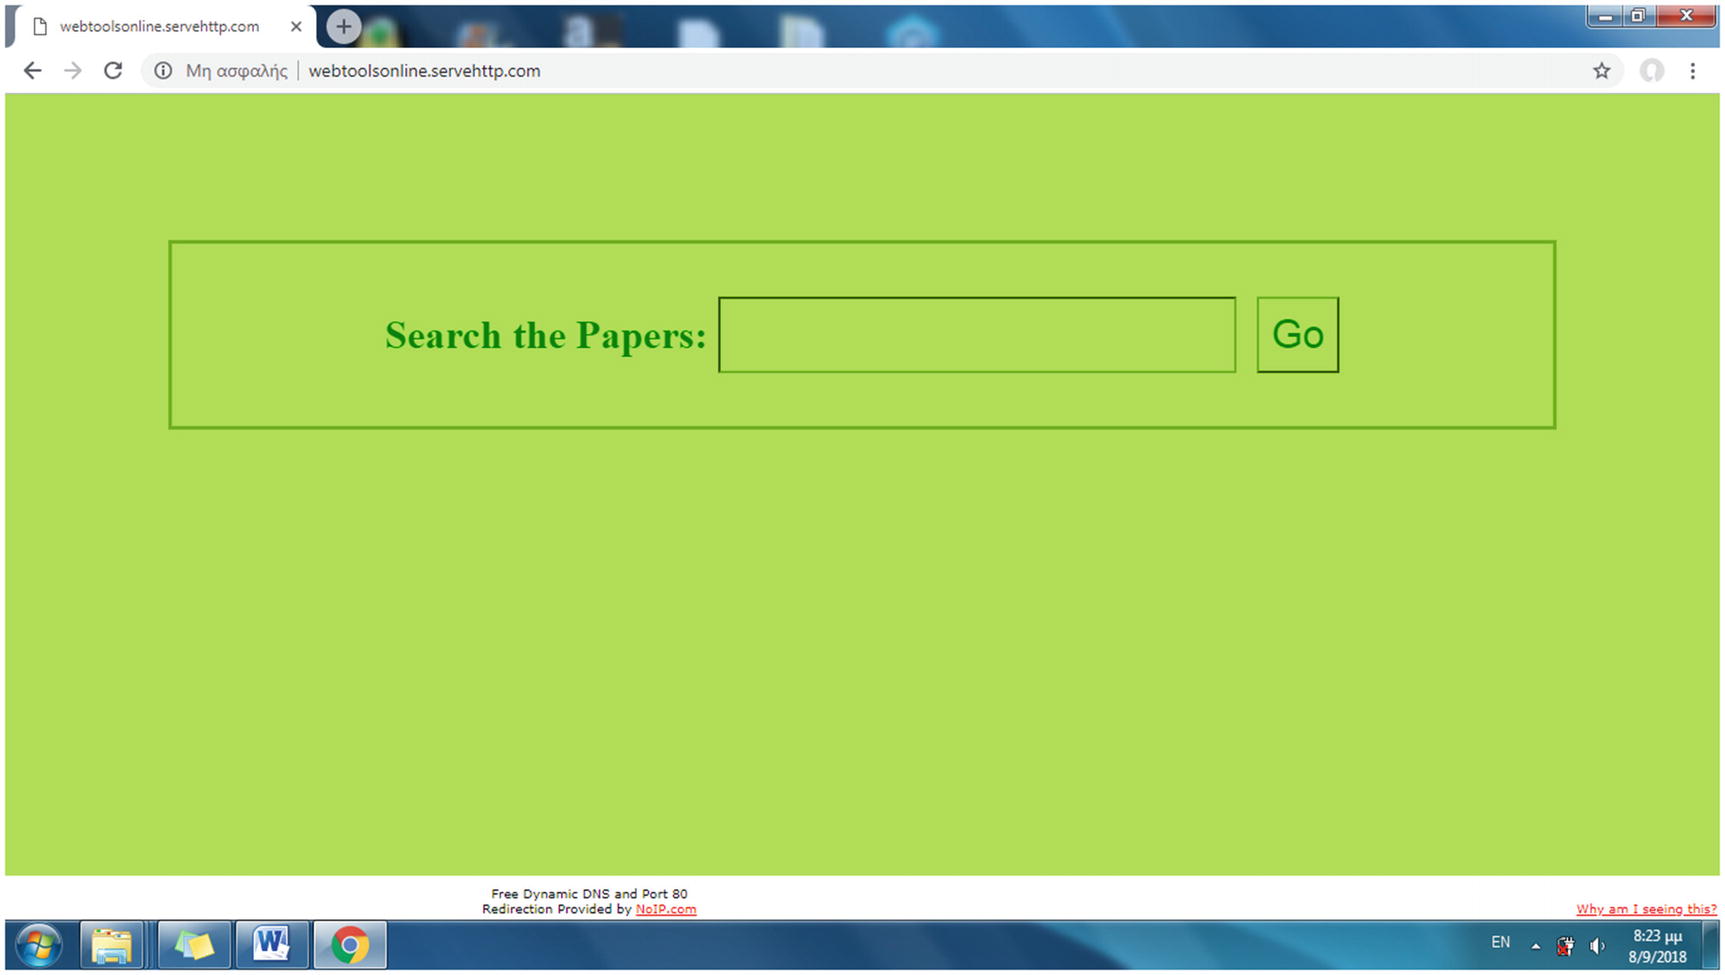
As discussed, in this project you’ll create a search-enabled site. Allowing a user to perform queries remotely in a web environment is a feature commonly found on e-commerce sites, search engines, wikis, and online academic databases. You will create next a site that provides similar services as the rfc-editor.org site and also you can borrow RFCs for your site’s content. Requests for Comments (RFCs) are the content offered from this site that the user will query. (RFCs are papers describing Internet protocols and technologies.)
The following is the URL to search RFCs at rfc-editor.org:
https://www.rfc-editor.org/search/rfc_search.php
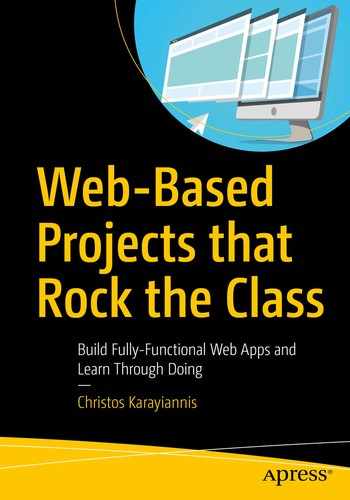
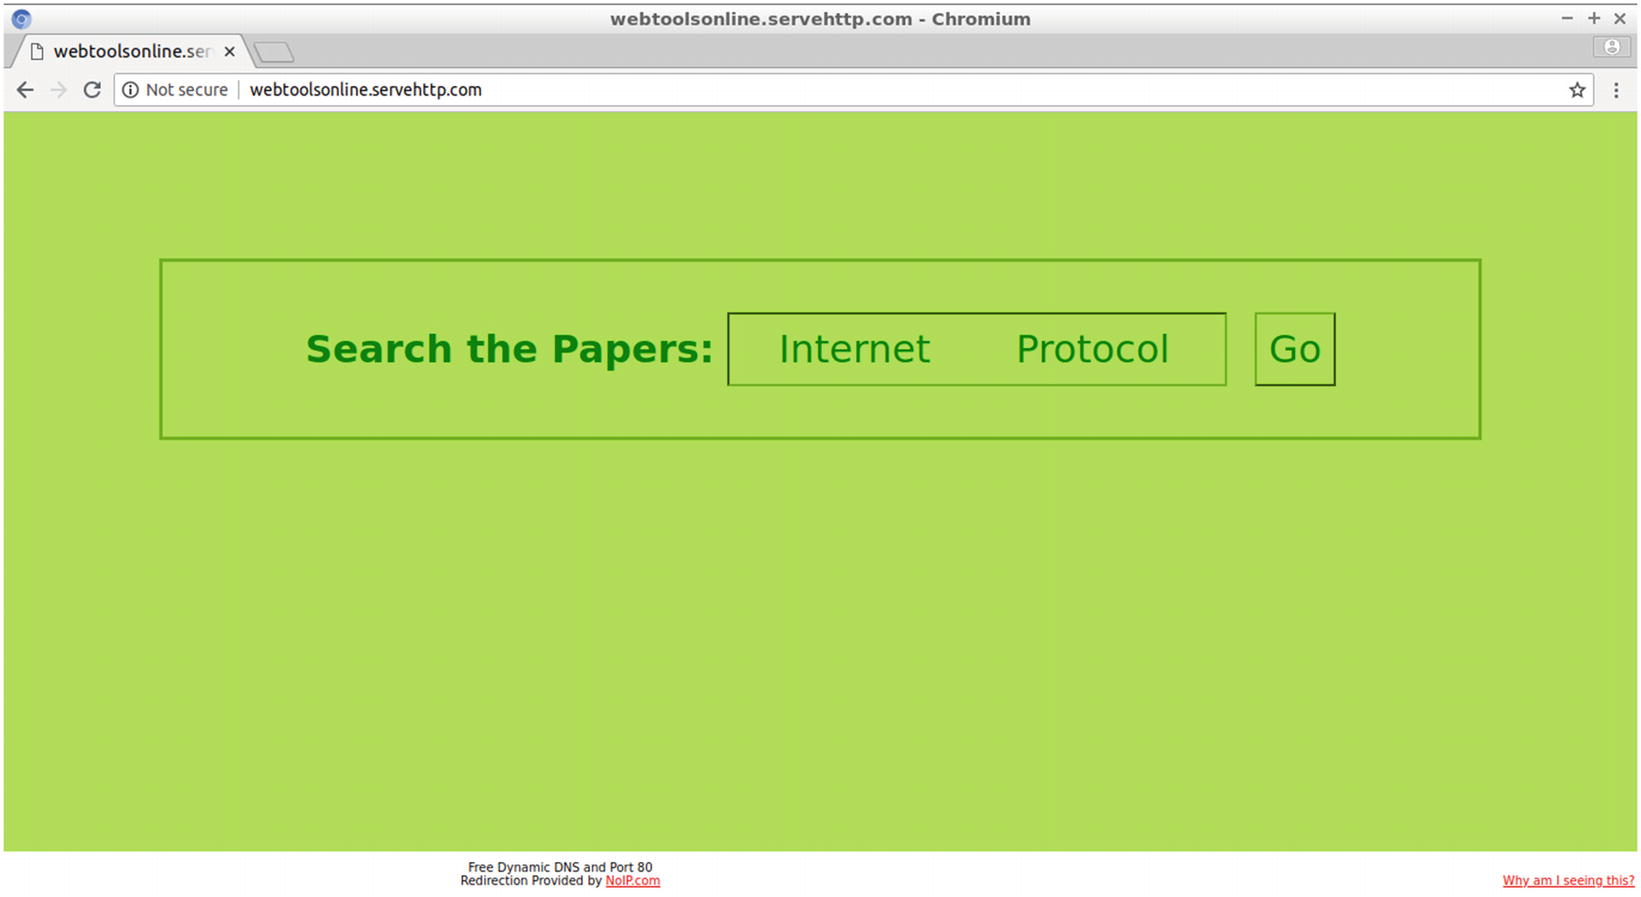
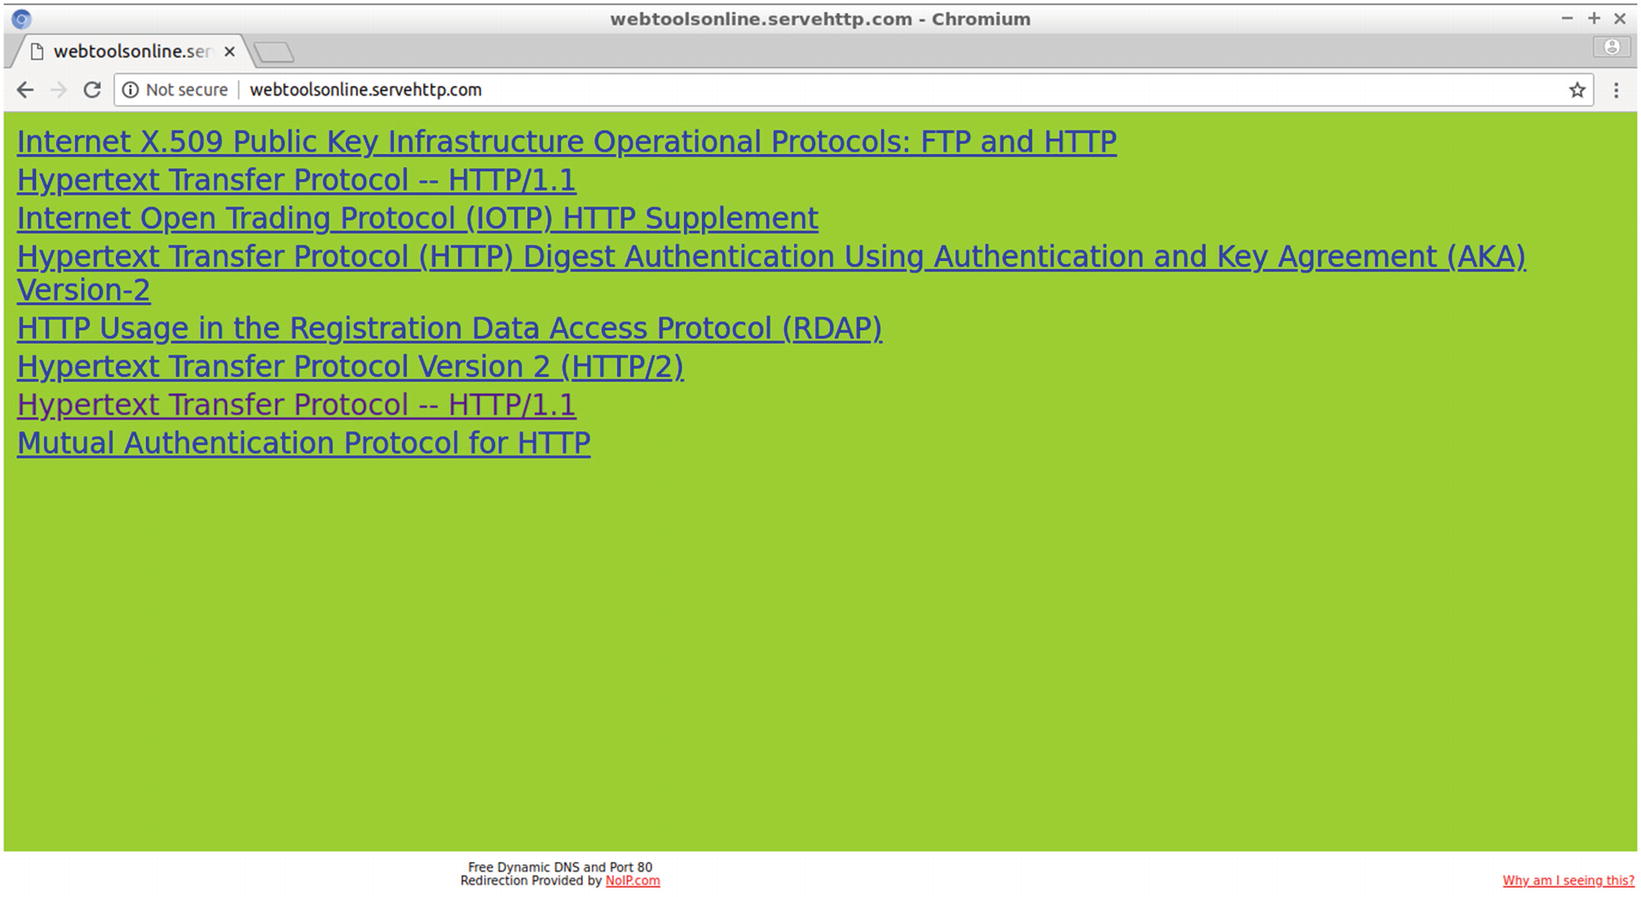
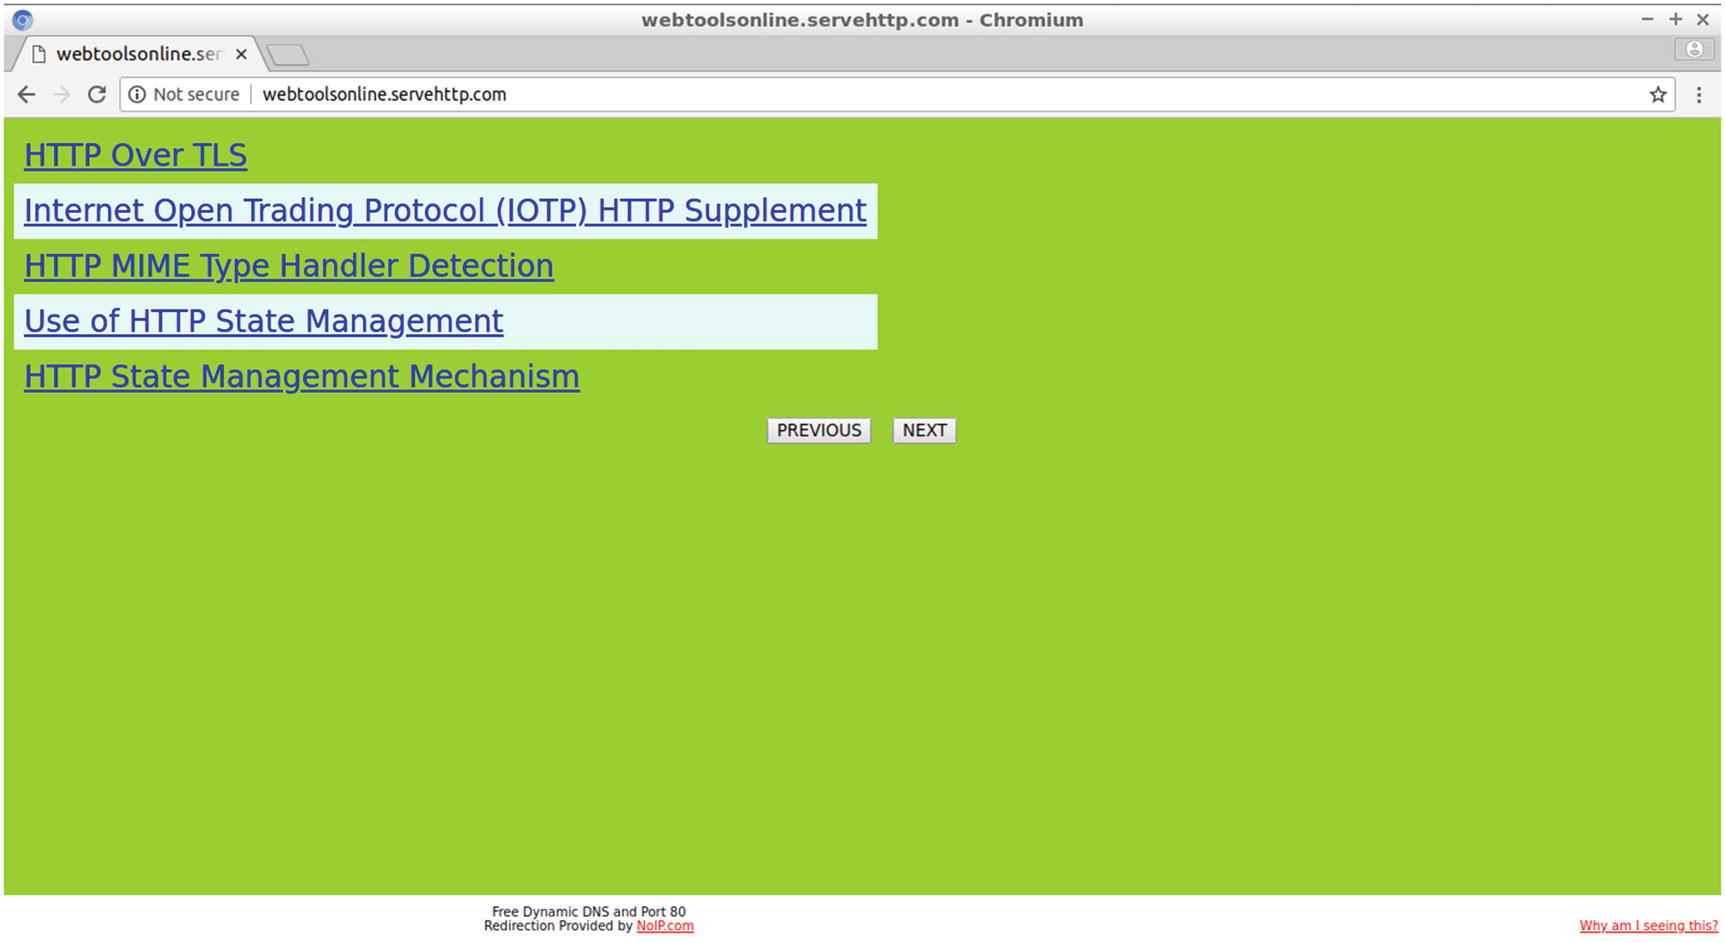
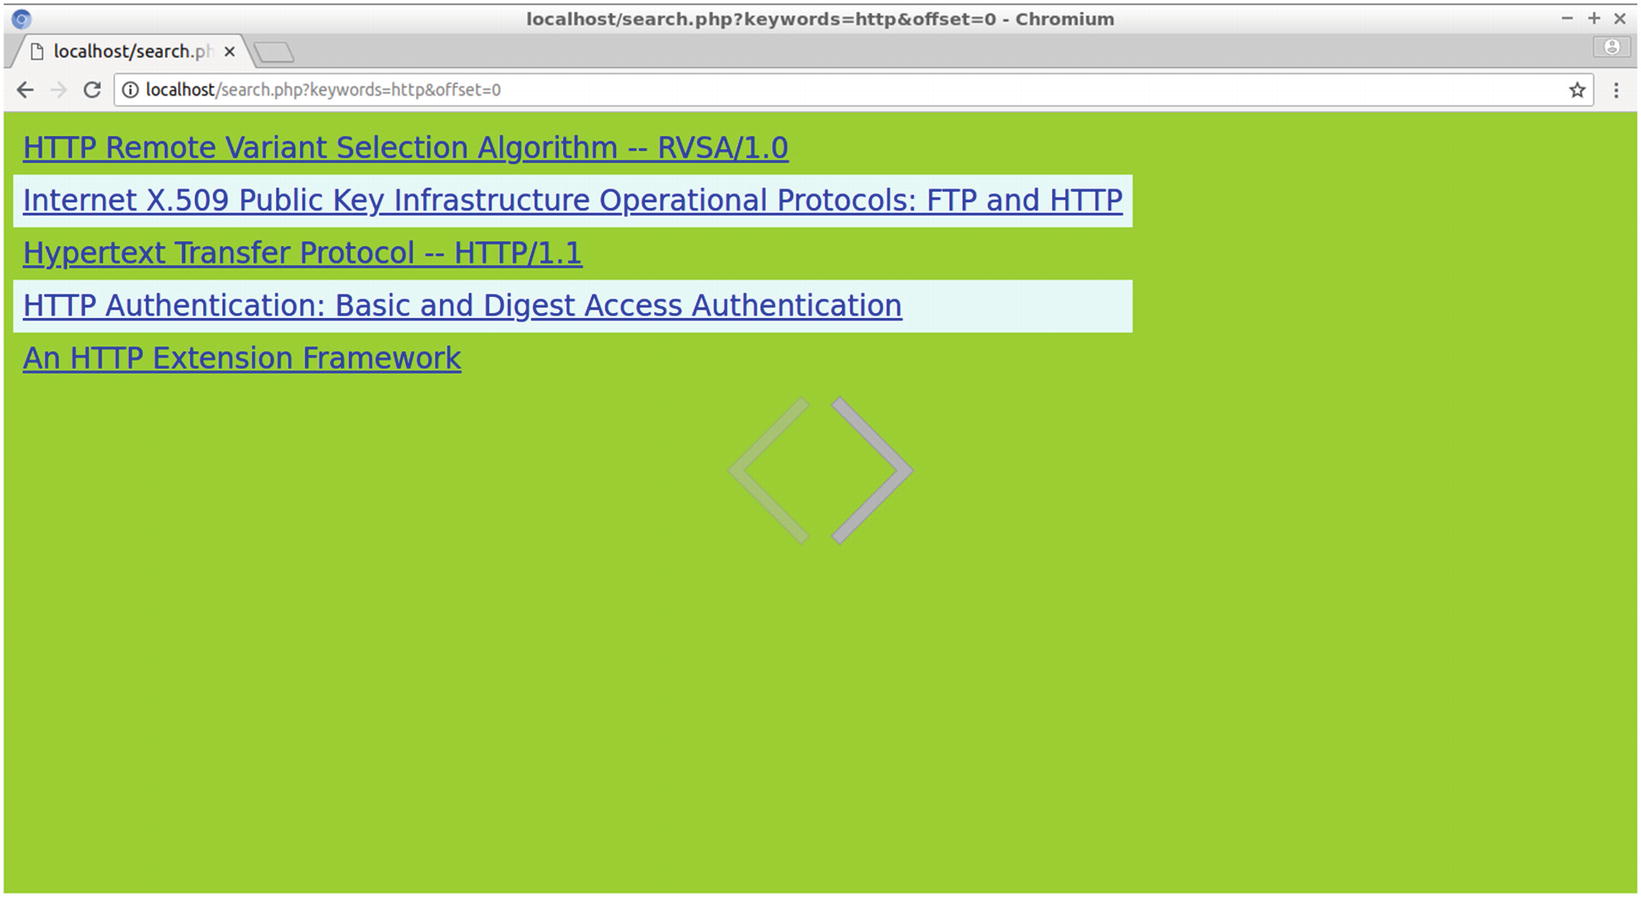
Figure 7-1 displays results for using the HTTP keyword in the RFC Editor. The results are links that lead to the corresponding RFCs. Pagination is also implemented to group them into 25 results per web page.
Figure 7-1
Querying the RFC Editor for HTTP
Figure 7-2 displays the home page of the project’s site.
Figure 7-2
The home page of the project’s site
As displayed in Figure 7-3, the results appear as links to RFCs, and pagination is used to show five results per page.
Figure 7-3
The results of querying the project’s site for HTTP
Designing the Project
The site you’ll implement requires a number of web pages that will be the content that the site offers; these pages are placed in a separate directory called info in this example. A Bash shell script running in regular intervals from cron will update a database with all the web page files currently included in the directory info. The title included in each “content” web page is what the user will remotely query in the database. The query will be issued from the home page where the user will enter keywords in an HTML form. A PHP program, after receiving the keywords, will connect to and query the database and return the results as links, with the title as the link text and the relative URL of the content web page file as the link’s URL.
Creating the First Web Content Samples
You can place this project’s content web pages in the new directory in the document root so that they are isolated from the directory index that provides the form and the action PHP program that processes the keywords. In this way, only the content web pages will be automatically inserted into the database. To create a new directory named info, enter the following command at the Linux terminal:
$ sudo mkdir /var/www/html/info
To create the first web page of this site, continue with the following commands:
$ cd info
$ sudo gedit page1.html
Enter the following HTML source code:
<!DOCTYPE html>
<html>
<head>
<title></title>
</head>
<body>
<h1>Hypertext Markup Language - 2.0</h1>
</body>
</html>
This is an empty web page that includes a heading (<h1>) that is the RFC’s title. The heading size here must be the same that the Bash shell will use for locating the title of each content web page. You can borrow the titles from the previous RFC Editor search. You can also enter some content in the body section of your page, which for simplicity is empty here other than the heading. What is required for this project is to create a large number of similar web pages with different titles to display how pagination is implemented. For the moment, just create a second content web page by using the following at the Linux terminal:
$ sudo cp page1.html page2.html
$ sudo gedit page2.html
In the gedit window, change the title to another one from the RFC Editor and save the file. Use, for instance, the title Form-based File Upload in HTML in the h1 element.
<!DOCTYPE html>
<html>
<head>
<title></title>
</head>
<body>
<h1>Form-based File Upload in HTML</h1>
</body>
</html>
You can continue this process to create lots of web pages for the site. The aim is to have many pages so that you can have a lot of query results.
Creating and Updating the Project’s Database
Next, you will create the database that includes all the titles of the content web pages placed in the info directory. As described in the following section, the database update will be an automated process.
To create info, the database used in this project, and also content, the table included in the info database, connect to the MySQL server with mysql, the MySQL client, using the following command:
$ mysql –u root
At the mysql> prompt that appears, create the info database.
mysql> create database info;
The MySQL server responds with an OK command.
Query OK, 1 row affected (0.00 sec)
The database is included with the other databases of the MySQL server. You can view this with the following command:
mysql> show databases;
The MySQL server responds with the following table, with the names of all the databases included so far:
+--------------------+
| Database |
+--------------------+
| information_schema |
| apress |
| info |
| library |
| mysql |
| performance_schema |
| sys |
+--------------------+
7 rows in set (0.00 sec)
You can locate database info and database apress, used in the previous chapter, as well as all the preexisting MySQL databases. Select info as the database that the commands entered from this point on will target.
mysql> use info;
The MySQL server responds with the following message:
Database changed
Create a table called content. This table will include two columns: url, which is a varchar up to 255 characters, and title, which also is type varchar. The url column will store the root-relative URL path of a specific web page. For instance, the URL for page1.html will be /info/page1.html, where the first slash is the document root. The column url is a nice candidate for a primary key because it includes unique values; no files are allowed by the operating system to have the same name in the same directory. The title column corresponds to the title of the web page, included in the <h1> tags. For instance, for page1.html, the title is Hypertext Markup Language - 2.0. To create the table content, use the create table SQL statement.
mysql> create table content (url varchar(255), primary key(url), title varchar(255));
The MySQL server responds with an OK message.
Query OK, 0 rows affected (0.40 sec)
You don’t have to manually enter any records because, as explained previously, this will be an automated process. Exit the MySQL client using the following command:
mysql> exit
MySQL responds with a good-bye message.
Bye
Writing the Shell Script That Updates the Database
Who will be responsible for updating the database so that each time a new web page is added to the site its title is included in the database? For this, many approaches can be used. For instance, it could be the responsibility of the person who places a new web page in the info directory to open MySQL and use an insert into command to store the title of the new page in the database. This sounds like it creates a little overhead, and if a person forgets to do this every time they add a page, the system will lose its reliability. Another approach is to create a shell script that hides the overhead from the administrator; however, forgetting to run the script would result in the same problem of unreliability. Another solution would be to automate the process and have the script run at regular intervals to update the database. Because this approach doesn’t require anyone to intervene, it is less error prone.
To create db.sh, the Bash shell script that updates the database, change the working directory to your home directory, e.g., /home/christos/, with the following command:
$ cd ~
Use a text editor like gedit to create a file called db.sh.
$ gedit db.sh
In the new window that appears, enter the following lines of Bash code and save the file:
#!/bin/bash
FILES=/var/www/html/info/*
db="info";
table="content";
sqlstring="truncate table $table;";
mysql --user="root" --database="$db" -e "$sqlstring";
for file in $FILES
do
title=`grep -o '<h1>.*</h1>' $file | sed 's/(<h1>|</h1>)//g'`;
filename=$(basename "$file");
path="/info/";
url=$path$filename;
records="url, title";
my_values="'$url', '$title'";
sqlstring="insert into $table ($records) values($my_values);";
mysql --user="root" --database="$db" -e "$sqlstring";
done
The first line is a directive stating that the Bash language will be used for this script. Next comes a number of variable definitions. For instance, FILES means all (*) files found in /var/www/html/info. The variable db is assigned to info, which is the name of the database in this example. Also, table, the variable that holds the name of the database’s tables, is assigned to the value content. The variable sqlstring temporarily holds the value:
"truncate table $table;"
That evaluates to the following string:
"truncate table content;"
One approach for the script is to enter only the titles of the HTML files that are not already included in the table. However, if the title of a specific file changes, the database will still include the previous one. The other approach is to delete all the database entries and add all the titles from HTML files located in info to the database. This script implements the second approach, and for this, the truncate table SQL statement is used to remove all the records from a table.
The db.sh script will run either manually, invoked by the user, or automatically in predefined time intervals. Each time the script runs, it truncates the table and then inserts the titles and file paths of the HTML files in the info directory.
The following is the command used by the shell script to connect to the MySQL server:
mysql --user="root" --database="$db" -e "$sqlstring";
It evaluates to the following command:
mysql --user="root" --database="info" -e "truncate table content;";
Hint!
This is a command run from inside a shell program, but you can run this as a single command from the Linux terminal. After all, a shell program is a collection of shell commands.
After all the records in the table are deleted, you can use a for loop to insert the title and root-relative path of each HTML file in the info directory to the info database. The loop is included between the do...done commands.
for file in $FILES
do
...
done
For each file in the directory info, the line that includes the h1 element—whose text is the web page’s title—is extracted with grep:
title=`grep -o '<h1>.*</h1>' $file | sed 's/(<h1>|</h1>)//g'`;
By using the Unix pipe operator (|), the line output by grep is passed as input to sed. Then sed removes the start and end tags of the h1 element by replacing them with an empty character. The sed output, which is the title of the HTML page, is assigned as a value to the variable title.
The web page file name is returned to the variable filename when the command basename runs.
filename=$(basename "$file");
The file name is then concatenated to string /info/ to form url, the root-relative path.
path="/info/";
url=$path$filename;
For instance, for the file name page1.html, the path becomes /info/page1.html.
The title and url values (e.g., info/page1.html and Hypertext Markup Language - 2.0) will be entered in the corresponding table columns (url, title) with the sqlstring, which forms the SQL insert command.
records="url, title";
my_values="'$url', '$title'";
sqlstring="insert into $table ($records) values($my_values);";
The next command uses the mysql client to connect to the MySQL server and submit the command included in sqlstring, shown here:
mysql --user="root" --database="$db" -e "$sqlstring";
The following is an example of the command sent to the server after evaluating the variables:
mysql --user="root" --database="info" -e "insert into content (url, title) values('/info/page1.html', 'Hypertext Markup Language - 2.0');";
To run the shell script, you need to grant executable (x) file permission at least to yourself, that is, to the user (u). The other options are to grant this right to your group (g) and all others (o). Use the chmod command from your home directory as follows:
$ chmod u+x db.sh
Run manually the shell script from your home directory as follows:
$ ./db.sh
The period before the slash denotes the current directory. This is used because when running executable Linux files, their relevant or absolute path needs to be provided except if the script is stored on one of the directories assigned to the PATH environment variable. To view the directories included in the PATH list, use the following:
$ echo $PATH
Next, connect to the info database to view the contents of the table called content. Use the command:
$ mysql –u root
The MySQL client waits for the next command with the mysql> prompt. Select the database to work with.
mysql> use info;
Read all the records of the table content.
mysql> select * from content;
After using this command, the MySQL server responds by outputting the following table (given that so far you have created two web pages in the directory info: page1.html and page2.html):
The MySQL server responds with a good-bye message.
Bye
Automating the Database Updates with cron
To schedule db.sh to execute automatically, use Linux cron to schedule tasks. This daemon process checks a crontab (cron table) file containing instructions for cron to execute. cron as a daemon process runs in the background and executes commands at specific dates and times; for instance, it can be used hourly to take backups from a database.
The crontab command opens the crontab for editing and lets you add, remove, or modify scheduled tasks. Before using crontab, you may want to select the text editor to work with. For instance, to use gedit, enter the following at the Linux terminal:
$ export VISUAL=gedit
Run the command crontab as follows:
$ crontab –e
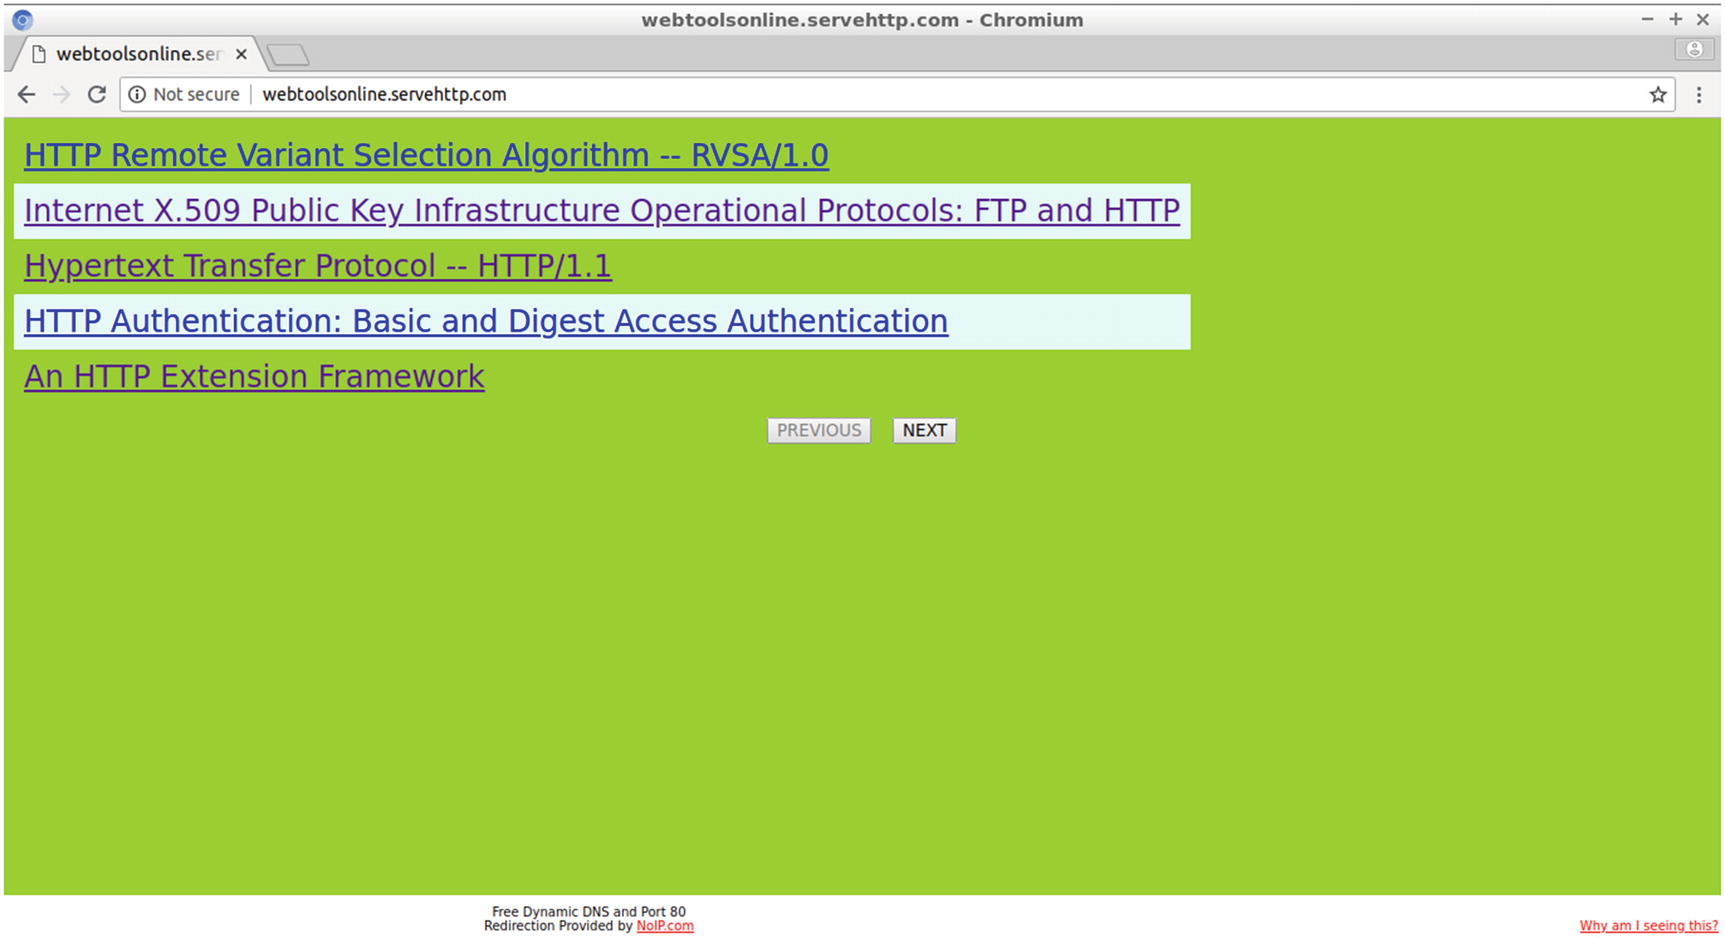
As shown in Figure 7-4, crontab opens in the gedit environment. Enter the following entry:
*/20 * * * * /home/christos/db.sh
Each crontab entry consists of six fields, specified in the following order:
An asterisk (*) indicates “every,” a forward slash (/) means repeat at a specific interval, and a hyphen (-) indicates a range. Therefore, the previous entry indicates the following: “Execute /home/christos/db.sh every 20 minutes (*/20), every hour, every day, every month, every weekday.”
Figure 7-4
The crontab entry used in the example
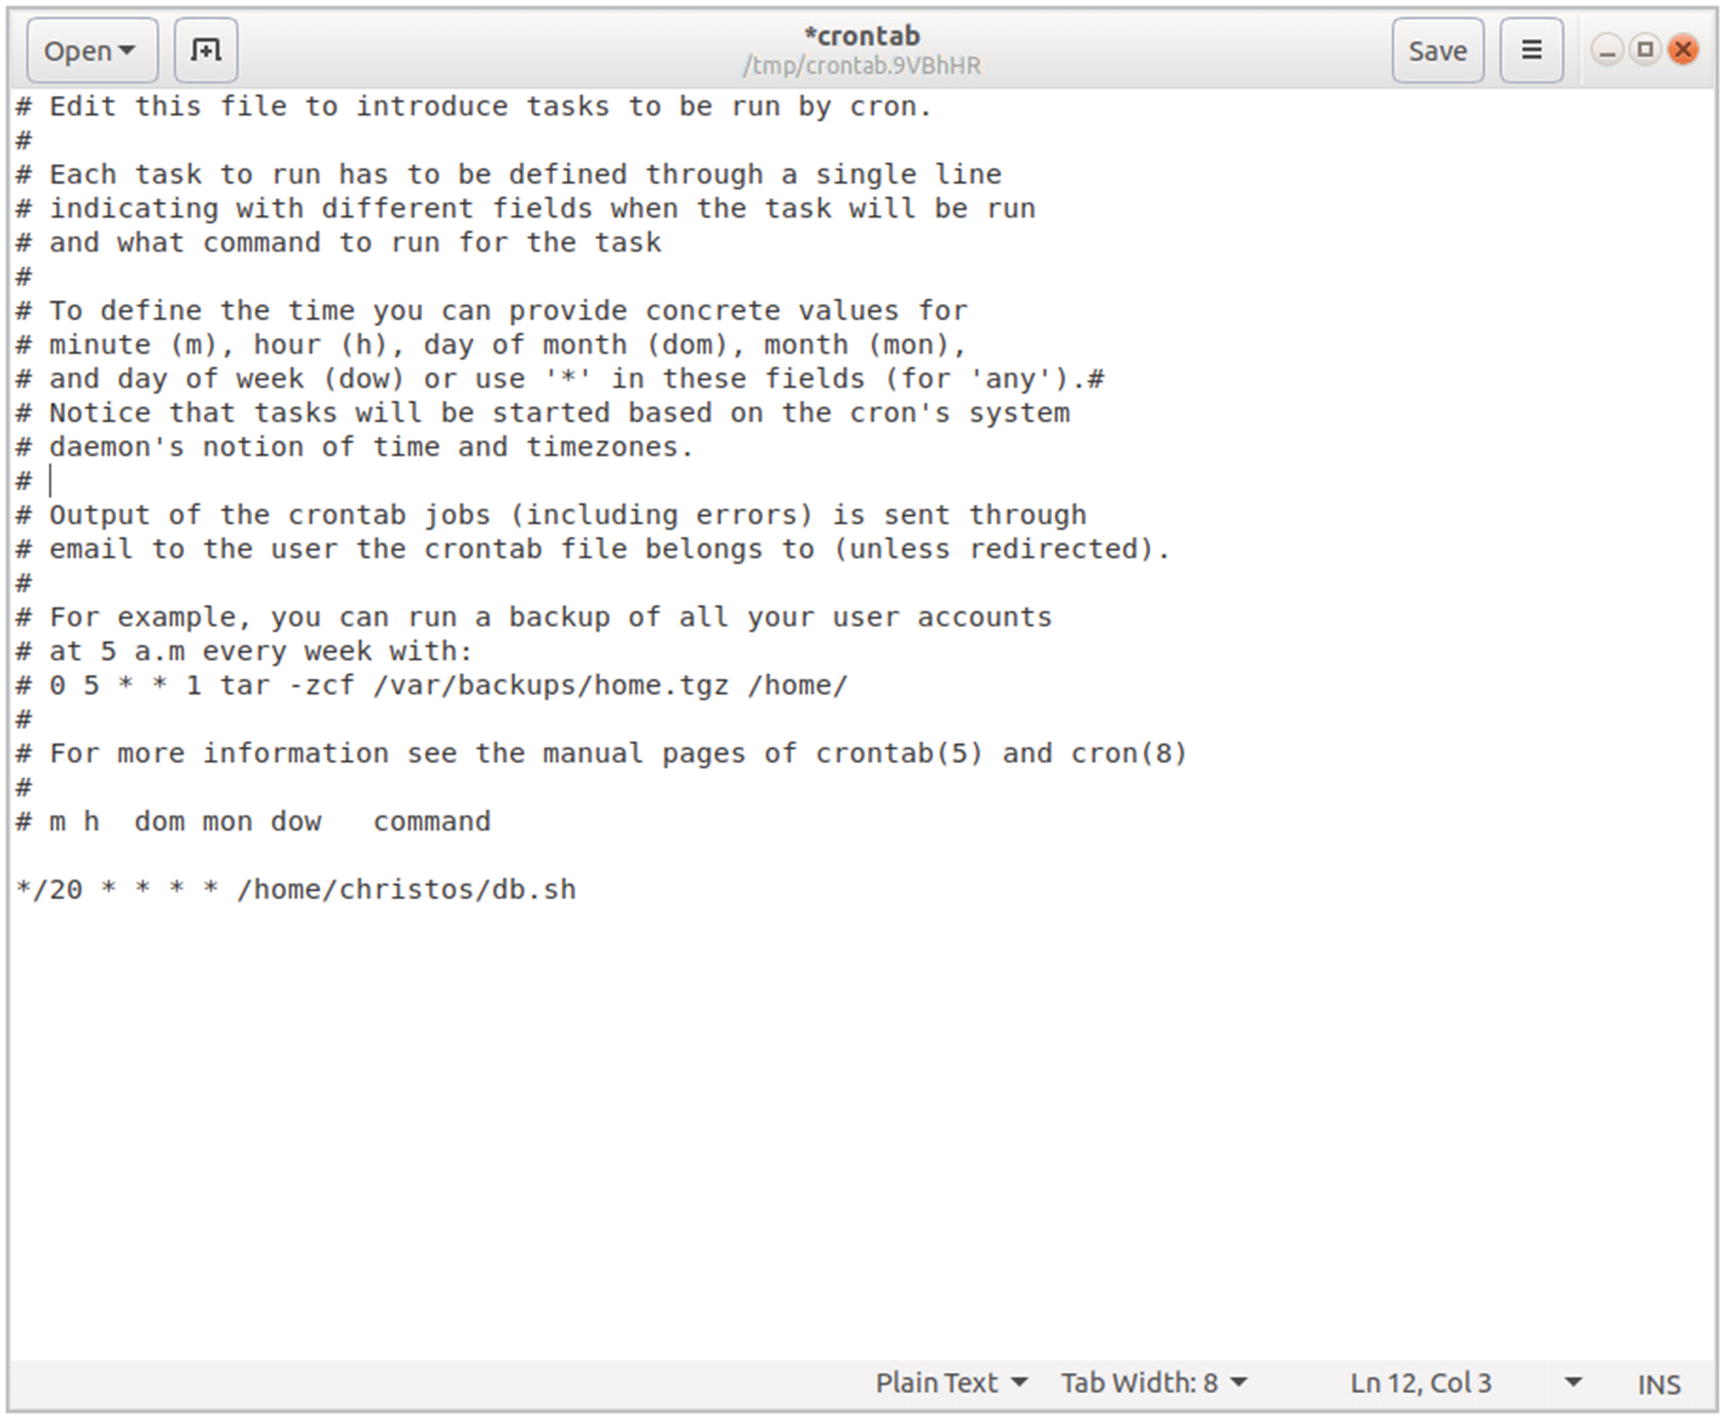
Hint!
To experiment with the syntax, use the URL https://crontab.guru/ in the address bar of your browser.
This site, displayed in Figure 7-5, provides a textbox to insert a crontab entry and get a description, based on the entry, about how often a specific job will be run.
Figure 7-5
The crontab test page from crontab.guru
Do not click the Save button yet in the gedit window.
To test crontab, press Ctrl+Alt+T to open a new terminal, connect with mysql to the MySQL server, and use the info database. Run the select statement, the same used in the previous section.
mysql> select * from content;
The MySQL server responds with the same output as last time.
Press Ctrl+Alt+T to open a new terminal window. Make info the working directory.
$ cd /var/www/html/info
Create another web page.
$ sudo cp page1.html page3.html
Change the title of page3.html to be a different one from the one used in page1.html.
$ sudo gedit page3.html
Replace the original title with another. For instance, use the following:
<h1>Hypertext Transfer Protocol -- HTTP/1.1</h1>
Save the file and close the gedit window.
Move to the gedit window of crontab and change the time interval of the crontab entry from 20 to 2 minutes so that you won’t wait long for the daemon process to run. You can restore it to 20 minutes later. You can now click the Save button in the gedit window of crontab. Wait for two minutes, and at the terminal of the mysql client press the up arrow on the keyboard to execute the previous command.
mysql> select * from content;
In the output table, a new record is included with the columns corresponding to the page3.html filepath and title.
This entry was added by the db.sh shell script that was run by cron. You can restore now the entry interval from 2 to 20 minutes.
At this point, the database used for searching all the web page titles has been created, and the Bash script scheduled by cron constantly updates the database to reflect the added or deleted HTML files of the info directory.
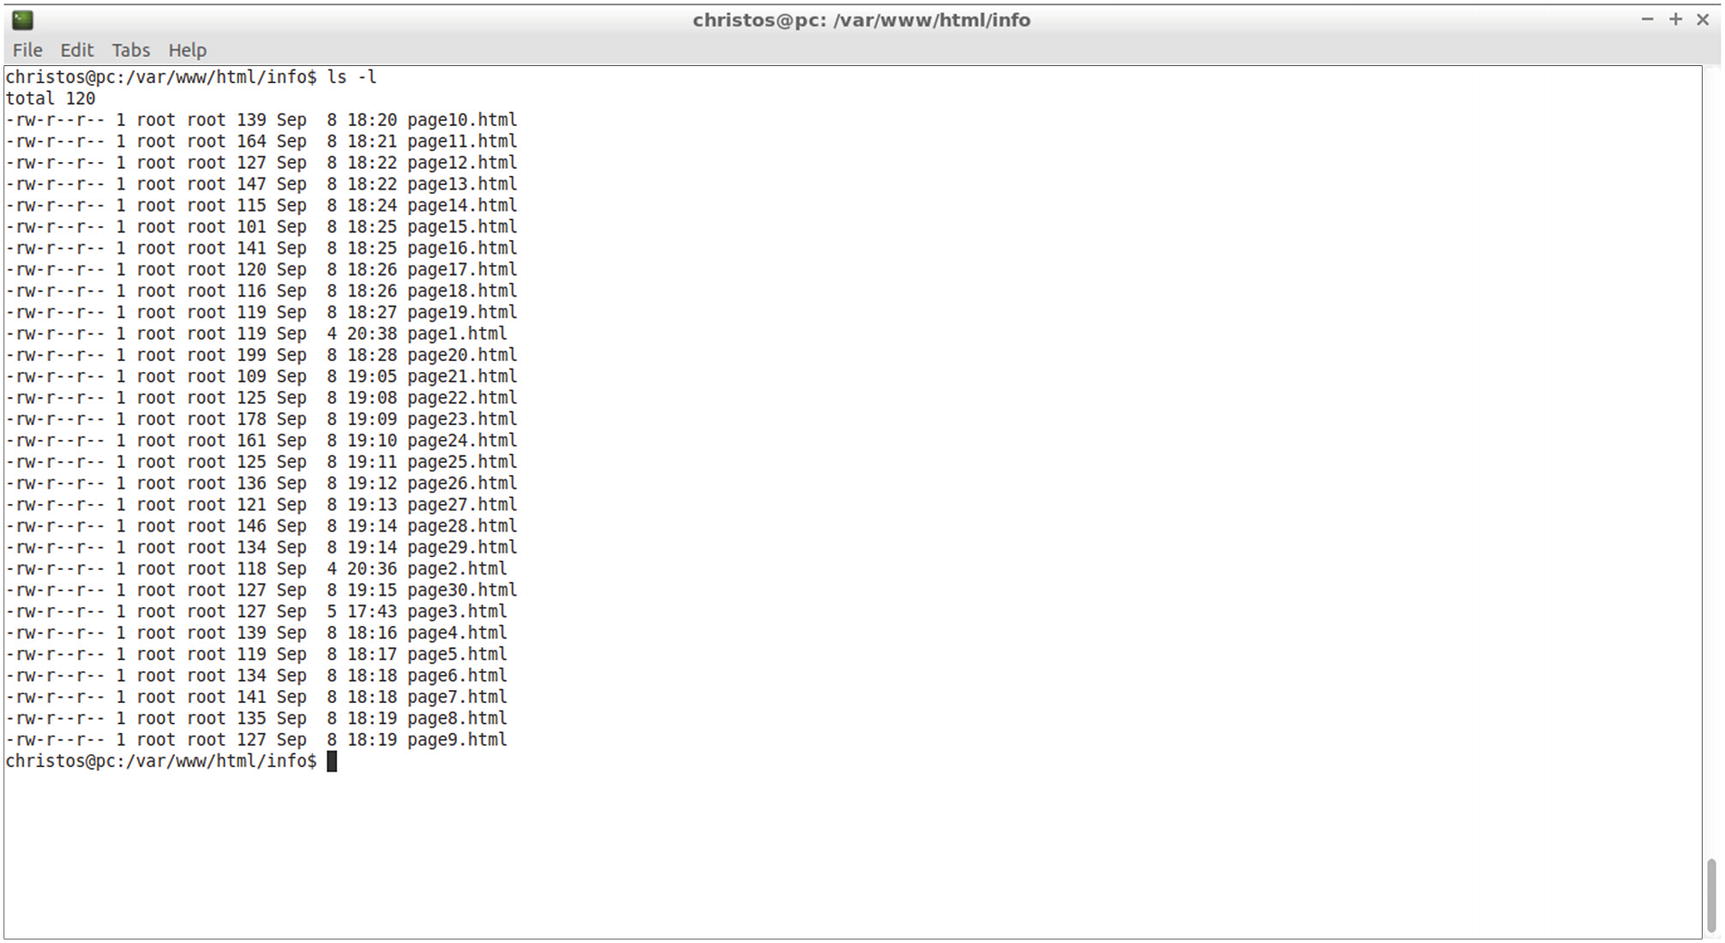
Now is a good opportunity to create more web pages and therefore more entries in the info database so you can have a larger number of results, which will be required when we implement pagination. The site will show five results per web page, instead of putting all the results on a single web page. For the example used in this chapter, the HTML filespage1.html up to page30.html were created, as indicated by the ls -l output for the info directory, displayed in Figure 7-6.
Figure 7-6
Web pages page1.html up to page30.html are the content web pages used for the example’s site
After the time indicated in the crontab file, db.sh updates the database with the 30 entries shown in Figure 7-7.
Figure 7-7
Cron updates the database and creates one record for each web page found in the info directory
With the content of the site ready, you can proceed to designing index.php, the home page of the site that provides the search form, and also search.php, the action program that receives the form’s keywords, connects to the info database, and returns the results to the client.
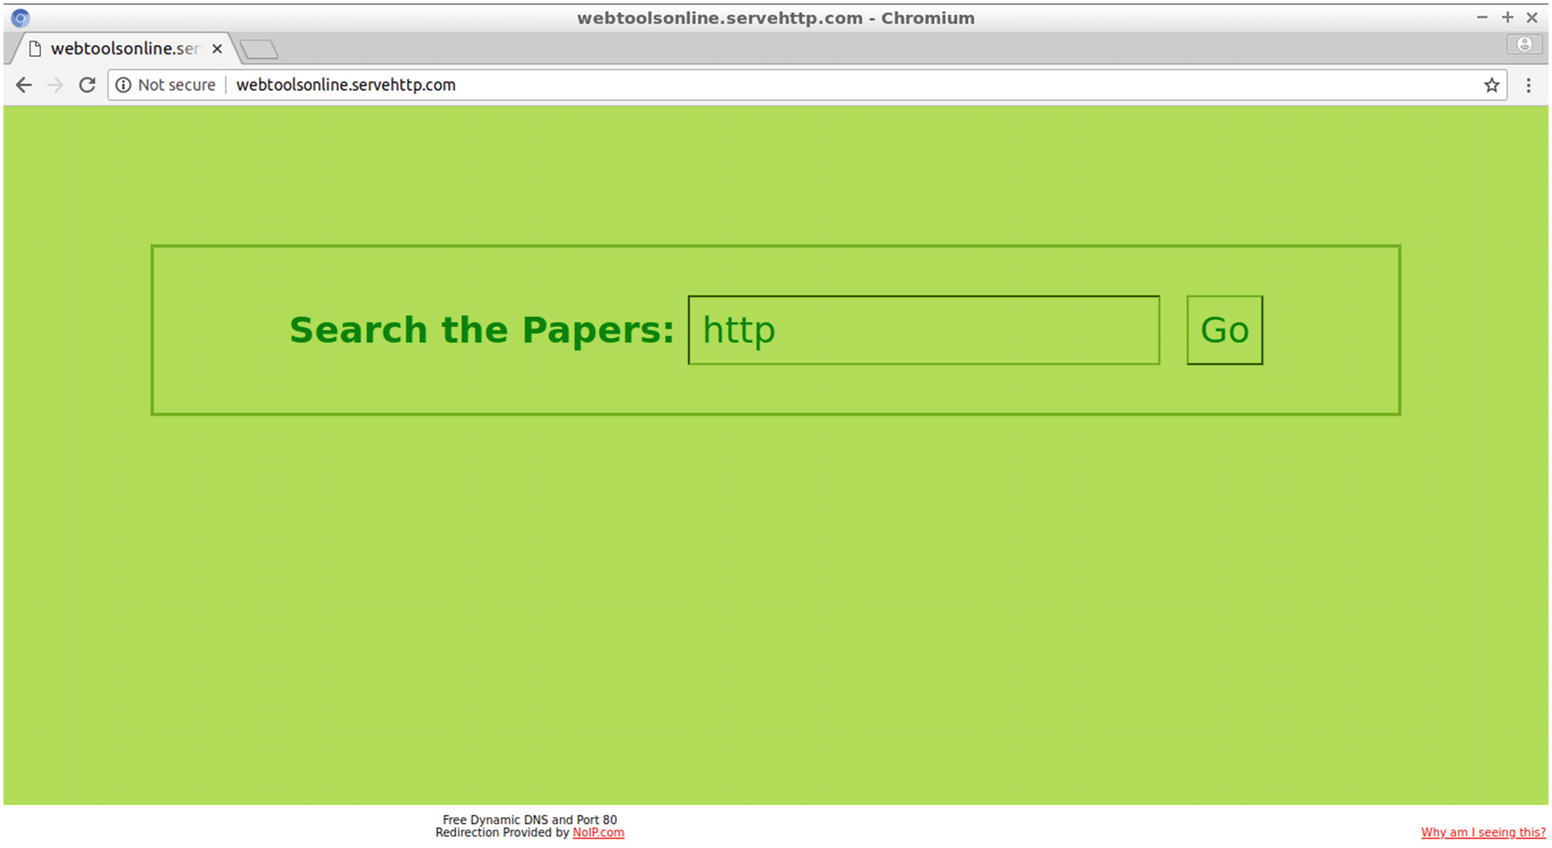
Designing the Home Page of the Site
Like with the previous web-based projects, two basic HTML files are required for this site. One web page provides the HTML form for submitting the keywords to the web server, usually included in the home page of the site. Another web page, indicated in the action attribute of the form element, is the one that receives the keywords, queries the database, and dispatches the query results to the user. The database is automatically updated at regular intervals with the titles and the filepaths of all the content web pages of the site.
In the previous chapter, you learned how to connect to the MySQL server with the Bash shell scripting language. Here you will connect to the MySQL server from a PHP program. The PHP-MySQL interface routines will be used to issue the query and include the results in an HTML table, in the form of hyperlinks that lead to the corresponding content web pages.
Creating the Directory Index of the Site
For the home page of the site, you will use the index.php file. You probably already have a directory index with the name index.php in the document root directory from a project of a previous chapter. If the command ls /var/www/html returns an index.php file, rename it by using the following commands:
$ cd /var/www/html
$ sudo cp index.php indexOLD.php
Create next a new index.php file with gedit.
$ sudo gedit index.php
Enter the following source code and save the file:
The previous source code creates a web page with a form. You center the form horizontally by setting the CSS margin property to auto.
margin: auto;
The form’s method is POST, and the form’s action is set to search.php. The code of search.php will therefore receive the keywords the user enters in the textbox and will use the PHP-MySQL interface routines to forward them to the MySQL server to query the info database. The query results will be converted to links with text that is the title of the web page. An HTML table with the results will be displayed to the user. As indicated by the value in the action attribute file, search.php is located in the same directory as index.php since no other relevant or absolute path is provided.
Figure 7-8 shows the home page of the site (index.php).
Figure 7-8
The home page of the site
There are two main methods to connect PHP and MySQL.
MySQLi extension (MySQL improved)
PDO (PHP Data Objects)
In this project, you will use the first one. To be able to use the mysqli PHP command, you have to install the MySQL extension for PHP. At the command line, enter the following:
$ sudo apt-get install php-mysql
Creating the Action PHP Program
Create search.php in the document root directory. search.php is used as the value of the form’s action attribute, the one that defines the file that processes the user’s keywords.
$ cd /var/www/html
$ sudo gedit search.php
Enter the following lines and click the Save button in the gedit window to save the file:
<!DOCTYPE html>
<html>
<head>
<style>
body {
background-color:yellowgreen;
}
a {
font-size:24px;
}
</style>
</head>
<body>
<?php
if(!empty($_POST["keywords"])){
$keywords = $_POST["keywords"];
}
$array = preg_split('/s+/', trim($keywords));
$cnt=0;
$items="";
foreach ($array as $item) {
++$cnt;
$item = " title like '%{$item}%'";
if ($cnt != count($array)) {
$item="{$item} or ";
}
$items .= $item;
}
$servername = "localhost";
$username = "root";
$password = "";
$dbname = "info";
$mysqli = new mysqli($servername, $username, $password, $dbname);
The PHP code starts with the following command, which sets the PHP variable $keywords to the value sent with the POST HTTP method, from the textbox named keywords of the form found in index.php:
if(!empty($_POST["keywords"])){
$keywords = $_POST["keywords"];
}
In the next code line, the PHP function trim() removes spaces before and after the $keyword value, which is a string.
At a result, the preg_split() function applies. PREG stands for PCRE Regular Expression, where PCRE means Perl Compatible Regular Expressions. preg_split() splits a string into a regular expression and returns the parts to an array, $array in this example. The regular expression used is as follows:
/s+/
This indicates one or more (+) spaces (s) from the start to the end of the string (/ /).
$array = preg_split('/s+/', trim($keywords));
The next code snippet starts by setting the variable $cnt to zero. This variable will increase by one at any foreach() iteration, which extracts each item of $array and assigns it to the variable $item. $array at this point is an array of all the keywords inserted into the form’s textbox. On each iteration, the current $item is used to form the string title like '%{$item}%', which for instance for the keyword HTML evaluates to the string title like '%HTML%'. This string will be used as part of the SQL query command for the info database that will be submitted to the MySQL server.
select title, url from content where title like '%HTML%';
Hint!
The curly braces ({}) provide another way to enter a PHP variable into a string.
As you recall from the previous chapter, the like operator is used with the where SQL clause to return select columns that include the keyword that like applies to. By including the keyword between the like wildcard symbol (%), which represents zero or more characters, the keyword may be included in any position of the column’s value.
The $cnt variable is used therefore to determine the last element of the $array. For any item of the array except the last one, an or (the OR logical operator) is appended at the end of the item. For a multikeyword search, for instance if both the HTML and HTTP keywords are used, the values of the variable $items will be concatenated with or (and for the last keyword an or operator should not be used).
title like '%HTML%' or title like '%HTTP%'
The concatenation of all $item values takes place recursively and is accumulated to the $items variable. The concatenating assignment operator (.=) is used to append the argument on the right side to the argument on the left side.
$cnt=0;
$items="";
foreach ($array as $item) {
++$cnt;
$item = " title like '%{$item}%'";
if ($cnt != count($array)) {
$item="{$item} or ";
}
$items .= $item;
}
The following variables are used for the mysqli() function in the PHP code to make a connection to the MySQL server:
$servername indicates the hostname of the computer, and it can simply be assigned to the localhost value.
$username is assigned to root, the username used for the MySQL server connection. This corresponds to the –u argument of the mysql command.
$ mysql –u root
$password is the password used for the MySQL connection, provided with the –p argument when running mysql at the command line. The empty string (no password) is used in this example.
$dbname is assigned to info, the name of the database used in the MySQL server.
The previous variables hold therefore the following values for this connection:
$servername = "localhost";
$username = "root";
$password = "";
$dbname = "info";
Those variables are passed to the mysqli() object constructor function to return on connection success $mysqli, the newly created mysqli object. The following code makes and also tests the connection from the PHP code to the MySQL server:
$mysqli = new mysqli($servername, $username, $password, $dbname);
With the arrow (->) operator and the name of the object, you can access object properties and methods.
Next, the $sqlquery variable is assigned the command of the query to be executed. The following value after evaluation selects the columns title and url from the table content where the title includes one or more of the keywords entered in the form by the user.
$sqlquery = "select title, url from content where ".$items." ;";
The query is submitted to the server with the mysqli_query() function, and the results are retrieved with the $result variable. The function mysqli_fetch_assoc() returns the next record of the query results in the variable $row. The while loop iterates until all result rows are read. For each $row value, the two table columns url and title are indicated as $row['url'] and $row['title'], respectively. An HTML link will be formed with the title as the link text and the URL as the value of the href attribute. By using the PHP concatenation operator (.) to concatenate strings like <a href=" and string variable values like $row['url'], a working HTML link is formed. For example, with the title Hypertext Markup Language - 2.0 and URL /info/page1.html, the HTML link element becomes the following:
<a href="/info/page1.html">Hypertext Markup Language - 2.0</a>
Notice that the PHP escape () character is used with a double quote (") to allow the double quote be used as a normal character so that it does not delimit the start or end of a string.
All links will be included in a table data (<td>) element, and this element will be included in a table row (<tr>) element of a table. The table is used to align the results. For example, center alignment can also be used for better visual appearance. The table is delimited with the start table tag and the end table tag, both entered in the evaluated PHP code with the PHP echo command.
The function mysqli_free_result() is used to free the memory occupied by $result when it is no longer needed. Also, the database connection is closed by invoking the close method of $mysqli as follows:
$mysqli->close();
The result of the previous code snippet is to evaluate the PHP code to an HTML table without borders. Each row includes the title of each result that the MySQL query returns. This title is a link that leads to the web page that discusses the topic included in the title.
Testing the Dynamic Content Site
In the address bar of your browser, use the URL domain name you have registered to display the directory index (index.php) of your site. In this example, the following domain name is used:
http://webtoolsonline.servehttp.com/
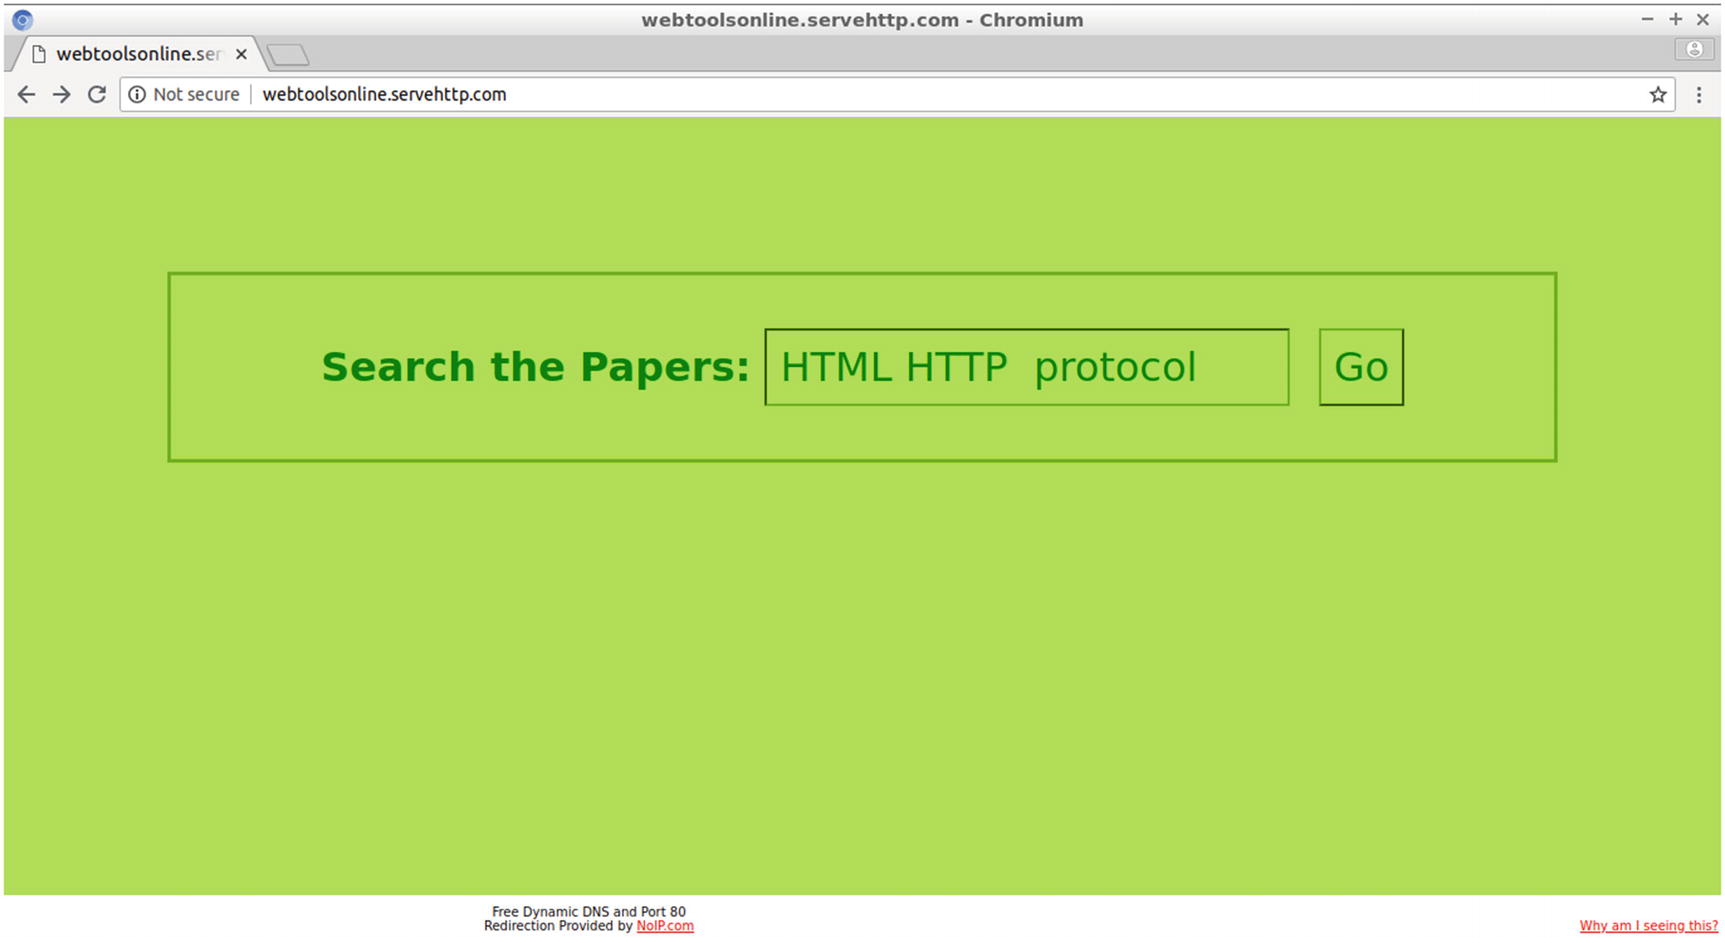
Use some keywords and feel free to include unnecessary spaces before and after the words, as displayed in Figure 7-9.
Figure 7-9
Entering keywords in the home page’s form
Click the Go button. The query results (in the form of links) appear, as shown in Figure 7-10.
Figure 7-10
The query results appear as links, each one leading to one of the content web pages
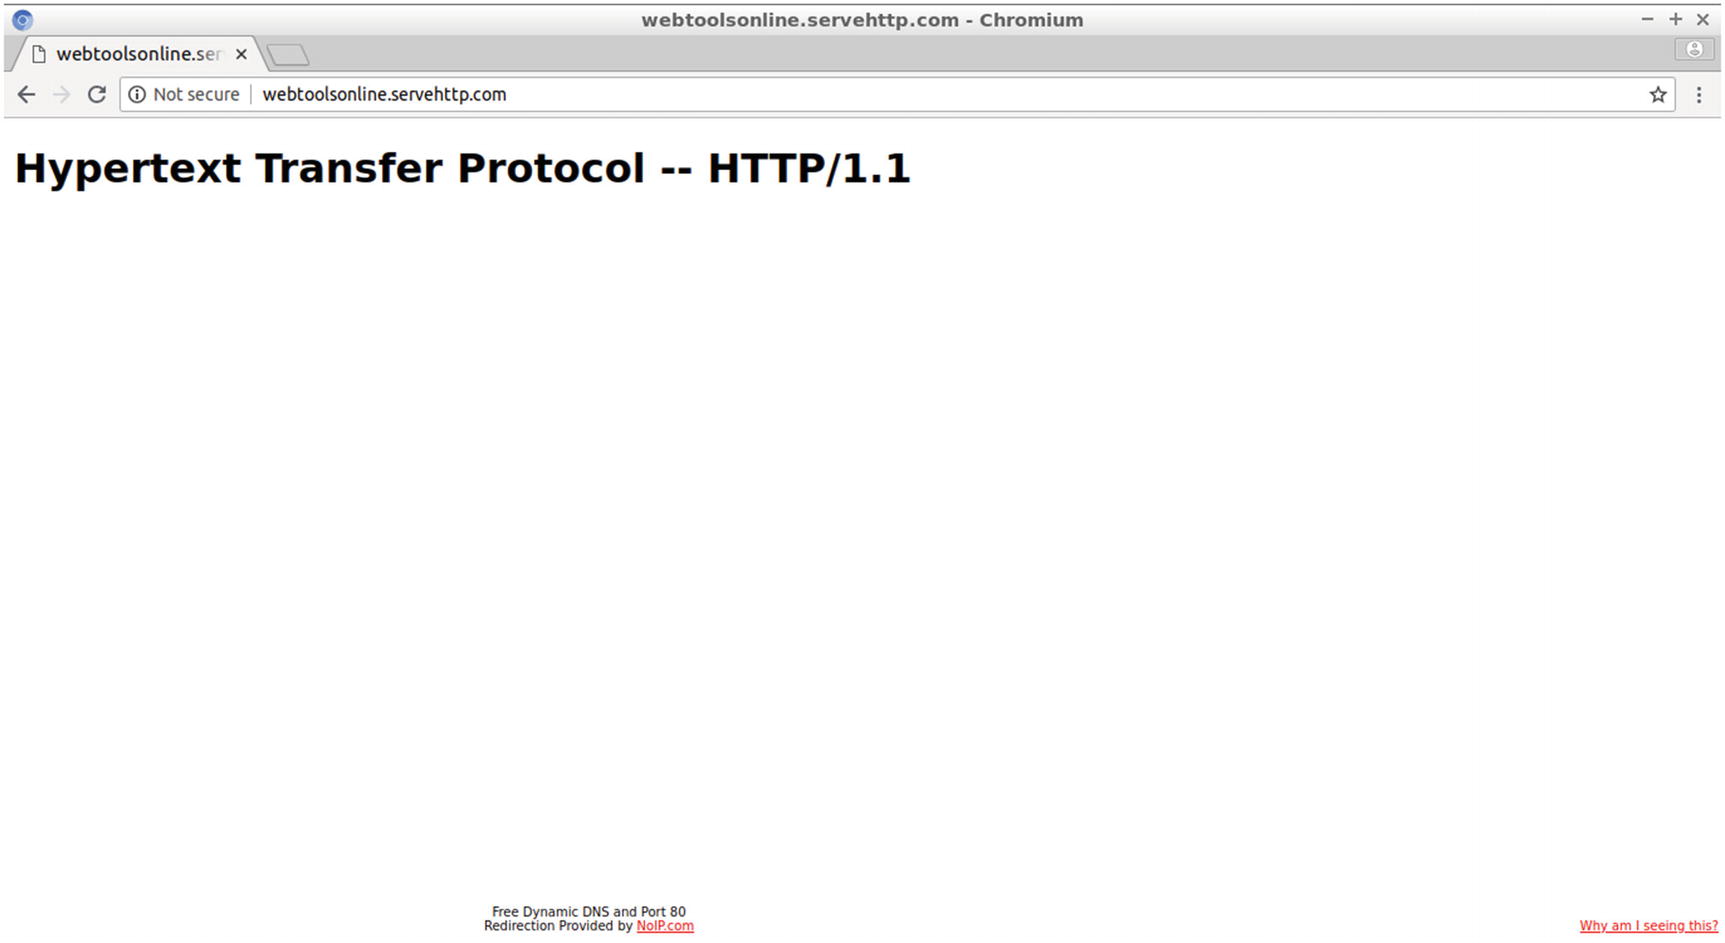
Click any of the links included in the results. The corresponding web page appears in your browser, as shown in Figure 7-11 (for simplicity it is not filled with any usable content yet).
Figure 7-11
The web page of one of the query results
Next, enter a query that will return more results. You can use even more keywords than the ones used here. Figure 7-12 displays, for instance, using HTML, HTTP, and protocol as keywords.
Figure 7-12
Using multiple keywords to view more results than a computer screen accommodates
Click Go again. The web page shown in Figure 7-13 appears.
Figure 7-13
Viewing multiple results requires scrolling
To view the query results, scrolling is required. Another approach is to use pagination to group the results onto separate pages. This is what you’ll do next.
Making Modifications
To make some modifications and inspect in detail the inner workings of the previous code, create a backup copy of search.php called search2.php.
$ cd /var/www/html
$ sudo cp search.php search2.php
You can modify search.php and restore it when you finish experimenting. In the following steps, you will change the source code to examine how the exclusion of trim() and preg_split() can lead to serious problems.
Enter at the end of the following code snippet the echo $items command for inspecting the variable’s value:
<?php
if(!empty($_POST["keywords"])){
$keywords = $_POST["keywords"];
}
// trim() spaces left right, preg_split() between
$array = preg_split('/s+/', trim($keywords));
$cnt=0;
$items="";
foreach ($array as $item) {
++$cnt;
$item = " title like '%{$item}%'";
if ($cnt != count($array)) {
$item="{$item} or ";
}
$items .= $item;
}
echo $items;
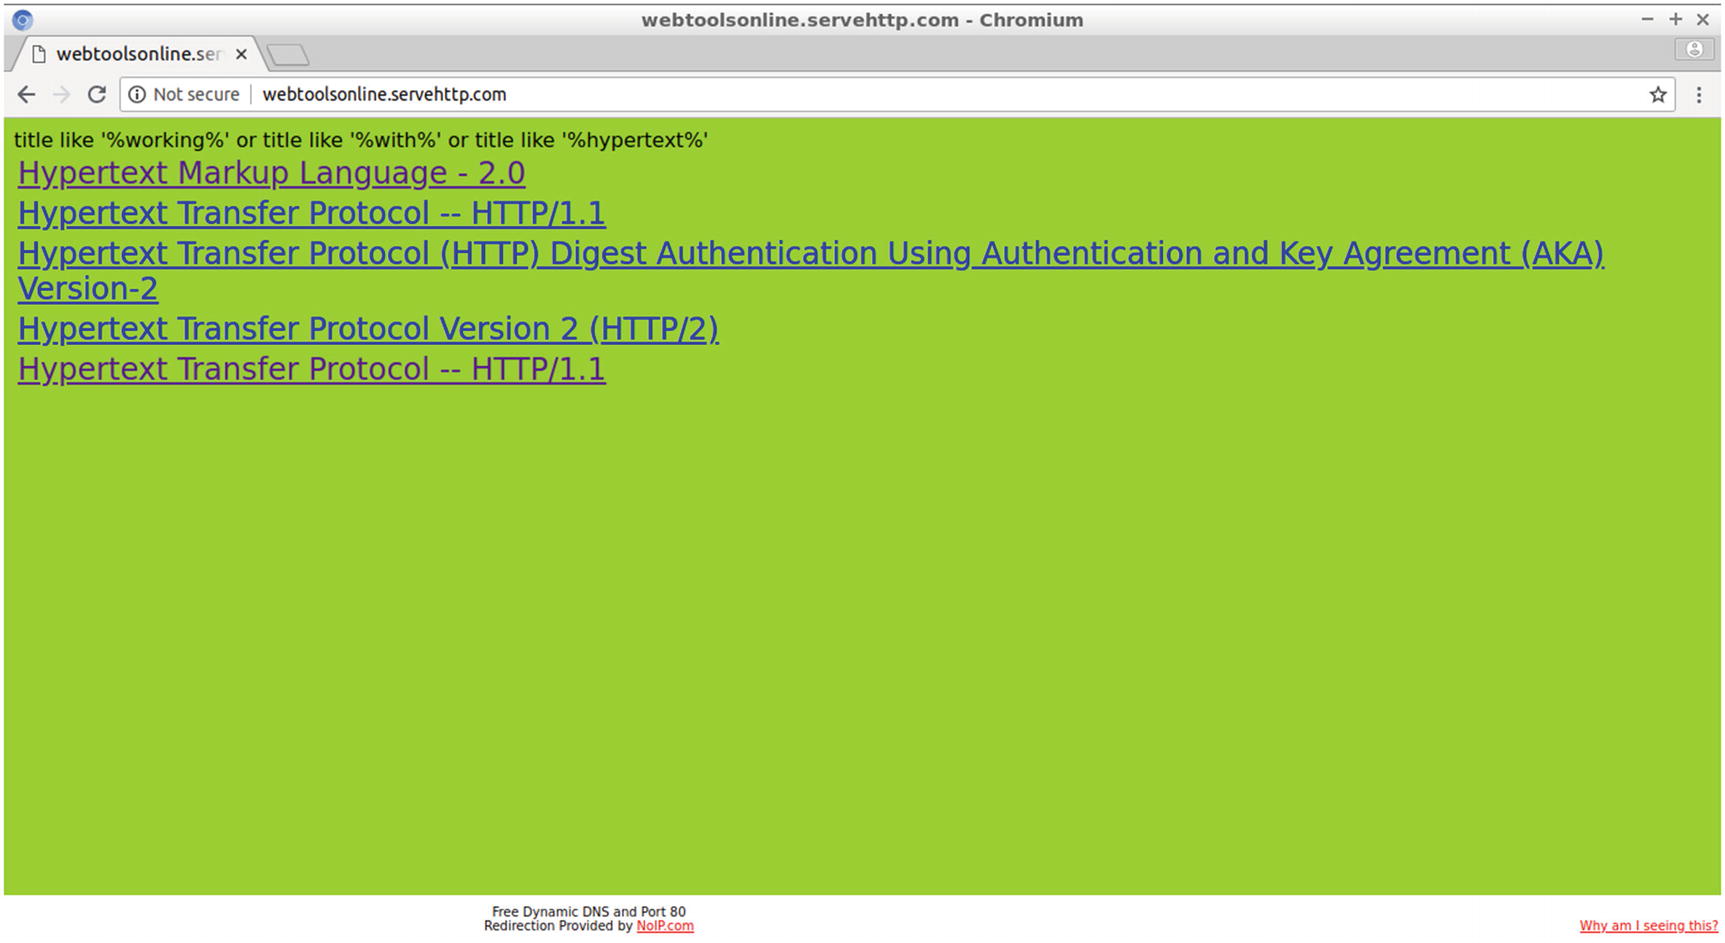
Use your browser to make a query from index.php and view the results. Use the following keywords (including some spaces before or after the words):
working with hypertext
Click the Go button. As displayed in Figure 7-14, the $items value is displaying in the search.php window.
Figure 7-14
Printing echo messages for relating the source code to the query results
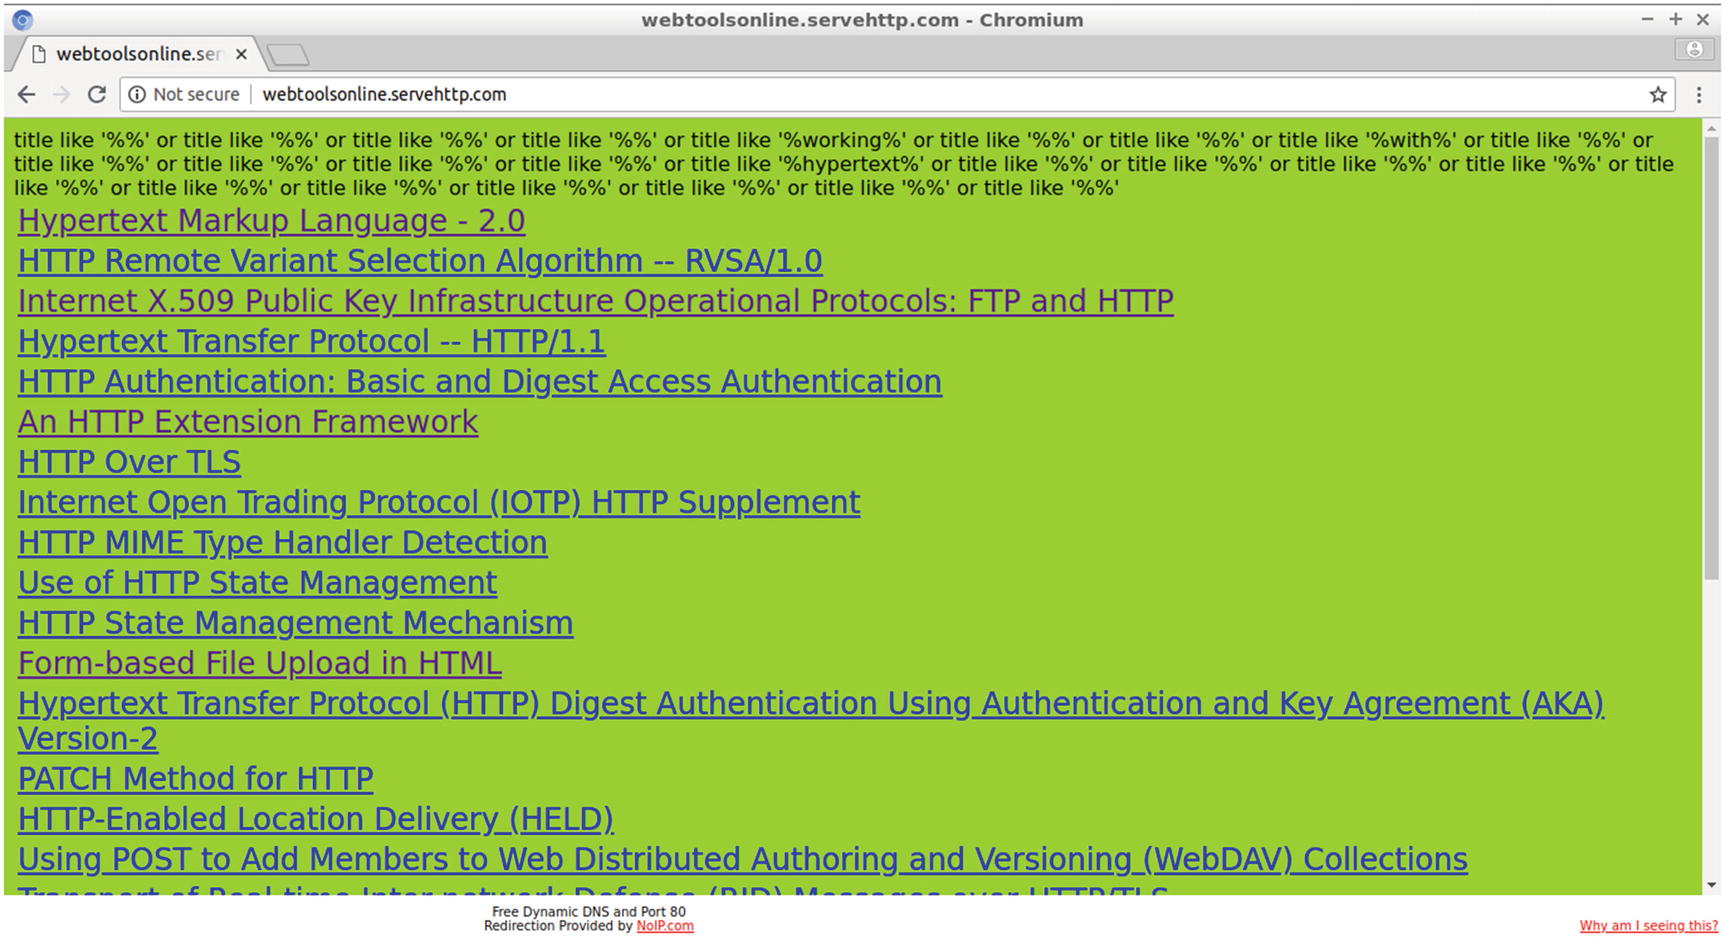
The $items value is as follows:
title like '%working%' or title like '%with%' or title like '%hypertext%'
Modify the following line:
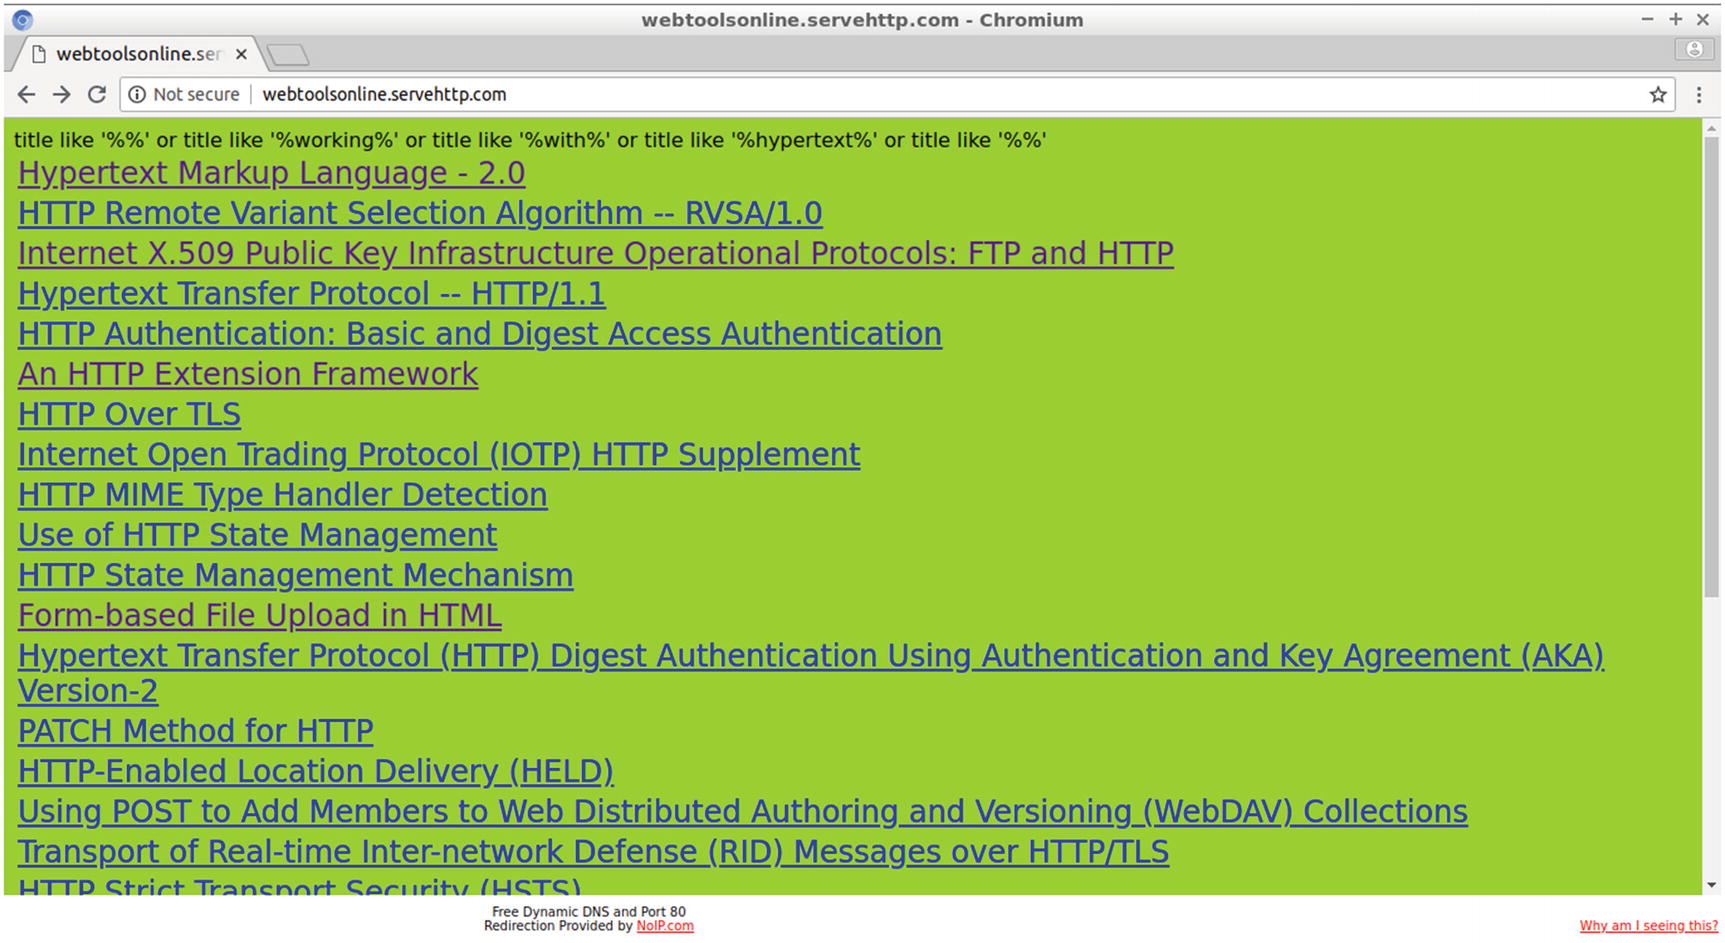
$array = preg_split('/s+/', trim($keywords));
Remove the trim() function:
$array = preg_split('/s+/', $keywords);
Run the previous query again. Without trim() in the query string, there are now empty keywords (%%) at the start and the end, as the following echo output displays:
title like '%%' or title like '%working%' or title like '%with%' or title like '%hypertext%' or title like '%%'
Figure 7-15 shows the evaluated search.php web page.
Figure 7-15
By excluding trim(), all database records are selected
As shown in Figure 7-15, including like '%%' inserts all the available database records in the query results.
Make a final modification to search.php by removing the function trim() and the function preg_split() from the command line. Insert $array using a simple function like explode() that uses a single space as a delimiter.
$array = explode(" ", $keywords);
The $items may look like the following:
title like '%%' or title like '%%' or title like '%%' or title like '%%' or title like '%working%' or title like '%%' or title like '%%' or title like '%with%' or title like '%%' or title like '%%' or title like '%%' or title like '%%' or title like '%%' or title like '%hypertext%' or title like '%%' or title like '%%' or title like '%%' or title like '%%' or title like '%%' or title like '%%' or title like '%%' or title like '%%' or title like '%%' or title like '%%' or title like '%%'
As shown in Figure 7-16, by excluding preg_split(), all the database query records are included in the query results.
Figure 7-16
By excluding preg_split(), all database records are selected
Finally, restore the original search.php file.
$ sudo rm search.php
$ sudo mv search2.php search.php
Improving the Query Results Appearance with a Two-Colored Table
Next, you’ll use CSS properties to provide a different background color to the even-numbered rows than the odd-numbered rows. Also, with the :hover CSS pseudoclass, you can provide a different background color to the row the mouse is resting on. Change the style element of search.php to look like the following:
<style>
body {
background-color:yellowgreen;
}
a {
font-size:24px;
}
table.center {
margin-left:auto;
margin-right:auto;
}
table {
border-collapse: collapse;
/* border: 1px solid blue; */
}
th {
text-align: center;
padding: 8px;
color: goldenrod;
font-size:24px;
}
td {
text-align: left;
padding: 8px;
color: green;
font-size:18px;
}
tr:nth-child(even){
background-color: lightcyan;
}
tr:hover {
background-color:silver;
}
tr.no_hover:hover {
background-color:floralwhite;
}
</style>
Use the form in index.php to make a new query, e.g., for the keyword protocol.
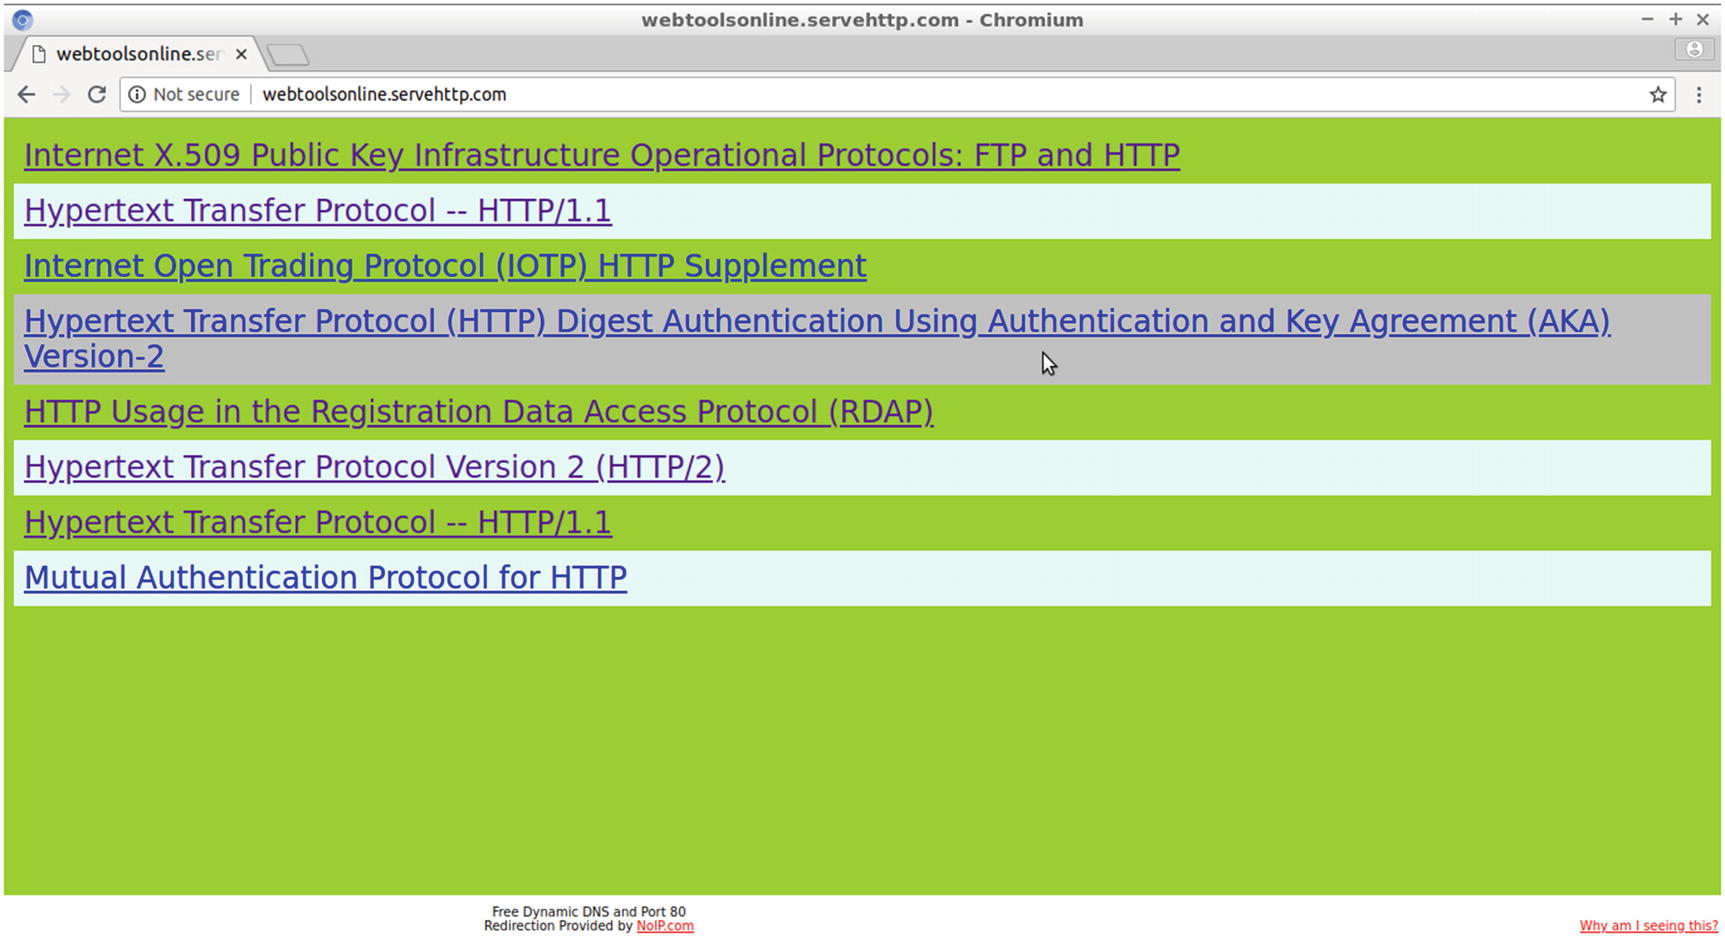
Figure 7-17 displays the results displayed in a two-colored table and also shows the row highlighted that the mouse pointer is on.
Figure 7-17
Using a two-colored table
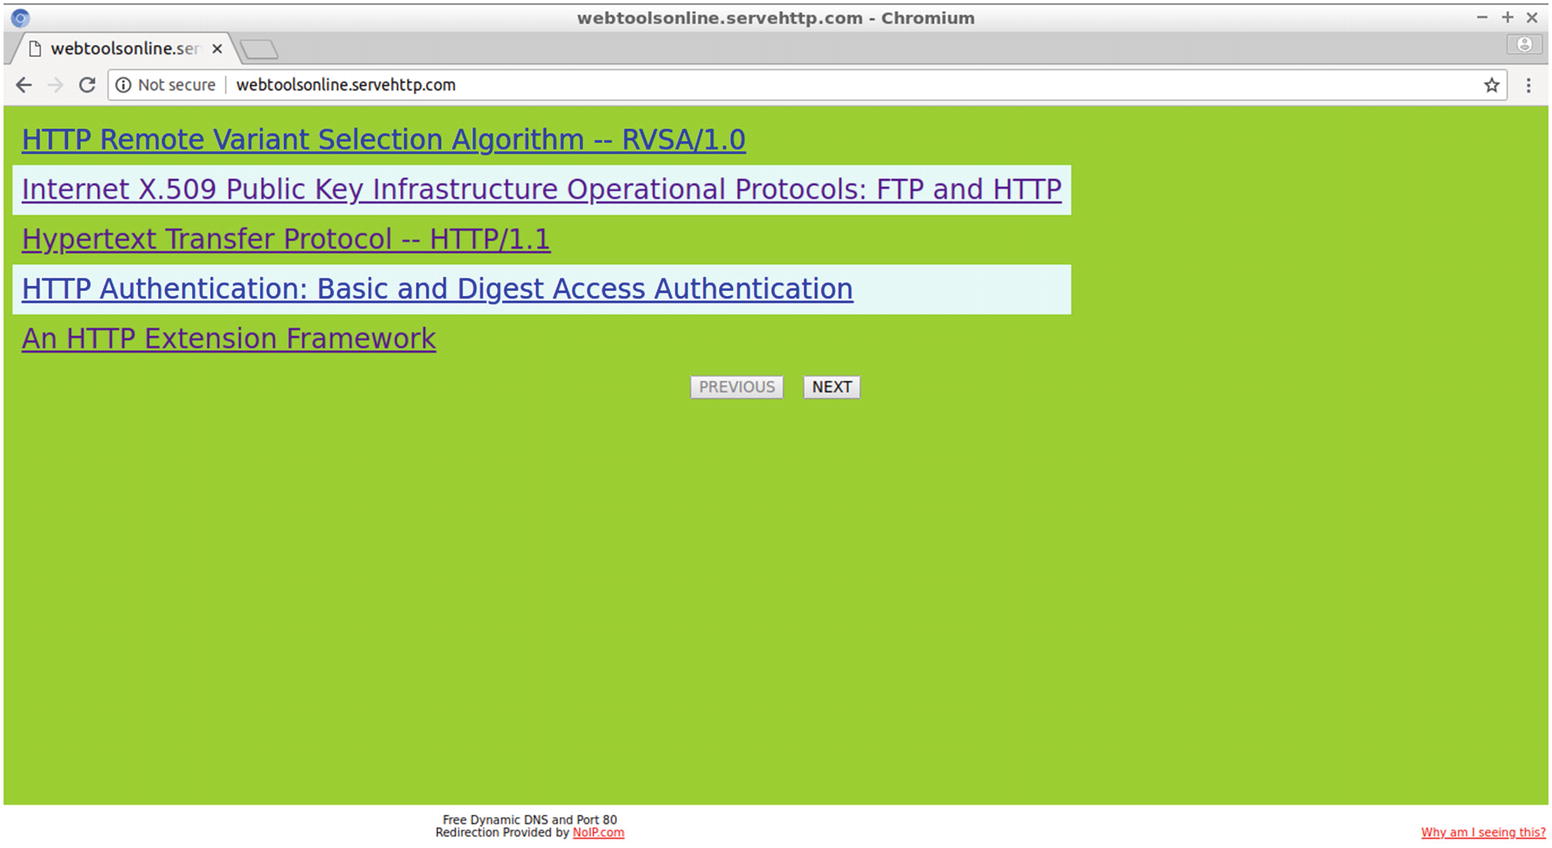
Implementing Pagination
Instead of having all the results appear on a single page, you can group them into sets of a specific number per page, e.g., 20, and present them using several web pages that are linked with buttons or images. You can use at least two buttons: one for the next available results and one for the previous results (if any exist). This is especially useful when the query returns lots of results like a real-world search engine query usually does.
Each web page will provide part of the total results. The limit MySQL clause is the key to return the results starting at a specific offset and to include a count of the number of results to return. To experiment with the limit option, run a SQL query from the MySQL client. For example, use the following:
$ mysql –u root
mysql> use info;
mysql> select * from content where title like '%http%';
Next use the same command with the limit clause, where limit 5, 3 indicates limit is 5 and count is 3:
mysql> select * from content where title like '%http%' limit 5, 3;
The results are restricted therefore to only three records, starting from the record that is indexed as five. Because the first record is indexed as zero, the following table includes the sixth, seventh, and eighth records:
In the new version of the previous site, the number of records per page will be set for simplicity to five. The initial query from index.php will set the limit and count values to 0 and 5, respectively, to display the first five records. Two buttons with the captions Previous and Next will be used on the evaluated search.php page for browsing the rest of the records. Initially, the Previous button will be disabled since the first results page does not include previous results. By clicking the Next button, the following five (or fewer if the remaining result number is less than five) records will be fetched. The Previous button will move you to the five records before the first one currently displayed.
Each button is used as a submit-type button in a separate HTML form, requesting a query that moves the offset backward for the Previous button and forward for the Next button to the result list.
Where is the current offset saved, though, when swapping from one page to another? The PHP engine extracts the offset sent along with the form data, updates it (either increasing or decreasing it), and includes it on the reply page so that it can be available for the next form submission. The offset placement is not visible to the user since it is included as the value of the form’s input element of type Hidden. Other than the offset, the keywords entered by the user need also to be retained at each pagination transition when clicking the buttons. The initial web page used by the client includes a textbox for entering the keywords; however, the Previous and Next buttons can perform a keyword search on the same keywords by carrying them also in a hidden field.
Figure 7-18 displays the HTML form of the new version of search.php used to query the database for HTTP. This is the same query executed previously from the command line.
Figure 7-18
Using the pagination version of index.php
By clicking the Go button, the first set of records appear, as shown in Figure 7-19.
Figure 7-19
Displaying the query results with the new version of search.php
So far, no previous results exist, and therefore the Previous button is disabled. Click the Next button. The web page displayed in Figure 7-20 with the next five records appears.
Figure 7-20
By clicking the Next button, the Previous button becomes enabled
This time, both buttons are enabled, and you can proceed forward or return backward. Click the Next button four times until you reach the final web page, the sixth one, displayed in Figure 7-21.
Figure 7-21
When you reach the last web page of results, the Next button becomes deactivated
The Next button as expected is disabled, and you can move only backward. You can also provide on each page a Home link to get to the home page of your site. For now, you can click the Refresh button of your browser to move to the home page.
The Pagination-Enabled Version of index.php
To implement the pagination feature on the site, changes to both the index.php and search.php source code are required. In these files, the new code added will be included between comment lines of forward slashes. The HTML comments in those files will look therefore like the following:
<!-- ///////////// -->
CSS comments will look like the following:
/* ///////////// */
PHP comments will look like the following:
/////////////////////
The source code for the new version of index.php is as follows:
The only line added is the hidden input type element required to provide zero as the initial offset value for the first set of result records. The original index.php version did not use a limit clause for the select statement, and therefore no offset variable was used.
The Pagination-Enabled Version of search.php
The following is the source code of the new version of search.php:
In the CSS section, the class center was used for the second HTML table, which includes only the Previous and Next buttons. A distinct class is required that does not implement multicoloring, as the plain table selector does for the first table, used for the query results.
The following PHP code sets $offset and $count, the two arguments of limit. The variable $count is set to five. $offset is set by $_POST["offset"], and for the query issued from the form’s textbox, the value sent is always zero. The form of index.php is not, however, the only form included in the new version of this client-server application. As shown in the last part of the new version of search.php, each one of the two buttons (Previous and Next) is used in their own form, which updates the offset value.
With the $count set to a constant value and $offset set either by the index.php form or by the forms used with the buttons, the query can be executed in the new version with the limit option.
$sqlquery = "select title, url from content where ".$items." limit $offset, $count ;";
///////////////////////////////////////////
With the following code, the variable $c holds the number of the results of the previous query (the limit option is not used for this query to return the result number). The variable $c will be used later to disable the Previous and Next buttons when at the start or at the end of the query results, respectively. Notice that the echo ceil($c/$count); command is commented out but can be also used for debugging purposes to return the total number of result pages. The PHP function ceil() returns the next highest integer value by rounding up if necessary.
The last added source code creates the second HTML table for this web page with the two buttons Previous and Next that are used as the submit buttons of their forms. The value of the action attribute in each form is filled by PHP code, specifically by the echo command. It is set to $_SERVER['PHP_SELF'], the variable that returns the current PHP script executed.
The PHP code for the Previous button updates the offset, used hence as $sub, by decreasing it by five as follows:
$sub=$offset-$count;
Then a conditional echo runs, with the condition $sub>=0. If this is true, which means there are more previous pages, the following HTML tags are printed with the conditional echo command to the evaluated web page received by the client.
This prints to the evaluated web page the tags that create three form elements: a submit button with the Previous caption and also two hidden objects, one for sending the keywords used by the client and the other for sending the updated offset ($sub).
If the echo condition is false, just one form element is formed: a submit button. It is disabled, though.
Similar is the code for the Next button, with the difference being that the update to the offset is done by adding the following count:
$sum=$offset+$count;
Also, the choice to provide an enabled or disable Next button is determined by the following condition:
$sum<$c
Here, $c is the total number of query results.
By using each one of the Previous and Next buttons as the submit buttons of two forms, whose action attribute indicates the same PHP code, and using hidden input type fields for updating the offset value and carrying the keywords, with a button click the query slide moves one position backward or forward.
Using Images Instead of Submit Buttons
For a stylish appearance, you can replace the submit buttons with images by providing the appropriate CSS properties to switch them from enabled to disabled. In the following example, two images were borrowed from Wikimedia Commons.
The previous code replaces the buttons created from the input elements of type submit with image buttons using a submit property. The following tag is used for the prev.png image file:
<input type="image" src="prev.png" border=0>
The following tag is used for the next.png image file:
<input type="image" src="next.png" border=0>
The disabled attribute can also be used in the previous code with the images.
Test the new site using the same query as previously. The two images appear in Figure 7-22.
Figure 7-22
Using images instead of buttons in search.php
Notice that there is no characteristic to visually indicate that the left image is disabled, although it still behaves as disabled when you click it. You can change that by utilizing CSS properties. In the CSS section of search.php, enter the following CSS disabled selector that applies to the input elements of type image:
input[type=image]:disabled
{
opacity:0.5;
}
When the image is disabled, its opacity property level becomes 0.5, with 1 being not transparent and 0 being completely transparent.
Run the previous query again. The transparency of the left image is set to 50 percent, as shown in Figure 7-23. This indicates that the image is not active.
Figure 7-23
Changing the opacity CSS property for the disabled images
Implementing the Site with the GET Method
Next, you’ll change the request method for this site from POST to GET.
The method POST stores the form data in the body of the request message of the HTTP request, while GET attaches the data to the URL as the query string (name-value pairs) in the request line of the message. By using pagination and the GET method, the URL changes in each page to reflect the offset, count, and keywords carried in the query string.
Change all POST references to GET for both files used in this client-server application. In index.php, change the value of the form method attribute to get.
In search.php, replace all the $_POST variables with $_GET. Use, therefore, $_GET["keywords"] instead of $_POST["keywords"] and $_GET["offset"] instead of $_POST["offset"].
Replace also POST with GET in the form elements, created for the buttons, so that you finally have the following:
To test the GET method, do not use a domain name like http://webtoolsonline.servehttp.com/, which was used previously with POST because of the masking DDNS feature, discussed in Chapter 4, which alters the visible URL in the user’s browser. Use, for instance, the address from the masking service, which in the examples of Chapter 4 was as follows:
http://christos.ddns.net:8080/index.php
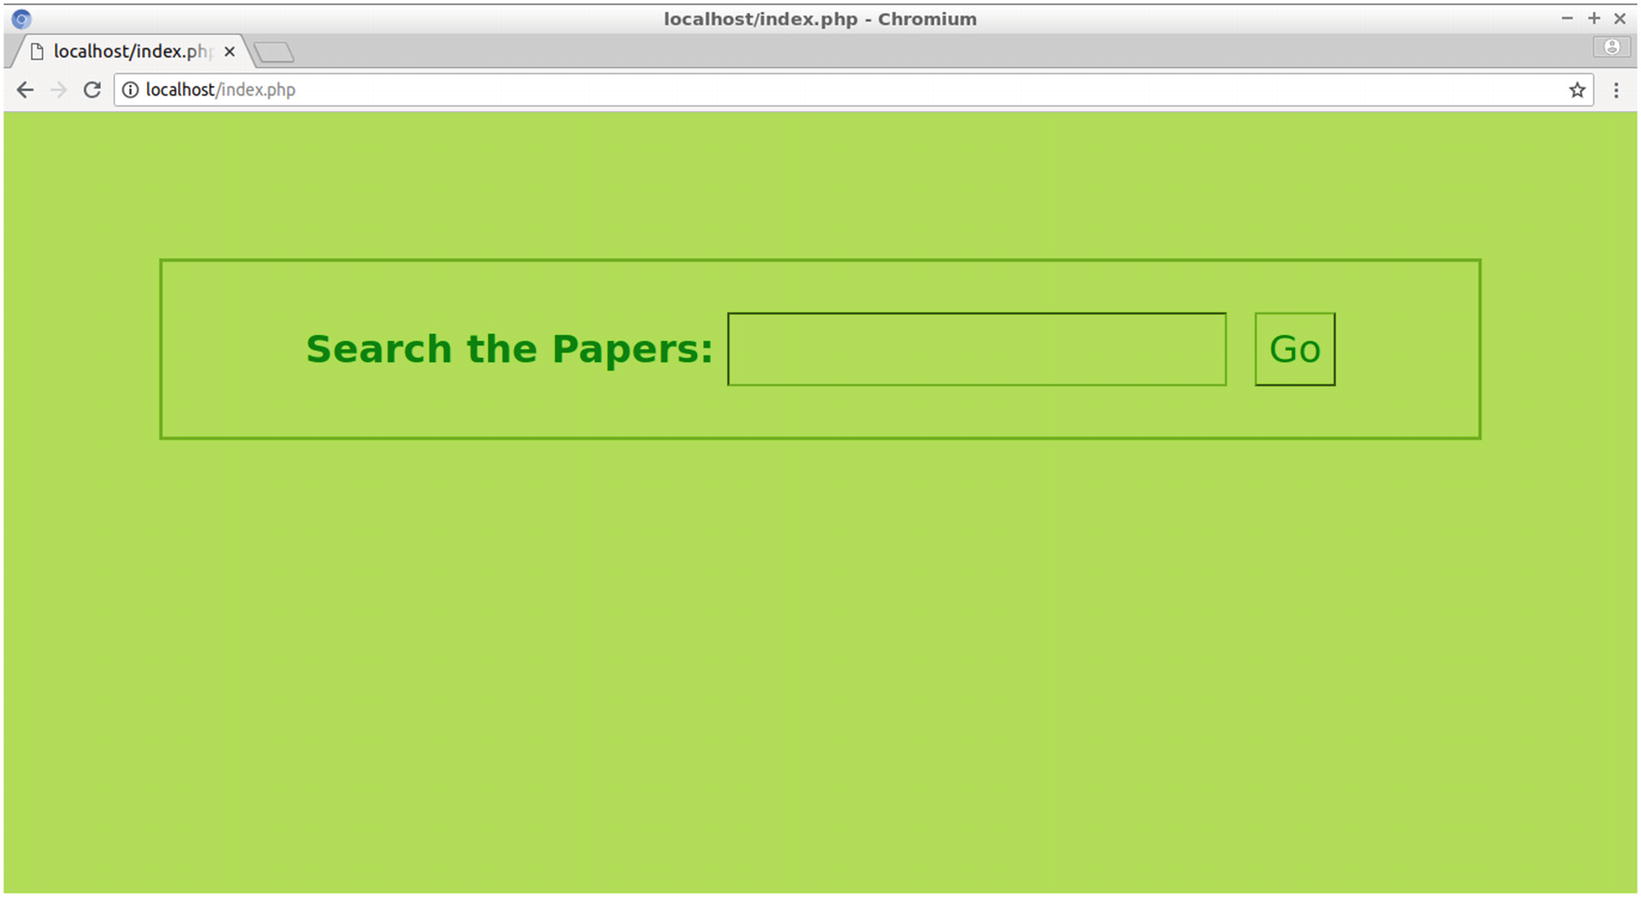
Or, as shown in Figure 7-24, simply use the following:
localhost/index.php
Figure 7-24
Viewing the GET version of the site locally
Run the previous query for the keyword HTTP. The query string is now visible in the address bar of your browser. In this example, as shown in Figure 7-25, it is as follows:
keywords=http&offset=0
Figure 7-25
With GET, the query string appears in the URL of the site
Click the right-facing arrow image. The query string, as shown in Figure 7-26, becomes as follows:
x=3&y=3&keywords=http&offset=5
As expected, the keywords value remains the same, but the other values change. The offset is updated to 5, and you can also see x with a value of 3 and y with a value of 3. The explanation for those two mysterious names comes is that because an image was used as a submit button, it attaches to the query string the x and y coordinates of the mouse pointer when the mouse clicks the image. The value pair (3, 3) means that the mouse pointer was placed near to the origin (0, 0) of the coordinates, which is the upper-left corner of the image.
Figure 7-26
Viewing the mouse coordinates in the query string
In the browser’s address bar, change the offset value manually, for instance to 17:
Press the Enter key. As shown in Figure 7-27, the page content gets updated with the five next records, starting at offset 17.
Figure 7-27
Manually changing a value in the query string
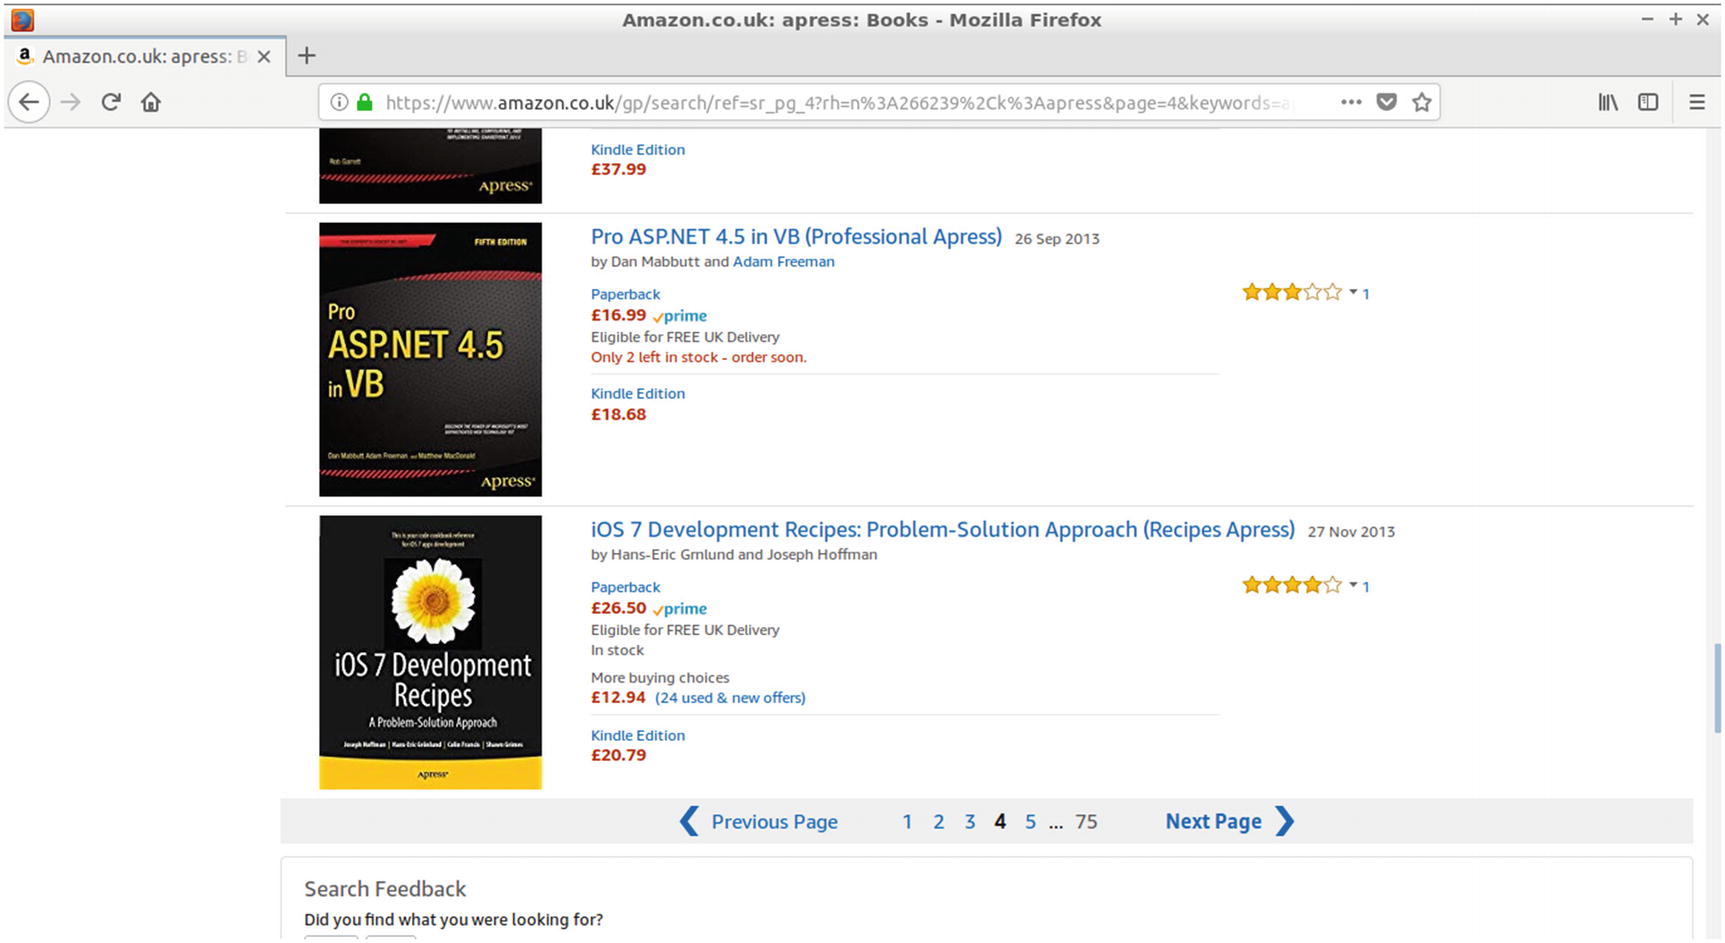
You can use this shortcut in many commercial sites when you want to move to the results at a position that is not included by the web page buttons. For instance, at the amazon.co.uk site, displayed in Figure 7-28, the current web page is page 4 of the query results as indicated with the page number at the bottom of the page and also in the web page’s URL.
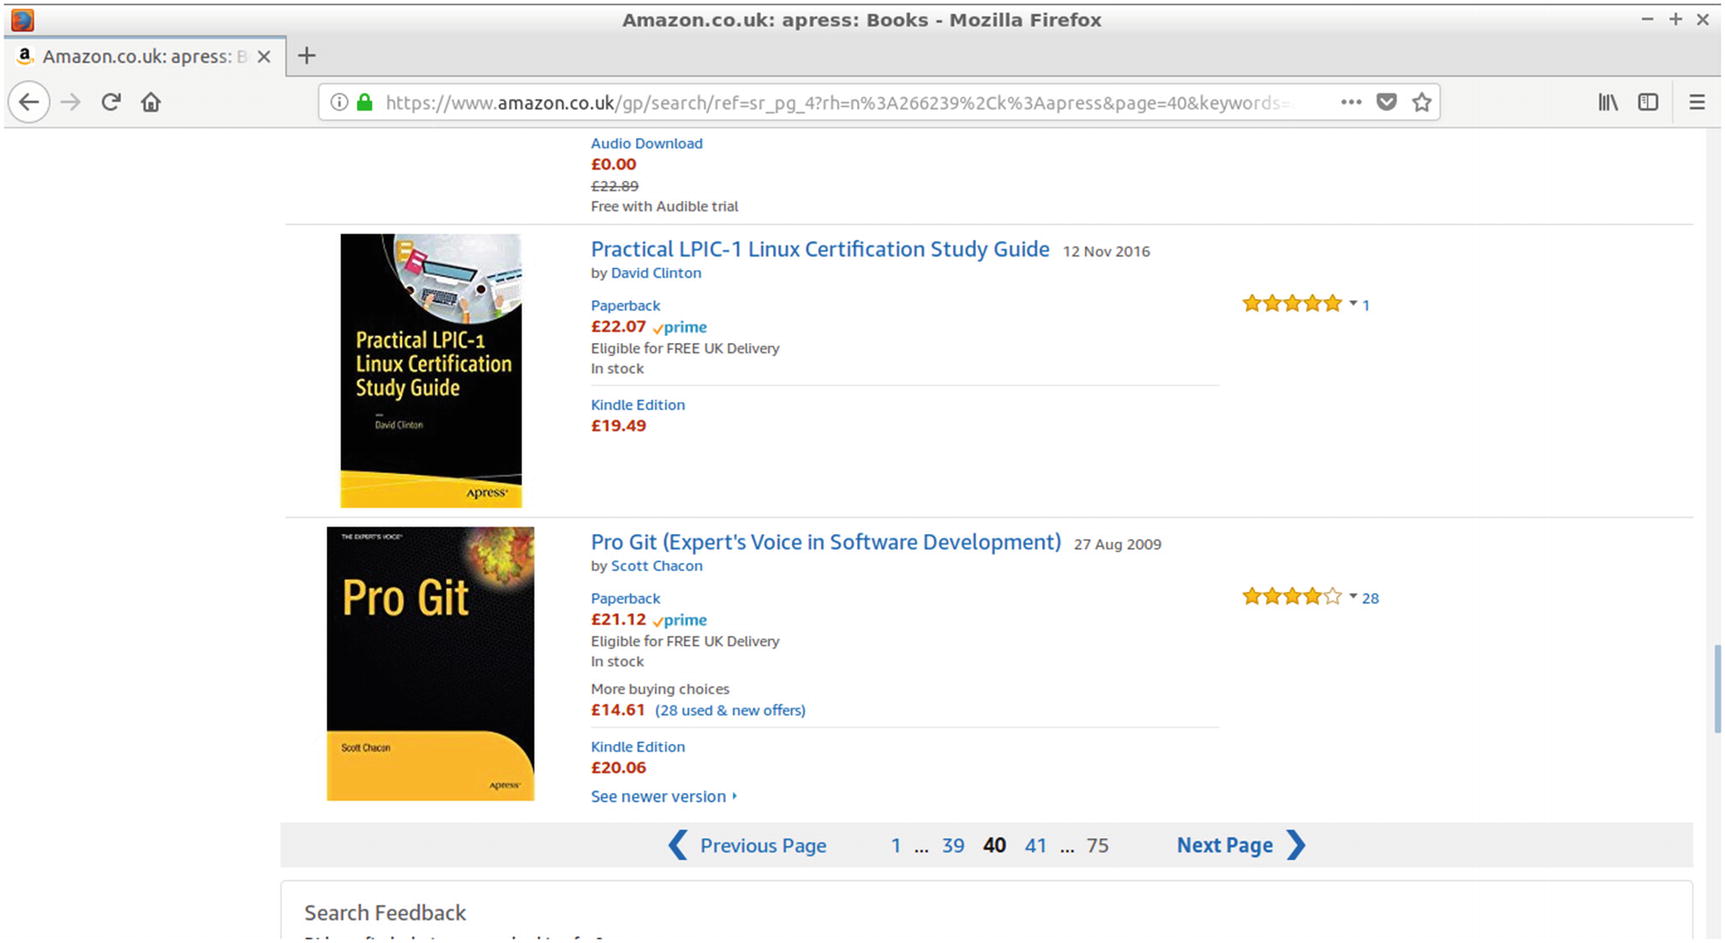
Change the value 4 in page=4 to 40 and press the Enter key to instantly move to page 40 of the results (Figure 7-29).
Figure 7-29
Amazon.co.uk showing page 40
Summary
In this chapter, you created a project that includes a multiword search feature that is found in a large number of web sites. The query searches the contents of the site and specifically the title of each web page entered in a database. The query results are returned as links to web pages that include the keyword.
You also automated the process of updating the database with new web pages entered into the site by using cron to schedule the updates with a Bash shell script.
In the following chapter, you’ll implement Secure Sockets Layer (SSL) for your site so that cryptography is enabled and a secure communication between the web server and the clients is ensured.