In this chapter, you’ll configure your router to forward any incoming packet with a TCP port number from the web service to the computer hosting your web server. TCP port 80 is the default port number for the HTTP protocol; however, other port numbers can also be used. Another port number used often for the HTTP protocol is port 8080. This port number, sometimes called the HTTP alternate port, is used when the ISP does not allow incoming traffic for port 80.
With the router configured to forward requests for the port you prefer to the web server, your site becomes available to the whole Internet. In this chapter, you’ll use a DNS domain name for the server instead of an IP address and thus make the URL for your site more user-friendly.
By allowing the Apache web server to connect to the Internet, your next project is to utilize the GeoIP Apache module to allow the server to locate the geographic origin of the site visitors, pinpoint them on a map, and even respond in their native language.
The NAT Protocol
The router device that connects two networks requires two IP addresses. Like Janus, the two-faced ancient Roman god of gates, it looks in two directions: externally and internally to the network. These addresses are referred to as public and privateaddresses, respectively. All workstations in the LAN allocate private IP addresses. The router represents all the private IP addresses of the LAN with its unique public IP address by implementing the Network Address Translation (NAT) protocol. NAT was developed to address the problem of the IPv4 address shortage. With a single public IP address for the router, multiple computers and Internet-enabled devices can connect to the Internet in a seamless manner.
NAT comes in two variations: static and dynamic. With static NAT, each host requires one public IP address for its private IP address to be reachable over the Internet.
With dynamic NAT, multiple hosts can translate their private IP address to the public IP address of the router. An extension of dynamic NAT is port forwarding, aka port mapping, which consists of a router service. With port forwarding, the router is configured to dispatch packets with a specific destination port number to a specific machine on the LAN. For instance, the router in Figure 3-1 is set to forward all packets with destination port 80 to the host with the private IP address 192.168.1.100.
Figure 3-1
A packet with destination addresses the public IP address of the router and port number 80 with the dynamic NAT service is forwarded to the private IP address of the web server
Enabling Port Forwarding to Your Router
To relay HTTP requests aimed at the public IP address of your router with the HTTP port number, you have to apply port forwarding on your web server. When an HTTP request with port 80 (or any other port number that you choose) arrives at the router, it will be forwarded to the private IP address of your web server. Most routers today include port forwarding not only because it’s a feature of dedicated web servers but also of many home appliances that act as servers, for instance IP cameras.
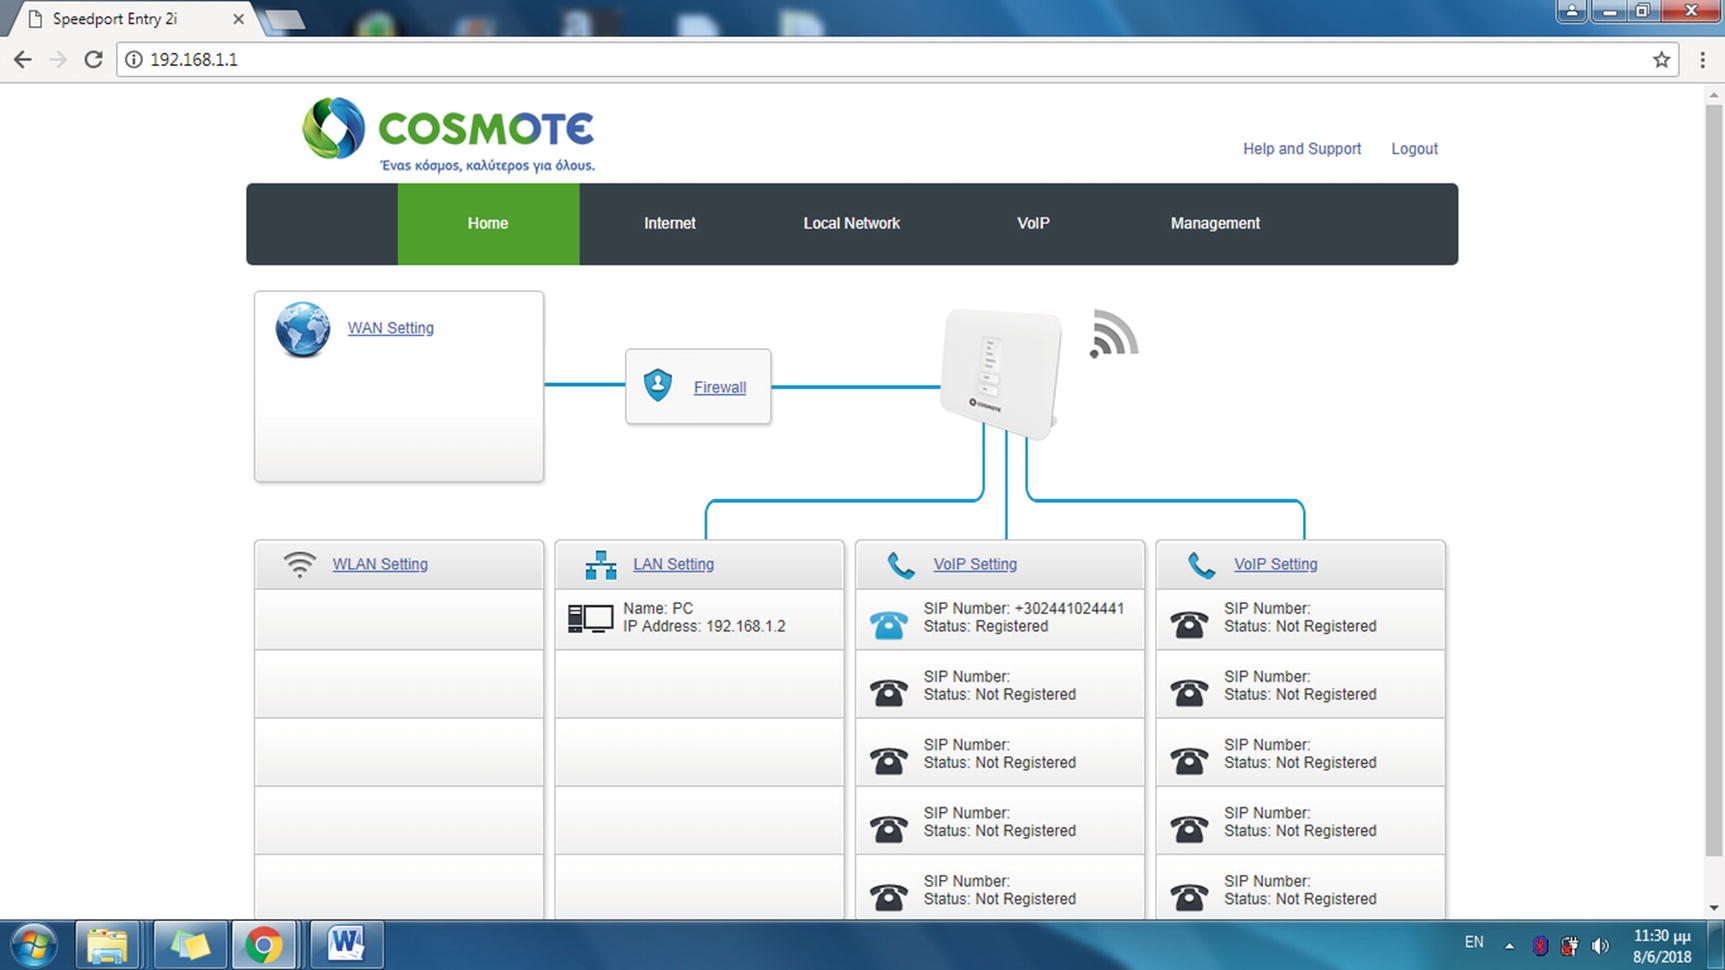
Most router configuration options are accessed through the HTTP or Telnet protocol. To use the first approach, enter the private IP address of your router in the address bar of your browser and provide the username and the password to go to the web-based router setup page. Locate the Port Forwarding option in the main menu of your router. For the examples in this book, the private IP address of the router is 192.168.1.1. When using this address in the browser’s address bar, the web page for the router appears; Figure 3-2 shows the page for the Speedport Entry 2i VDSL router.
Figure 3-2
The home web page for the web-based configuration interface of the test router
Click the Firewall link to go to the web page where the Port Forwarding option is available below the main navigation bar.
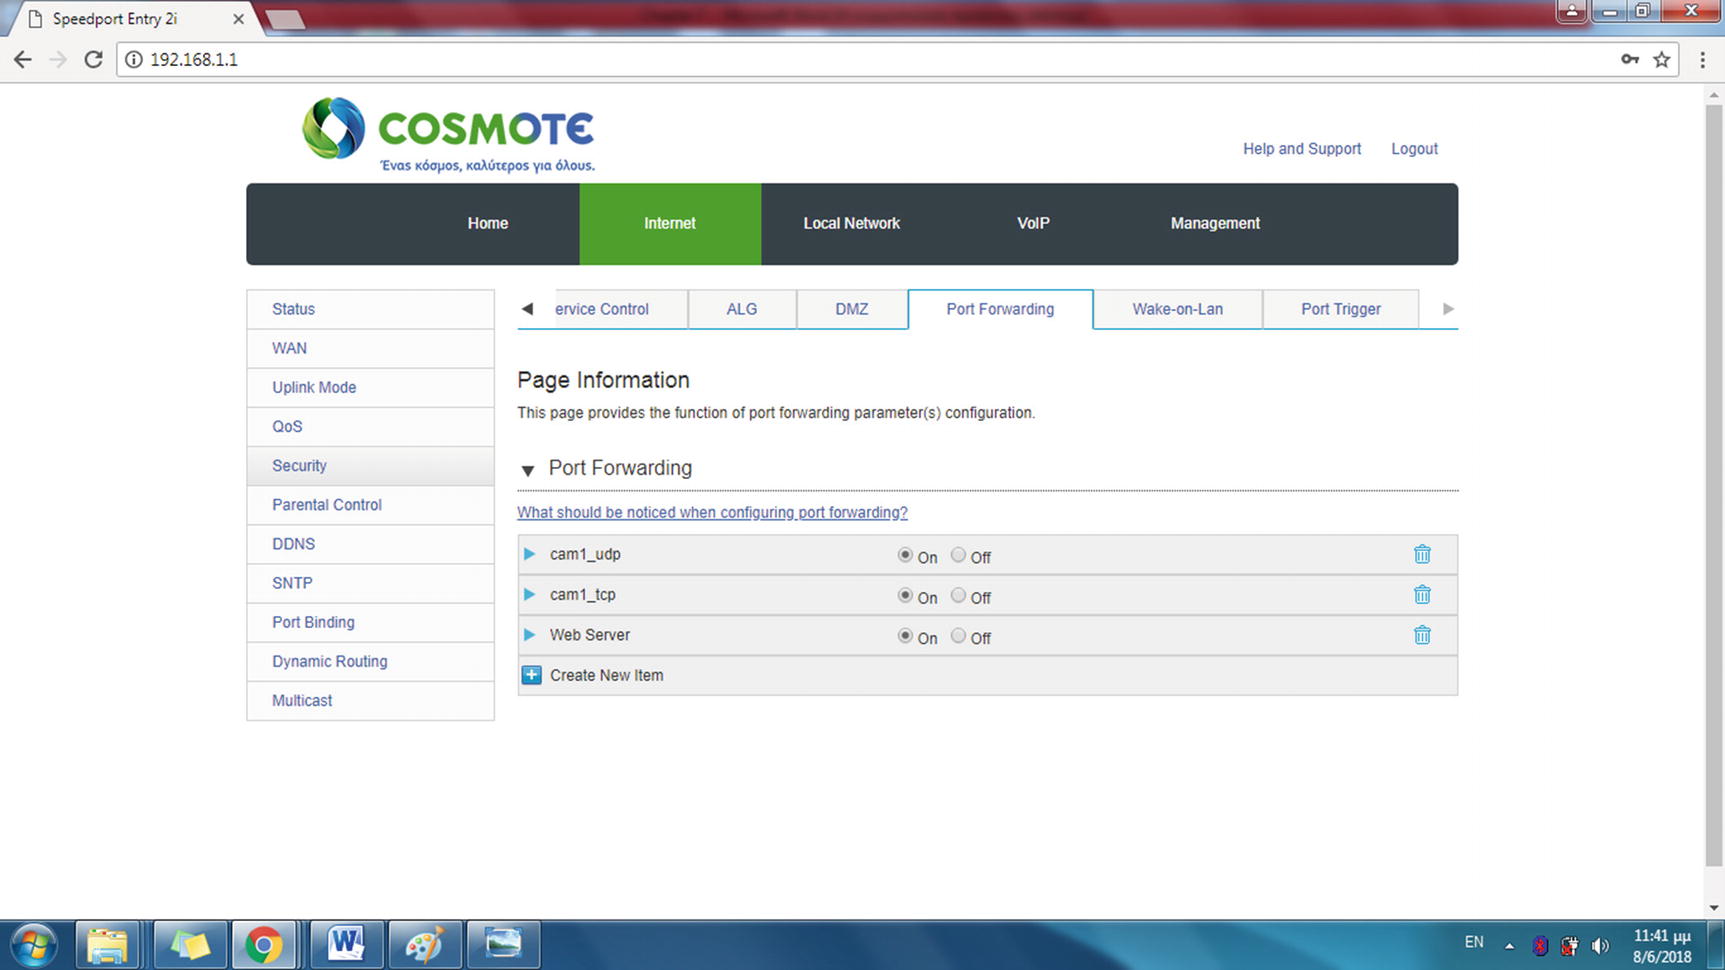
Click the Port Forwarding link to go to the web page displayed in Figure 3-3.
Figure 3-3
The Port Forwarding configuration web page
Click the Create New Item button to create a new entry for the Port Forwarding list. The form elements for the Port Forwarding settings appear, as shown in Figure 3-4.
Figure 3-4
The form with the port forwarding details
Enter a name for the service you implemented with port forwarding in the Name field, e.g., Web Server. Enter the private IP address for this computer, e.g., 192.168.1.100 (in the field LAN Host IP Address), and enter the port numbers you will use for the web service, e.g., 8080 (in the fields WAN Port Range and LAN Host Port Range). For the Protocol option, select TCP from the drop-down list to implement the HTTP protocol. Click the Apply button to confirm the settings. The new entry appears in the Port Forwarding list.
This is a good chance to add all the port numbers used for the HTTP and HTTPS protocols for the examples in this book. You can assign the computer with the private IP address of 192.168.1.100 the responsibility of receiving the TCP/IP packets on your LAN for the port numbers 80, 8080, 8181, and 443.
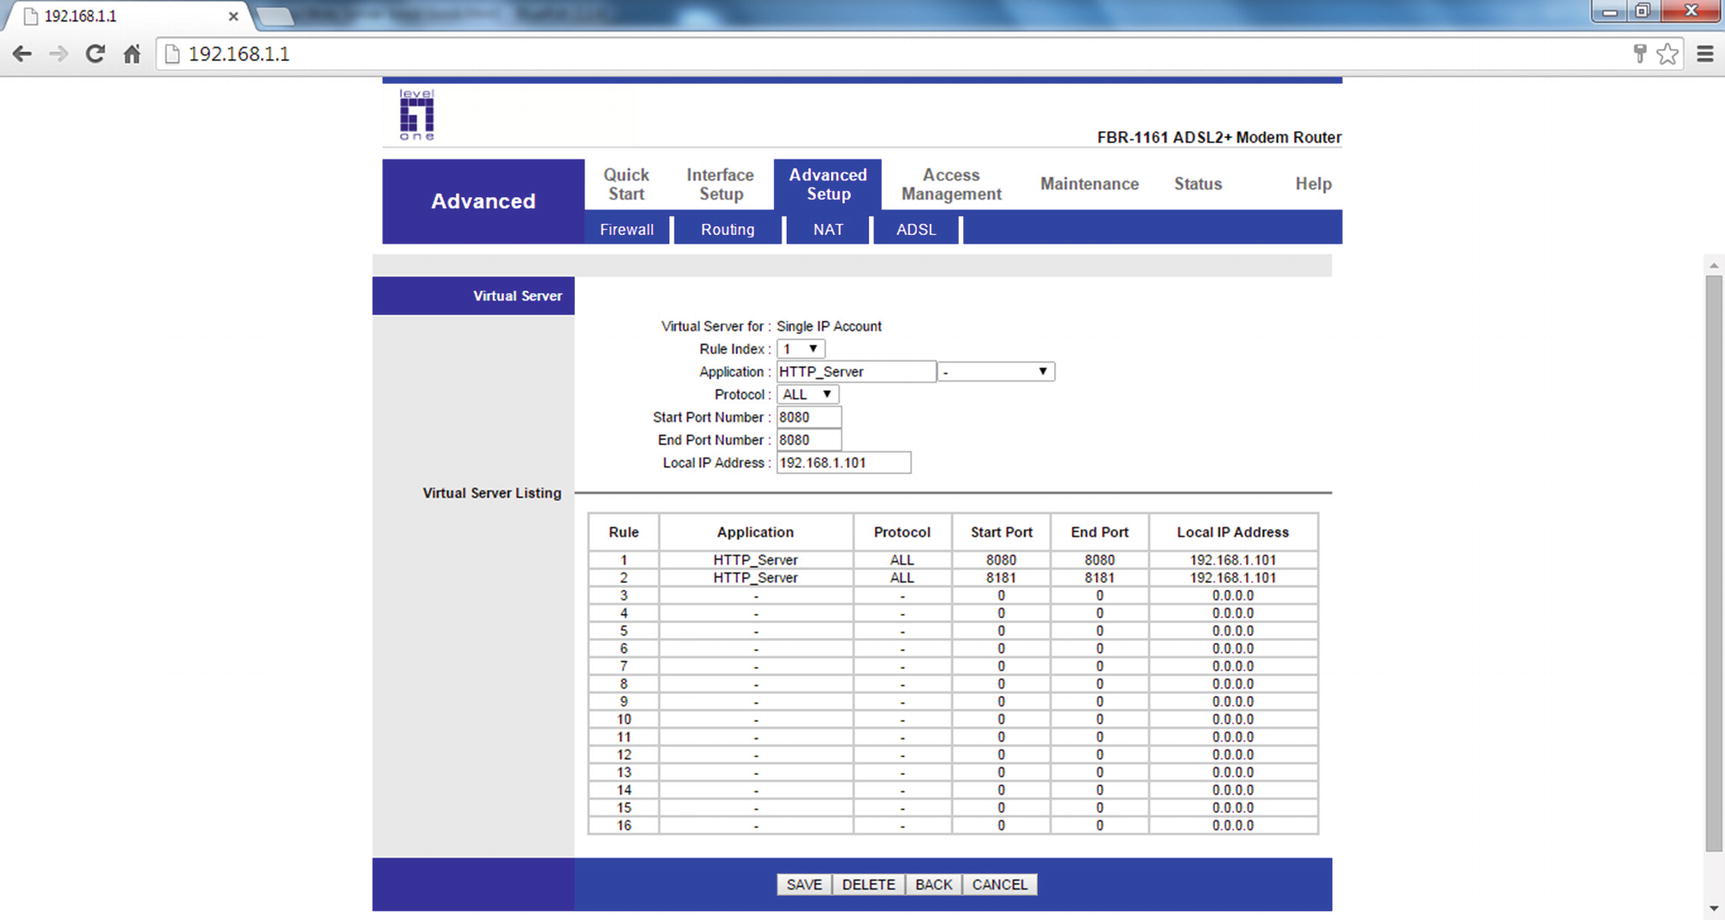
Each router model uses a different GUI environment to provide the Port Forwarding settings. Figure 3-5 shows the configuration page of the FBR-1161 LevelOne ADSL router, which displays the settings under the NAT option of the Advanced Setup menu.
Figure 3-5
The port forwarding web page for the LevelOne FBR-1161 ADSL router
The previous configuration assigns ports 8080 and 8181 to be forwarded to the LAN computer with IP 192.168.1.101 for all protocols (both TCP and UDP).
As a general rule, you have to provide three main settings: the port number on which the port forwarding applies for the router’s public IP address, the private IP address of the LAN computer assigned with the task to dispatch client requests for this specific port, and TCP as the transport protocol used for the HTTP and HTTPS services. As each router implements a different user interface for the web-based settings, it is useful to locate your specific router model options for port forwarding at https://portforward.com/router.htm.
Implementing Port Forwarding with Apache Vhosts
To implement the port forwarding feature, you can use the example1.conf configuration file from Chapter 1, which is a simple copy of the file 000-default.conf and which utilizes the default HTTP port 80. If your ISP blocks requests to this port, you can use another Apache virtual host that serves another port, for instance the HTTP alternate port, 8080. In that case, use the following commands at the Linux terminal to create a new configuration file by copying and modifying the default Apache configuration file 000-default.conf:
$ cd /etc/apache2/sites-available
$ sudo cp 000-default.conf example4.conf
Use a text editor to edit the file example4.conf.
$ sudo gedit example4.conf
Change just the first two lines as indicated next:
Listen 8080
<VirtualHost *:8080>
# The ServerName directive sets the request scheme, hostname and port that
# the server uses to identify itself. This is used when creating
# redirection URLs. In the context of virtual hosts, the ServerName
# specifies what hostname must appear in the request's Host: header to
# match this virtual host. For the default virtual host (this file) this
# value is not decisive as it is used as a last resort host regardless.
# However, you must set it for any further virtual host explicitly.
#ServerName www.example.com
ServerAdmin webmaster@localhost
DocumentRoot /var/www/html
# Available loglevels: trace8, ..., trace1, debug, info, notice, warn,
# error, crit, alert, emerg.
# It is also possible to configure the loglevel for particular
# modules, e.g.
#LogLevel info ssl:warn
ErrorLog ${APACHE_LOG_DIR}/error.log
CustomLog ${APACHE_LOG_DIR}/access.log combined
# For most configuration files from conf-available/, which are
# enabled or disabled at a global level, it is possible to
# include a line for only one particular virtual host. For example the
# following line enables the CGI configuration for this host only
# after it has been globally disabled with "a2disconf".
#Include conf-available/serve-cgi-bin.conf
</VirtualHost>
# vim: syntax=apache ts=4 sw=4 sts=4 sr noet
The first directive, Listen 8080, instructs Apache to listen on TCP port 8080. The starting <VirtualHost *:8080> container is used with the end </VirtualHost> container to enclose the group of directives that apply to the new vhost. The wildcard asterisk (*) with the port number 8080 appended with a colon indicates that the enclosed directives apply to incoming requests destined to any one of the available IP addresses (*) of the web server over port 8080.
Click the Save button of the gedit window to apply the configuration to the vhost. Next you need to enable the new configuration with the a2ensite command.
$ sudo a2ensite example4
To disable any previous configuration files that utilize the same port, for instance example2.conf, to avoid conflictions, use the a2dissite command.
$ sudo a2dissite example2
To enable the new configuration file, you need to reload the web server.
$ sudo service apache2 force-reload
If you intend to use port 8080 with the Apache server, you should configure ufw, the Linux firewall, to permit it. For port number 80, no actions are required because you already allowed this port in Chapter 1. Enter the following at the Linux terminal:
$ sudo ufw allow 8080
Testing the New Virtual Host
To implement the router’s port forwarding service, you have to access your site from an external LAN using the public IP address of your router. The common case is your ISP assigns your router a dynamic public IP address that changes, e.g., each time the router restarts. Alternatively, an ISP can offer static IP addresses, usually after the client’s request. In each case, to find the current public IP address of your router, use an online service like https://bearsmyip.com/. The current public IP address of your router is displayed in your browser, as shown in Figure 3-6.
Figure 3-6
Discovering the public IP address of the router with an online service
Enter the URL consisting of this IP address in your browser’s address bar from a LAN computer.
http://94.64.2.196
Alternatively, if you utilize port 8080 for your web server, enter the following:
http://94.64.2.196:8080
Your directory index is displayed in your browser, as shown in Figure 3-7.
Figure 3-7
Testing the site using the public IP address of your router, from a computer of your LAN
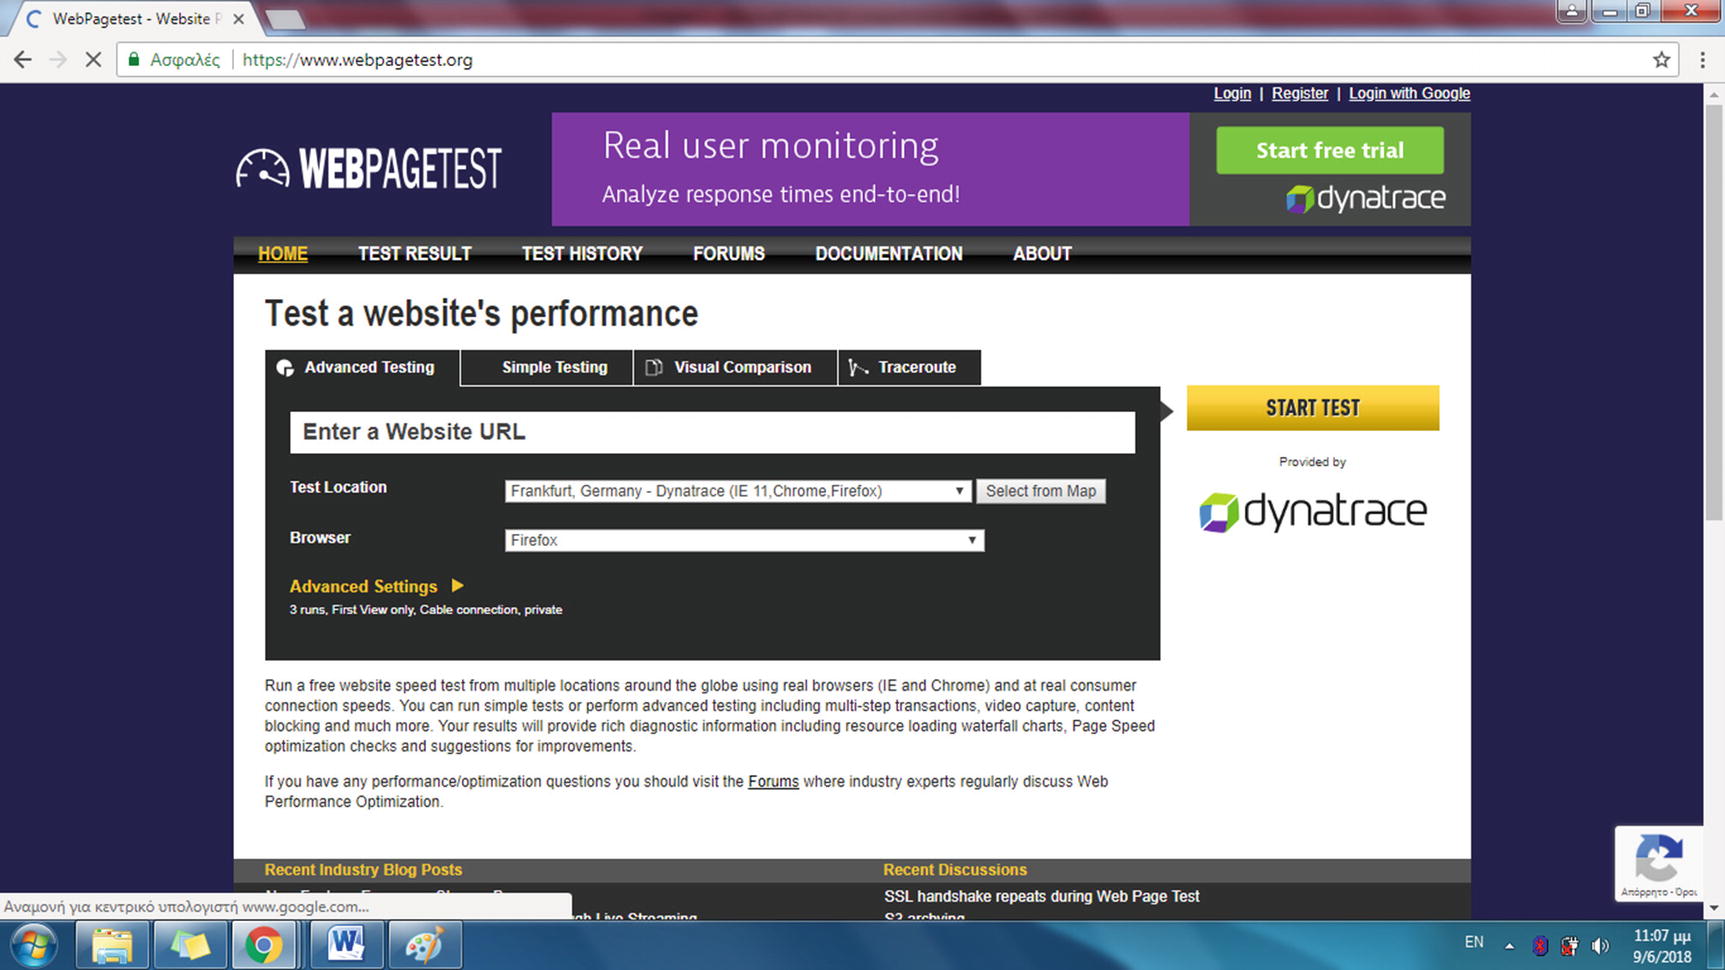
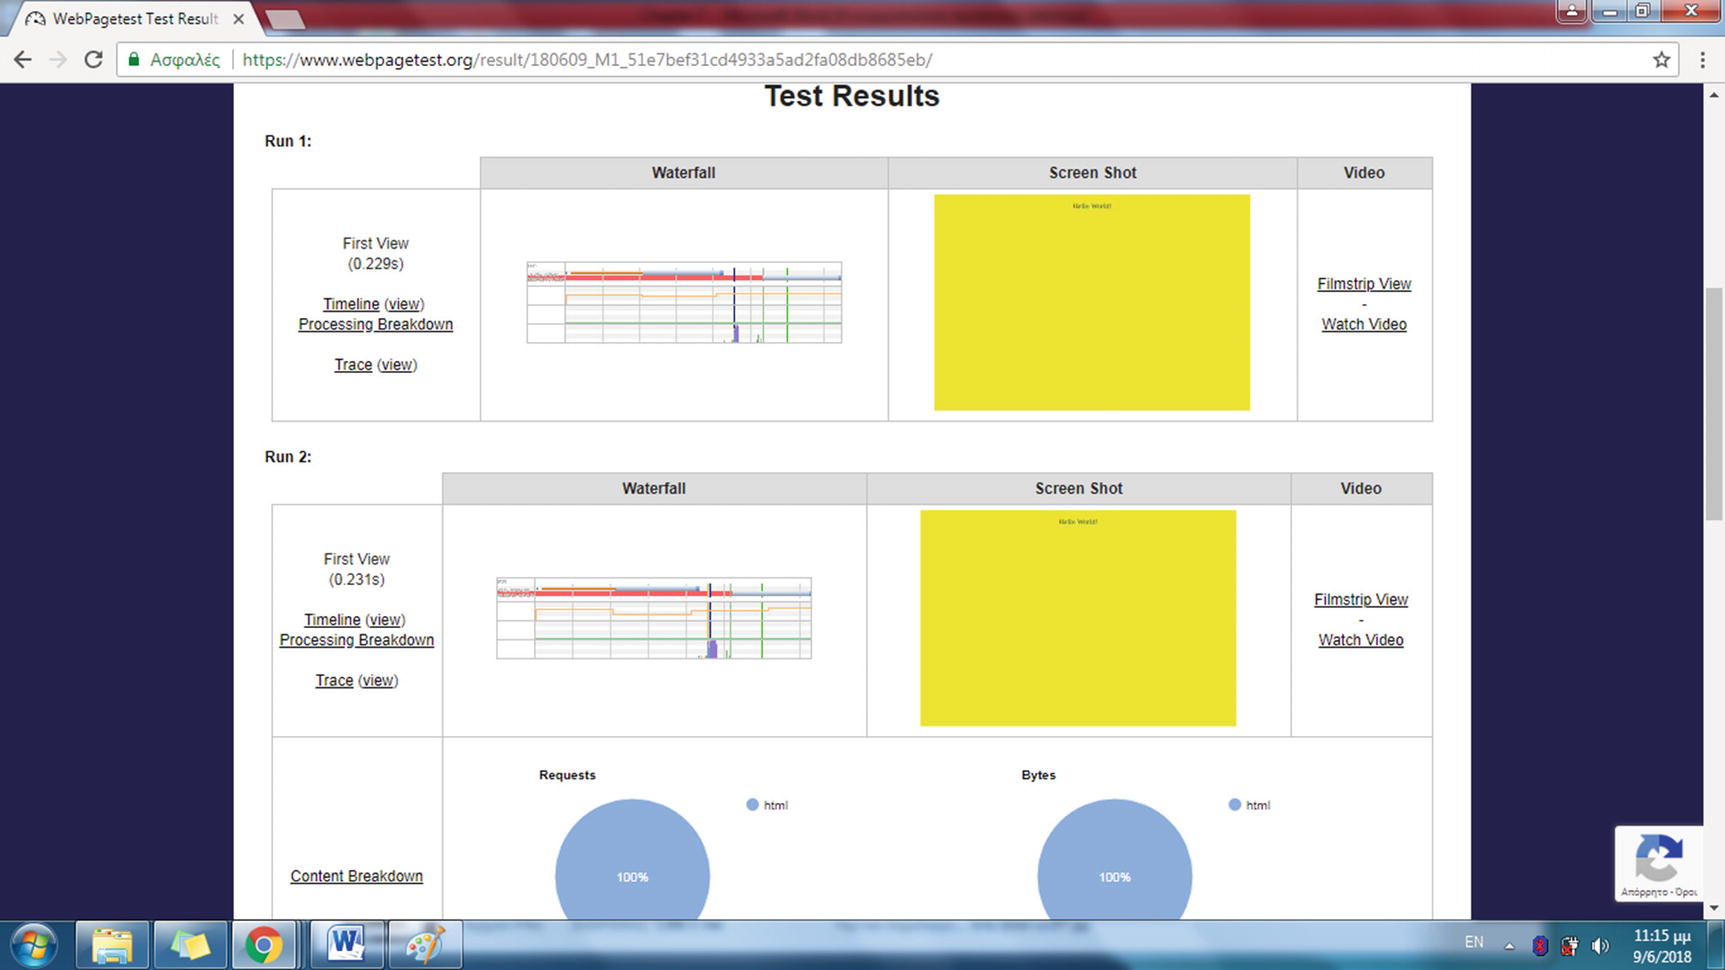
To make the test definitive, you next have to request the web page from an external computer to your LAN. You can either use your mobile phone’s Internet connection and view the web page with the previous URL or have a remote computer make the connection for you. There are many online services for testing web pages from various positions around the world. Actually, in Chapter 5, you will follow the steps to create a similar Internet service all by yourself. Such an online service is www.webpagetest.org. Using the images sent to your browser by this site, you can view the web page the way it is downloaded to the site’s remote browser. You can even choose the country, city, and browser, and also view statistics such as the download time. Figure 3-8 shows the webpagetest.org home page.
Figure 3-8
The home page of webpagetest.org
Enter the URL you want to test in the main textbox.
94.64.2.196
Or if you use a different port such as port 8080 instead of the default HTTP port, append the port number to the IP address with a colon. Here’s an example:
94.64.2.196:8080
Use the Test Location drop-down list to select a location (country and city) where the request to your server will originate from, and select the browser used from the Browser drop-down list. Click the Start Test button. After a few seconds, images of your web page are displayed along with info about the download time and the web page’s size. Figure 3-9 displays the result web page.
Figure 3-9
The result web page for testing your site remotely with webpagetest.org
On the web page in your browser, you can view screenshots of the directory index, each one taken from different tests for your site. You can click those images to enlarge them. This test verifies that your web site is able to be viewed externally.
With your site available to users throughout the world, you can make use of the GeoIP Apache module to give your web server information about the visitor’s location based on their IP address. The PHP source code will use these geographical details and return geographical information in the web page sent back to the user.
Using the GeoIP Apache Module
With the online service proving that your web pages are available to the whole Internet, it is a good chance to use a geolocation service to retrieve information about the origin of the users visiting your site and at the same time try an Apache module. With a geolocation service, the IP addresses of your visitors are compared to a database and are matched to specific countries, cities, geographical coordinates (latitude or longitude), etc. Those values are assigned to the Apache server variables for each client’s request and become available from the PHP engine.
With the following steps, you will implement a geolocation service with MaxMind’s Apache module geoip_module.
Hint!
To avoid prepending the sudo keyword in the following commands, enter the following at the Linux terminal:
$ sudo su
Install geoip_module with the following command:
$ apt-get install libapache2-mod-geoip
The geoip_module shared object file (mod_geoip.so), which includes the compiled source code used by Apache, is installed in the directory /usr/lib/apache2/modules.
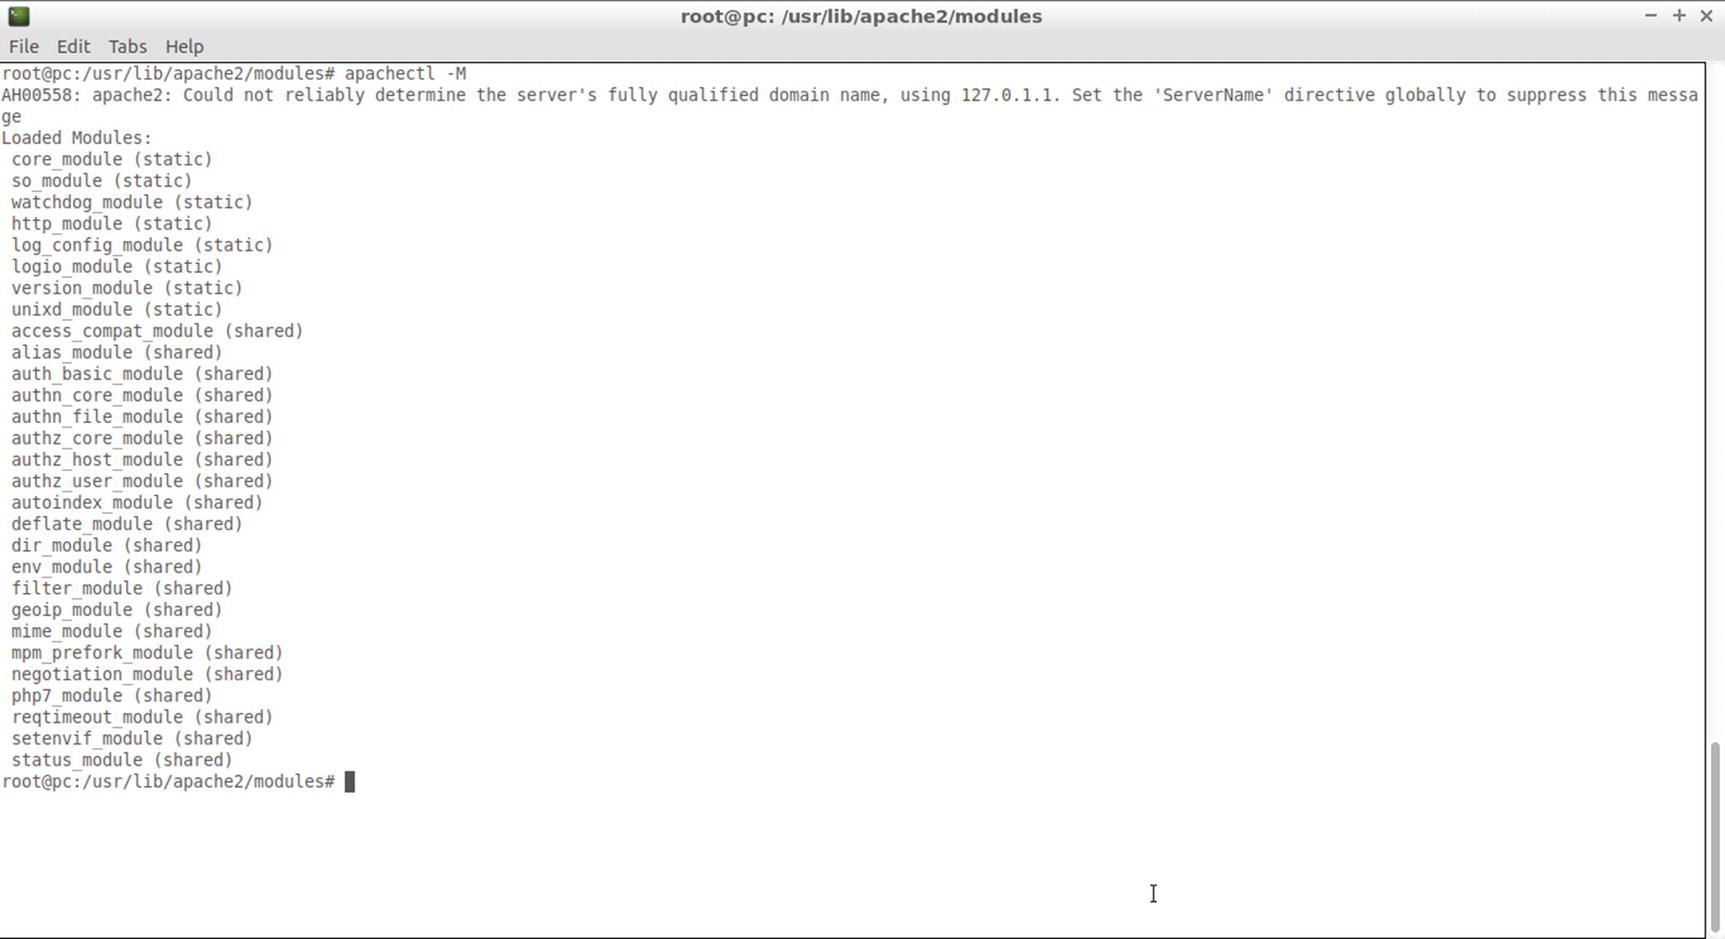
The geoip_module module is included among the other Apache modules loaded from Apache. Use the following command to view the list of loaded modules:
$ apache2ctl –M
Figure 3-10 displays the list of modules currently loaded.
Figure 3-10
Command apache2ctl -M returns the list of loaded Apache modules
You can find the module’s configuration files in the directory called mods-available. Using gedit from the Linux terminal, edit the configuration file geoip.conf of the geoip_module as follows:
$ gedit /etc/apache2/mods-available/geoip.conf
Set the GeoIPEnable directive from Off to On. The configuration file includes then the following directives:
<IfModule mod_geoip.c>
# For performance reasons, it's not recommended to turn GeoIP on serverwide,
# but rather only in <Location> or <Directory> blocks where it's actually
# needed.
GeoIPEnable On
GeoIPDBFile /usr/share/GeoIP/GeoIP.dat
</IfModule>
Enable the new configuration file using the a2enmod (apache2 enable module) command:
$ a2enmod geoip
Hint!
If you need to disable the GeoIP module, you can use the a2dismod (apache2 disable module) command as follows:
$ a2dismod geoip
geoip_module is included now as a symbolic link to the directory /etc/apache2/mods-enabled.
Reload Apache using this:
$ sudo service apache2 force-reload
geoip_module looks up the client’s IP address from MaxMind’s database. The following are the steps to download the GeoIP database.
Change the working directory to GeoIP.
$ cd /usr/share/GeoIP/
wget is a command-line utility for downloading web pages and other resources with web protocols. You will use wget next to download the GeoIP.dat.gz zipped database file:
The previous source code makes use of apache_note(), an Apache-specific function that accesses the Apache notes table to retrieve the information exchanged between Apache modules. The file geo2.php, on the other hand, includes PHP source code that can be used independently from other web servers as well.
<!DOCTYPE html>
<html>
<body>
<?php
$country_name = $_SERVER["GEOIP_COUNTRY_NAME"];
print "Your Country: " . $country_name;
?>
</body>
</html>
With the GeoIP module enabled, the web server looks up the IP address of the client in the database files and sets environment variables such as GEOIP_COUNTRY_NAME used next from the PHP global variable $_SERVER, for instance $_SERVER["GEOIP_COUNTRY_NAME"].
Hint!
You can test the environment variables with the following PHP code:
<?php
echo 'Client IP Address: ' . getenv('GEOIP_ADDR') . "<br>";
echo 'Client Country Code: ' . getenv('GEOIP_COUNTRY_CODE') . "<br>";
echo 'Client Country Name: ' . getenv('GEOIP_COUNTRY_NAME') . "<br>";
echo 'Client City: ' . getenv('GEOIP_CITY');
?>
Insert the previous source code in a PHP file located in the document root of your web server and request this file next in your browser. Here is some sample output:
Client IP Address: 206.189.190.142
Client Country Code: US
Client Country Name: United States
Client City: Chicago
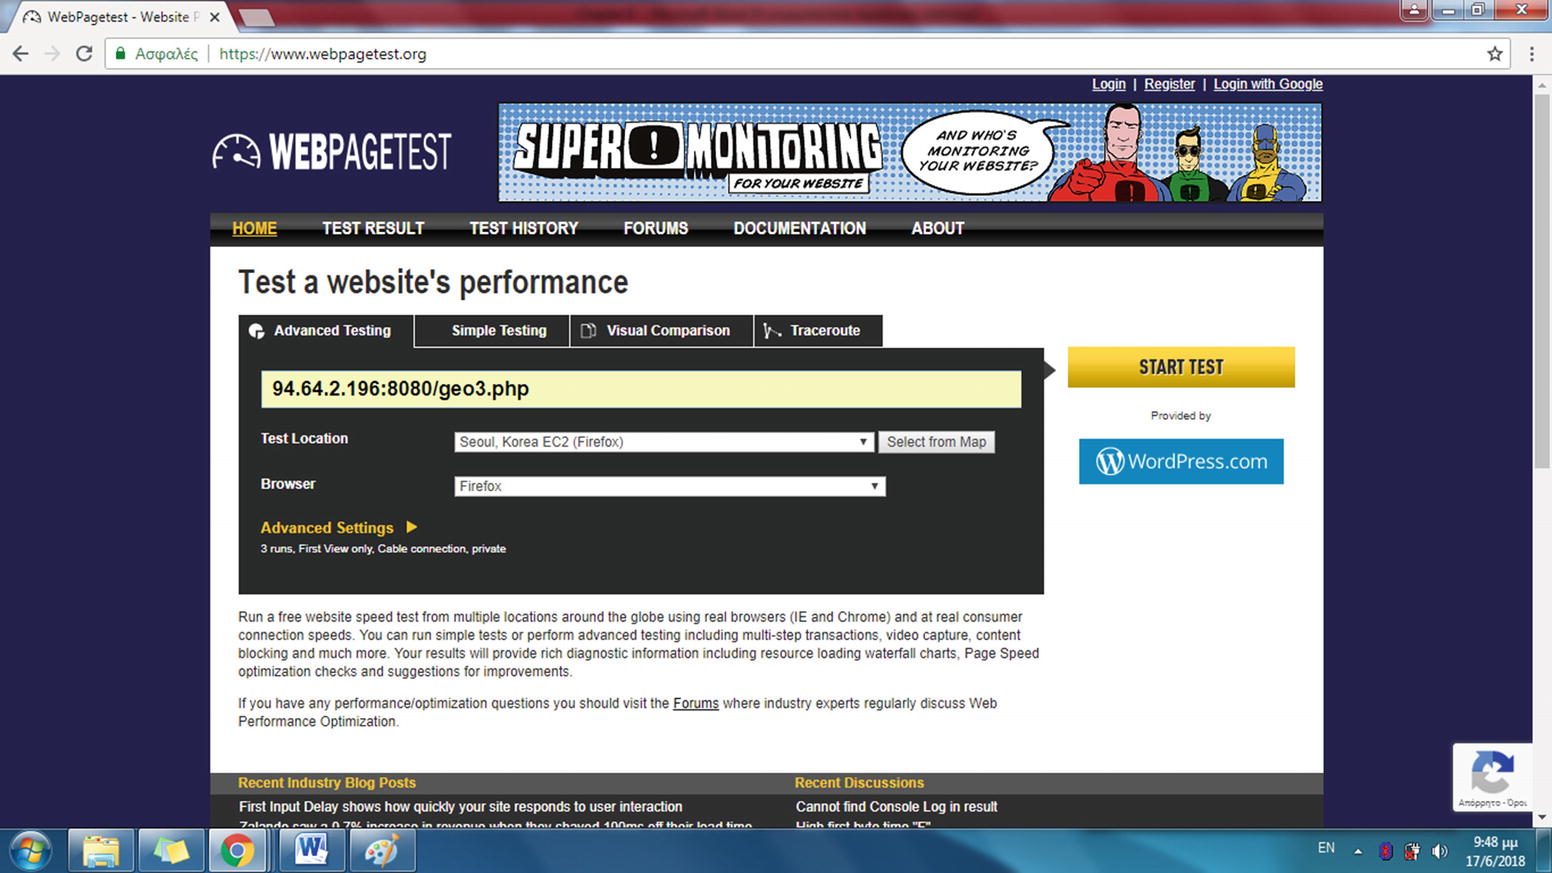
Test the files geo1.php and geo2.php using a web page tester like webpagetest.org. On the home page of this site, enter a URL that includes the current IP public address of your router and the port set in the port forwarding service of your router, relative to the document root path of the PHP file you are testing. Here’s an example:
94.64.2.196/geo1.php
If you are using another port other than the default, append this port number with a colon to the IP address, as shown here:
94.64.2.196:8080/geo1.php
Select a country in the Test Location drop-down list, as shown in Figure 3-11, where the test will run from. For instance, in the following test, Ireland was selected:
Ireland – EC2
Select also the browser’s name in the Browser drop-down list.
Chrome
Figure 3-11
Selecting at the webpagetest.org site a specific computer in a country where the test will run
Alternatively, you can select the country from a map using the Select from Map button. The available geographical locations are pinned on the map, as displayed in Figure 3-12. Click a specific pin to use the corresponding remote computer for your test.
Figure 3-13 displays the web page, returned when the test runs, enlarged by clicking it. This is the web page that will appear in the web browser of the user in Ireland.
Figure 3-13
The web page displaying “Your Country: Ireland” as it appears on the computer located in Ireland
The web page displays the following:
Your Country: Ireland
Hint!
Notice that the geolocation service is not always accurate. Also, the GeoIP database file needs to be constantly updated, something that can be automated with a software tool like cron.
In the site in the following section, the geographical information for the user is taken from the PHP source code and processed to display web pages with text corresponding to the time in the official language of the country associated with the user’s IP address.
Responding to the Visitor’s Native Language
With this next project, you’ll create a web site that looks up the IP address of the visitor to the GeoIP database, retrieves the visitor’s two-letter country code (ISO 3166-1 alpha-2), and responds by saying “hello” in the official language of that country. This is a simplified example; however, similar techniques are used on the sites of international corporations to provide their content, e.g., device manuals, in different areas of the world.
In the document root directory /var/www/html, create a file called geo3.php with the following source code:
<!DOCTYPE html>
<html>
<head>
<style>
p {
font-size:80px;
color:red;
}
</style>
</head>
<body>
<?php
$cc = $_SERVER["GEOIP_COUNTRY_CODE"];
switch ($cc) {
case "US":
case "UK":
print "<p>hello</p>";
break;
case "FR":
print "<p>bonjour</p>";
break;
default:
print "<p> 😀 </p>";
}
?>
</body>
</html>
The PHP code retrieves the GEOIP_COUNTRY_CODE environmental variable, whose value is a two-letter country code. A switch statement then checks this value against some predefined country codes, for instance, US, UK, and FR. You can add more switch statements for more country codes. For each country, a “hello” message in the corresponding language is printed on the screen. The default statement, which applies for all cases not covered in the previous switch statements, prints a Unicode smiley instead of a greeting. The specific smiley used in the example corresponds to Unicode hex code 1F600. To print the characters in a large red font, CSS style properties were used.
Visit the webpagetest.org home page to test your server and select a U.S. city from the Test Location list. In the example shown in Figure 3-14, a computer located in California was used.
Figure 3-14
Running the test from a computer located in California
Enter the following URL at the main textbox:
94.64.2.196/geo3.php
Or if your server configuration implements port number 8080 use:
94.64.2.196:8080/geo3.php
The IP address 94.64.2.196 used in this example should be substituted with the public IP address of your router. Click the Start Test button. The web page in Figure 3-15 displays the content of the web page viewed from the remote computer in California.
Figure 3-15
The message “hello” displayed in the browser of a test computer located in California
Perform the test again, this time from a French location. On the home page of webpagetest.org, displayed in Figure 3-16, a computer from Strasburg is selected to download your specified web page.
Figure 3-16
Running the test from a computer located in Strasburg
Click the Start Test button to run the test. As displayed in Figure 3-17, the web page of your site greets the visitor with “bonjour.”
Figure 3-17
The message “bonjour” displayed in the browser of a computer located in France
Do a final test using a South Korean site. In the example in Figure 3-18, a computer located in Seoul was selected. For simplicity, the PHP code of geo3.php supports only three countries, leaving all other country visitors to be welcomed with a smiley.
Figure 3-18
Running the test from a computer located in Seoul
As displayed in Figure 3-19, for a non-US, UK, or France visitor, instead of a written message, the downloaded web page from your site displays a broad smile.
Figure 3-19
The smiley displayed in the browser of a computer located in Korea
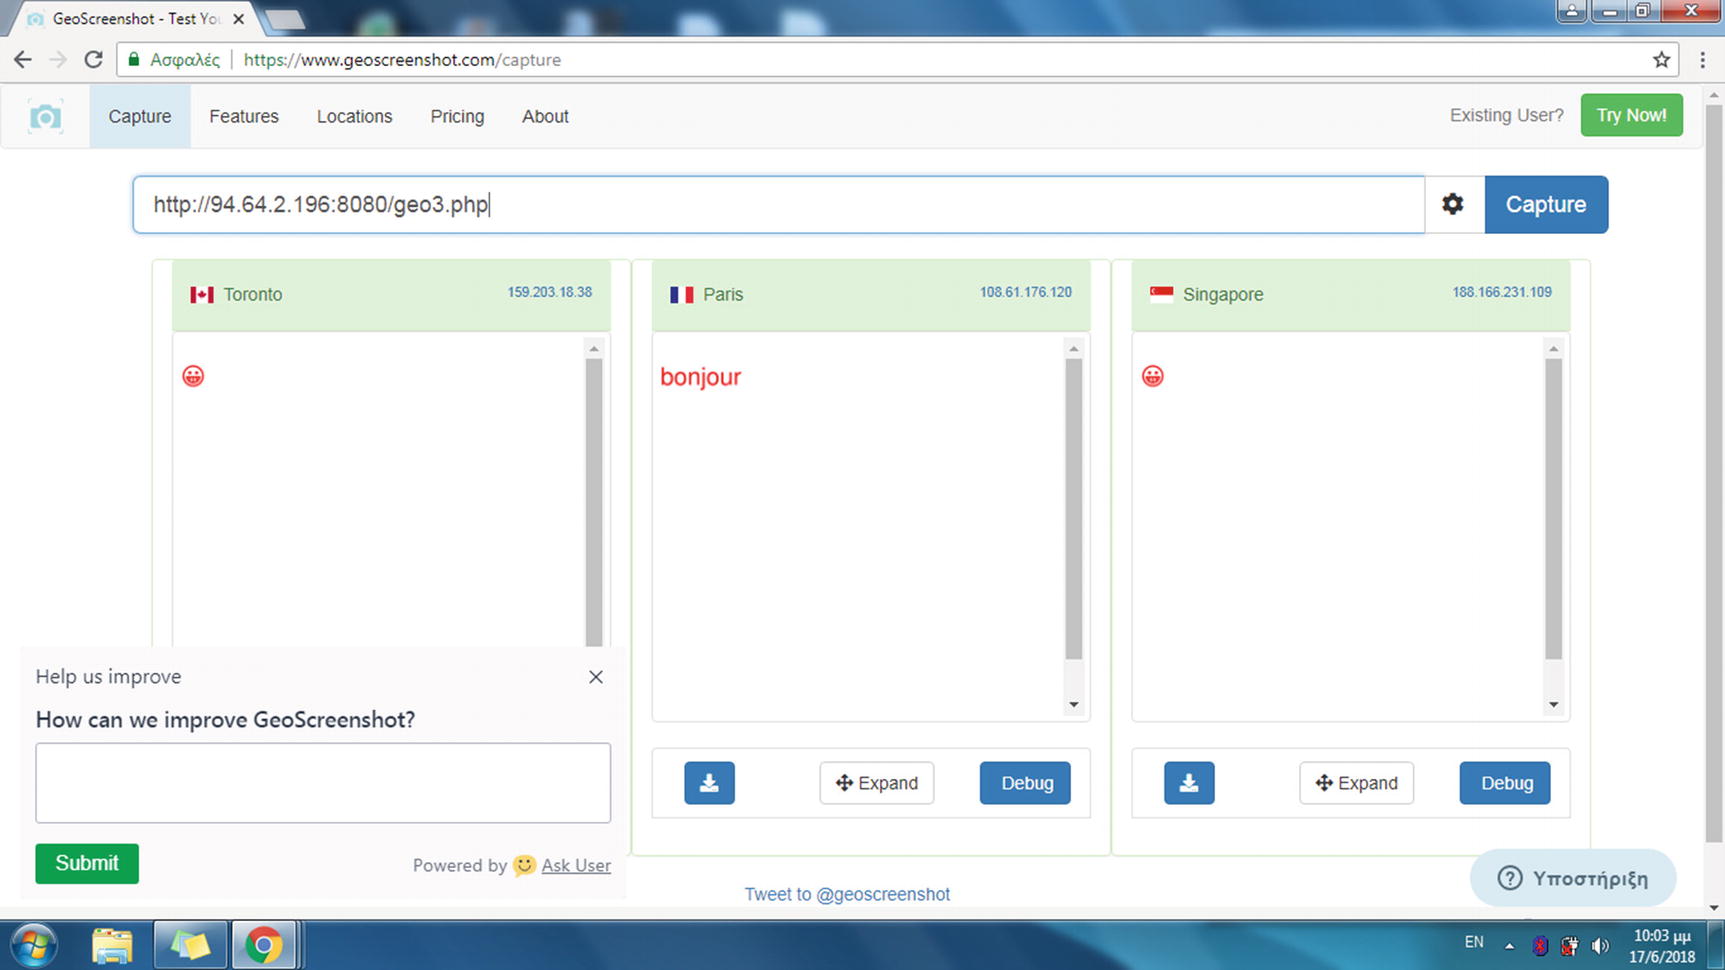
Another site for testing your page is www.geoscreenshot.com. It performs multiple tests from different locations and displays the results in a single web page. Figure 3-20 shows a test for the geo3.php web page.
Figure 3-20
Using geoscreenshot.com to test your site remotely
In the following section, you’ll install another database, GeoIPCity, to look up the IP address of the visitor and retrieve the latitude and longitude associated with the IP address so that the visitor’s location on the map is returned to the user.
Using a Map to Display the Visitor’s Location
In this project, you’ll gather more information about the visitor, such as the city registered with the IP address used and also the geographical coordinates. The latitude and the longitude associated with the IP address of the client can be used to pinpoint the location of the client on a map. To use this information, another database file should also be downloaded and included in the files that the Apache server looks up.
Like previously, type sudo su to avoid prepending most of the following commands with sudo.
$ sudo su
Move to the GeoIP directory.
$ cd /usr/share/GeoIP/
Use the wget utility from the command line to download GeoLiteCity.dat.gz in the current directory.
The previous PHP source code injects the basic HTML tags with the echo command. By using a single quote (') instead of a double quote (") in echo, you can maintain the double quotes of the HTML source code without having to escape them with a backslash (") in order not to intervene with the PHP string delimiter double quotes.
The $_SERVER['GEOIP_LONGITUDE'] and $_SERVER['GEOIP_LATITUDE'] parts that correspond to the visitor’s longitude and latitude, respectively, are the PHP global variables. The Apache module sets them by looking up the client’s IP address in the GeoIPCity.dat database. The coordinates will be used in the URL value of the src attribute of the image element (img) to create the static map that will be displayed in the web page of the user. Static maps are image files, commonly in PNG or JPEG format, that do not require a mapping library. However, they lack interactivity with controls like the Zoom control or the Map Type control. According to the coordinates in the image URL, a specific area will be displayed that will reflect the origin of the client’s host computer.
There are many static map APIs you can use; some require a registration and a fee. In this project, Yandex will be used. At https://staticmapmaker.com/yandex/, you can find the following example for using Yandex to create a static map:
<img width="600" src="https://static-maps.yandex.ru/1.x/?lang=en-US&ll=-73.7638,42.6564&z=13&l=map&size=600,300" alt="Yandex Map of -73.7638,42.6564">
The previous tag is inserted into the HTML source code and creates an image with a width of 600 pixels and a height of 300 pixels, with English language labels. It focuses on longitude 73.7638 and latitude 42.6564 with a zooming level set to 13. There is also alternative text (alt) in case a problem occurs and the map does not load. Figure 3-21 displays how the user visiting staticmapmaker.com can interact with the Static Map Maker online tool. By using the provided form, the user can use specific geographical coordinates, zoom level, width, and height for the image created, and they can define the category of the map formed, e.g., satellite or traffic. So, you can include this map on a site, a URL with the required query string according to the user settings is also created automatically. The image tag that includes the previous URL as the value of the src attribute is also formed to be used readily in the HTML source code.
Figure 3-21
Using the Static Map Maker tool to create a static map image
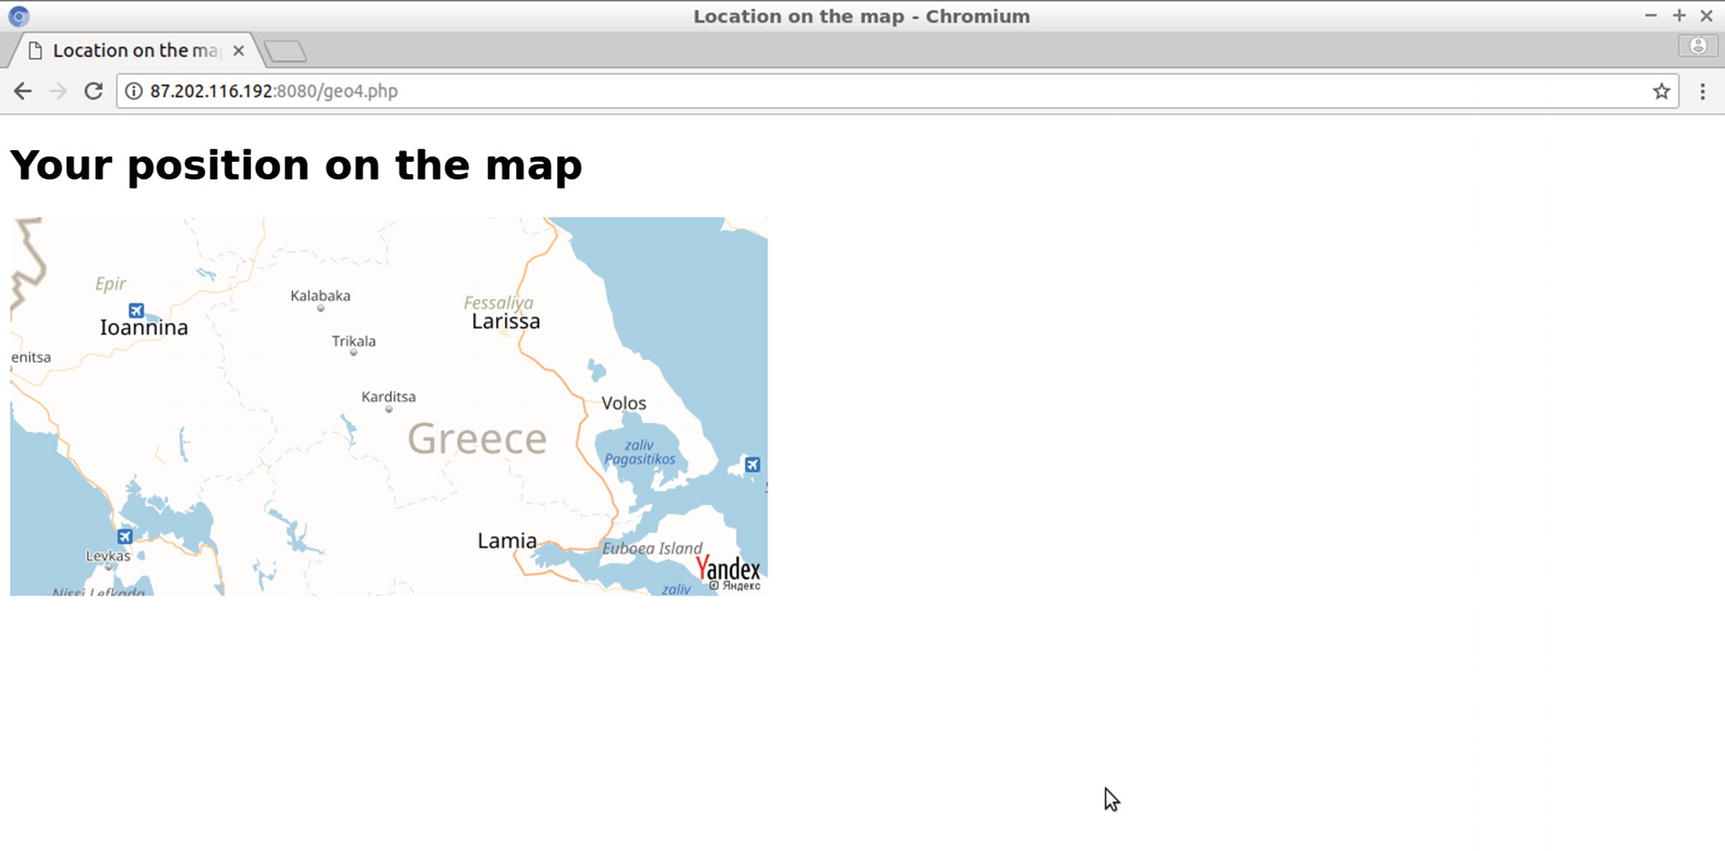
You can use the format of the image element from Static Map Maker for the static map included in your web page. The basic attributes of the static map are set in the query string of the URL value of the src attribute. For instance, in the source code of geo4.php, the zoom level was set to 8 (z=8). The longitude and the latitude were replaced by the PHP global variables $_SERVER['GEOIP_LONGITUDE'] and $_SERVER['GEOIP_LATITUDE'] to hold the values associated with the client’s IP address. To form the src attribute, which includes the PHP global variables, a number of echo commands are used.
To test this web page, use an online service like whatismyipaddress.com to find the public IP address of your router and replace it with the IP address used in this example, 87.202.116.192:
87.202.116.192/geo4.php
Or if you utilize port number 8080 use:
87.202.116.192:8080/geo4.php
Figure 3-22 displays the requested web page geo4.php from a computer in the LAN where the web server is hosted for this example.
Figure 3-22
Testing geo4.php from a computer of your LAN
Right-click the web page and select View Page Source to display the web page source code and find the values for $_SERVER['GEOIP_LONGITUDE'] and $_SERVER['GEOIP_LATITUDE'] as included in the query string of the src attribute in the image element. For the previous example, the image element is formed as follows:
Two more PHP global variables are used in the previous source code: $_SERVER['GEOIP_CITY'], which holds the name of the city and $_SERVER['GEOIP_COUNTRY_NAME'], which corresponds to the name of the country as registered with the client’s IP address.
Using the URL of file geo5.php, the web page is displayed, as shown in Figure 3-23.
Figure 3-23
Testing geo5.php
In the next section of this chapter, you’ll make changes to improve the appearance of the previous site.
A New Version of the Static Map Web Page
Here you’ll use gedit to create in the document root of your web server a new version of the geo5.php file, called geo6.php.
$ cd /var/www/html
$ sudo gedit geo6.php
Enter the following source code and save the file:
<!DOCTYPE html>
<html>
<head>
<title>Your Location</title>
<style>
body{
background-color:#B9D6E5;
}
.center {
margin: auto;
}
p{
text-align: center;
}
</style>
</head>
<body>
<div class="center">
<p>
<?php
echo '
<h1 style="text-align:center">Your position on the map is in '
Test geo6.php in your browser, as shown in Figure 3-24.
Figure 3-24
The map as displayed in the new version, geo6.php
In the new file geo6.php, there are a few significant differences from the web page created with the file geo5.php. First, the image is centered on the web page. A div element of the class center is used to include the image and the heading. The class is defined with CSS as follows:
.center {
margin: auto;
}
The second difference in the geo5.php source code is the zoom level, set now to 4, to include a larger area on the map. By zooming out on the map, the name of the city is not printed anymore, and instead a map pin is used to indicate the city’s location. There are a lot of different placemarks offered for the Yandex maps. You can view them at https://tech.yandex.com/maps/doc/staticapi/1.x/dg/concepts/markers-docpage/. The format for the value of the pt variable on the image’s URL, used for placing a specific marker, is as follows:
The value pm2rdl corresponds to a placemark that belongs to group 2 of the Yandex placemarks (pm2), is red (rd), and also has a large (l) size.
The third difference is the background color selected for the web page, which is actually the same color used for the oceans on the map. To find the specific color (RGB color code #B9D6E5 in this example), use the following instructions.
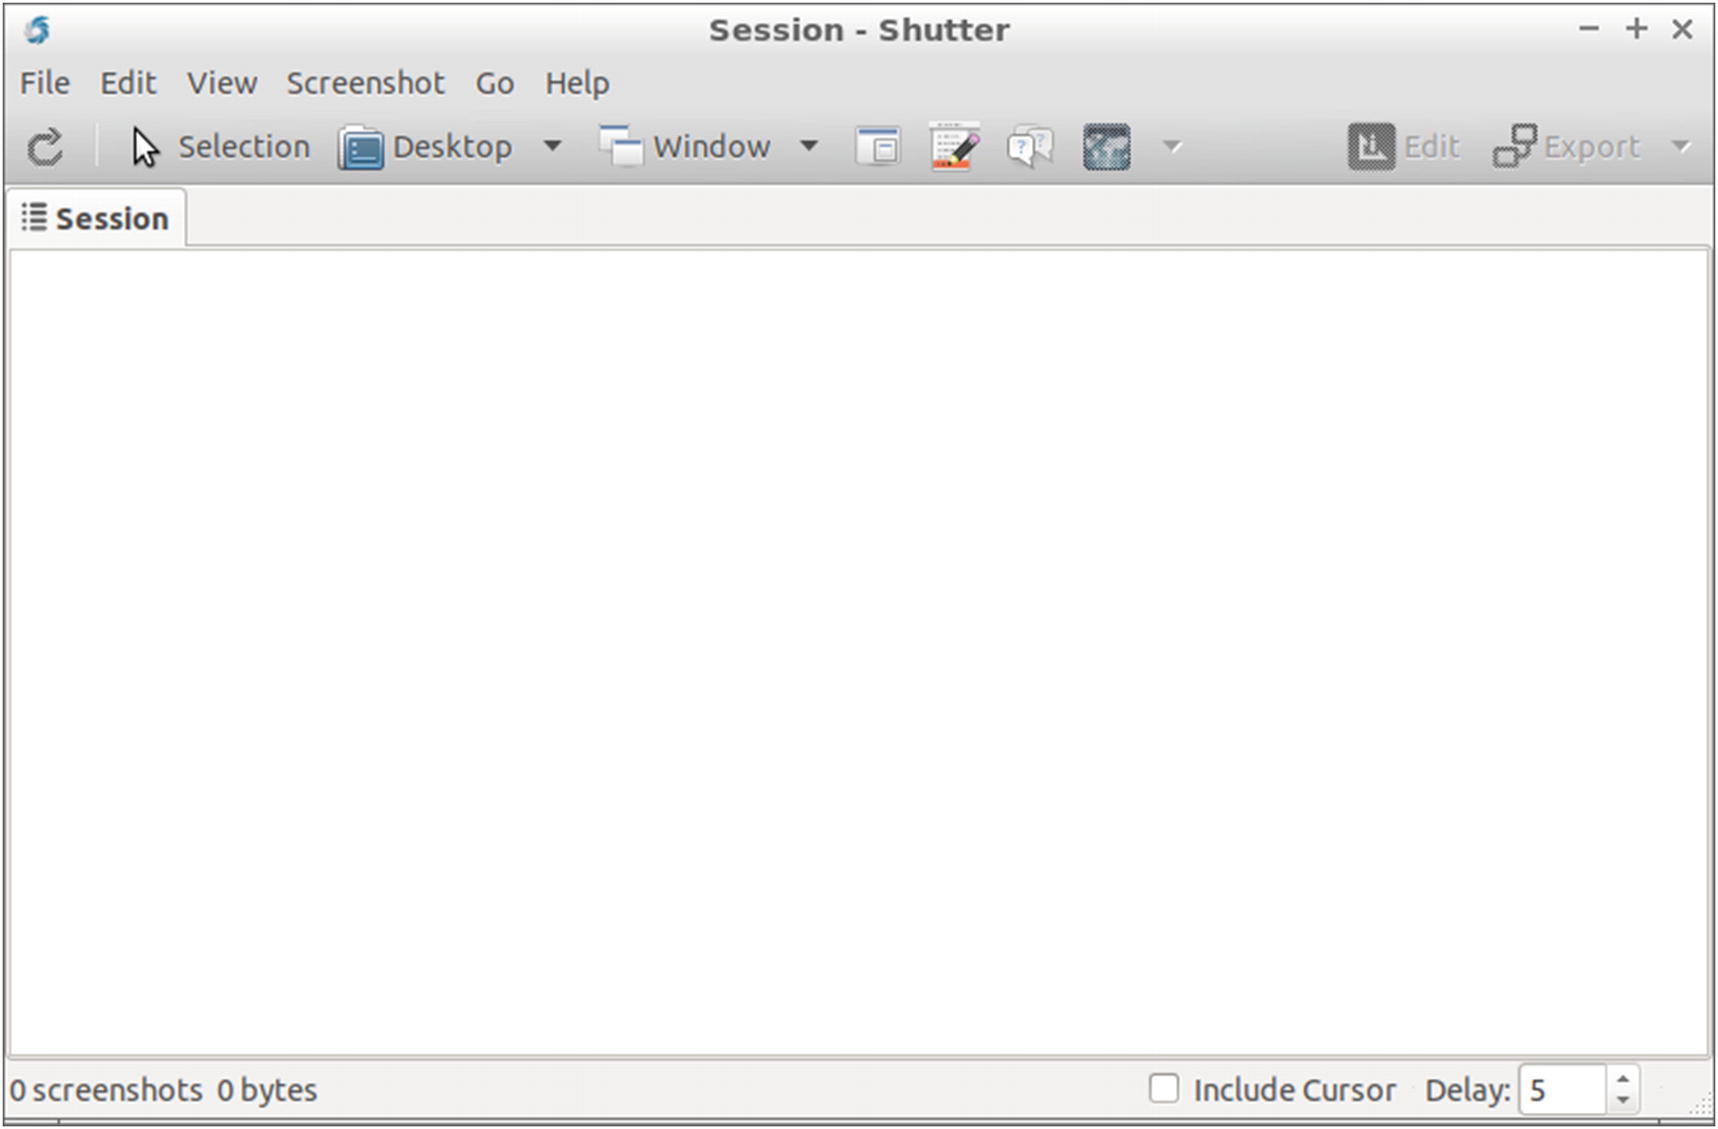
First make a screenshot of the geo6.pphp web page, using a Linux screenshot tool like Shutter. To download and install Shutter, use the following command at the Linux terminal:
$ sudo apt-get install shutter
Start the application from the Linux GUI or from the command line as follows:
$ shutter
The Shutter window opens, as displayed in Figure 3-25.
Figure 3-25
The Shutter window
Open with your browser the previous version, geo5.php, to detect the ocean color. Click the arrows for the up-down control at the bottom of the Shutter window to set the seconds (e.g., 5) of the Delay field. This corresponds to the delay timer for the shot. Click next to the Window menu button and select Active Window. The delay timer starts counting, and within this interval you have to select with the mouse the browser window, displaying geo5.php, for the screenshot. Click the browser window to select it. The image is saved in the Pictures folder of your home directory.
Use an image editor like mtPaint to open the image file. With the Eyedropper tool, click the color of the ocean. As displayed in Figure 3-26, the Eyedropper tool for mtPaint is included as a button in the Palette Editor window, which you open by selecting the Palette menu and then Palette Editor.
Figure 3-26
The Eyedropper tool of mtPaint
The color used for the oceans in geo5.php is used in the source code of geo6.php as the background color, by setting the value of the background color in the CSS section to the RGB value #B9D6E5.
Summary
This chapter covered the following:
You enabled the web server to become accessible to the whole Internet by configuring the router to implement port forwarding.
You installed the GeoIP Apache module that associates the visitor’s IP address with geographic information.
You ran examples that use the information provided from the GeoIP module with the PHP source code.