
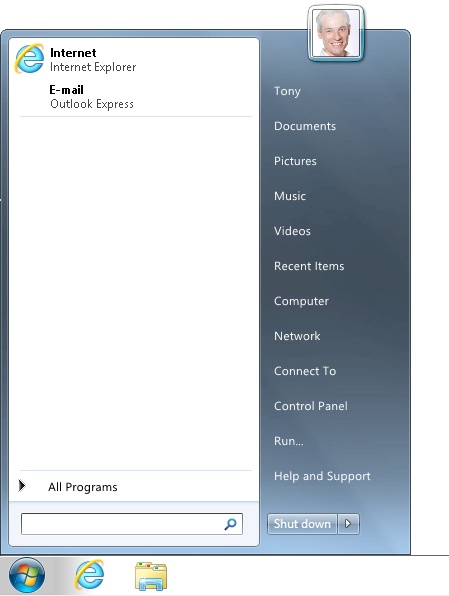
In the past few years, people have begun using computers in completely different ways. While many still use their computer at a desk with a keyboard and mouse, those same people step away from their desk and use mobile phones and tablets to keep in touch.
Microsoft designed Windows 8.1 to fit modern computing. The familiar Start menu is completely gone, replaced by a continuously updated Start screen. You even have the option of never touching another keyboard and mouse: Windows 8.1 is touch-friendly, allowing you to grab the latest tablet computers and navigate them with your fingers.
Windows 8.1 also integrates the cloud, allowing users to authenticate using a Microsoft account and to store and share files using SkyDrive. Social networking is deeply integrated into Windows, and Windows 8.1 connects to Twitter, Facebook, and other social networking sites just as easily as to local resources.
These changes will require those of us experienced with earlier versions of Windows to relearn some of the ways we interact with a computer. The new interface and apps are so intuitive that most people will comfortably navigate Windows 8.1 with just a few minutes of learning. The underpinnings, however, require deep examination to fully understand.
As with every version of Windows, Microsoft recognizes the importance of backward compatibility. Though Windows 8.1 is designed to be touch-friendly, it is equally usable with a keyboard and mouse. Though apps designed for Windows 8.1 provide the greatest performance, you can still run almost any app created for earlier versions of Windows, and your existing drivers will work without modification.
This first chapter gives you an overview of the most important new features of Windows 8.1. Some of these features were introduced in Windows 8 or have been updated since that release. Future chapters become increasingly more technical, providing greater detail about apps, the touch interface, documents, media, security, networking, troubleshooting, and much more.
Note
Because this book is focused on consumer and small business uses of Windows 8.1, it will not describe features that are exclusive to Windows 8.1 Enterprise.
Whereas Windows 7 had a Start button that was always visible, and applications typically had menus and toolbars that remained visible, one of the design goals of Windows 8.1 is to completely immerse you in full-screen applications. Instead of wasting screen space on buttons, Windows 8.1 makes the corners and edges of the screens active, but it does not label them, so it is important for even the most experienced Windows users to learn the location of these new controls. While these new controls will not be immediately obvious to most Windows users, learning them takes just a few minutes.
Windows 8.1 is designed to be equally usable with a touch screen or a conventional mouse and keyboard. The sections that follow briefly describe the different ways you can control Windows 8.1.
Windows 8.1 and apps designed for Windows 8.1 are accessible using tablet computers without a mouse or keyboard. The touch controls are intuitive, especially if you have a smartphone. However, some of the controls will not be obvious the first time you use Windows 8.1. This section describes the basic touch controls.
Tapping, like clicking with a mouse, performs an action. For example, tap an app on the Start screen or a link in Internet Explorer to open it.
To select text within an app, tap it, and then use the circles to adjust the selection, as shown in Figure 1-1. Tap the selection to copy or paste it.
Holding your finger on an object can do one of two things, depending on the app:
Display information about the object, much like hovering over an object with the mouse.
Display a context menu, much like right-clicking an object.
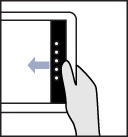
The edges of the screen are really important in Windows 8.1. By swiping a finger in from the edges and corners of the screen, you can perform different actions regardless of the app you have open:
Swipe from the right side of the screen to view the charms for searching, sharing, and printing.
Swipe from the left side of the screen to bring up a list of previously used apps.
Swipe from the top or bottom of the screen to view app-specific commands, which function like an app’s menu.
Figure 1-2 illustrates swiping from the right side of the screen.
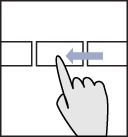
Slide your finger across the screen to drag objects and scroll the screen, as shown in Figure 1-3. For example, to scroll left or right on the Start screen, just touch anywhere on the screen and slide to either side.
To view a list of recently used apps (equivalent to holding down the Alt key and repeatedly pressing Tab), tap the upper-left corner of the screen and then slide your finger down. You can then slide an app to dock it to one side of the screen, or slide it to the bottom of the screen to close it.
Flick objects to select them. A flick is a short, quick, downward swipe. For example, you would tap a tile on the Start screen to open the app, but flick it to select the tile so you can change its settings.
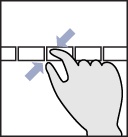
Some apps, including the Start screen, support pinching and stretching to zoom in and out, as illustrated by Figure 1-4. Zooming in allows you to see more detail, while zooming out shows you more context.
In some apps, you can also use two fingers to rotate objects on the screen, as shown in Figure 1-5. For example, you might use this technique to rotate a picture from horizontal to vertical.
Note
Touch controls Watch the video at http://aka.ms/WinIO/touchcontrols.
Windows 8.1 also provides new mouse controls:
Move your mouse to the upper-left corner to view the most recently used app. Click to open it or drag it to the side of the screen to snap it.
Move your mouse to the lower-left corner and then click to open the Start screen.
Move your mouse to the upper-left corner and then slide it down (without clicking) to view a list of recently used apps.
When viewing the list of recently used apps, click an app to open it or drag it to the side of the screen to snap it.
Move your mouse to the upper-right or lower-right corner to view the charms. Click a charm to use it.
Right-click most apps to view the app commands. Some apps, such as Internet Explorer, provide traditional context menus when you right-click.
Drag an app from the foreground to either side of the screen to snap it.
Right-click the lower-left corner to open quick links.
Note
Mouse controls Watch the video at http://aka.ms/WinIO/mousecontrols.
Windows 8.1 provides the keyboard shortcuts in Table 1-1 to access its features.
Table 1-1. Windows 8.1 keyboard shortcuts
Action | Key |
|---|---|
Display the Start screen | Windows key |
View charms | Windows+C |
Search | Windows+Q |
Search for files | Windows+F |
Open Settings | Windows+I |
View app commands | Windows+Z |
Open quick links for power users (try it!) | Windows+X |
Show the desktop | Windows+D |
Lock the computer | Windows+L |
Run an app | Windows+R |
Snap an app to the right | Windows+Period |
Snap an app to the left | Windows+Shift+Period |
Switch applications | Windows+Tab |
Windows 8.1 has a brand new user interface and app model. The new design theme focuses on simplicity, functionality, and touch. Gone are the beveled edges, drop shadows, and reflections that have become overused in the last decade. Instead, you interact with the simplest elements: immediately recognizable white icons and squares and rectangles designed to resemble subway tiles. Intuitive tapping and swiping controls work well with or without a mouse and keyboard.
When Windows 8.1 starts, it displays a lock screen with a picture and the time and date. Swipe up from the bottom of the screen to access the login screen. After login and every time you press the Windows key, Windows 8.1 displays the Start screen.
For more information about the apps included with Windows 8.1, read Chapter 2.
Note
The Windows 8.1 user interface Watch the video at http://aka.ms/WinIO/UI.
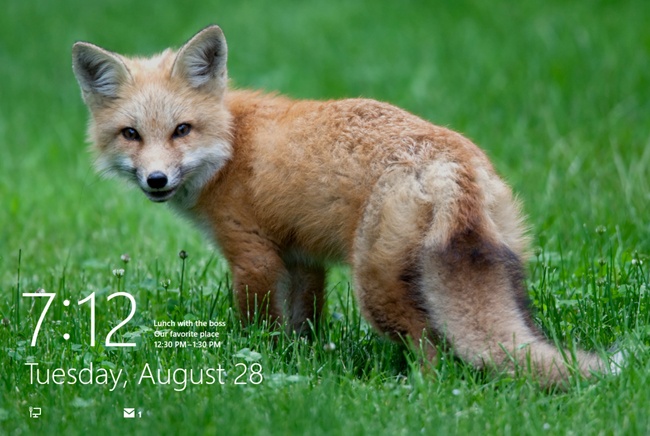
The first screen you see when you start Windows 8.1 is the lock screen, as shown in Figure 1-6. The lock screen shows a picture, the current date and time, battery life (for mobile devices), the network status, and notifications from up to seven different apps. To open the lock screen from your desk, click your mouse or press any key. To open the lock screen with touch, swipe up from the bottom.
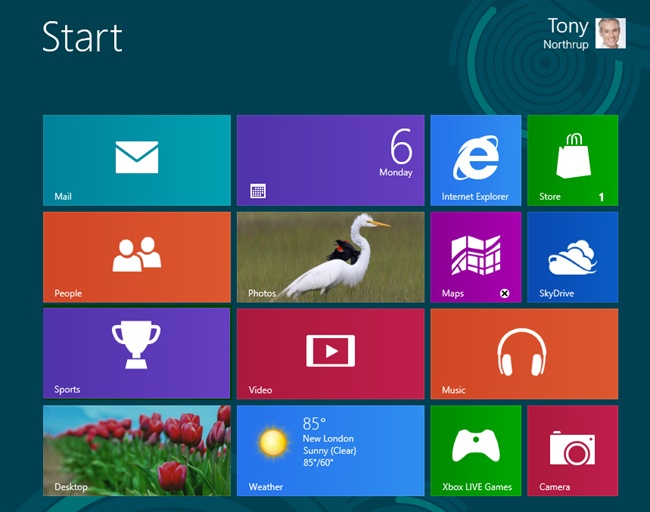
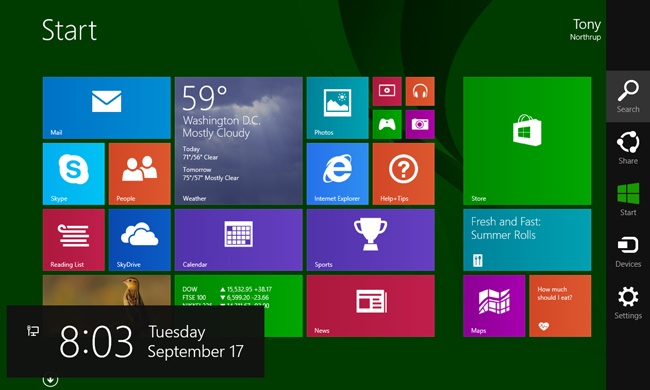
The Start screen, shown in Figure 1-7, is always the first page Windows 8.1 displays. Like most apps designed for Windows 8.1, the Start screen scrolls horizontally, rather than vertically. Instead of scrolling, you can zoom back to see the entire Start screen. To zoom with touch, pinch or stretch the Start screen. To zoom with a mouse and keyboard, hold down the Ctrl key and either scroll the mouse wheel or press the Plus Sign or Minus Sign.
The Start screen does not show every app. If you don’t see the app you need, simply type its name from the Start screen. Windows 8.1 will search for the app and display any matching results.
After you open an app, you can open the Start screen in several different ways:
Move your mouse to the lower-left corner of the screen.
Press the Windows key on your keyboard.
On touch-sensitive PCs, touch the lower-left corner. You can also swipe in from the right to view the charms and then touch the Start charm.
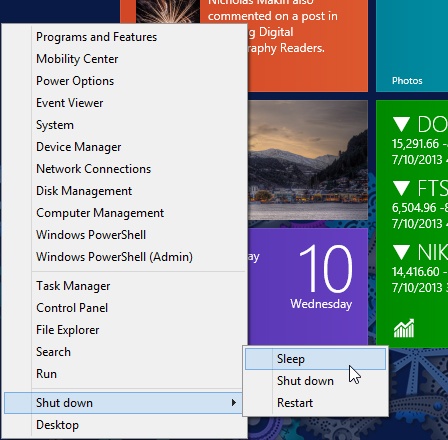
If you press the Windows key multiple times, Windows 8.1 will switch between the Start screen and your desktop. To run a command, simply type the command name and press Enter. Alternatively, you can open the Run dialog box from the desktop by pressing Windows+R. Press Windows+X to access the WinX menu, as shown in Figure 1-8, which contains links to commonly used tools.
Inside OUT: Getting a Windows 7–like Start menu
If you miss the Windows 7 Start menu, try giving the Windows 8.1 Start screen a few weeks. It really is better than the Windows 7 Start menu, even for traditional keyboard and mouse users. Sometimes, it’s better to stick with what you know, however. While Windows 8.1 no longer has a Windows 7–like Start menu, you can download and install free alternatives. My favorite is ViStart (see Figure 1-9), available at http://lee-soft.com/vistart/. Another option is Start8, available at http://www.stardock.com/products/start8/.
Drag tiles to reorganize them on the Start screen. To change the size of tiles using touch, swipe up from the bottom, select a tile, and then touch an option. You can also flick tiles to select them and then open the app by swiping up from the bottom. With a mouse, right-click the tile you want to edit.
For information about live tiles and configuring apps on the Start screen, refer to Chapter 2.
Windows 8.1 introduces the idea of charms. You can use charms to perform common tasks in apps started from the Start screen, regardless of which app you’re using. To view the charms with touch, swipe in the from the right. To view the charms with a mouse, move your pointer to the upper-right or lower-right corner. To view charms with a keyboard, press Windows+C.
The five standard charms are:
Search. Opens the search bar to find apps, settings, and files. Some apps also use the Search charm to find content within the app. For example, to find a particular song, touch the Search charm, select the Music app, and type the name of your song. Press Windows+F to directly open the Search charm.
Share. Allows you to share content within apps that support sharing. For example, to email a link to a webpage that you have open in Internet Explorer, touch the Share charm, and then touch the Mail app. Windows 8.1 will open the Mail app with a link to the current webpage in the body of the message. Press Windows+H to directly open the Share charm.
Start. Opens the Start screen. You can also open the Start screen by pressing the Windows key.
Devices. Allows you to print from the current app or send data to another device, if you have any supported devices installed. Press Windows+K to directly open the Devices charm.
Settings. Lets you change options for the current app. Press Windows+I to directly open the Settings charm.
Charms, as shown in Figure 1-10, replace toolbar buttons and menu items that each app used to have for searching, sharing, printing, and setting options. Apps can still have unique commands for other features.
To access PC Settings, touch the Settings charm or press Windows+I, and then select Change PC Settings in the lower-right corner. Figure 1-11 shows the new PC Settings tool that provides a touch interface to some of the Control Panel functionality you might be familiar with from Windows 7. You must still configure some settings from the Control Panel desktop app. To find a specific setting, press Windows+W, and then type words related to the setting.
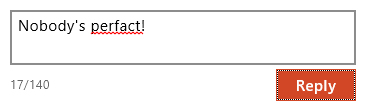
Windows 8.1 can now highlight misspelled words and even autocorrect spelling errors and typos, as shown in Figure 1-12. Use the General screen within PC Settings to configure this feature.
Windows 8.1 includes more powerful and organized search capabilities. From the Start screen, simply type to search apps, settings, files, and even webpages. Windows displays matching results, with your most commonly used resources at the top of the list.
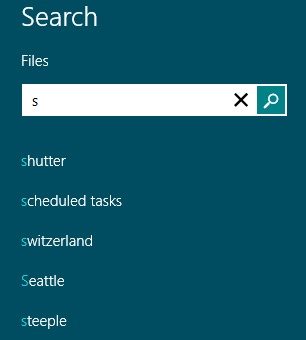
To search only files, press Windows+F and type your search. (See Figure 1-13.) Windows 8.1 displays suggested searches below the search box, including spelling corrections. Use the Down Arrow key to select a suggestion or simply click it.
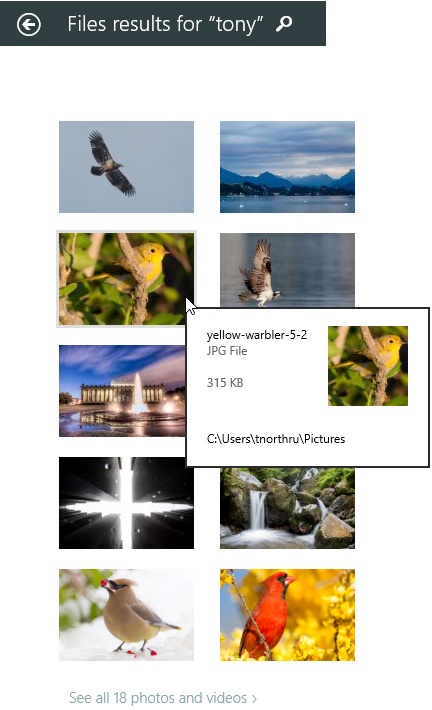
Results are organized based on the type of file: All (which includes every result), Documents, Pictures, Music, Videos, and Other. Hover your pointer over any result to see a larger thumbnail and more file details, as shown in Figure 1-14. You can use the Advanced Query Syntax (AQS) from Windows 7 to find files by attribute.
To search Settings, touch the Search charm and then touch Settings, or press Windows+W. Then, type words related to the setting you need to change. Windows 8.1 displays a list of settings you can modify.
Windows 8.1 is designed to be used in either portrait or landscape mode, supporting the fact that users might prefer to hold tablet computers either vertically or horizontally. Most Windows 8.1 features are designed to work well no matter how the computer is held, and apps can support both horizontal and vertical displays, as well as a variety of different resolutions.
You can disable rotation, which is useful when you want to use a tablet computer lying flat or on its side.
Windows 8.1 supports changing the default language. You no longer need to be concerned about the default language when you buy a computer; if you prefer to use a different language, you can change it at any time. This is particularly useful for environments where multiple users access a single computer and those users prefer different languages.
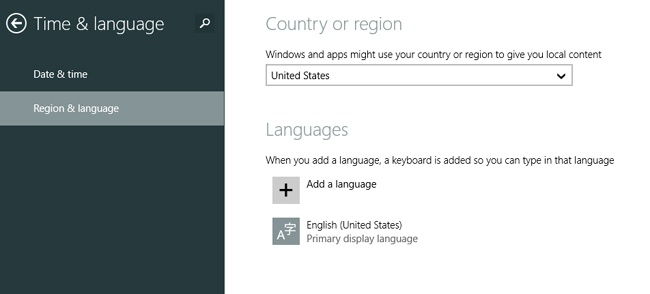
To add languages or to change the default language for your user account, use the Region & Language page in PC Settings, as shown in Figure 1-15.
Note
For more information, refer to Chapter 5.
Like previous versions of Windows, Windows 8.1 includes powerful accessibility features to make using a PC easier for users with different data input and visual needs. Windows 8.1 also makes several improvements:
Narrator (the text-to-speech tool that audibly reads words from the screen) is now faster.
Narrator supports more languages and voices.
Narrator has new configuration settings that you can use to adjust the voice, speed, and other aspects of Narrator’s behavior.
Windows works better with accessibility features, making it easier for users with different needs to install and configure their PC.
When using a Windows 8.1 tablet PC, you can hold the Windows logo key and press Volume Up to launch Narrator.
Internet Explorer 10 and Narrator can continuously read a webpage.
Note
For more information, refer to Chapter 7.
Windows 8.1 supports Unified Extensible Firmware Interface (UEFI) for BIOS, which allows for richer graphics using the Graphics Output Protocol (GOP) driver. UEFI also reduces the number of BIOS-related screens, allowing Windows 8.1 to provide a single visual experience from startup, instead of the computer hardware displaying BIOS screens and then switching to Windows, which provides a graphical display.
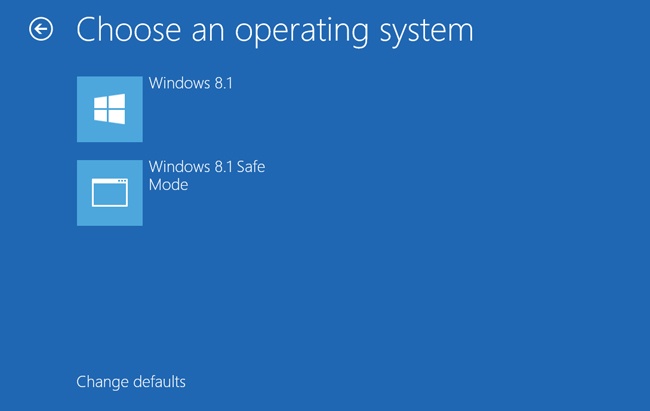
These capabilities allow Windows 8.1, when running on hardware that supports UEFI, to never display the text-based consoles that computers have used to start since before Windows existed. You can use the touch interface to select different operating systems, as shown in Figure 1-16, which shows a custom boot item (Windows 8.1 Safe Mode) added by the user with the BCDEdit tool.
By clicking Change Defaults Or Choose Other Options, you can even change startup options before Windows starts, restore Windows, or run Windows Recovery Environment (WinRE), as shown in Figure 1-17. You never need a keyboard.
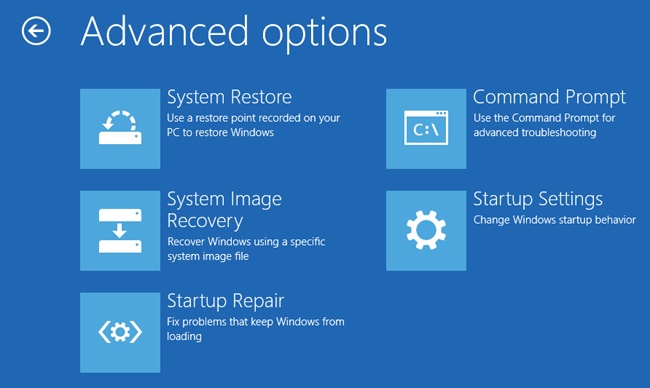
Figure 1-17. Windows 8.1 provides startup repair configuration and tools using a touch-friendly interface.
Note
For more information, read Chapter 27.
Windows 8.1 is designed to run on almost all existing computer hardware, including desktop PCs, mobile PCs, and tablets. Most computers running Windows Vista or Windows 7 can be upgraded to Windows 8.1 and provide an even better experience.
Apps in Windows 8.1 have higher minimum screen resolution requirements than in earlier versions of Windows, but most current computers meet or exceed the screen resolution requirements.
The sections that follow describe the Windows 8.1 hardware requirements in more detail.
Hardware requirements for Windows 8.1 have not changed from Windows 7, and Windows 8.1 will perform as fast, or faster, than earlier versions of Windows on almost any recent PC. The Windows 8.1 hardware requirements are:
32-bit versions of Windows 8.1 1 GHz or faster processer, 1 GB of RAM, 16 GB of free hard disk space, and a graphics card that supports DirectX 9 with WDDM 1.0 or higher
64-bit versions of Windows 8.1 1 GHz or faster processer, 2 GB of RAM, 20 GB of free hard disk space, and a graphics card that supports DirectX 9 with WDDM 1.0 or higher
Windows 8.1, the Start screen, the desktop, and desktop apps still work at 800x600. A resolution of 1024x768 is required for apps designed for Windows 8.1. Using multitasking with snap requires a minimum resolution of 1366x768 to dock apps to either side of the screen. Windows 8.1 scales well to higher resolutions and even multiple monitors.
Note
For more information about multitasking and snap, refer to Chapter 2.
Windows 8.1 supports touch-capable PCs that were designed for Windows 7. Therefore, existing Windows 7 users with tablets can upgrade to Windows 8.1. However, touch-capable PCs designed for Windows 8.1 can provide an even better experience. Microsoft’s hardware certification process for touch-capable computers requires higher levels of precision that improve the accuracy of common tasks, such as tapping, swiping, and sliding.
Windows 8.1 provides expanded support for sensors. While Windows 7 supported using ambient light sensors (ALS) to control display brightness, a feature known as adaptive brightness, Windows 8.1 includes support for several other types of sensors:
3-D accelerometers that measure how the computer is moving
3-D gyro sensors that measure how the device is rotating
3-D magnetometers that measure magnetic fields, such as that from the North Pole
Windows 8.1 uses this sensor data for adaptive brightness and automatic screen rotation. More importantly, Windows 8.1 processes the information using a feature known as sensor fusion and makes it available to apps. By using the compass, incline, and device-orientation information provided by sensor fusion, apps can determine precisely how the computer is being held, where it is being pointed, and how it is being moved.
When using apps, Windows 8.1 should offer increased battery life when compared to earlier versions of Windows. For more information, refer to Chapter 2.
Windows 8.1 natively supports USB 3.0. This does not cause existing USB 2.0 ports to support USB 3.0; the computer must have USB 3.0 compatible hardware. Windows 7 required separate drivers to work with USB 3.0.
Windows RT can run on computers that use ARM processors. ARM processors are often used in mobile devices such as smartphones, media players, and tablet computers. ARM support means you can use Windows 8.1 on some of the smallest and most efficient touch-screen-equipped devices, bringing the desktop experience anywhere you go.
Because ARM processors cannot run traditional Windows applications, Windows RT will run only apps designed for Windows 8.1. In other words, you cannot run apps designed for Windows 7 or earlier versions of Windows on Windows RT.
Because security threats are constantly changing, Windows must continue to add new security features to help protect the user’s privacy and the PC’s integrity. Security features are valuable only if they do not significantly inconvenience the user, however. For example, a PC would be more secure if it required users to type a long, complex password each time they used it. However, the inconvenience would be so great that many users would find a way to bypass the password entry completely, nullifying the security benefits.
In Windows 8.1, Secured Boot and the improvements to Windows Defender and the SmartScreen filter help to improve your PC’s security without further inconveniencing you. Picture passwords, PIN logins, Windows Live integration, and BitLocker performance directly improve Windows usability. However, by making security more convenient to users, these features can also improve security.
The sections that follow describe these features in more detail. For detailed information about security features, read Chapter 18, and Chapter 19.
Passwords are a convenient way to log in when using a keyboard, but typing is more difficult when you’re using a tablet computer. Picture passwords, a sign-in method that authenticates a user by checking gestures made on a picture, provide an easier way to log in using touch, with security that will be sufficient for many users.
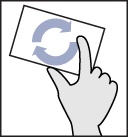
To log in with a picture password, select a picture. Then, choose a sequence of three motions on the picture. Each motion can be a tap, a line, or a circle. Circles and lines can be any size or direction. Figure 1-18 shows one step of a sample picture password login: drawing a small counterclockwise circle around the nose of a fox.
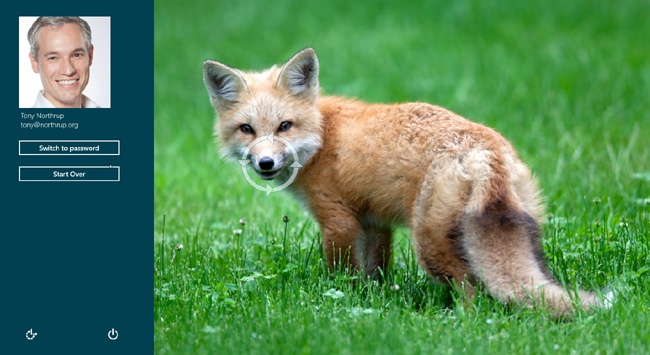
Figure 1-18. Draw lines, dots, and circles (as shown around the fox’s nose) to log in using a picture password.
Using the example in Figure 1-18, a user could specify any of the following sequences to log in:
Tap the right ear, tap the nose, and then tap the left eye.
Draw a line from the nose to the tail, draw a small clockwise circle around the right ear, and then draw a small counterclockwise circle around the left ear.
Draw a line from the right ear to the left ear, tap the nose, and then draw a big clockwise circle around the head.
Picture password is disabled by default. Enable it from the Account, Sign-In Options screen of PC Settings. The next time you sign in, you are automatically prompted to enter your picture password. For more information about picture passwords, refer to Chapter 18.
You can also log in to Windows by using a four-digit numeric PIN. Pins are easy to type and remember, but they are not as secure as conventional or picture passwords. If you do decide to use a PIN, avoid common sequences such as 1111 or 1234 and important dates.
PIN login is disabled by default because it is significantly less secure than using a complex password. Enable PIN login from the Users screen of PC Settings. The next time you sign in, click Sign-In Options, and then click the keypad icon. For more information about using a PIN, refer to Chapter 18.
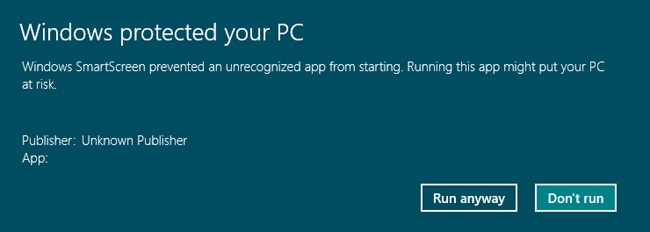
Windows 8.1 integrates the SmartScreen filter from Internet Explorer into the operating system, helping to reduce the risk of users downloading and running known malware. If SmartScreen detects an application that is potentially malware or has not yet established a reputation, it warns the user as shown in Figure 1-19. The user has the option to continue on and run the application.
As shown in Figure 1-20, Windows Defender in Windows 8.1 offers an important security improvement: improved protection from rootkits. Rootkits are a form of malware that runs below the level of the operating system and can be completely undetectable once Windows starts. On computers with UEFI-based secure boot, Windows Defender can detect potential malware attempting to load at boot and resume.
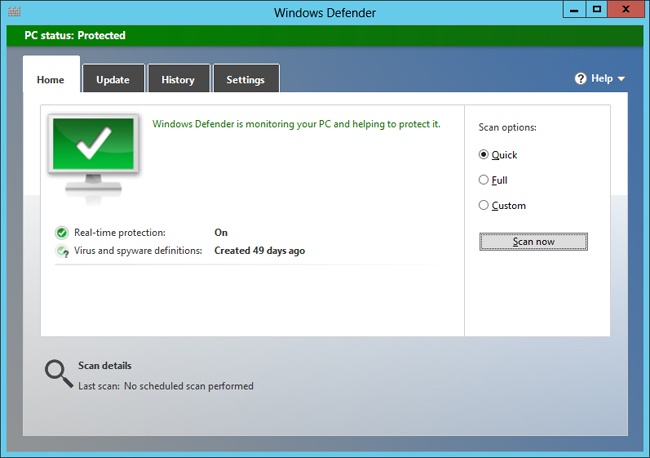
When Windows Defender checks files as Windows accesses them to verify that they are not potentially malicious, Windows Defender adds some overhead, slowing your computer down just a small amount. In Windows 8.1, Windows Defender’s performance is improved. Windows Defender adds only a 4-percent processing overhead to boot time. The performance improvements will also improve battery life.
Naturally, you can also choose to use third-party antimalware software or disable Windows Defender completely.
BitLocker is a disk encryption feature built into Windows Vista, Windows 7, and Windows 8.1. Windows 8.1 reduces the time required to initially encrypt your disk by encrypting only the portions of the disk that have data stored on them. Free space is not encrypted until the operating system writes to it.
Windows 8.1 helps to reduce the risk of malware by more closely monitoring system integrity during the startup process. If Windows 8.1, working with a computer’s onboard Trusted Platform Module (TPM) chip, detects any threats to system integrity, it automatically starts the Windows Recovery Environment (WinRE), which attempts to remove the malware by restoring system files and settings.
If your computer supports UEFI-based Secure Boot (as defined in the UEFI 2.3.1 specification), UEFI can help verify that all firmware and firmware updates are valid and that Windows system files are properly signed. This can make it much more difficult for a rootkit to install itself on a computer. For more information, read Chapter 27.
Windows 8.1 supports logging in with local user accounts, just as Windows 7 and earlier versions of Windows did. For the first time, however, users have the option of logging in with a Microsoft account.
Windows and app settings work between different PCs. You can switch to a local account. Store your files in SkyDrive, and your entire Windows experience can be cloud-based. Log in to any computer, and have a familiar desktop environment and access to all your files.
This is very useful for users with multiple computers. If you use a desktop during the day, you can pick up your mobile computer, log in from a coffee shop, and continue exactly where you left off. For example, if you were in the middle of watching a video online, you can continue from that same point. If you were reading the news, Windows 8.1 will remember exactly where you were.
If you forget your password, you can use the Microsoft account website (shown in Figure 1-21) to reset your password from any device connected to the Internet. Microsoft accounts have sophisticated security features to minimize the security risks of password resets, including two-factor authentication, such as communicating with your mobile phone or a secondary email address.
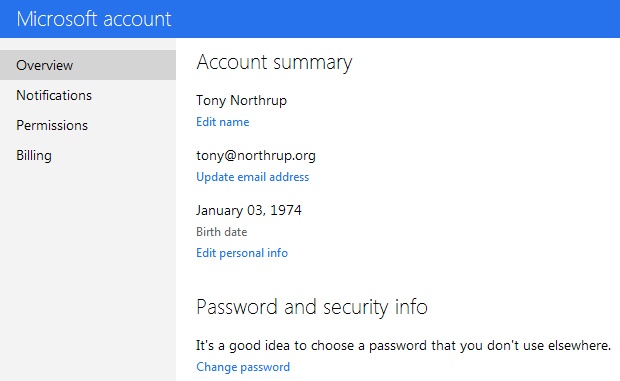
Figure 1-21. Use a Microsoft account to synchronize settings between computers and manage your account online.
If the computer can’t connect to the Internet to authenticate you, or your Microsoft account credentials are compromised, Windows 8.1 can authenticate you using cached credentials. Basically, you can log in with the same user name and password you used in the past. For detailed information, read Chapter 18.
Connecting to the Internet is one of the most important uses for a PC, and users often use Wi-Fi and mobile broadband to connect to many different networks from a variety of locations. Windows 8.1 makes mobile networking easier and more efficient by giving you better control over mobile broadband charges and by more intelligently connecting to your preferred Wi-Fi networks.
Windows 8.1 treats mobile broadband connections as metered connections. This behavior causes Windows to minimize the network traffic sent across mobile broadband connections, potentially reducing data charges. To further minimize mobile broadband usage and improve battery life, Windows 8.1 will automatically turn off your mobile broadband when a Wi-Fi hotspot is available. Wi-Fi hotspots usually have faster bandwidth, higher data caps, and lower latency. If you move away from the Wi-Fi hotspot, Windows 8.1 can automatically use your mobile broadband to reconnect to the Internet.
These improvements keep you connected while reducing your costs, maximizing your network performance, and increasing your battery life.
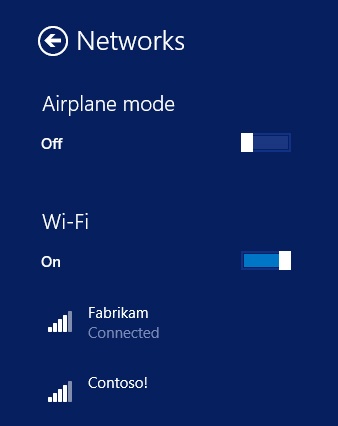
Windows 8.1 includes a new user interface for turning wireless interfaces on and off, as shown in Figure 1-22. If your PC is equipped with mobile broadband, Windows will show a separate option on the same screen. You can use the new airplane mode to quickly turn all wireless signals off.
Note
For detailed information, read Chapter 22.
Windows 8.1 makes minor improvements to Wi-Fi behavior. If you manually disconnect from a Wi-Fi network, Windows 8.1 will stop automatically connecting to that network. If you disconnect from one Wi-Fi network and then connect to another, Windows 8.1 will configure the newly connected network at a higher priority so that Windows 8.1 automatically chooses that network in the future.
Windows 8.1 features connect more quickly to Wi-Fi networks when resuming from standby. Typically, Windows 8.1 can be connected to your preferred Wi-Fi network in about a second after resuming from standby. Windows 7 could often take more than 10 seconds.
Note
For detailed information, read Chapter 21.
Windows 8.1 includes two major storage innovations: SkyDrive and Storage Spaces. SkyDrive provides cloud-based storage that can be accessed from any Internet-connected PC and many different mobile devices. Storage Spaces allows you to connect just about any type of disk to your computer (including disks you have left over from older computers) and combine them into organized volumes with varying levels of protection similar to RAID (redundant array of independent disks). The sections that follow describe these features in more detail.
SkyDrive stores your documents on the Internet, so they can be accessed from any device with an Internet connection. You can access files stored in SkyDrive using the SkyDrive app, shown in Figure 1-23, as well as the standard open and save tools that Windows uses to access local files.
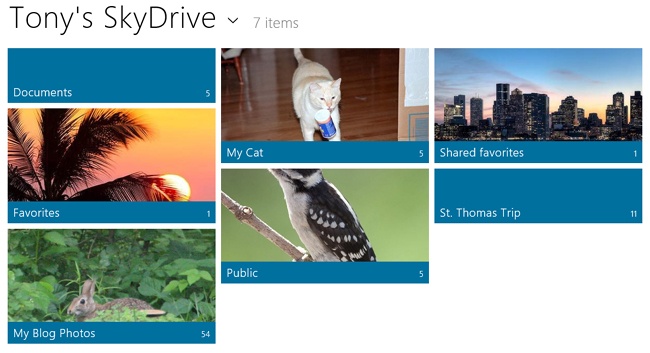
You can even choose to allow access to files stored on your local computer through SkyDrive.
Besides Windows 8.1, some of the devices you can use to access SkyDrive include:
Any browser using the website https://skydrive.live.com/
PCs running Windows Vista and Windows 7 using SkyDrive for Windows
Macs using SkyDrive for Mac
iPhones and iPads using the SkyDrive app
Android phones using an app that connects to SkyDrive
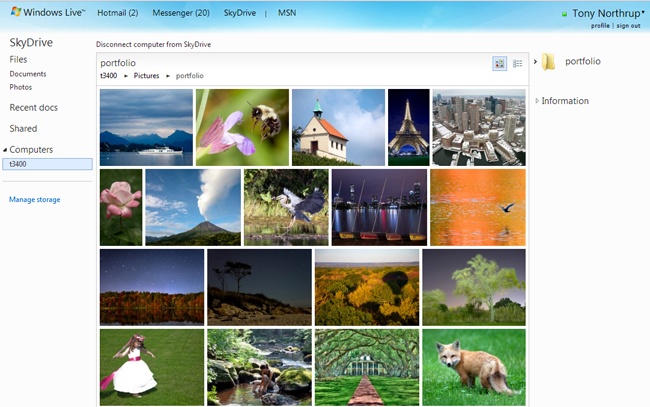
To download the official SkyDrive apps, visit https://apps.live.com/skydrive. If you install the SkyDrive for Windows desktop app, you can choose to allow access to files stored only on your local computer (as shown in Figure 1-24). This can be useful if you need to access a file that you forgot to copy to SkyDrive and your computer is turned on and connected to the Internet. Access to your local files is optional and is always protected by two-factor authentication.
The SkyDrive website provides browser-based tools to access common files, including Microsoft Office documents. Depending on the file type, you might need to install apps on mobile devices to view or edit documents. SkyDrive requires logging in with your Microsoft account, which has the same credentials most users use to log in to Windows.
Many apps, including the Photos and Video apps, allow you to copy files to SkyDrive by using the Share charm, as shown in Figure 1-25.

As of September 2013, SkyDrive offers users 7 GB of free storage, with the option to buy additional storage. For more information about SkyDrive, read Chapter 13.
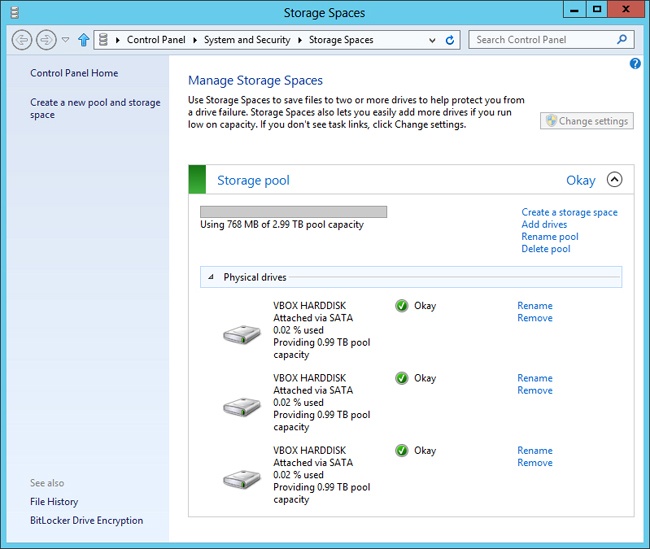
With Storage Spaces (shown in Figure 1-26), you can access hard disk storage any way you want. For example, you can connect three different disks to your computer, combine them as a storage pool, and then access them as a virtual drive (such as D:) to store your documents. Later, you could easily add more disks to increase the space. You can even configure redundancy, protecting your data in the event a disk fails.
Disks in a storage pool can be different sizes and connected through USB, SATA (Serial ATA), or SAS (Serial Attached SCSI). Storage Spaces provides two data-resiliency options to protect your data in the event a single hard disk fails:
Mirroring. Storage Spaces can keep an extra copy of all data on different hard disks. If a single disk fails, Windows 8.1 will transparently access the redundant copy of the data contained on your failed disk and will even make an extra copy on the remaining disks if space is available.
Parity. Storage Spaces protects your data from the failure of a single disk by storing parity information. While mirroring requires twice the storage space, parity data requires much less space when used with three or more physical disks. Accessing and updating data protected with parity can be slower than with mirroring.
Unlike with traditional RAID mirroring and parity, you do not need to use identical partition sizes. You cannot boot from a Storage Space. Therefore, you always need a separate physical disk to use as your boot disk.
Note
If you have used Windows Home Server Drive Extender (a feature of Windows Home Server that is now deprecated), you might recognize some of these capabilities.
You can protect individual pools differently by using mirroring, parity, or no redundancy. For example, you could use mirroring to protect your Documents folder, parity to protect your Videos folder, and no redundancy to protect your Downloads folder.
Storage Spaces is not available with Windows RT. Chapter 12, discusses Storage Spaces in more detail.
Windows 8.1 makes several improvements that power users especially will appreciate. While many Windows 8.1 improvements will most benefit casual users, Windows 8.1 also includes features that will make power users more productive.
Improved support for using multiple monitors makes managing the extra screen space much simpler. Task Manager has been completely reworked to provide a great deal of information instantly. If you have ever had to reinstall Windows to solve problems, you will appreciate how easy Windows 8.1 makes it to refresh or reset your PC. Finally, client Hyper-V is built into Windows 8.1 and provides the ability to run almost any operating system within a virtual machine.
The sections that follow describe these features in more detail.
For users with two or more monitors attached to their computer, Windows 8.1 offers two improvements:
You can use different background images for each monitor or stretch a single image across both.
The taskbar can span both monitors, or you can have a separate taskbar for each monitor.
Note
For more information about configuring multiple monitors, refer to Chapter 5.
Task Manager gives you detailed insight into the inner workings of your computer and the power to prioritize and stop processes. The redesigned Task Manager is both easier to use and more powerful.
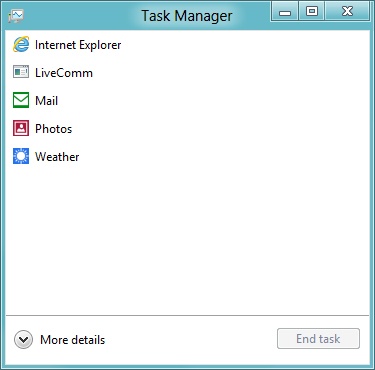
When you open Task Manager by pressing Ctrl+Alt+Del on a keyboard or Windows+Power on a tablet and then clicking Task Manager, Windows 8.1 starts Task Manager with a simplified interface, shown in Figure 1-27, that simply displays a list of applications and the End Task button. This interface (which replaces the Applications tab in earlier versions of Windows) is ideal for casual users, but it does not allow a user to stop the Explorer task and lacks the level of detail power users might have become accustomed to in earlier versions of Windows.
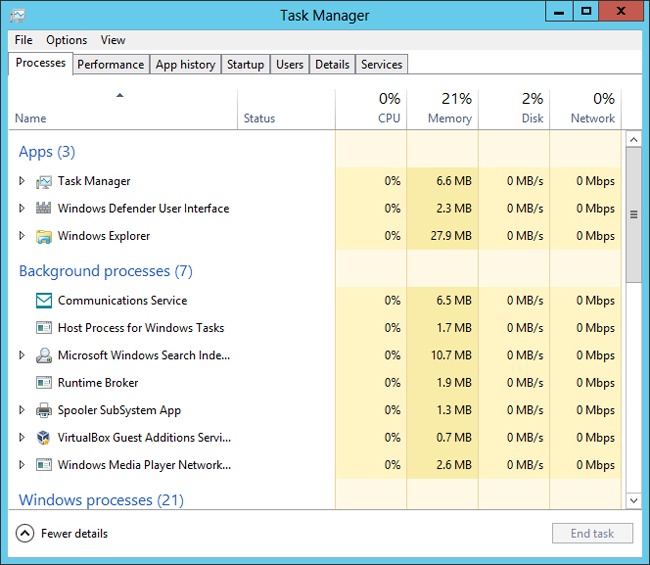
Click the More Details link to view expanded information about running applications and the operating system’s state. This view of Task Manager displays seven tabs:
Processes. Helps you identify which process is slowing down a computer.
Performance. Displays an overview of the amount of CPU, memory, disk, and network resources Windows 8.1 and your applications are currently using.
App History. Shows you the CPU and network resources applications have used, even if the application has been closed.
Startup. Displays applications that start automatically.
Users. Displays running and suspended applications for each logged-in user.
Details. Displays in-depth information about every process running on the computer, similar to the information provided by the Processes tab in Windows 7 Task Manager.
Services. Displays all services installed in Windows, whether or not they are running.
Figure 1-28 shows the new Processes tab of Task Manager.
Note
For detailed information about Task Manager, refer to Chapter 26.
At times, Windows might not perform as well as it did when new. Windows might seem slow, or you might experience seemingly unexplainable problems. The cause of these types of problems varies, but often they might be caused by unreliable drivers, corrupted system files, or malware. In the past, many users resorted to reinstalling Windows to solve these problems.
Windows 8.1 gives you two easier options on the General page of PC Settings:
Refresh Your PC. A useful tool for solving some Windows problems that traditional troubleshooting techniques might not have fixed, refreshing your PC automatically reinstalls Windows while maintaining your documents, some system settings, and apps. You will still need to reinstall desktop applications.
Reset Your PC. A useful tool for preparing your computer for a different owner, resetting your PC automatically reinstalls Windows and removes all your applications, files, and settings.
Both options reinstall Windows; however, the process happens automatically without prompting the user for the information usually gathered during setup, including choosing a preferred language and providing a product key. For more information, refer to Chapter 27.
Windows 8.1 includes Hyper-V, which provides the ability to run virtual machines. A virtual machine is an isolated computer within your computer that can run a second copy of Windows or many other operating systems. Essentially, it’s a separate computer running inside a window.
When working with virtual machines, the term host refers to the physical computer that is running Hyper-V. The term guest refers to the virtual machine that is running within Hyper-V.
Virtual machines create a simulated environment that behaves very similar to a physical computer. The guest operating system seems to have all the physical resources any operating system might have: one or more processors, memory, disks, network adapters, monitors, and a keyboard and mouse. However, all these resources are virtual, giving you complete control over the guest operating system.
While most users will never need to create a virtual machine, they can be very useful to advanced users. You can use virtual machines to:
Try new software without impacting the settings on your computer, which is particularly useful if an app might be malware.
Run an operating system other than Windows 8.1, which might be required if an app does not run properly in Windows 8.1.
Test a variety of different configuration settings without impacting your computer.
Undo any number of changes to a computer, instantly returning it to an earlier state.
Each running virtual machine requires dedicated memory. For example, if you want to run Windows 8.1 within a virtual machine, you need to allocate at least 2 GB of RAM to the guest operating system. This would reduce the amount of RAM available to apps running on your host. Each virtual machine also needs to store its own system files on a virtual disk. Therefore, if you plan to use virtual machines, you should consider adding extra RAM and hard disk space to your computer.
Using Hyper-V requires the 64-bit version of Windows 8.1 Pro and a computer with second level address translation (SLAT) capabilities (found in some Intel Core i7, Core i5, and Core i3 processors and in AMD processors that support Rapid Virtualization Indexing). You might need to enable SLAT by configuring your computer’s BIOS settings. Hyper-V also requires an additional 2 GB of RAM, for a total of at least 4 GB of RAM.
Hyper-V is not enabled by default. To enable it, select the Hyper-V option from Turn Windows Features On Or Off in Control Panel. Then, restart your computer. You can then launch the Hyper-V Manager desktop app to configure Hyper-V.
Note
For detailed information, read Chapter 20.
In October 2013, Microsoft released Windows 8.1, a free update to Windows 8. Similar to a service pack, Windows 8.1 fixes bugs, adds new features, has been more thoroughly tested than a typical update, and can be directly installed on new computers.
The sections that follow discuss the most important features added in the Windows 8.1 update.
Note
What’s new in the Windows 8.1 update Watch the video at http://aka.ms/WinIO/new.
One of the biggest innovations in Windows 1 (released in 1985) was the ability to run multiple apps side by side in separate windows. That innovation was so important that an entire operating system was named after the feature.
Windows 8.1 still supports traditional windows on the desktop. However, the Windows 8.1 touch interface runs most apps full-screen.
In Windows 8, you could run two apps side by side. However, one app always ran at a resolution of 320 pixels, while the other app took up the remaining space. That worked well on most tablets, but it looked rather silly on my 30-inch monitor because the second app took up a narrow strip of only 12 percent of my screen.
The Windows 8.1 update removes the 320-pixel limitation, allowing you to resize side-by-side apps to any width. For example, you can have two apps running side by side, evenly sharing the display, or you can resize the apps, as long as each is wider than 320 pixels.
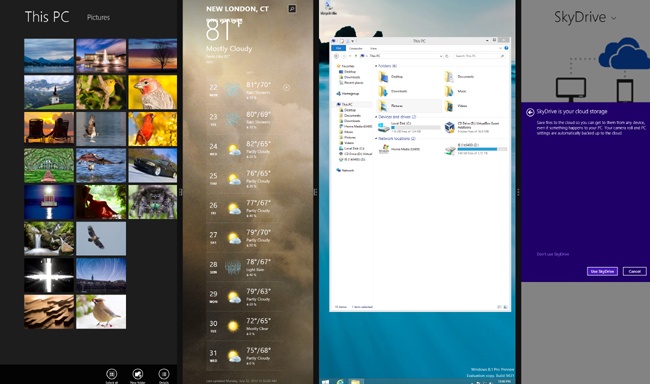
If you have a 1080p resolution screen (1920x1080 or higher), you can run three or more apps side by side in Windows 8.1. Figure 1-29 shows four apps running on a 2560x1600 pixel monitor: Photos, Weather, the desktop, and SkyDrive. If the maximum number of apps are running side by side and you launch a new app, Windows 8.1 prompts you to choose which app you want to replace.
Windows 8 always showed you the Start screen after booting. Some users prefer to work on the desktop, however, or they need to automatically start a desktop app, such as Home Theater PC (HTPC) software. With the Windows 8.1 update, you can start the desktop automatically after logging in.
To go directly to the desktop when you log in, search from the Start screen for navigation properties and select it. Then select Go To The Desktop Instead Of Start When I Sign In, as shown in Figure 1-30.
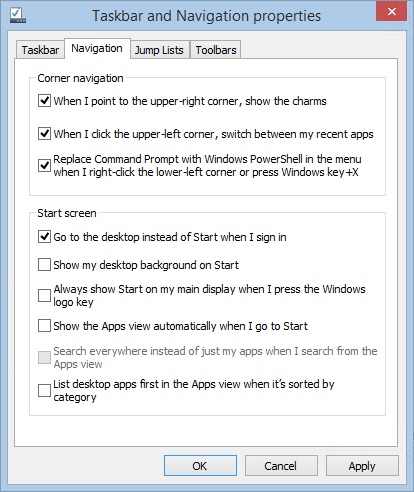
You’ll find a few other useful options on the Navigation tab:
Show My Desktop Background On Start. As the name indicates, you can now select your own picture as the Start screen background.
Always Show Start On My Main Display When I Press The Windows Logo Key. By default, Windows shows the Start screen on whichever display you’re currently using. If you’d rather have it appear always on the main display, select this check box.
Show The Apps View Automatically When I Go To Start. By default, the Start screen displays the tiles that you’ve organized. If you’d rather see a list of all the apps, select this check box.
Search Everywhere Instead Of Just My Apps When I Search From The Apps View. By default, Windows searches only your apps when searching from the Apps view; it doesn’t search your files, settings, or the web. If you’d like it to search for all these, select this check box.
List Desktop Apps First In The Apps View When It’s Sorted By Category. If you spend most of your time on your desktop and don’t use many apps designed for Windows 8.1, selecting this check box helps you find your apps faster.
In Windows 8, users had to open the Start screen by pressing the Windows logo key on the keyboard or a tablet, or by clicking in the lower-left corner of the desktop. As shown in Figure 1-31, Windows 8.1 has added a Start button to the desktop, in the same place earlier versions of Windows had it.
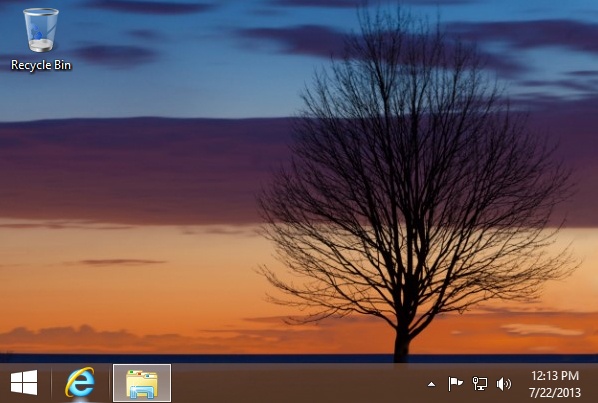
The desktop Start button doesn’t open a Windows 7–style Start menu like you might expect; it displays the Start screen. If you’ve already learned how to open the Start screen without using the Start button, you can turn it off by installing the free StartKiller app from http://www.tordex.com/startkiller/.
If you miss your Windows 7 Start menu, get it back by installing Start8 from http://www.stardock.com/products/start8/.
The WinX menu has always been my favorite power user’s tool—open it by pressing Windows+X or right-clicking the lower-left corner of the screen. The WinX menu now gives you more options, including the options to sleep, restart, or shut down your PC.
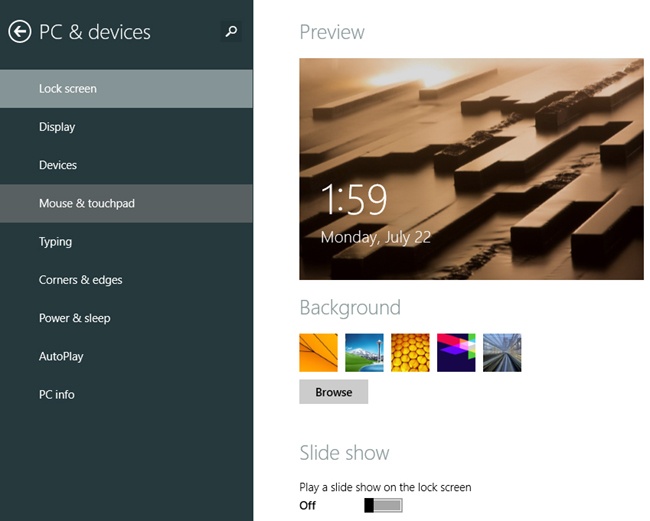
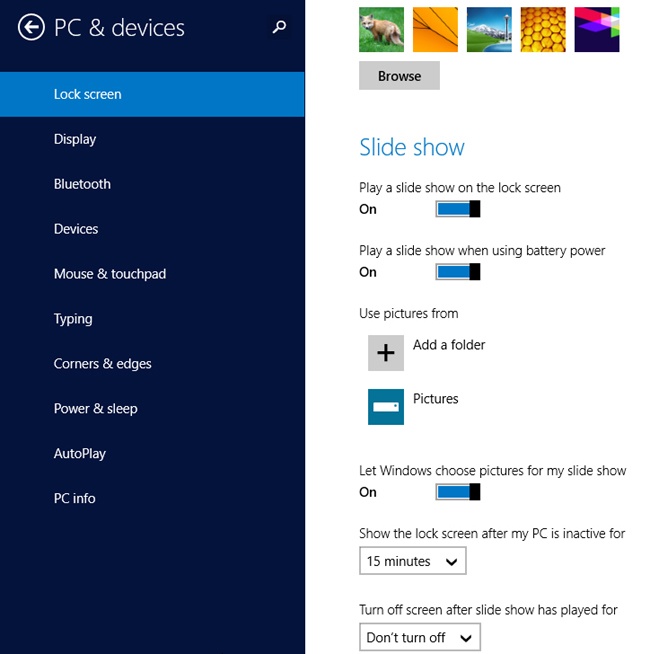
Your lock screen can now display a photo slide show. That’s nice if you have a tablet displayed in a common area of your house, such as a tablet propped up in your kitchen. To set up a slide show, follow these steps:
From PC Settings, select PC & Devices.
Select Lock Screen.
Select Play A Slide Show On The Lock Screen.
Optionally, configure your slide show, as shown in Figure 1-32:
Select Play A Slide Show When Using Battery Power if you plan to keep your device unplugged but aren’t worried about it running out of battery power.
Under Use Pictures From, configure the folders that have your pictures. If you keep your pictures in your Pictures folder, you don’t have to configure this.
Select Let Windows Choose Pictures For My Slide Show to let Windows intelligently choose which pictures to show. For example, it tends to show more recent pictures from the same season, rather than embarrassing pictures of you from high school. Okay, I admit it; I have no idea how the algorithm works.
Configure when the slide show starts and stops by setting Show The Lock Screen After My PC Has Been Inactive For and Turn Off Screen After Slide Show Has Played For.
On touch PCs, you can allow users to take pictures without unlocking the PC, similar to what you can do with most smartphones. Simply swipe down from the lock screen to open the camera without logging in. Some of the features will be limited until you log in and authenticate yourself.
Windows 8.1 enables this feature by default. To turn it off, access the lock screen settings from the PC & Devices page of PC settings, and then select Use Camera From The Lock Screen at the bottom of the page.
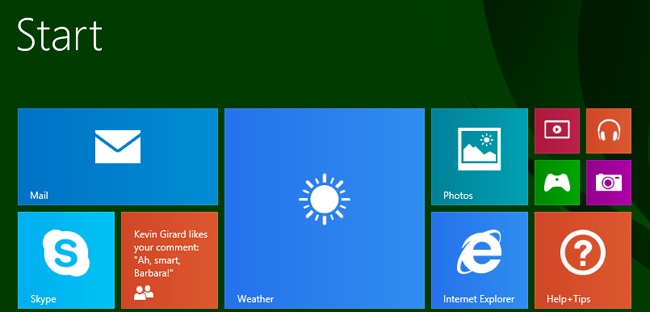
You can now select larger or smaller sizes for tiles on your Start screen. The larger tile sizes allow you to get more information from live tiles without opening the associated app. The smaller tile sizes allow you to fit four times more apps on the Start screen without scrolling.
Figure 1-33 shows each of the different tile sizes: wide, large, small, and medium. To change the size of a tile, select it by flicking or by right-clicking it, and then click Resize.
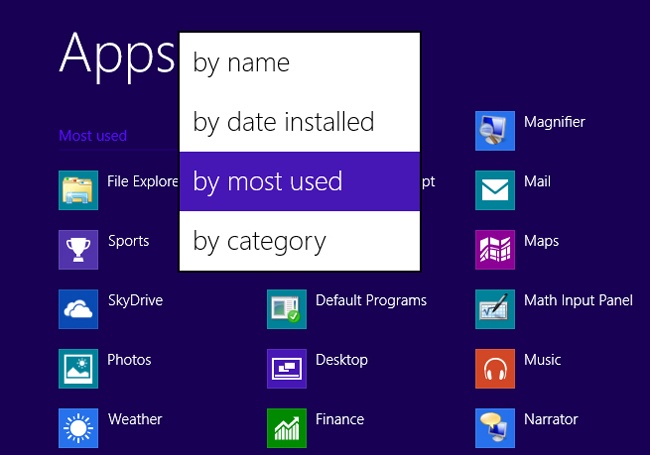
Just swipe up from the bottom of the screen (on touch-screen PCs) or click the down arrow in the lower-left corner of the Start screen to view all your apps, including those that don’t have a tile on the Start screen. As shown in Figure 1-34, click the list at the top of the All Apps screen to change how the apps are sorted.
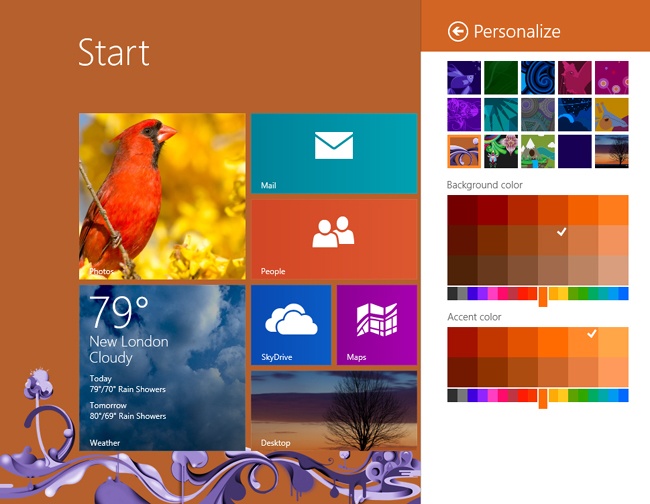
You’re no longer limited to the handful of colors Windows 8 supported for the Start screen. As shown in Figure 1-35, you can select almost any color you want by opening the Settings charm and then selecting Personalize. You can also select your own desktop wallpaper, though you can’t select a different image as your wallpaper.
Windows 8.1 also makes your Start screen more dynamic by using motion accents. Basically, graphics move with your Start screen, providing an interesting, almost three-dimensional effect. Watch the video at the link provided at the beginning of this section to see motion accents in action.
Perhaps my favorite improvement in Windows 8.1 is search. Now, you can simply type from the Start screen and Windows will find what you’re looking for, whether it’s an app, setting, document, picture, news, or webpage. As shown in Figure 1-36, Windows 8.1 displays the results using a full-screen interface that’s much nicer to browse than any web search engine.

Windows 8 featured a handful of settings accessible from the touch interface (available from the Settings charm by selecting Change PC Settings). However, to change most settings, you still had to open Control Panel on the desktop, exactly as in Windows 7. That worked well with a keyboard and mouse, but it could be difficult to use with touch.
Windows 8.1 moves more settings from Control Panel to the touch interface. Now, all the settings most users might need to change are accessible through touch. Some settings accessed less frequently, such as configuring BitLocker or Windows Firewall, still require you to use Control Panel from the desktop.
In Windows 8, you could access Adobe Flash–based websites only from the desktop. The Windows 8.1 update includes Internet Explorer 11, which supports Adobe Flash, whether you’re using the touch-screen interface or the desktop. Additionally, Microsoft will now distribute updates to Adobe Flash using Windows Update, which allows Adobe to more quickly fix newly discovered vulnerabilities.
Internet Explorer 11 also supports Enhanced Protected Mode (EPM) on the desktop, and EPM is enabled by default. EPM runs webpages in a sandbox, preventing them from accessing important system resources and your personal files. EPM also provides 64-bit tabs, which are less vulnerable to attacks such as buffer overflows than are 32-bit tabs.
Together, these security improvements reduce the risk of getting a malware infection from a website.
Windows 8.1 includes several improvements to security:
Windows Defender network support. Windows Defender can now monitor your network communications for suspicious activity, allowing it to detect malware that would otherwise remain hidden.
Biometrics. If your PC has a fingerprint scanner (or if you’ve installed a USB fingerprint scanner), you can now use it to log on and to authenticate in other areas of Windows 8.1, such as User Account Control prompts. Naturally, you can still revert to a traditional password. However, fingerprint scanning can be a convenient way to log on, especially when using a touch-screen device.
Encryption. All editions of Windows 8.1 support device encryption. In Windows 8, only the RT, Pro, and Enterprise editions supported BitLocker Drive Encryption. Those editions of Windows 8.1 still provide more full-featured encryption management tools than the standard edition of Windows 8.1, but standard users can now encrypt drives for better security.
Assigned access. You can limit specific accounts to running only a single app. When the user logs on, that app will automatically open, and the user won’t be able to switch to other apps. Assigned access is useful for kiosk environments, where a PC serves a very specific, single function.
Remote data removal. With increased mobility comes the increased risk of physical loss of your PCs. Windows 8.1 provides remote data removal, which allows businesses to configure types of data to always be encrypted. If the PC is lost, the business can remotely wipe the data (provided the PC connects to the Internet).
Windows 8.1 supports printing directly to 3-D printers, so you can print 3-D objects using plastic. You can do this with earlier versions of Windows, but doing so required additional software. For more information about 3-D printing in Windows, including apps to help you get started, visit http://channel9.msdn.com/Events/Build/2013/3-9027.
Windows 8.1 supports tethering. With tethering, you can use Wi-Fi to share an Internet connection. For example, if your Windows 8.1 PC has a mobile broadband connection, you can enable tethering and then connect other wireless devices to a mobile Wi-Fi hotspot. Any device that connects to the hotspot will be able to use the mobile broadband connection to access the Internet. Tethering is particularly useful when you are traveling because you can share a single Internet connection between all your wireless devices.
In Windows 8, you had to follow a complex series of steps to enable tethering or use a third-party app.
This book focuses on using Windows 8.1 in the home environment. However, I do want to mention the features that Windows 8.1 adds that are primarily intended for business environments:
NFC tap-to-print. When administrators allow it and your printers and Windows 8.1 devices support it, you can now connect to a printer using near field communications (NFC). Just tap your device against a printer, and you’ll be able to print your document.
Better Bring Your Own Device (BYOD) support. Administrators can configure business networks to allow users to connect their home devices, including Windows 8.1 RT tablets, to the corporate network while minimizing security risks. For more information, visit http://www.microsoft.com/en-us/windows/windowsintune/pc-management.aspx.
Work folders. If your system administrator allows it, you can now synchronize your work files with your different devices, even if you bought them yourself.
Windows 8.1 is missing a couple of features that were part of Windows 7:
DVD playback. Windows 7 had DVD playback capabilities built in. You could insert a DVD movie and play it without any additional software. This is not a feature in Windows 8.1. Because of licensing fees, including DVD playback capabilities increases the cost of every computer that includes Windows. However, many new netbooks, ultrabooks, and tablets do not even include DVD hardware, so including the feature would increase costs without offering the user any benefit.
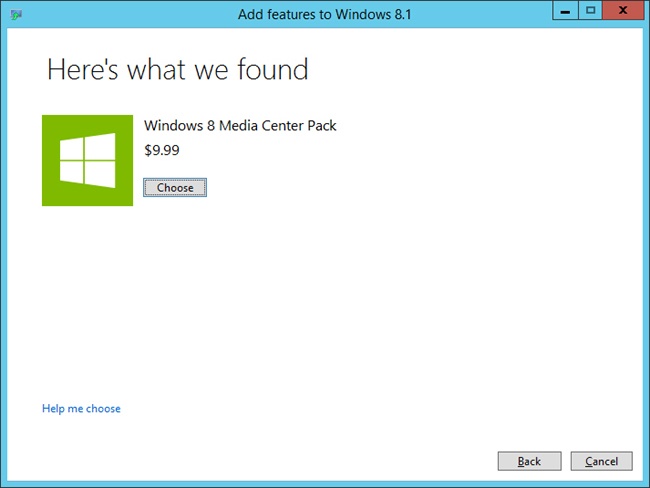
Media Center. With Media Center, you can use a remote control to play music, videos, and DVDs, as well as to record and play TV. Media Center has been a popular way to create a Home Theater PC (HTPC). Some editions of earlier versions of Windows included Media Center, but Media Center is available only as an add-on for Windows 8.1 (for an additional charge). As with DVD playback, supporting the ability to record broadcast TV added costs to computers for features that many people would never use. To purchase Media Center, use the Add Features To Windows 8.1 tool in Control Panel, as shown in Figure 1-37.
For more information about watching videos, refer to Chapter 14. For more information about Media Center, refer to Chapter 17.
While Windows 8.1 does not natively support playing back DVDs, computer manufacturers are likely to include their own software for DVD playback on computers with the necessary hardware, so the user experience is not likely to change.