
Chapter 13: Customizing Builds for Distribution and Advanced Development
In This Chapter
Introducing common basic customizations
Creating App Store and Ad Hoc builds for iOS apps
Creating App Store builds for Mac apps
Working with advanced build techniques
Chapter 12 introduced the Xcode build system. This chapter introduces some useful examples of simple customization, explains how to create and distribute App Store and Ad Hoc builds, and introduces more advanced build customization techniques that work with build phases and build rules—the steps in the build sequence that define how individual files are processed.
![]() NOTE
NOTE
If you haven't read Chapter 12 yet, start there. The contents are a prerequisite for this chapter.
Introducing Common Basic Customizations
Basic build customizations are very common. As you develop apps, you'll find that you typically need to perform the same customizations over and over. This section includes a selection of useful customizations. It isn't a definitive list, but it includes tasks that developers need to perform regularly that aren't highlighted in the official documentation. As you gain more experience, it's likely you'll extend this list with standard customizations of your own.
All require changes to the build options and build settings for projects and/or targets that were introduced in Chapter 12. They don't modify the build rules, which are introduced later in this chapter.
The customization process for iOS and OS X projects is recognizably similar. OS X and iOS projects have slightly different low-level compiler settings and noticeably different app-specific options under their respective Info tabs, but the settings are organized in the same way and appear in the same editor. Most of the customizations in this section are relevant to both platforms.
![]() CAUTION
CAUTION
Be aware that some of the build settings and options interact with each other, while others may not do what you expect them to. These gotchas are listed in this section, with suggested workarounds.
Creating a build for testing and debugging
The debug/test build is the default in Xcode. So for iOS Simulator testing and OS X testing, you don't need to do any customization. Optionally, you can select the runtime platform using the pop-up menu at the top left of the main Xcode toolbar and customize other build settings as needed. But the defaults should create a build that can be debugged and launch it.
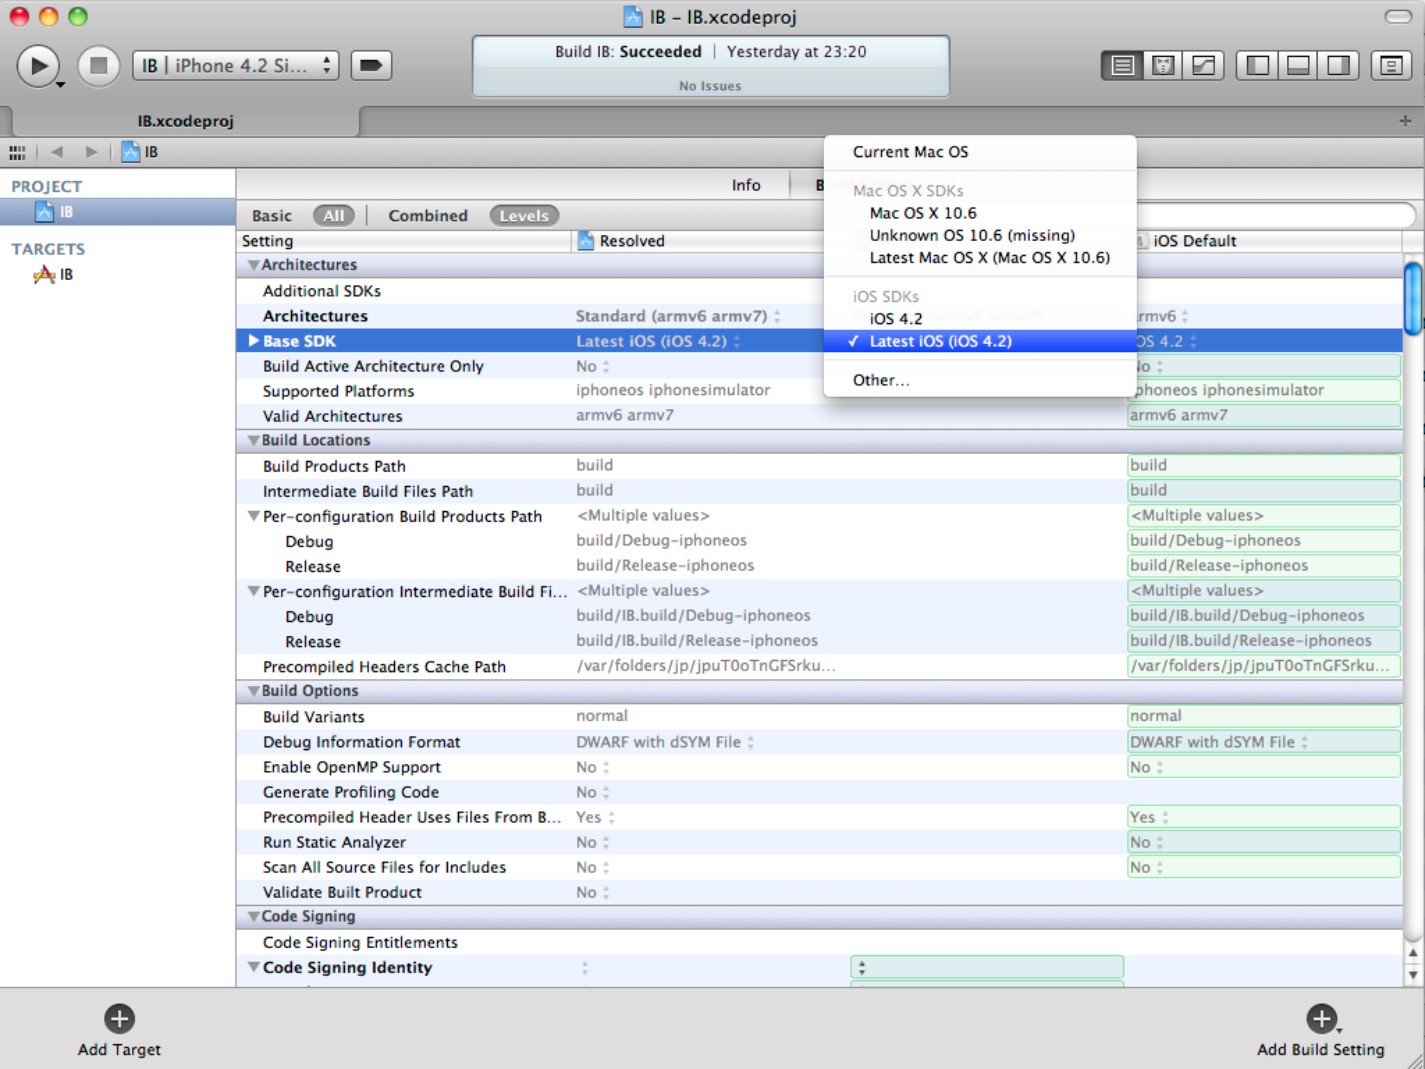
Selecting the Base SDK
The Base SDK is the version of the libraries and headers used to generate apps for a specific version of either iOS or OS X. Whenever a new version of either OS is released, Apple generates a new version of Xcode for developers with an updated SDK.
Early versions of Xcode 3 didn't handle this intelligently. When you loaded an old project or downloaded a project from a website, Xcode typically displayed an unhelpful “SDK missing” error message. Because Xcode couldn't find the original SDK, the project wouldn't build until you selected an updated SDK manually.
In Xcode 4, the project build settings include new automated Latest iOS and Latest Mac OS X options, as shown in Figure 13.1. If you save your projects with this setting and reload them into a later release of Xcode, they should select the most recent SDK automatically, even if it's different from the SDK used for the original project.
Note that projects saved with older versions of Xcode continue to show this error when you reload them. (This is a common error when you try to load a sample project downloaded from a developer's blog.)
To fix the problem, select the latest SDK manually in the build settings after loading the project.
![]() NOTE
NOTE
You may want to change this setting for final distribution builds, as described later.
Figure 13.1
Selecting the Latest OS option to ensure that projects always load with a current SDK
Setting the minimum supported OS version
With each new version of iOS and OS X, new functions, classes, and methods are added, and older elements are removed. Not all users upgrade to the most recent version of each OS, especially not those running OS X, who have to pay for upgrades. iOS users of older devices are typically limited to an older version of the OS.
It's often useful to create products that are compatible with an older version of the OS, but that also can run on newer versions. The minimum supported OS version is known as the Deployment Target. If a user tries to run the product on an older version, the loader displays an error message.
Understanding the SDK and the deployment target
Newcomers to Xcode are often confused by the relationship between the base SDK, the deployment target, and the OS version shown in the Simulator. The key point to understand is that the SDK defines the symbols and libraries that appear in the product. The deployment target is simply a number used by the loader to check OS compatibility.
![]() CAUTION
CAUTION
Don't confuse the deployment target with the targets used in a project. The deployment target is an OS version. The build targets are processes and file specifications that create a product. For clarity, the deployment target could have been labeled the deployment OS, but unfortunately it wasn't.
The SDK supplied with any version of Xcode includes support for older versions of the OS, up to some arbitrary limit. For example, the iOS 4.3 SDK can build projects that run under iPhone OS 3.0 and later, but not iPhone OS 2.x and 1.x.
An often-repeated rule for selecting an SDK and deployment target is that you should always select the Latest OS SDK (as described earlier) and the most ancient supported deployment target. In practice, beta development complicates the requirements. Here's a more comprehensive guide:
![]() Select the Latest OS SDK for all development builds. With a beta SDK, you can use this option to experiment with new features.
Select the Latest OS SDK for all development builds. With a beta SDK, you can use this option to experiment with new features.
![]() If you have a beta SDK installed, select the current public release of the OS—the version before the current beta—as the Base SDK for App Store distribution builds.
If you have a beta SDK installed, select the current public release of the OS—the version before the current beta—as the Base SDK for App Store distribution builds.
![]() Not all beta SDKs include this previous version. If you've installed a beta SDK and find the current public OS SDK is missing, you must use or reinstall a separate older copy of Xcode for distribution builds.
Not all beta SDKs include this previous version. If you've installed a beta SDK and find the current public OS SDK is missing, you must use or reinstall a separate older copy of Xcode for distribution builds.
![]() Don't try to create a final production build with a beta version of the OS until the beta SDK is upgraded to a final GM (Gold Master) seed and Apple confirms this seed is suitable for production code. This usually happens just before public release.
Don't try to create a final production build with a beta version of the OS until the beta SDK is upgraded to a final GM (Gold Master) seed and Apple confirms this seed is suitable for production code. This usually happens just before public release.
![]() You can use a beta SDK for Ad Hoc test builds only if your testers have access to the equivalent beta versions of the OS for their devices. If they don't, which is often the case, select the previous public SDK as the active SDK. You can give them access, but some assembly is required. For details, see the Creating App Store and Ad Hoc builds section later in this chapter.
You can use a beta SDK for Ad Hoc test builds only if your testers have access to the equivalent beta versions of the OS for their devices. If they don't, which is often the case, select the previous public SDK as the active SDK. You can give them access, but some assembly is required. For details, see the Creating App Store and Ad Hoc builds section later in this chapter.
![]() The Simulator supports various older versions of the OS. You can use this option to partially test code for backward-compatibility.
The Simulator supports various older versions of the OS. You can use this option to partially test code for backward-compatibility.
![]() You also can test compatibility on real devices, if you have them. If you need to, you can use Xcode's Organizer to downgrade newer devices to older versions of the OS for testing. (Don't do this on devices you use personally; you're likely to lose data.)
You also can test compatibility on real devices, if you have them. If you need to, you can use Xcode's Organizer to downgrade newer devices to older versions of the OS for testing. (Don't do this on devices you use personally; you're likely to lose data.)
![]() Set the deployment target as low as possible, for maximum backward-compatibility. This gives users the best chance of being able to buy and use your app.
Set the deployment target as low as possible, for maximum backward-compatibility. This gives users the best chance of being able to buy and use your app.
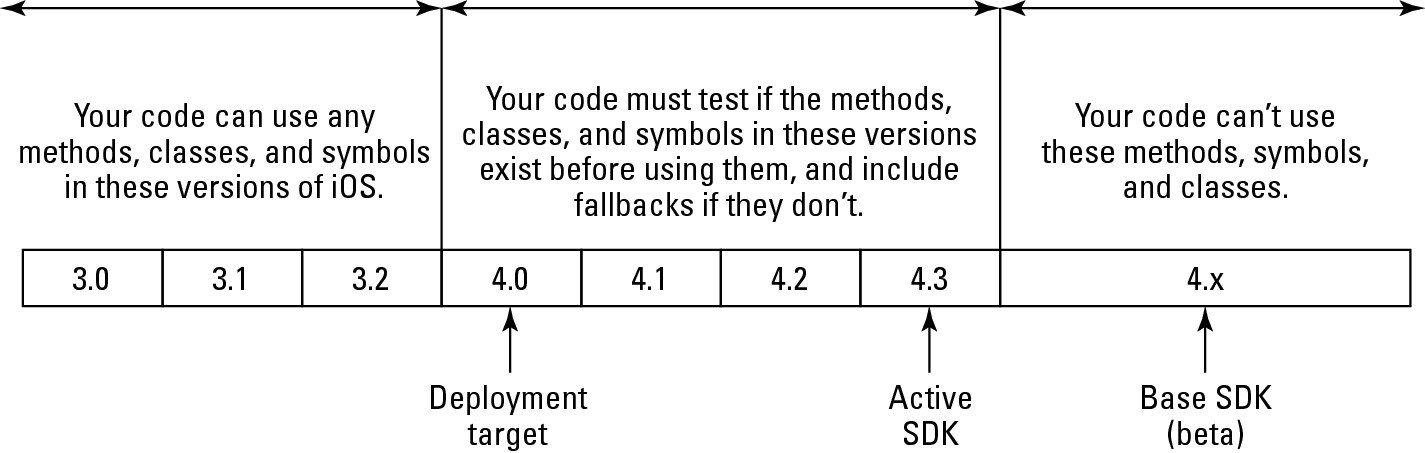
A key point is that when you set the deployment target to an older version of the target OS, your code must test for OS-dependent features. Figure 13.2 illustrates this graphically.
In the figure, your app can run on any device with iOS 4.0 or later. The latest features from the iOS 4.3 SDK aren't available on devices with older versions of iOS, so your code must check they exist before it tries to use them. Your code will of course compile with the iOS 4.3 SDK—but when the deployment target is set to support older version of iOS, it won't run reliably on a range of supported OS versions unless you include versions-specific tests and code features.
Supporting multiple versions of an OS is non-trivial. It's also difficult to test in full. The only true test is to run the code on multiple devices, each of which has a different version of the OS—or on a single device multiple times, updating the installed OS each until every version has been tested.
![]() NOTE
NOTE
This can be lots of work. It's not unusual to test code on the oldest and newest supported OS, check by inspection that the code is likely to work on intermediate versions, and hope there are no surprises.
Figure 13.2
The most general view of SDK and deployment selection. Code must include tests to check for OS-dependent features that may not be available on a user's device. Missing features must be implemented with workarounds and fallbacks.
Common practical techniques for multi-OS support include the following:
![]() Using variations on the
Using variations on the respondsToSelector: method to check whether methods are available
![]() Using
Using NSClassFromString to check whether a class is supported
![]() Reading the supported system version from
Reading the supported system version from UIDevice
![]() Including conditional compilation elements to manually select OS-dependent code (This option is typically used to check for a platform—for example, OS X, the iOS Simulator, or an iOS device—during compilation. Don't use it to manage OS versions.)
Including conditional compilation elements to manually select OS-dependent code (This option is typically used to check for a platform—for example, OS X, the iOS Simulator, or an iOS device—during compilation. Don't use it to manage OS versions.)
![]() TIP
TIP
For practical examples of multiple OS support with code, search for Using SDK-Based Development in the documentation. There's more about conditional compilation later in this chapter.
Setting the deployment target
You can set the deployment target in three ways:
![]() Select the deployment OS with the Deployment Target menu in the Project⇒Info tab, as shown in Figure 13.3.
Select the deployment OS with the Deployment Target menu in the Project⇒Info tab, as shown in Figure 13.3.
![]() Select the deployment OS with the Deployment Target menu in the Target⇒Summary tab.
Select the deployment OS with the Deployment Target menu in the Target⇒Summary tab.
![]() Select the Deployment Target item in the build settings table for either the project or the target.
Select the Deployment Target item in the build settings table for either the project or the target.
Figure 13.3
Selecting the Deployment Target. This feature appears in three places, but for single-target apps it's easiest to set it here.
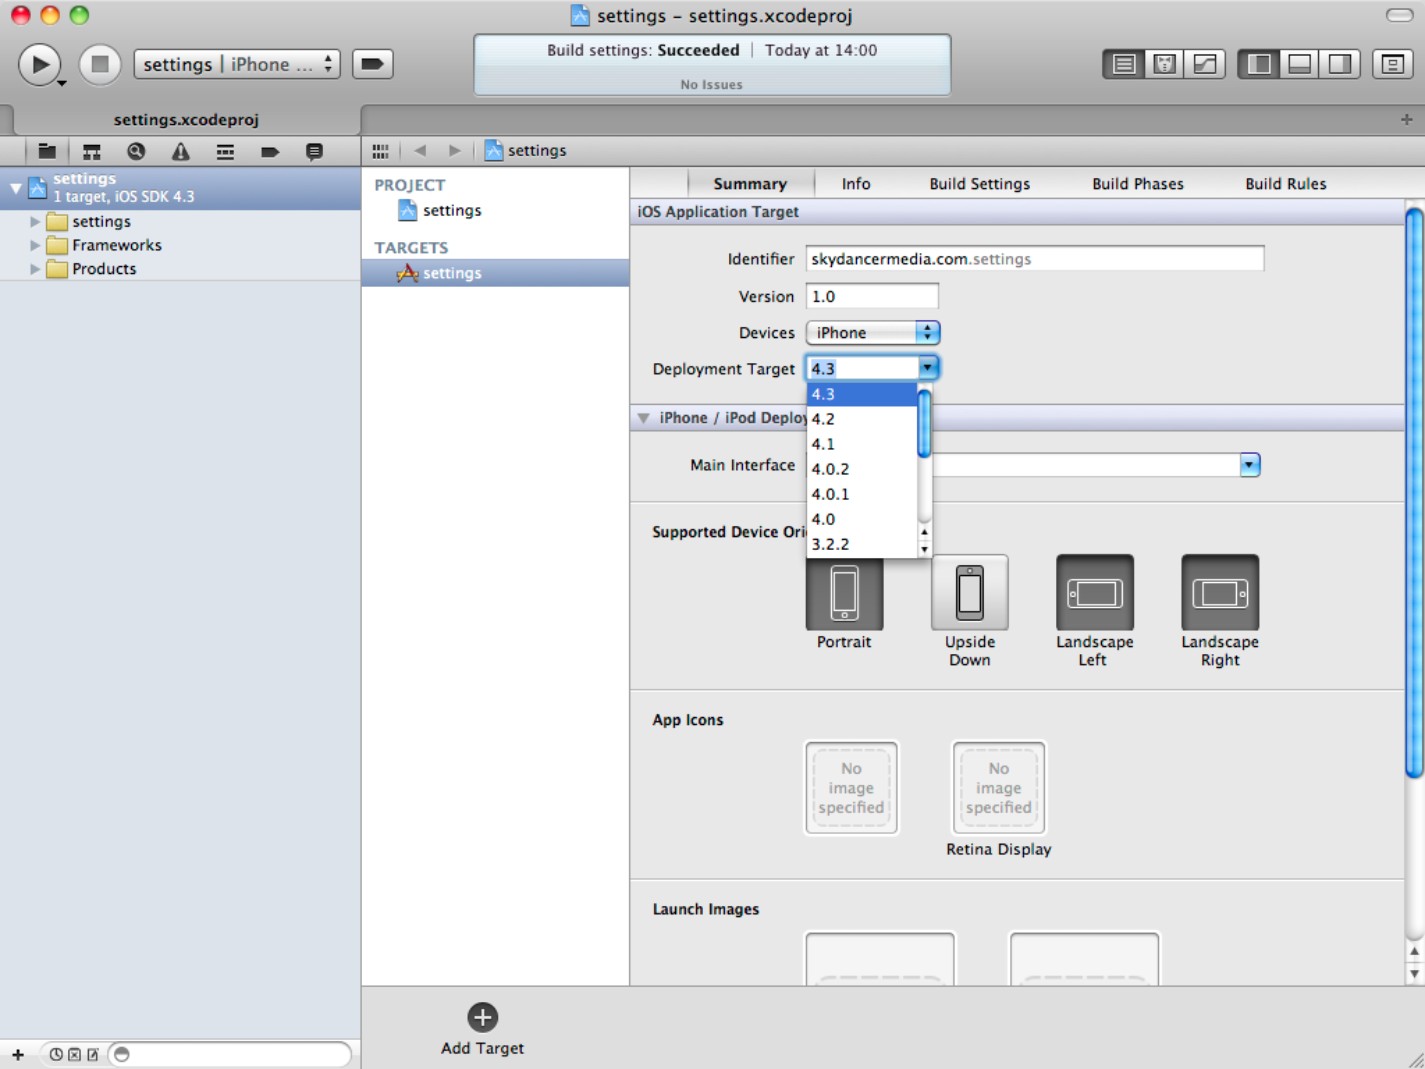
These options appear interchangeable, but they're subtly different. The first option creates a project build setting. The second creates a target build setting. The final option can create either a project or a target setting.
![]() CROSS-REFERENCE
CROSS-REFERENCE
The differences between project and target settings and the interactions between them were introduced in Chapter 12. If you're not yet familiar with them, read that chapter before continuing—the differences are crucial.
For single-target iOS and OS X apps, use the target summary setting for simplicity and clarity. For more complex projects with multiple targets, it's up to you to select the option that works best in the context of the project.
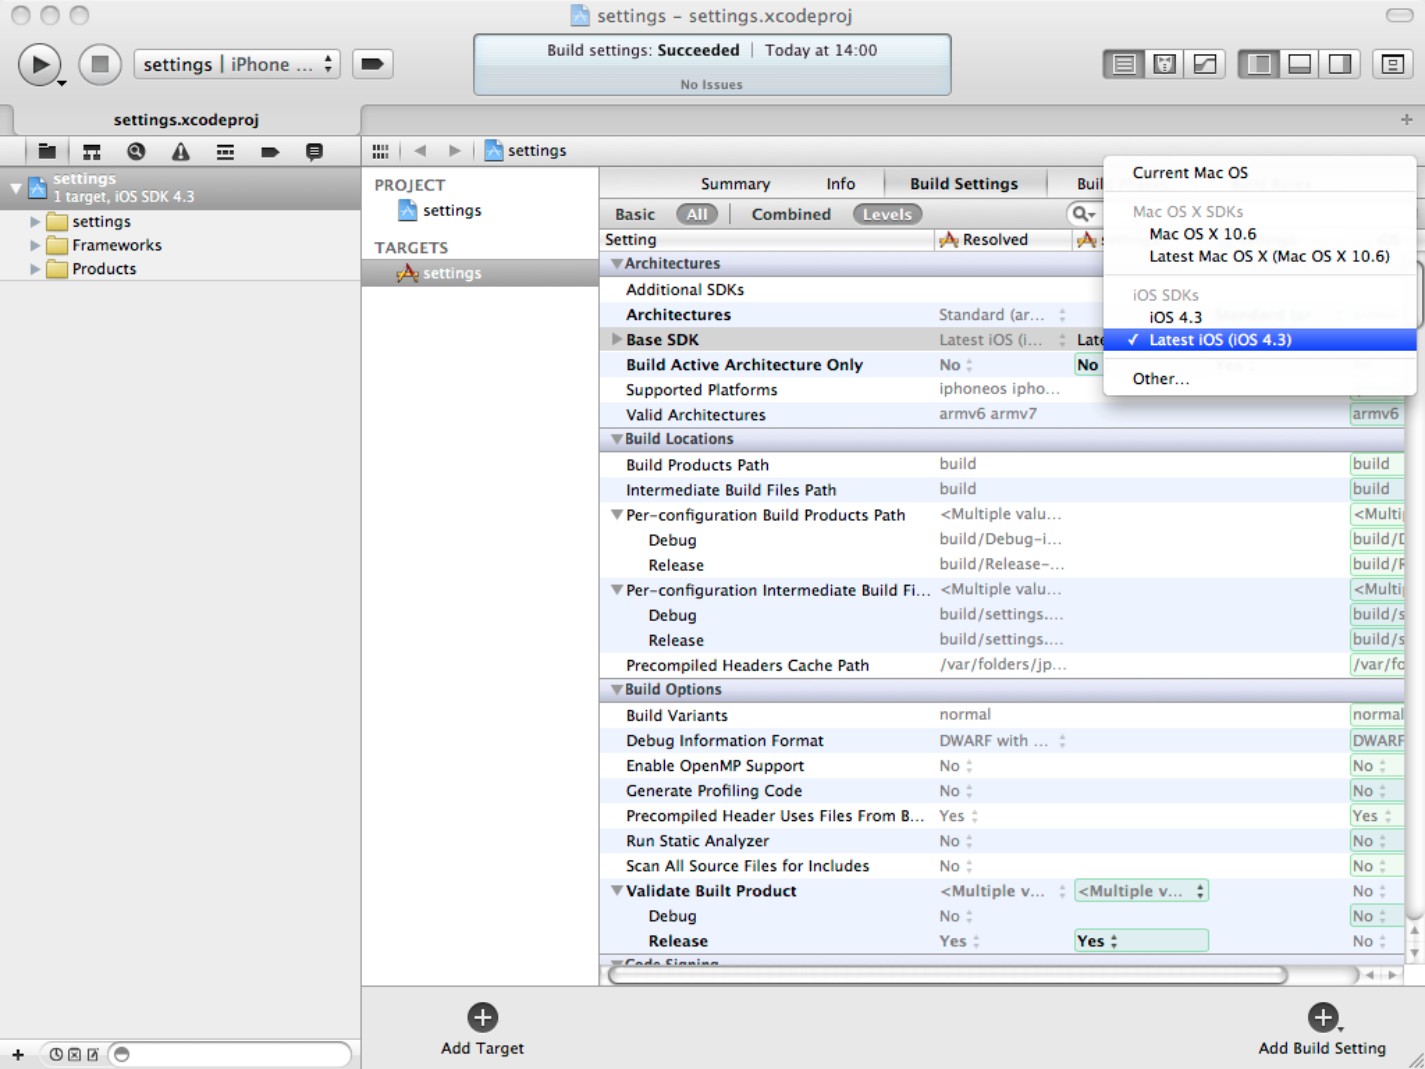
Setting the Base SDK
There's exactly one way to set the Base SDK—it's included in the list of build settings, as shown in Figure 13.4. When you load a project created with an older version of Xcode and you see the “missing Base SDK” error, open the build settings and fix it by selecting the correct “Latest OS” option for your project and platform, as shown in the figure.
New projects should always have the Base SDK selected correctly, by default.
Figure 13.4
Using the Build Settings to set the Base SDK
![]() CAUTION
CAUTION
Note that Xcode allows you to select an iOS SDK for an OS X project, and vice versa. This is never a wise thing to do. Occasionally you can load an older Mac project and Xcode assumes it's an iOS project—and vice versa. So you may need to correct this by hand. Note also that you can set different SDKs for Release, Debug, and custom configurations. Very occasionally you may discover a practical need for this, but it's not a widely used feature.
Including a framework or library in a build
This topic was introduced in Chapter 5, but it's expanded here. To add a framework or library, follow these steps:
1. Navigate to the Build Phases tab.
2. Open the Link Binary With Libraries item, as shown in Figure 13.5.
3. Click the + (plus) button at the bottom left of the item.
Figure 13.5
Adding a framework to a target

4. Select the framework or library from the menu.
5. The framework is added to the Project navigator. To keep the project organized, drag it to the Frameworks group.
Note that the list of frameworks is filtered by platform, so you can't add an iOS framework to an OS X project (or vice versa).
You can rearrange the compile order by dragging frameworks up and down the list, although this isn't usually necessary. You also can add an external non-Apple framework by selecting the Add Other option and navigating to the framework files. Use this option to add frameworks or libraries created by other developers.
Technically, you link against a framework. There are two options: Required and Optional.
A Required library must be present on the target platform and is loaded at launch with the rest of the application or product. If it isn't present, the application refuses to load.
Optional libraries are loaded only when they're referenced at runtime. This saves memory and creates a smaller initial product. But if the library isn't available, the application stalls or crashes. You can use the techniques introduced in the previous section—tests for classes and methods, conditional compilation, and so on—to create code that can handle optional libraries robustly.
Typically, you use the framework build option discussed here to add precompiled binaries with headers. But if you have a framework's source code, you can add the files to the project's sources using the Add Files option in the Project navigator. Third-party frameworks are often supplied as source code that you can add to your project, which may be a simpler option than trying to build and import the code as a stand-alone library.
Always remove frameworks from a finished project if they're not being used. For example, you might add one of the audio or graphics frameworks to experiment with it, decide that another framework is a better solution, but leave both in the build. Although this is an obvious point, it's easy to overlook it. When you finish development, check to see that every framework listed under Link Binary with Libraries is essential.
![]() CAUTION
CAUTION
If you're used to framework management in Xcode 3, be aware that this feature is handled very differently in Xcode 4. The list of linked frameworks still appears in the Project navigator, but the right-click Add Framework option is no longer available.
![]() TIP
TIP
It can be easier and quicker to add Apple frameworks using a different technique. Open the Frameworks group, right-click any of the existing frameworks, and select Show in Finder to view the default list of Apple frameworks. Each framework appears in a folder. To add a framework, drag its folder from Finder and drop it on the Frameworks group. Leave the Copy items option unchecked. Click Finish. The framework is added to your project, and it also appears in the Link Binary with Libraries list. (Don't forget to add an #import directive to include the headers in your code!)
Selecting a compiler
It's not immediately obvious that Xcode 4 includes two compilers for C family languages: the older GCC (Gnu Compiler Collection) and a newer LLVM (Low Level Virtual Machine) compiler. Each compiler has an associated debugger.
There are significant differences in speed, reliability, and debugger integration between the compilers. The LLVM compiler is more efficient and faster than GCC. The corresponding debugger is more tightly coupled with the source code than the Gnu Debugger, and it produces more informative error messages. But GCC has better optional support for other languages and can sometimes be a better choice for cross-platform projects.
To select a compiler, choose one of the three options from the Compiler Version menu in the Project build settings. These are your options:
![]() GCC 4.2: This uses the standard GCC compiler.
GCC 4.2: This uses the standard GCC compiler.
![]() LLVM GCC 4.2: This is a hybrid option that uses the old GCC frontend/parser and the new LLVM compiler. It gives faster compile times, especially on larger projects.
LLVM GCC 4.2: This is a hybrid option that uses the old GCC frontend/parser and the new LLVM compiler. It gives faster compile times, especially on larger projects.
![]() LLVM Compiler 2.0: This is a somewhat experimental option. It selects the new Clang frontend/parser and the LLVM compiler. If you're used to GCC, you'll find that selecting this option generates new and unfamiliar—but more comprehensive and useful—errors and warnings.
LLVM Compiler 2.0: This is a somewhat experimental option. It selects the new Clang frontend/parser and the LLVM compiler. If you're used to GCC, you'll find that selecting this option generates new and unfamiliar—but more comprehensive and useful—errors and warnings.
![]() NOTE
NOTE
When a project has different targets, it's possible to select a different compiler for each target. While Xcode allows you to do this, it's not a common requirement. Note also that when you switch compilers, some of the switches and options displayed under the Build Settings tab change too. Because you don't usually need to fine-tune the default settings, you can leave these alone, but it's worth being aware that LLVM has a slightly smaller selection of options.
![]() CROSS-REFERENCE
CROSS-REFERENCE
For more information about compiler technology, see Appendix C.
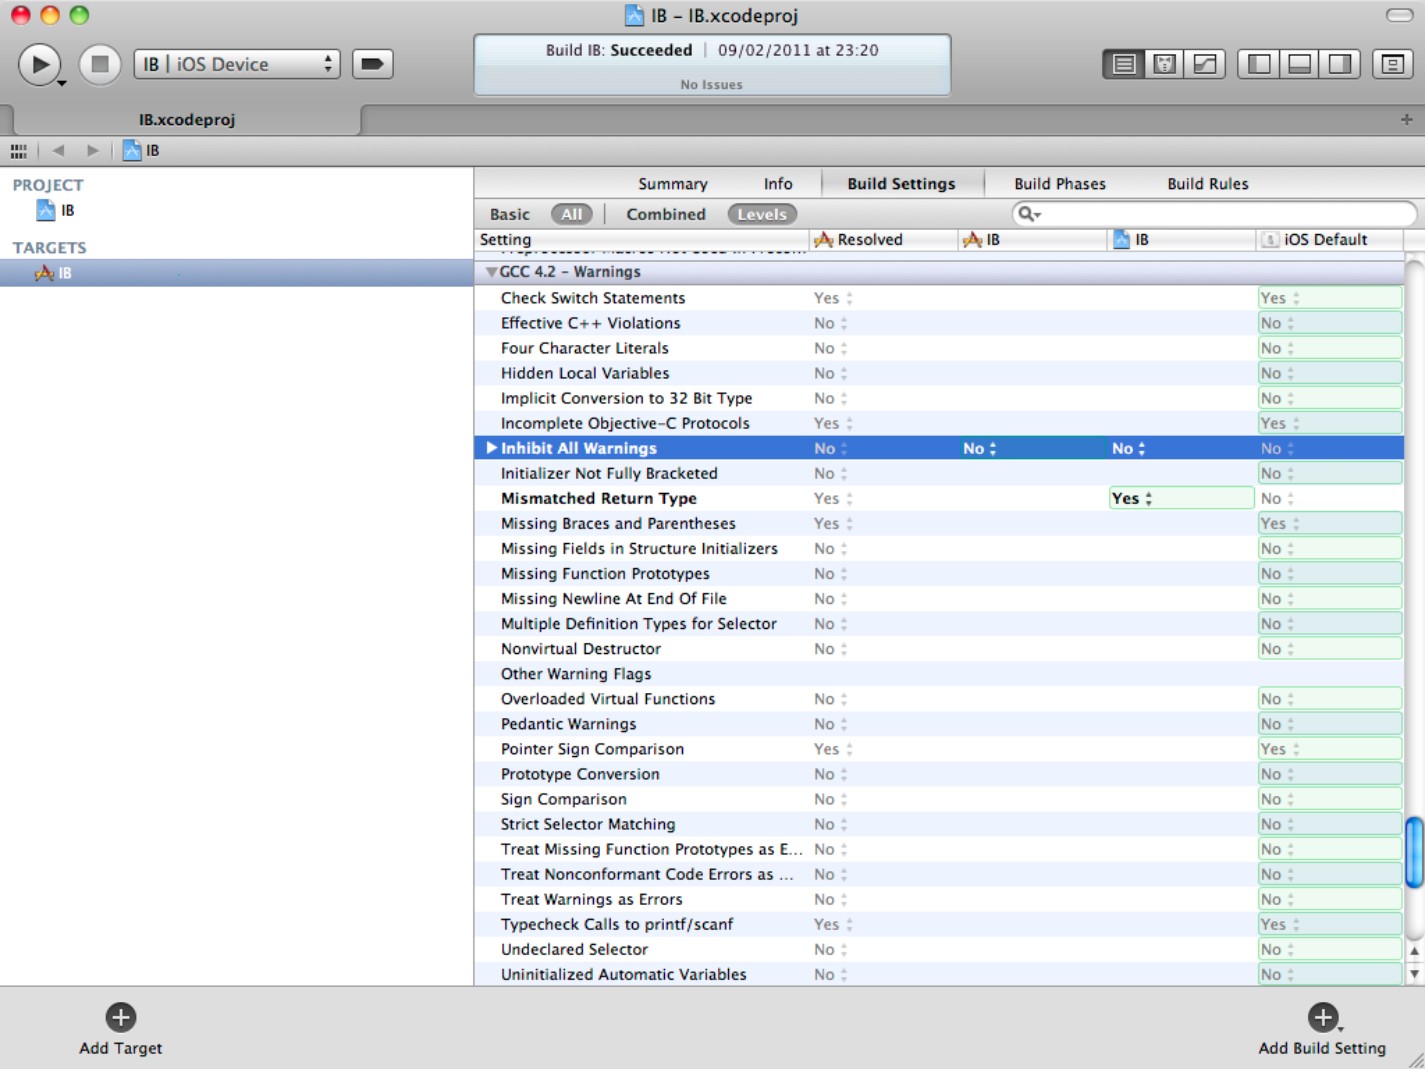
Controlling warnings
You can use the Warnings section toward the bottom of the full list of build settings to enable and disable specific warning messages, as shown in Figure 13.6.
The master switch is called Inhibit All Warnings. When this is enabled, the compiler ignores the other warning switches and suppresses all warnings, without exception. This is a dangerous option.
Most of the other options are self-explanatory, to varying degrees. For example, unused variables and unused values produce warnings by default. Unused functions don't. It's worth exploring the list to fine-tune the options to match your programming style.
Figure 13.6
Selecting warning messages
Disabling iOS PNG compression
By default, when you include PNG (Portable Network Graphics) image files in your project, the build process runs the art files through a PNG compression stage.
Unfortunately, Xcode's PNG compression isn't outstandingly efficient and may add unwanted transparency artifacts. You can minimize the size of the files by compressing them manually in an editor such as Adobe Photoshop or Fireworks. You can then tell Xcode to disable its compression and use the files as they are. (If you don't, you may find it makes precompressed files bigger.)
The compression setting is labeled Compress PNG Files. You can find it at the top of the Packaging heading in the Target Build Settings.
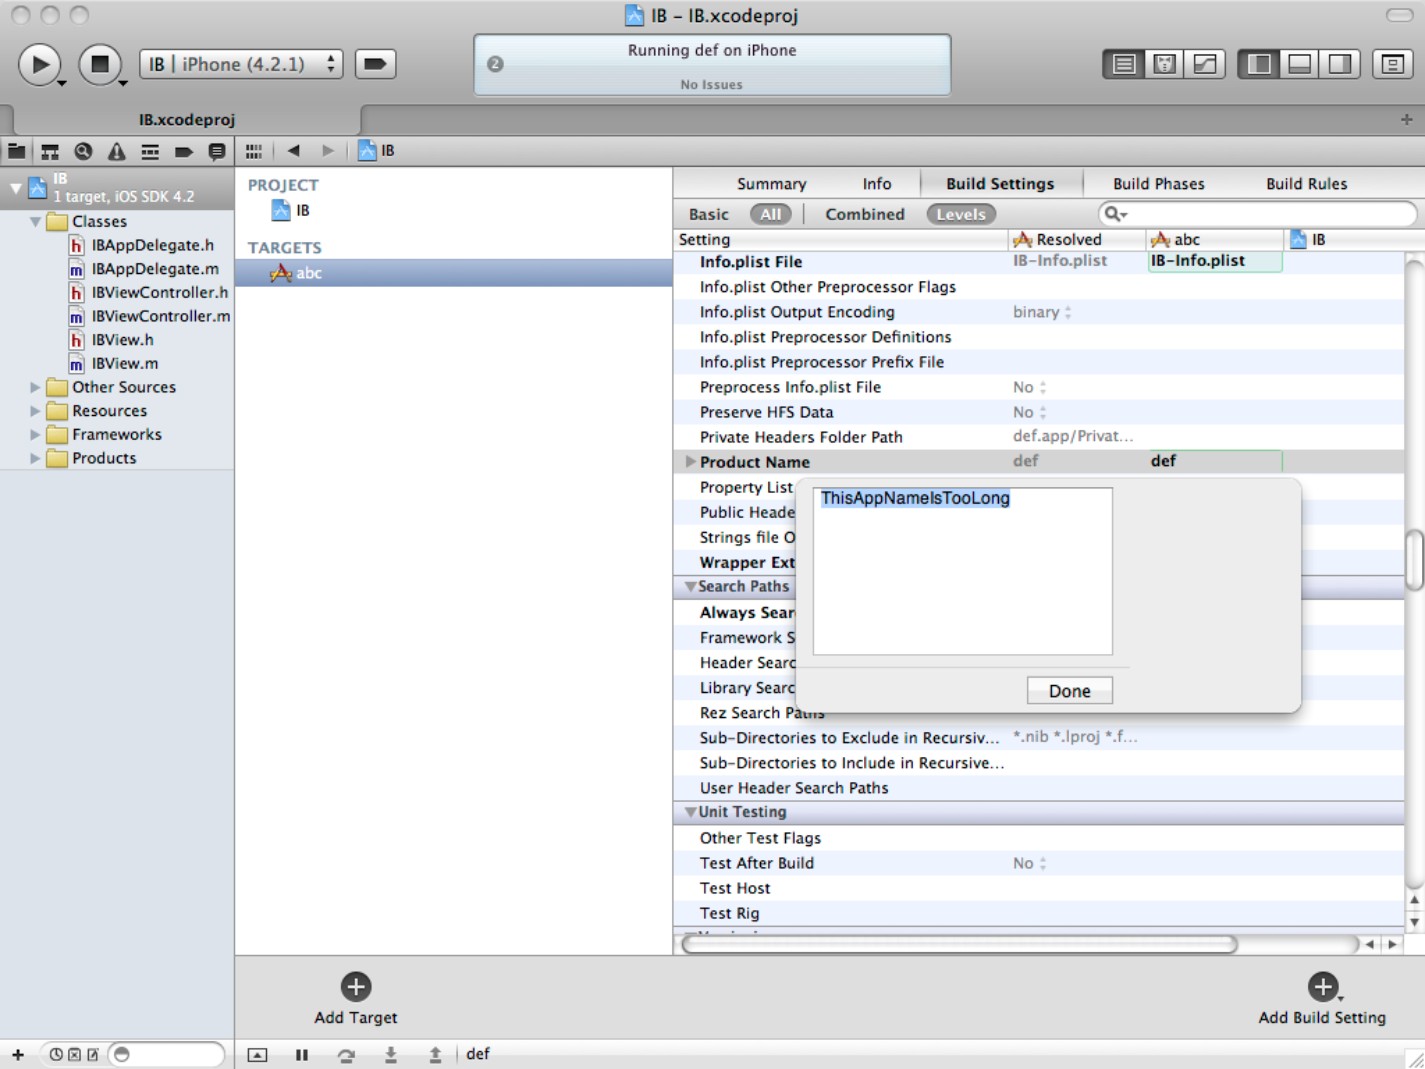
Changing an app's name before shipping
It's often useful to change the final production title for an app, to customize the name string that appears under the app icon in iOS or above the Dock in OS X.
There's no easy way to change the project's filenames or the project name as a whole. But you don't need to, because you can set the name independently using the Product Name setting in the Build Settings. You can find it halfway down under the Packaging header.
The default is a macro called $(TARGET_NAME). You might assume this means that the target name is copied from the Target name. This is true, up to a point. But it's easier to edit the name directly, as shown in Figure 13.7. You can either single-click twice on the product name to edit the name in place. Or you can double-click to display the floating edit box shown in the figure.
Figure 13.7
Editing the product name. This setting changes the name that appears under/over the app in the Dock and in Springboard.
![]() TIP
TIP
It's a good idea to keep iOS app names short, because Springboard truncates longer names with ellipses (…). Ten characters is a realistic maximum, but you may occasionally be able to squeeze in 11. You can test the truncation in the Simulator.
What if you want to edit the target name instead and force the product name to follow it? You can edit the target name by double-clicking it next to the icon in the gutter area to the left of the settings. If you leave the product name set to the default macro, it should follow suit.
Unfortunately, it doesn't. The product name field is copied to the target name only when the project loads. So to refresh the name, you have to close the project and load it again.
This is an obvious bug. It may or may not be fixed in future versions.
Creating App Store and Ad Hoc Builds
Now that you're familiar with the build system and with build customization, you can start to create builds for the App Store.
Xcode 4 includes a simplified building and packaging process that makes it easier to submit apps to the App Store and to create and distribute beta versions for testing. The process is simpler than it was in Xcode 3, but some assembly is still required.
The first time you submit an app, allow a day or two to work through each stage. The submission process isn't simple. It becomes easier with experience, but the best way to guarantee a successful first upload is to work through the stages carefully and methodically.
![]() CAUTION
CAUTION
Before you can create an App Store or Ad Hoc, you must work through the provisioning process introduced in Chapter 11. If you haven't done this, do it now; it's a prerequisite for this section.
![]() CAUTION
CAUTION
You must give iTunes Connect information about your bank account and tax details before you begin uploading a paid app. Work through this process well before you submit an app. International tax law is outside the scope of this book, but be aware that you may need to supply extra paperwork for certain territories; otherwise, income is taxed at source, although it may be possible to reclaim deductions later. Non-US individuals require an ITIN (Individual Taxpayer Identification Number) from the U.S. IRS to avoid deductions. It can take between three months and a year to obtain one.
Building and packaging an iOS project for the App Store
Debugging and testing an app is only the first stage of the App Store process. To sell it, you must package it and upload it, which takes significant extra work.
The packaging and uploading process has six steps:
1. Start by preparing marketing and support materials.
Technically, this isn't part of the build process, but you have to do it anyway before you create a final build.
2. Create a modified Release build configuration.
3. Customize some of the build options in the new configuration.
4. Build the project as an archive.
5. Upload the marketing materials to iTunes Connect, and create an application record.
6. Validate the project archive to check for basic errors, and submit it to iTunes Connect.
Preparing marketing and support materials
You need the following:
![]() Standard Artwork files: For a list, see Table 13.1. Preparing artwork isn't a trivial job; even if you have good design skills and aren't attempting a complex design, it can take half a day to a day to create every required file—longer to create every possible file. Professional developers often outsource this work to graphic designers. (This list includes essential artwork. Your project also may use its own separate artwork files for icons, sprites, and so on, but if it's finished, it should have those already.)
Standard Artwork files: For a list, see Table 13.1. Preparing artwork isn't a trivial job; even if you have good design skills and aren't attempting a complex design, it can take half a day to a day to create every required file—longer to create every possible file. Professional developers often outsource this work to graphic designers. (This list includes essential artwork. Your project also may use its own separate artwork files for icons, sprites, and so on, but if it's finished, it should have those already.)
![]() An SKU number (an arbitrary product code of your choice): Every app must have a unique SKU.
An SKU number (an arbitrary product code of your choice): Every app must have a unique SKU.
![]() Marketing text: This can be up to 4000 words of compelling text to persuade iTunes customers that they need your app.
Marketing text: This can be up to 4000 words of compelling text to persuade iTunes customers that they need your app.
![]() A list of search keywords, up to a maximum of 100 characters: Your app appears in iTunes when users search for any of these words.
A list of search keywords, up to a maximum of 100 characters: Your app appears in iTunes when users search for any of these words.
![]() TIP
TIP
If you can't think of a suitably professional-looking SKU, you can prefix the code with a shortened version of your name or your company name, followed by the reversed date.
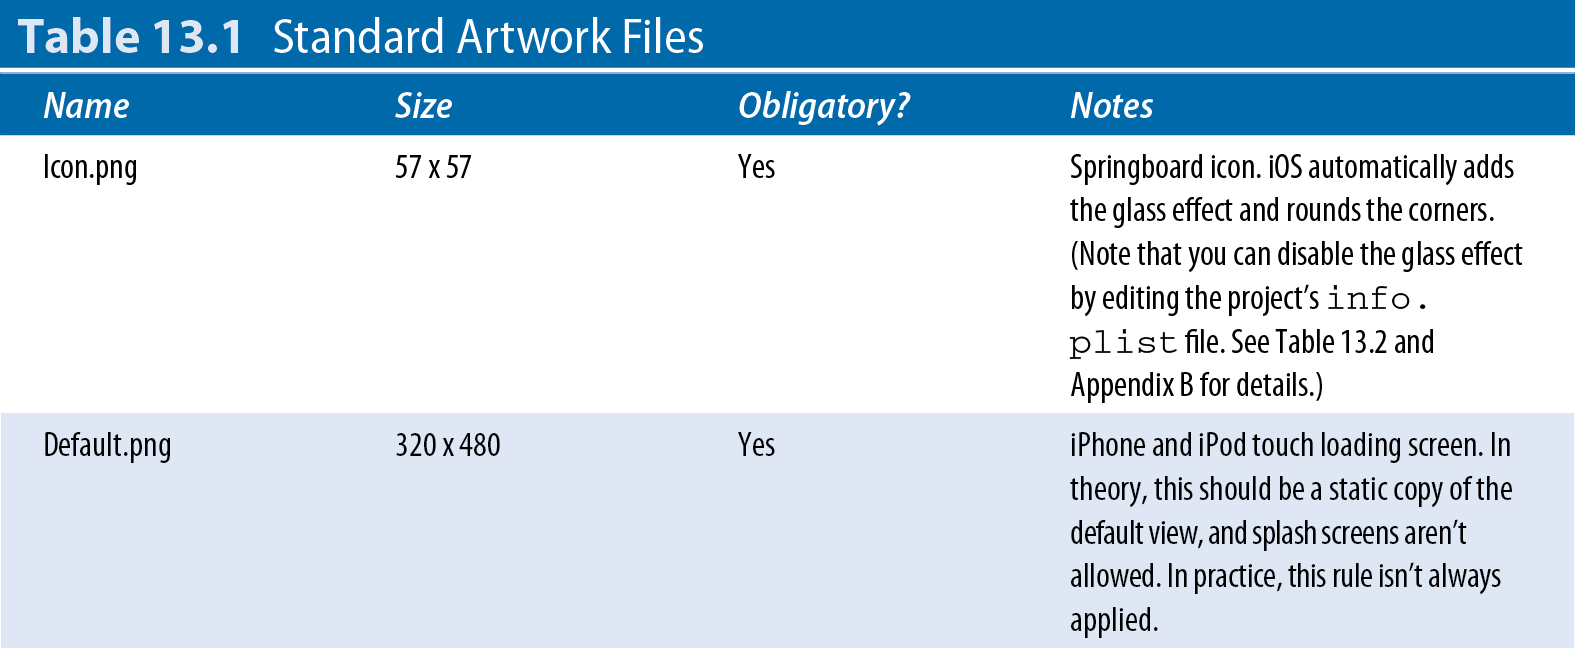
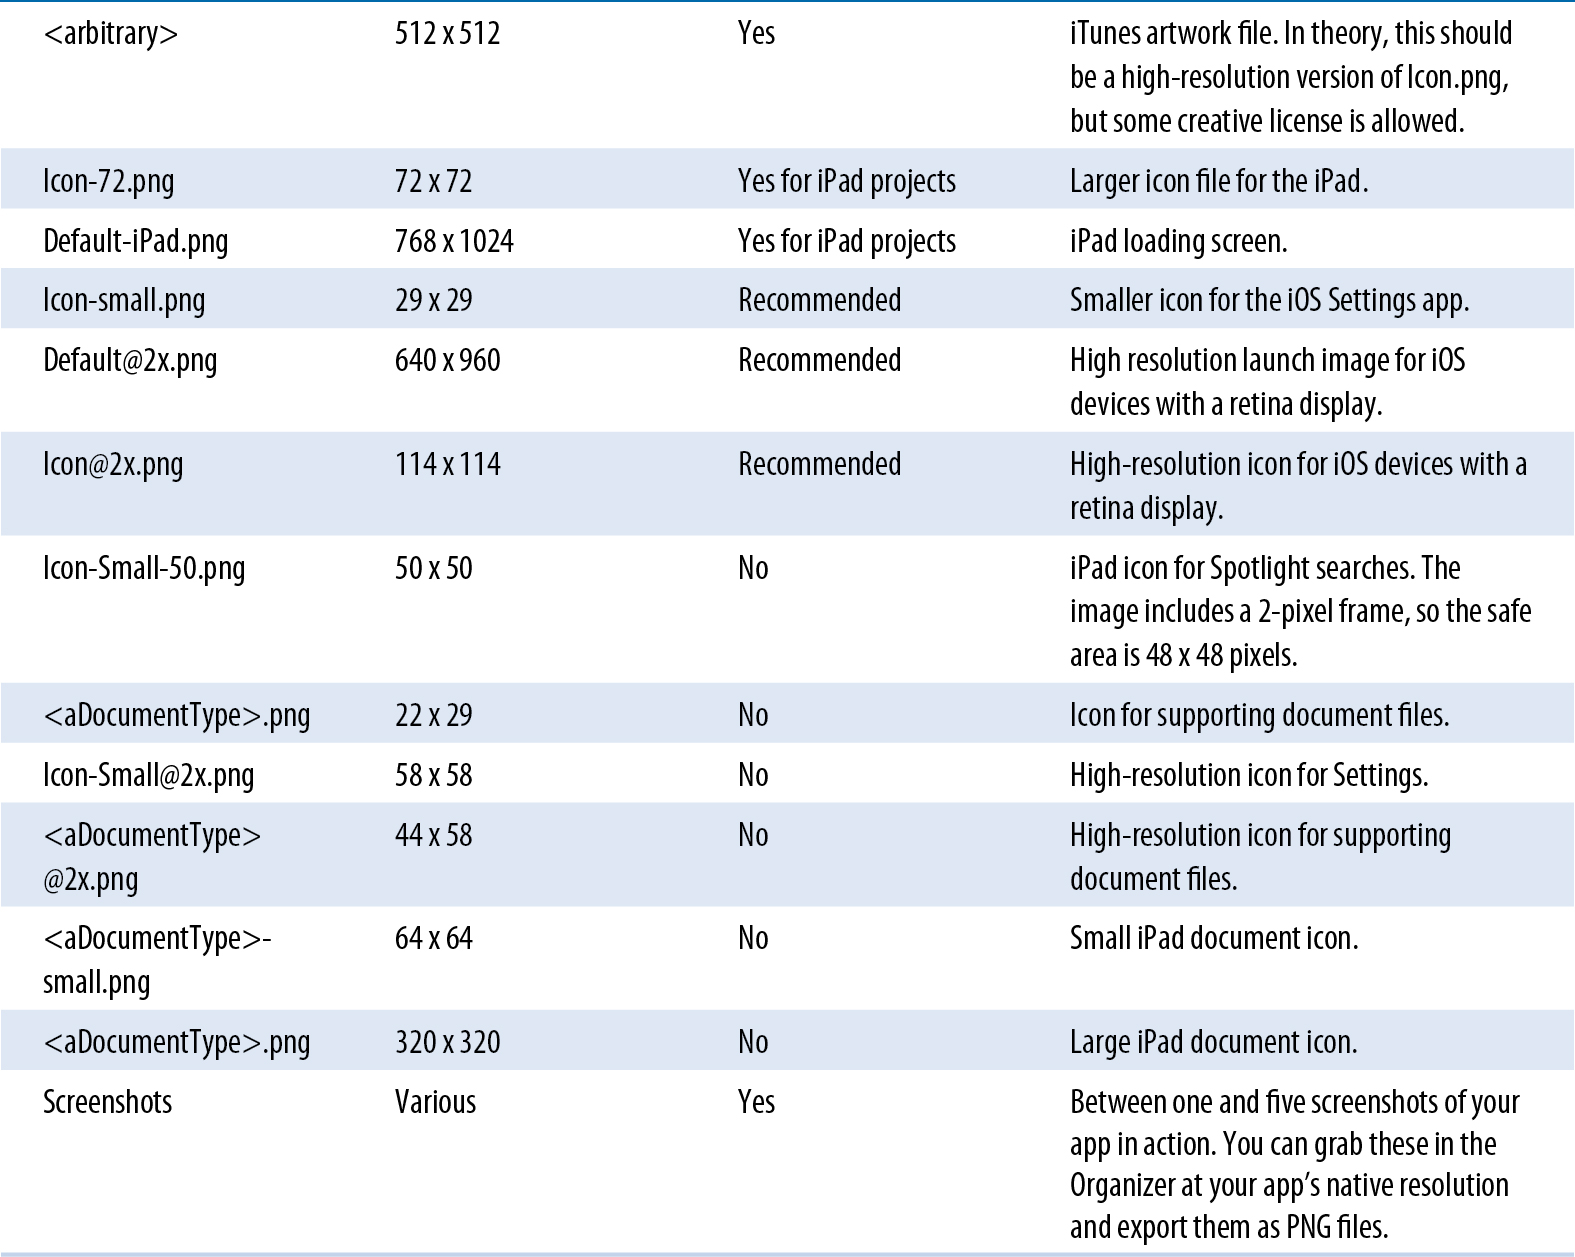
Although this list looks long, many of the images are optional, so you can get by with a more minimal selection. For the iPad, there are two default images rather than one: Default-Portrait.png and Default-Landscape.png. Optionally, you can add further default images to suit the LandscapeLeft, LandscapeRight, and PortraitUpsideDown orientations: Default-LandscapeLeft.png and so on. The default screen size is 1024 x 768, but you may need to remove 20 pixels from one edge when the status bar is visible.
All files except the screenshots should be added to the application in the Project navigator. For convenience, add them to the Resources group.
![]() CAUTION
CAUTION
If you're having problems getting Xcode 4 to recognize PNG files during validation (see later in this section), try saving them with the Generic RGB color profile. The default is sRGB, and Xcode 4 sometimes doesn't accept files with this profile.
Creating a new build configuration
The build settings for an App Store release typically use a modified version of the default Release build configuration. You can create one in two ways:
![]() Modify the existing Release configuration in place.
Modify the existing Release configuration in place.
![]() Make a copy, and use it for the final build.
Make a copy, and use it for the final build.
The advantage of an in-place edit is that there's less other work to do. You can edit the existing Release configuration settings, and you're ready to build.
The advantage of creating a copy is that if you create further configurations—for example, for beta distribution—you can use the default Release configuration as a standard starting point. You also can save the configuration with the project and give it a useful name. When you're ready to release an updated version of the project, you can reuse your customized App Store configuration as is.
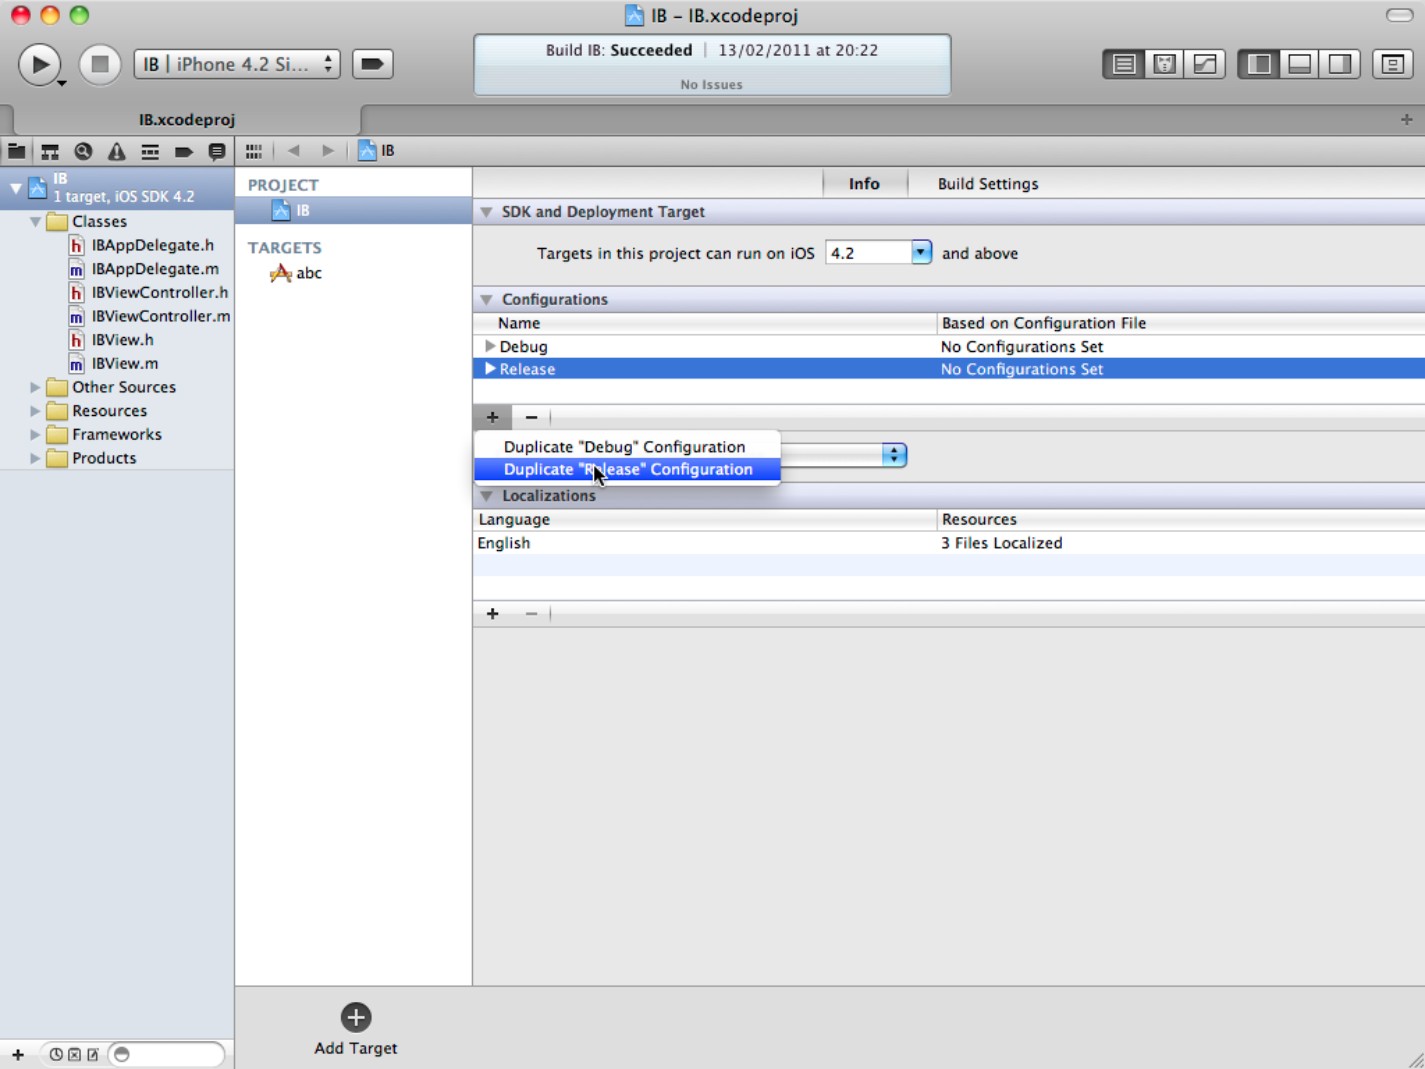
This example demonstrates how to use a separate file. Follow these steps:
1. Select Project and the Info tab.
2. If the Configurations heading isn't open, click the reveal triangle to open it.
3. Click the + (plus) icon at the bottom of the subpane.
4. Select the Duplicate “Release” Configuration option from the floating menu, as shown in Figure 13.8.
This creates a new configuration called Release copy.
5. Single-click twice on the name, and type in a modified name, such as App Store.
Customizing build settings and options
Preparing the build is a two-stage process. You can perform the steps in any order:
![]() Customize the build settings.
Customize the build settings.
![]() Customize other build options.
Customize other build options.
Figure 13.8
Creating a new configuration for App Store builds by copying the default Release configuration
Customizing build settings
Select the app target, select the Build Settings tab, select the Combined view, and work through the list that follows.
Most items are configuration-specific, so if a setting appears with <multiple values>, click its reveal triangle and change the value next to the App Store configuration.
![]() Base SDK: This should have been set to the most recent public OS version during development. Double-check it anyway.
Base SDK: This should have been set to the most recent public OS version during development. Double-check it anyway.
![]() Validate Built Product: Select Yes.
Validate Built Product: Select Yes.
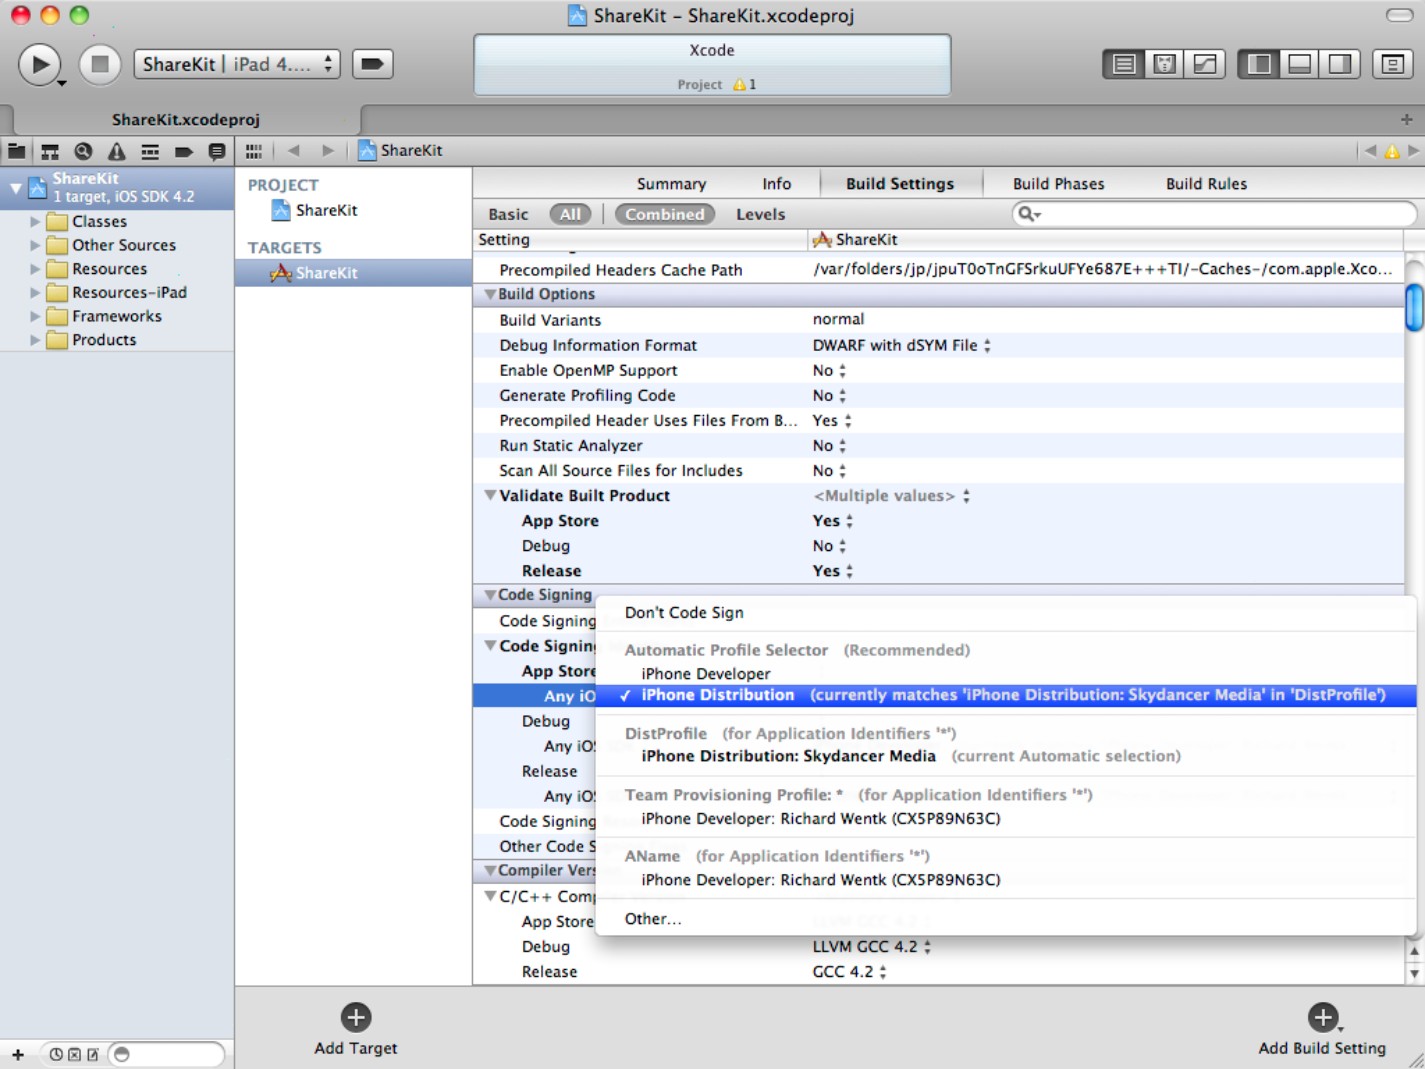
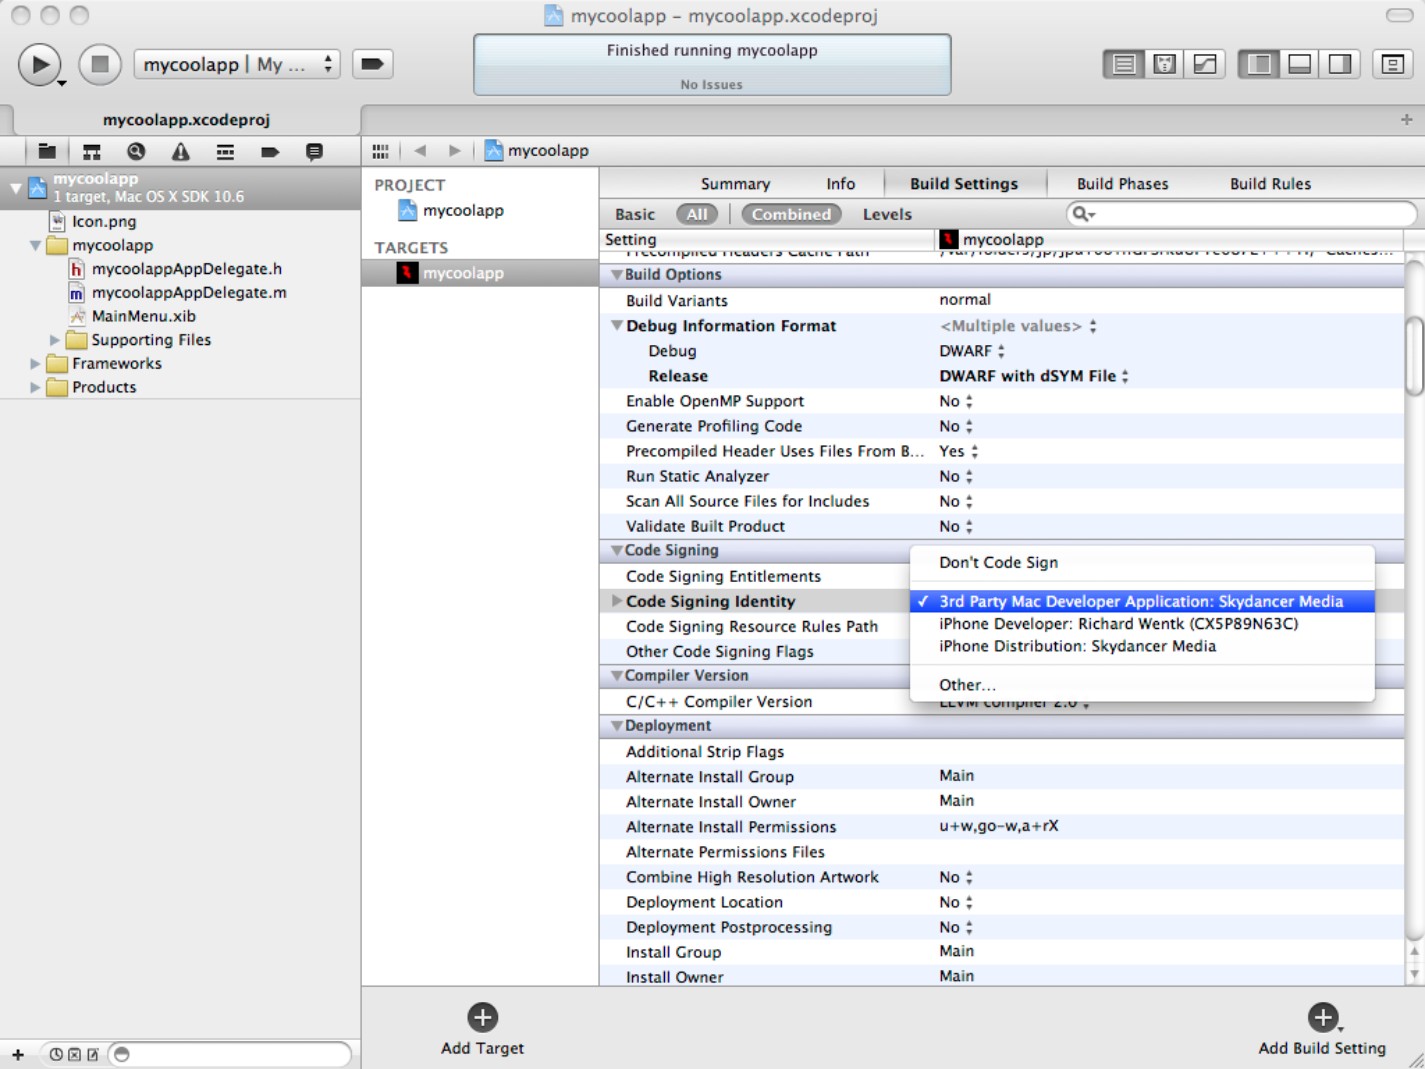
![]() Code Signing Identity: Select a valid distribution provisioning profile. You can use the default iPhone Distribution under the Automatic Profile Selector header, as shown in Figure 13.9. But be very careful: If you have multiple distribution profiles, it may select the wrong one or default to the last one used. Double-check that it really has selected the correct profile, which is usually the one you've named Distribution.
Code Signing Identity: Select a valid distribution provisioning profile. You can use the default iPhone Distribution under the Automatic Profile Selector header, as shown in Figure 13.9. But be very careful: If you have multiple distribution profiles, it may select the wrong one or default to the last one used. Double-check that it really has selected the correct profile, which is usually the one you've named Distribution.
![]() Strip Debug Symbols During Copy: Select Yes.
Strip Debug Symbols During Copy: Select Yes.
![]() Targeted Device Family: Select the devices supported by your app.
Targeted Device Family: Select the devices supported by your app.
![]() iOS Deployment Target: Set this to the oldest version of iOS supported by your app, as discussed earlier in this chapter.
iOS Deployment Target: Set this to the oldest version of iOS supported by your app, as discussed earlier in this chapter.
![]() Product name: Set this to the final production name string, as discussed earlier.
Product name: Set this to the final production name string, as discussed earlier.
Figure 13.9
Selecting the distribution profile in the build settings for the new App Store configuration
![]() NOTE
NOTE
You also can make these changes in the Levels view. The Combined view is simpler and less cluttered, especially on a smaller monitor.
Customizing other build options
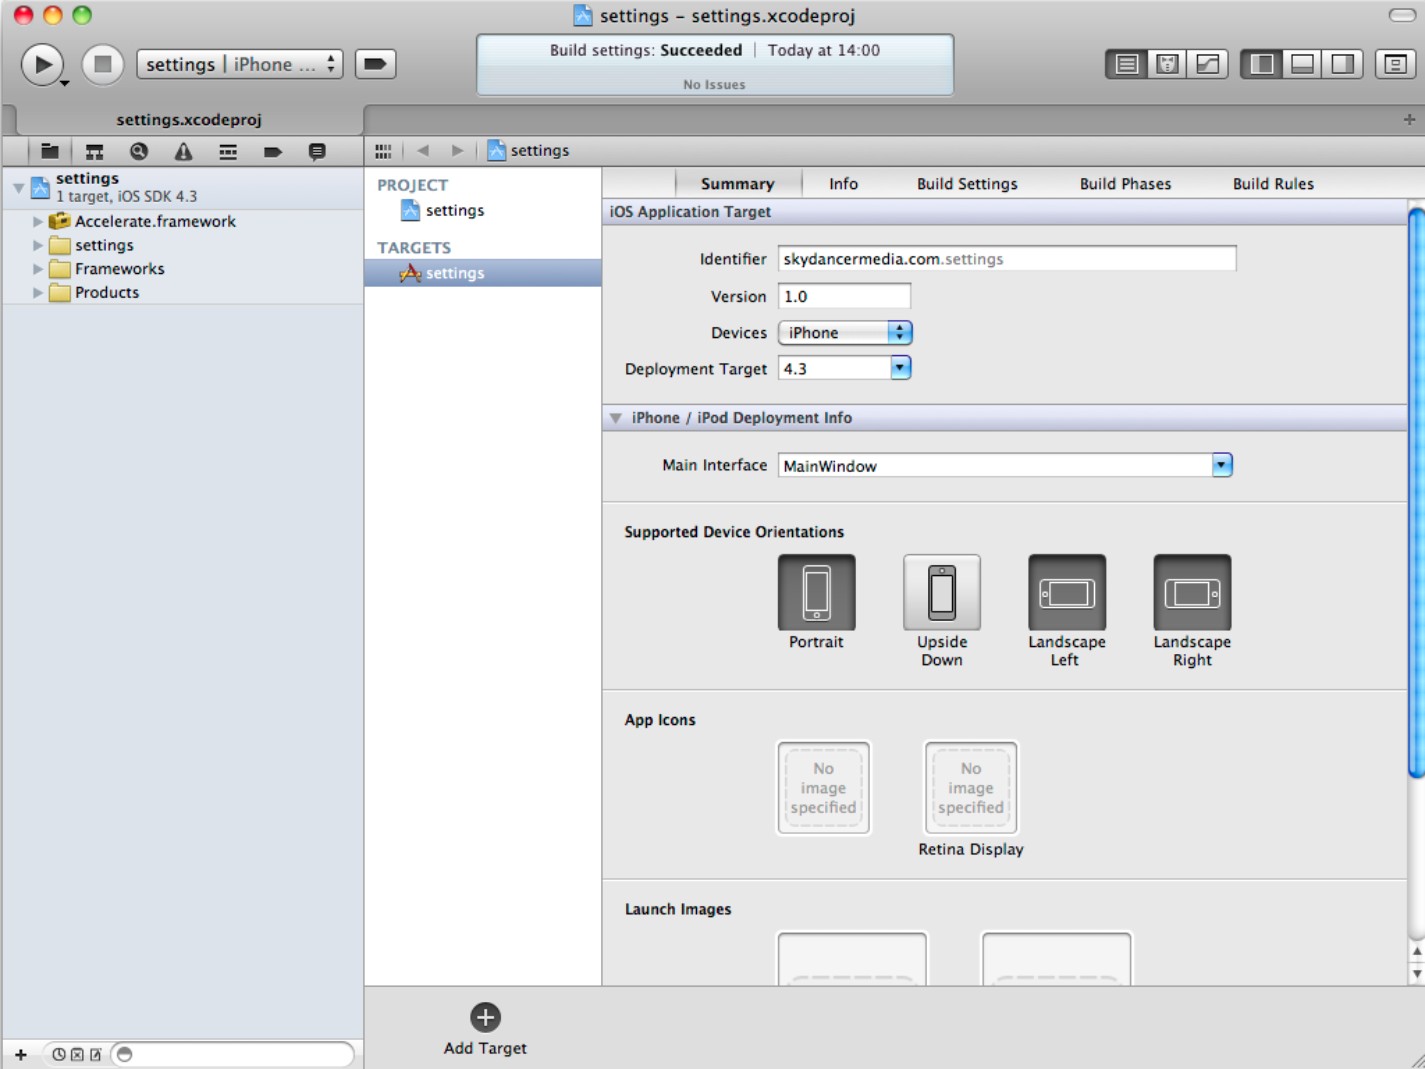
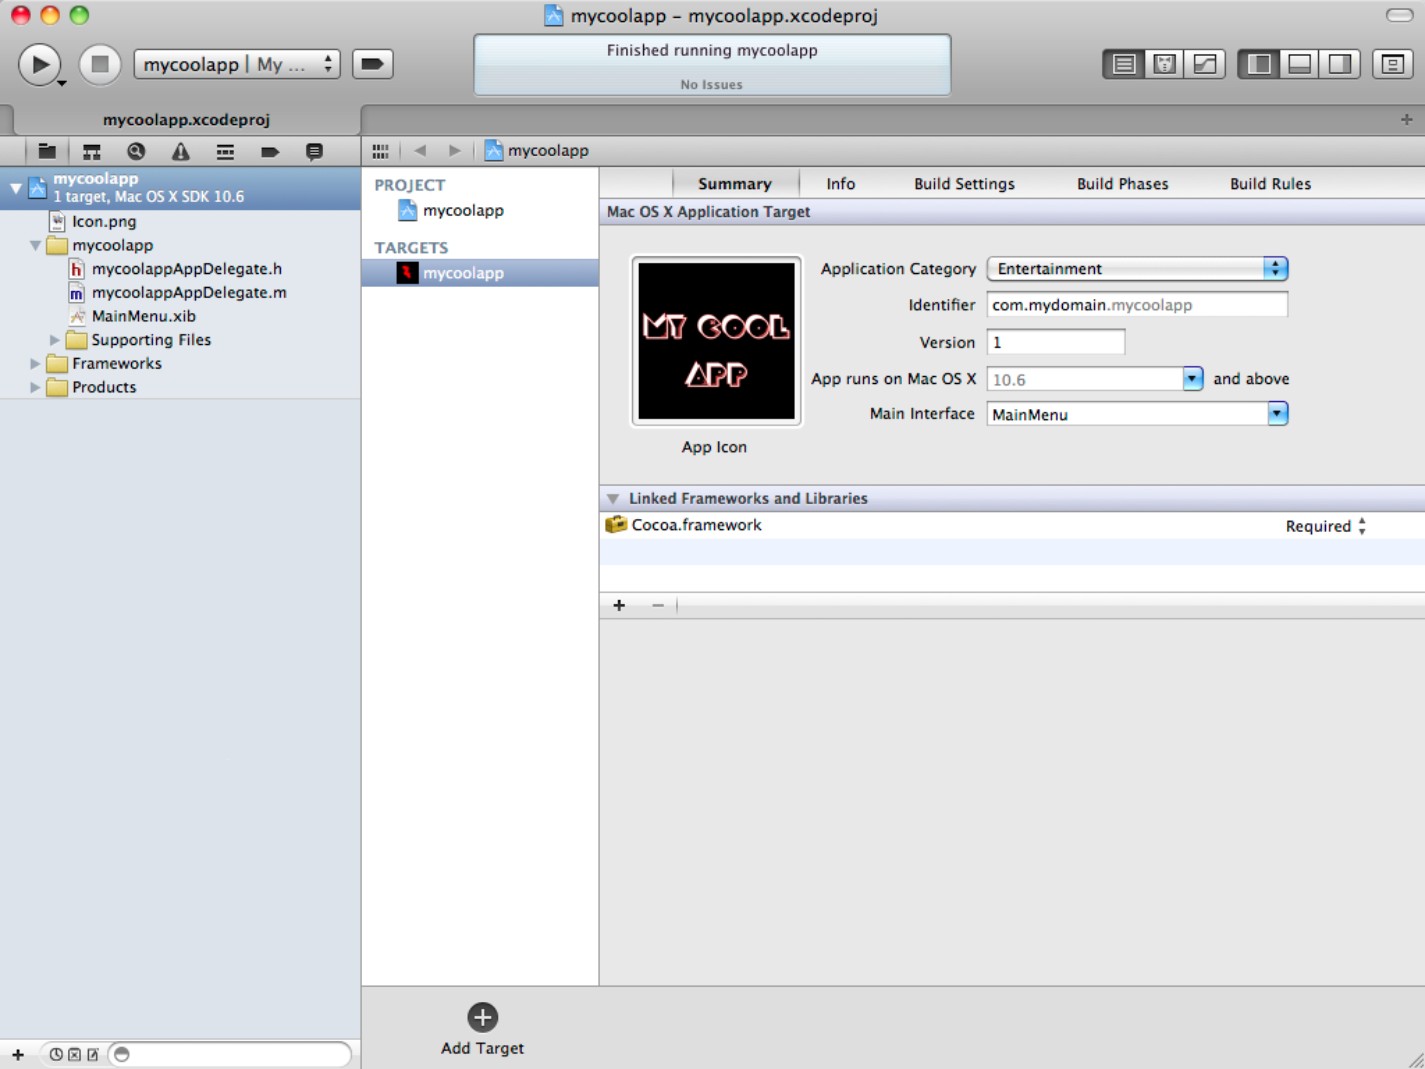
Customizing the other options is a two-step process. Select the Summary tab, and make the following changes:
![]() Version: Set this to the current version number of your app.
Version: Set this to the current version number of your app.
![]() Devices: Ignore this; it copies its value from the Targeted Device Family build setting.
Devices: Ignore this; it copies its value from the Targeted Device Family build setting.
![]() Main Interface: Don't change this. (If you need to use this feature, set it during development and testing.)
Main Interface: Don't change this. (If you need to use this feature, set it during development and testing.)
![]() Supported Device Orientations: These options don't define the supported orientations; you do that in code in your view controllers. In theory, they define the orientations in which the app is allowed to launch. In practice, implementation is erratic and seems to vary between devices and different versions of iOS. So you need to experiment with these settings during development.
Supported Device Orientations: These options don't define the supported orientations; you do that in code in your view controllers. In theory, they define the orientations in which the app is allowed to launch. In practice, implementation is erratic and seems to vary between devices and different versions of iOS. So you need to experiment with these settings during development.
![]() App icons: Right-click each icon, and navigate to the icon files you prepared earlier, as shown in Figure 13.10, with the dimensions listed in Table 13.1 (57 x 57 for the required standard icon and 114 x 114 for the optional Retina Display icon).
App icons: Right-click each icon, and navigate to the icon files you prepared earlier, as shown in Figure 13.10, with the dimensions listed in Table 13.1 (57 x 57 for the required standard icon and 114 x 114 for the optional Retina Display icon).
Figure 13.10
Setting the Summary options for an iOS App
![]() Launch Images: Right-click each placeholder, and navigate to the default launch images you prepared earlier, with the dimensions in Table 13.1.
Launch Images: Right-click each placeholder, and navigate to the default launch images you prepared earlier, with the dimensions in Table 13.1.
![]() Other Images: If your app is universal or iPad-only, add images for iPad support in the same way.
Other Images: If your app is universal or iPad-only, add images for iPad support in the same way.
![]() NOTE
NOTE
It's likely you defined app icons and launch images during development. If so, you don't need to define them again.
Select the Info tab. You can typically leave the Custom iOS Target Properties unchanged; the Summary settings change some of them, and the default settings are usually correct.
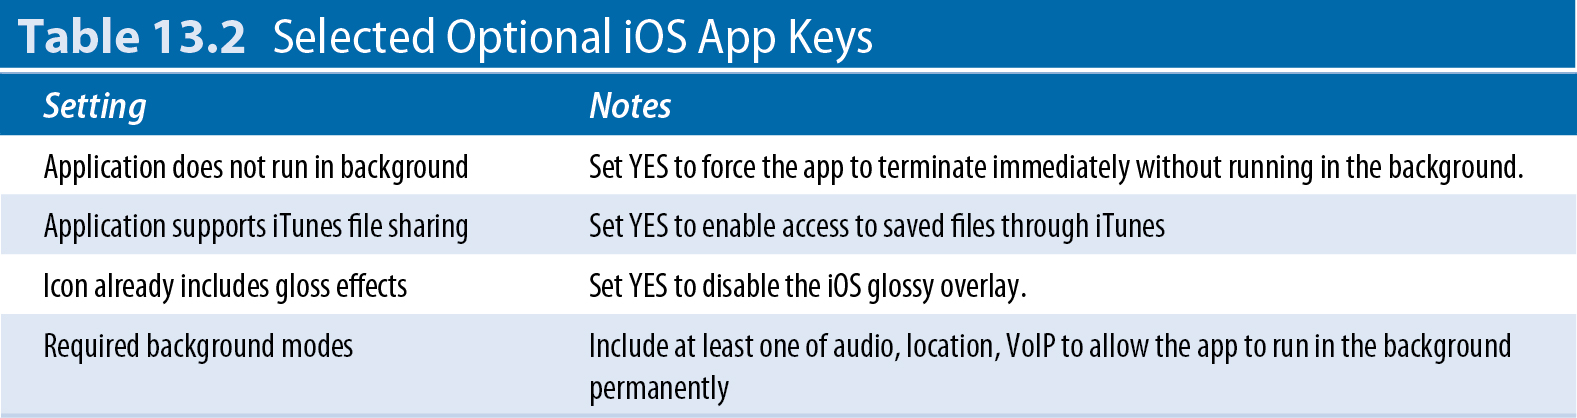
Occasionally, you may want to add special features. Table 13.2 has a short list of the most useful optional keys. See Appendix B for more information about how to add, edit, and select the features on this page.
Building the project
You're almost (but not quite) ready to build the project. In Xcode 3, you built a project in the usual way, archived it manually in Finder, and manually uploaded the archive to iTunes Connect.
In Xcode 4, the Archive build action and the validation/submission features automate this process. You can do everything from Xcode without having to find the app package in Finder or using an external uploader.
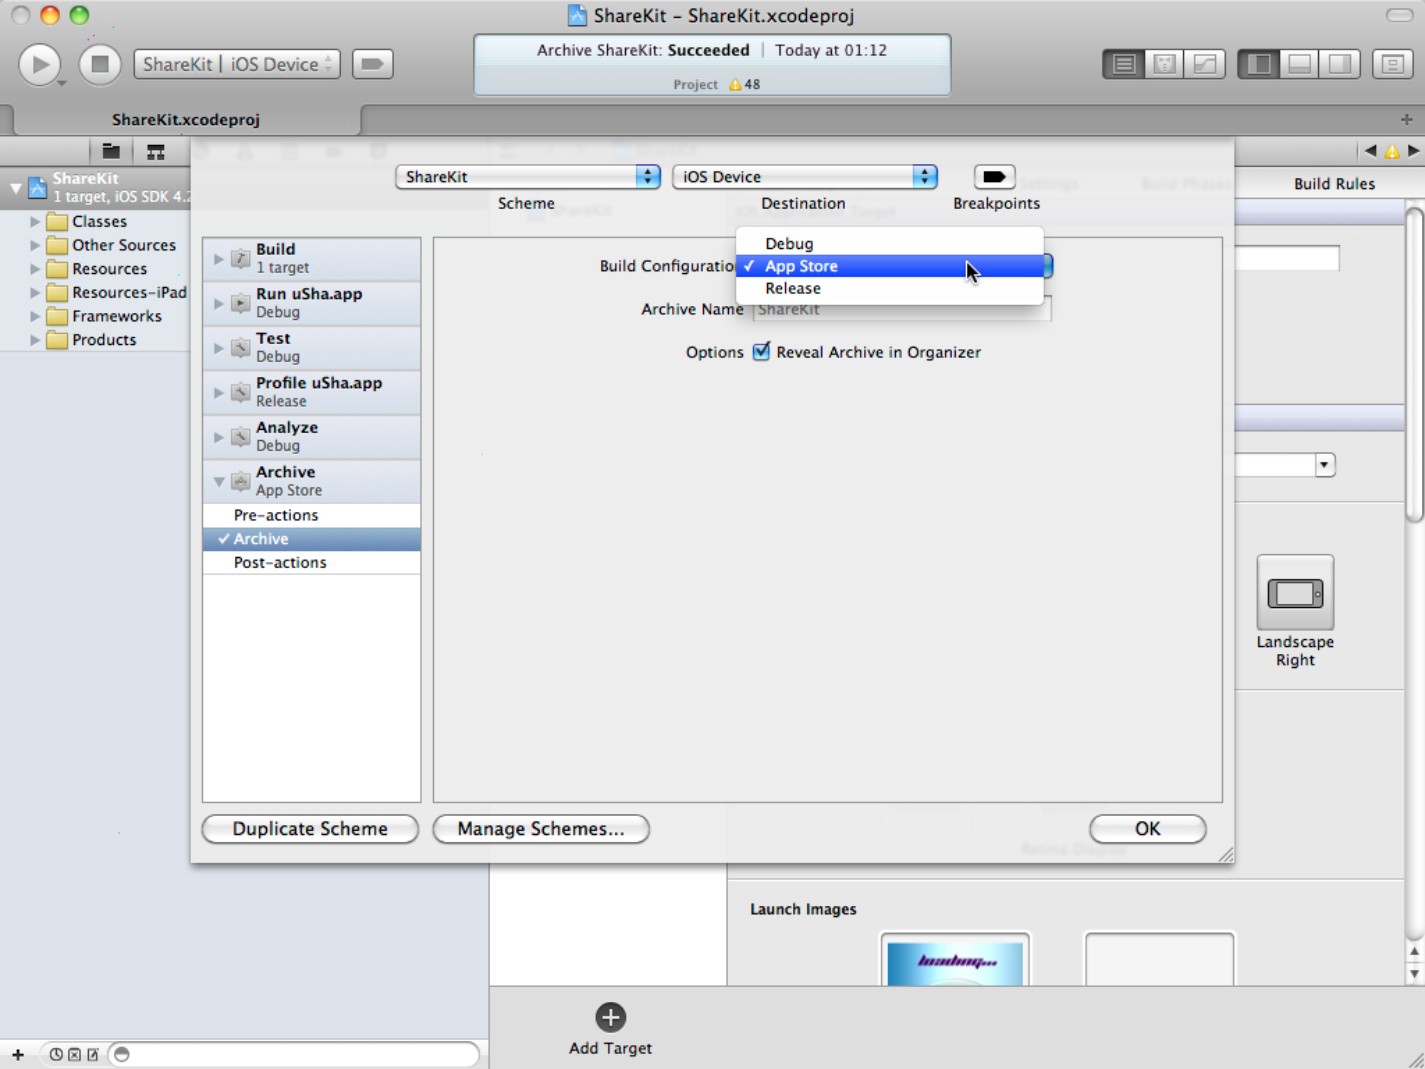
By default, the Archive uses the Release configuration. You must change this before building. Follow these steps:
![]() CAUTION
CAUTION
If you forget this step, the product is assigned your development certificate. Other very bad things may also happen, and your archive isn't valid.
1. Select Product⇒Edit Scheme from the main Xcode menu.
2. Select the Archive action in the column at the left.
3. Select the App Store configuration from the Build Configuration menu, as shown in Figure 13.11.
4. Leave the Reveal Archive in Organizer option checked.
5. Select iOS Device as the Destination from the menu at the top of the dialog.
6. Make sure the Breakpoints button is deselected.
Figure 13.11
Make sure that your new App Store configuration settings are applied when you build to archive/upload.
7. Select Product⇒Archive from the main Xcode menu.
This runs the Archive action and builds your app from scratch, which may take a while.
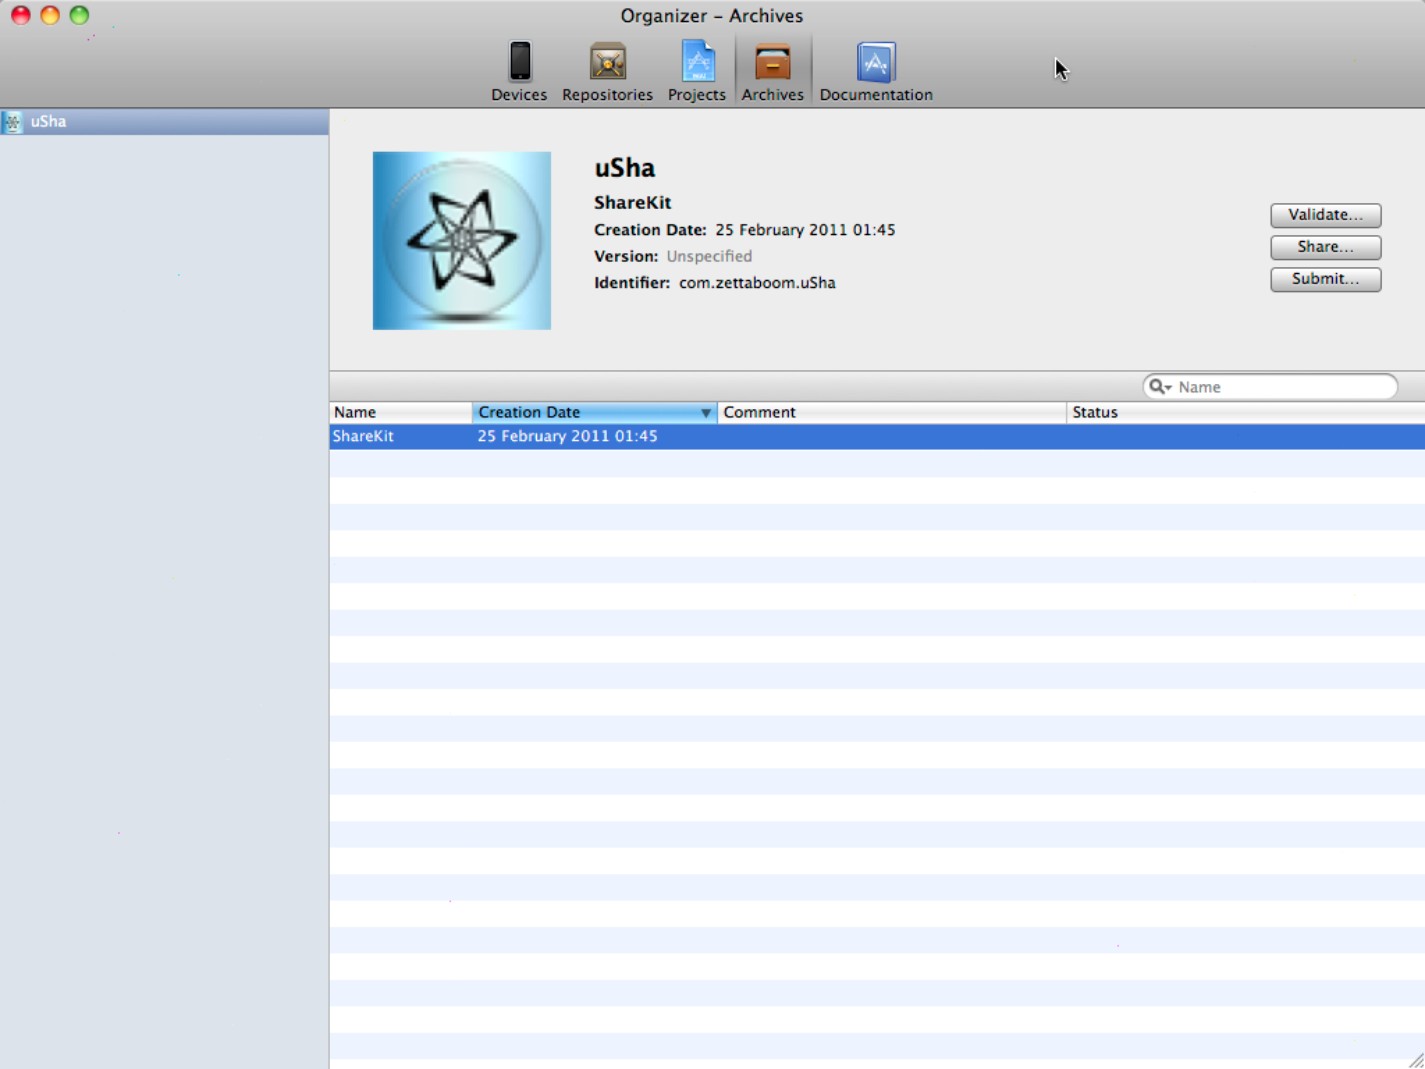
Eventually, the Archives window from the Organizer appears, as shown in Figure 13.12. But you can't submit the application yet; first, you must fill in the “paperwork” on iTunes Connect so that the App Store is ready for your app.
Figure 13.12
The Archive that appears in the Organizer is a packaged app that can be submitted to the App Store, but only after you've filled in some online “paperwork.”
Uploading marketing and support materials
iTunes Connect works in almost exactly the opposite way you'd expect. Instead of uploading a binary and then adding marketing text and images for it, you upload the marketing materials first to create an application record. You then upload your archived app. It becomes the binary associated with the record.
![]() NOTE
NOTE
The way iTunes Connect works may seem counterintuitive, but it has a valid purpose. If your binary is rejected, the application record remains in place, and you don't have to reenter it when you resubmit. Similarly, when you upgrade your app to a new version, you can reuse the details you entered when you first submitted the app.
Follow these steps to upload your app:
1. Log in to the iOS Developer Portal, and select iTunes Connect from the list of items at the top right of the screen. (You can also access iTunes Connect directly at itunesconnect.apple.com.)
2. Select Manage Your Apps.
3. Click Add New App at the top left.
4. Work your way through the “paperwork,” the first page of which is shown in Figure 13.13, by filling in the fields, uploading artwork, answering questions about encryption technology and age ratings, and copying and pasting your marketing text.
Most of the options are straightforward. The most likely source of confusion is the Bundle ID option.
5. Select the ID embedded in your distribution profile. If you have a single App ID, use it. If you have multiple IDs, select the last one you used when creating a certificate.
If you followed all the steps in Chapter 11, you should have an application record.
Figure 13.13
This is the first page of the “paperwork.” Note the Bundle ID menu.

![]() CROSS-REFERENCE
CROSS-REFERENCE
See Chapter 11 for a reminder about App IDs.
![]() NOTE
NOTE
You can repeat the process to create multiple app records in a single session. In fact, you can create as many records as you want. They aren't visible on the App Store until you upload a binary for each, and the record and binary are approved for sale.
Submitting an app to iTunes Connect
Eventually, your application record is complete. At the time of this writing, the final screen tells you to use an application called Application Loader to submit the binary. Whether Apple removes this screen in future, you can ignore it because Xcode 4 includes its own upload and packaging tools.
Submission is another two-stage process. The first step is app validation; it's optional but recommended. The second is submission/upload.
Validating an app
The internal details of the validation process are secret, but we know it checks for basic errors, including missing artwork, invalid package and bundle settings, and incorrect provisioning. Successful validation doesn't guarantee that your app will be accepted for sale, but it flags the most obvious errors that guarantee that Apple will reject it.
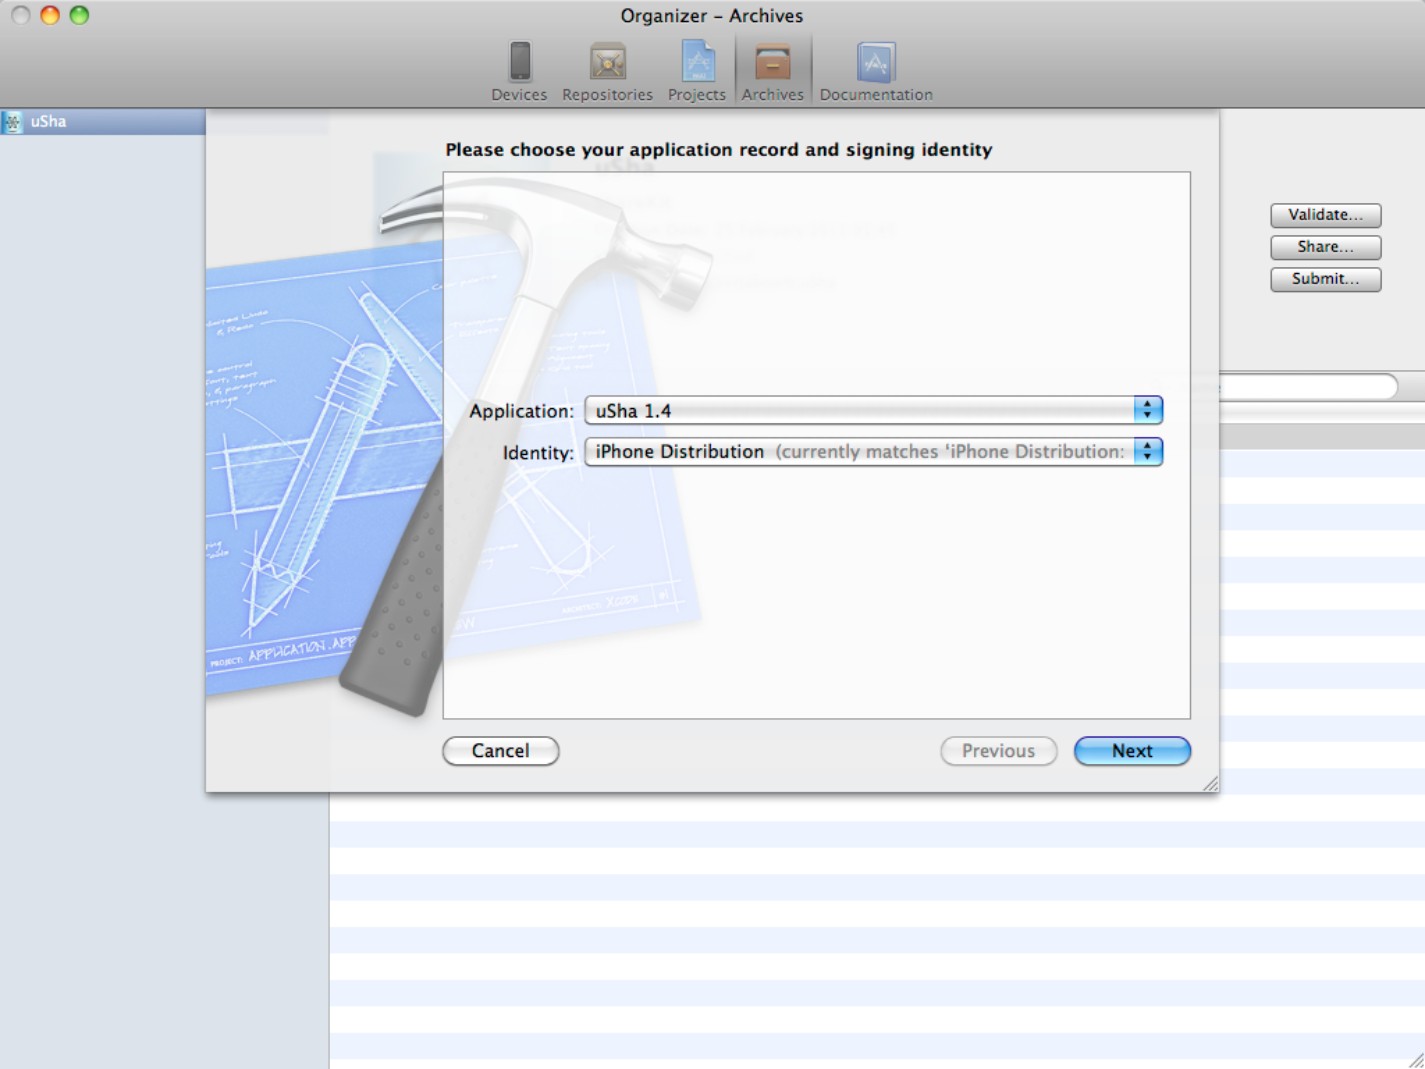
In the Organizer, select your archive (if it isn't already selected), and click the Validate button at the top right of the window. You are asked to log in with your developer name and password. Next, you see the dialog box shown in Figure 13.14.
The Application menu shows any application records that you haven't yet completed with a binary. Typically, there's a single item here—the last record you created.
The Identity menu should match the distribution identity you selected in the build settings before you built the app, as described earlier in this section.
Figure 13.14
Validating an app before upload
![]() TIP
TIP
The menu is identical to the menu used to select an identity in the build settings. Make sure you select the same item in both.
Click Next. Xcode packages the app for upload and runs the validation checks. If validation fails, the dialog box lists one or more errors, as shown in Figure 13.15.
Figure 13.15
The Validate option displays a list of issues. There may be more than one.

To fix validation errors, follow these steps:
1. Delete the archive, unless you want to keep it, but typically, you don't.
2. Add or repair the items that are missing or incorrect.
This may mean changing some of the items in the build summary/info pages. You don't usually need to modify the build settings.
3. Create another archive build by selecting Product⇒Archive from the main Xcode menu.
4. Revalidate the new archive.
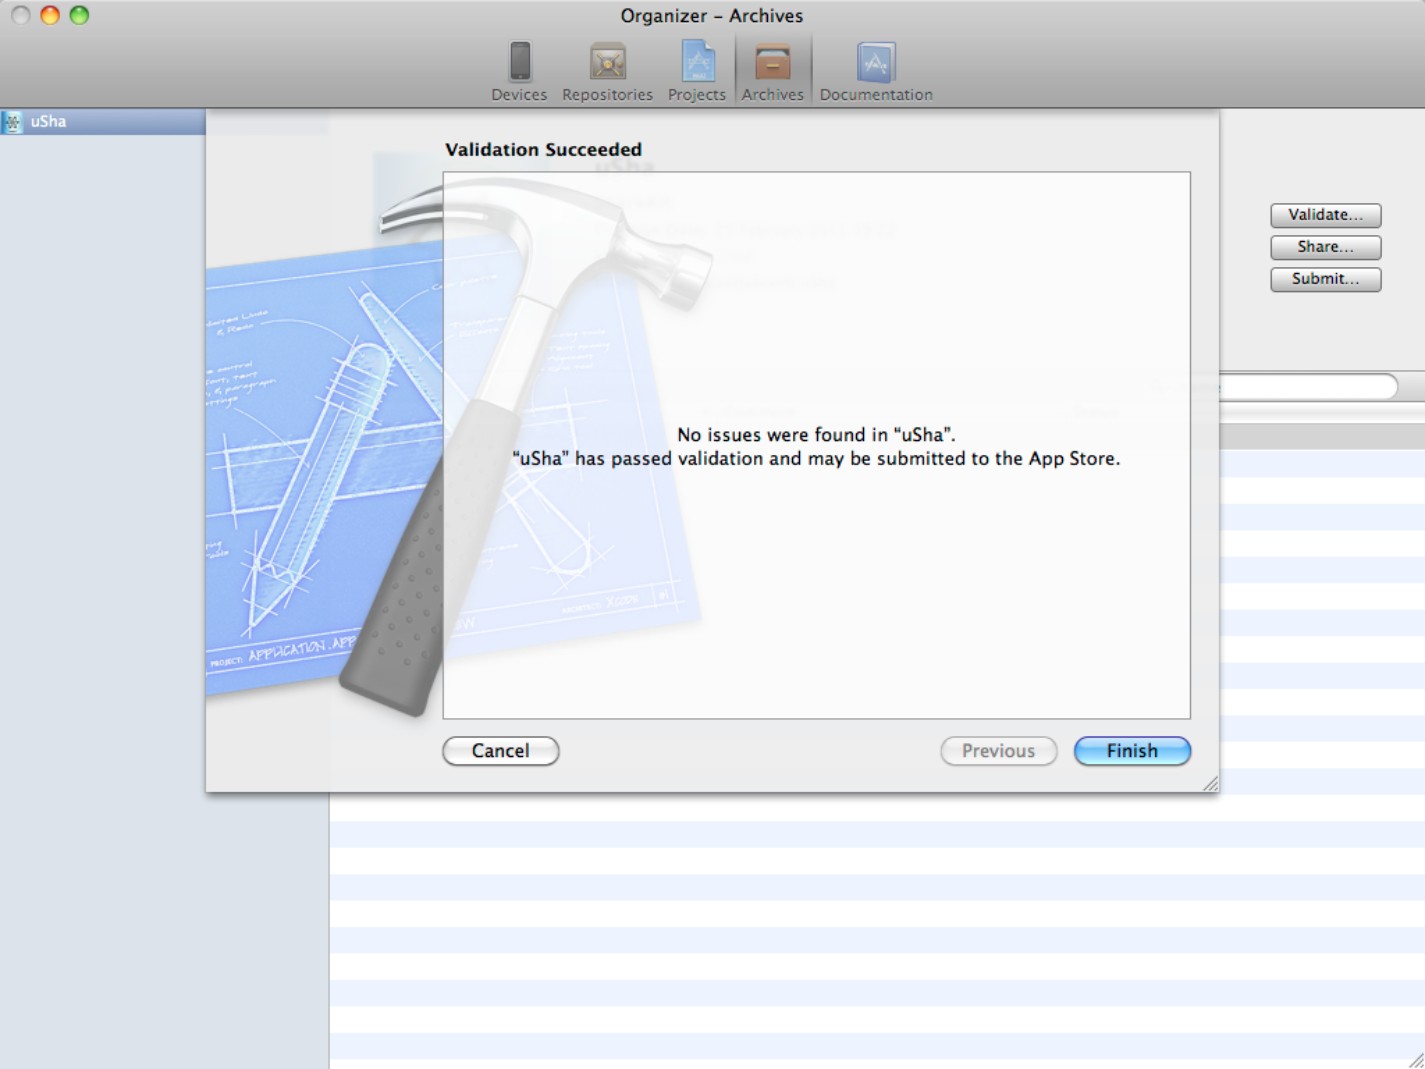
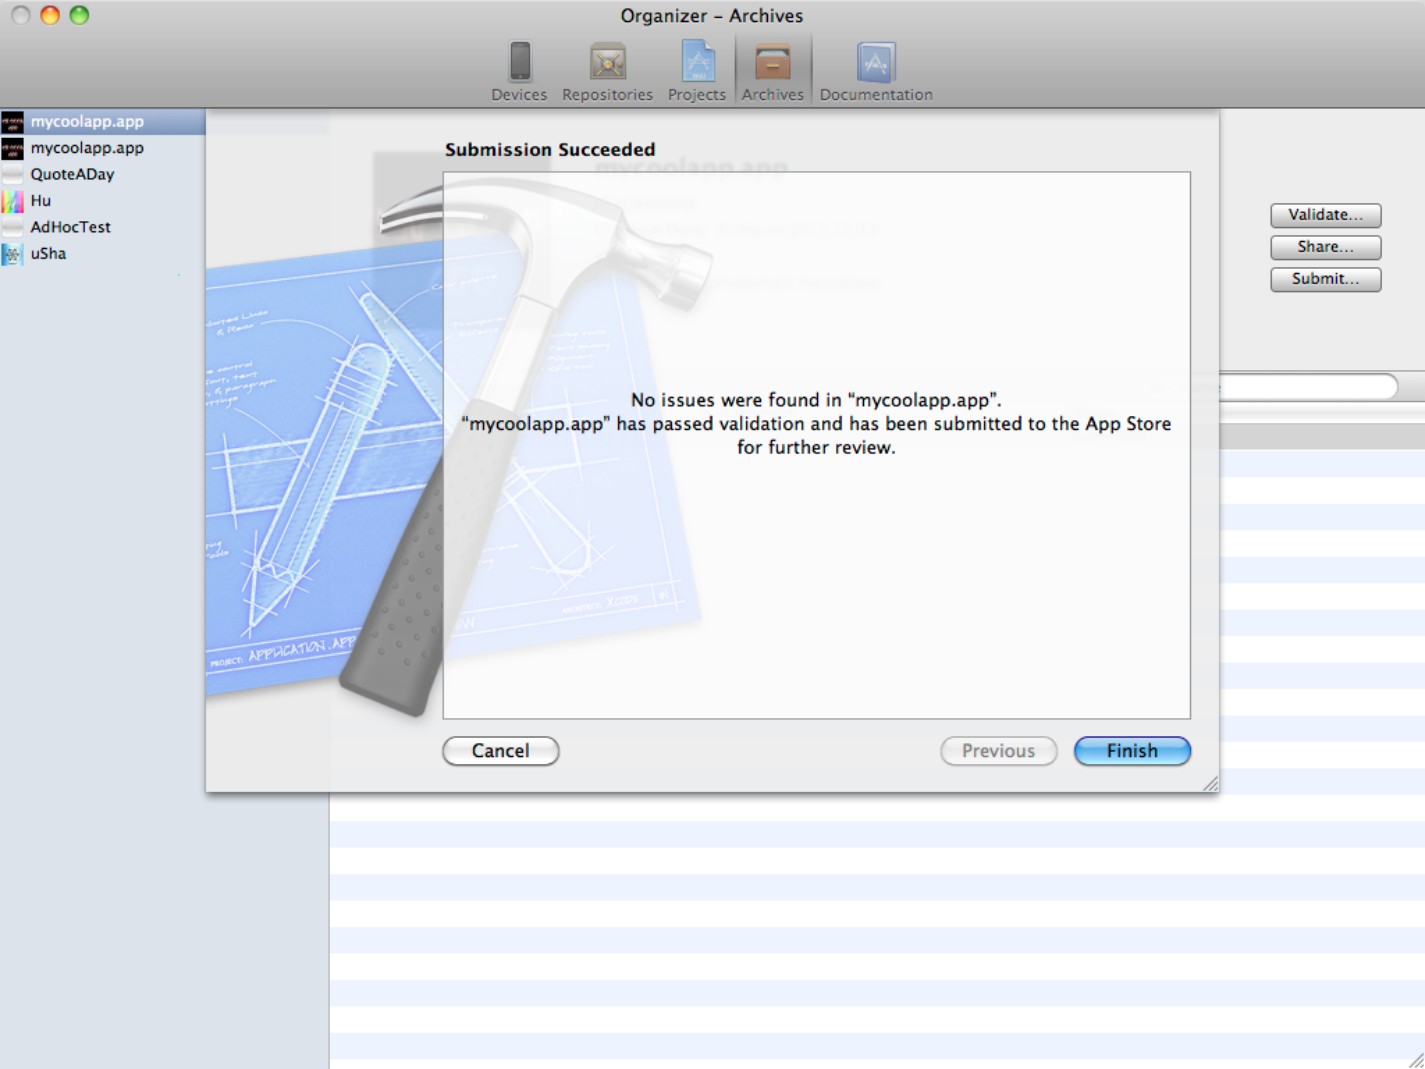
Figure 13.16 shows a successful validation.
Figure 13.16
A successful validation means you're ready to submit the app.
![]() CAUTION
CAUTION
The validation process isn't completely robust, and sometimes apps fail for no reason. When there's a problem with iTunes Connect, you see cryptic error messages such as “Unable to extra package metadata.” Obvious app problems are usually labeled accurately. It's a good idea to double-check everything, clean the build, and perhaps copy the files to a new folder before archiving and validating again. If you're sure your app is valid, you can sometimes submit it successfully after a failed validation by clicking Submit three or four times until the upload is accepted.
Submitting an app
To submit an app, click the Submit button at the top right of the Organizer. The submission process is very similar to validation; you're asked to log in, and then the app is packaged. Instead of a validation pass, the package is uploaded, as shown in Figure 13.17.
Figure 13.17
A successful submission
![]() NOTE
NOTE
In fact, submission includes another validation pass. But it's quicker to validate separately before submitting.
After submission, the app is added to the review queue. It typically takes one to two weeks for the app to reach the head of the queue, and a random duration that can last a day to a couple of months for the review process. Most apps go on sale within two weeks of submission.
iTunes connect displays status messages—Waiting For Review, and In Review—to let you see where the app is in the review process. When the review is complete, you'll receive an e-mail with notice of acceptance or rejection.
Deleting or hiding apps after submission
If you discover a problem with your binary after submission, select the app, select Binary Details, and click the Reject This Binary button at the top right. You can then repeat the submission process with a new binary. Note that you can't delete an app submission record while a binary is awaiting review.
If you want to delete an app after it's been accepted for sale, this is a complicated process. It's usually easier and quicker to remove an app from sale than to delete it completely. Select the app, click Rights and Pricing, select the Specific Stores link, and click the Deselect All button at the top right of the Rights and Territories list. This leaves its submission record on iTunes Connect so you can update it with a new version at a later date, but hides it from buyers on iTunes.
Creating and distributing an iOS Ad Hoc build
The build process for an Ad Hoc build that you can share with beta testers is similar to an App Store build. But there are differences. Before you create an Ad Hoc build, you must create a suitable distribution profile.
Creating and installing an Ad Hoc provisioning profile
For more details about provisioning, see Chapter 11. Figure 13.18 shows the settings for an Ad Hoc profile. Remember that you must do the following:
Figure 13.18
Creating an Ad Hoc profile
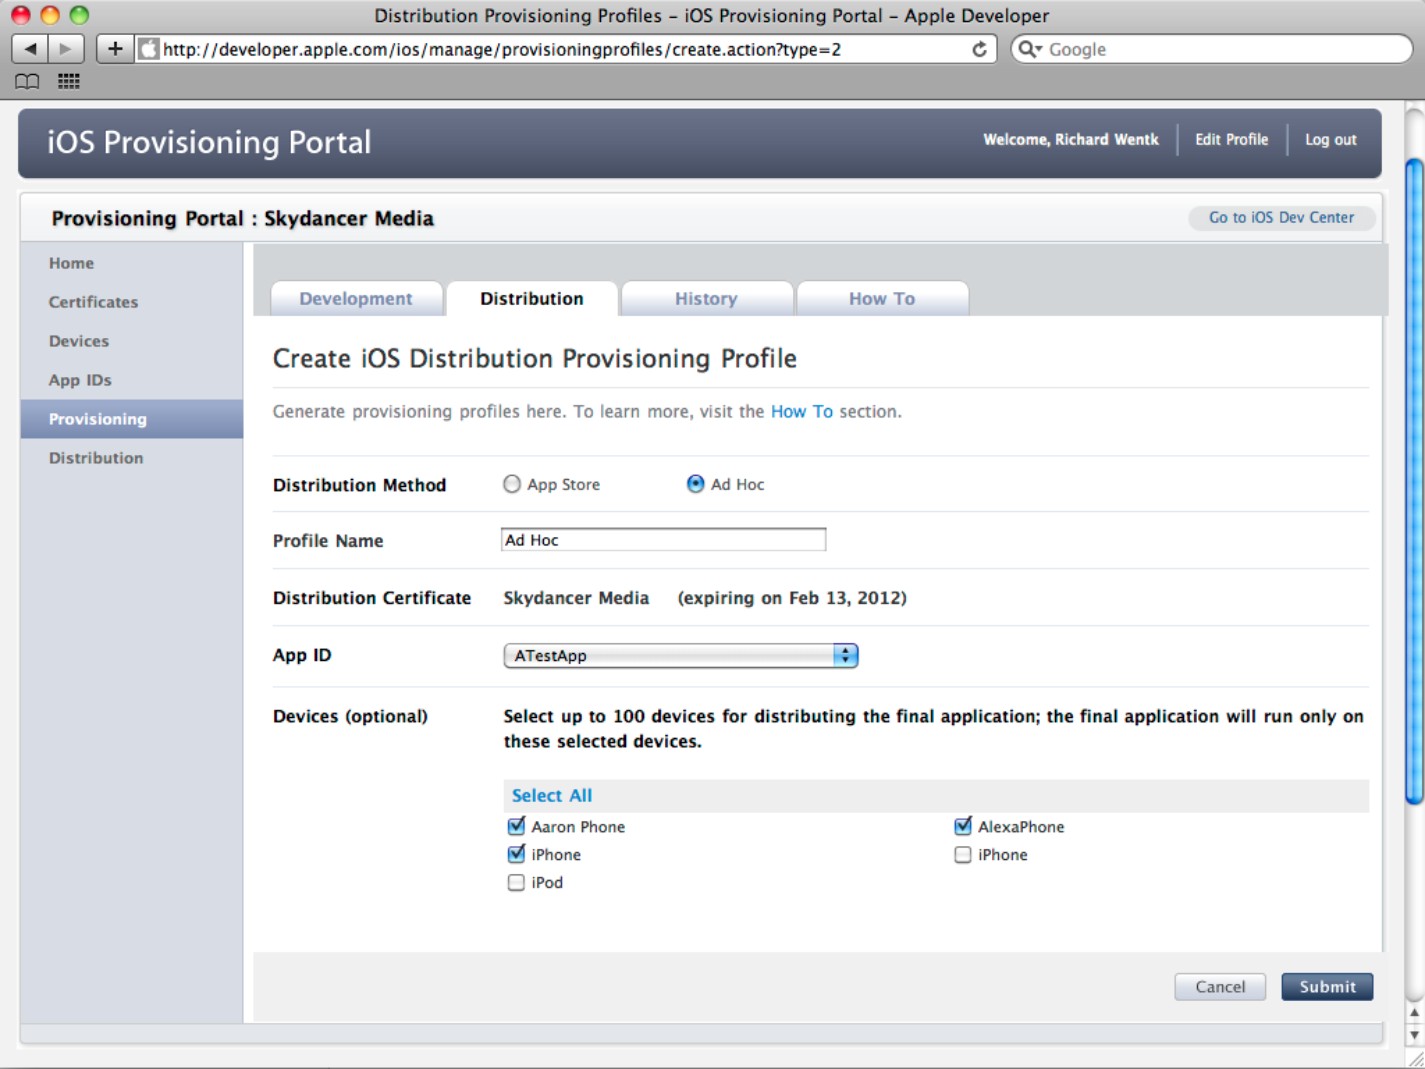
1. Get the UDID of every supported device from each user, and add it to your device list.
2. Select the devices in the list that your testers will use.
Users can run the app only on the devices in the list.
3. Pick a valid App ID for the profile or create a new one, and make a note of it for later.
4. Install the new profile by dragging it from Finder and dropping it onto the Provisioning Profiles item at the top left of the Devices window in the Organizer.
The new profile will have the .mobileprovision file extension.
![]() TIP
TIP
After creating the new profile, don't forget to refresh the page on the portal to update its status from Pending to Active.
Creating an Ad Hoc build
Once you have an Ad Hoc profile, use the following steps to build your beta app:
1. Create a new build configuration based on the default Release profile, and give it a new name, such as Ad Hoc.
2. Sign the app with the new Ad Hoc distribution profile in the build settings.
If you use the profile auto-selector, remember to double-check that this worked correctly and you're signing the build with the Ad Hoc profile. Modify other build settings as needed.
3. Select the Ad Hoc Release configuration in the Archive Build Action.
4. Select the iOS Device option in the platform pop-up menu and build the archive with Product⇒Archive.
5. In the Organizer, use the Share button to create a shareable app package with a .ipa suffix. Select the Ad Hoc profile from the Identity menu, and save the packaged app to a convenient location.
6. E-mail the file to testers, or upload it to a website and e-mail them a download link.
7. Testers use iTunes to install and run the app.
8. If the app is for a beta version of the OS, testers must be able to install that version on their devices before testing the app.
Installing an Ad Hoc app with iTunes
To install an app, testers open iTunes and drag and drop the file onto the Library at the top left, as shown in Figure 13.19. Syncing the device with the Sync Apps option—testers may need to check the app in the app list manually—installs the app and automatically installs the embedded distribution profile.
Figure 13.19
Installing an Ad Hoc app with iTunes

![]() NOTE
NOTE
In earlier versions of Xcode, Ad Hoc distribution didn't work unless projects were built with an Entitlements.plist file, and the provisioning profile was supplied to testers with the app. These steps are no longer necessary, because the packaging process embeds a working profile and entitlements are managed automatically.
![]() NOTE
NOTE
If you're developing apps for a beta version of iOS or OS X, there's no legal way to supply beta copies of an OS update to testers who aren't registered developers. Illegal ways are discussed online, but they're outside the scope of this book.
Using Over the Air (OTA) distribution
In Xcode 3, enterprise developers had the option to create a package that could be downloaded and installed directly on the device by clicking a web link in Safari. This is called Over the Air (OTA) distribution, and it creates a much smoother experience for testers.
OTA distribution uses a feature built into Safari (and only Safari) that allows the browser to validate a provisioning profile and install an app on any iOS device running iOS 4.0 and later.
Although it was introduced as an enterprise tool, all developers can use this feature, but the packaging process for creating the support files for an OTA app is moderately complex. In addition to the ipa file, the link requires some basic HTML and a supporting plist manifest file with details of the app. Creating the HTML is easy, but creating the manifest plist is more challenging.
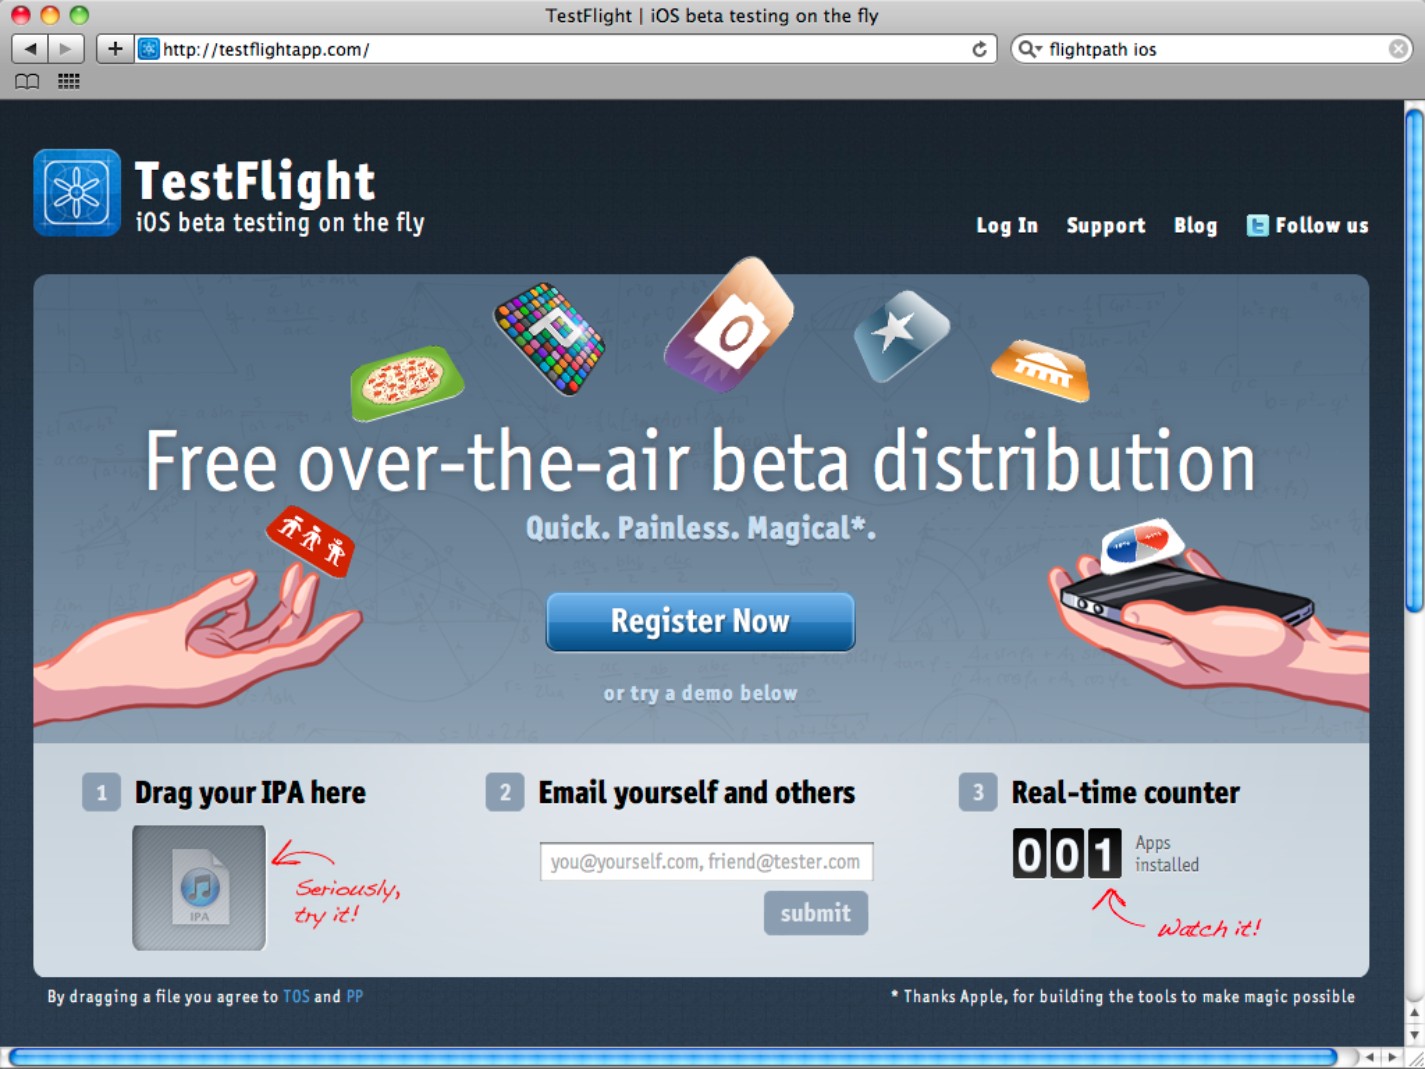
Xcode 4 doesn't support this feature for standard developers, but various commercial workarounds are available. For example, diawi (www.diawi.com) is an ad-sponsored app that allows developers to upload test builds to its website and e-mail links to testers. TestFlight (http://testflightapp.com), shown in Figure 13.20, is a similar alternative. These options make OTA distribution almost as easy as drag and drop.
Figure 13.20
TestFlight: one way to create an OTA distribution for beta testers
Developers who don't want to entrust their files to a third party can use iOS BetaBuilder (www.hanchorllc.com/category/ios-betabuilder/) to create custom HTML and manifest files for distribution from their own web server. BetaBuilder loads an ipa file and generates supporting HTML and a manifest plist tied to a specific download URL. You can then upload the files to a server and e-mail testers the URL. At the time of this writing, a supporting app is being developed.
Note that although official enterprise OTA doesn't require device registration, standard developers must still register devices and include them in every Ad Hoc distribution profile.
![]() CAUTION
CAUTION
Non-enterprise OTA isn't officially supported by Apple. The technology has been borrowed for non-enterprise use, and Apple may withdraw it without notice.
Creating a Mac App Store submission
A Mac submission is similar to an iOS submission, but somewhat simpler. Begin by creating an App Record on iTunes Connect, filling in the “paperwork” to create a binary slot. You then customize the app's settings, build it as archive, package it, and upload the binary.
Currently, there's no device registration or support for device-limited Ad Hoc distribution for testing. (This may change in the future.)
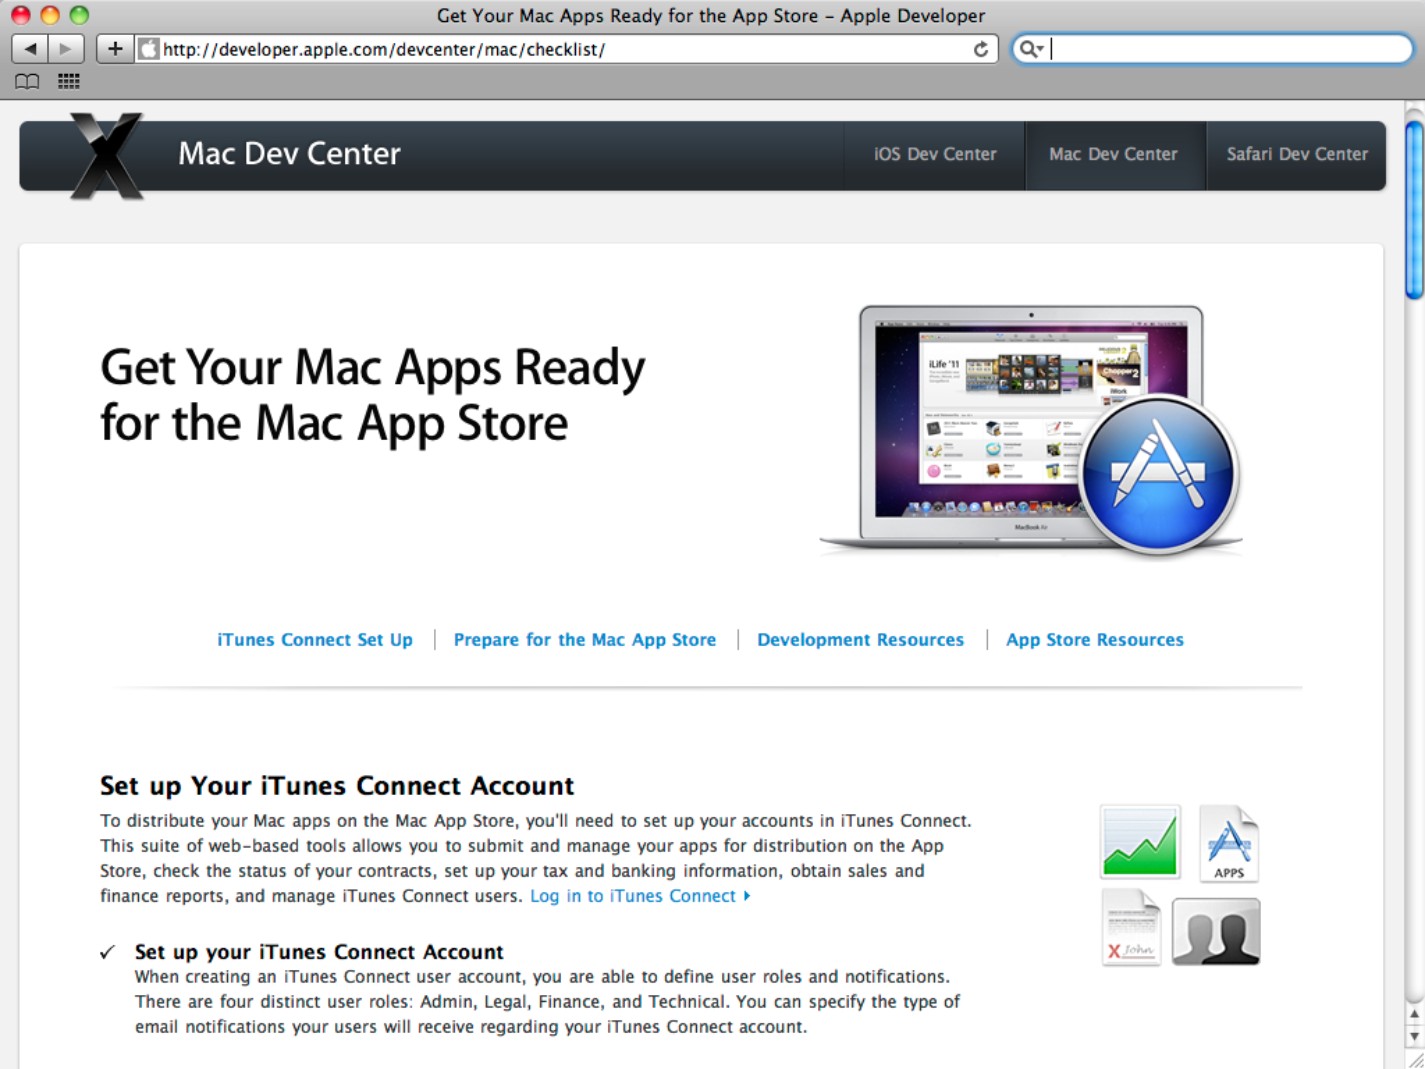
Finding iTunes Connect
At the time of this writing, there's no direct link to iTunes Connect on the front page of the Mac Dev Center. To open iTunes Connect, select the Get Your Mac Apps Ready for the Mac App Store link at the top right of the front page, and then click the Log in to iTunes Connect link at the bottom of the Set up Your iTunes Connect Account paragraph, shown in Figure 13.21.
Creating marketing and support materials
The “paperwork” for a Mac submission is very similar to an iOS submission. The promotional screenshot must have a resolution of 1280 x 800 or 1440 x 900 in .jpeg, .jpg, .tiff, or .png in the RGB color space with a resolution of 72dpi or better. In practice, this means you can run the app, set your Mac's display resolution to the required dimensions, and use Grab utility in /Applications/Utilities to capture the art as a .tiff file.
![]() TIP
TIP
The artwork doesn't have to be an unedited screen grab. You also can create custom promotional artwork that captions or highlights important features of your app. This is pushing against the guidelines, but if the artwork isn't too heavy handed and promotional, there's a good chance it will be accepted.
Figure 13.21
There's no direct link to iTune Connect from the Mac Dev Center front page; you have to go through this intermediate page.
Creating an App ID and managing certificates
OS X apps don't support wildcard/suite IDs, so you must create a new ID for each app, following the steps described in Chapter 11.
App IDs aren't built into the Mac App Software Certificate or the Mac Installer Package Certificate, so you can reuse the same certificates for every app.
![]() NOTE
NOTE
When a user buys an app from the store, iTunes generates a receipt file that locks it to one specific Mac. Your app can validate this receipt to prevent piracy. This requires extra code; it's not automatic. Validation isn't part of the build process, but it's a good idea to add it and test it while developing. For details and sample code, see Validating App Store Receipts in the documentation.
Customizing the build for the App Store
You must do the following:
![]() Customize the build settings.
Customize the build settings.
![]() Modify the build options: summary and info.
Modify the build options: summary and info.
But you don't need to do these things:
![]() Create a new configuration. The default Release configuration can be used as is.
Create a new configuration. The default Release configuration can be used as is.
![]() Edit the default scheme. There's no need to select an updated configuration in the default settings for the Archive action.
Edit the default scheme. There's no need to select an updated configuration in the default settings for the Archive action.
Customizing the build settings
Click the project at the top of the project navigator, select the target, and click the Build Settings tab to open the settings editor. These are the critical settings:
![]() Architectures: Leave this set to Standard (32/64-bit Intel) for backward compatibility. For apps that are 64-bit only, including those that run under OS X 10.7 Lion, set this to 64-bit Intel.
Architectures: Leave this set to Standard (32/64-bit Intel) for backward compatibility. For apps that are 64-bit only, including those that run under OS X 10.7 Lion, set this to 64-bit Intel.
![]() Debug Information Format: Check that this is set to DWARF with dSym File.
Debug Information Format: Check that this is set to DWARF with dSym File.
![]() Code Signing Identity: Set this to the identity that begins with 3rd Party Mac Developer Application, as shown in Figure 13.22.
Code Signing Identity: Set this to the identity that begins with 3rd Party Mac Developer Application, as shown in Figure 13.22.
Figure 13.22
Setting the code signing identity for a Mac app
![]() Product Name: Optionally, you can change this to set the final production name.
Product Name: Optionally, you can change this to set the final production name.
![]() Deployment Target: Set the lowest supported version of OS X, as described earlier.
Deployment Target: Set the lowest supported version of OS X, as described earlier.
![]() NOTE
NOTE
After you set a code signing identity, you can continue to test and run the project on your Mac in the usual way. Unlike iOS code signing, Mac code signing doesn't prevent this. Receipt checking can complicate this, so disable receipt checking code until your final production build.
Creating the app icon file
Mac apps use a special multi-icon file with a .icns extension that stores multiple resolutions of the icon. There's only one way to create this file: Use the Icon Composer utility, which is supplied with Xcode 4. You can find it in <Xcode 4 install folder>/Applications/Utilities.
You have two options for icon design:
![]() Create a single 512 x 512 file in an image editor, and allow Icon Composer to create the other resolutions for you.
Create a single 512 x 512 file in an image editor, and allow Icon Composer to create the other resolutions for you.
![]() Create separate files for other resolutions.
Create separate files for other resolutions.
The required resolutions are 512 x 512, 256 x 256, 128 x 128, 32 x 32, and 16 x 16. Rescaling a single file usually creates poor results, but—depending the design of your icon—this may not matter.
A time-saving option is to create two resolutions: 512 x 512 and 32 x 32. Use Icon Composer to create the 256 x 256 and 128 x 128 resolutions from the larger file, and the 16 x 16 resolution from the smaller. For best results, create the smaller file independently. For example, if the icon includes text, retype the text in the smaller file with a smaller font size.
Save your source files as PNGs. Launch Icon Composer, and drag the files from Finder into the squares in the Icon Composer UI, as shown in Figure 13.23. When every square is filled, save the file with the .icns extension.
Figure 13.23
Creating an icon file with Icon Composer

Modifying the build options
On the Summary page, shown in Figure 13.24, you need to do the following:
![]() Add the App Icon: Right-click the Add Icon box and navigate to your new
Add the App Icon: Right-click the Add Icon box and navigate to your new .icns file.
![]() Select an Application Category: Select one item from the menu. It must match the category in your submission record on iTunes Connect.
Select an Application Category: Select one item from the menu. It must match the category in your submission record on iTunes Connect.
![]() Ignore the Identifier: Set it in the Info window instead.
Ignore the Identifier: Set it in the Info window instead.
![]() Set a version number.
Set a version number.
![]() Ignore the App Runs on Mac OS X menu: This is overridden by the deployment target in the build settings.
Ignore the App Runs on Mac OS X menu: This is overridden by the deployment target in the build settings.
![]() Ignore the Main Interface. If you changed this during development, don't change it again now.
Ignore the Main Interface. If you changed this during development, don't change it again now.
Figure 13.24
Preparing the target Summary settings
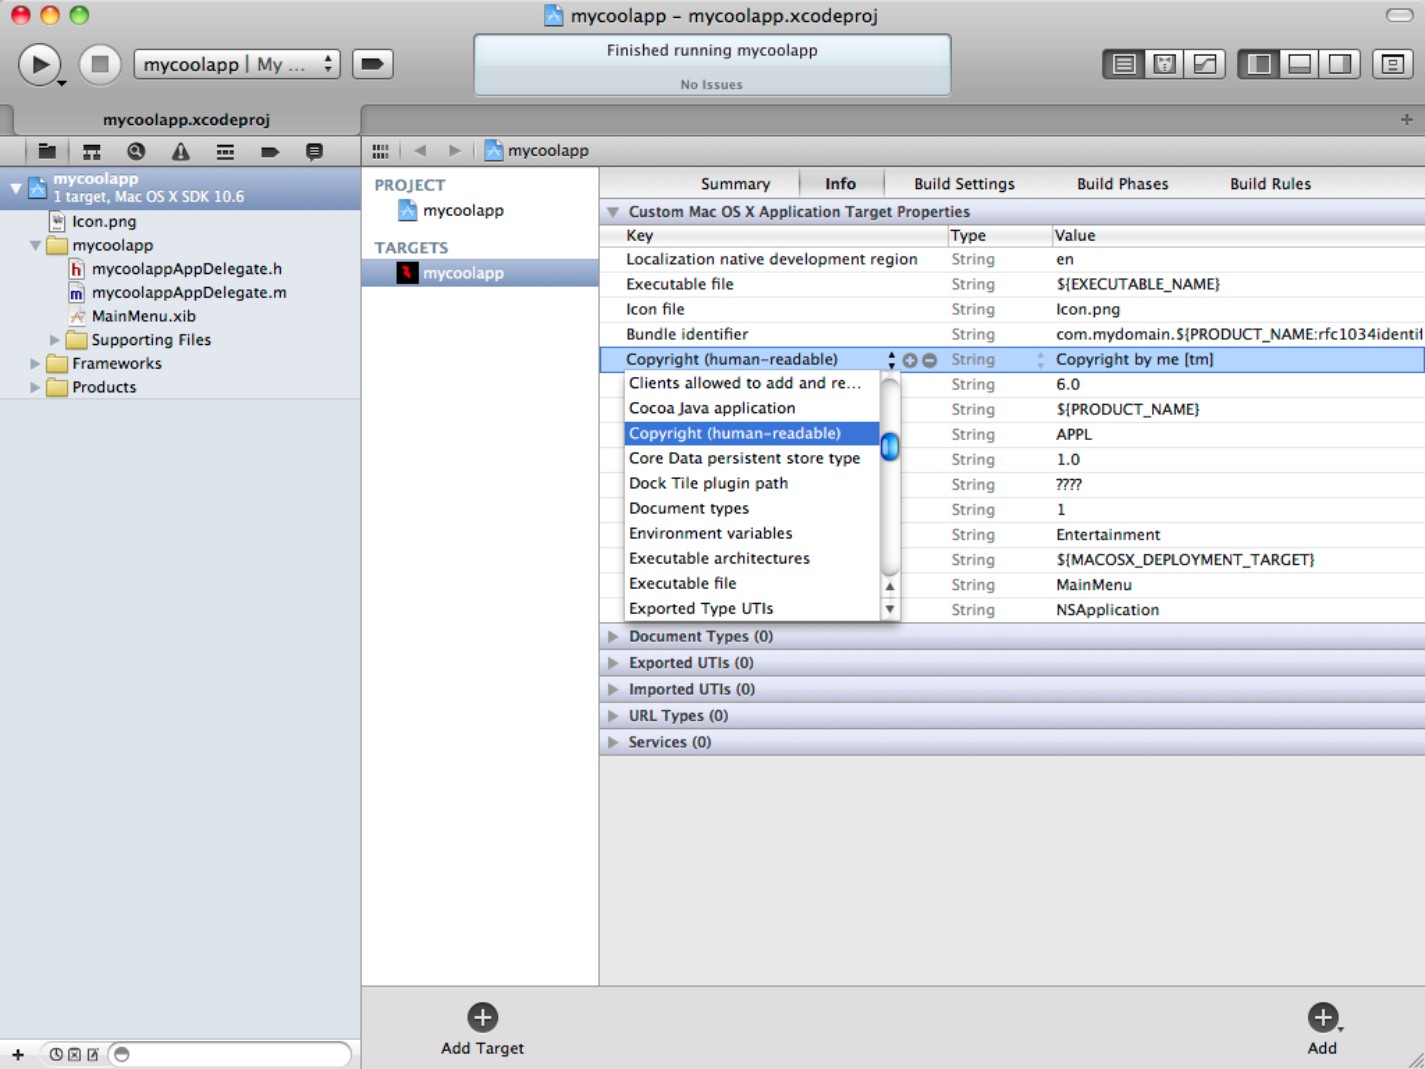
On the info page, shown in Figure 13.25, you need to do the following:
![]() Set the Bundle Identifier: This must match the string used as an App ID in your submission record. (See the Caution.)
Set the Bundle Identifier: This must match the string used as an App ID in your submission record. (See the Caution.)
![]() Add a copyright notice: Right-click in the Key list, select Add Row, and select Copyright (human readable) from the key list. Click the Value field to the right, and type your copyright text.
Add a copyright notice: Right-click in the Key list, select Add Row, and select Copyright (human readable) from the key list. Click the Value field to the right, and type your copyright text.
![]() CAUTION
CAUTION
At the time of this writing, Xcode 4 defaults to a forward domain name on the target Info and Summary pages—in other words, your domain name appears as <yourdomain.com>. Reverse domain names—<com.yourdomain>—are considered standard, so you can manage this in two ways. One option is to create a matching, nominally incorrect App ID. The other is to edit this by hand to correct it. If you leave the PRODUCT_NAME macro unchanged, Xcode 4 successfully adds your product name to the bundle name. You can preview the name in the Identifier box on the target summary page. The critical point is that the Bundle Identifier must match the App ID you create for your project—although if you create a wildcard/suite ID, the product name itself is irrelevant.
Figure 13.25
Adding a copyright notice to the Info plist
Building, testing, and validating the app
Follow these steps to build, test, and validate your app:
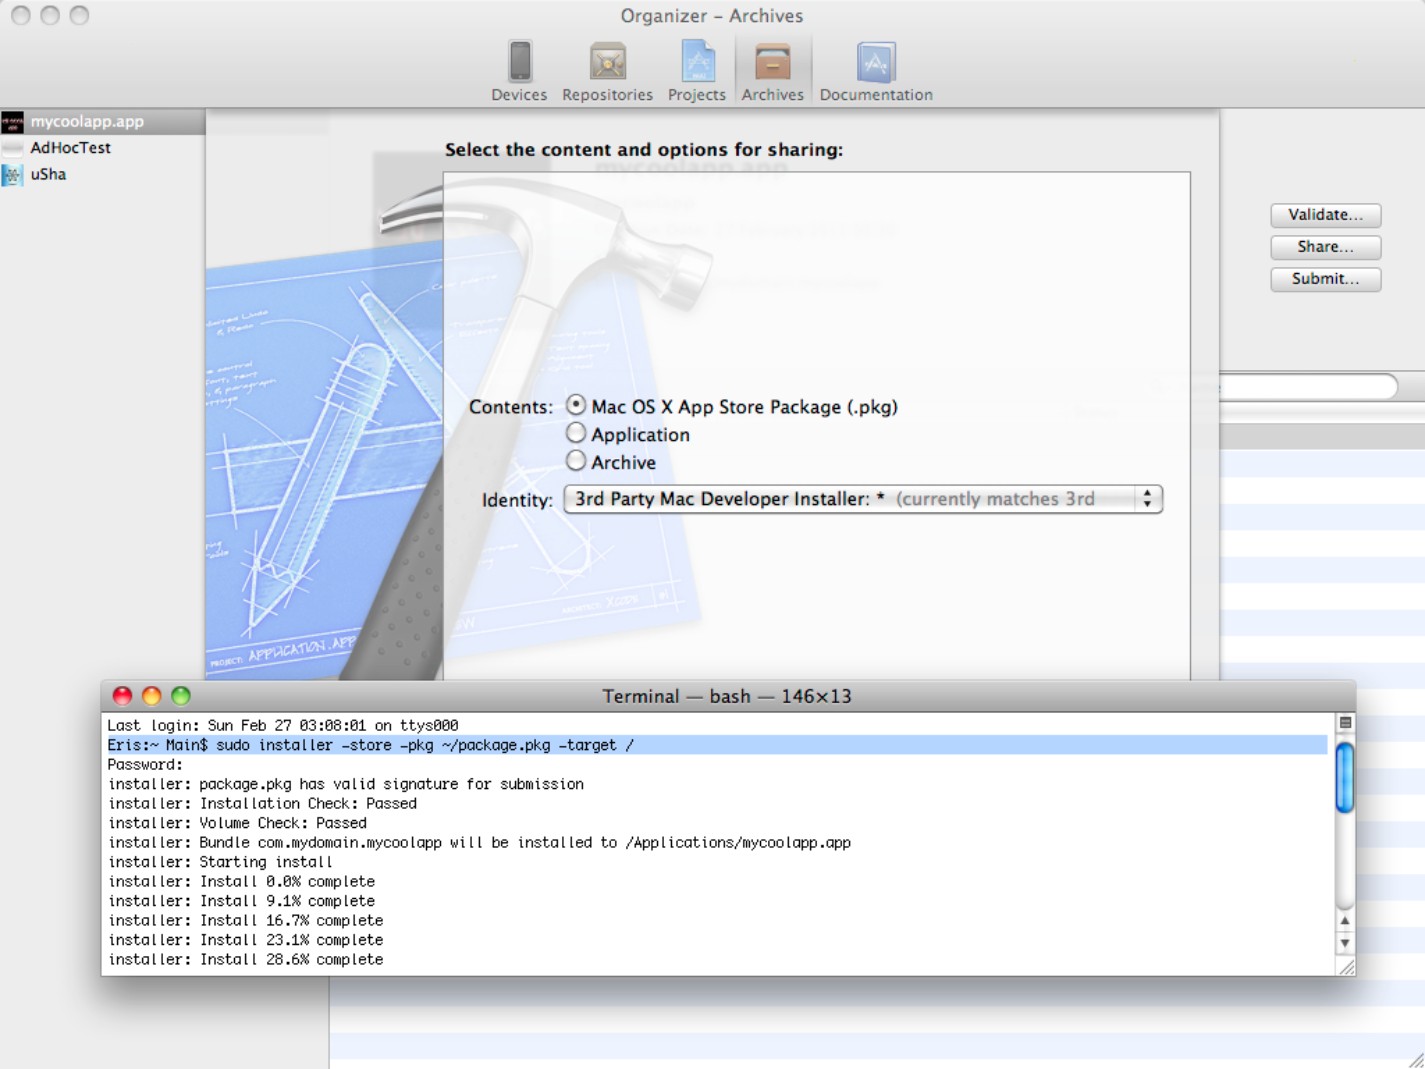
1. Select Product⇒Archive to build the app and open the Organizer.
You can use the Validate button to perform basic validation, as for an iOS app. You also must run a separate check to make sure your app will install correctly after it has been downloaded from the App Store.
2. Select the Share button at the top right, and leave the default setting for Contents unchanged—for example, Mac OS X App Store Package (.pkg), as shown in Figure 13.26.
3. Save the file to a location you can easily access from the command line, such as your root user directory.
4. Open Terminal, and type this code snippet:
sudo installer -store -pkg <path-to-package> -target /
This runs the standard OS X installer in App Store mode, which forces it to check signatures and permissions. (If you double-click the app package it installs without these checks.) The app should install in your /Applications folder, where you can run it in the usual way.
5. If validation and the installer test work correctly, click the Submit button to submit the app.
6. Log in, select an app record, and pick a signing identity, as for an iOS app.
Figure 13.26
Checking installation with a store-compatible manual install
Working with Advanced Build Techniques
So far, the build process has been treated as a “black box” that does its job after it's initialized with a standard list of build settings. This is adequate for simpler apps, but for more complex projects, it can be useful to break apart the build process and customize it further.
Understanding the build process
In outline, the build process has four stages:
1. Preprocessor
2. Compiler
3. Linker
4. File copier and processor
The preprocessor makes working copies of the original source files, expanding #include directives to include the original headers, expanding macros (low-level reusable code snippets and definitions), and implementing conditional compilation. Conditional compilation uses directives such as #if and #ifdef to test compiler and system settings and select code according to their values.
Internally, the preprocessor is more complex than this simple description suggests, but a full introduction is outside the scope of this book. The key practical point is that you can use preprocessor directives to include and exclude code automatically according to various system, platform, and build settings.
The compiler converts the files generated by the preprocessor into machine code. The LLVM and GCC compilers do this in different ways, but the end result is identical—a file with the .o (object) extension. Projects that use source code in other languages can call an external compiler to produce compatible binaries.
Each source file in the project creates a separate object file. The linker combines them all into a single executable binary, resolves symbol references to a specific location in the binary, and checks that all references are present and correct. For example, if your code calls a framework, the linker checks that the framework is included. If it can't find the framework or the specific symbol in it, it can't complete its task and the build fails.
The file copier processes supporting files. Different file types are processed in different ways, according to set rules. For example, nib files are compacted, image files may be compressed, plists are processed using their own separate processor, and so on. All processed files are copied to the target's product folder. Some may be handed to the linker, so the point at which files are processed may vary.
The Xcode build system implements this scheme inside a customizable build manager. Each stage runs multiple shell scripts. You can add your own scripts to the default build sequence. Potentially, you can even replace the default scripts with your own custom-written alternatives, although this isn't a trivial job.
In practice, Xcode manages the build process through a combination of two elements:
![]() Build phases select and process files of a given type. You also can add phases that run arbitrary scripts. Build phases define when files are processed and when other scripted build events happen.
Build phases select and process files of a given type. You also can add phases that run arbitrary scripts. Build phases define when files are processed and when other scripted build events happen.
![]() Build rules define the scripts that control what happens to a file with a specific extension. They define how files are processed.
Build rules define the scripts that control what happens to a file with a specific extension. They define how files are processed.
To customize a build fully you must know how to do the following:
![]() Access the standard build settings and environment variables in your code, so you can add conditional compilation features.
Access the standard build settings and environment variables in your code, so you can add conditional compilation features.
![]() Create your own custom build settings for use in conditional compilation.
Create your own custom build settings for use in conditional compilation.
![]() Create and manage build phases.
Create and manage build phases.
![]() Create and manage build rules.
Create and manage build rules.
Introducing conditional compilation
Conditional compilation is an automated process that literally includes and excludes lines of code from your source files. You create conditional code by surrounding it with preprocessor directives, which look similar to conventional C code but are prefixed with the # character.
Table 13.3 lists the standard conditional and unconditional directives.
Using conditional compilation
In theory, conditional compilation is very simple. A typical example looks like this:
#ifdef <some token>
…code to include…
#endif
The token is a general catch-all name for all the available settings, macros, environment variables, and user-defined flags and values. The challenge with conditional compilation is finding which tokens are available.
Compilers include a range of settings that are defined by the language, platform, compiler, and build. Some tokens are defined as macros and use a special format: their names are prefixed with a double underscore, and they may end with another double underscore. Users can define their own custom tokens as absolute values, references to other settings, or logical combinations of two or more settings.
![]() CAUTION
CAUTION
Note that you can't compare strings in an #if directive, but you can compare tokens with numerical values. You can also check whether a specific token has been defined.
Table 13.4 lists a small selection of useful macros and platform settings.
Having a single source for these tokens would be useful, but they're scattered across many different locations. For compiler-specific tokens, search online for “GCC preprocessor macros” and “LLVM preprocessor macros.” For some of the Apple-specific tokens, search in Finder for the file TargetConditionals.h.
Creating custom tokens
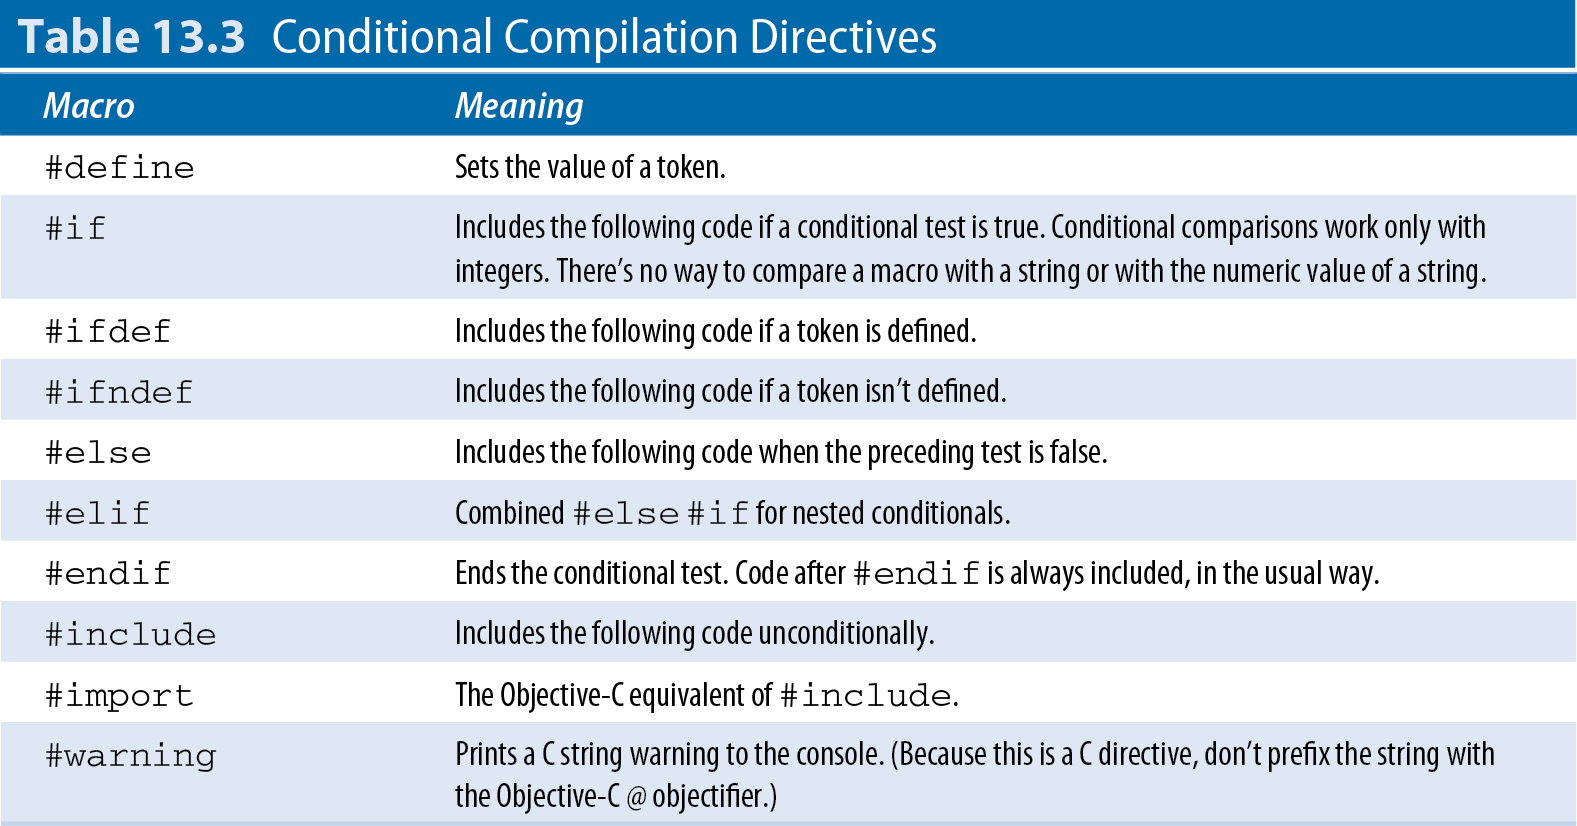
Creating your own tokens is often useful—for example, you can add a token that's only defined when you select a custom configuration.
Note that it's a good idea to give your tokens a custom prefix; your initials are a popular option. Developers often add tokens to their code. If code is shared, simple names such as DEBUG and IPHONE can be defined in multiple locations, creating conflicts.
1. Open a project with at least one custom configuration. Open the target build settings, and scroll down the Other C Flags entry under the Language settings, as shown in Figure 13.27.
2. Click the entry to show the different configuration options.
3. Click the name of your custom configuration, and click the small + icon that appears to the right.
This adds a new token to the build settings.
4. Select Any Architecture | Any SDK from the floating menu at the left, and type -DMY_TOKEN into the value field at the right to define the name and the value of the token.
If you select a specific SDK or architecture, the token is defined only when that SDK is active.
Figure 13.27
Adding a custom token. In this example MY_TOKEN is only defined when the My Debug configuration is active.
5. If you need to add more tokens, repeat the process.
You can define a value for the token by adding = (equal sign) followed by the value. The critical element that “tokenizes” your entry is the -D prefix.
You also can simply #define tokens in your project's -Prefix.pch file. They're available to every file in the project, and they override existing definitions.
![]() TIP
TIP
The predefined token NS_BLOCK_ASSERTIONS=1 for the Release configuration is an example a token with a value. If you want to use #ifdef, it's enough to define the token without giving it a value. Use the more general <tokenname>=<value> only if you want to check a numeric value or use a string.
![]() TIP
TIP
If you add #define NSLog to your project's -Prefix.pch file, all instances of NSLog are stripped from your code. This is a quick way to eliminate log messages when you no longer need them.
After you've defined MY_TOKEN correctly, you can use this conditional directive to include when the token is valid:
#ifdef MY_TOKEN
<…code included if MY_TOKEN is defined…>
#endif
![]() NOTE
NOTE
You can also add tokens to the Preprocessing section. Add them in the same way, but don't prefix them with -D.
Converting build settings into tokens
You can convert any build setting into a token by wrapping it in a dollar sign and either brackets or curly braces. For example, to read the value of the SDKROOT build setting into your own custom SDK_ROOT token, use the following:
SDK_ROOT = $(SDKROOT)
You see that Xcode substitutes the real value immediately, so, for example, you may see this:
SDK_ROOT = iphoneos
Unfortunately, you can't do much with this because the value isn't treated as a C string. If you use SDK_ROOT anywhere, iphoneos is substituted by the preprocessor. The compiler then looks for a symbol called iphoneos and doesn't find it, because it isn't a true symbol.
You can, however, use this technique to read numerical build settings into your code. But don't forget (again) that these values are valid at compile-time only.
Conditional compilation is useful for language-, platform-, and target-dependent compilation, but using compile-time build settings to select runtime code is somewhat eccentric. A more useful alternative is to create scripts in the build phases and build rules to define how a build proceeds internally.
![]() TIP
TIP
To find the name of any build setting, select it in the Build Settings editor, select Edit⇒Copy from the main Xcode menu, and paste the string into TextEdit. You can select multiple settings at the same time, as long as they don't take multiple configuration values. For a full list of build settings, see the Xcode Build Setting Reference in the documentation.
Understanding build phases and build rules
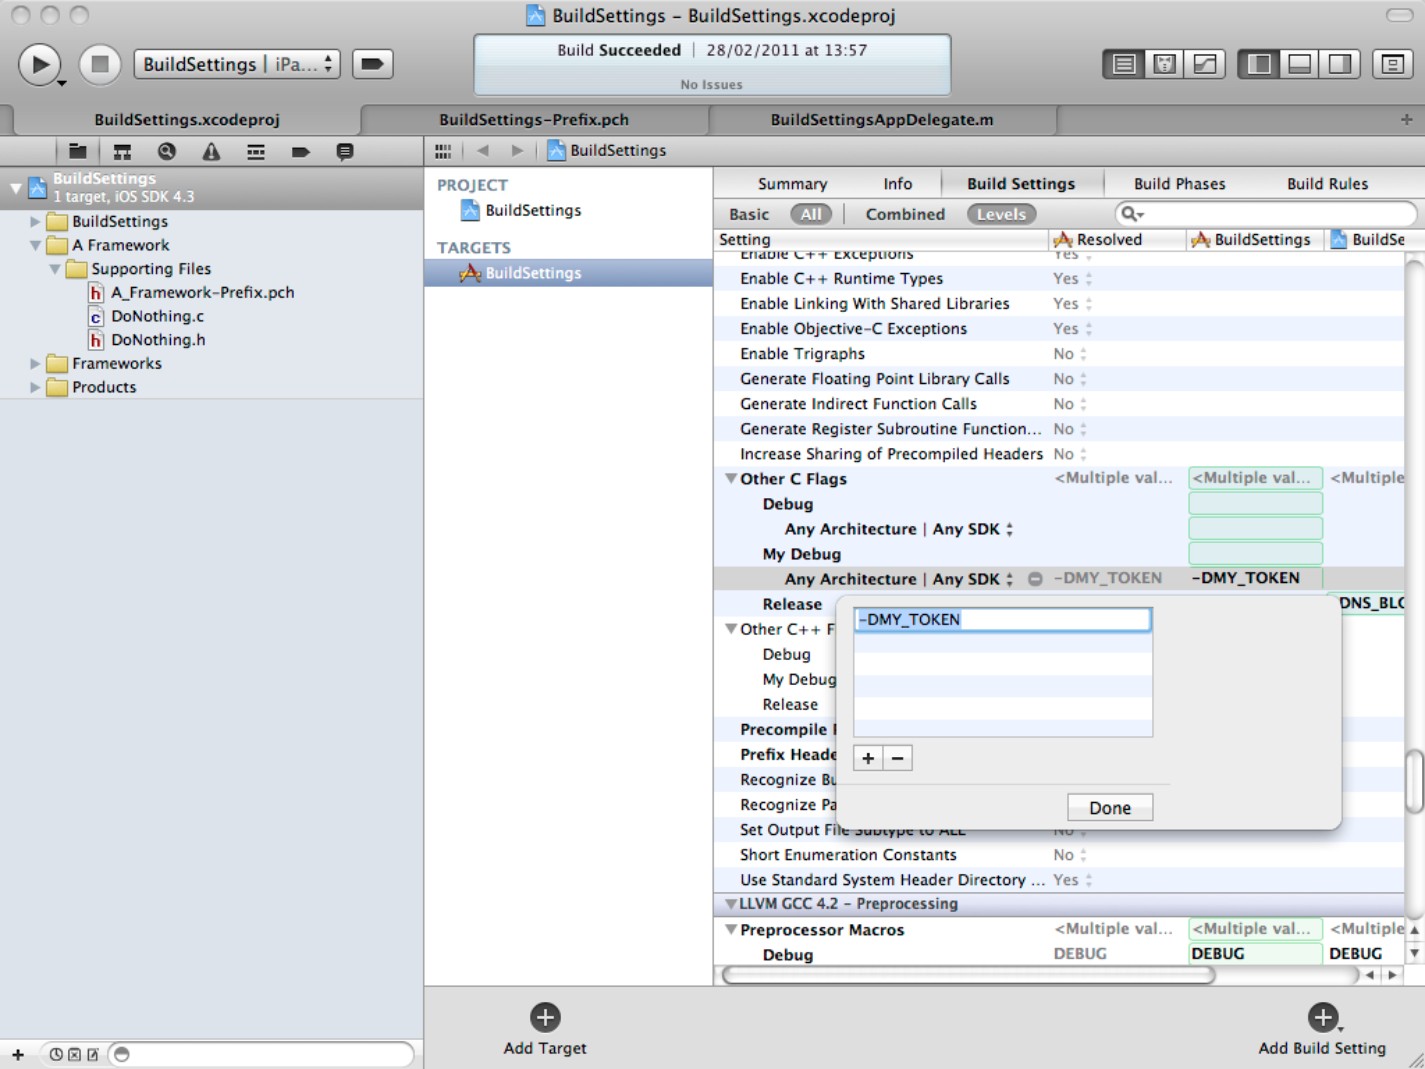
It's worth repeating that Xcode is simply a UI for a set of command-line scripts. The Build Phase and Build Rules tabs in the build editor define which scripts are run and what they do.
You can view the details of the build—the commands given at the command line and the output they generate—by selecting the Log navigator, selecting a completed build, and choosing All and All Messages in the toolbar at the top of the window. The default terse view shown in Figure 13.28 displays the commands in the order they were given. As you can see, the sequence in practice isn't as neat as the preprocess⇒compile⇒link⇒copy template given earlier.
If you right-click anywhere in the list and select Expand All Transcripts, you see the scripts for each stage. The long list of paths, steps, and compiler switches is difficult to read. In theory, you could copy and run each step in Terminal to create a complete build. In practice, you can't, because each new project uses a randomized file path for the build directory, which is in the project's derived data folder. You can find the location of this folder in the Projects page of the Organizer.
Working with build phases
The build phase system can seem complex when you encounter it for the first time, but in fact it's surprisingly easy to work with. To view the build phases editor, select the target build settings and click the Build Phases tab, as shown in Figure 13.29.
You can do the following:
![]() Manage target dependencies. (Use this option to control the order in which targets are compiled, so the targets are built in the correct sequence.)
Manage target dependencies. (Use this option to control the order in which targets are compiled, so the targets are built in the correct sequence.)
![]() Add more files to the compile sources list.
Add more files to the compile sources list.
![]() Add more libraries and frameworks to the Link Binary With Libraries list.
Add more libraries and frameworks to the Link Binary With Libraries list.
![]() Copy resource files to a product bundle.
Copy resource files to a product bundle.
![]() Add a custom build to do one of the following: copy files to the product, copy headers to the product, or run an arbitrary script.
Add a custom build to do one of the following: copy files to the product, copy headers to the product, or run an arbitrary script.
Figure 13.28
Listing what happens during a build in the Log navigator
Build phases are most useful when working with multiple targets. For example, if your project has two targets, such as an app and a framework, you typically add the framework to the app's Target Dependencies and add the library it creates to the app's Link Binary with Libraries list as shown in Figure 13.29. Adding it to the link list guarantees that the compiled framework is included in the finished app. Depending on the details of the target, you can choose to compile its source files with the other app files or independently as part of its own target build sequence.
Figure 13.29
Exploring build phases
Getting started with scripts and macros
You can use the Run Script option to add customized scripted processing or support. Scripts can be written in any language that works from the command line, including AppleScript, Perl, Python, Ruby, and the standard UNIX shell, all of which are built into OS X.
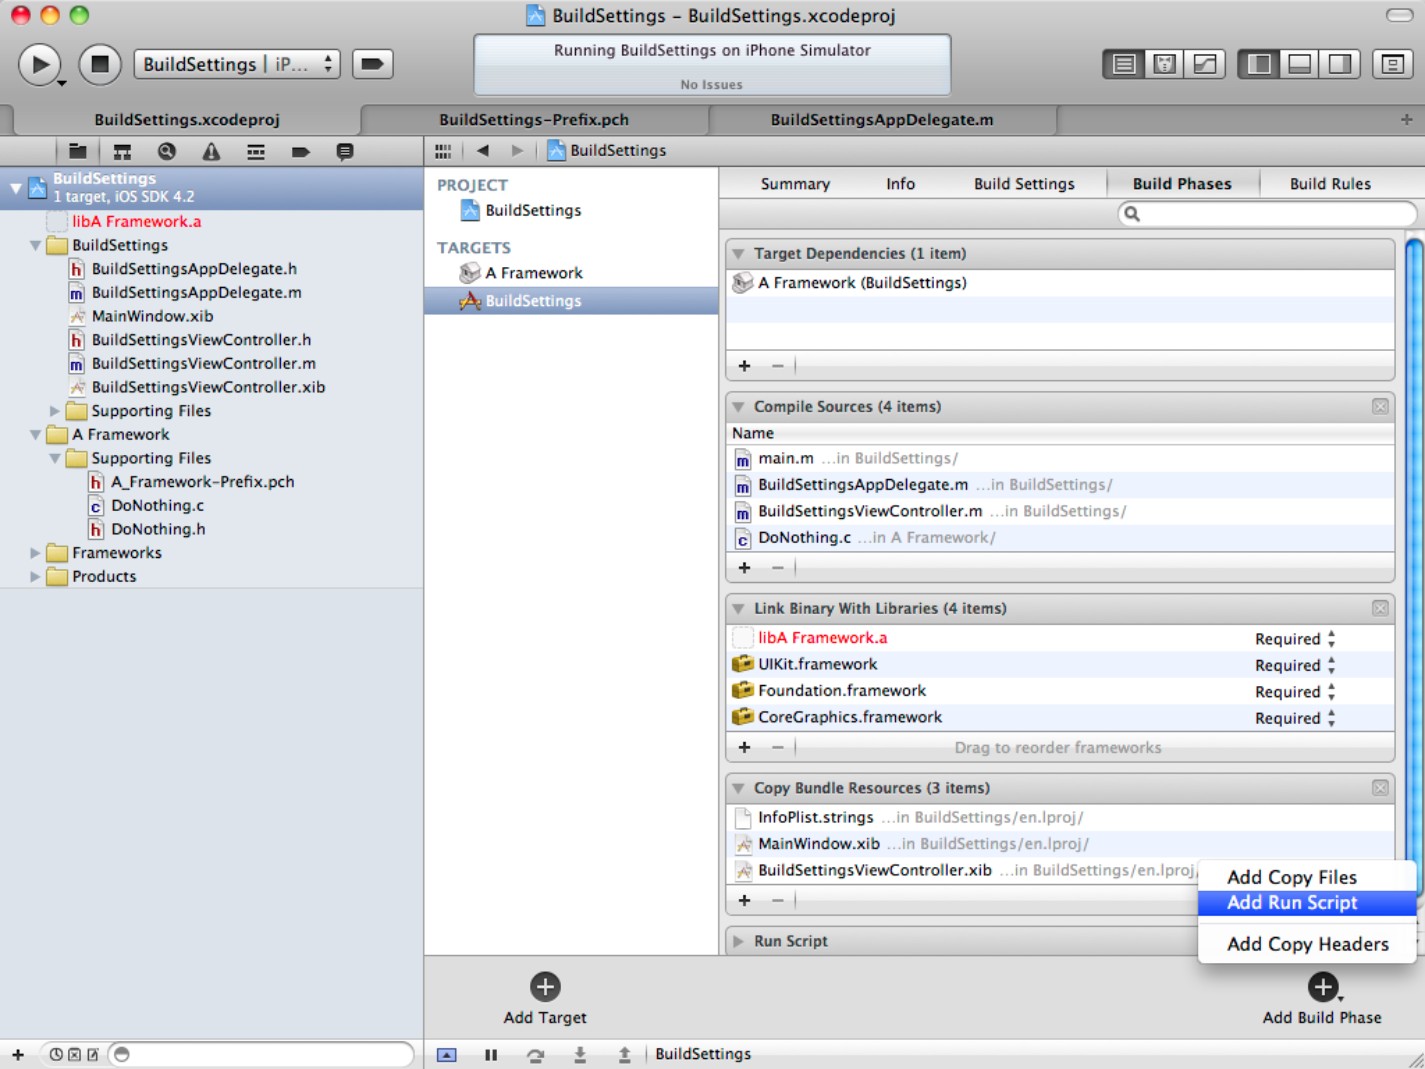
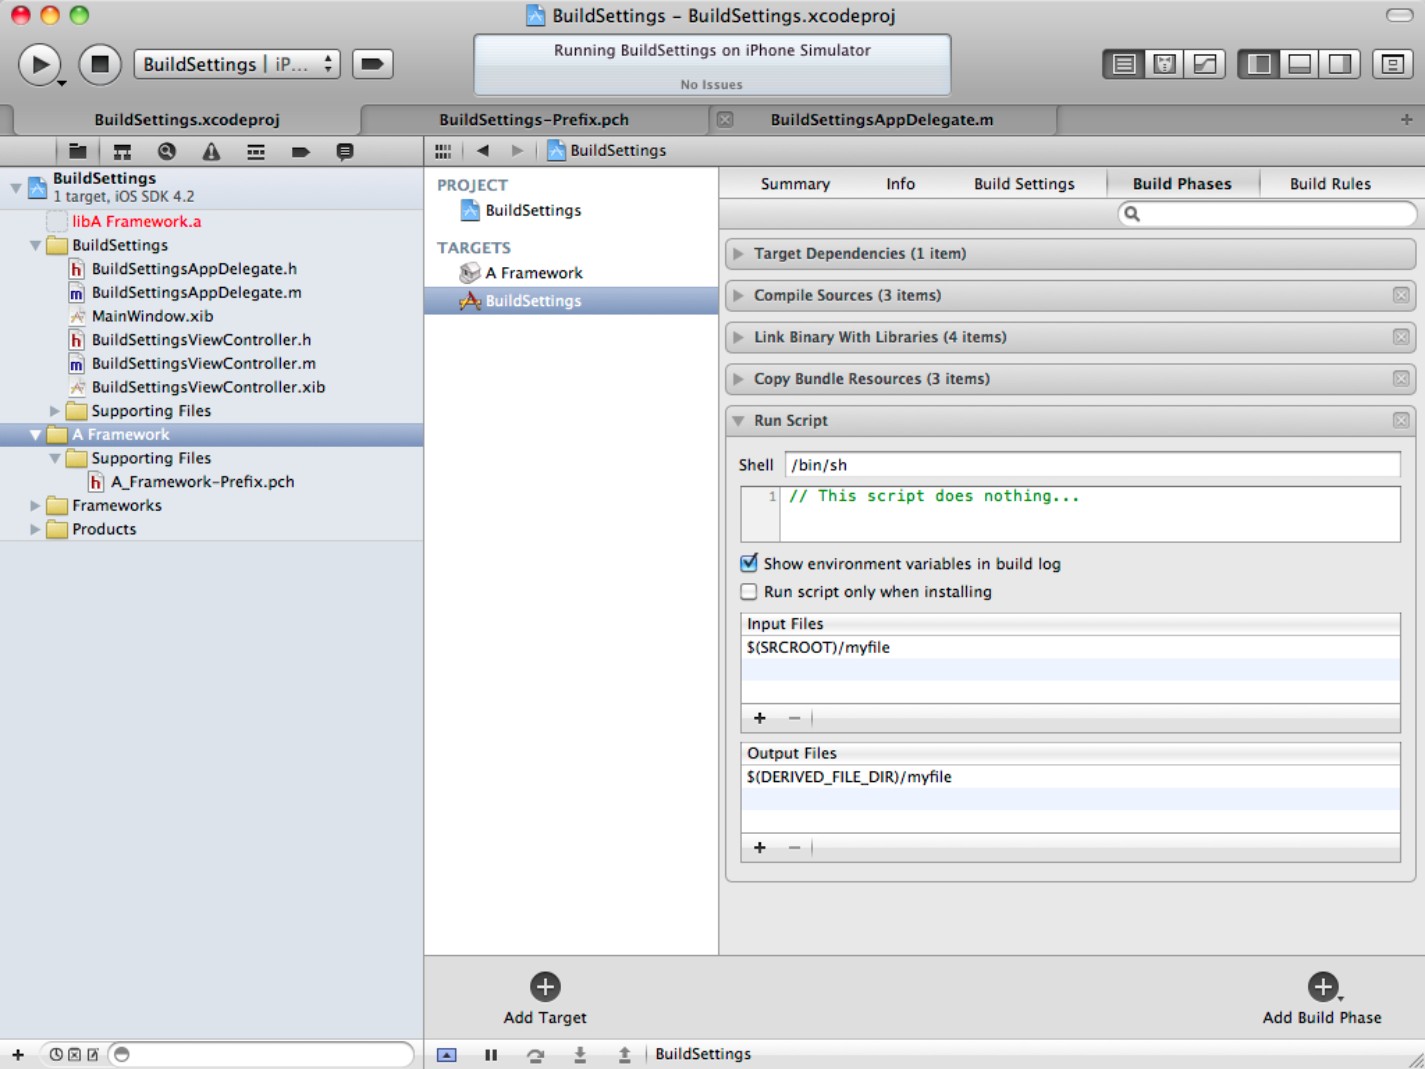
Build setting macros allow you to access useful build settings in your script. The two default examples in Figure 13.30 show how to read the source and destination directories. A more complex script might loop through every file in the source directory, or select files with a specific extension and then process them in some way. Because scripts have access to environment variables and to other processes, the potential of custom scripting is almost limitless. For example, you can implement or import complete source management tools and add them here, or back up some or all of the files in your build to a remote server.
To remove a script or build phase, click the cancel icon at the top right. You can rearrange the order in which build phases are run by dragging them up and down the list. The Target Dependencies are fixed, but every other phase can be moved.
Figure 13.30
Creating a new build phase begins with an empty custom script. Note that the input and output directories are taken from the build settings and filled in for you.
![]() CAUTION
CAUTION
Rearranging build phases can create nonsensical results; for example, placing the compile phase after the link phase is rarely useful.
Creating a simple example of a build phase
It's often useful to copy extra resources such as a font file to a bundle. Both OS X and iOS can access fonts from an application bundle. You can use this feature to guarantee that your choice of fonts is available to your app.
While it's possible to add fonts using the standard Add Files… option in Xcode, a custom build phase gives you control over your app bundle's folder structure. You can use a build phase to copy items from any location in your Mac to a folder inside the app.
Figure 13.31 shows one example of a Copy Files build phase. The settings shown in the figure create a folder called /fonts inside the app bundle's /Resources folder, and copy a font file to it from a shared project art directory. The Destination pop-up menu gives you more other powerful choices, including an absolute path option that can install resources to any disk location on a Mac.
Figure 13.31
Using a Copy Files build phase to add a font resource to a project.
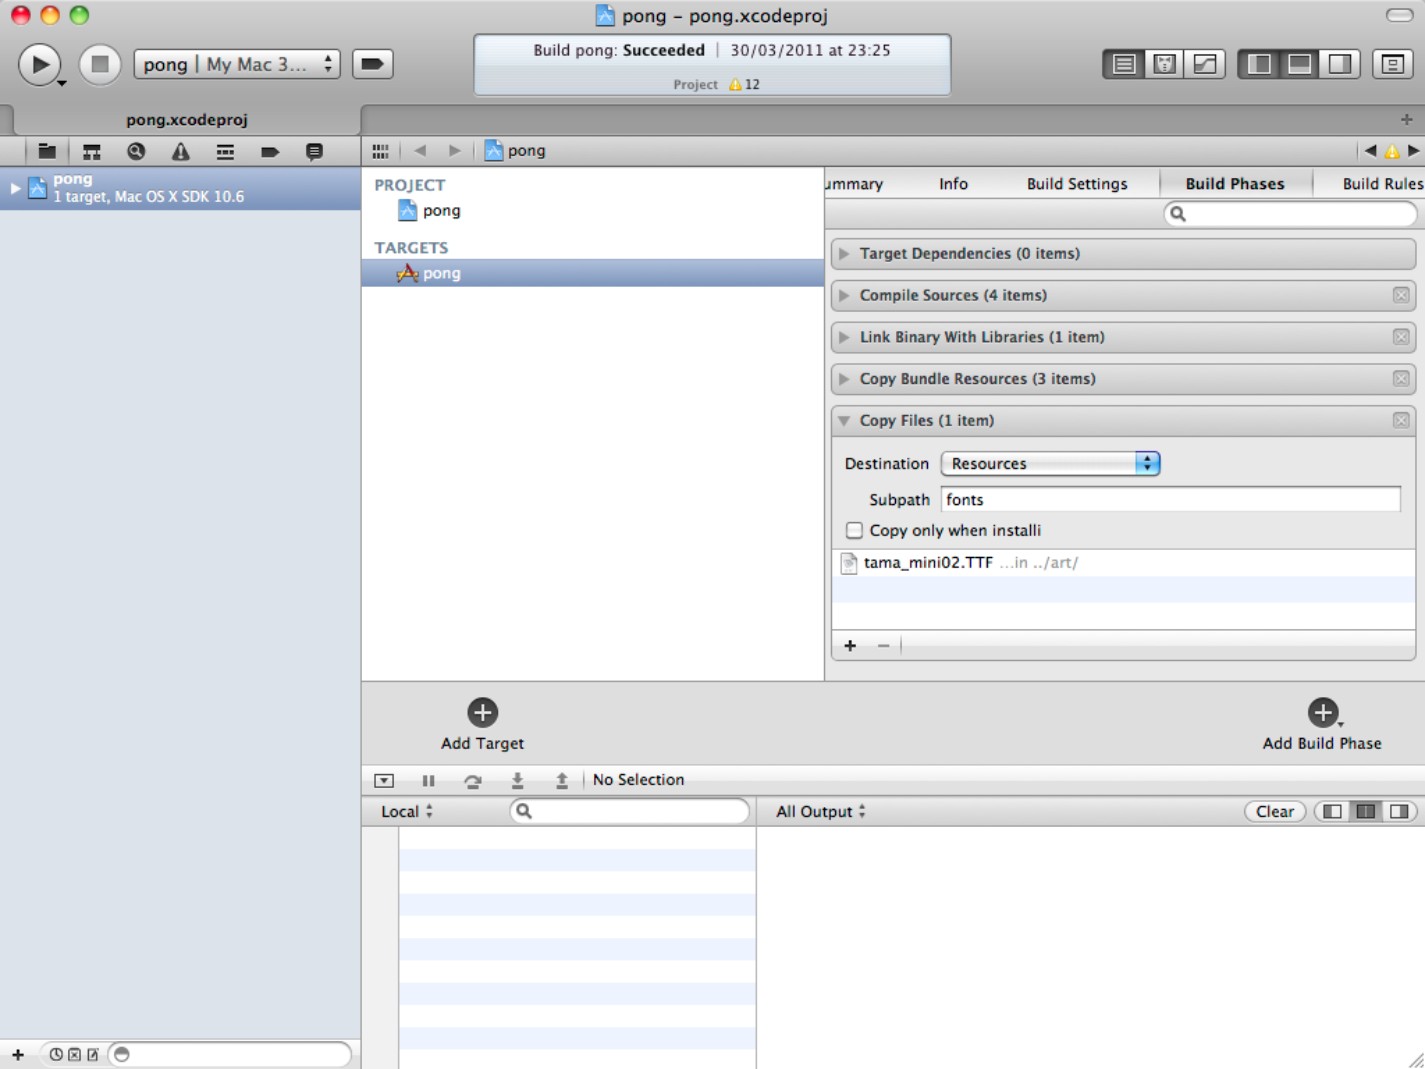
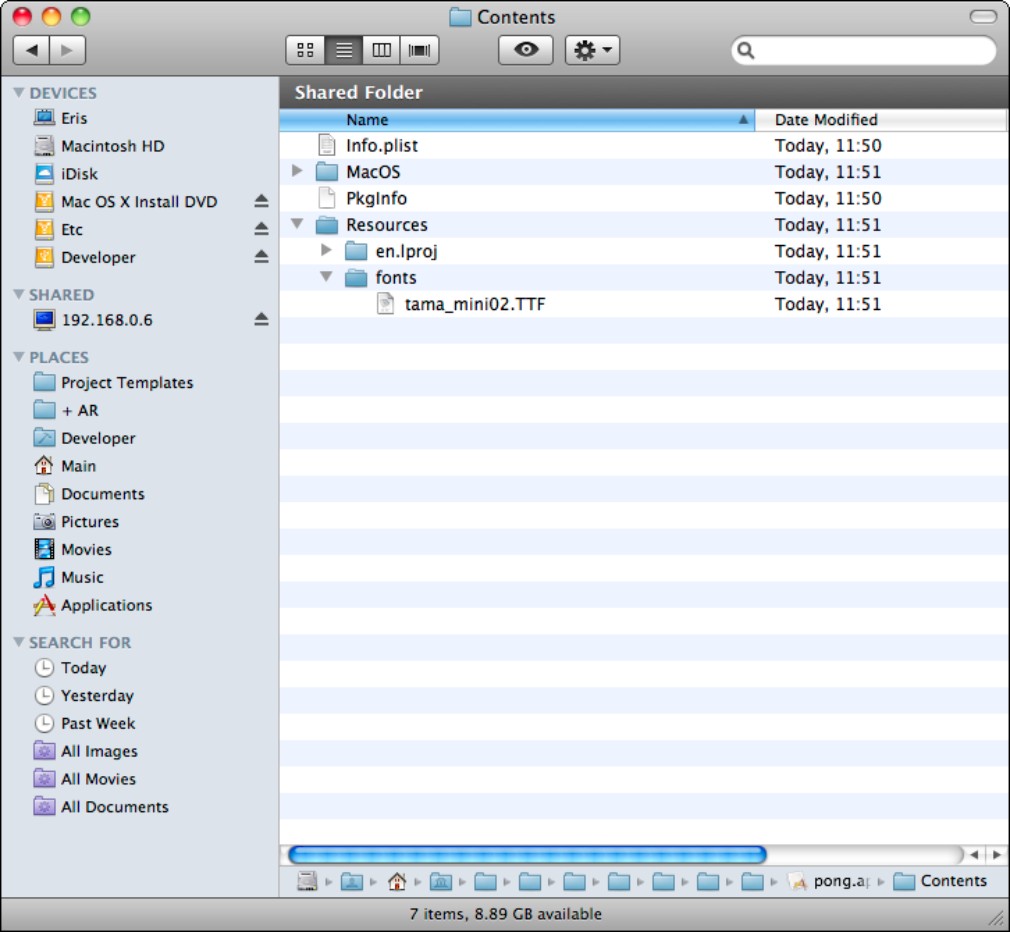
Figure 13.32 shows the result—the fonts folder is added to the bundle. You can now add a key called Application fonts resource path (ATSApplicationFontsPath) to the project's Info plist, and add standard code to load and use the font in the usual way. OS X treats the font as if it were included in a Mac's standard /fonts folder, but it's not accessible to most users, and can't easily be copied.
Figure 13.32
The /fonts folder added to the bundle, with the copied font
Creating build rules
To view the default build rules, select a target and click the Build Rules tab at the top right. The list shown in Figure 13.33 is the same for every target. It includes a list of file types and names the commands that can process them. The commands are at the lowest level of the Xcode build system; they're utilities that copy, compile, and process files in various ways, and they're scattered around various /usr/bin directories throughout the /Developer directory.
Figure 13.33
The default build rules
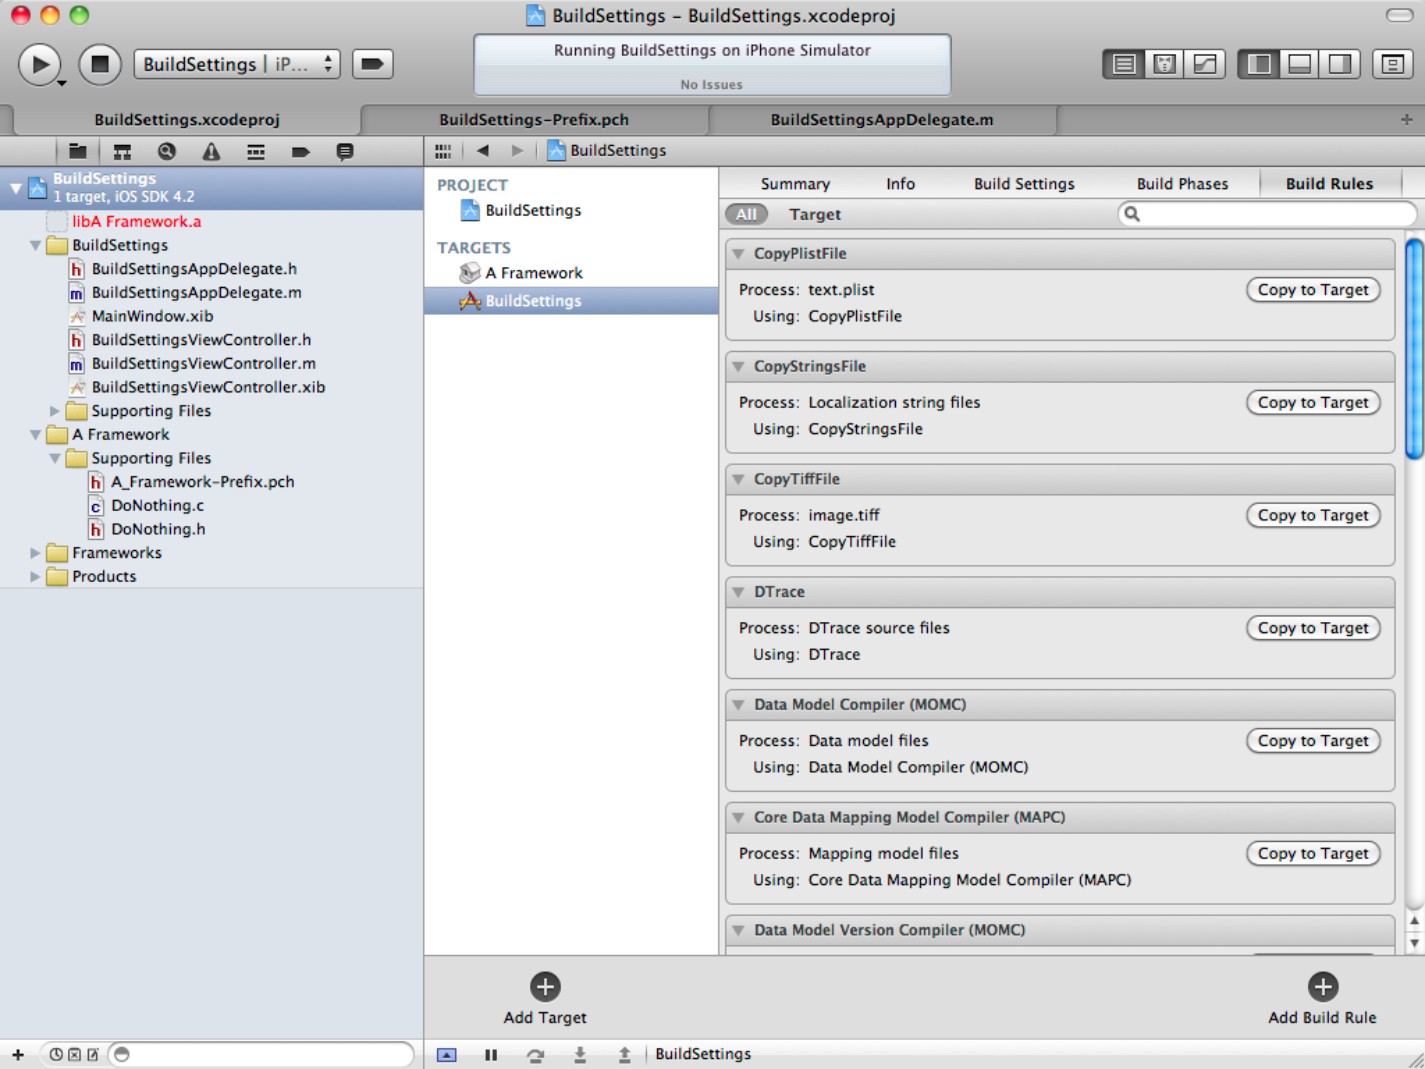
You can customize the existing rules by clicking the Copy to Target button. This opens the pane shown in Figure 13.34. Use the Process menu to select a file type. You can choose from a standard selection of types, or you can select Source files with names matching: and type the extension in the box to the right. Each of the standard rules defaults to one type. If you select a custom script, the default script stub includes a relevant build setting that points you to the directory holding the associated files. You can modify any of these default options in your script, as needed.
Use the Using box to select a processing action. You can select from another list of standard options or select the Custom script option to create your own scripted processor. The script editor is identical to the one for build phases, and it can use the same selection of languages supported by the shell.
Note that build rules are target-specific.
![]() NOTE
NOTE
You may be unfamiliar with some of the file types and processes in the menus. Many are highly specialized, and you're unlikely to use them.
Figure 13.34
The build rules use the same scripting options as the build phases. (You can get as creative as you want here.)
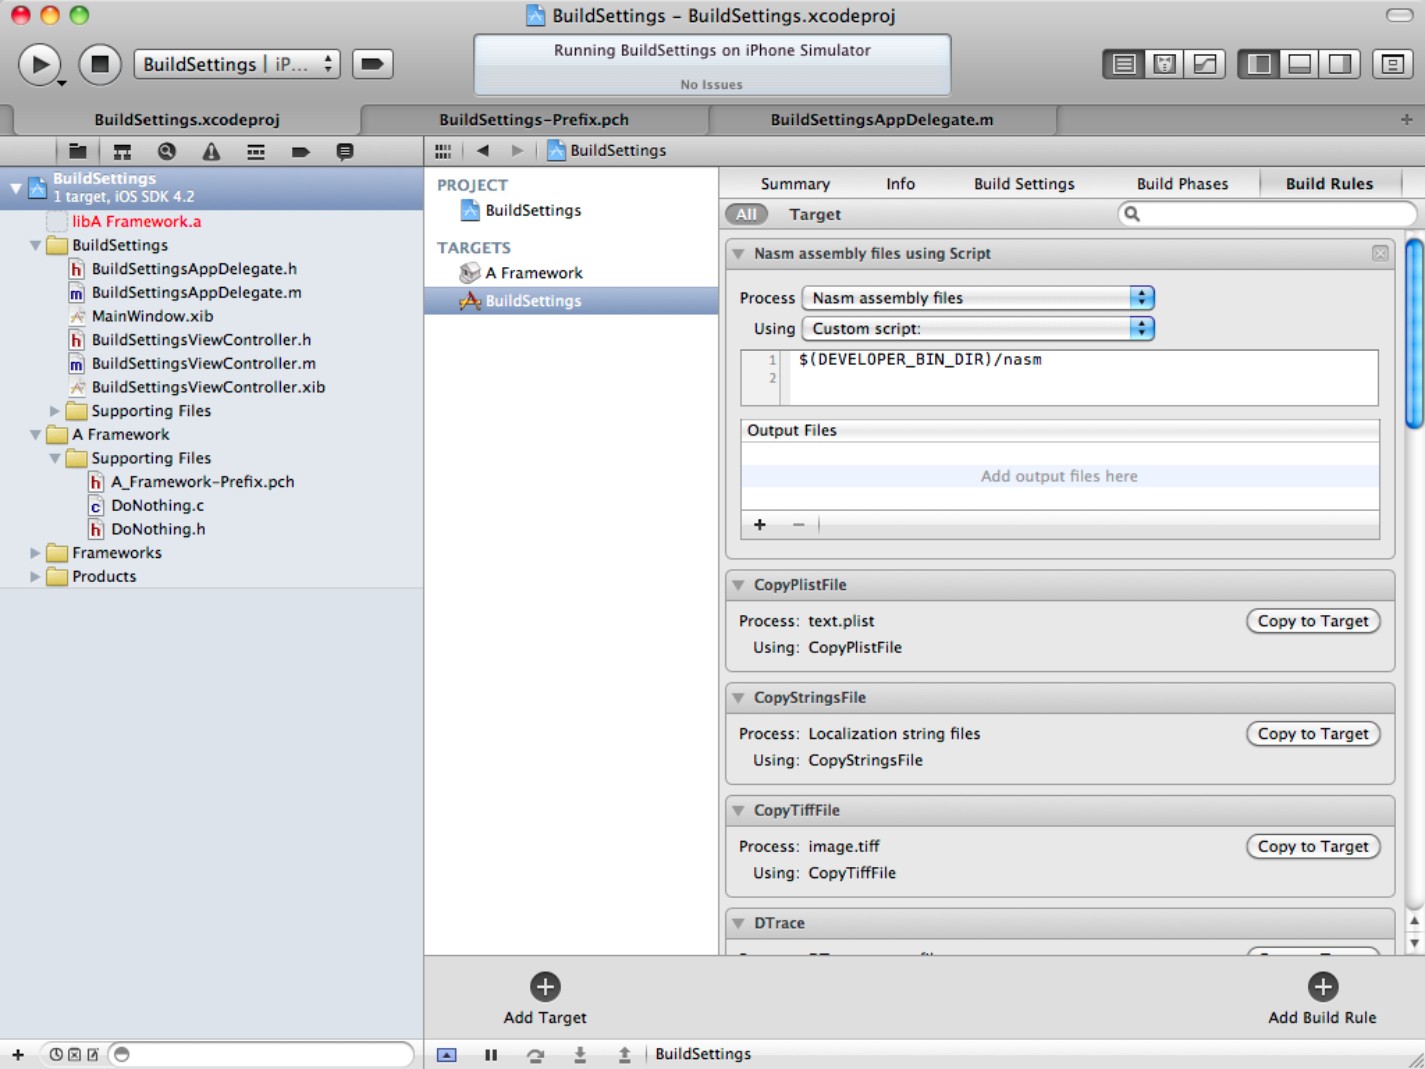
![]() TIP
TIP
You can speed up complex builds with many files and targets by using the Distributed Builds feature in the Xcode Preferences, which spreads the build process across multiple Macs. Install Xcode on every Mac, open Preferences, select Distributed Builds, Authenticate, and check both boxes. Repeat for other Macs, and select Refresh. Launch Xcode, and repeat the process on other Macs. The Distributed Builds dialog should find the other Macs automatically and distribute builds to them.
Summary
This chapter explored practical build customization. It began with a list of common simple customization tasks that used modified build settings to control some small part of the build process.
Next, it worked methodically through the steps needed to create distribution builds for the App Store and for Ad Hoc beta testing.
Finally, it introduced the low-level features of the build system, and it sketched how build phases and build rules can be used to create complex, fully customized builds that support multiple targets and dependencies and non-standard file types.