
Chapter 8: Creating More Advanced Effects with Interface Builder
In This Chapter
Using File's Owner and First Responder
Subclassing views and other objects
Creating custom IB objects
Creating views with static images
Supporting non-English languages
Creating outlets and actions is a key step in application design with Interface Builder (IB). More complex applications require more advanced skills, which are discussed in this chapter.
Using File's Owner and First Responder
The top two objects in the list at the left of the IB interface are placeholders. They make it possible to link to objects that are outside the nib file.
Using File's Owner
File's Owner is a placeholder for the object that loaded the nib. It represents a different object in every nib. For example, in MainWindow.xib in the sample project in Chapter 7, File's Owner is a placeholder for the UIApplication object. In IBViewController.xib, File's Owner stands in for the IBViewController object.
This may seem complex the first time you encounter this feature, and it's certainly not an intuitive feature, because the true class/object name isn't displayed next to the icon.
However, if you select the File's Owner icon, you can check the class name in the Identity Inspector. It appears in the Class field at the top of the Utility Area.
![]() Caution
Caution
These placeholders can seem confusing, but it's critical that you take time to experiment with them until you understand them. It's very difficult to use IB correctly if you don't.
In practice, you use File's Owner as a source and destination for links and actions. If you follow the instructions in Chapter 7, IB is intelligent enough to link to File's Owner automatically. In a more complex application, you may need to create links to a wider selection of objects.
You can use the File's Owner placeholder in two ways:
![]() To create links to the object that loads the nib file
To create links to the object that loads the nib file
![]() To review a complete list of existing links
To review a complete list of existing links
When you link item by item, it's easy to forget which links have been made. Opening the Connections Inspector and selecting the File's Owner icon shows every link placeholder object in a single display, as shown in Figure 8.1.
![]() TIP
TIP
It's often useful to view this list and create links to it rather than linking object by object, because the File's Owner pseudo-object displays all its outlets at the same time. This can be a significant timesaver.
Figure 8.1
Viewing the links to File's Owner with the Connections Inspector

![]() NOTE
NOTE
The view property is pre-linked for you in the view-based application template. Most of the other templates include pre-linked outlets. It's useful to review them; they can give you insight into how the nib hierarchy is organized and how the templates have been engineered.
Using First Responder
At first sight, the First Responder placeholder can seem even more abstract than File's Owner. But the principle is simple.
All iOS and OS X applications include a responder chain—an implied hierarchy of objects that dispatches user events. Here's what to expect:
![]() Windows, views, and certain other objects are subclasses of an abstract event management class (
Windows, views, and certain other objects are subclasses of an abstract event management class (UIResponder in iOS and NSResponder in OS X).
![]() This class includes a prewritten selection of methods that can handle standard user events such as copy, paste, undo, and so on.
This class includes a prewritten selection of methods that can handle standard user events such as copy, paste, undo, and so on.
![]() You can add your own custom events to this list.
You can add your own custom events to this list.
![]() Unlike a standard action, these messages are passed from object to object until a matching event handler method is found. A common test sequence is view⇒view controller⇒window⇒application, but this may vary, because it depends on the design of the application.
Unlike a standard action, these messages are passed from object to object until a matching event handler method is found. A common test sequence is view⇒view controller⇒window⇒application, but this may vary, because it depends on the design of the application.
![]() The First Responder icon is the connection point for this chain. It lists all the valid handler methods, in all objects that are part of the responder chain. It's the central event handler for an application, and provides a convenient single access point for responder methods that may be scattered across multiple objects.
The First Responder icon is the connection point for this chain. It lists all the valid handler methods, in all objects that are part of the responder chain. It's the central event handler for an application, and provides a convenient single access point for responder methods that may be scattered across multiple objects.
![]() Events without a handler are ignored.
Events without a handler are ignored.
In practice, you link objects that generate messages to the responder chain in the usual way. For example, in the sample IB application, shown in Figure 8.2, you can drag a link between one of the button events, such as a Touch Up Inside, to a responder handler, such as Copy.
A critical difference is that this doesn't generate code for you. IB doesn't know which object you want to add the handler code to, so it doesn't try to guess. Instead, you must add the code by hand to whichever responder object suits your needs.
Typically, this means copying a method signature from the UIResponder or NSResponder class—for example, for the copy: method—and creating your own full implementation.
![]() CAUTION
CAUTION
The methods you need to implement aren't mentioned in the UIResponder Class Reference. They're defined in the UIResponderStandardEditActions Protocol Reference, which is part of the UIKit Framework Reference. You won't find them unless you know this document exists. It's worth repeating again that you should review all the references used in a framework; otherwise, you may miss critical features. To add custom methods to the responder chain, define them as an IBAction and add them to a nib object. They appear in the responder list automatically, and you can link to them in the usual way.
Figure 8.2
Viewing the First Responder actions in an iOS application

![]() CAUTION
CAUTION
Before this works correctly, you need to let IB know that you're using a subclassed version of the window object. This assignment process is described later in this chapter.
For comparison, Figure 8.3 shows the First Responder list created by the standard OS X application template. iOS includes a handful of standard responder methods. OS X supports nearly 200.
In the application template, many are pre-linked to menu items. None of the methods are implemented, not even with stubs. But you can easily add code to your own subclasses to make them “live.”
![]() NOTE
NOTE
An OS X application includes an extra placeholder object called Application, which stands in for the main application object. It includes a selection of predefined actions, most of which aren't implemented. For information about handling these and other related application events, see the companion Cocoa Developer Reference title.
Figure 8.3
OS X supports many more First Responder actions than iOS.

![]() CAUTION
CAUTION
Some very important events don't appear in IB. For example, iOS and OS X touch messages—touchesBegan:, among others—aren't listed anywhere in IB. They're hardwired into the responder chain, and you can't redirect them in IB. You can only respond to them with code. If you want to copy and redirect them to multiple objects, you must add code to implement this.
Subclassing Views and Other Objects
A key feature of object-oriented development is subclassing—the ability to copy an existing object and extend it with custom code and new features. IB supports subclassing, but the steps required to replace a standard Cocoa/Cocoa Touch class object with a subclassed version of the same object aren't immediately obvious.
To subclass an object, follow these steps:
1. Add a new subclass to the project in the main Xcode editor, and add custom code to implement new features.
2. Assign the subclass to an existing object in IB.
After you have completed Step 2, you can continue to develop and debug your custom code and the new code will be active in your UI.
Any IB object can be subclassed; you can create completely new or substantially modified buttons, sliders, map views, Web views, and so on.
In practice, the UIView class in iOS and the NSView class in OS X are subclassed regularly, because it's often useful to add custom graphics or event management code to a view. Other controls and views are subclassed less frequently.
![]() TIP
TIP
You can subclass any object in a nib. It doesn't have to be visible or part of the UI.
![]() CAUTION
CAUTION
Customizing Apple's own subclasses of UIView and NSView—map views, Web views, image views, and so on—can be a frustrating experience. The more complex subclasses include undocumented features and properties, and it's often impossible to add new features without tricks and workarounds. For example, in some situations, animated view swaps are handled by “invisible” views that aren't part of the officially documented view system. Always check unofficial online developer forums to see if other developers have experienced problems—and if they may have already solved them.
Adding a new subclass in Xcode
In this example, we add a new subclass of UIView to the IB project from Chapter 7 and assign the subclass to the background view of the project.
Begin by copying and pasting the project folder in Finder. Rename the folder. The new name is arbitrary, but it must be unique. In the sample code for this project, the new name is IB Custom View. Open the folder, and double-click the .xcodeproj file to load it into Xcode 4.
![]() CAUTION
CAUTION
The project file is still called IB.xcodeproj. This doesn't matter. As explained in Chapter 2, it's very difficult to rename the working files used in an Xcode project, and it isn't usually necessary to do so.
When the project loads, right-click the Classes group and select New File… Select the Cocoa Touch templates, and then select the Objective-C Class template. Select UIView in the Subclass menu, as shown in Figure 8.4. Save the file as IBView.
Figure 8.4
Adding a new subclass of UIView to an iOS project

You see two new files: IBView.m and IBView.h. IBView.m includes a sparse selection of extra code that provides a minimal starting point for further customization. It also includes a method called drawRect:, which draws custom graphics in the view. By default, this method is commented out. Before we add code to it, we need to take a closer look at the iOS UI.
Figure 8.5 shows the dimensions of the background view as they appear in the Size Inspector. At the top right, you can see that the view is 320x460 pixels. The iPhone screen is 320x480 pixels. Why are 20 pixels missing?
In fact, the default view allows for the status bar at the top of the UI, which is exactly 20 pixels high. The y coordinate of the view is offset by 20, and the view is 20 pixels smaller to compensate.
When you use a background view of any kind in an iOS UI, you must adjust the dimensions to allow for other visible objects. This can affect the calculations used to create custom graphics.
In this example, the view's internal top-left coordinates remain at 0,0. The bottom-right coordinates are adjusted to 320,460 to allow for the smaller view size.
If the UI included other items such as a navigation bar, toolbar, or tab bar, the view's dimensions and coordinates would have to be changed accordingly.
Figure 8.5
Checking the size of the view with the Size Inspector

![]() TIP
TIP
It's not always easy to remember the dimensions of the various possible navigation and status features. Fortunately, you don't have to, because IB snaps a background view to the correct size when you create a new project from a template. If you add and resize further custom sub-views, IB's snap feature helps you resize them correctly. Note that you can extend a custom sub-view outside the screen area or hide parts of it under navigation objects. This isn't usually a useful thing to do, but the option is there if you need it.
![]() TIP
TIP
View management for iPad UIs includes similar features. OS X UIs include related view snapping features, but the design is more open-ended. You don't typically need to shrink a view by a fixed size, unless your application always runs full screen and you need to compensate for the menu bar, in which case you should read the screen dimensions dynamically without assuming a set size. In theory, iOS apps should also make no assumptions about screen dimensions, but this makes UI design very difficult. It's easier to assume the standard screen sizes are valid—for now.
Adding code to the subclass
The drawRect: method in a UIView is called whenever the screen is refreshed. A refresh happens automatically on launch, so adding code to drawRect: is a good way to create a custom background.
![]() NOTE
NOTE
While it's possible to load an image from a file in drawRect: and use the contents as wallpaper, there are easier ways to achieve this result; more details are provided later in this chapter. Similarly, there are easier ways to create a single color static background. drawRect: is ideal for more complex effects.
In this example, drawRect: code creates a static three-color gradient fill, using C functions from the Core Graphics framework. The code illustrates how a subclass of UIView can be customized to create a specific effect. In practice, you can add extra features to any of the existing methods defined for UIView, or you can add your own custom properties and methods, as needed.
The code does the following:
![]() It creates and clears a context, an area of memory used for graphics.
It creates and clears a context, an area of memory used for graphics.
![]() It creates a color space object, which holds information about colors.
It creates a color space object, which holds information about colors.
![]() It creates an array of three colors from RGB components.
It creates an array of three colors from RGB components.
![]() It creates a color-gradient object using the array.
It creates a color-gradient object using the array.
![]() It draws a rectangle in the view, allowing for the 20-pixel status bar.
It draws a rectangle in the view, allowing for the 20-pixel status bar.
![]() It draws a gradient fill from the top left to the bottom right of the view.
It draws a gradient fill from the top left to the bottom right of the view.
![]() It cleans up by restoring the original graphics state and releasing used memory.
It cleans up by restoring the original graphics state and releasing used memory.
- (void)drawRect:(CGRect)rect {
CGPoint startFill, endFill;
CGContextRef aContext = UIGraphicsGetCurrentContext();
CGContextClearRect(aContext, rect);
CGContextSetShouldAntialias(aContext, YES);
CGColorSpaceRef myRGB = CGColorSpaceCreateDeviceRGB();
size_t num_locations = 3;
CGFloat locations [3] = {0.0, 0.5, 1.0};
CGFloat components [12] =
{1.0, 0.0, 0.0, 1.0,
0.0, 1.0, 0.0, 1.0,
0.0, 0.0, 1.0, 1.0};
CGGradientRef myGradient =
CGGradientCreateWithColorComponents(myRGB,
components,
locations,
num_locations);
CGContextSaveGState(aContext);
CGContextAddRect(aContext, CGRectMake(0, 0, 320, 460));
CGContextClip(aContext);
startFill = CGPointMake(0, 0);
endFill = CGPointMake(320, 460);
CGContextDrawLinearGradient(aContext,
myGradient,
startFill,
endFill,
kCGGradientDrawsBeforeStartLocation+
kCGGradientDrawsAfterEndLocation);
CGContextRestoreGState(aContext);
CGGradientRelease(myGradient);
CGColorSpaceRelease(myRGB);
}
![]() NOTE
NOTE
This is lots of code for a simple effect; the Core Graphics library in iOS isn't outstandingly easy to work with. This chapter isn't a primer on Core Graphics, so don't try to remember the details. The key point is that UIView can be customized to suit your application's requirements. Subclassing isn't limited to graphics. For example, you also can customize how UIView responds to touch events or other user actions. In a more complex application, you might copy touch events, process them in your subclass, and resend them to other objects for further processing. In practice, subclassing is almost infinitely flexible.
Assigning the subclass in IB
If you build and run the application now, you get the result shown in Figure 8.6. The code has been added. But it doesn't run.
Figure 8.6
In subclassing UIView, the first step is to create subclass files and edit their code, but this step on its own isn't enough.
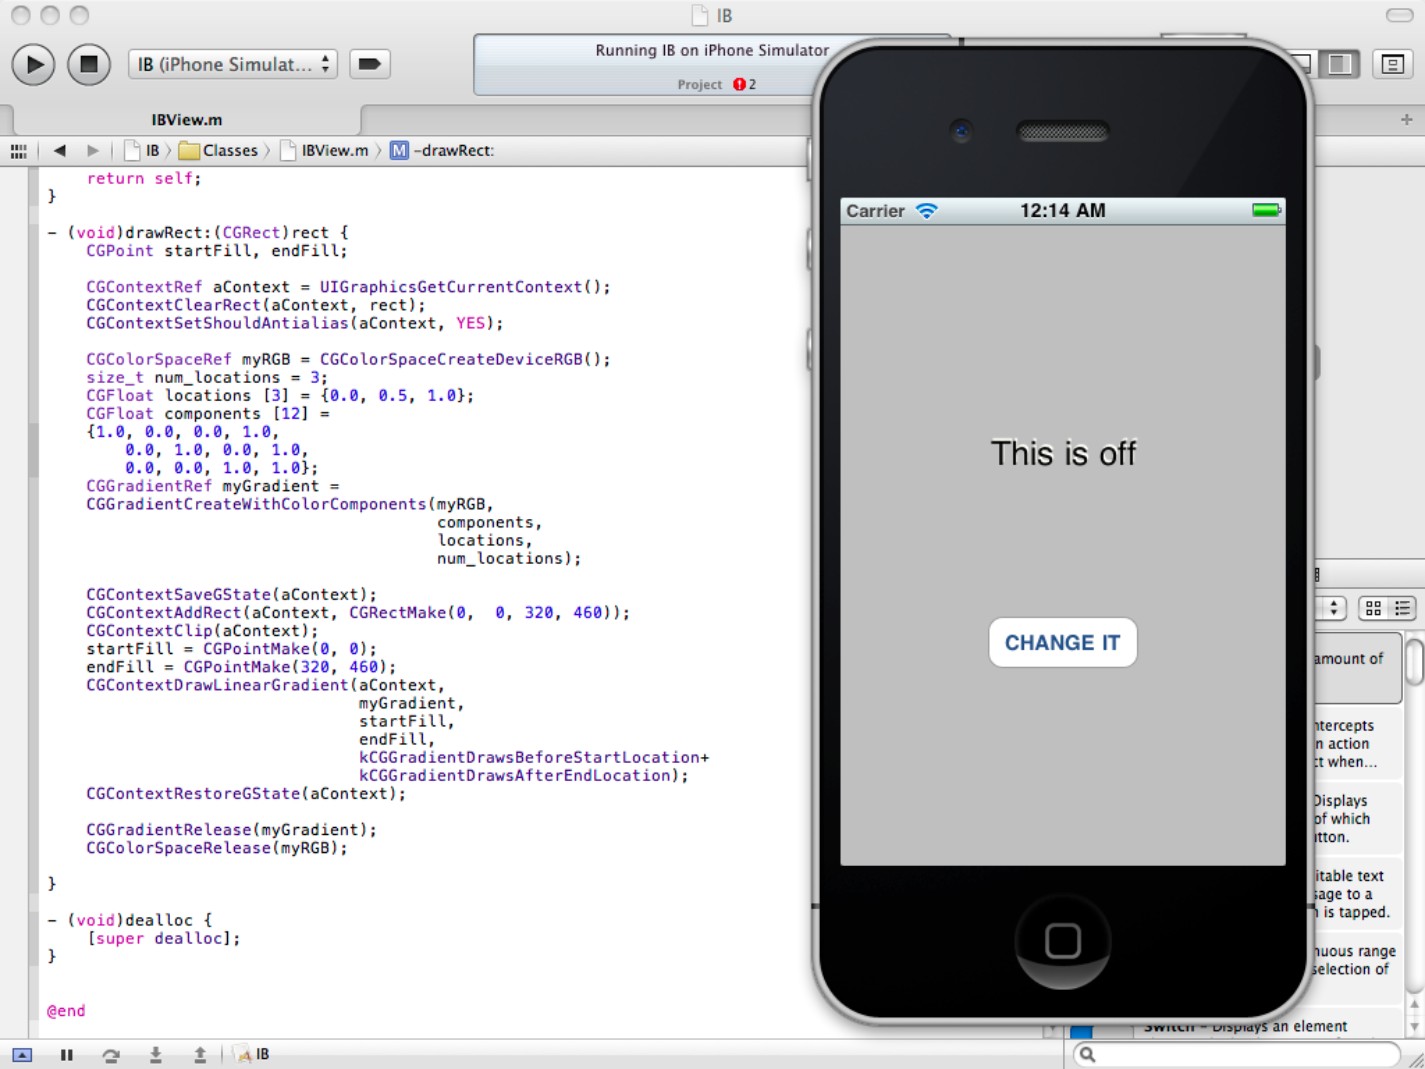
Figure 8.7 shows why. If you select the view in the nib file and look at the entry in the Class menu in the top pane of the Identity Inspector, you see it's set to UIView. When the application launches, it ignores the new code because the nib file still creates an instance of the original unmodified version of UIView.
Figure 8.7
In subclassing UIView, the final step tells IB that the view is now an instance of the new IBView subclass. This runs the code in the subclass and enables your new customized features.
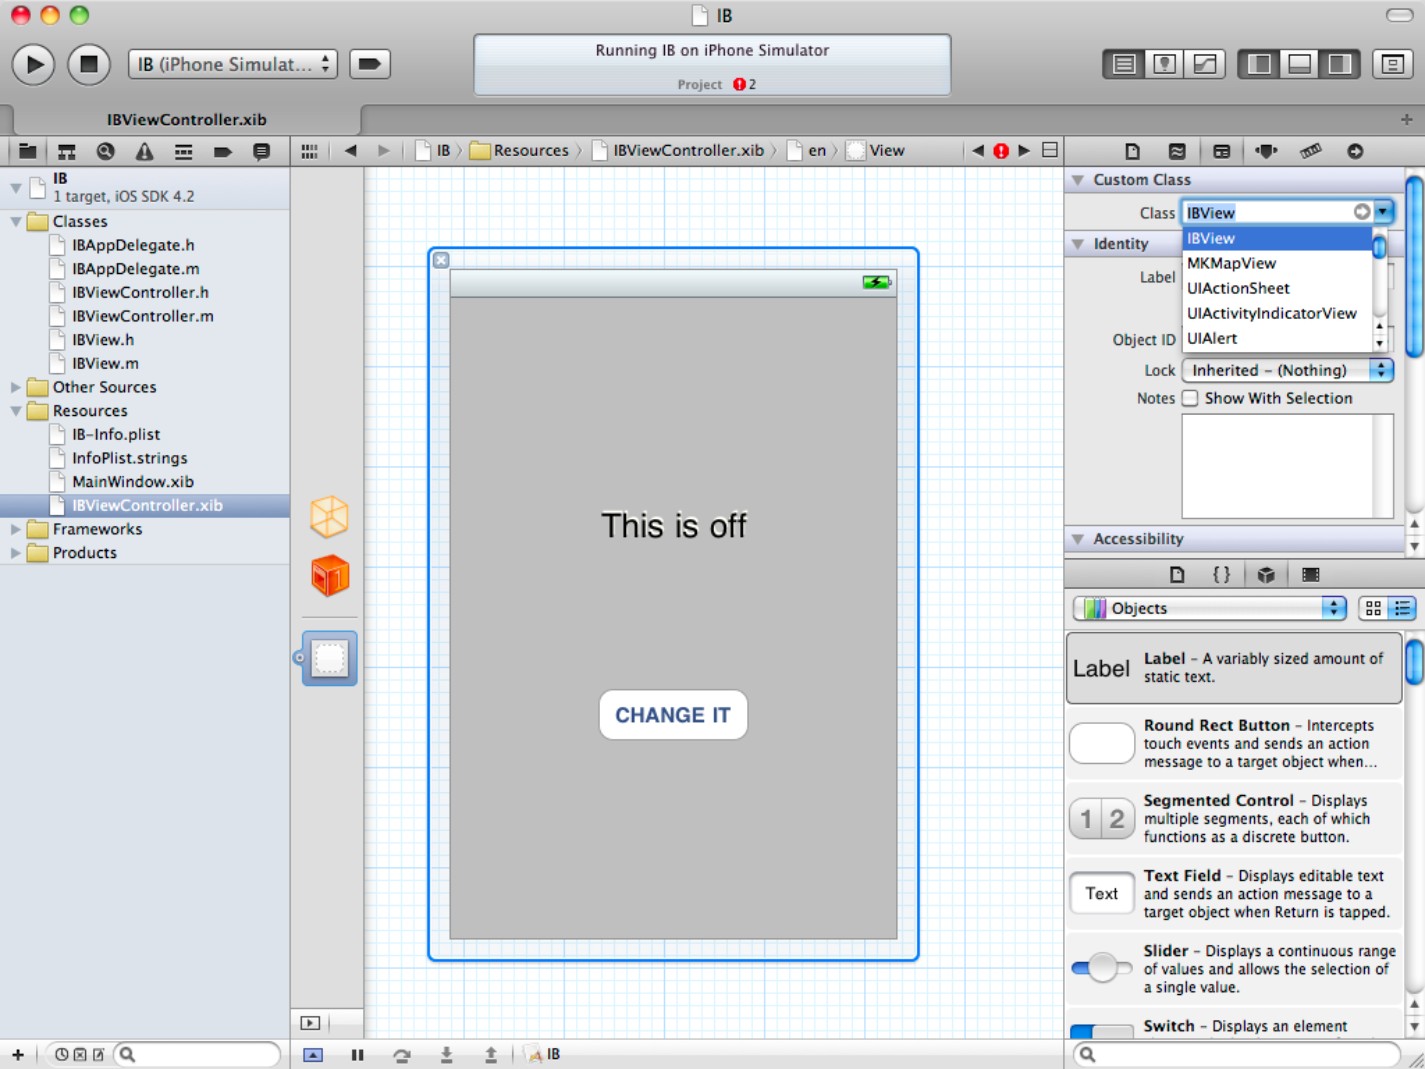
To fix this, we tell IB to create an instance of the new subclass, also known as assigning the subclass. Click the top-right menu as shown in the figure, and scroll down until you find IBView in the list. Click it to assign it. Now the nib file is set up correctly, and it loads the new subclass on launch.
Figure 8.8 shows the result. The UIView draws a colored gradient behind the other items.
![]() TIP
TIP
Whenever you select an object in the IB editor, the class identity list is updated to show all its valid subclasses. This listing is indiscriminate, and you can do nonsensical things such as assigning UIWindow as the designated subclass of your new UIView. In most applications, you can ignore most of the items in the list and simply look for your newly added subclass.
Figure 8.8
Running the subclassed view. The code added to the subclass creates a gradient fill.

Working with more advanced subclassing techniques
The following techniques are more specialized. You may not need to use them at all, but it's useful to know they're available.
Adding User Defined Attributes to a subclass
If you subclass an object in the IB library, it automatically inherits that object's attributes. For example, a subclass of UIViewController includes options to set a default orientation and a status bar, a top bar, and a bottom bar. You can't change these attributes, and you can't add further attributes of your own.
But not all Cocoa and Cocoa Touch objects have IB attributes—in fact most objects don't. How can you set initial values for these objects?
One option is to use code. But IB includes a User Defined Runtime Attributes feature, illustrated in Figure 8.9. Objects without “official” attributes include a general purpose keypath, value, and type editor in the Identity inspector. You can add initial values/types here, and they're loaded and set when the nib loads.
Each item is equivalent to running the setValue: forKeyPath: method on an object. In the figure, the example has the same effect as adding
[self setValue: @”Initial string” forKeyPath: @”myKeyPath”];
to an init method in the application delegate. Supported types include strings, localized strings, Booleans, numbers, and nil.
Figure 8.9
Adding custom attributes to an object

![]() CAUTION
CAUTION
In the first release of Xcode 4, this feature wasn't working correctly. In Xcode 3 it was available for OS X only. It's likely to be fixed in a future release—but check it before you use it.
Subclassing File's Owner
Note that you can follow the steps given above to subclass File's Owner. Typically, you don't need to do this unless you want to add features to the NSApplication/UIApplication classes, or you have a complex nib hierarchy and you need to add code to an element buried in the view hierarchy. For simpler apps, you can leave the default File's Owner class assignments unchanged. But it's useful to remember that even though File's Owner is a placeholder, you can still set its class using the Identity Inspector.
Creating Custom Objects
Sometimes you want to reuse custom objects in other projects. To simplify this, you can add your own objects to the Object Library in IB. But it isn't usually necessary to do this. Even if you reuse objects, it's often simpler to import them again and subclass them again than it is to create a stand-alone plug-in.
A plug-in has two advantages: The object can be added quickly with drag and drop, and it can include a custom Inspector pane for properties. You should consider a plug-in if the following conditions exist:
![]() You plan to sell or distribute it as part of a library of custom objects.
You plan to sell or distribute it as part of a library of custom objects.
![]() You are working with a development team and need to prepare one or more objects independently, but you aren't responsible for their use in applications.
You are working with a development team and need to prepare one or more objects independently, but you aren't responsible for their use in applications.
![]() The objects require significant initialization, which is more easily done with a custom Inspector pane than in code.
The objects require significant initialization, which is more easily done with a custom Inspector pane than in code.
![]() The objects will be reused over and over in many applications.
The objects will be reused over and over in many applications.
Creating custom objects is a project for intermediate and advanced developers and is outside the scope of this book. If you have experience with custom frameworks you can find the official documentation by searching online for Interface Builder Plug-In Programming Guide.
Creating Views with Static Images
Subclassing is a very powerful technique, and you can use it to customize any of the standard views and controls. For example, by subclassing UIButton and adding custom drawing code controlled by a timer, you can create buttons with pulsing dynamic color animations. As mentioned earlier in this chapter, some classes are easier to modify and extend than others. But as a rule, subclassing is more likely to be limited by your ability to imagine creative effects than by the limitations of iOS or OS X.
However, subclassing takes time. It's often useful to create simpler results such as a UI with a static fixed background. IB includes features to help you design and preview these less complex effects.
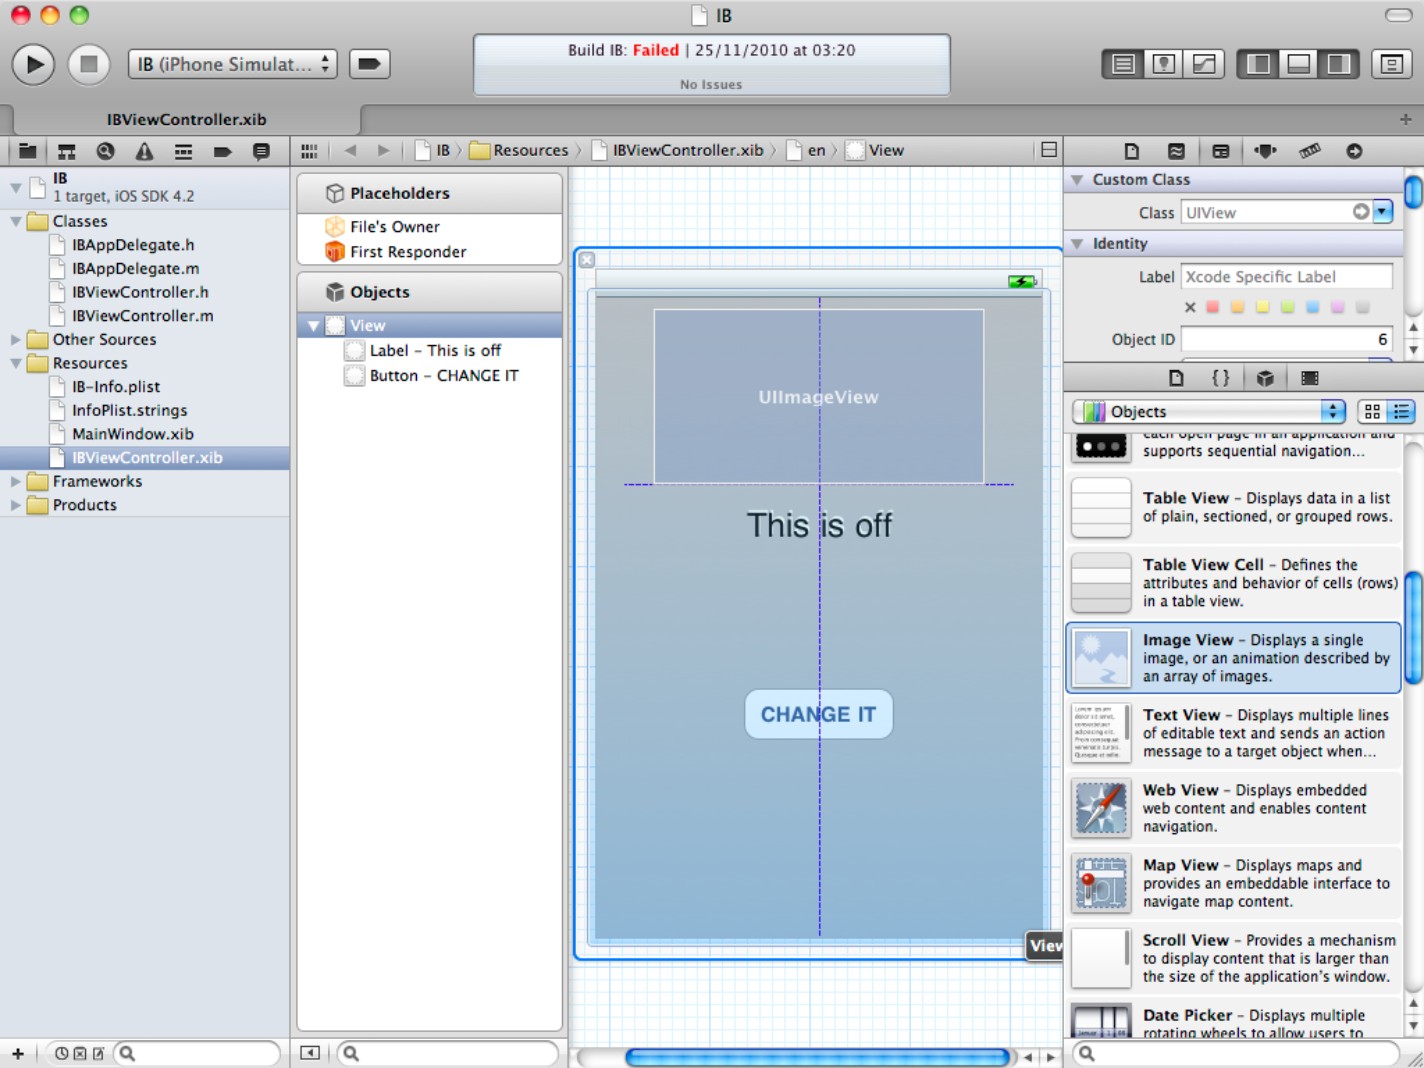
To create a static background to an iOS project, use a UIImageView object. Drag and drop it on the UI as shown in Figure 8.10. Then drag its position in the object list so it's behind the other objects and higher up the list. If you don't do this, the image view hides the other objects, which usually isn't what you want.
By default, the image view doesn't fill the UI. You can resize it manually by dragging the edges and corners, or you can use the Fill Container Horizontally and Fill Container Vertically options in the Arrange menu in the Size Inspector to expand the image to cover the available background space in the view.
Figure 8.10
Adding an image view to a UI is ideal for wallpaper and for static colored backgrounds.
Creating a colored background
The image view doesn't have to contain an image; you can use it to create a static colored background. To select a preset color, click the blue up and down arrows at the right of the Background menu. You see the list shown in Figure 8.11, which displays standard system colors.
While black, white, and gray appear as you'd expect, some of the background colors are more or less obviously textured. For example, the Group Table View Background Color includes vertical stripes, and the Simulator may not always display this accurately.
To set a custom color, click in the area to the left of the menu's up and down arrows to reveal a standard OS X Color Picker. Use the controls to select a color for the image view in the usual way. You can change the opacity for special effects.
![]() CAUTION
CAUTION
Some of the textures look good, but textures may be OS dependent, and they may not appear correctly in the Simulator. If you build an app that supports an older version of iOS, users may not see what you expect them to. To test this, keep one or more hardware test units running older versions of iOS. Differences aren't usually critical, but it's useful to be aware of this issue.
Figure 8.11
Setting a static background color

![]() TIP
TIP
To make the image view transparent, select the Clear Color from the default list or set the Opacity to 0 in the Color Picker. Occasionally, you may want to include a dummy view that collects and processes events before passing them on to other objects. To do this, use a transparent view managed by its own subclass code.
Importing an image file
For more complex static effects, you can import an image file. This example demonstrates how to import a file for a full-sized background view that creates a wallpaper effect. The procedure for customizing button graphics is very similar.
You also can extend the procedure to create custom objects such as radio buttons or game tokens. Active features require extra code.
To add a media file, right-click the Resources group in the Project Navigator and select Add Files to <Project Name>… When the dialog box shown in Figure 8.12 appears, navigate to a suitable file. In this example, the project uses a PNG file prepared in Adobe Photoshop and pre-trimmed to 320x460 pixels.
![]() TIP
TIP
You can use a file with almost any reasonable dimensions and rescale it manually in IB by dragging the edges and corners. For best results, create a file with the correct dimensions. You can even align the image view outside the boundaries of the UI to show one corner or side.
You can add the contents of one or more complete folders from this dialog box and optionally create a group for each folder. You also can choose to copy the file into the project or to create an indirect reference. For this project, select the Copy option.
Figure 8.12
Use this procedure to import any media file, including graphics, sounds, HTML content, text, and so on.

After import, you see the file in two places, as shown in Figure 8.13. It's added to the Resources group in the Project Navigator. It also appears in the Media Library, which is selected by the icon at the top right of the Library area. If you add further files, they appear in both locations.
In a complex project with many media files, it can be useful to create new groups to collect related media files into one location. You also can create a group for each class and include any associated media files, perhaps in a sub-group to simplify navigation.
Figure 8.13
After import, the new file appears as a Resource and is added to the Media Library.

![]() TIP
TIP
Although Xcode doesn't include an image editor, it does include a raw hex file editor. Select the Open As⇒Hex option to view any file's raw hex data.
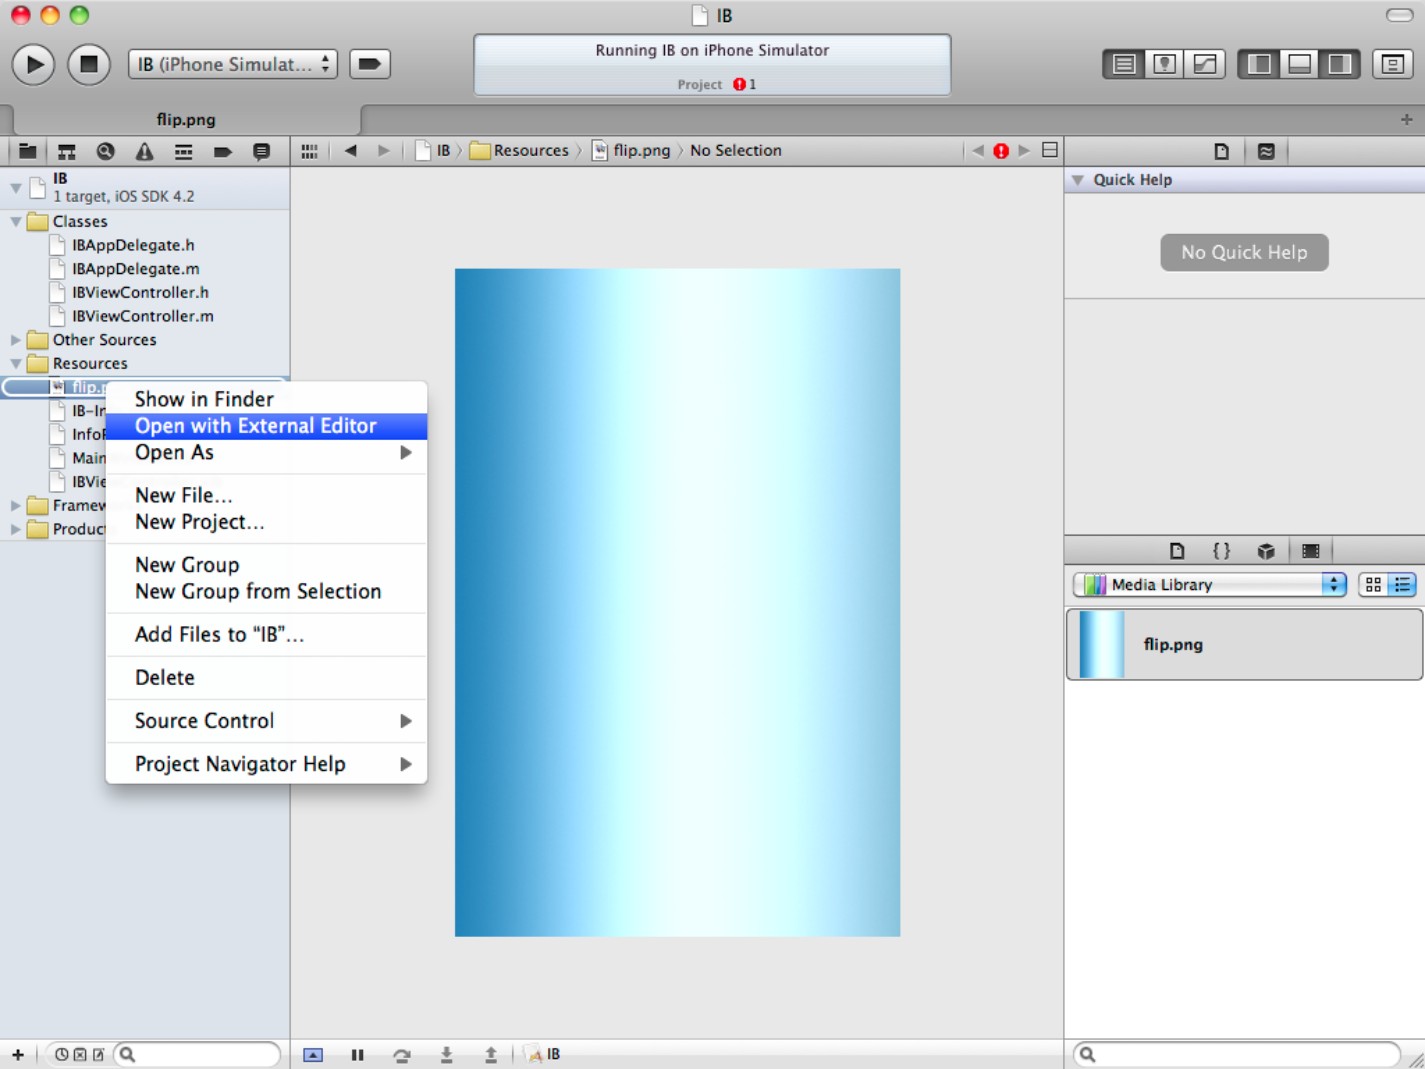
If you click the file in the Resource group, you see the preview shown in Figure 8.14. Xcode doesn't support internal editing of media files, but you can right-click any file and select Open with External Editor to load an editor that isn't built into Xcode. If you save the file afterward, Xcode reloads the new content automatically.
Figure 8.14
Previewing a media file, and selecting an external editor for changes
Assigning an image file
Figure 8.15 shows how to assign the image file to the image view. In the Attributes Inspector, select the image from the Image drop-down menu. All compatible images loaded into the project appear here.
Figure 8.15
Assigning an image file to the image view

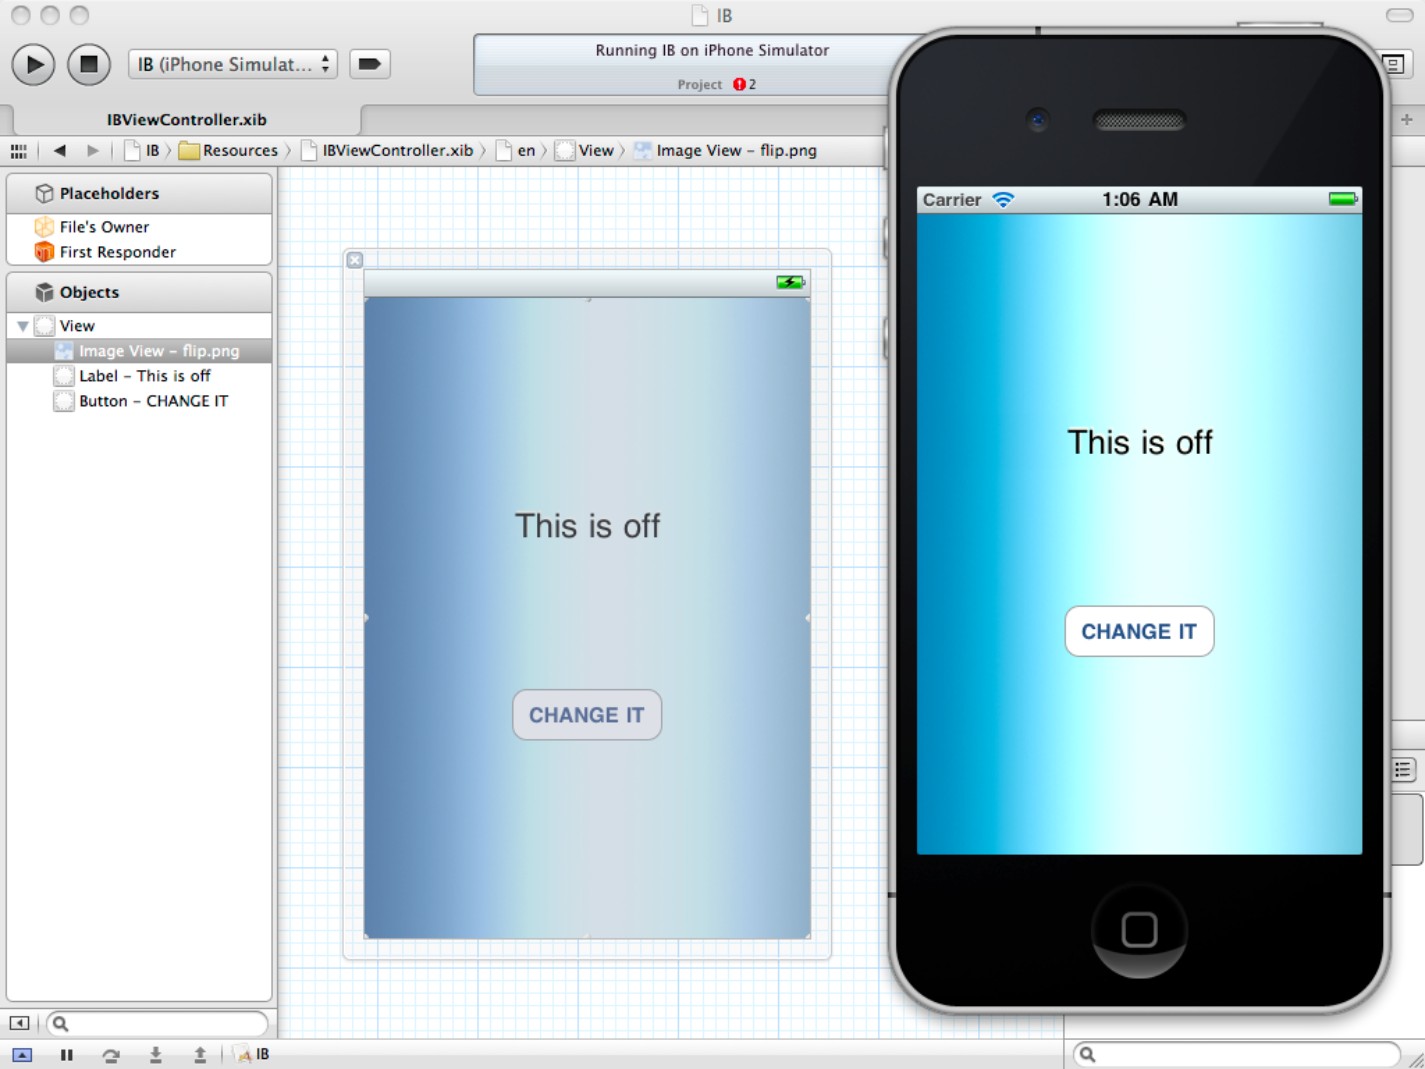
Once assigned, the image view loads the file automatically when the app runs. No further code is needed. You also can preview the image in place in the UI, although certain features such as PNG transparency may not work reliably. Figure 8.16 shows the result.
![]() TIP
TIP
To assign a custom image to a button, set the button type to Custom in the Attributes Inspector and assign the image file to the Background property—not the Image property. This is enough to implement basic highlighting, and the button darkens when tapped. Buttons have four potential states, but you can ignore the other states unless you're creating complex effects. The Background property defines the button's default look. You can layer the Image property on top of the button for more complex effects.
![]() NOTE
NOTE
Although OS X supports an NSImageView class that is similar to UIImageView in iOS, OS X applications are less likely to use background wallpaper. Images are usually used as decorative icons. The iOS Media Library is empty by default. The OS X Media Library includes a selection of standard icons and sounds that you can drag into your application without having to import them. Use the Image Well object with no border to duplicate the effect of an iOS image view.
Figure 8.16
The modified UI with background wallpaper, which Xcode correctly previews in the IB editor
Supporting Non-English Languages
Translating labels and messages into languages other than English is known as localizing an application. Localization improves an application's sales prospects, but it can be time-consuming and should be done selectively. Dialects of French and Spanish cover much of the non-English world and should be considered essential. Chinese is becoming an important market. Germany, Japan, and Korea have enthusiastic technology markets and are worth considering. Other languages can be supported as needed for specific applications and locations.
IB supports localization in two ways:
![]() Each supported language has a separate nib file, with custom labeling.
Each supported language has a separate nib file, with custom labeling.
![]() Each language also includes a .strings file with a dictionary of text strings, each of which has an associated key.
Each language also includes a .strings file with a dictionary of text strings, each of which has an associated key.
Creating these extra files is easy in IB. In the Project Navigator, select the main project tab at the top of the pane. Select Project in the adjacent pane, and select the Info tab in the main settings panel.
To add a language, open the Localizations sub-pane and click the Add (+) icon, as shown in Figure 8.17. Scroll down the long list to select the new language.
Adding a new language duplicates the current collection of nibs. It doesn't translate the contents. You must update the labels and other features of each nib manually. This may require expert input.
The new nib files are bundled with the application, and the nib loader reads a user's localization settings to select and load the correct nib for each country automatically.
Figure 8.17
Adding support for a non-English language

![]() TIP
TIP
Adding too many languages bloats the project with many almost identical nib files. Although Apple promotes multi-language support, realism suggests it's more practical to support the smallest possible selection of languages. As a workaround, you can use a single nib file and set the labels on launch with text loaded from the .strings file. This option takes longer to code, but is easier to expand and creates a much smaller final bundle.
IB doesn't support non-English text unless you're already using a non-English keyboard. Use the Character Viewer utility shown in Figure 8.18 to add accents, special symbols, and letters from non-English alphabets. To open the Character Viewer, select the Keyboard item in System Preferences and enable the Show Keyboard & Character Viewer in menu bar option. Click the flag icon that appears in the menu bar, and select Show Character Viewer from the menu. Select special characters as needed, and use the Insert button to add them while editing text.
Figure 8.18
Using the Character Viewer utility to add non-English characters to a nib

![]() Caution
Caution
Not all fonts support all characters. You may need to use special non-English fonts for languages such as Chinese, Japanese, and Korean.
![]() TIP
TIP
Managing localization strings can be painfully time-consuming. Xcode includes two command-line tools to simplify the process. ibtool can read through a nib and create a list of visible strings. You can then send the strings to a translator. When done, ibtool can fold the translated strings back into another “translated” nib. genstrings is a similar tool, but it works on source code files. For details see the man pages or search for examples online.
Working with Advanced IB Techniques
IB is a deep application with many hidden features. There isn't room to explore them all—in fact, hardly anyone uses IB to its fullest possible extent. But it's worth becoming familiar with some of the more accessible advanced techniques.
Using tags
Many IB objects include a Tag field, as shown in Figure 8.19. You can use this field to search a nib—or more usually, a view in a nib—to find a matching object. For example, to find the button in the figure you might add the following code to the view controller:
UIButton* theButtonImLookingFor
= (UIButton *)[self.view viewWithTag: 101010];
Typically you wouldn't do this for simple object updates—outlets are a better option. But tags can be very useful when you work with table views. You can create cells dynamically and use tags to define how they're displayed—for example, to create cells with alternating colors. Tags can also be a good way to manage UI elements when you generate them in code without using IB at all.
Figure 8.19
Defining a tag for a UI button

Sending messages between nibs
It's often useful to send messages between objects in different nibs. It isn't trivially easy to do this—some setting up is always required. But it's not a difficult problem.
One common solution is to pass messages through First Responder. Optionally, you can add custom methods to First Responder by clicking it, selecting the Attributes inspector, and adding an action as shown in Figure 8.20. Add the action code to one of the classes in the responder chain. You can then link the custom action to buttons, menus, and other IB message-generating objects in the usual way.
This can be a useful way to leapfrog across objects in the responder hierarchy. For example, if you want to create a button that sends a message to a window rather than a view controller, subclass the window and add a responder method to it.
![]() NOTE
NOTE
There's only one First Responder item in an application. Although it appears in every nib, it's the same item. (File's Owner is different for every nib.)
![]() CAUTION
CAUTION
Objects with custom methods must be plugged into the responder chain correctly—otherwise messages disappear and are ignored. It can take longer to add the code that ensures an object supports first responder status correctly than to create the responder methods.
Figure 8.20
Adding a custom action to First Responder

Converting iPhone projects to the iPad
Because there are so many differences between the two platforms, there's no simple automatic way to convert an iPhone project into an iPad app. However, Xcode includes a minimal transitioning feature that can help you begin the conversion process.
The converter relies on the fact that iPad and iPhone apps load different nib files at launch. It takes an existing iPhone launch nib and creates a new launch nib from it for the iPad. This is enough to create a basic universal app that runs on both platforms.
![]() NOTE
NOTE
The Window-based template creates two separate app delegate files and two starting nibs. Converted iPhone apps also have two nibs, but the main window is controlled by a single shared app delegate which remains unaltered. This is usually easier to work with; app management code is shared, not duplicated. Similarly, it's possible to create a single shared controller that's aware of which platform it's running on. This is more efficient than creating two controllers with similar code.
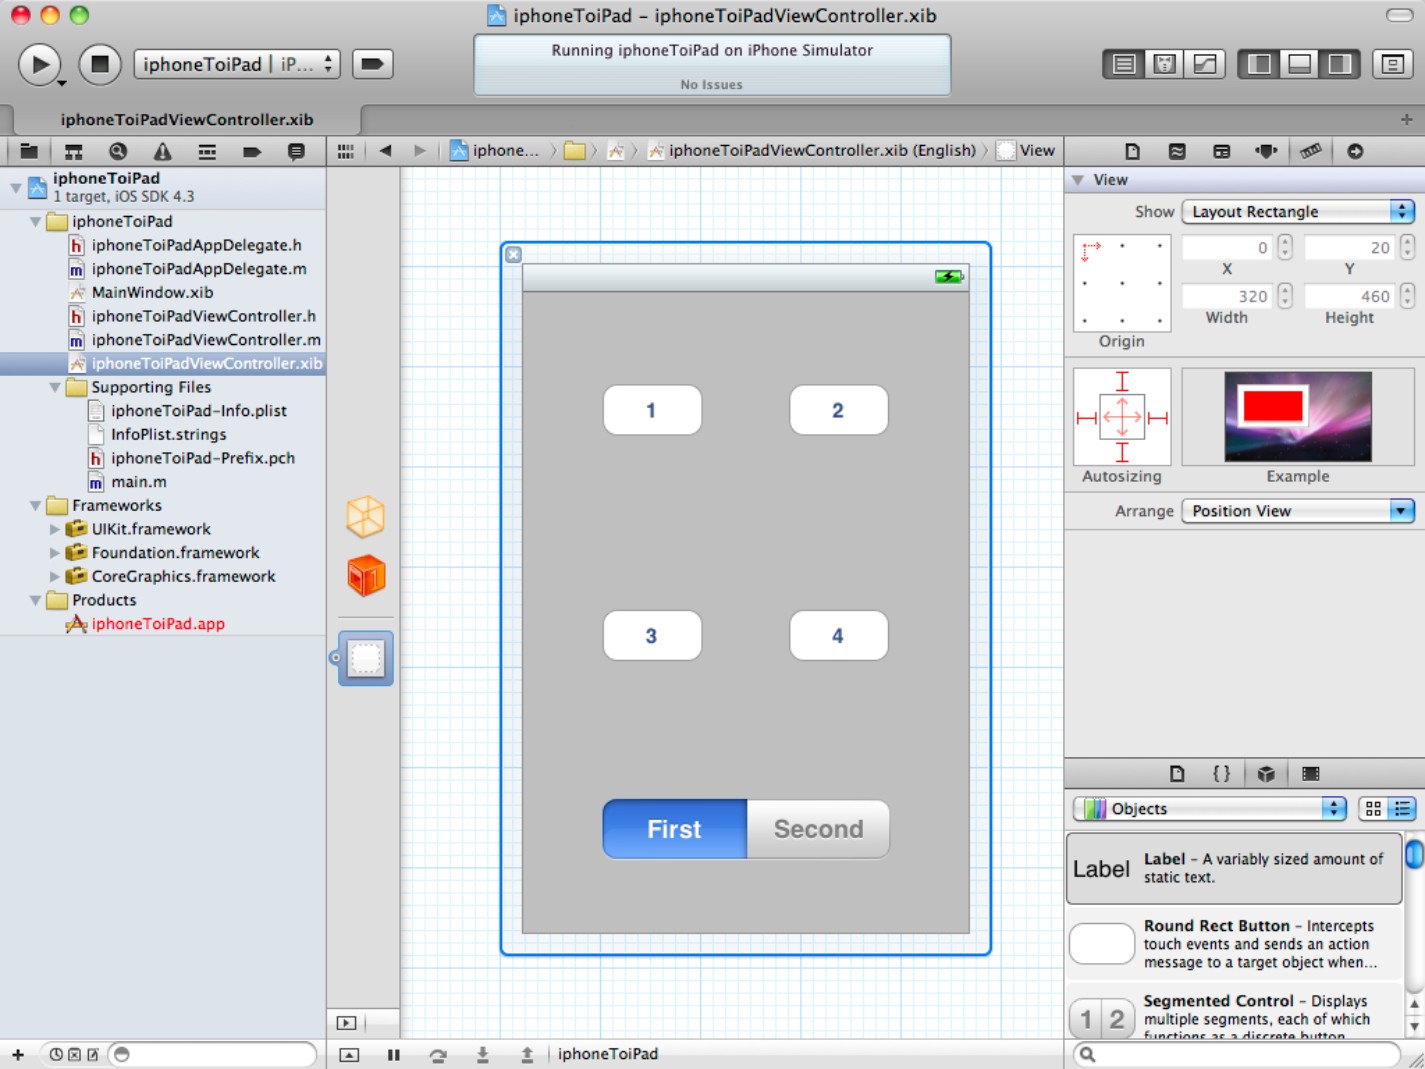
The best time to convert an app is when it's finished. Figure 8.21 shows a dummy iPhone app UI that stands in for a finished app for this demonstration. You can start with an existing app of your own, or you can load any of the templates. The exact contents of the app don't matter.
In this example there are two nib files. One defines the main window, and the other defines the UI and also instantiates the view controller.
Figure 8.21
Getting ready to convert an iPhone app to the iPad
To convert an app, click the project name at the top left of the Project navigator. Select the app under the Targets icon. Select Universal from the menu, as shown in Figure 8.22. (You can also select iPad, which creates an iPad-only version.)
Note that this feature isn't prominent. In Xcode 3, you could select a conversion option from the Project menu. In Xcode 4, you have to know that this feature exists, and where to find it.
Figure 8.22
Selecting the new format

Select Yes in the confirmation dialog. Xcode creates a new group called iPad and adds a new file called MainWindow-iPad.xib to it. This nib is formatted and tagged as an iPad launch nib. You can now run the app in the iPad Simulator, as shown in Figure 8.23.
![]() CAUTION
CAUTION
There's more to an iPad nib than larger dimensions. Nibs contain device information, so you can't simply resize an existing iPhone nib by hand. The converter handles the hidden details for you.
Figure 8.23
Running the converted app in the iPad Simulator

You can see from the illustration that formatting is haphazard. Given the extra space, it's usual for iPad apps to have more features than their iPhone equivalents. A minimal UI that works well on the iPhone can look comical on the iPad, unless you redesign it.
Note that if you run in the iPhone Simulator, the original app loads as before. Only the main window has changed. The view controller remains the same, but you can now extend it with iPad-specific features.
Summary
This chapter introduced the File's Owner and First Responder placeholder objects and explained their role in UI design and event management. It demonstrated how to customize objects by subclassing them and how to assign subclasses to visible objects in IB. It showed how to create simple static background images in IB with flat colors or image files and introduced IB's localization features, with support for non-English nib files. Finally it explored some more advanced applications of IB, including universal iPhone/iPad development.