
Chapter 5: Working with Files, Frameworks, and Classes
In This Chapter
Adding new files to a project
Working with groups
Working with frameworks
Xcode projects include a list of constituent files. When you build a project, Xcode processes each file in turn. Source code files are compiled into binaries and linked together. Resource files are copied to the project's output folder, also known as its bundle.
Each step in the process is known as a build phase. If your project has special requirements, you can customize the build phases or create custom build phases—for example, to compile source code in a specific sequence, allowing for dependencies. More typically, you can use the default build phases as they are.
You can define the files included in a project in two ways. The simple way is to use the file management features built into the Project navigator. For more advanced management, you can use the features introduced in Chapter 13 to customize Xcode's default build phases. For simple apps, you can usually ignore this option, because the build phases “just work.”
![]() CROSS-REFERENCE
CROSS-REFERENCE
For more information about custom builds and build phases, see Chapter 12.
Working with Files and Classes
The Project Navigator includes all the features you need for basic file and class management. The Navigator is easy to work with, but it's worth emphasizing again that there is an indirect relationship between the files and folders (or groups) that appear in the Navigator, and the contents of the project folder on disk.
When you create a new Xcode project, the new files are added to a single folder. But this is a convenience, not a necessity.
You can create a working project where the “official” project folder is empty, and every file is in a different physical folder. Project files don't have to be local; they can be anywhere on disk or on a network. This makes it easy to reuse source code and create libraries. The same library code can be referenced from multiple projects without copying.
This applies equally to C/C++ source code, Objective-C class definitions, and resources such as graphics files. If you use a library of custom icons or button graphics, you can keep the image files in a single folder and import them into multiple projects as needed.
There are advantages and disadvantages to keeping files in multiple locations. The advantage is that you can keep single copies and reuse them in multiple projects. The disadvantage is that it becomes harder to keep safety copies of the files in a project. It also becomes harder to use the source control management (SCM) features introduced in Chapter 14.
![]() CAUTION
CAUTION
Typically after you build a project, Xcode copies graphics files into the application bundle. OS X allows your applications to create and access a common resource folder outside of the bundle. iOS doesn't. Be careful about adding files to an iOS project. To minimize the size of the finished app, add only files that are used. Don't add complete folders or resource collections.
Adding new files to a project
To save time, Xcode includes a selection of file templates that add prewritten content, including classes with headers and implementation files that include minimal but useful boilerplate set-up and tear-down code.
The templates are similar to the application templates introduced in Chapter 3. Instead of creating a complete application, they add a useful building block to an existing application. The templates for iOS and OS X are slightly different, but they overlap significantly—much more than for the equivalent application templates.
You can add new files to a project in two ways: using Xcode's New File menu option or by dragging and dropping the file from a template in Xcode's Utility area.
Using the New File menu option
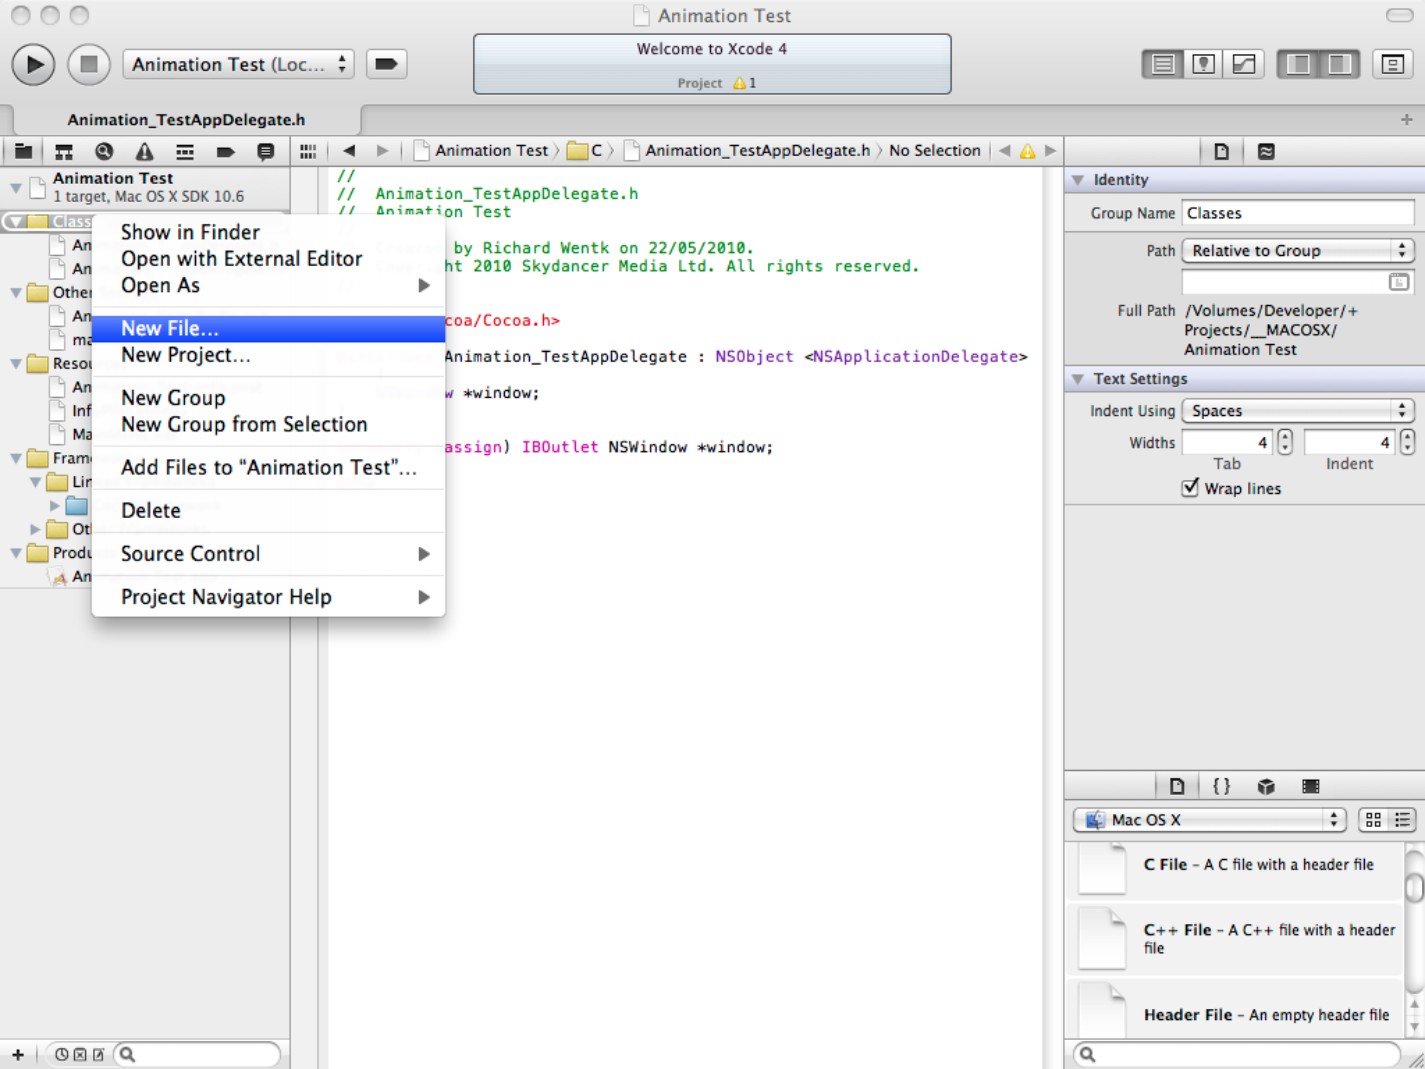
You can select the New File menu option from the main Xcode menu via File⇒New⇒New File. You can also right-click in or on a group and select New File from the contextual menu that appears when you right-click on a group, as shown in Figure 5.1.
Figure 5.1
Adding a file using the New File option
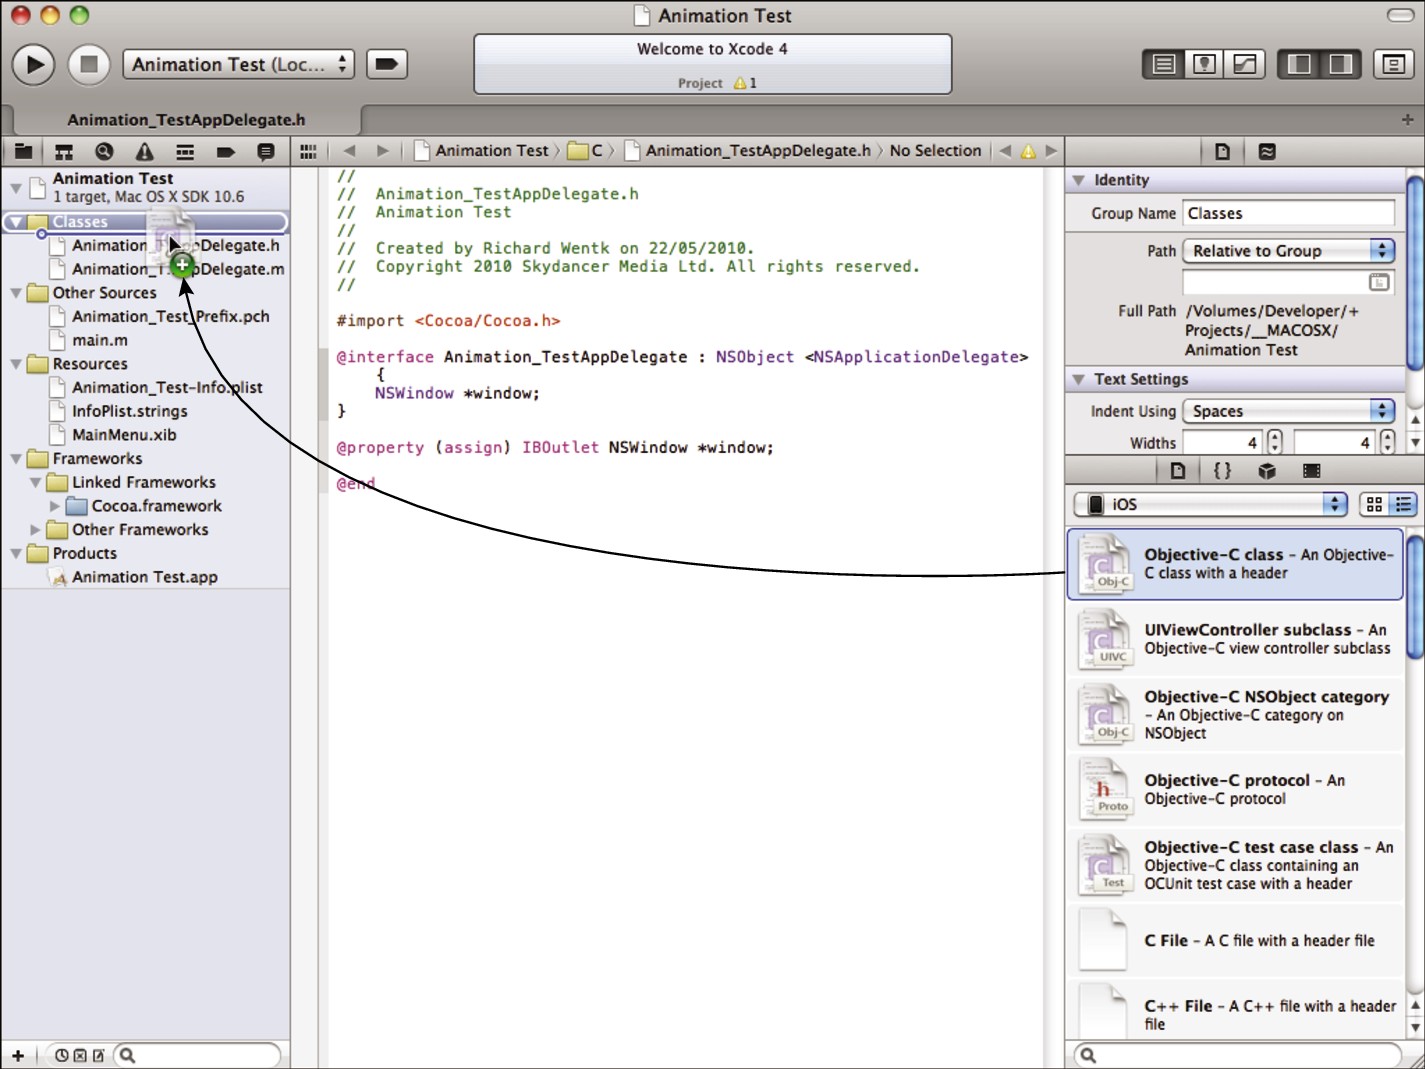
Selecting New File displays the file template list, shown in Figure 5.2. You can select OS X or iOS templates from the list and then choose sub-types from the two panes at the left.
Figure 5.2
Selecting the file template from the iOS and OS X panes

Use the Save dialog to name the file, as shown in Figure 5.3. By default the file is added to the project folder. Optionally, you can choose to save it to a different location. After this dialog box disappears, the file is added to the Project Navigator inside the group that you right-clicked.
![]() NOTE
NOTE
To emphasize again, the file always appears in the Project Navigator, no matter where you save it on disk. For practical reasons, it's a good idea to save project files to the project folder. You don't have to do this, but if you don't, you may have to keep track of file locations by hand. If you move the project folder to a different location, Xcode may not be able to adjust its file references, and the project may not build.
Figure 5.3
Naming the new file before saving it
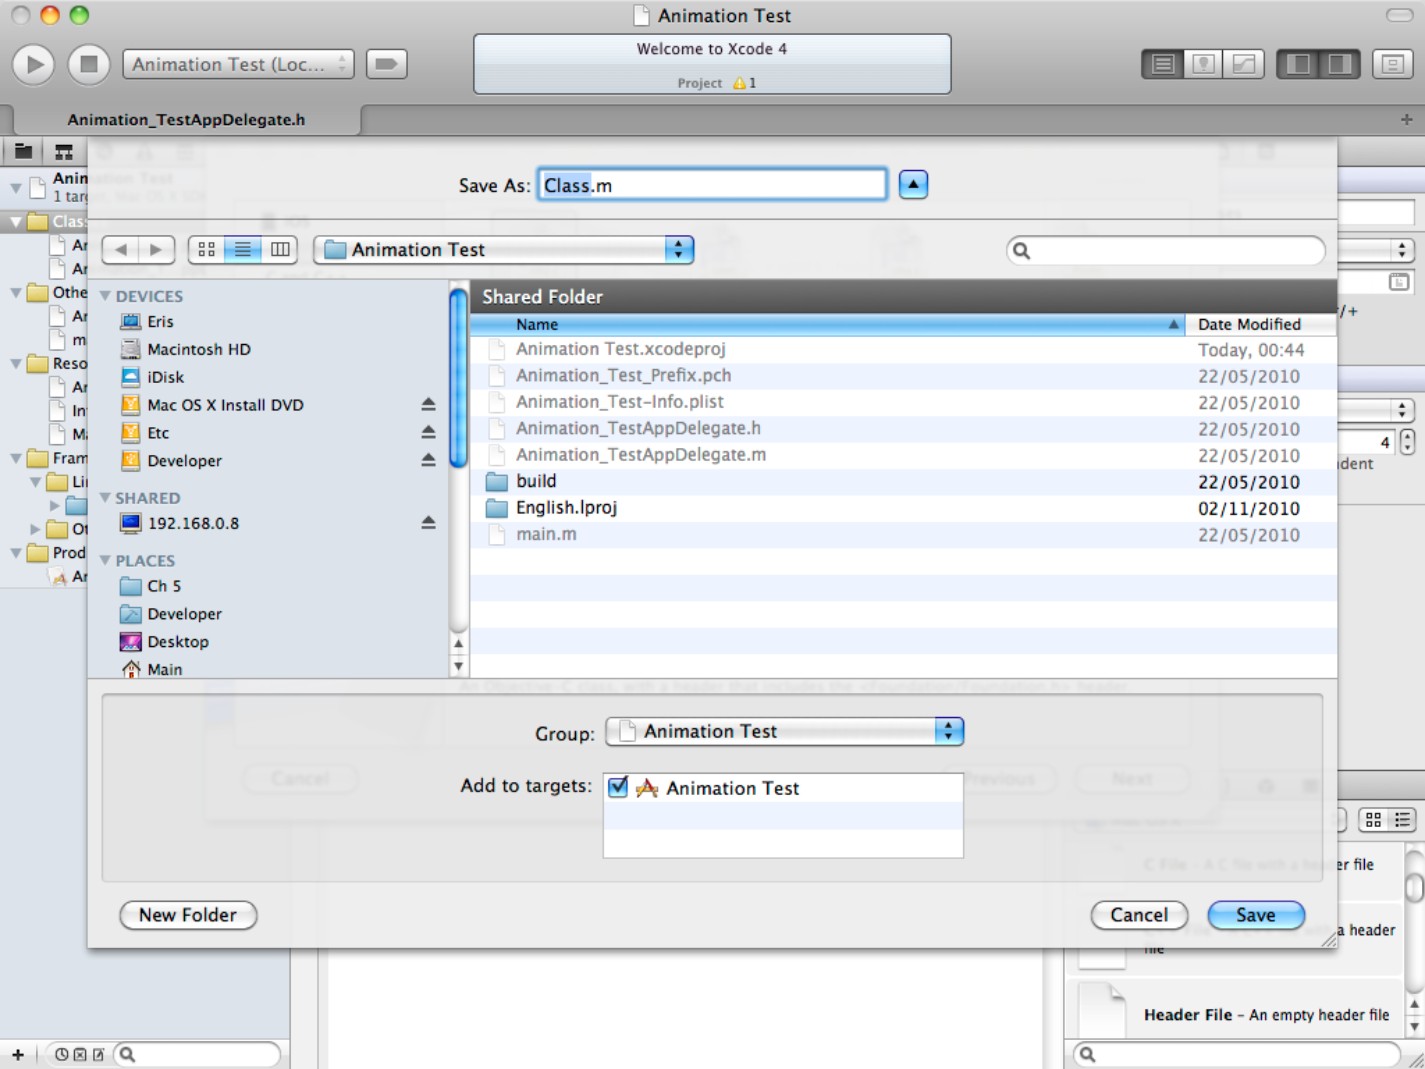
![]() NOTE
NOTE
You can use the Add to targets option to define which targets the file will be added to. Simple apps typically have a single target, so you can ignore this feature. For more information about targets, see Chapters 12 and 13.
Using drag-and-drop from the Utility area
To use the drag-and-drop feature, select the File Template Library icon if it isn't already selected. Optionally, you can select the iOS or OS X sub-libraries, as shown in Figure 5.4. This is a recommended step. If you don't select a sub-library, the menu lists the iOS templates, followed by the templates for OS X. Although the templates for both platforms appear similar, most are incompatible, and you should filter them to ensure that you're making a selection from the correct list.
Figure 5.4
Selecting iOS or OS X file templates

With the drag-and-drop option, you can select a template and drop it directly into any group, as shown in Figure 5.5. The naming/saving step is identical to that shown in Figure 5.3.
Figure 5.5
Adding a file with template drag-and-drop
Comparing the New File and drag-and-drop options
The drag-and-drop option is quicker and simpler than using New File, because it skips the two steps shown in Figures 5.1 and 5.2. However, for certain file types, the New File option reveals extra features that aren't available with drag-and-drop.
For example, Figure 5.6 shows the extra check boxes that appear if you use New File to add a view controller to an iOS project. In this example you can use these check boxes to create an iPad-compatible class, with an associated nib file. If you use drag-and-drop, these options don't appear.
Figure 5.6
These extra features available when using the New File option don't appear when using drag-and-drop.

Naming new files
Xcode doesn't enforce a naming convention for new files, so it's up to you to name files using a scheme that works for you. By default, the class files are named class.m and class.h, which is unhelpful, especially if you use more than one class.
It's good practice to include both the project and functional class name in every new class; for example, a new view controller for the flip view in an iOS project might be called FlipsideViewController. Terse and obscure names such as AClass or MyClass will confuse you later and are best avoided.
Adding a new class
When you add a new Objective-C class, Xcode automatically adds a header file to the project. Where needed, it also adds a matching implementation file to the project. There are five templates for iOS classes and four templates for OS X classes, with significant overlap, as shown in Table 5.1.

![]() CAUTION
CAUTION
You can add iOS templates to OS X projects, and vice versa. For example, Xcode 4 allows you to add an OS X menu to an iOS application. The menu doesn't do anything because it isn't referenced by the code, but it's included—as a waste of space—in the app bundle. When you add new items, be careful to have the correct OS selected.
Adding new resources
Although it's often useful to add new windows and views to a project, the templates make this unnecessarily complex. It would be useful to add nibs and supporting source code in a single step, but the templates don't support this. Instead, you must add a suitable nib from a list of resource files and then add supporting classes manually.
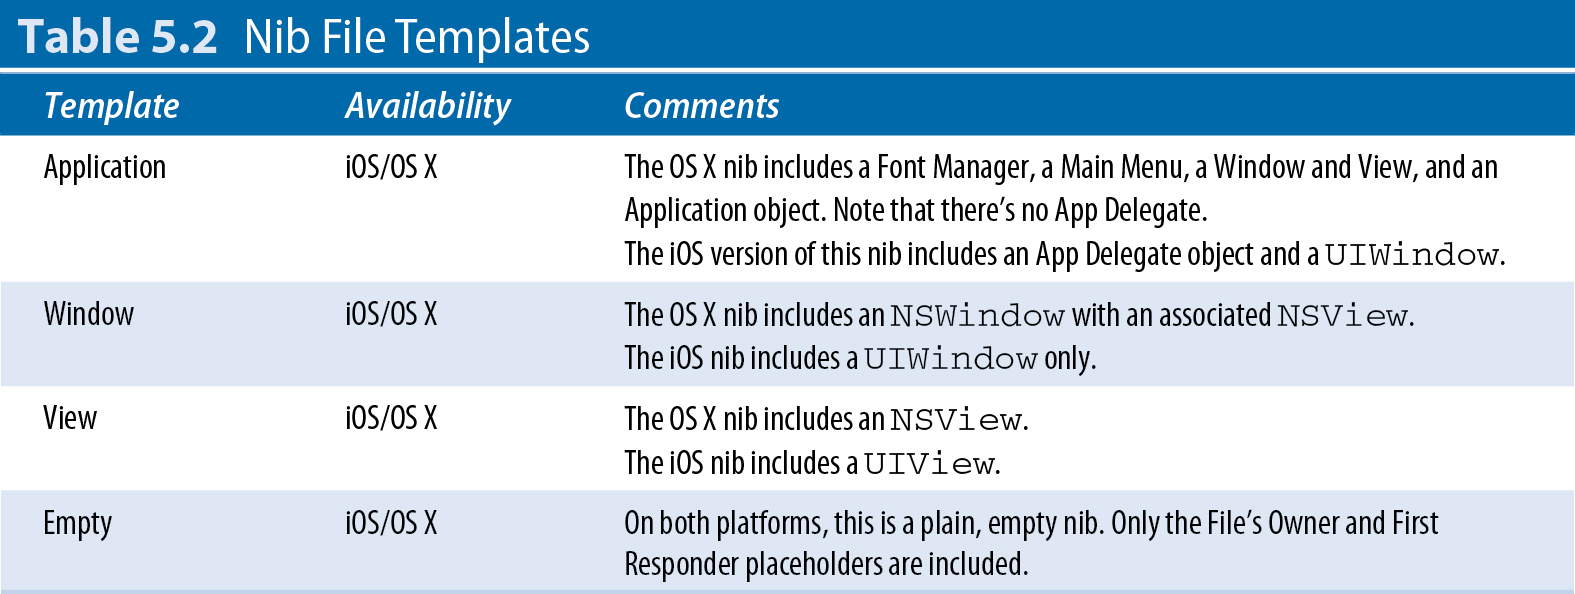
The one exception to this is the UIViewController subclass template for iOS, which creates source code files and an associated nib. For other tasks, you must add and edit the nib files by hand, add supporting class files separately, and then reclass the nibs so they're linked to the source code. For more details, see Chapters 7 and 8. Table 5.2 lists the nib files that are available.
Adding miscellaneous other files from the templates
The templates include a selection of other files. You can add them to a project in the usual ways.
![]() The C/C++ templates add a standard C or C++ pair of header and code files. You can import these into Objective-C code in the usual way. For more about working with these languages, see Chapter 12.
The C/C++ templates add a standard C or C++ pair of header and code files. You can import these into Objective-C code in the usual way. For more about working with these languages, see Chapter 12.
![]() The Shell Script and Assembly File templates support shell scripts and assembly code, respectively. You can run a shell script as part of a custom build. Assembly code is used for very specialized hardware-level coding.
The Shell Script and Assembly File templates support shell scripts and assembly code, respectively. You can run a shell script as part of a custom build. Assembly code is used for very specialized hardware-level coding.
![]() The Core Data templates include a Data Model file and a Mapping Model file. You can add these to projects that support Core Data. If your project doesn't use Core Data, you can ignore them. For details, see Chapter 13.
The Core Data templates include a Data Model file and a Mapping Model file. You can add these to projects that support Core Data. If your project doesn't use Core Data, you can ignore them. For details, see Chapter 13.
![]() Use the Rich Text File (RTF) and Strings File templates to add text-based data. The Strings file is used for localization—non-English language support. For details, see Chapter 12. The RTF file is a standard text file. You can use it to hold any string- or text-based data. For OS X applications, you can use an RTF file to define the information that appears in an application's About box.
Use the Rich Text File (RTF) and Strings File templates to add text-based data. The Strings file is used for localization—non-English language support. For details, see Chapter 12. The RTF file is a standard text file. You can use it to hold any string- or text-based data. For OS X applications, you can use an RTF file to define the information that appears in an application's About box.
![]() Settings and Property Lists (plists) include an empty XML plist file for general property preferences and settings. Both iOS and OS X applications already include an info.plist file with basic application details. The iOS templates include a separate Settings Bundle, which uses an iOS-specific format to define an app's settings and preferences.
Settings and Property Lists (plists) include an empty XML plist file for general property preferences and settings. Both iOS and OS X applications already include an info.plist file with basic application details. The iOS templates include a separate Settings Bundle, which uses an iOS-specific format to define an app's settings and preferences.
![]() Resource Rules and Entitlements are signed certificates that can be used to lock your application to specific hardware or software environments. For example, on iOS you can use these features to create an ad hoc build that runs on specific handsets for beta testing, bypassing the app store. Entitlements and code-signing are complex topics. For practical details, see Chapter 11.
Resource Rules and Entitlements are signed certificates that can be used to lock your application to specific hardware or software environments. For example, on iOS you can use these features to create an ad hoc build that runs on specific handsets for beta testing, bypassing the app store. Entitlements and code-signing are complex topics. For practical details, see Chapter 11.
![]() You can use a Configuration Settings File to create your own list of build settings for a project—for example, to create your own build setting defaults. For information about custom builds, see Chapter 12.
You can use a Configuration Settings File to create your own list of build settings for a project—for example, to create your own build setting defaults. For information about custom builds, see Chapter 12.
Deleting and renaming files
You can delete a file with the Delete key, or by right-clicking a file and selecting the Delete option from the contextual menu, as shown in Figure 5.7. When you delete a file, a dialog box appears asking you if you want to remove it from the project and leave it on disk (“Remove Reference”) or move it to the trash. If you leave it on disk, you can re-import it later if you change your mind about the deletion. This can be a good safety net for small projects, but on large projects, it's likely to clutter up the project folder with unnecessary files.
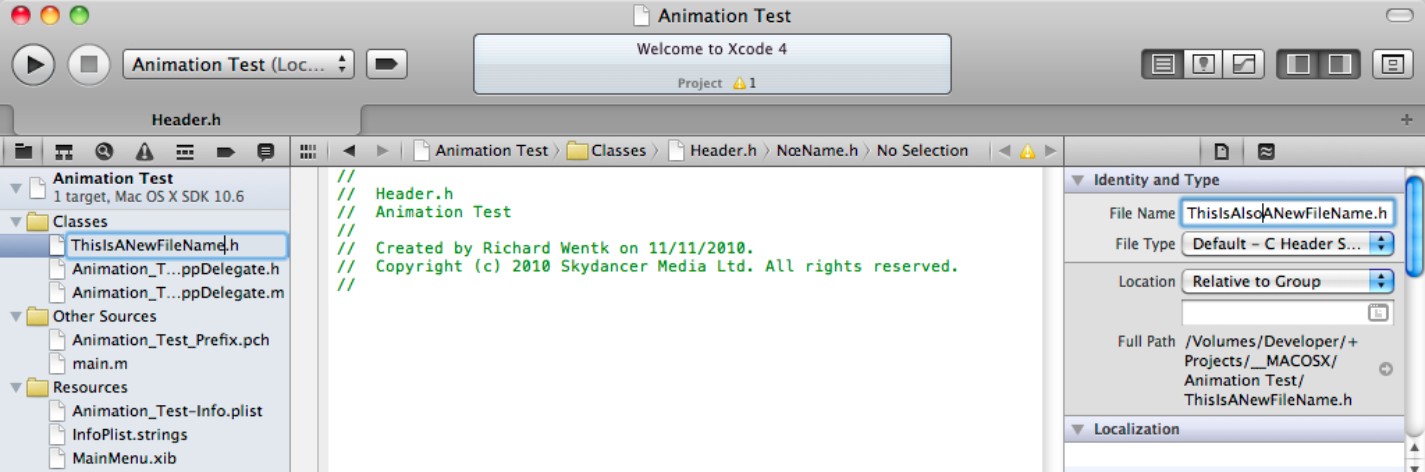
To rename a file, click once to select it in the Project Navigator and type in the new name. You also can enter the name in the File pane of the Utility area. Figure 5.8 is a composite that shows both options. Renaming a file changes its name in the project and also renames it on disk.
![]() CAUTION
CAUTION
File extensions are significant, but changing the extension isn't enough to change how Xcode processes the file during a build. If you need to change the type of a file and modify how it contributes to a build, select a new type from the list in the File Type drop-down menu in the File pane of the Utility area.
Figure 5.7
Deleting a file using the right-click contextual menu
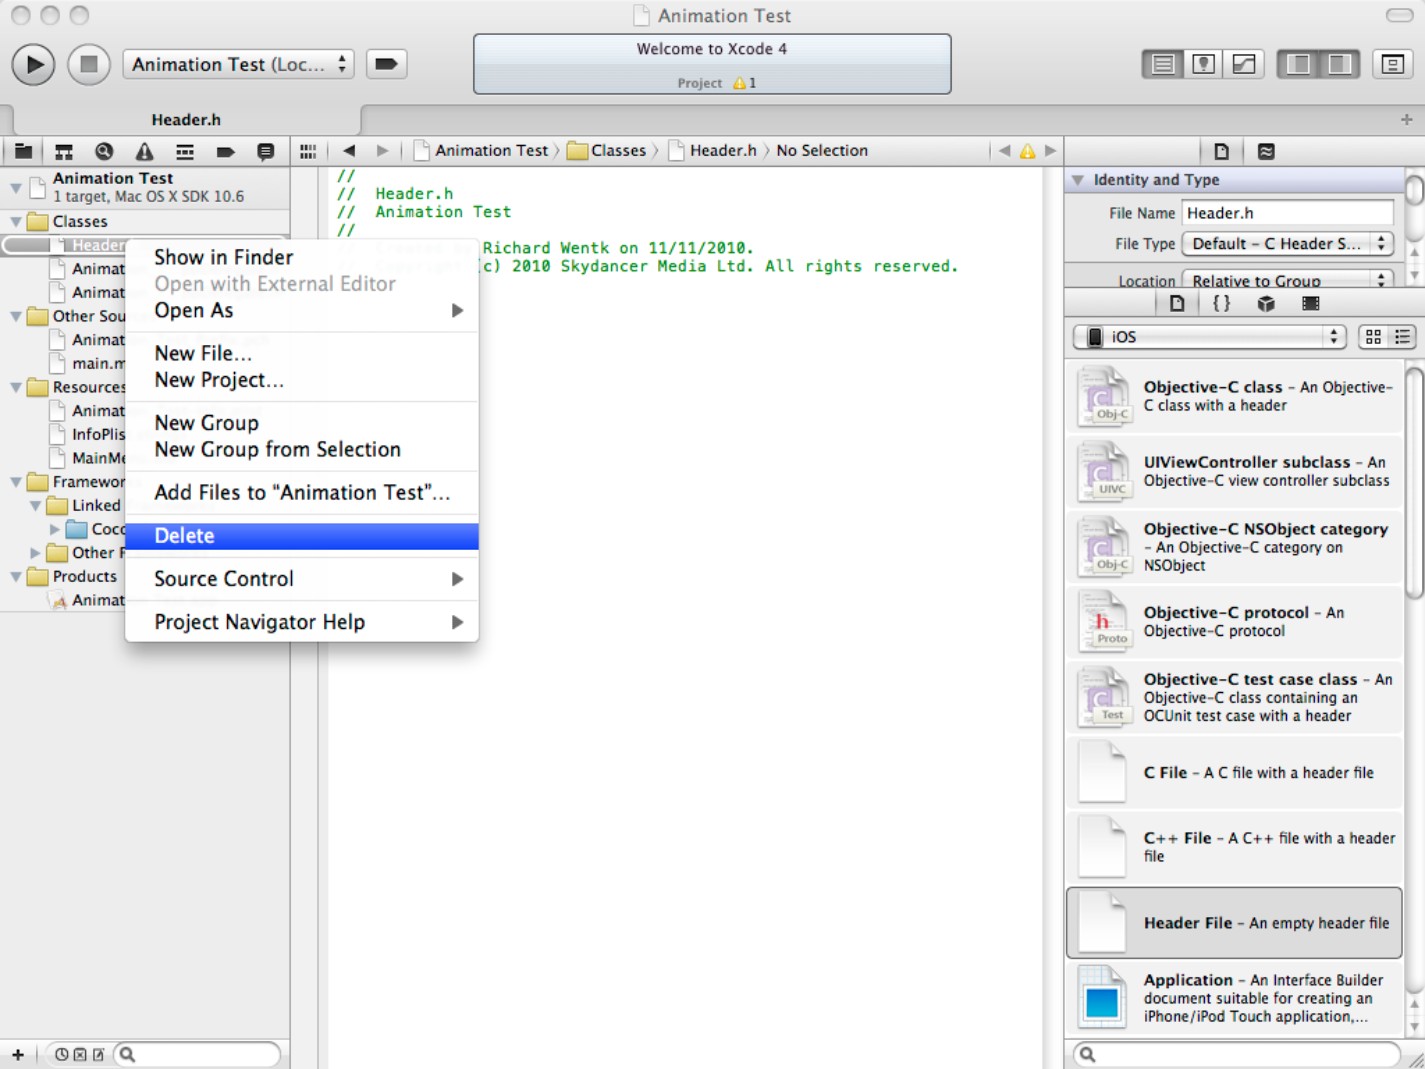
Figure 5.8
The two ways to rename a file
Note that there's no way to rename an entire project. The project name is embedded in the project folder, the class names, the header files, the project nib files, and may also be embedded in various security options including the code-signing features.
You can work on projects with identical names in Xcode, as long as the main Xcode project files are in different folders and you don't try to edit shared files (if there are any) simultaneously in two different windows. If the files are independent, it doesn't matter what the project is called.
Generally, the project name is for your convenience. It has no effect on the final application name, and duplicated project names don't cause problems.
Importing existing files
Because Xcode's file templates aren't exhaustive, you often need to import into a project files created with other editors, such as graphics, sound files, HTML web pages, PDF documents, and so on. During a build, these non-standard file types are copied to the application folder without processing. Xcode includes preview features for a small selection of file types, most obviously for graphics. But you must edit and prepare these files using other tools.
To import a file or folder, right-click a group and select the Add Files to… menu option. You'll see the dialog box in Figure 5.9. Navigate to the folder with the files, and then select the import options using the check box and radio button.
Figure 5.9
Adding an image file to a project from the Pictures folder

Optionally, you can copy files from the source folder into the project folder. If you leave the Destination box unchecked, files are left in their original location and accessed via a reference. Generally, it's good practice to copy files that are unique to the project, but to use references for files that are reused by many projects.
You can also create groups or folder references for added folders. Although I've emphasized that groups aren't necessarily mirrored in a project's folder structure, you can use this option and the group management features introduced in the next section to create folders on disk that match the groups in the Project Navigator. This step isn't essential, but it can make a project easier to navigate if you're reusing its classes and resources.
Reimporting missing files
As long as you leave a file's Location option set to Relative to Group in the File pane of the Utility Area, you can move a project folder to a different location on disk without breaking the file references.
However, Xcode does occasionally glitch and lose files from a project. If you move items that are referenced indirectly in a different folder, Xcode may not be able to find them. And if you import a project created by an older version of Xcode, the Location option may not have been set correctly.
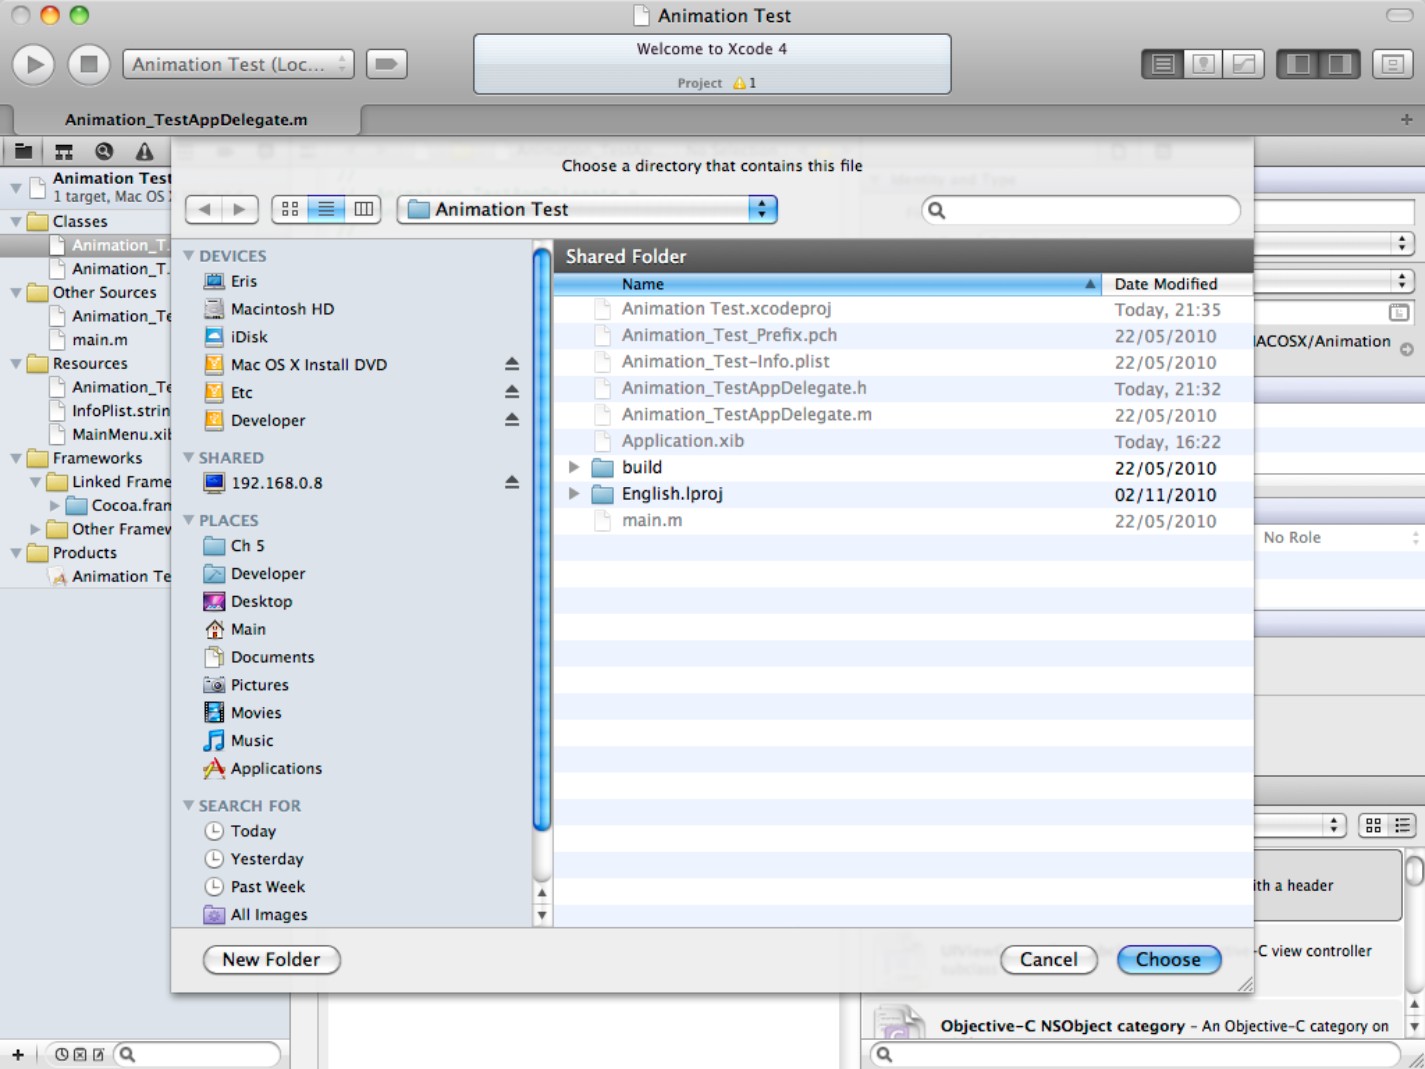
Broken references appear in the Project Navigator in red. As long as you can find the original file on disk, you can fix a broken reference by hand. Click the window-like icon to the right of the text box above the Full Path string in the File pane. You'll see the folder selector shown in Figure 5.10. Use it to navigate to the folder that holds the missing file, and select it when done. Xcode repairs the reference.
![]() CAUTION
CAUTION
In Xcode 3, you fixed a broken reference by selecting the file on disk. In Xcode 4, you fix it by selecting the folder that holds the file.
Figure 5.10
You can change the path of a file to fix a missing reference or to substitute one version of a file in one folder with a different version in another, although there are better ways to manage version control in Xcode.
Working with Groups
Groups are cosmetic, for your convenience. You can use any group structure, nested as deeply as you like. The default structure with separate class and resource folders is only one of many possible arrangements. You also may create a separate group for each class or (less usefully) a single group for every file in the project.
Moving groups and files
Files are compiled more or less in descending order through the Navigator. Circular class references are handled automatically, so there's no significant speed advantage to reordering the groups. But it's sometimes useful to modify the group order for clarity.
You can drag and drop groups in the Project Navigator, but dropping a group on another group nests it, which may not be what you want.
To move a group to the top of the list, drop it on the Project item at the top of the Navigator. To rearrange all groups into a new order, you need to do this repeatedly. This can be a tedious process, especially if you have many groups.
Moving files is much easier. You can simply drag a file from one group and drop it in another. Any file can be moved to any group.
Creating a new group
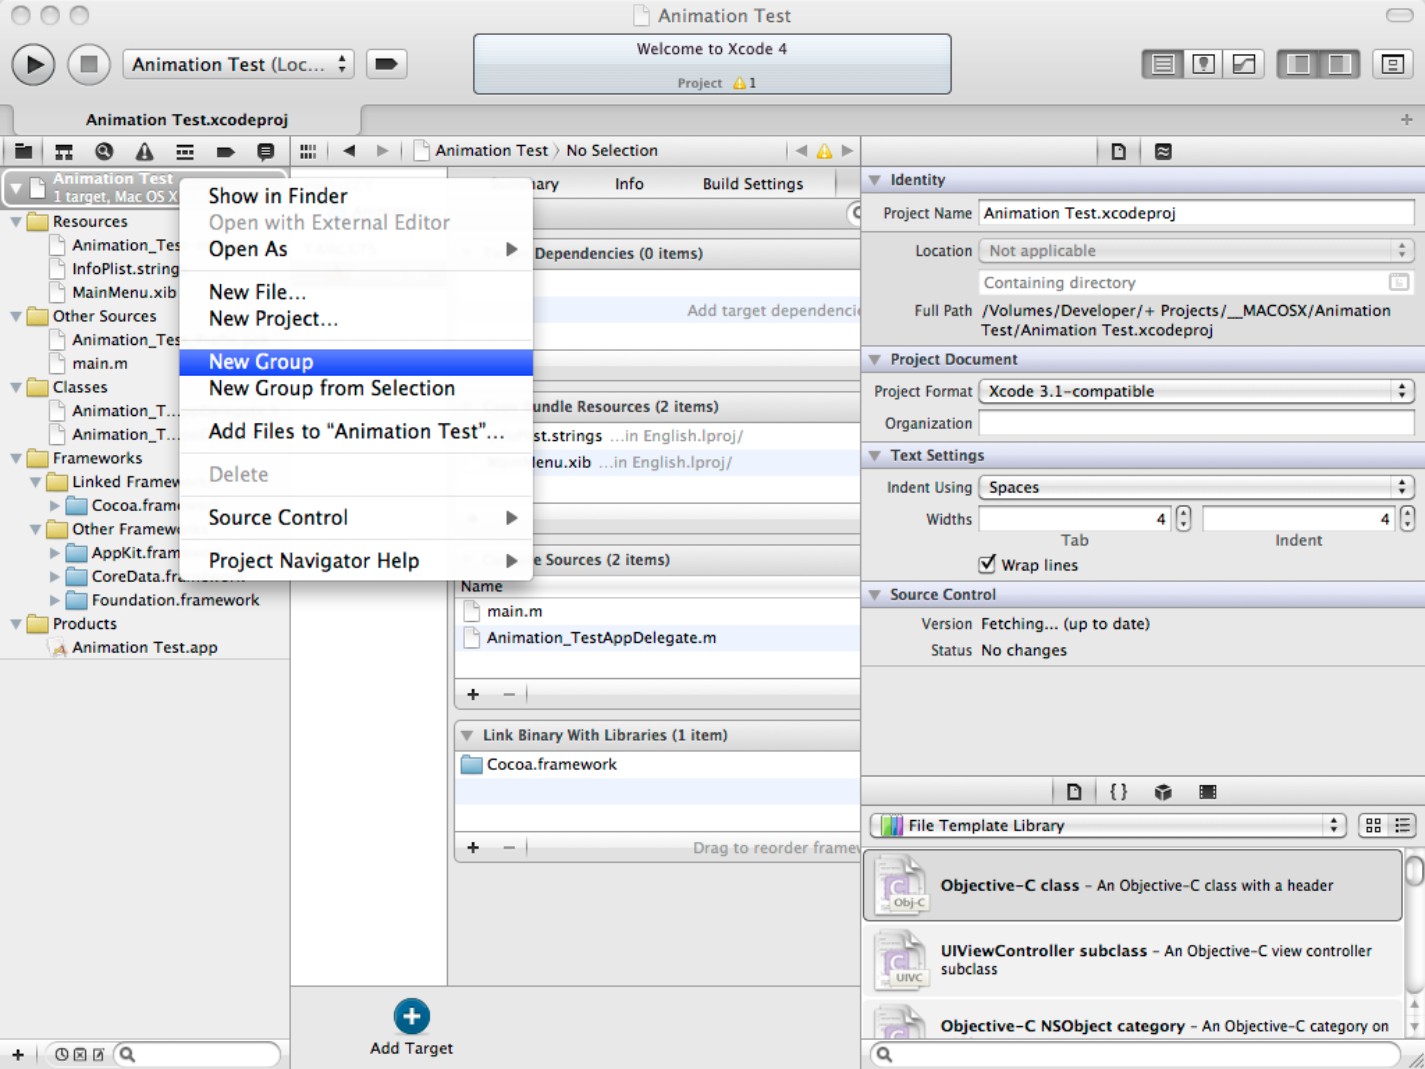
To add a new group, right-click the Project item and select New Group from the menu, as shown in Figure 5.11. You also can select multiple items in the Navigator using any of the standard Mac multi-select options and collect them into a single new group by selecting New Group from Selection.
Figure 5.11
You can add a new group from the floating menu or use File⇒New⇒New Group in the main Xcode menu.
![]() TIP
TIP
To create a new group inside an existing group, right-click the existing group instead of the Project item. You can nest groups almost indefinitely.
Organizing groups
Because groups are completely free-form, you can organize your project however you like. There's no need to use the default organization, with separate class and resource groups. For example:
![]() For an iOS project, collect each view controller and its associated nib into a separate group. This is usually easier to navigate than keeping classes and nibs separated.
For an iOS project, collect each view controller and its associated nib into a separate group. This is usually easier to navigate than keeping classes and nibs separated.
![]() If your project uses many supporting graphics files, group them into a separate Graphics folder to keep them distinct from other resources. This simplifies graphic previews and makes it easier to find the project nib files.
If your project uses many supporting graphics files, group them into a separate Graphics folder to keep them distinct from other resources. This simplifies graphic previews and makes it easier to find the project nib files.
![]() Similarly, you can keep other project resources such as plists and code-signing files in a separate group to keep them out of your way.
Similarly, you can keep other project resources such as plists and code-signing files in a separate group to keep them out of your way.
![]() Source code for frameworks and libraries should have its own separate groups, especially if the files are imported from a standard location on disk. It's a good idea to keep these items separated from project source code.
Source code for frameworks and libraries should have its own separate groups, especially if the files are imported from a standard location on disk. It's a good idea to keep these items separated from project source code.
Working with Frameworks
Apple's frameworks are prewritten libraries that can be imported into any project to add specific features, such as support for video, sound, data management, or various hardware features.
When you build an OS X or iOS project, you may need to add one or more of Apple's frameworks to your project before you can use them. A selection of default frameworks is included in every application template; for example, OS X projects always include the Cocoa and AppKit frameworks, and iOS projects always include Cocoa Touch, UIKit, and CoreGraphics. All projects include the Foundation framework.
Other frameworks are optional, and you must add them manually. For example, you must add the GameKit framework to use the classes and methods built into GameKit. If you don't, the compiler can't find the symbols included in the framework, and your build fails, sometimes spectacularly, with hundreds of errors.
![]() TIP
TIP
If you do get hundreds of errors while building, it usually means you've forgotten to import a framework. Typically, most of the errors disappear after you add the framework correctly. Don't forget that you also need to import the framework's header file into every file that references it in your project.
Using frameworks
Although you could add every framework to every project, this would slow build times to a crawl. Depending on the build options, including every framework might also create huge binaries. So it's standard practice to add only the frameworks that are referenced by your code.
![]() TIP
TIP
You'll often use at least one of the standard graphics frameworks and perhaps also one of the animation frameworks. It's easy to forget to add frameworks, and adding the headers by hand is a chore. You can save time by creating a default project that already includes a more realistic and useful selection of frameworks than are included in the standard Apple templates.
Apple frameworks include a binary with associated header files, as shown in Figure 5.12. When you add a framework, Xcode adds both the header and the binary to its build list. The header is referenced during compilation, and references to the binary are added while linking.
Figure 5.12
The framework header files include useful comments that often add extra detail and insight that isn't available in the more formal class reference documentation.

You also can add third-party frameworks. Some frameworks are supplied with full source code. You can add these by importing all files into your project, as described earlier in this chapter. Other frameworks are supplied in a binary/header format. To add these to a project, see the section below.
Adding existing frameworks
The framework management system in Xcode 4 is completely different to that in Xcode 3. It's no longer related to the Add files… menu option. Instead, it's buried in the Build Phases page of the target build settings, as shown in Figure 5.13.
Figure 5.13
Adding an Apple framework to a project in Xcode 4 has nothing in common with the menu options used in Xcode 3.
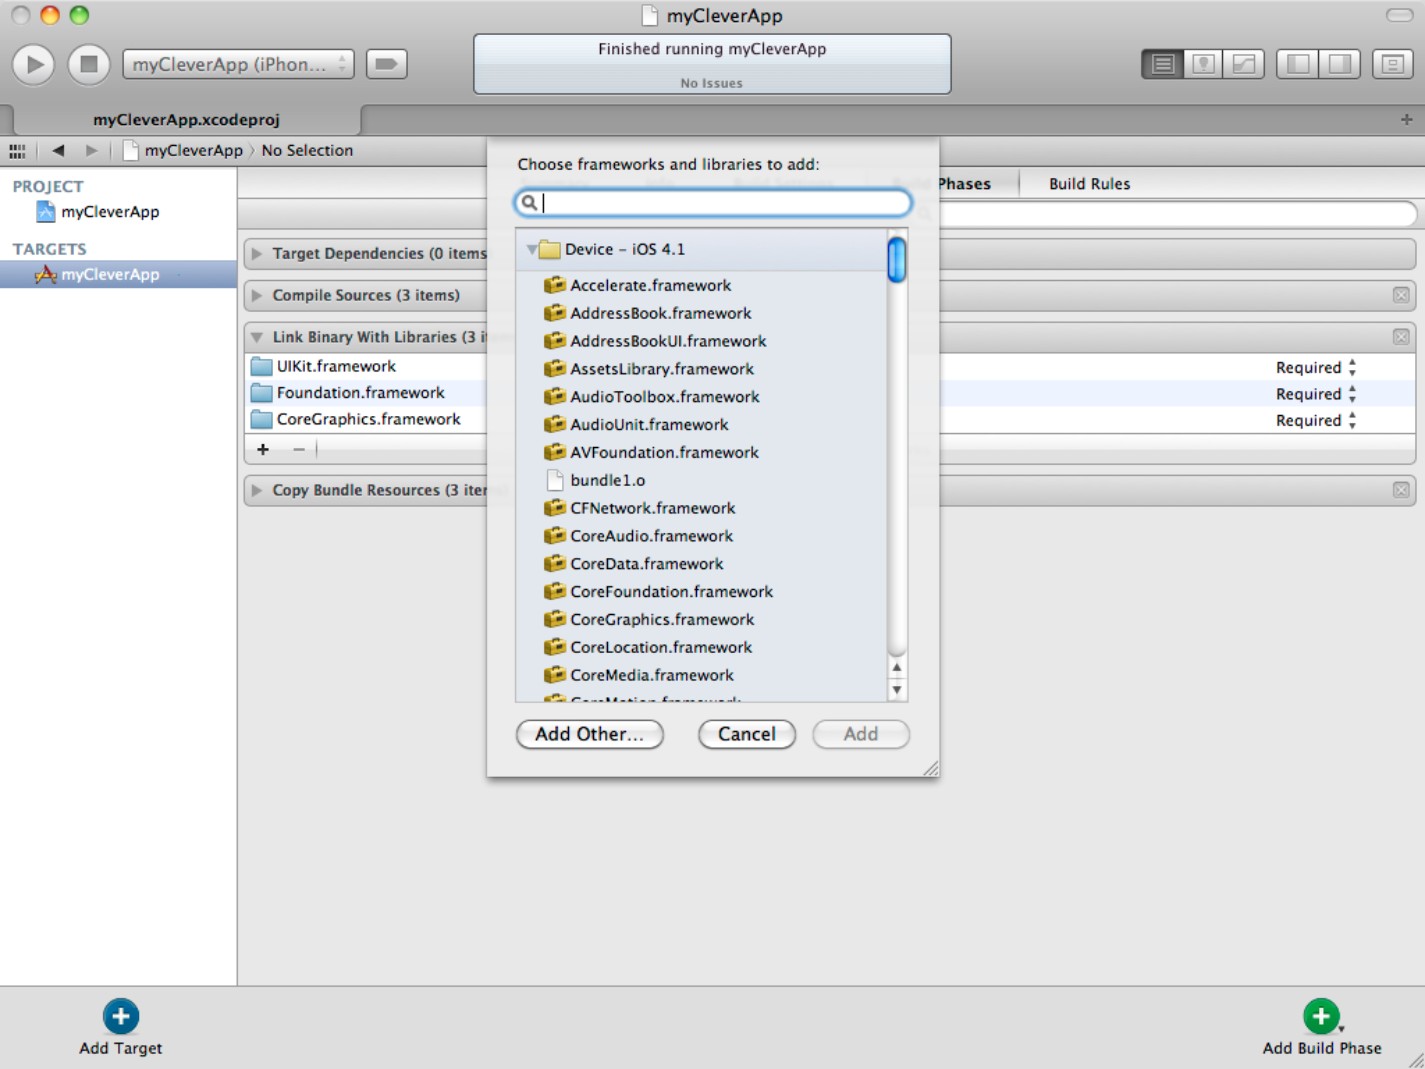
To add a framework, select your project in the Project Navigator, select the TARGETS icon in the gutter, and select Build Phases. Click the Link Binary With Libraries reveal triangle, and then select the plus (+) icon at the lower left.
You can now select a framework from the pop-up list that appears (refer to Figure 5.13). To delete a framework from the project, select it in the Link Binary with Libraries table and click the minus (-) icon.
To add a precompiled third-party framework, select Add Other… and navigate to the framework folder on your disk.
Summary
This chapter introduced file and group management. It explained how to add new files to a project using the standard templates and sketched the key features and applications of each file type, including classes, nib files, and other resources.
It listed the different ways in which files can be deleted, renamed, and re-imported, explored how files can be organized within groups, and outlined some of the ways in which groups can simplify project management.
Finally, it introduced frameworks, explained how frameworks are added to Xcode 4 projects, and contrasted this with the different framework management options used in previous versions of Xcode.