
Chapter 17: Creating Unit Tests
In This Chapter
Introducing unit testing
Understanding unit testing in Xcode
Creating a project for unit testing
Creating a test case
Running tests
Unit testing is a powerful software engineering technique that's supported in Xcode. This chapter outlines the technique so you can understand the theory behind unit testing, and it explains how to use unit testing in practice.
Introducing Unit Testing
You can test software in many ways, and software engineering has evolved formal processes that can simplify design and improve project efficiency.
Software can fail in five ways:
![]() The conceptual model for the user interface is misleading, incorrect, or inconsistent. If typical users make wrong assumptions about the software, the developer has made wrong assumptions about how users think and how they expect the software to work. Failures at this level may not be critical, but they frustrate users and waste their time.
The conceptual model for the user interface is misleading, incorrect, or inconsistent. If typical users make wrong assumptions about the software, the developer has made wrong assumptions about how users think and how they expect the software to work. Failures at this level may not be critical, but they frustrate users and waste their time.
![]() The UI is fragile. Common and inevitable user errors—such as whitespace in text, null entries, misspellings or invalid characters, or accidental mouse clicks—cause the application to fail.
The UI is fragile. Common and inevitable user errors—such as whitespace in text, null entries, misspellings or invalid characters, or accidental mouse clicks—cause the application to fail.
![]() The UI or underlying model isn't secure. Deliberate hacking attempts can open an application's internal features to outsiders in an uncontrolled way.
The UI or underlying model isn't secure. Deliberate hacking attempts can open an application's internal features to outsiders in an uncontrolled way.
![]() The underlying logic is flawed. Code may contain incorrect assumptions about interfaces, contracts, and processing requirements.
The underlying logic is flawed. Code may contain incorrect assumptions about interfaces, contracts, and processing requirements.
![]() The underlying logic is fragile. Memory or file errors, API inconsistencies and bugs, and other method-driven issues create crashes or other problems. Failures can be complex and cumulative; a feature works until a problem occurs, and then a dependent feature appears to fail at some point later. The dependencies may not be obvious.
The underlying logic is fragile. Memory or file errors, API inconsistencies and bugs, and other method-driven issues create crashes or other problems. Failures can be complex and cumulative; a feature works until a problem occurs, and then a dependent feature appears to fail at some point later. The dependencies may not be obvious.
![]() NOTE
NOTE
In software engineering a contract is an explicitly defined interface between two elements. The two elements are designed to exchange information in a certain way, and the contract defines the details of the exchange—specifically the data format, timing, and sequence of the exchange.
Unit testing is designed to help with some of these problems but isn't a solution for all of them. Philosophically, unit testing is closer to method and function testing than sequence testing. To use unit testing successfully, code should have clearly defined interfaces and predictable outputs.
A key benefit of unit testing is that if a bug is easy to reproduce, it's easy to test for it. Creating a test guarantees that future bug fixes don't reintroduce problems. Unit testing can help make these regression errors less likely.
Another benefit is that with minor modifications, test code can be used as example code in documentation, to illustrate how features are designed to work.
You also can use unit testing as a design aid. If you test as you go, you can catch logical inconsistencies and overly complex contracts before you implement them. Potentially, you can use test code to sketch how a feature should work before you implement the code for the feature.
In spite of the advantages, unit testing remains controversial. There's an approximate consensus that unit testing is most effective in collaborative projects with a well-defined API. Solo programmers are more likely to have an overview of their project than group developers, so objective testing of elements can sometimes be more of a distraction than a benefit. As interaction becomes more GUI-driven and open-ended, unit testing code can become so large that it rivals the size of the main application, and the return on the time and effort invested becomes smaller.
For all applications, unit testing is most effective when combined with intensive beta testing and formal bug tracking. The most robust production regime combines beta testing, unit testing, and aggressive defensive coding that anticipates and codes around likely input errors.
Understanding Unit Testing in Xcode
In outline, you can do the following with unit testing:
![]() Compare returned values from a method or function with expected values
Compare returned values from a method or function with expected values
![]() Check that objects are created and initialized correctly
Check that objects are created and initialized correctly
![]() Confirm that error conditions throw an exception
Confirm that error conditions throw an exception
![]() Repeat tests any number of times
Repeat tests any number of times
![]() Create composite test sequences that run various tests in order
Create composite test sequences that run various tests in order
![]() Select tests depending on the results of previous tests
Select tests depending on the results of previous tests
When you create a new iOS or OS X project, you can choose to add unit testing features. Xcode automatically adds the features—in fact, it adds a separate target that implements unit testing—and initializes them. However, the initialization isn't comprehensive, and extra work is required before you can begin adding test code. The work isn't described in the official documentation, but it is listed below.
In detail, the unit testing package includes the following:
![]() A framework called SenTest: The framework manages the testing and creates error reports. You must add custom code for each feature or case you want to test.
A framework called SenTest: The framework manages the testing and creates error reports. You must add custom code for each feature or case you want to test.
![]() A set of test macros: The macros are designed to check for possible error conditions and report them during a build.
A set of test macros: The macros are designed to check for possible error conditions and report them during a build.
![]() A separate test bundle: To run your tests, build the bundle. Errors are reported during the build.
A separate test bundle: To run your tests, build the bundle. Errors are reported during the build.
![]() A test class, which is part of the bundle: You add custom test code to this class and include macros to check for error conditions and report them. This custom code runs automatically during a build. Each test method in the class is called a test case.
A test class, which is part of the bundle: You add custom test code to this class and include macros to check for error conditions and report them. This custom code runs automatically during a build. Each test method in the class is called a test case.
![]() A unit test application: This runs automatically behind the scenes, triggered by a script, and does the heavy lifting required for the unit testing process. You don't have to run it by hand.
A unit test application: This runs automatically behind the scenes, triggered by a script, and does the heavy lifting required for the unit testing process. You don't have to run it by hand.
If you're new to unit testing, you may find the process counterintuitive. You might expect unit testing to be a runtime process, like debugging, but it isn't. In fact, you run unit tests by building your project in a special way. The build process runs your test code, and errors appear in the build log. They're not logged to the console like runtime errors.
You must understand that the test build is independent of the standard release/debug builds. It's possible for a release/debug build to complete with no errors, even though a test build reports multiple bugs.
A standard build reports basic compilation and linking errors. Your test build adds further checks for logical consistency, predictable output, and other error conditions. It's up to you to define these checks, to add custom test code to implement them, and to define the format and content of the error messages that report them.
The testing framework gives you the tools to build tests, but it doesn't recommend specific tests, include any default tests, or suggest useful testing strategies. Until you add test case code, a test build does nothing. So it's also up to you to decide which features should be tested, how they should be tested, and how complex and exhaustive the testing process should be.
![]() CAUTION
CAUTION
If your test code includes logical errors, the testing process itself fails. Keep tests as simple as possible, and build more complex tests from simple tests that are known to work. This won't guarantee that your tests are valid, but it's more likely to be useful and manageable than a complex, intricate test system that's difficult to understand.
![]() NOTE
NOTE
The test framework is called SenTest in the test code. You may see it described as OCUnit in the Apple documentation. Technically, OCUnit is the Objective-C variant of SenTest. In practice, the two names are interchangeable.
Creating a Simple Unit Test Project
To create a project that includes unit testing, follow these steps:
1. Use File⇒New Project to create a new project.
Check the unit testing options before you save the project. This creates a standard project with extra test build features that include a build bundle and a test class.
2. Develop your project, modifying the standard project classes and adding new classes in the usual way.
3. For each feature you want to test, add test case code to the test class file.
4. Initialize Xcode's settings to make sure the test code runs as it should.
5. Optionally, you can use standard debugging tools to verify the test code.
6. Whenever you need to test the project, select the test build and build it.
If the test build fails, correct the bugs in the project code.
7. When the project is complete, build a release version in the usual way.
Because the test code exists in a separate bundle, it isn't linked into a standard release build.
Because unit testing is open-ended, the example described in the rest of this chapter illustrates how to create a single simple test case for a single trivial class; it's a very basic math operation in a math framework. Although the framework and the test code are trivial, you can easily expand this example to meet the needs of a real project.
![]() NOTE
NOTE
This example illustrates how to create unit test for an iOS project. The unit testing process for iOS and OS X projects is similar enough to be considered identical.
![]() NOTE
NOTE
If your project uses Core Data, you can include it in the usual way. Core Data features and unit testing features are unrelated. You can add either, neither, or both to a project.
Creating a new project that supports unit testing
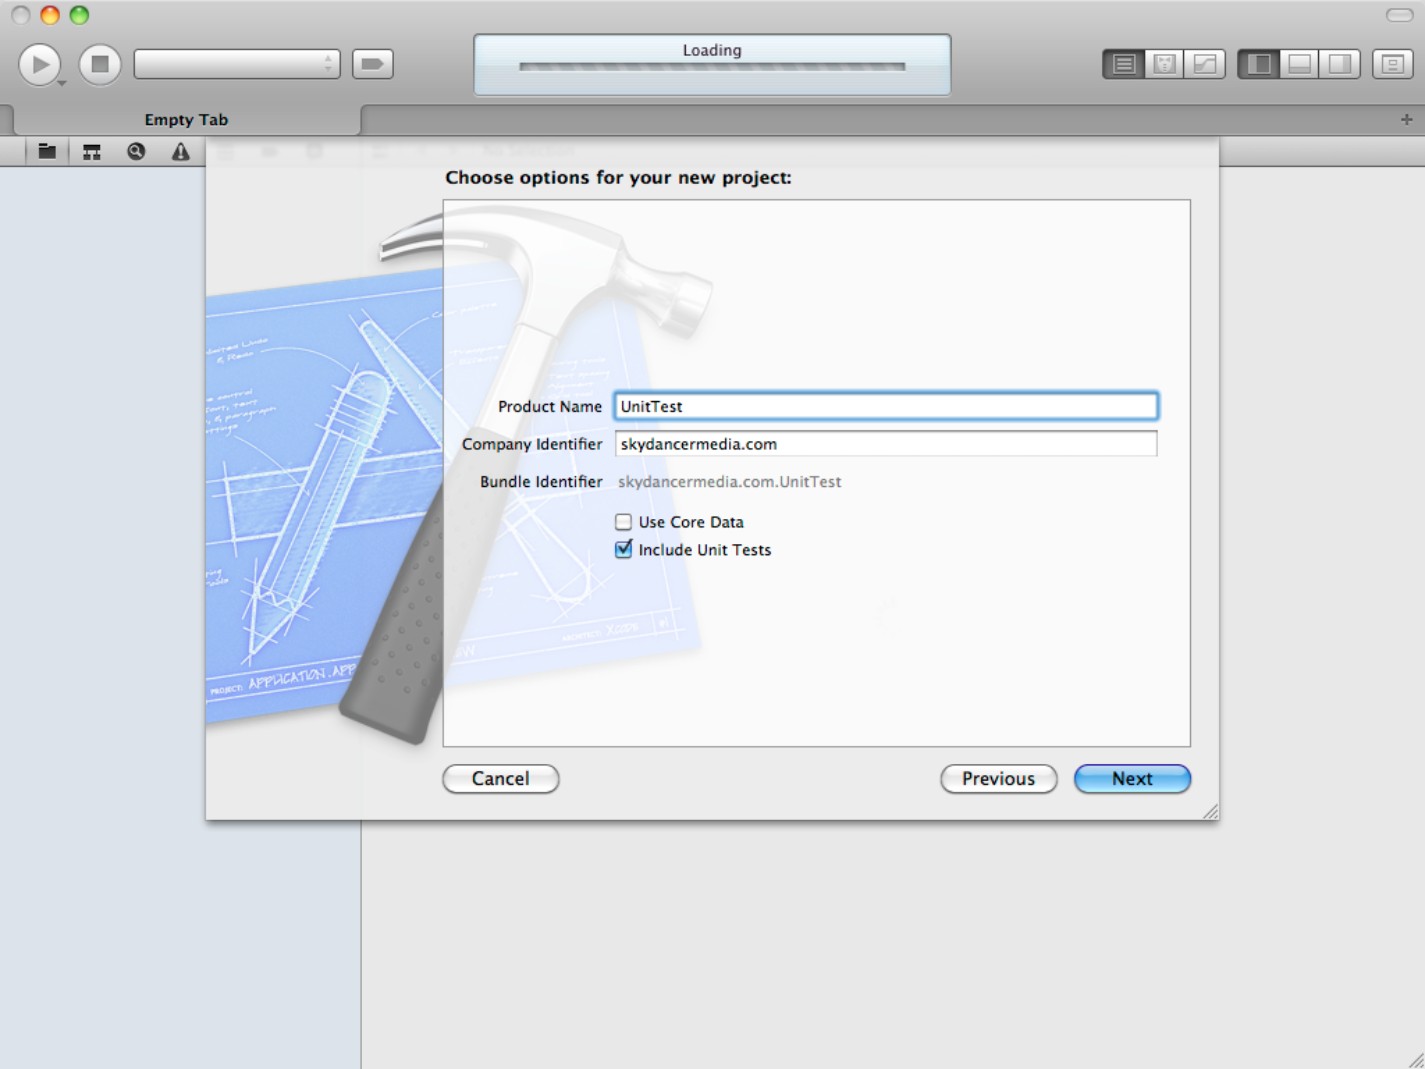
For both Xcode and iOS projects, the unit testing option appears as a check box, as shown in Figure 17.1. For this example, create a new Navigation-based project and check the box. Save the project as UnitTest.
![]() CAUTION
CAUTION
Although you can add unit testing to an existing project, it's not a simple process. It's more efficient to include unit testing when you create a new project. If you don't use the test features, they won't get in your way, but they'll be ready if you need them.
Figure 17.1
Creating a new project that supports unit testing
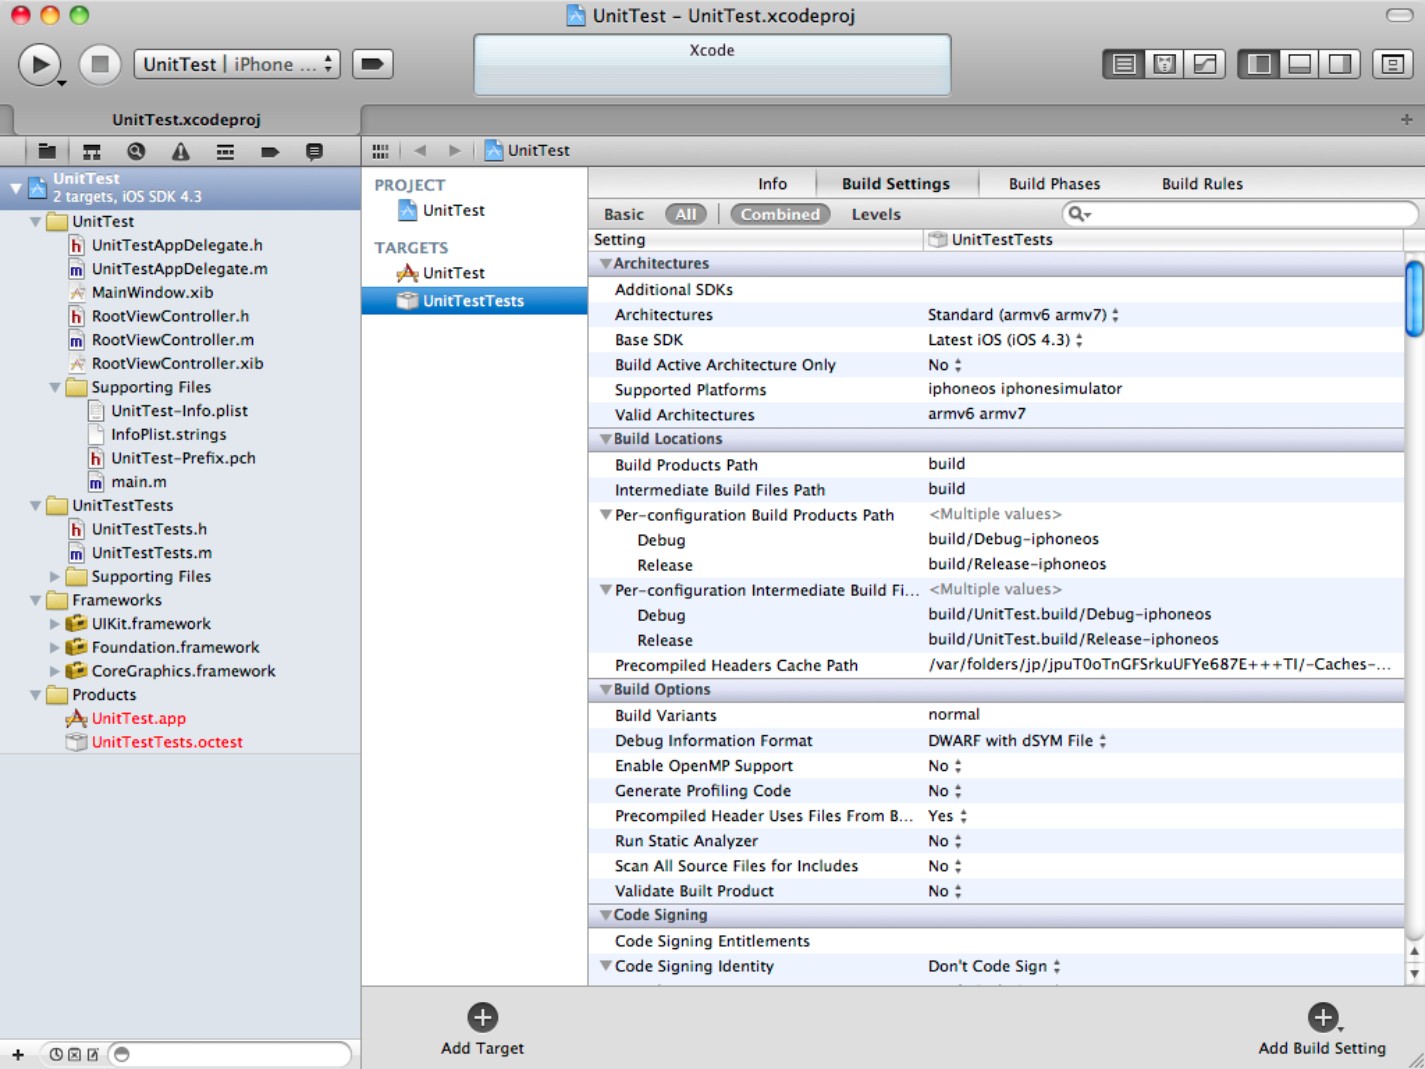
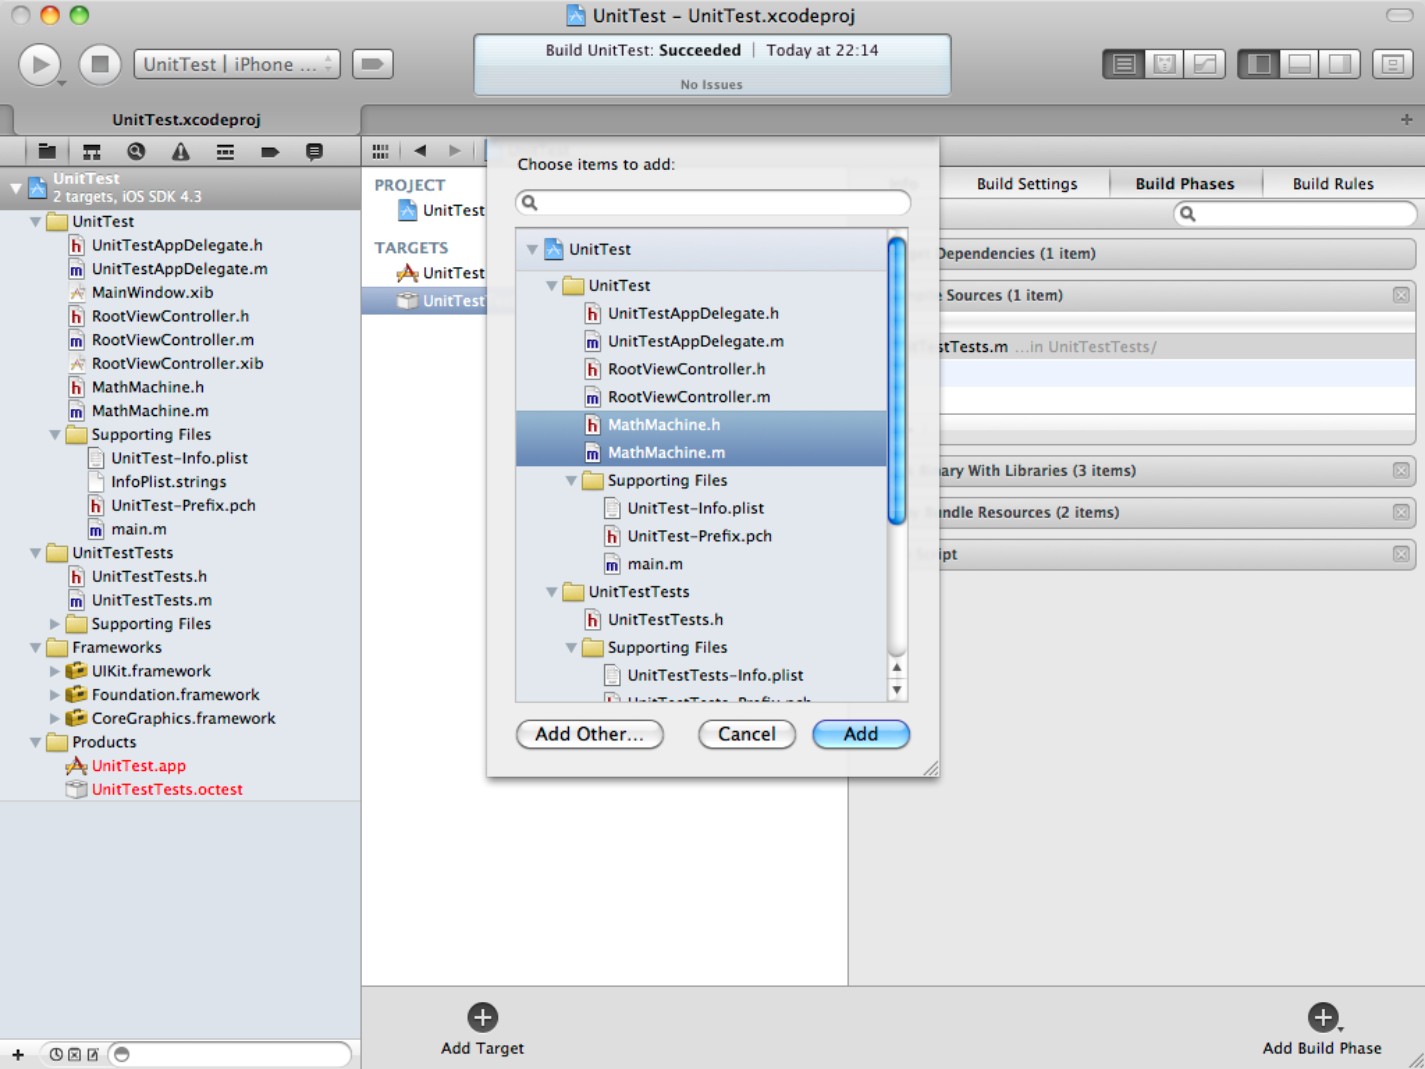
Xcode automatically adds unit testing features to the project, as shown in Figure 17.2. You'll find a new product bundle with the suffix Tests.octest, a new target with the Tests suffix, and a new class called Tests with a standard header and implementation file.
Figure 17.2
Exploring the new test features
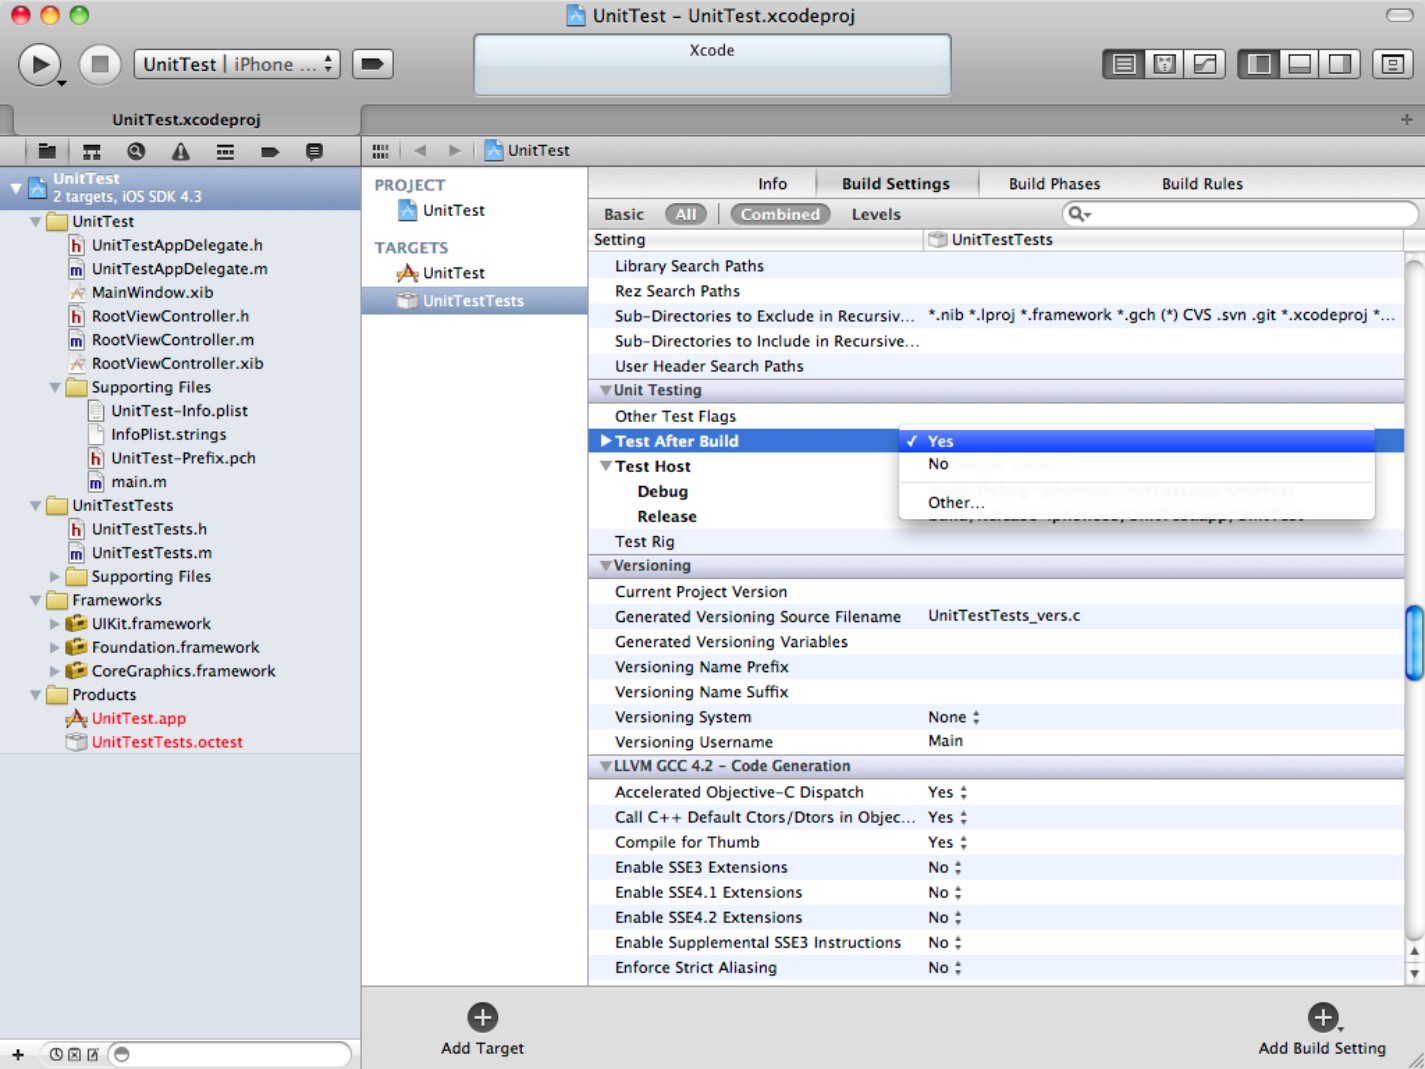
Although these features are included in the project, testing isn't enabled. To enable it, select the Tests target and view the Build Settings. Scroll down to the Unit Testing switches, and make sure Test After Build is set to Yes, as shown in Figure 17.3.
![]() CAUTION
CAUTION
Make sure you enable testing for the test target, not for the main build. Optionally, scroll up to the Linking switches. You'll see -framework SenTestingKit added to the Other Linker Flags field. In earlier versions of Xcode, you had to set this switch manually, but this is no longer necessary in Xcode 4.
Figure 17.3
Enabling testing. Testing is disabled if this switch is set to No, even during test builds.
Creating a class for testing
Testing doesn't modify your main source code. It's an external process, and it leaves your main build code unchanged.
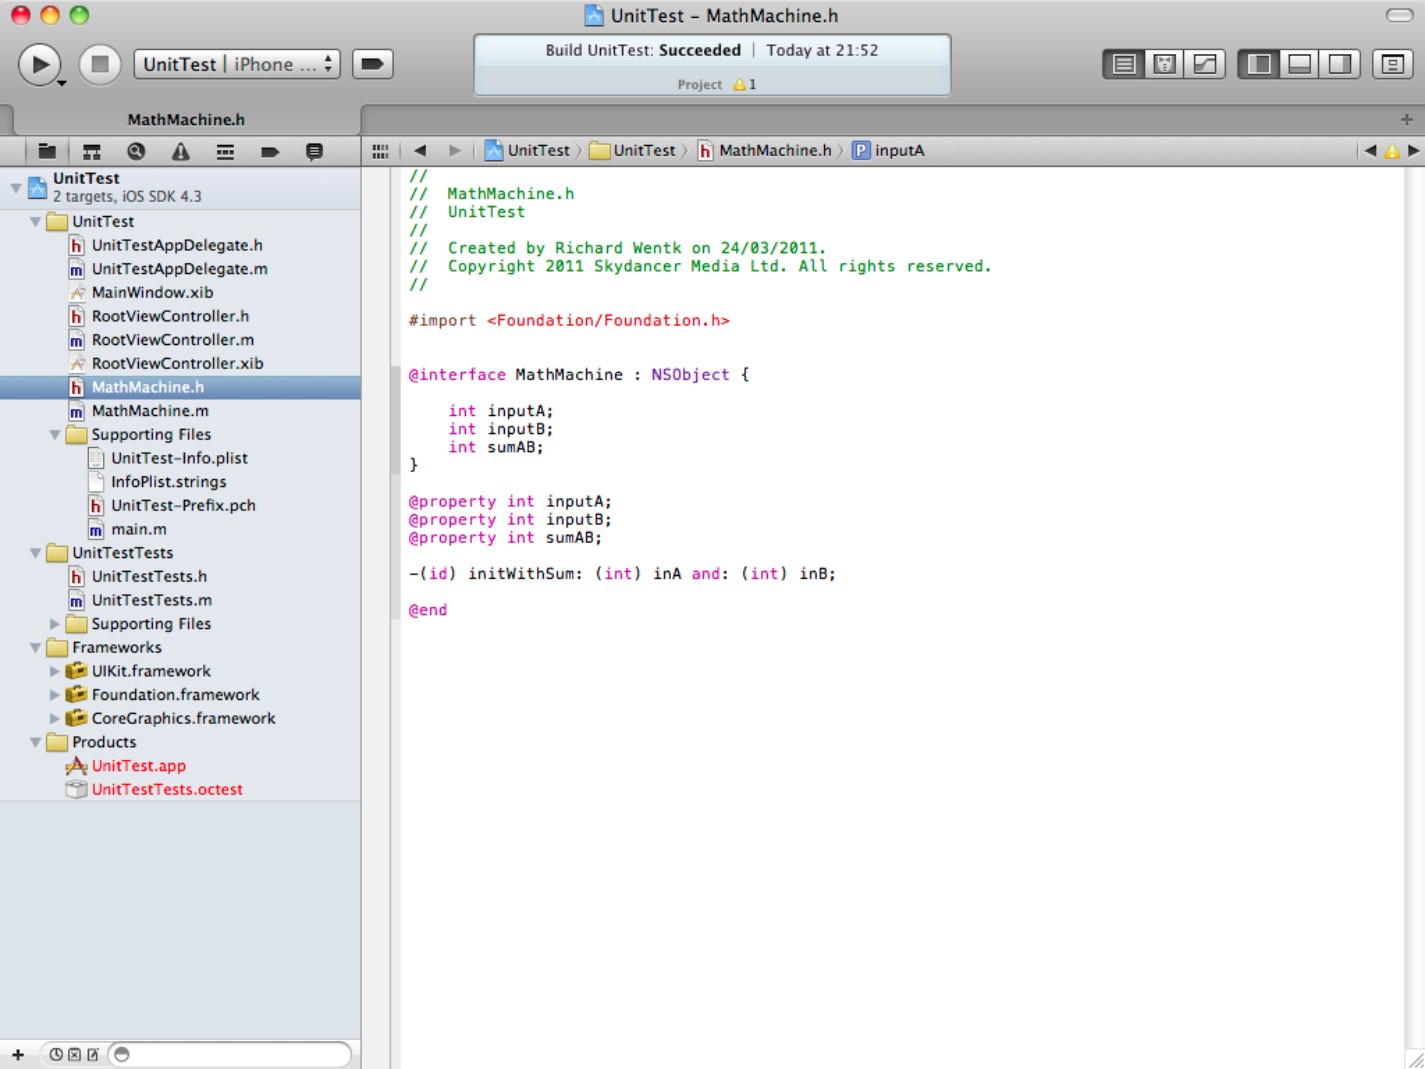
For this example, create a new class called MathMachine to hold some basic math code. Right-click the UnitTest group in the Project Navigator, select New File, choose the Objective-C class option, and set it to be a subclass of NSObject. Save the file as MathMachine. Xcode adds a header and implementation file to the Classes group in the usual way.
![]() NOTE
NOTE
Because this project is called UnitTest, the UnitTest group holds the main source code. The unit testing code is in the UnitTestTests group. In a project with a different name such as ProjectX, the unit testing code would be in ProjectXTests—and so on.
MathMachine is going to unleash the power of gigahertz computing by adding together two integers—inputA and inputB—and storing them in a property called sumAB. Add the following code to the header file, as shown in Figure 17.4:
#import <Foundation/Foundation.h>
@interface MathMachine : NSObject {
int inputA;
int inputB;
int sumAB;
}
@property int inputA;
@property int inputB;
@property int sumAB;
-(id) initWithSum: (int) inA and: (int) inB;
@end
This defines the MathMachine class with some supporting properties. It also creates a single method called initWithSum:.
Figure 17.4
Creating a new class to add a pair of integers
Add the following code to the implementation file, as shown in Figure 17.5:
@implementation MathMachine
@synthesize inputA;
@synthesize inputB;
@synthesize sumAB;
-(id) initWithSum:(int)inA and:(int)inB
{
if (self = [super init]) {
self.inputA = inA;
self.inputB = inB;
self.sumAB = inA + inB;
}
return self;
}
}
@end
Figure 17.5
Implementing the initialization and addition method

![]() NOTE
NOTE
If you're new to Objective-C and Cocoa, this may seem like a lot of code for a simple operation. In fact, most of this code creates a new class and defines one possible custom initialization method. Although this is a long-winded idiom, it's standard for Objective-C and Cocoa classes. In a real math framework, the class would be extended with many more properties and many other initialization and processing methods.
Creating a test case
Now that the project includes something to test, you can add the code to test it. Tests are defined as individual methods in the <ProjectName>Tests class. The name of each method must start with test. Methods that begin with any other string are ignored.
Each method is called a test case. As explained earlier, it's up to you to create test code that exercises the features of your target class in the most logical and comprehensive way. In practice, this requires three steps:
1. Define the inputs to the test and the results they should generate.
2. Add a test case method to the Tests class header.
Depending on your test code, you may need to define the inputs and expected results as constants.
3. Implement the test method in the Tests implementation file.
Use assert macros, described below, to implement the tests and report errors.
4. Optionally, add set-up and tear-down code around the test.
The Tests implementation file includes predefined setUp and tearDown methods to hold this optional code. You can create and release test objects in these methods, or you can build alloc and release calls directly into each test case. The best solution depends on the test requirements.
Defining test inputs and results
Figure 17.6 shows the header of the test class. You can see two predefined inputs, kA and kB, and a predefined expected sum, named kExpectedSum. The testMathMachineSum method runs the test that compares them. Here's the code:
#import <SenTestingKit/SenTestingKit.h>
#define kA 1
#define kB 1
#define kExpectedSum 2
@interface UnitTestTests : SenTestCase {
@private
}
-(void) testMathMachineSum;
@end
The #define statements and the testMathMachineSum method have been added. The other parts of the file are created with the project. Note that the method doesn't take parameters, and there are no semicolons after the #define directives.
This example is trivial. In a more realistic test case, the relationship between the expected result and the inputs would be less obvious. It might rely on a series of object allocations and other complex operations. Potentially, you could predefine an array holding a sequence of input events in the setUp method and sequence through the array in the test code implementation. Inputs and expected results might be downloaded as a file from a remote server and created by other members of a development team.
Figure 17.6
Defining test inputs, an expected value, and a test method

The key point isn't that the test is simple, but that the relationship between the test inputs and the expected output is well defined and predictable. The point of testing is to confirm that this relationship is reliable and that the code being tested reproduces it on demand.
The test code itself can use any standard Cocoa/Cocoa Touch and OS X/iOS features in any combination. You can even generate inputs and results dynamically using independent code that is known to work.
Creating test code
By default, the test implementation file includes a single testExample method that prints a “Unit tests are not implemented yet…” message. To create a test, delete this method and add the code shown in Figure 17.7 and listed below. The code creates an instance of the MathMachine class, initializing it with the initWithSum: method. It runs an assert macro to check whether the expected sum is the same as the sum returned by the method. Finally, it releases the instance. The two %i parameters are part of the macro. The first displays the expected value, the second the value returned by the test method.
![]() NOTE
NOTE
The alloc and release code could go into the setUp and tearDown methods. This example is deliberately self-contained for simplicity. In a more complex example, you can often improve clarity by keeping set-up, test, and tear-down code separated.
#import “UnitTestTests.h”
#import “MathMachine.h”
@implementation UnitTestTests
- (void)setUp {
[super setUp];
//Set up code here
}
- (void)tearDown {
// Tear-down code here.
[super tearDown];
}
-(void) testMathMachineSum
{
MathMachine *testMathMachine =
[[MathMachine alloc] initWithSum: kA and: kB];
STAssertTrue(testMathMachine.sumAB == kExpectedSum,
@”Sum incorrect. Expected %i, got %i”,
kExpectedSum, testMathMachine.sumAB);
[testMathMachine release];
}
@end
Figure 17.7
Implementing a test method

Understanding STAssert macros
The core of the test is in the line that begins STAssertTrue. This is one of the special macros included in the test framework. The full list is shown in Table 17.1.
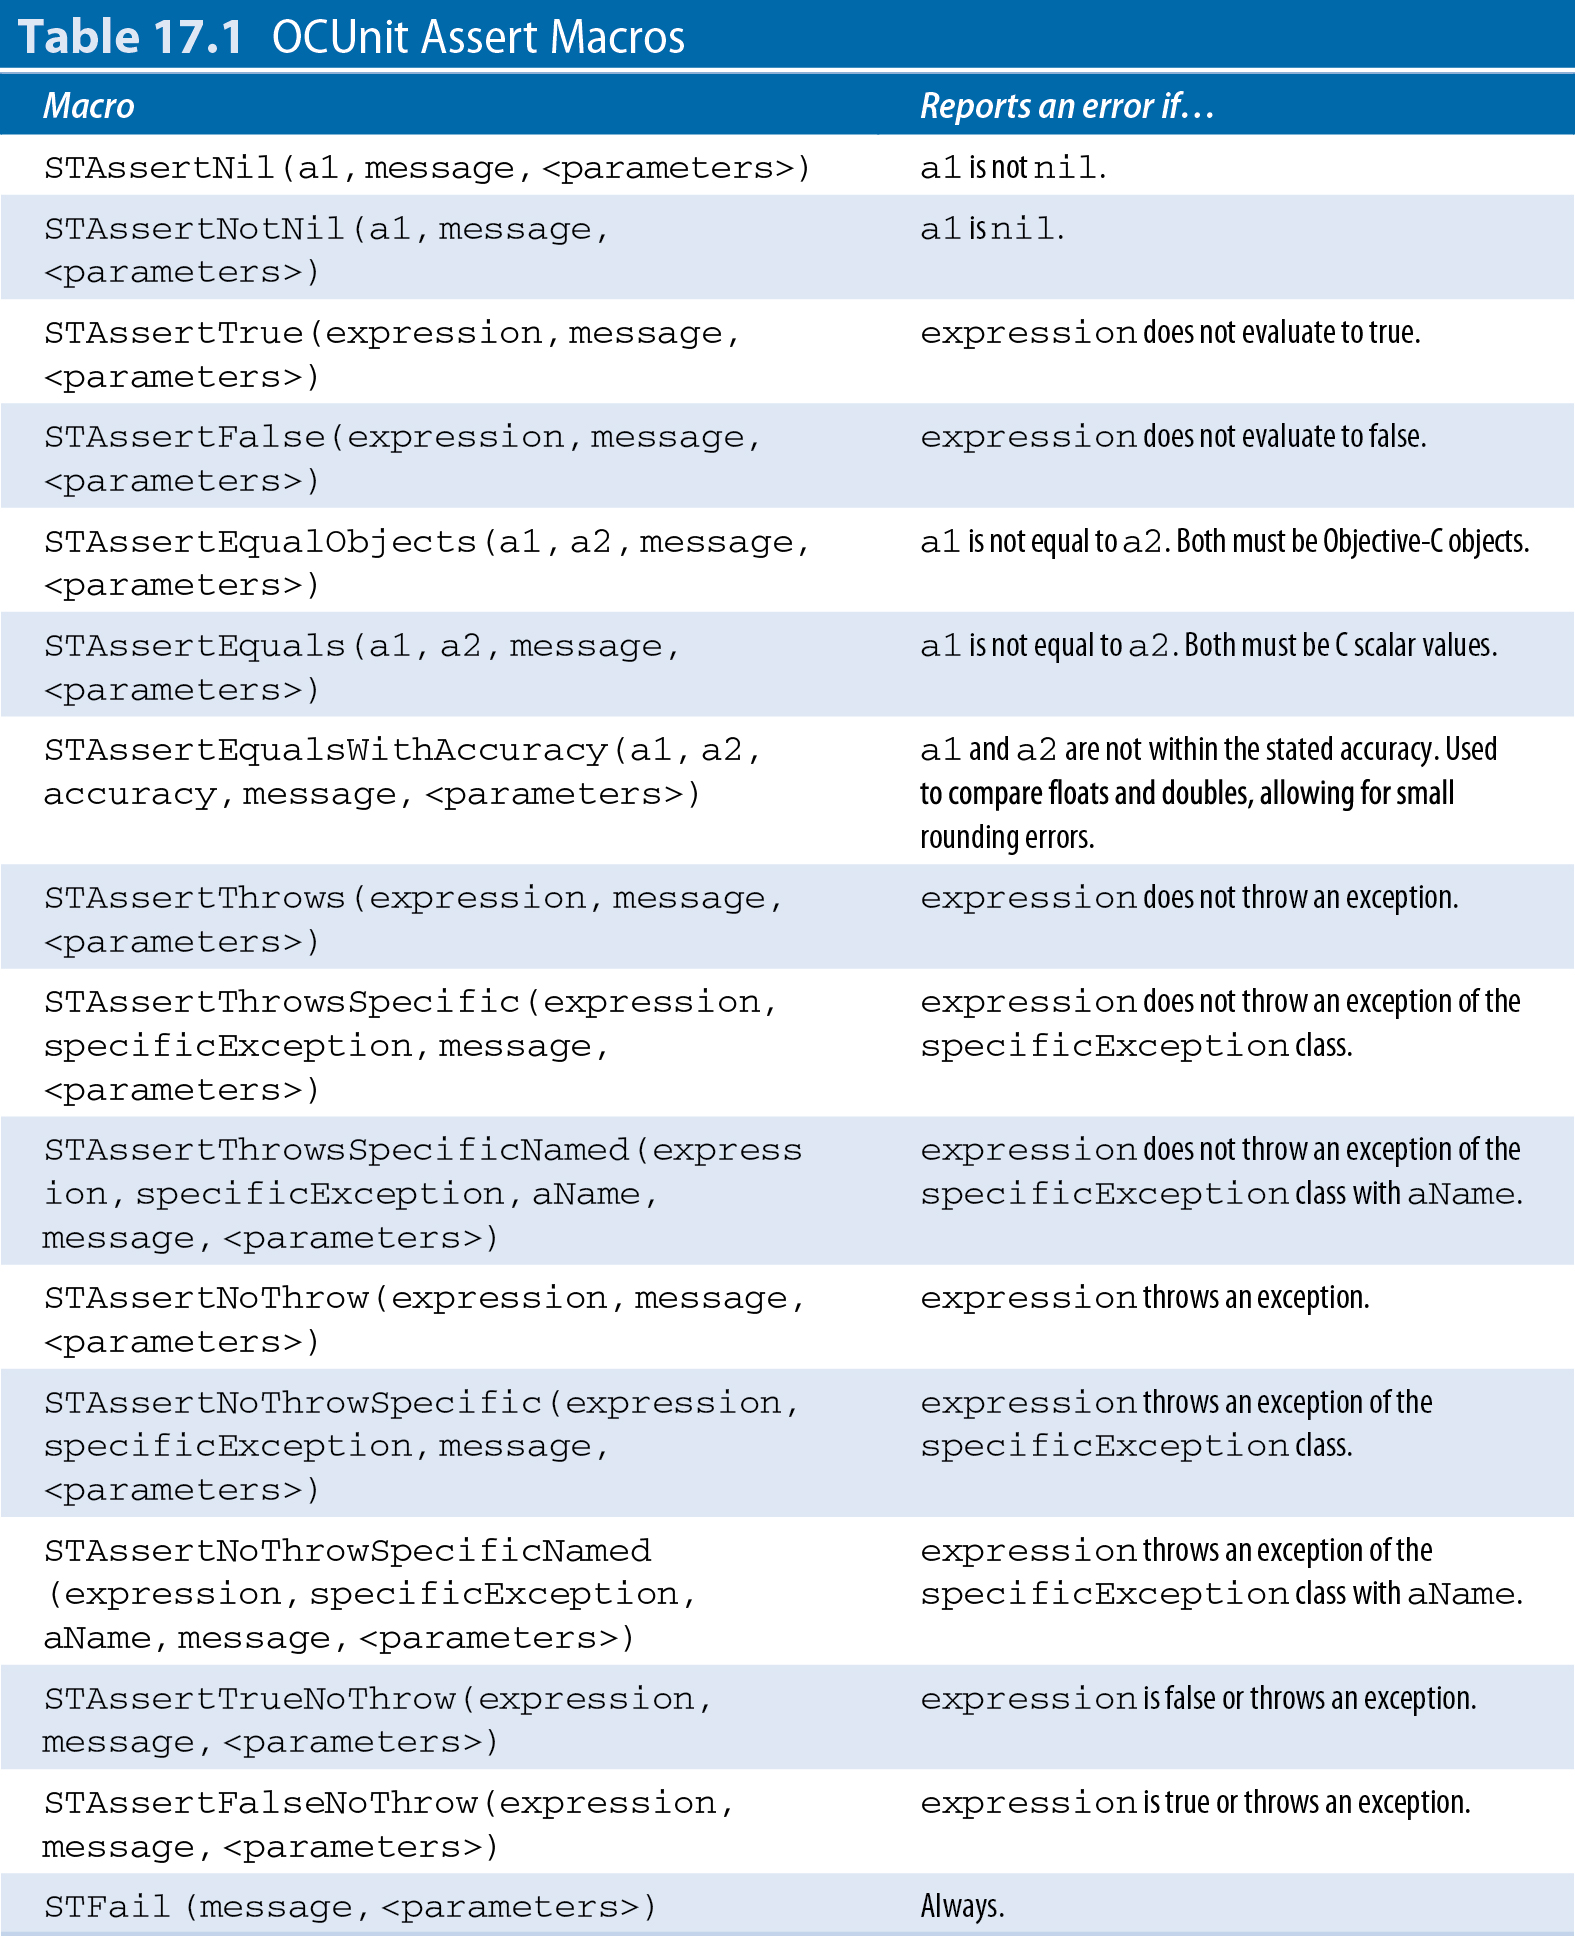
Table 17.1 OCUnit Assert Macros
The macro syntax is unusual compared to standard Objective-C, so it's worth breaking it apart element by element. To create a test using the macro, you must include the following:
![]() An
An STAssert macro from the table
![]() A conditional expression to implement the test, which may take multiple parameters
A conditional expression to implement the test, which may take multiple parameters
![]() An error string, which optionally can contain standard
An error string, which optionally can contain standard printf/NSLog parameter placeholders with formatting codes
![]() The parameters to be logged, if there are any
The parameters to be logged, if there are any
In the example code, the elements look like this:
![]()
STAssertTrue. Test if the following conditional evaluates to true. Write an error to the build log if it doesn't.
![]()
testMathMachine.sumAB == kExpectedSum. This is the conditional that implements the test. It checks whether the expected sum constant matches the sum returned by the initWithSum: method in the previous line.
![]()
@”Sum incorrect. Expected %i, got %i”. This is the text of the message that appears in the build log when the test fails. It takes two integer parameters.
![]()
kExpectedSum, testMathMachine.sumAB. These two parameters are reported in the message. If the test fails, the current value of the parameters is logged as part of the message.
When you create test code, you must select a macro from the table, add a suitable expression, and fill in the message and parameter details as needed. Without a test macro, your test code does nothing.
You can test for multiple error conditions by including multiple macros in a single test method. You can and should include multiple independent test methods. In a real example, each test case method should test a specific feature in your code. When you add a new feature or correct a bug, add a corresponding test case. You can also use these macros to generate messages that confirm when tests have been passed.
![]() TIP
TIP
The assert macro syntax is used throughout development in many environments. If this is your first encounter with it, it can seem unintuitive because assert assumes negative logic and does the opposite of what you'd expect it to in English. It checks a condition and logs an error if the condition isn't true. When you use these macros, it can be helpful to think of “assert” as equivalent to “test if.”
Running tests
When you save the code, the tests are almost ready to run. But Xcode requires one final step before it can run a test build successfully.
By default, classes that are being tested aren't included in the test bundle. If you try to run a test build, Xcode can't find the headers or the code for them.
To fix this, select the UnitTestTests target, as shown in Figure 17.8. Select the Build Phases tab, and open the Compile Sources pane. Click the + triangle to add a new source, and select the MathMachine.m file, as shown in the figure. This adds the source file to the build and ensures that the test framework can see the class you're trying to test.
When you are testing multiple classes, you must add them all. Add UI management classes such as view controllers only if they're referenced in the classes that are being tested.
Figure 17.8
Adding the code to be tested to the test build
Optionally, if you have multiple versions of Xcode installed, you can choose to run a specific version of the OCUnit testing package, as shown in Figure 17.9. The package is run as a script. The default selects the standard system script, which should be suitable for most projects. The modified default shown in the figure selects the most recent version. You may also need to do this if Xcode can't find the standard script, so it's worth knowing that this option exists.
Figure 17.9
Selecting the test script using the Run Script option in the Build Phases. You don't usually need to do this, but it is worth knowing how to change this option in case you want to customize the process.

You can now run your first test build. Select Product⇒Test from the main Xcode menu, as shown in Figure 17.10. Xcode runs the testing script on both targets. You should see a Build Succeeded message. The project passes the build test with no errors.
Figure 17.10
Select the test build. The initial build should be successful.

To see what happens when a build fails, open the MathMachine.m file and change
self.sumAB = inA + inB;
to
self.sumAB = inA - inB;
Clearly, this won't add two numbers correctly. Build the test again, and you should see the output shown in Figure 17.11. The test case for the sum operation reports that the sum is incorrect. The error message uses the text and parameters you added to the test code.
Figure 17.11
This time the test failed. The unit testing code generated an error message to tell you which test raised an error.

Note again that testing isn't like a normal build or debug session. The error appears in the test case code, not in the class is being tested. In fact it appears—with some redundancy—under the code that defines the error. And it's reported in the Issue Navigator as an issue with the test bundle, not the main target.
This shouldn't be surprising, but it is unusual compared to a standard Xcode build, and it's worth keeping the differences in mind when you work with the SenTest test framework.
![]() TIP
TIP
SenTest/OCUnit is ideal for Objective-C tests, but alternatives are available. For C++, it's worth exploring the alternative googletest framework available from code.google.com/p/googletest/. The framework isn't trivially easy to integrate into Xcode, but it offers expert developers a richer feature set and wider community support.
![]() TIP
TIP
Don't forget that you can use the UI Automation feature in Instruments to exercise a UI. UI Automation is a different system, but the two test systems can work well together. You can use unit tests to check basic code logic and then exercise the UI to ensure that it manages user events correctly.
Summary
This chapter introduced the SenTest/OCUnit unit testing framework. It explained some of the theory behind unit testing and demonstrated how to prepare a project for unit testing and set up Xcode so the unit testing features work correctly.
It illustrated the essential features of the test process with a simple example test case and summarized the key STAssert macros used to create test code.
Finally, it showed how to run the test code and how to find and interpret the messages it generates.