
Chapter 12: Working with Builds, Schemes, and Workspaces
In This Chapter
Getting started with the Xcode build system
Understanding settings and options
Editing schemes and build configurations
Managing schemes, build actions, and targets
So far in this book, builds have been treated as one-click processes, and projects have been treated as stand-alone collections of files.
But it's a key feature of Xcode that the build process is almost infinitely customizable. Instead of treating the build process as a black box that takes source files and converts them into an app, you can break the build process into steps, change the settings and outputs from each step, or even add completely new steps—for example, to create hybrid projects with code written in other languages.
You also can combine projects and files in various ways to create hybrid builds that share related code; for example, you can develop a framework and a project that tests it or uses it at the same time.
In Xcode 3, this kind of mixed build was difficult to manage. In Xcode 4, sharing code between projects has been simplified with a new workspace system that makes it easy to work on multiple related projects simultaneously.
This chapter outlines the key features of the Xcode 4 build system and introduces the editors and options that control the build process.
Chapter 13 introduces some practical examples of build customization and explores more advanced build control options.
Getting Started with the Xcode Build System
Although you can use the build system in a simple one-click way, the underlying technology is powerful, but complex. The default one-click option deliberately hides the complexity, but you must be familiar with its key elements before you can begin customizing builds.
Figure 12.1 is a first look at how Xcode builds are organized.
These are the key elements:
![]() Projects: A project is a collection of source files that you can select and change using the editing tools introduced earlier in this book.
Projects: A project is a collection of source files that you can select and change using the editing tools introduced earlier in this book.
![]() Workspaces: A workspace is a container for one or more projects. Previous versions of Xcode were project-based. However, developers often need to work with source files in a more open way. It's not unusual to use combinations of files from the same code base in multiple related projects. Workspaces make it easy to do this. All projects in a workspace share the same build space, and you can use Xcode's build features to define how the sources are combined. Potentially you can also build multiple projects with a single build operation.
Workspaces: A workspace is a container for one or more projects. Previous versions of Xcode were project-based. However, developers often need to work with source files in a more open way. It's not unusual to use combinations of files from the same code base in multiple related projects. Workspaces make it easy to do this. All projects in a workspace share the same build space, and you can use Xcode's build features to define how the sources are combined. Potentially you can also build multiple projects with a single build operation.
![]() Targets: A target is a recipe for building the files in a project, and it defines its product—for example, an app or a framework. By default, a project includes a single target. You can add further targets, as needed. Note that a target doesn't have to be a finished app. You can also create targets that process code in other ways—for example, to run a selection of optional test macros to check that important features work correctly.
Targets: A target is a recipe for building the files in a project, and it defines its product—for example, an app or a framework. By default, a project includes a single target. You can add further targets, as needed. Note that a target doesn't have to be a finished app. You can also create targets that process code in other ways—for example, to run a selection of optional test macros to check that important features work correctly.
![]() Products: A product is the collection of files created by a target: an app, framework, test build, and so on.
Products: A product is the collection of files created by a target: an app, framework, test build, and so on.
Figure 12.1
The components of the Xcode build system

![]() Build actions: There are six standard actions, as shown in the figure. Build actions select one or more targets, build them, and then run them through further Xcode features. For example, the Run action loads the code into a runtime environment and launches a debugger, and the Analyze action runs the code through an analyzer to check for basic errors.
Build actions: There are six standard actions, as shown in the figure. Build actions select one or more targets, build them, and then run them through further Xcode features. For example, the Run action loads the code into a runtime environment and launches a debugger, and the Analyze action runs the code through an analyzer to check for basic errors.
![]() Scheme manager/editor: A workspace can have one or more schemes, which are defined in the scheme manager/editor. You can use schemes to customize build actions; for example, the Run action in one scheme builds one target, but in another scheme, it builds every target in the workspace.
Scheme manager/editor: A workspace can have one or more schemes, which are defined in the scheme manager/editor. You can use schemes to customize build actions; for example, the Run action in one scheme builds one target, but in another scheme, it builds every target in the workspace.
![]() Scripts: You can set up build actions to run pre-action and post-action scripts, which can play sounds, send e-mail messages, open alert boxes, copy files, and so on.
Scripts: You can set up build actions to run pre-action and post-action scripts, which can play sounds, send e-mail messages, open alert boxes, copy files, and so on.
![]() Settings and configurations: Although not shown in the figure, settings and configurations define low-level options for compilation, linking, and packaging. They're introduced in more detail later in this chapter.
Settings and configurations: Although not shown in the figure, settings and configurations define low-level options for compilation, linking, and packaging. They're introduced in more detail later in this chapter.
Even though Xcode 4 includes new simplified build management features, the relationship between the different elements involved in a build isn't outstandingly intuitive. You may need to read this chapter more than once before the relationships become clear.
![]() NOTE
NOTE
You don't need to understand the process in detail to create a simple App Store build, but some elements interact in unexpected ways. You'll find it easier to use productively if you have a good understanding of the build system.
Creating and organizing a workspace
When you create a new project, you automatically create a workspace to hold it. For simple app projects, you can ignore workspaces and simply save each new project as a stand-alone unit. For more complex applications that hold multiple projects, you can use a workspace to group related projects together.
The easiest way to use a workspace is to create an empty workspace and then add projects to it. To create a blank workspace, select File⇒New⇒New Workspace from the main Xcode menu. You can then add projects by right-clicking in the blank area at the bottom of the Project navigator, and selecting New Project….
You also can add existing projects. Select Add Files…, navigate to an existing project's .xcodeproj file, and select it.
![]() CAUTION
CAUTION
This is useful for simple shared development, but this option doesn't support source control, so use it with care. For more advanced source control options, see Chapter 14.
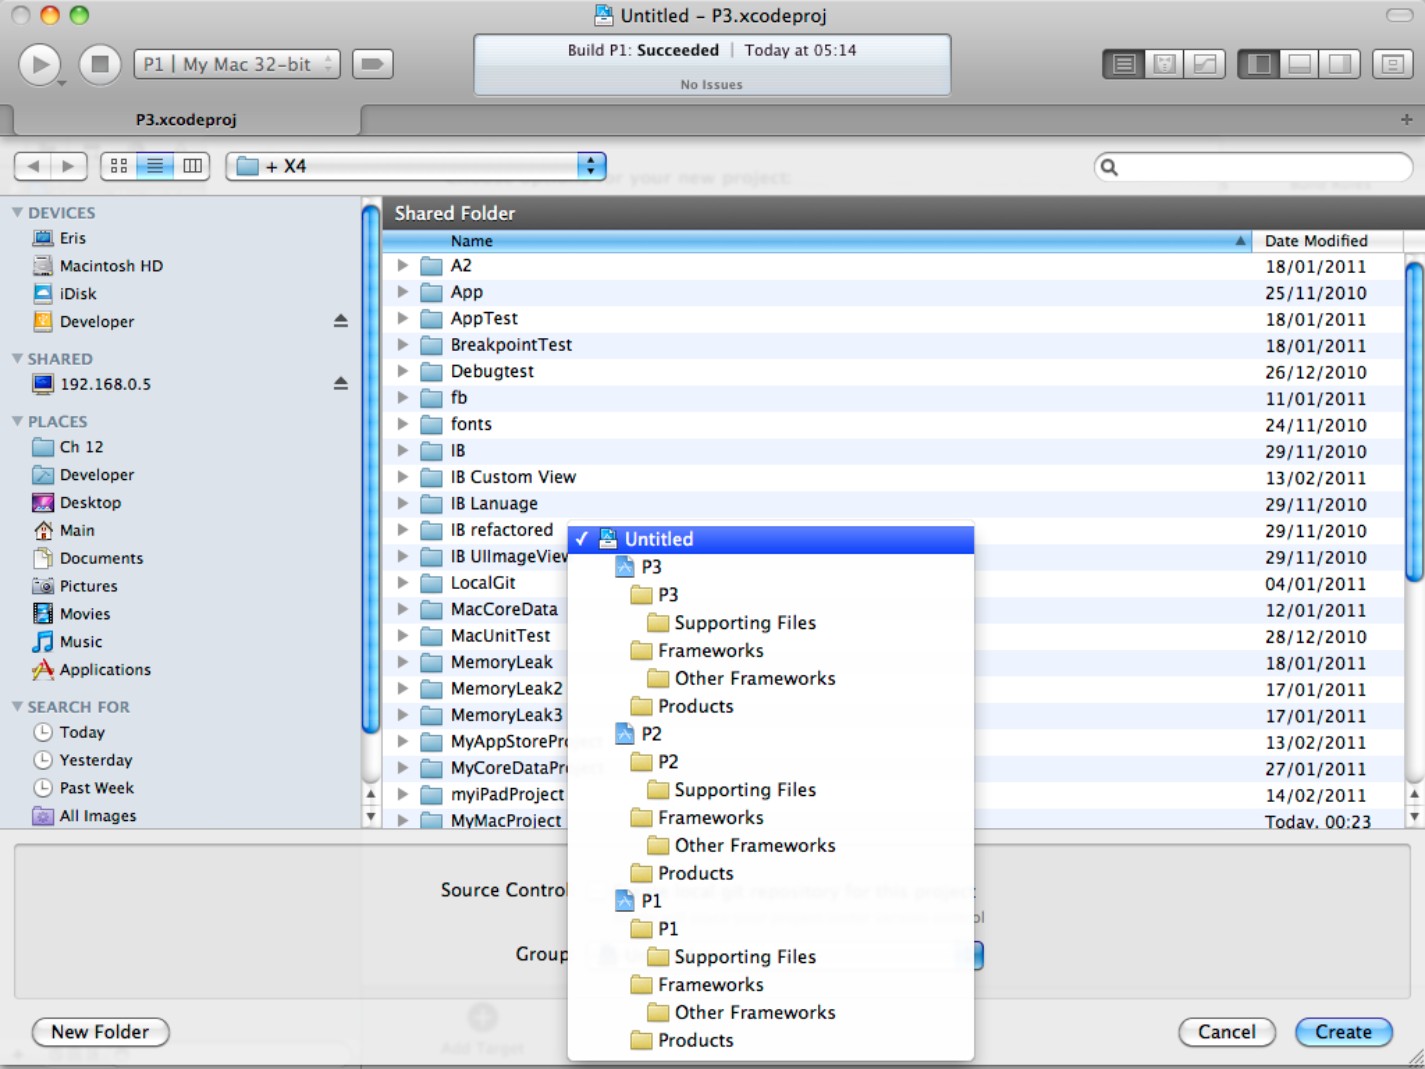
The workspace acts as an implied master group in the Project navigator. When you save your new project for the first time, you can use the Group pop-up at the bottom of the dialog box to control which group it's added to. The default is the new workspace, as shown in Figure 12.2.
You also can use this dialog box to define the project's save path in the usual way. Projects in a workspace can be saved to any path; they don't have to be saved to the same folder.
Figure 12.2
When selecting a project's group in a workspace, the default selection is usually correct.
![]() NOTE
NOTE
You can nest projects and put a project inside another project's group. This isn't usually a useful thing to do; projects are easier to work with when each has its own group.
Working with projects and targets
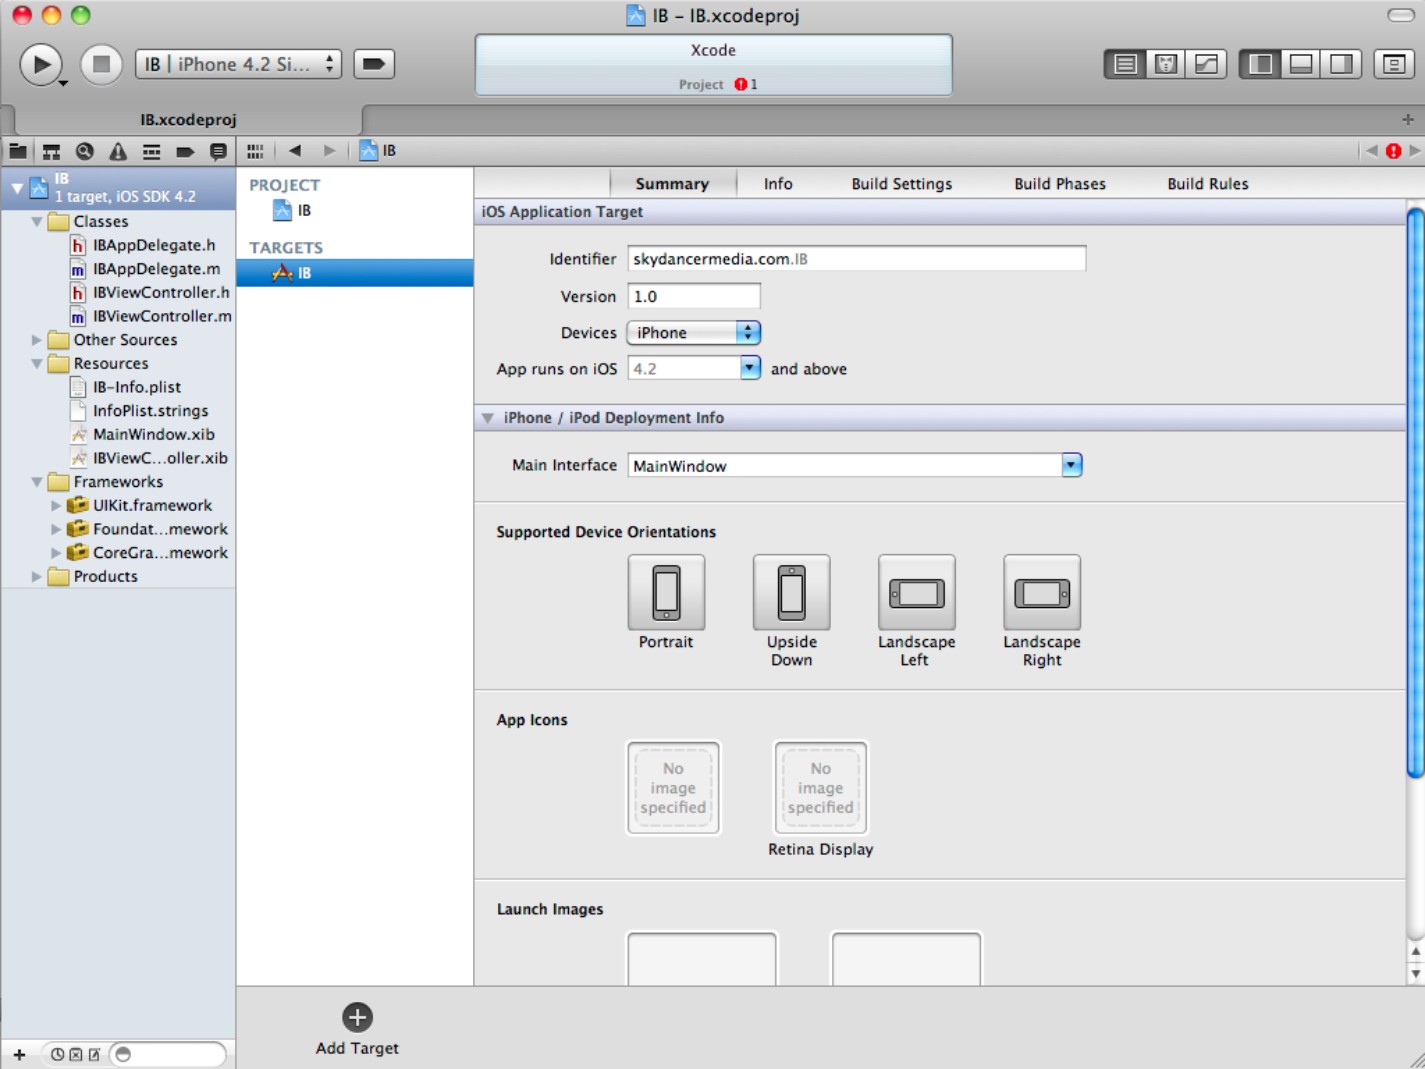
A workspace is a container and has no build settings or options. It's effectively a master group that holds other items. Projects and targets do have build options—hundreds of them. Xcode includes a separate build editor to manage them, shown in Figure 12.3. To open this editor, select the project name at the top left of the Project navigator. A list of options appears at the right, as shown in the figure.
![]() TIP
TIP
It may not be intuitively obvious that you need to click the project name to display the build editor. It's worth taking a few moments to fix this step in your mind to help you remember it later.
Figure 12.3
Navigating to the build editor. The project settings are shown by default.

The build editor is complex. There are two items in the gutter area to the left of the options: the PROJECT and TARGETS headings. As you might expect, the project icon displays the options for the project as a whole, while each target icon displays options for each target. Select a target, and you'll see a longer list of tab options at the top of the window, as shown in Figure 12.4.
By default, each has project has one target. If you need to process a project's files in two or more ways, you can define multiple targets for a project—as you see in Chapter 17, where you work with projects that include two targets, one that creates a standard build and one that creates a specialized build to implement automatic code testing. For standard simple app projects, you can keep the default single target.
Figure 12.4
Navigating to the target build settings. The tabs at the top include extra items that aren't included in the project settings.
Understanding settings and options
There are five critical points to remember about projects and targets:
![]() Projects and targets can have separate build options.
Projects and targets can have separate build options.
![]() Build options are not the same as build settings.
Build options are not the same as build settings.
![]() Build options include information needed to make a target, including selected artwork files, supported orientations, version numbers, property lists, and so on. They also include build settings.
Build options include information needed to make a target, including selected artwork files, supported orientations, version numbers, property lists, and so on. They also include build settings.
![]() Build settings are a list of low-level compiler, linker, and packager switches.
Build settings are a list of low-level compiler, linker, and packager switches.
![]() Target options override project options.
Target options override project options.
Xcode uses a priority hierarchy to calculate which settings and options to use when building a target. There's more information about this later in this chapter.
![]() NOTE
NOTE
In earlier versions of Xcode, you could also define an executable—a context in which a product would run. In Xcode 4, this option has been expanded and built into the new schemes feature, which is described later in this chapter.
Understanding the project options
If you select the project icon, you'll see two tabs:
![]() Info: This includes a minimum supported OS version, a list of configurations (selected build setting presets), and a summary of the files localized for specific languages. In practice, the Localizations option is essential for foreign language support, the Configurations option is useful to App Store build customization, and the SDK/Deployment/OS option is usually overridden by the target.
Info: This includes a minimum supported OS version, a list of configurations (selected build setting presets), and a summary of the files localized for specific languages. In practice, the Localizations option is essential for foreign language support, the Configurations option is useful to App Store build customization, and the SDK/Deployment/OS option is usually overridden by the target.
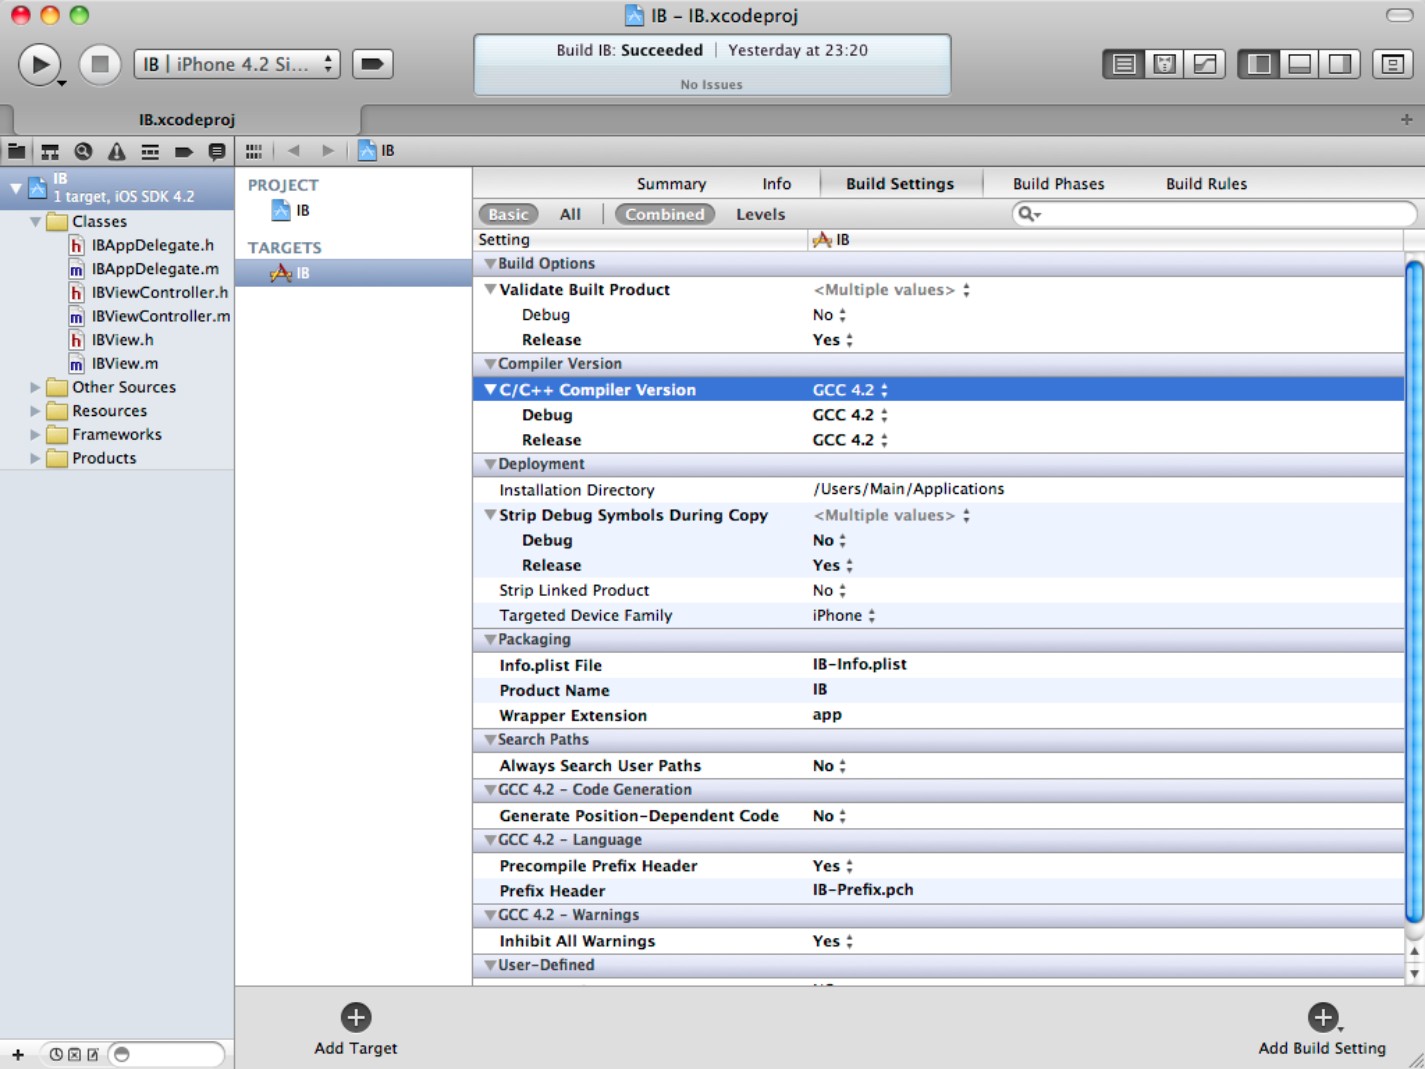
![]() Build settings: This is a long list with hundreds of compiler, linker, and deployment options that apply to the project as a whole. They can be overridden by the equivalent settings for each target.
Build settings: This is a long list with hundreds of compiler, linker, and deployment options that apply to the project as a whole. They can be overridden by the equivalent settings for each target.
Understanding the target options
If you select the target icon, or select one target if your project has many, you see five tabs with different options. Note that target options are independent. If your project has multiple targets, each has different options. These are the tabs you see:
![]() Summary: This includes basic build information, including an app version number, minimum OS, default nib, and so on. You must customize these settings to make a valid App Store build. These options are described in more detail in Appendix B.
Summary: This includes basic build information, including an app version number, minimum OS, default nib, and so on. You must customize these settings to make a valid App Store build. These options are described in more detail in Appendix B.
![]() Info: This is a text-like list of options that control app launch. Again, you must customize these settings for an App Store build. Note that this list is a plist—an XML property list. Editing techniques and contents are described in Appendix B.
Info: This is a text-like list of options that control app launch. Again, you must customize these settings for an App Store build. Note that this list is a plist—an XML property list. Editing techniques and contents are described in Appendix B.
![]() Build Settings: At first sight, this list looks identical to the project build settings: It's another list of compiler, linker, and deployment options. The two lists are very similar, but there are some minor differences. Remember that these target build settings override the project build settings.
Build Settings: At first sight, this list looks identical to the project build settings: It's another list of compiler, linker, and deployment options. The two lists are very similar, but there are some minor differences. Remember that these target build settings override the project build settings.
![]() Build Phases: The contents of this tab control the files that are processed and the order in which they're processed. Each phase defines the files and frameworks included in the build sequence. Here, you also can set dependencies to force a rebuild of a target when some related files are modified. For simple apps, you can ignore most of the features on this page, except for one: the option to include standard frameworks in your project.
Build Phases: The contents of this tab control the files that are processed and the order in which they're processed. Each phase defines the files and frameworks included in the build sequence. Here, you also can set dependencies to force a rebuild of a target when some related files are modified. For simple apps, you can ignore most of the features on this page, except for one: the option to include standard frameworks in your project.
![]() Build Rules: The rules define how files of each type are processed. Specifically, you can define or create custom scripts for each existing file type in the list, and you can add new file types of your own, with custom processing options. These advanced options aren't needed for simple apps; they become useful in more complex projects.
Build Rules: The rules define how files of each type are processed. Specifically, you can define or create custom scripts for each existing file type in the list, and you can add new file types of your own, with custom processing options. These advanced options aren't needed for simple apps; they become useful in more complex projects.
![]() CROSS-REFERENCE
CROSS-REFERENCE
Build settings are introduced in this chapter. Build phases and rules are described in more detail in Chapter 13.
Exploring build settings
As mentioned earlier in this chapter, the build settings include every compiler, linker, and packager option. When you build a project, Xcode converts these settings into command-line switches and includes them in the compiler scripts. The full list of settings is very long and can seem intimidating. But in practice, you can leave most settings unchanged in a typical project.
To work with the build settings, select the Build Settings tab in the build options window. The settings appear in an editor, with four buttons that control the layout of the UI. The first two buttons control which settings are visible, and the second two control how they're displayed. The settings appear in a list or table, with group headings. These are the settings:
![]() Basic: This layout lists a small subset of the build settings, as shown in Figure 12.5. It's not the most useful subset, but it does include some important settings. The list of settings is fixed, so you can't create your own selection.
Basic: This layout lists a small subset of the build settings, as shown in Figure 12.5. It's not the most useful subset, but it does include some important settings. The list of settings is fixed, so you can't create your own selection.
Figure 12.5
Within the basic build settings, the two most useful options are the Compiler Version and the Targeted Device Family.
![]() All: This layout lists every setting, as shown in Figure 12.6.
All: This layout lists every setting, as shown in Figure 12.6.
![]() Combined: Switches with multiple values appear as embedded menus. You can click a setting to select a different value.
Combined: Switches with multiple values appear as embedded menus. You can click a setting to select a different value.
![]() Levels: This is a complex view that illustrates how the settings cascade through various levels of defaults, as shown in Figure 12.7. This feature is explained below.
Levels: This is a complex view that illustrates how the settings cascade through various levels of defaults, as shown in Figure 12.7. This feature is explained below.
Figure 12.6
The complete list of settings is shown by the All button.

![]() TIP
TIP
You can use the hide/reveal triangles in the group headings to hide the less useful settings and simplify the display.
![]() TIP
TIP
If you open the Quick Help in the Utilities pane and select a build setting, you see a short but helpful description of the setting and the equivalent command-line switch. For more advanced customization, the settings are described in slightly (but not much) more detail in the official documentation, which has extra information about how some settings interact with others. Search for Build Setting Reference in the documentation in the Organizer.
Figure 12.7
The new Levels view shows multiple build settings in a single window.
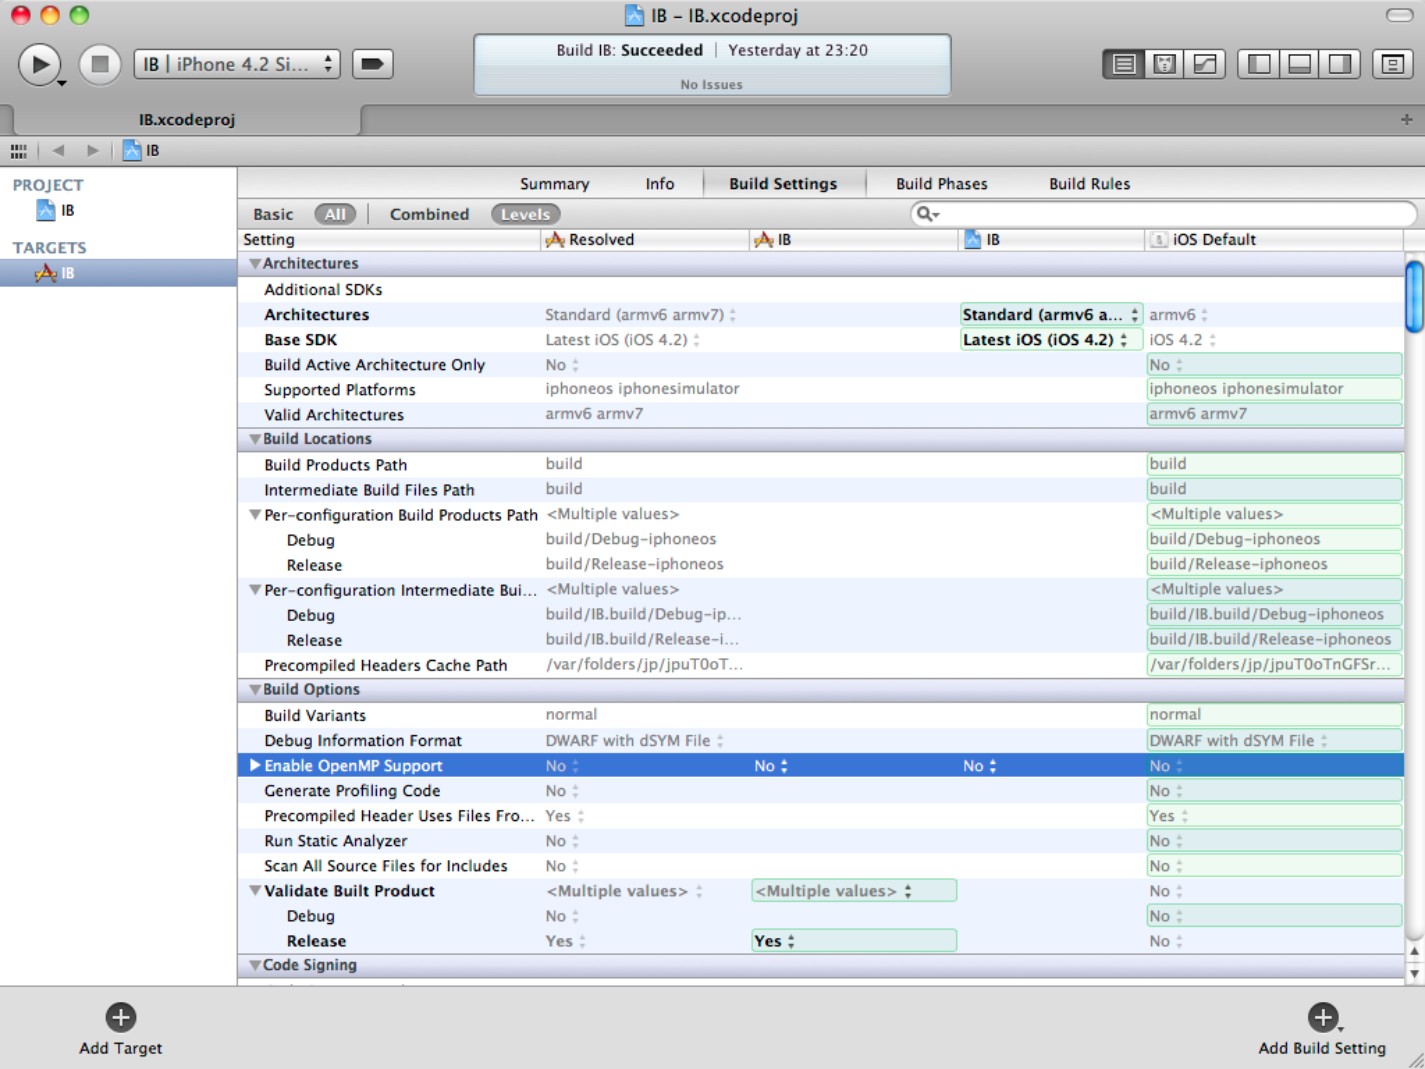
Understanding the Levels view
The Levels view has four columns when viewing target settings, and three columns when viewing project settings. It's not immediately obvious how this view works, but the design becomes clearer after you understand how it's organized.
There are two key points. The first is that Xcode build settings cascade through multiple levels of defaults. Each level overrides the previous level. When Xcode creates a build, it uses this table to find the settings with the highest priority and applies those to the build.
The order of priority flows from right to left. These columns are present:
![]() OS default: These are the standard default switches that apply when the other rows are empty.
OS default: These are the standard default switches that apply when the other rows are empty.
![]() Project settings: This list shows the Project build settings. It's identical to the list you can view by selecting the PROJECT icon and All/Combined buttons under the Build Settings tab. These settings override the OS defaults. If a project has multiple targets, the settings apply to all of them.
Project settings: This list shows the Project build settings. It's identical to the list you can view by selecting the PROJECT icon and All/Combined buttons under the Build Settings tab. These settings override the OS defaults. If a project has multiple targets, the settings apply to all of them.
![]() Target settings: This list shows the Target build settings for the current selected target. It's identical to the list you can view by selecting the All/Combined buttons. These settings override the project settings and the OS defaults. If your project has multiple targets, the settings in this column apply to the currently selected target. Other targets can have different settings.
Target settings: This list shows the Target build settings for the current selected target. It's identical to the list you can view by selecting the All/Combined buttons. These settings override the project settings and the OS defaults. If your project has multiple targets, the settings in this column apply to the currently selected target. Other targets can have different settings.
![]() Resolved: These are the final calculated settings applied to the build. Because they're calculated from the other columns, you can't edit them.
Resolved: These are the final calculated settings applied to the build. Because they're calculated from the other columns, you can't edit them.
Figure 12.8 illustrates how each level overrides the next. Levels with higher priority override those lower down the list.
The second key point is that Xcode only stores the highest level setting needed to create an unambiguous resolution.
If you scroll through the table, you'll see that many settings are left to their system defaults. There's no entry for either the project or the target. Because they're left empty, the resolved value is the same as the default.
This may seem like a trivial point, but in fact it's crucial. When you edit a target or project setting, you're not only modifying its value, you're also adding a new entry to the settings table.
Why does this matter? Consider the following sequence of actions:
1. You edit a project setting.
2. The setting has the highest priority, so it applies to all targets. You can change it repeatedly, and it's always applied.
3. Later on, you decide to edit that setting for one target.
4. The new target setting is applied as you'd expect.
5. You change the project setting again.
6. Because a target setting exists now, the new project setting isn't applied to the target. The target setting continues to override it.
As soon as you change a setting at the target level, you lock out all future project-level changes to that setting.
This is almost intuitive—but not quite. If you work exclusively in the Combined View, it can be difficult to understand what's happening, because sometimes changes you make are applied as you'd expect, and sometimes they aren't.
The Combined View doesn't illustrate the difference in priority between target and project settings. It also doesn't make it clear that if no target setting has been defined, a project setting can—confusingly—appear to override a target setting.
Figure 12.8
Build settings are arranged in levels. The diagram shows how levels with higher priority override lower levels.

![]() NOTE
NOTE
Advanced developers who use the command-line tools can override all settings by hand. This is a specialized and advanced technique, included in the figure for completeness. It's not supported from Xcode directly.
The Levels view has some quirks:
![]() The two central columns aren't labeled. They include the project name and an icon, but there's no text to indicate that you're editing project and target settings.
The two central columns aren't labeled. They include the project name and an icon, but there's no text to indicate that you're editing project and target settings.
![]() You can't edit the OS defaults or the Resolved column.
You can't edit the OS defaults or the Resolved column.
![]() There are some minor differences between the settings shown for a project and for a target.
There are some minor differences between the settings shown for a project and for a target.
![]() Both the target and project build settings include a Levels view. However, the version in the project settings doesn't include the target settings column.
Both the target and project build settings include a Levels view. However, the version in the project settings doesn't include the target settings column.
As a simple working rule, if you're developing an app with a single target, it's easier to ignore the project settings and work exclusively at the target level. Use the Target Levels view to edit and confirm the settings you want to change. Ignore the project column entirely.
If your project has multiple targets, it's standard practice to make project-level settings. But beware of the target-level lock out described earlier. Once you add a target-level setting, there's no way to delete it. If you attempt to apply project-level changes, it always overrides them.
Note also that the empty rows in the project and target columns aren't really empty. If you select them, you see that you can edit them.
![]() CROSS-REFERENCE
CROSS-REFERENCE
There's a more advanced guide to build settings in Chapter 13.
Working with Schemes and Build Configurations
Developers often need to customize builds for different purposes; for example, a test build for debugging is likely to have different build settings than a final App Store build. Xcode handles this in two ways.
Build configurations allow you to change a subset of build settings for a specific aim: debugging, release, and so on. Potentially, every build setting can hold a different value for each configuration. By default, most settings take a single value; only a small number are initialized with multiple values.
Schemes give you wider control. The key feature of schemes is that they define build actions that allow you to build your project for different purposes: testing and debugging, code analysis, archiving, and so on. Schemes include build configurations, but add other build and test options.
Getting started with build configurations
Switching configurations is a quick way to change a group of build settings in a single operation, as shown in Figure 12.9. When you select a configuration, Xcode automatically selects the corresponding values and applies them to the build. Single-valued settings remain constant.
In practice, this means that you can quickly customize a configuration to create a build for a specific aim—debugging, local testing, App Store release, Ad Hoc release, and so on—without having to create a separate independent list of build settings.
Conveniently, configurations include the settings needed to create useful debug and distribution builds. Less conveniently, these settings are scattered randomly throughout the full list of all build settings.
![]() NOTE
NOTE
Why not duplicate every build setting for a configuration? The practical reason is that the settings editor can display multiple values for different configurations. But duplicating every setting for all possible configurations would make the editor unwieldy and difficult to work with. In practice, most settings don't need to be modified, so most of the duplication would be unnecessary.
Figure 12.9
Most build settings have a single value. Settings included in a configuration file can take and display multiple values. The resolved value depends on which configuration is active.
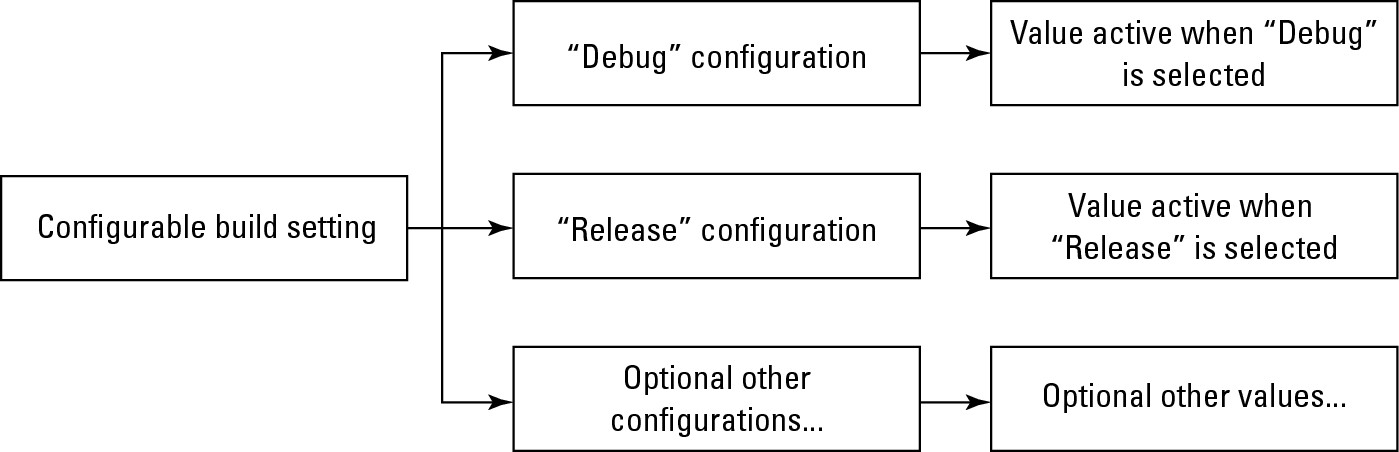
By default, each new project is created with two configurations: Debug and Release. You can create your own configurations by duplicating either or both of these and giving your new configuration a different name. You can then modify its settings and save it with your project.
To create a setting with multiple values, select it and click the reveal triangle at the far left. The setting opens to show a list of configurations. You can now set different values for each configuration.
The settings editor gives multiple values special treatment. It displays them with a <Multiple Values> tag, and the configuration settings appear in rows under it. Figure 12.10 illustrates this with an example of a key configuration setting for iOS projects: the Code Signing Identity.
![]() NOTE
NOTE
Configurations are project-specific. Configuration names and settings are part of a project. For more advanced configuration customization, see Chapter 13.
Figure 12.10
Viewing multiple configuration values for the Code Signing Identity setting

Table 12.1 lists every setting that defaults to multiple values. In practice, you can ignore most of them, because the essential differences can be summarized as follows:
![]() Debug: This configuration includes debug symbols—an appended list of strings and memory addresses used to display human-readable information in the debugger. On iOS, this configuration signs code with the Developer Identity so it can be tested on live hardware.
Debug: This configuration includes debug symbols—an appended list of strings and memory addresses used to display human-readable information in the debugger. On iOS, this configuration signs code with the Developer Identity so it can be tested on live hardware.
![]() Release: You can use this configuration as the basis of a build suitable for distribution —for example, Ad Hoc beta testing or App Store upload. But it typically has to be modified to achieve this. This configuration doesn't include debug symbols. On OS X, this configuration creates an app that can be run by double-clicking, but it doesn't include App Store distribution information and isn't wrapped in an installer package. On iOS, this configuration is useless without further customization. It doesn't create a build that you can upload to the App Store or e-mail to beta testers.
Release: You can use this configuration as the basis of a build suitable for distribution —for example, Ad Hoc beta testing or App Store upload. But it typically has to be modified to achieve this. This configuration doesn't include debug symbols. On OS X, this configuration creates an app that can be run by double-clicking, but it doesn't include App Store distribution information and isn't wrapped in an installer package. On iOS, this configuration is useless without further customization. It doesn't create a build that you can upload to the App Store or e-mail to beta testers.

Understanding schemes
Schemes take the various build options and configuration settings and wrap extra features around them.
By default, when you build a project, Xcode creates a test build that includes debugging symbols. It launches the debugger and attaches it to the active runtime automatically.
In Xcode, this sequence is one of six standard build actions—options that build and process targets in various ways. These are the standard actions:
![]() Build: Builds one or more targets—in other words, creates their products, but doesn't launch, process, or use them in any other way. This action is the master action. It's an essential first step and is performed automatically by all other actions. You also can run it manually with the Project⇒Build option in the main Xcode menu.
Build: Builds one or more targets—in other words, creates their products, but doesn't launch, process, or use them in any other way. This action is the master action. It's an essential first step and is performed automatically by all other actions. You also can run it manually with the Project⇒Build option in the main Xcode menu.
![]() Run: Builds and runs the app in the debugger. This is the default action, triggered when you click the big Run button in the main Xcode toolbar.
Run: Builds and runs the app in the debugger. This is the default action, triggered when you click the big Run button in the main Xcode toolbar.
![]() Test: Builds and runs the unit testing features described in Chapter 17. If the project doesn't include a unit testing target, this action does nothing.
Test: Builds and runs the unit testing features described in Chapter 17. If the project doesn't include a unit testing target, this action does nothing.
![]() Profile: Builds, launches the Instruments profiling and testing application described in Chapter 16, and loads the app into it.
Profile: Builds, launches the Instruments profiling and testing application described in Chapter 16, and loads the app into it.
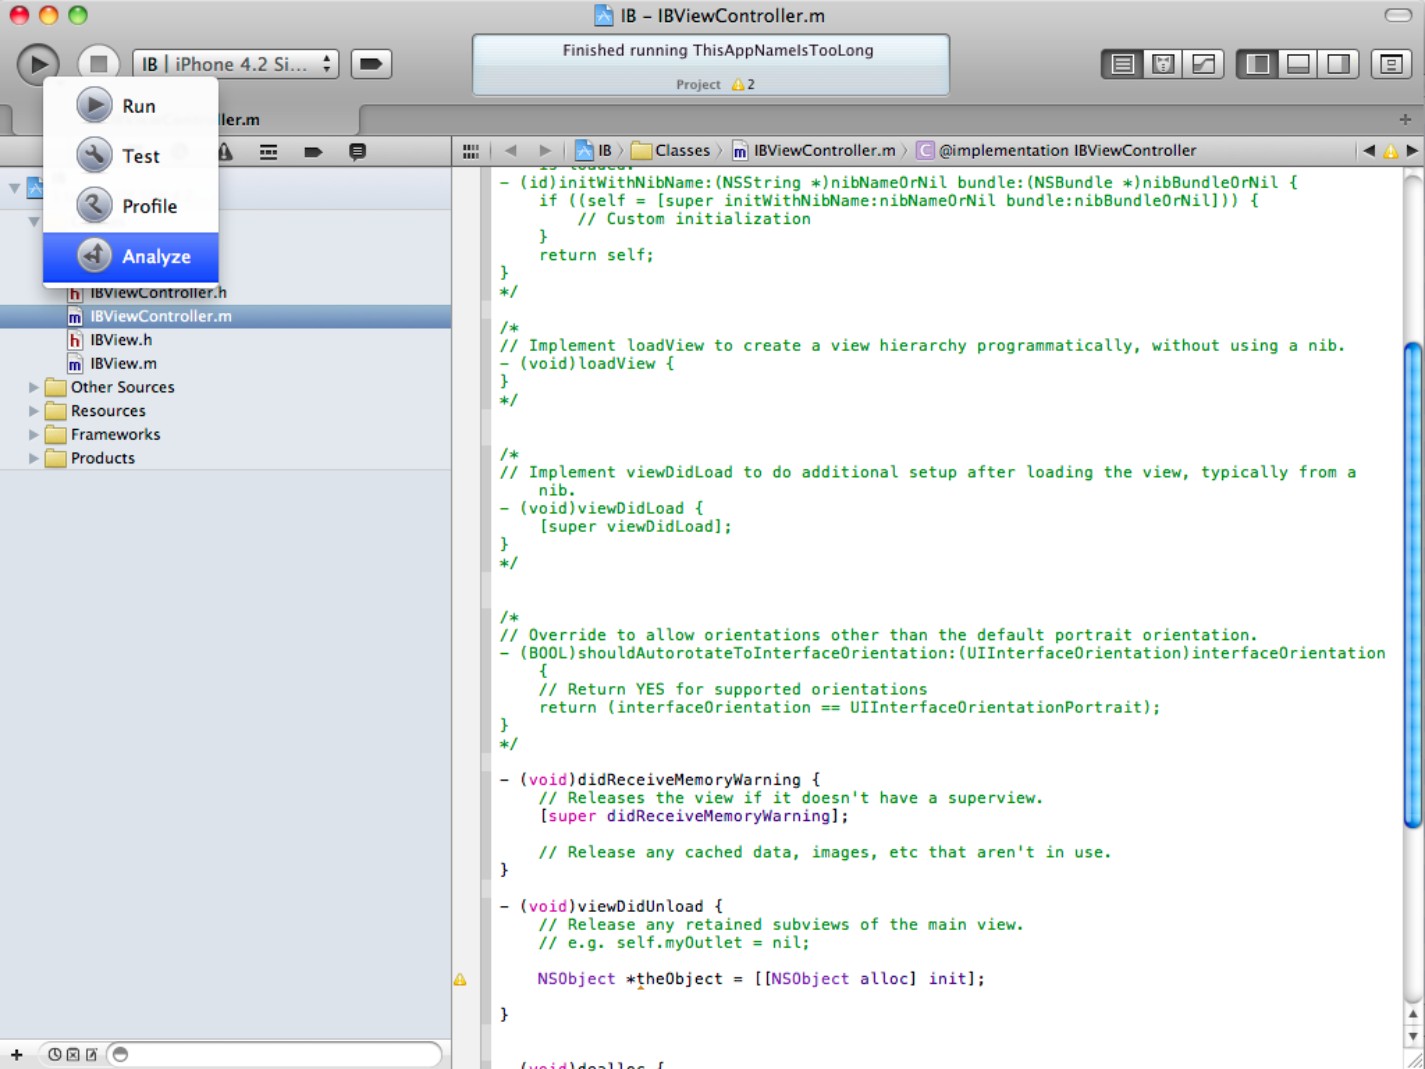
![]() Analyze: Builds and runs the code analyzer described in Chapter 15. Although a full build may not be necessary for code analysis, Xcode runs the Build action anyway.
Analyze: Builds and runs the code analyzer described in Chapter 15. Although a full build may not be necessary for code analysis, Xcode runs the Build action anyway.
![]() Archive: Builds and packages an app ready for distribution, adding it to the Archive list in the Organizer (introduced in Chapter 10). This option is accessible only through the Product menu and isn't included in the toolbar pop-up.
Archive: Builds and packages an app ready for distribution, adding it to the Archive list in the Organizer (introduced in Chapter 10). This option is accessible only through the Product menu and isn't included in the toolbar pop-up.
The easy way to get started with schemes is to click and hold the master Build button at the top left of the Xcode toolbar. You see four of the actions in the pop-up list, as shown in Figure 12.11. You can select from the full list of actions under the Product header in the main Xcode menu.
You can use these build actions without changing them, but you also can customize them. At the very least, you should be familiar with the action options, because they interact with Xcode's main menu, build configurations, and build settings in ways that aren't obvious.
![]() NOTE
NOTE
You can't easily create your own custom build actions. The standard actions are hardwired into Xcode, and you can't extend or modify the list directly. Expert developers can create their own customized build scripts and run them from the command line, but this takes them out of the Xcode environment.
Figure 12.11
Selecting a build action from the toolbar
Editing schemes
Schemes define how each build action is customized, to define what happens before, during, and after each action. You also can set up each action to build a selection of targets.
Schemes are managed using Xcode's scheme editor/manager, which has separate dialog boxes for editing schemes and for managing them. You can use it to create a new scheme, edit an existing scheme, or manage a collection of schemes. Simple projects typically need a single scheme, so the edit option is the most useful.
You can access the editor/manager in two ways:
![]() The main Xcode Product menu header includes three scheme options at the bottom of the list.
The main Xcode Product menu header includes three scheme options at the bottom of the list.
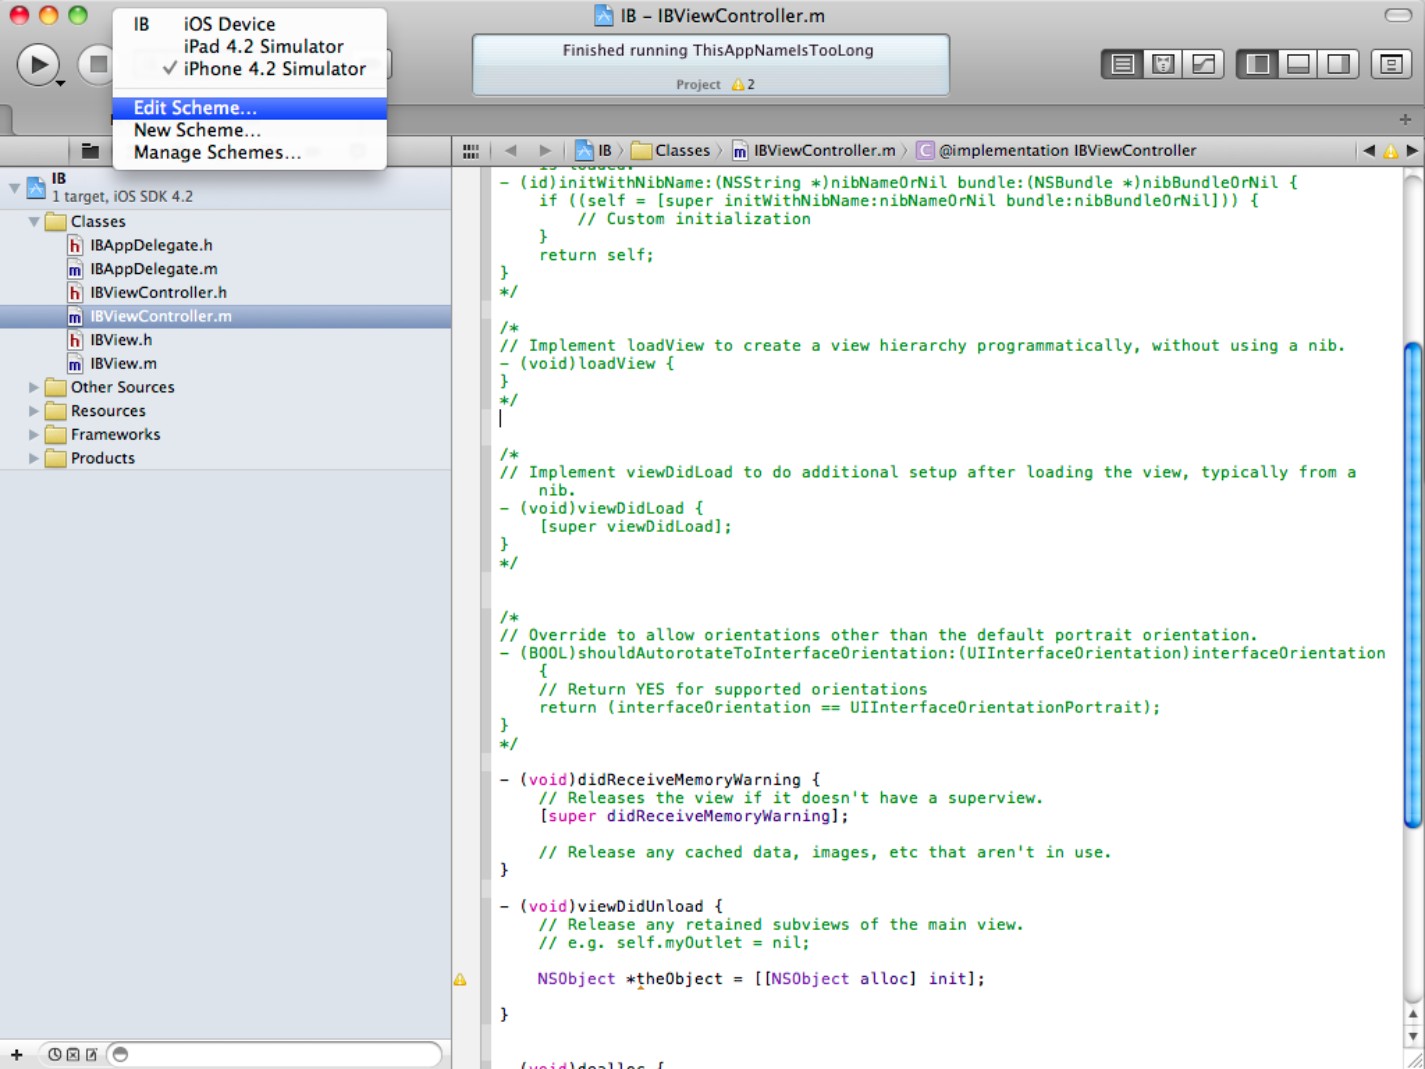
![]() The same options appear at the bottom of the destination (platform) drop-down menu in the main Xcode toolbar, as shown in Figure 12.12.
The same options appear at the bottom of the destination (platform) drop-down menu in the main Xcode toolbar, as shown in Figure 12.12.
Figure 12.12
The simple way to display the Scheme editor
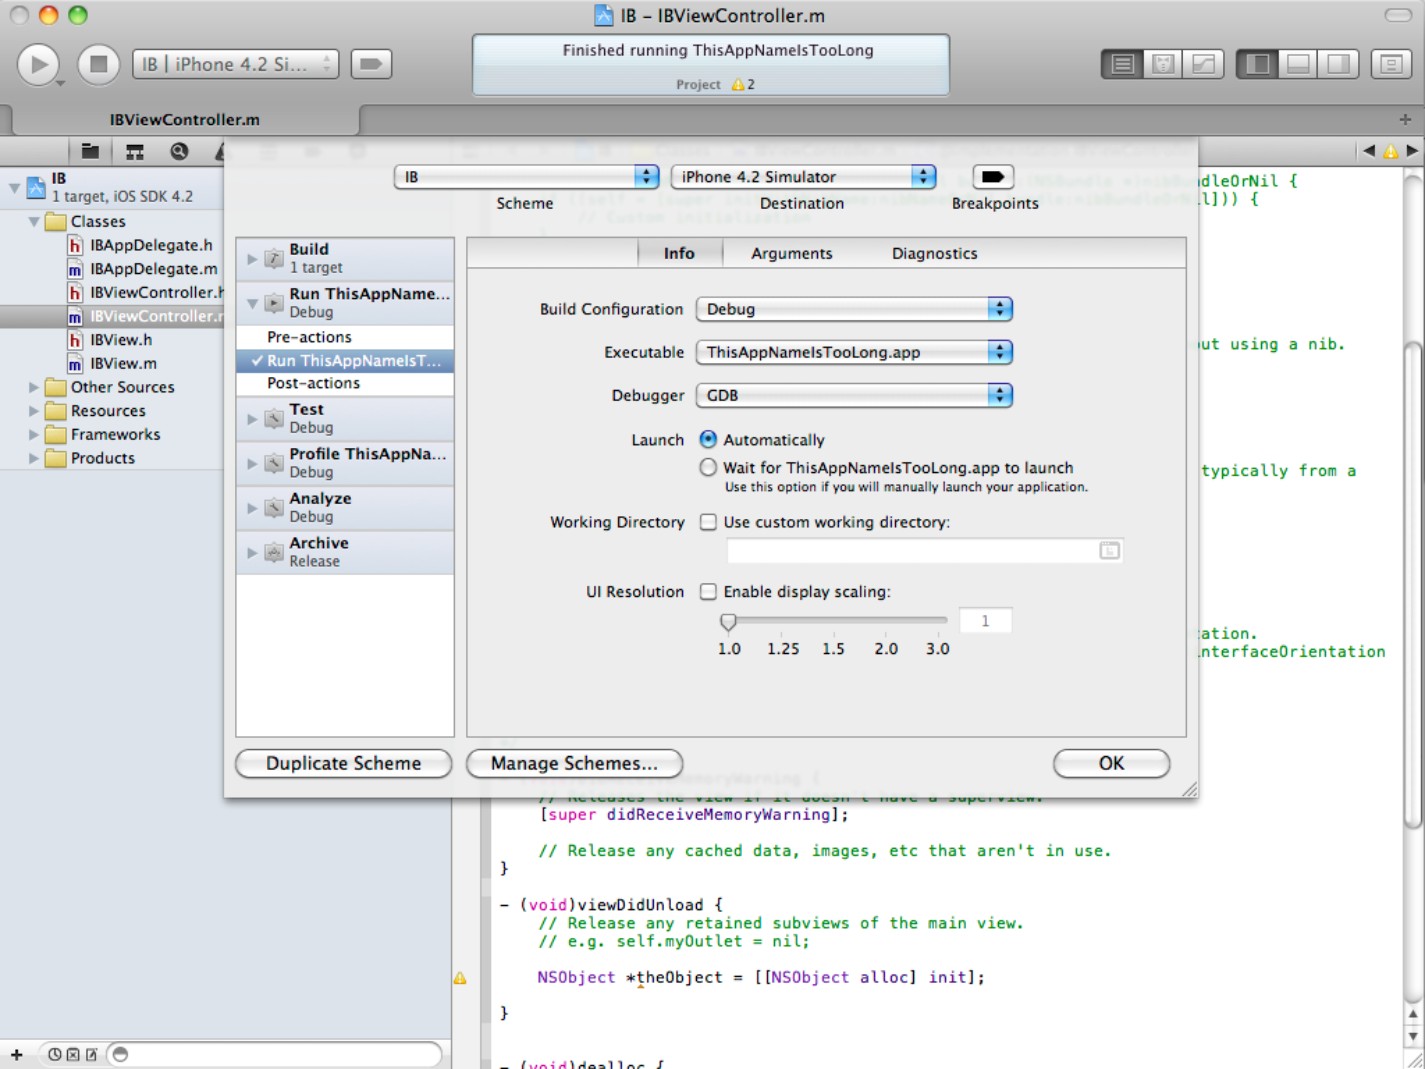
The editor is shown in Figure 12.13. It's a deceptively simple dialog box that hides some very powerful features. The five standard build actions are shown in a list at the left, with a special Build catch-all option that controls which actions are supported by the project. (The Build option is described in more detail later in this chapter.)
You can do the following in the editor:
![]() Click the reveal triangle to reveal a list of pre-action scripts, action options, and post-action scripts.
Click the reveal triangle to reveal a list of pre-action scripts, action options, and post-action scripts.
![]() Change the build action options under the Info tab in the pane on the right.
Change the build action options under the Info tab in the pane on the right.
![]() For selected actions, you can set further customization options, including optional command-line arguments.
For selected actions, you can set further customization options, including optional command-line arguments.
![]() For the Run action only, you also can enable extra low-level diagnostics and logging features.
For the Run action only, you also can enable extra low-level diagnostics and logging features.
![]() For the Build action only, you can include other possible targets and select the targets that are built by the other standard actions.
For the Build action only, you can include other possible targets and select the targets that are built by the other standard actions.
![]() Click the Manage Schemes button to open the Scheme Manager dialog box.
Click the Manage Schemes button to open the Scheme Manager dialog box.
Figure 12.13
Using the Scheme editor
Each action has different options you can modify, although there's some overlap between them. The options control what happens after a build, what happens before and during the build run, and what happens after the run. By default, nothing happens before or after an action, but you can change this by adding custom scripts for each build action. The options also control other settings, including the build configuration used by the action.
Selecting a build configuration
This option is available for every action. Use the drop-down menu to select one of your project's build configurations. If you create a custom build configuration, it appears in the menu automatically.
Adding pre-action and post-action scripts
Each build action has six stages. The first three stages run the default build action. The last three define what Xcode does with the output from the build.
1. Xcode runs one or more pre-action script for the build, if defined.
2. The project runs the default build action: It compiles, links, copies, and otherwise processes the files to create one or more targets.
3. Xcode runs one or more post-action scripts for the build, if defined.
4. The main action runs one or more optional pre-action scripts.
5. The main action performs its task—one or more built files is loaded into the debugger, analyzed, profiled, tested, and so on.
6. The main action runs one or more optional post-action scripts.
You can use pre-action and post-action scripts for set-up and tear-down, messaging, and to trigger other arbitrary events. Scripts can be shell scripts or AppleScript code. You also can select a pre-written script that sends an e-mail message.
These are some possible applications of scripts:
![]() Playing a sound at the end of an automated test or debugging run
Playing a sound at the end of an automated test or debugging run
![]() Copying files generated during testing or debugging to another Mac, uploading them to a server, or e-mailing them
Copying files generated during testing or debugging to another Mac, uploading them to a server, or e-mailing them
![]() Launching another application that uses the results of a test run
Launching another application that uses the results of a test run
![]() Using the speech synthesizer to report test results from a run
Using the speech synthesizer to report test results from a run
![]() Bringing some other window to the front of the desktop
Bringing some other window to the front of the desktop
If you can write AppleScript, scripting is an immensely powerful feature for automated testing and test reporting.
![]() NOTE
NOTE
For information about AppleScript development, see the companion AppleScript Developer Reference title.
![]() CAUTION
CAUTION
Note that scripting shouldn't be used for basic build control. If you need to set build switches, control which files are included in a project, or define how they're processed, use the Build Phases feature described in Chapter 13. Scripting is designed to control what happens after a build, not what happens during a build.
To add a pre-action or post-action script, select an action, click its reveal triangle to show the three optional stages, and select either the Pre-actions or Post-actions option. By default, you see a message telling you that no actions are defined. Click the + (plus) icon at the bottom left of the pane, and select either the New Run Script Action or New Send Email Action option, as shown in Figure 12.14.
For a scripted action, you can either type a script or drag and drop an existing script into the script pane. The example code in the figure plays one of the system sounds. You can add multiple independent scripts.
For an e-mail action, fill in the e-mail fields. The e-mail message is sent automatically when the script runs.
To remove an action, click the close box at the top left of the script's sub-pane, or select the action by clicking its title bar. Click the - (minus) icon at the bottom left of the pane to delete it.
Figure 12.14
Adding a couple of pre-action scripts

![]() NOTE
NOTE
To clarify the terminology, scripted actions are optional and can be run before and after one of the five standard build actions, which are fixed.
Setting arguments and environment variables
The Run, Test, and Profile actions include an Arguments dialog box. You can use it to specify arguments and environment variables that are passed to your application when it launches, via the standard C language argc/argv placeholders. It's up to you to define what your application does with these variables. Click the + (plus) and - (minus) icons in the panes of the Arguments dialog box to add and remove items.
![]() CAUTION
CAUTION
These are not build flags or switches. They're passed to your application, not to the compiler/linker.
Selecting a debugger
For OS X projects, you can override the debugger selected in the build configuration here. At the time of this writing, for iOS projects, the only debugger option shown here is GDB.
Setting Run action options
The Run action has some unique features. You can use the Executable menu to select which file is run. By default, this menu selects the app created by the build, but for more complex projects, such as testing a plug-in in a wrapper/master application, you can nominate some other file.
You also can select a custom working directory. This makes it easy to find files generated by the app and saved to its local file space, which is particularly useful for iOS projects.
For both the Run and Profile processes, you can scale the display with the UI Resolution option.
![]() CAUTION
CAUTION
This feature works only on OS X projects. At the time of this writing, UI elements aren't always scaled consistently.
In the Arguments dialog box, you can add an optional list of modules with further debug symbols. This is a specialized feature used to include symbols from modules that may not be built into your project.
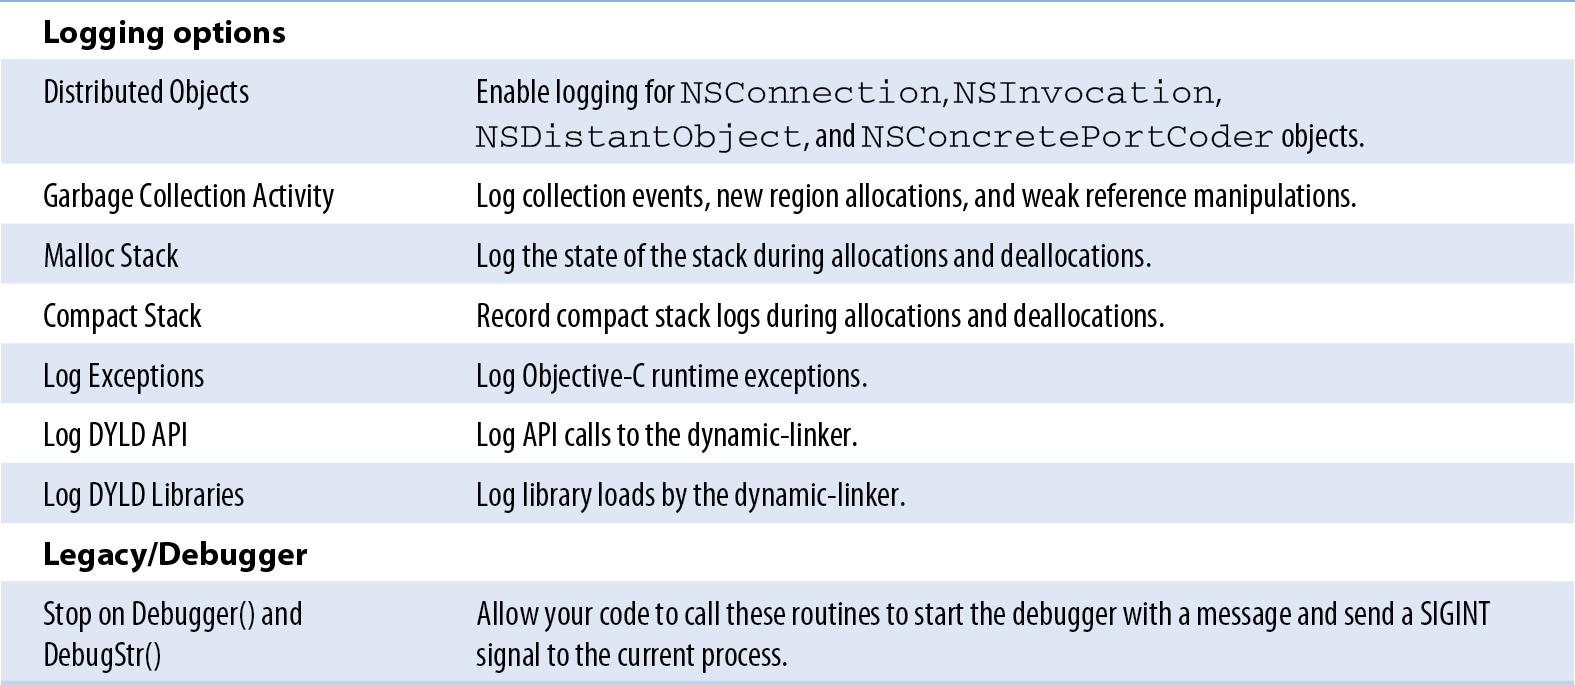
The Diagnostics dialog box enables specialized low-level diagnostic options. You can control memory management, enable logging for various events and exceptions, and allow your application to send messages to the debugger. Table 12.2 lists the options.

Setting Profile action options
The Profile action options are very similar to the Run process options. In fact, for the Arguments list, you can check the Use the Run action's options box to copy the arguments and environment variables from the Run action's settings.
The significant feature here is the Instrument option. You can use this to launch a default instrument automatically. This saves you having to select an instrument by hand.
![]() CROSS-REFERENCE
CROSS-REFERENCE
For more about instruments and profiling, see Chapter 16.
Setting Archive process options
App Store and Ad Hoc distribution builds are described in detail later in this chapter. But as a preview, you typically either edit the standard Release configuration or make a copy. A key fact to remember is that if you create a copy for a distribution build, you must select the copy for the Archive action. Otherwise, the Archive action defaults to the standard Release configuration, which is likely to have incorrect settings.
Working with the Build action
The Build action has been left until last because it has some unusual features and a unique edit page.
Selecting common scripts
You can add pre-action and post-action scripts in the usual way. Because Build is the master action and is included automatically in the other actions, any scripts you add here are run by every action.
Selecting targets for each action
The editor also defines which targets are built by the other standard actions. The design of this editor isn't outstandingly intuitive, so it's worth taking the time to understand how to use it effectively.
As shown in Figure 12.15, targets are listed vertically at the left and the standard build actions are listed across the top. When you check a box under an action, it tells Xcode to build that target when you run that action.
Figure 12.15
Selecting the targets built by each action

For example, with the settings in the figure, running Profile builds MyMacProject only. Running Test or Archive builds AnotherTarget only. Running Analyze builds both.
When you check the Parallelize Build box, Xcode builds independent targets in parallel. This isn't usually a timesaver on a single machine. But if you have more than one Mac, you can split the build process across a network, which is a timesaver, especially for complex projects.
The Find Implicit Dependencies tells Xcode to find and build dependent targets automatically.
Adding targets
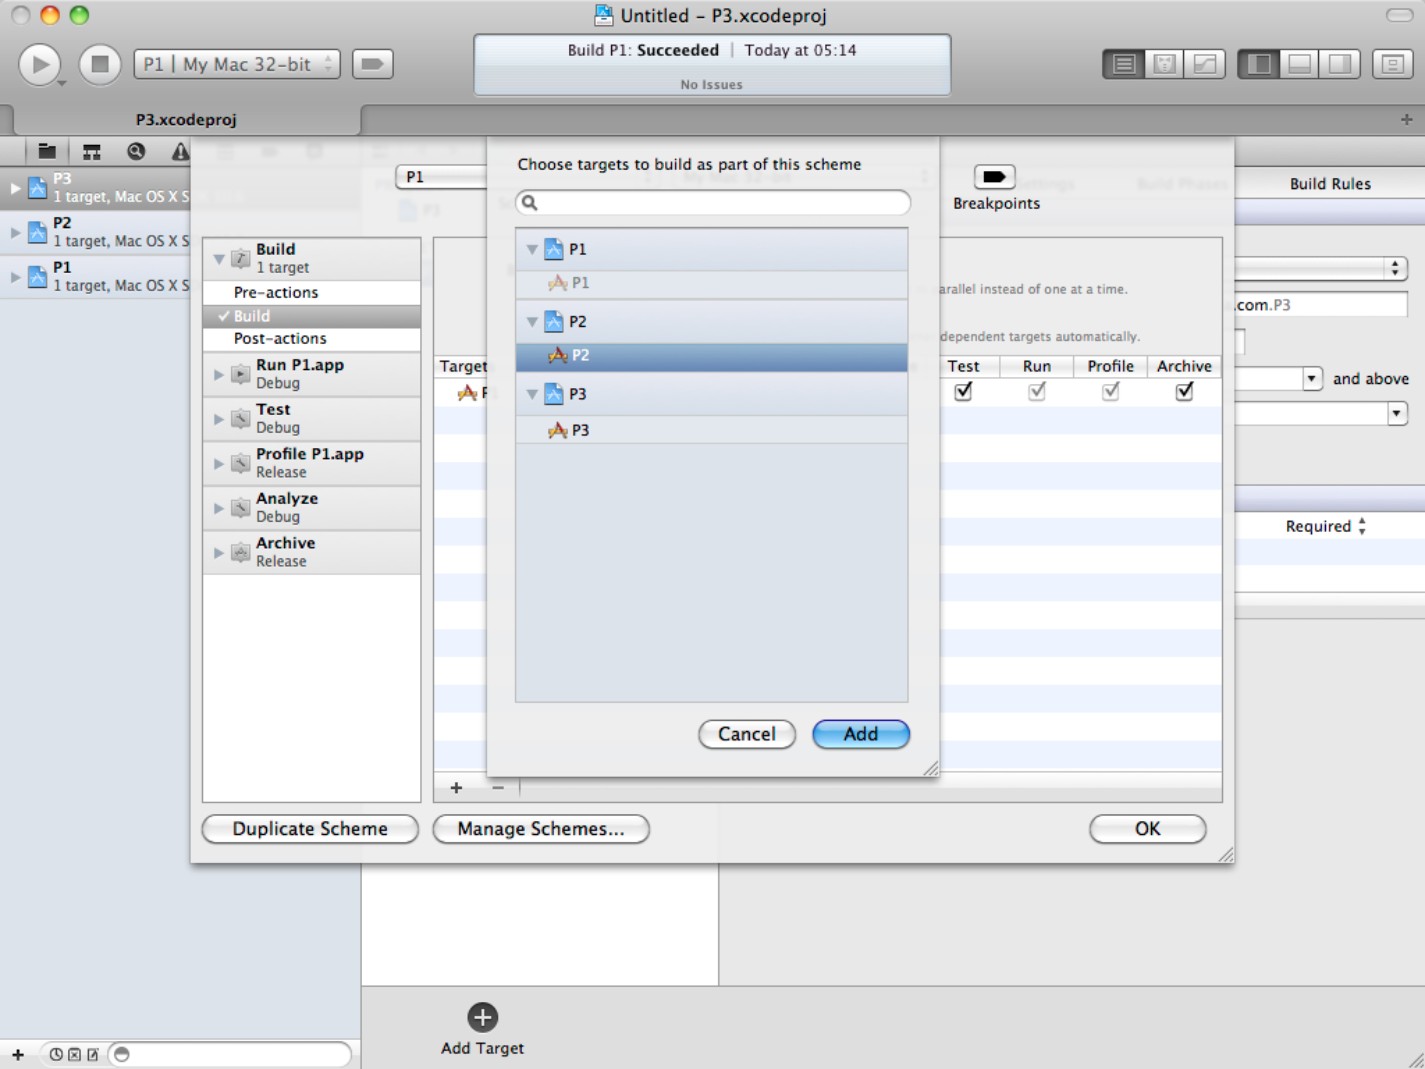
Before you can select a target, you must add it. Unfortunately, when you create a new target in Xcode, it doesn't appear on this page automatically. You must add it manually before you can force a build action to build it.
To add a target, use the main build options pages shown earlier in this chapter. You can then add the target to this page by clicking the + (plus) icon near the bottom left and selecting the new target from the list, as shown in Figure 12.16.
Figure 12.16
Adding a target
Note that if your workspace has multiple projects, you can select a target from any project in the workspace. This is the easiest way to create complex multi-target builds.
![]() CAUTION
CAUTION
You can't create new targets for a project here; you can only add targets that were already created elsewhere in Xcode.
Understanding hidden effects
When there's a single target, enabling and disabling the actions has some erratic effects elsewhere in Xcode. With a single target, you can't disable the Run and Profile actions at all. If you disable Test and Archive, the corresponding options in the main Xcode menu become grayed out, so you can't select them. If you disable Analyze, the corresponding menu option isn't grayed out.
You can still select the actions with the pop-up menu shown earlier (refer to Figure 12.11), but if you do, you get an error message telling you that the action has been disabled.
Because none of these effects makes a great of deal of sense, it's easier to ignore this page when your project has a single target. The default settings leave every action enabled.
Managing schemes, build actions, and targets
By default, each project has a single scheme. But whenever you create a new target, Xcode 4 autocreates a new scheme for it.
There's almost limitless potential for confusion in this arrangement, because the UI doesn't make the distinction between schemes and targets clear. In fact, the new scheme and the new target have the same name.
To clarify the relationship, remember the following:
![]() The scheme menu selects schemes, not targets.
The scheme menu selects schemes, not targets.
![]() In Xcode 4, you never build a target directly. Instead, you run a standard build action.
In Xcode 4, you never build a target directly. Instead, you run a standard build action.
![]() The action defines which targets are built.
The action defines which targets are built.
![]() A scheme can define separate multiple targets for each action.
A scheme can define separate multiple targets for each action.
![]() Before a scheme can build multiple targets, you have to add each target to the scheme by hand.
Before a scheme can build multiple targets, you have to add each target to the scheme by hand.
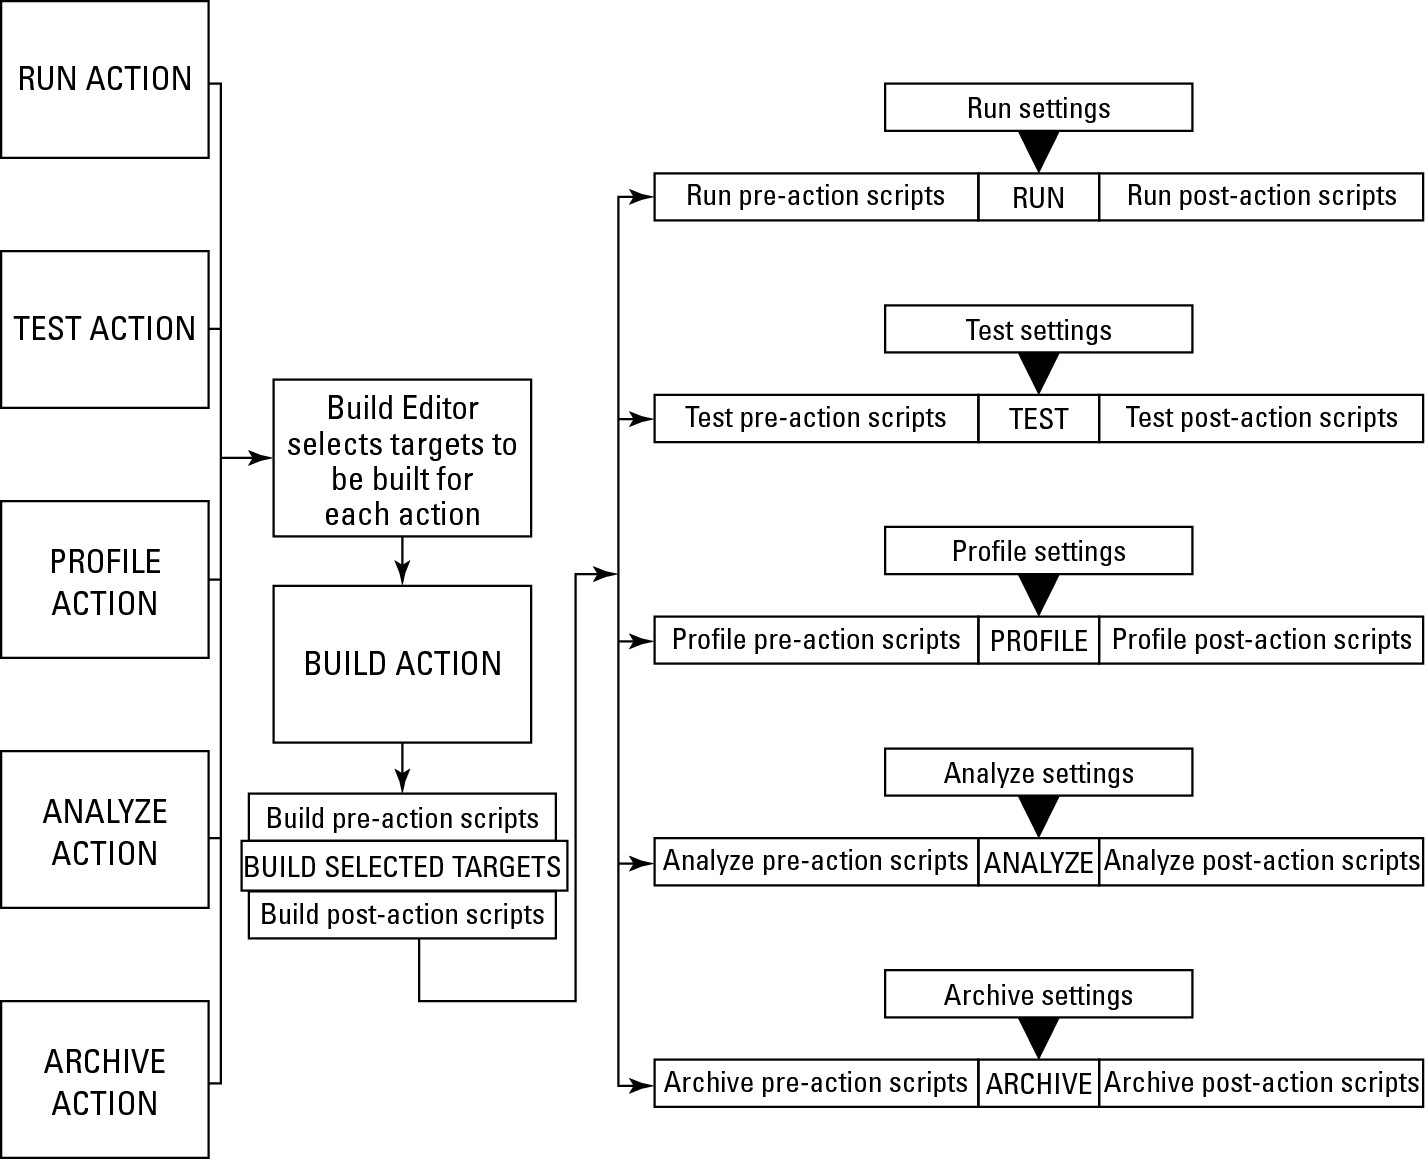
Figure 12.17 clarifies the anatomy of a scheme. The Build action is central because it's run by every other action, and it selects which targets are built by each action.
When you create a new target and Xcode autocreates a scheme for it, it enables all the build actions for it. This may or may not match your needs, depending on how your project is organized. For example, if you're creating a framework and building a test project around it, you're more likely to build both at the same time.
Figure 12.17
The anatomy of a scheme. The Build action is effectively a subroutine for the other actions. It also can be run independently.
Often, to avoid possible confusion, it's useful to turn off autocreation and manage schemes manually. You can create them by hand as needed, or if you have multiple targets and need a scheme for each, you can click the Autocreate Schemes Now button.
It's also helpful to create and rename schemes for specific build and test events—for example, “Build All.” Naming your schemes after your targets is likely to distract you, except for those relatively rare occasions when you have a project with multiple independent targets that you want to build separately.
The key point isn't that there's a right way and a wrong way to use schemes, but that you must understand the relationship among targets, schemes, and autocreation to work with multiple targets effectively.
Figure 12.18 shows the Manage Schemes dialog box. To disable autocreation, make sure the Autocreate schemes box at the top left is unchecked. To create a new scheme manually, select the + (plus) icon near the bottom left. You can choose to create a new scheme or duplicate an existing scheme. The - (minus) icon deletes a scheme. You can use the gear (action) icon to import and export schemes for reuse across other projects.
The final option is the container column, which defines whether the scheme is stored in a project or workspace. The advantage of storing a scheme in a project is that when you select the Shared option to the right of the Container column, everyone who is using that project can use the scheme also.
![]() CAUTION
CAUTION
Sharing a scheme means that others can delete it or modify it without your permission.
Figure 12.18
Managing multiple schemes

![]() NOTE
NOTE
Note that the scheme menu displays multiple destinations for each scheme. A destination is a platform—or more technically, an SDK. For example, an iOS scheme can select an iOS device, the iPhone Simulator, or the iPad Simulator as a destination. Destinations aren't stored or selected in a scheme, and you'll see that every scheme gives you the same platform choices. Typically, you select a scheme, then you select an SDK, and finally you select a build action, to create a build for that SDK.
Summary
This chapter introduced the Xcode build system. It outlined the relationship between workspaces, projects, targets, build actions, and schemes. It introduced build options and build settings, and it illustrated how settings are prioritized and how you can modify them in the build editor.
Next, it explained how build configurations define project-wide containers for a certain subset of build settings.
Finally, it examined build schemes, explored how schemes and build actions can be used to build different groups of targets, and explained how the build actions can then process products in various ways for debugging, code analysis, archiving, and so on.