
Appendix B: Working with Other Editors
In This Appendix
Understanding plists
Editing plists
Editing Core Data model files
Using external editors
Xcode includes a number of other built-in editors and supports links to external editors.
Editing plists
Plists (or property lists) define application settings. When you create a new iOS or OS X app, Xcode automatically creates a file called info.plist, prefixed with the app name—for example, myApp-info.plist.
This file includes important app settings—the name of the nib file loaded on launch, the application icon, version number, and so on—which are discussed later in this appendix. You can also create your own separate custom plists for your own use—for example, to define application preferences.
Plist editing is more complex than it looks. Xcode 4 has a number of non-obvious features that can simplify the editing process, if you know they exist and understand how to use them.
Understanding plists
Internally, a plist is an XML file saved with the .plist extension. The content is a standard Cocoa NSDictionary. It holds a hierarchy of named key objects that either store a single value or hold an array or dictionary object with its own contents.
If you're new to iOS and OS X, think of a key/value pair as an entity with two components: a key, which is a name string, and a value, which can be a simple or complex object.
Simple values are one of the following: a string, a number, a date, a Boolean, and a general data field.
Container objects are arrays or dictionaries.
An array stores values in strict sequential order and can be accessed with either a numerical or enumerated index. Array items typically appear with a number, such as Item 0, Item 1, and so on. Non-contiguous numbering isn't allowed.
A dictionary is more free-form and is used as a more general, but slower, key/value container.
Container objects can be nested. An item in an array can be a string, a Boolean, and another array. This second array can contain a date and a dictionary. The dictionary may contain one or more further collections and so on, creating a hierarchical data structure.
Plists are typically used for application initialization of launch settings and user preferences. Although they can be arbitrarily complex, they're not designed for generic data storage. Some plists are standardized with specific keys and content formats. When you edit these in Xcode, you can only add keys from a fixed set of options. The formatting of the key values is preset.
Other plists are optional and freeform. It's up to you to design their formatting and content.
It can take some time to master plist editing, so it's good practice to experiment with it before you need to use it professionally.
Getting started with plist editing
Although Xcode includes a general purpose plist editor, it also includes features that simplify the editing of certain kinds of plists.
Four options are available:
![]() To edit any plist included in a project bundle, select it in Xcode, as shown in Figure B.1. This loads the file into Xcode's plist editor window.
To edit any plist included in a project bundle, select it in Xcode, as shown in Figure B.1. This loads the file into Xcode's plist editor window.
![]() For simplified access to the main application settings plist—the info.plist file—you can use two editors built into the project build settings. These editors can be used only to modify this one file.
For simplified access to the main application settings plist—the info.plist file—you can use two editors built into the project build settings. These editors can be used only to modify this one file.
![]() To edit another plist—for example, one of the standard OS X plists used to define the preferences for other applications—double-click it in Finder. After you install Xcode, it becomes the default editor for all plists. A floating editor window appears, as shown in Figure B.2. This editor is identical to the plist editor in Xcode. If the plist is part of an Xcode project, the project isn't loaded.
To edit another plist—for example, one of the standard OS X plists used to define the preferences for other applications—double-click it in Finder. After you install Xcode, it becomes the default editor for all plists. A floating editor window appears, as shown in Figure B.2. This editor is identical to the plist editor in Xcode. If the plist is part of an Xcode project, the project isn't loaded.
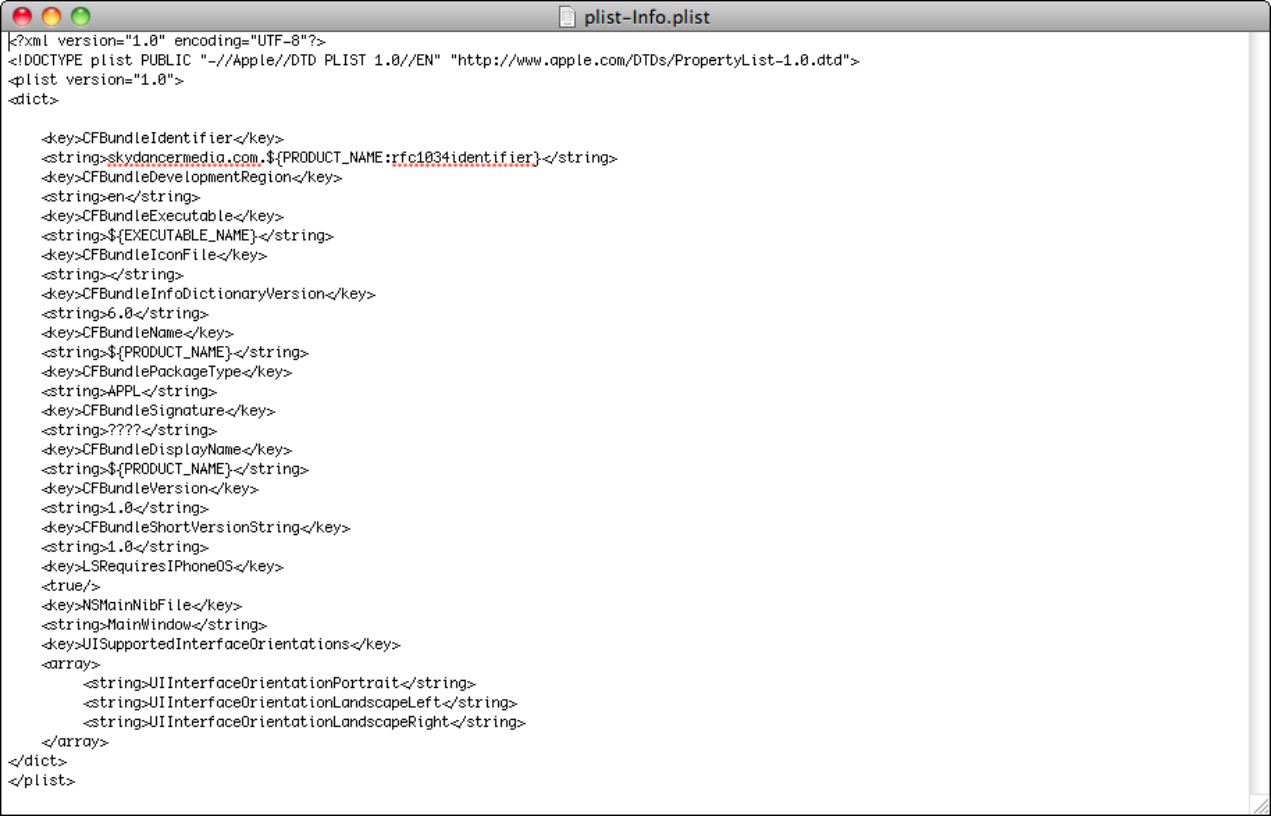
![]() You can edit a plist as raw text in TextEdit, as shown in Figure B.3. Right-click the plist in Finder, select Open With⇒Other…, and select TextEdit.app in the Applications window.
You can edit a plist as raw text in TextEdit, as shown in Figure B.3. Right-click the plist in Finder, select Open With⇒Other…, and select TextEdit.app in the Applications window.
![]() CAUTION
CAUTION
In Xcode, you don't need to save a plist file by hand. If you edit the same file in multiple Xcode editors, you see that any change in any editor is instantly duplicated in every editor. The file is saved automatically when you build or quit a project, like a source code file. This applies only to Xcode. Edits made in TextEdit must be saved in the usual way. It's a bad idea to open a file in Xcode and TextEdit at the same time.
Figure B.1
Editing a project plist in Xcode is the easiest way to work with plists.

Figure B.2
Loading a plist into the Xcode editor as a stand-alone file launches Xcode, if it's not already running. If the plist is part of a project bundle, the rest of the project isn't loaded.

Figure B.3
Using TextEdit, you can make changes to the text and resave the file, but the contents must be formatted correctly.
Editing info.plist project settings in Xcode
Every project includes a <projectname>-info.plist file that stores application settings. The settings are chosen from a list of standard keys. When you create a new Xcode project, info.plist file appears in the project's Supporting Files group. If you import a project created with an older version of Xcode, the info.plist file usually appears in the Resources group.
Understanding the application settings
When your app launches, one of the first things it does is load this info.plist file. It reads the keys and values from the file to find paths to the app's initial nib file and other support resources, to define runtime features such as the OS platform and multitasking options, to enable or disable graphics options such as anti-aliasing and the gloss look on iOS springboard icons, and so on.
The full list of keys that can be included in the file is long and is grouped under five headings:
![]() Launch Services: These keys define low-level architecture-specific options.
Launch Services: These keys define low-level architecture-specific options.
![]() OS X: These miscellaneous keys are specific to OS X apps.
OS X: These miscellaneous keys are specific to OS X apps.
![]() UIKit: These miscellaneous keys are specific to iOS apps and the iOS UI.
UIKit: These miscellaneous keys are specific to iOS apps and the iOS UI.
![]() Core Foundation: These keys for either or both platforms define application housekeeping and set-up features.
Core Foundation: These keys for either or both platforms define application housekeeping and set-up features.
![]() Cocoa: These keys define Cocoa initialization options and Cocoa support features.
Cocoa: These keys define Cocoa initialization options and Cocoa support features.
![]() NOTE
NOTE
A brief introduction to each key is available in the documentation in the Information Property List Key Reference document.
By default, the info.plist file includes a minimal selection of essential keys. You can and should set the values of some of these keys by hand; otherwise, your app won't be accepted for sale.
The other keys are less critical. If they're included in the default info.plist, you can leave their settings unchanged. If they're not included in the default file, you can usually ignore them.
Occasionally, you may want to add a key by hand to enable a non-standard feature. For example, you can use the optional UIFileSharingEnabled key to allow a user to access files created by the app through iTunes. Including the UIPrerenderedIcon key and setting the value to YES disables the iOS shine effect for the app's icon in Springboard. Adding other keys adds other corresponding features.
The info.plist editors include features for editing the default keys and for adding optional new keys.
Introducing the application settings editors
Editing the info.plist file is a critical part of app development. This file gets preferential treatment in Xcode, so there are three ways to edit it:
![]() You can select it in the Project Navigator and edit it with the standard plist editor, which is described later in this chapter.
You can select it in the Project Navigator and edit it with the standard plist editor, which is described later in this chapter.
![]() In the project build settings, you can use a simplified Summary editor to display and change selected important settings, as shown in Figure B.4.
In the project build settings, you can use a simplified Summary editor to display and change selected important settings, as shown in Figure B.4.
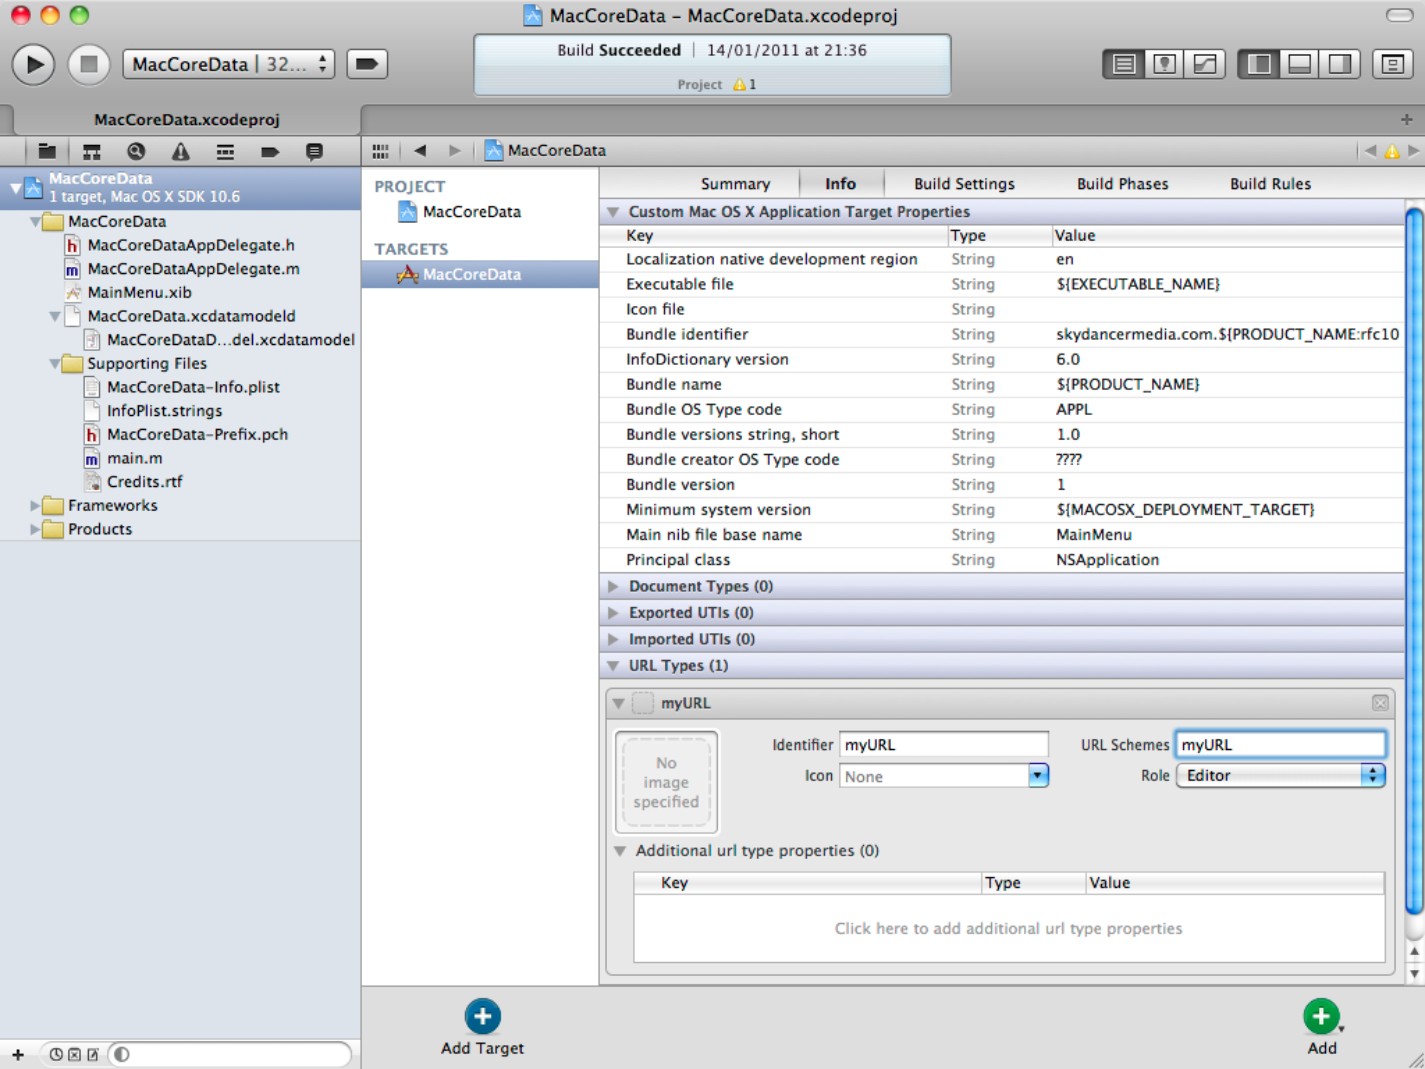
![]() Also in the project build settings, you can use a more comprehensive Info editor, as shown in Figure B.5. This editor is similar to the standard Xcode plist editor, but it adds some extra features.
Also in the project build settings, you can use a more comprehensive Info editor, as shown in Figure B.5. This editor is similar to the standard Xcode plist editor, but it adds some extra features.
To use the editors in the build settings, select the project name at the top left in Project Navigator, select the project under TARGETS, and choose either the Summary or the Info tab at the top of the build settings window.
![]() CAUTION
CAUTION
It's important to understand that these editing options all edit the same file.
Figure B.4
When you view the Summary settings, there's nothing to indicate that when you change these settings, you're editing the info.plist file, but you are—immediately and permanently.
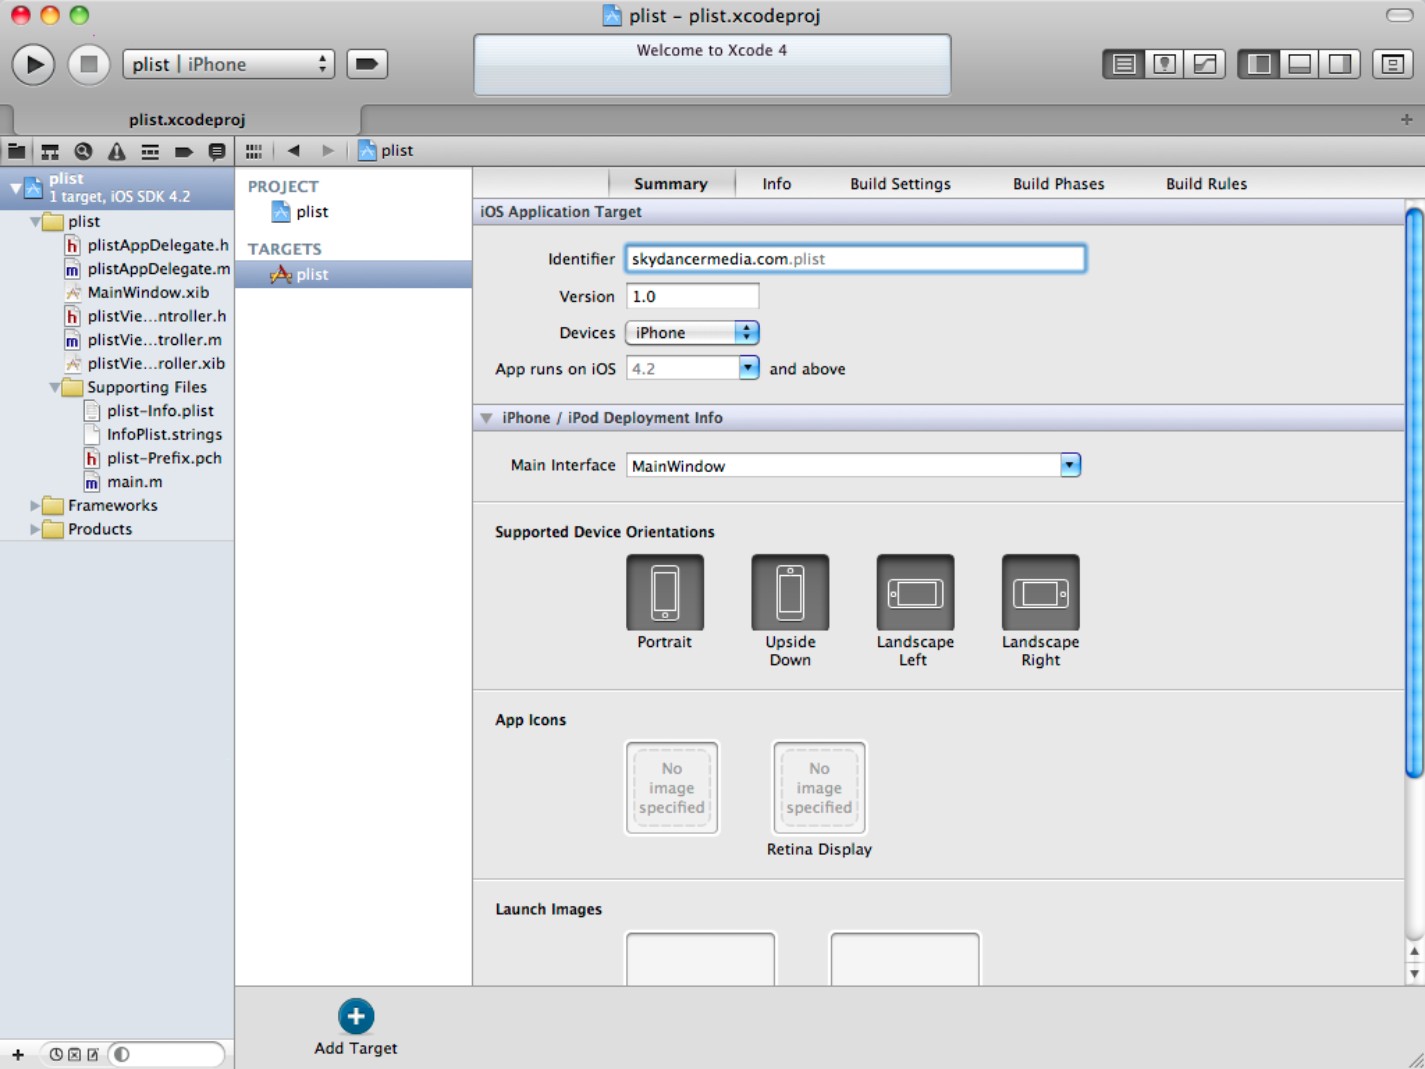
Figure B.5
The more comprehensive Info editor is similar to the standard Xcode plist editor, but it has added fields to set an optional document type and UTI (Uniform Type Identifier) and URL scheme keys. The iOS and OS X versions of this file include slightly different contents, but they are recognizably similar and can be edited in the same ways.
Changing settings with the Summary editor
The Summary settings editor is a collection of buttons, menus, and text fields used to define the basic key values needed for App Store acceptance. For simplicity, this editor hides many of the keys in the file. To view and edit them, use one of the other editors.
Although the meanings of the settings may not be obvious, the UI features are Mac-standard and simple enough to be self-explanatory. Changing any setting immediately updates the corresponding value in the app's info.plist file. The settings are listed in Table B.1.

Changing settings with the Build Info editor
Unlike the Summary editor, which lists selected highlights from a project's info.plist file, the Build Info editor lists every key and value in the entire file. It's very similar to the standard plist editor described later in this chapter, but it includes four extra options: Document Types, Exported UTIs, Imported UTIs, and URL Types. The OS X version adds one further option called Services. These options add standard keys to the plist that define optional document type, URL scheme, and services support for an application.
Adding optional keys
To add an optional key, follow the steps below:
1. Right-click an existing row.
You can select any row as long as it isn't a multi-valued type; for example, the Type field isn't Array or Dictionary.
2. Select Add Row from the floating menu.
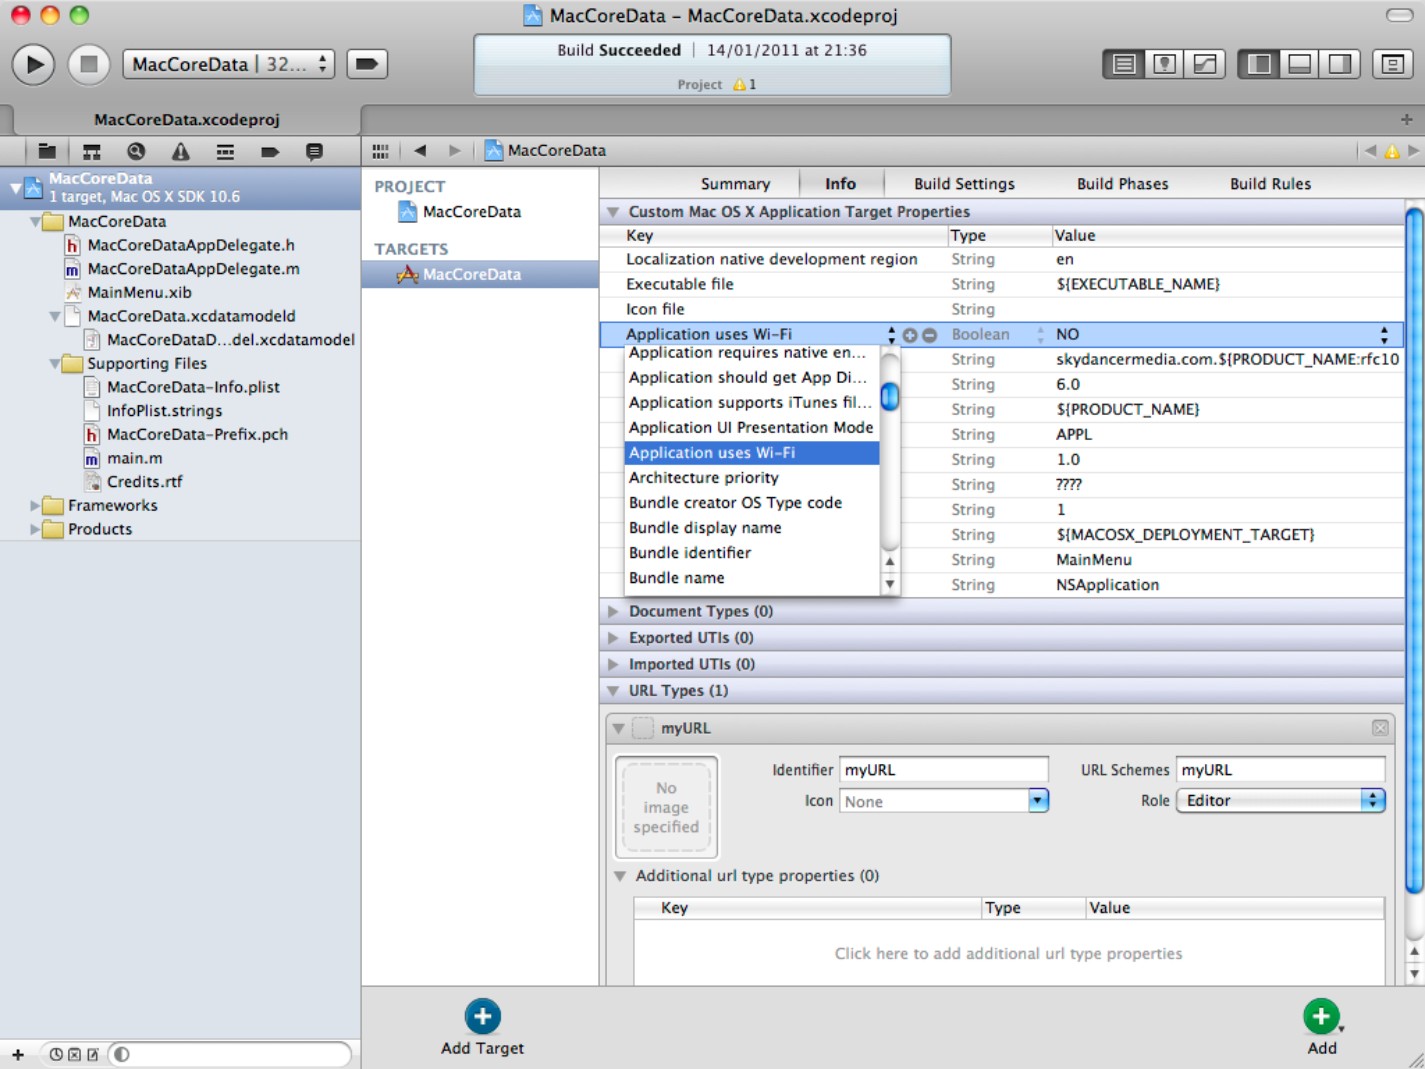
3. Select a key from the floating list, as shown in Figure B.6.
4. Click the Value field to edit the key.
Value editing depends on the value type and is described later in this chapter, in the description of the general plist editor.
Figure B.6
Adding one of the optional keys to the info.plist file
To remove a key, select its row and click the - (minus) icon to the left of the Type field.
A few caveats apply to key editing. Some keys are valid only on one platform; for example, it makes no sense to specify the Application requires iPhone environment key for an OS X app. But the key list is the same for iOS and OS X projects, and there's nothing to stop you from adding an invalid key to the project settings. Results are unpredictable; the OS may ignore the key, or it may crash your app.
Don't assume that the keys work as advertised, because some don't. For example in iOS 4.2, you can set the Status bar is initially hidden key for an iOS app, but unless you add extra supporting code to your app's applicationDidFinishLaunching: method, the status bar is still visible after launch. Generally, explicit initialization code is more reliable than the start-up keys. It's good practice to experiment with a key to make sure that it works correctly.
Finally, do read the Information Property List Key Reference. This reference is buried in the docsets, and it's difficult to find unless you know it exists. Without it, you won't know which keys are available or what they do, and the start-up options and settings will remain inexplicable and mysterious.
Adding support for documents, URL schemes, and services
In addition to generic start-up options, experienced iOS and OS X developers and programmers can add further optional keys to define how an app uses file types, URL schemes, and services.
In iOS and OS X, a URL scheme is a system that links an application to a certain URL launch string. In the same way that the http:// string always opens a web page, you can define custom strings here that can launch your apps from some other app.
A UTI can define your app as an editor or viewer for a custom file type.
Services on OS X are similar but more advanced features that can define an application as a provider or consumer of Services; these are optional external options that appear in every major application under the “Application Name”⇒Services menu entry.
![]() NOTE
NOTE
For more information about UTIs, search the documentation for Uniform Type Identifiers. For information about URL schemes, search for the Apple URL Scheme Reference document. For information about Services, see the Services Implementation Guide.
These optional keys appear in a list at the bottom of the Info editor. Figure B.6 includes a simple example. In a practical application, more set-up would be needed, with extra support code to implement this feature.
Creating new plists
The app's info.plist file is created for you and its keys are fixed and standardized, but you can add further custom plists for your own use and add arbitrary keys to them to suit the needs of your app. Here's how:
1. Right-click the Supporting Files group, and select New File.
For iOS and OS X, select Resource and then Property List.
2. Select Next, and save the file with a useful name.
On iOS only, you can create a unique kind of plist known as a settings bundle. This is identical to a standard empty plist, but you can use it to store and manage application preferences. The iOS preferences system is complex and outside the scope of this book. But in this context, the settings.bundle file can be edited in the plist editor in the same way as a standard plist; the editor ignores the unusual name.
Using the general Xcode plist editor
The main Xcode plist editor is similar to the Info editor in the Build settings, but it lacks the UTI, document, file type, and services options.
In fact, the info.plist is just one of a number of default plist file types. In the Summary and Info editors, the plist file type is fixed. In the general plist editor, you can select an alternative plist type. This doesn't change the contents or the format of the file, but it does replace the standard list of optional keys with one of a number of other lists.
Depending on the application, you can use these alternative key lists to save time when entering new keys. Or you can ignore them and create your own unique key list.
To select a file type, right-click anywhere in the edit area, select Property List Type, as shown in Figure B.7. Select one of the options from the sub-menu. For a customized key list, Unique is the best choice.
Figure B.7
When you set the plist type, this doesn't modify the file type; it selects between the different sets of default keys that appear while editing.

![]() NOTE
NOTE
These options are not all properly documented. The easiest way to find out what each file type does is to select it, select one or more of the default keys, and search for them in the documentation. Most options are aimed at intermediate to expert developers.
After you set the type, you can edit the list in the following ways:
![]() Add a new key: Right-click an existing single-value key, and select Add Row. Either select the key name from the default list or edit the default New Item name.
Add a new key: Right-click an existing single-value key, and select Add Row. Either select the key name from the default list or edit the default New Item name.
![]() Change or select the key type: Right-click the key, and select one of the types from the Value Type sub-options.
Change or select the key type: Right-click the key, and select one of the types from the Value Type sub-options.
![]() Delete a key: Select the key, and use the Cut option in the right-click menu or press the Delete key.
Delete a key: Select the key, and use the Cut option in the right-click menu or press the Delete key.
![]() View the raw key name: For keys associated with Cocoa and other OS constants and parameters, you can view the key names by right-clicking and selecting Show Raw Keys/Values. This shows the key as a name—for example,
View the raw key name: For keys associated with Cocoa and other OS constants and parameters, you can view the key names by right-clicking and selecting Show Raw Keys/Values. This shows the key as a name—for example, CFBundleIconFile—instead of a text description. This can be useful when you're looking for key names in the documentation.
![]() Edit a value: Value editing depends on the key type. See Table B.2 for details.
Edit a value: Value editing depends on the key type. See Table B.2 for details.
Note that if you're creating a completely customized plist, it's up to you to decide if arrays or dictionaries are the best containers for the data. If you're editing any of the standard pre-defined key lists, the type is defined by the standard values and can't be edited.
![]() CAUTION
CAUTION
Note that if there are no single-value keys in the list, if you try to add a new key, you get a new key/value pair in one of the multi-value items. The workaround is to make a copy of the multi-value item and edit it as needed, rather than trying to add it from scratch.

Editing Core Data Files
In addition to an updated plist editor, Xcode 4 also includes a revised editor for Core Data files. Core Data is an optional data management framework included in both iOS and OS X. Although the concepts used in Core Data are simple, the English words used to describe them are complicated, and elements of the API are also more complex than they need to be. This can make Core Data seem more intimidating than it really is.
Understanding Core Data
Core Data has three main elements, supported by three optional elements:
![]() A managed object context: This is a complicated way to say “a container for objects.”
A managed object context: This is a complicated way to say “a container for objects.”
![]() One or more entities: An entity is an object that holds data.
One or more entities: An entity is an object that holds data.
![]() One or more attributes in each entity: An attribute is a key/value pair. The key is a name string, and the values are one of a set of standard supported types: integers of various lengths, decimal numbers, floats, doubles, strings, Booleans, and so on.
One or more attributes in each entity: An attribute is a key/value pair. The key is a name string, and the values are one of a set of standard supported types: integers of various lengths, decimal numbers, floats, doubles, strings, Booleans, and so on.
![]() Optionally, entities can have relationships: A relationship references one entity from another. References can be bidirectional. They can be one-to-one, linking entities directly, or one-to-many, with multiple cross-links. Core Data's support for one-to-many relationships is limited.
Optionally, entities can have relationships: A relationship references one entity from another. References can be bidirectional. They can be one-to-one, linking entities directly, or one-to-many, with multiple cross-links. Core Data's support for one-to-many relationships is limited.
![]() Optionally, entities can include one or more predefined fetch requests: A fetch request is an operation that returns objects or selected object attributes, such as the highest or lowest value.
Optionally, entities can include one or more predefined fetch requests: A fetch request is an operation that returns objects or selected object attributes, such as the highest or lowest value.
![]() Optionally, each fetch request can include one or more predicates: These are specific search filters.
Optionally, each fetch request can include one or more predicates: These are specific search filters.
Although Core Data isn't a full relational database, it's often used for general data management. Typical applications include media collections and contact databases. For example, to manage a library, you might create a Book entity and add attributes to store the title, year of publication, author, and so on. You can then call standard Core Data code to add an instance of the Book entity for each book in the library, call other code to list all books with a specific author, and so on.
Entities, attributes, relationships, and other details are defined in a data model file, with the .xcadatamodel extension.
When you create a new project, you can include Core Data by ticking the Use Core Data option, as shown in Figure B.8. This option generates a blank data model file that you can expand with your own entity designs.
The data model becomes “live” with only supporting code. The Core Data templates include minimal set-up and tear-down code, but you must add further code to access and modify the data.
![]() NOTE
NOTE
This section is a brief practical introduction to the Core Data model editor but isn't a complete guide to Core Data development. For an introduction to practical Core Data programming and more information about creating and using entities, relationships, fetch requests, and predicates in practice, see the companion Cocoa Developer Reference title.
Figure B.8
Creating a Core Data project for OS X. iOS projects include the same feature.

Introducing the data model editor
The data model editor appears when you select a data model file in the Project Navigator, as shown in Figure B.9. The default file is empty.
![]() CAUTION
CAUTION
File selection is somewhat counter-intuitive. The data model file appears inside a container file with the .xcadatamodeld extension. To load the editor, click this file's reveal triangle and select the .xcadatamodel file inside it. The .xcadatamodeld container file can, in theory, contain more than one data model file. Even if there's only one, you must select it to edit it.
A key feature of the editor is the Editor Style option at the bottom right of the window. You can use this feature to toggle between the default table view and a graph view, as shown in Figure B.10. When the file is empty, the graph view shows a blank editing area with a graph paper background.
The table view is designed for quick summary overviews of the entities in the file. The graph view shows entities and relationships visually. The table view is easier to work with when the data model is busy, with many entities. The graph view is better suited for simpler models with a smaller number of entities, and it provides a more intuitive visual guide to entity relationships.
Figure B.9
A first look at the Core Data editor, with an empty default data model file
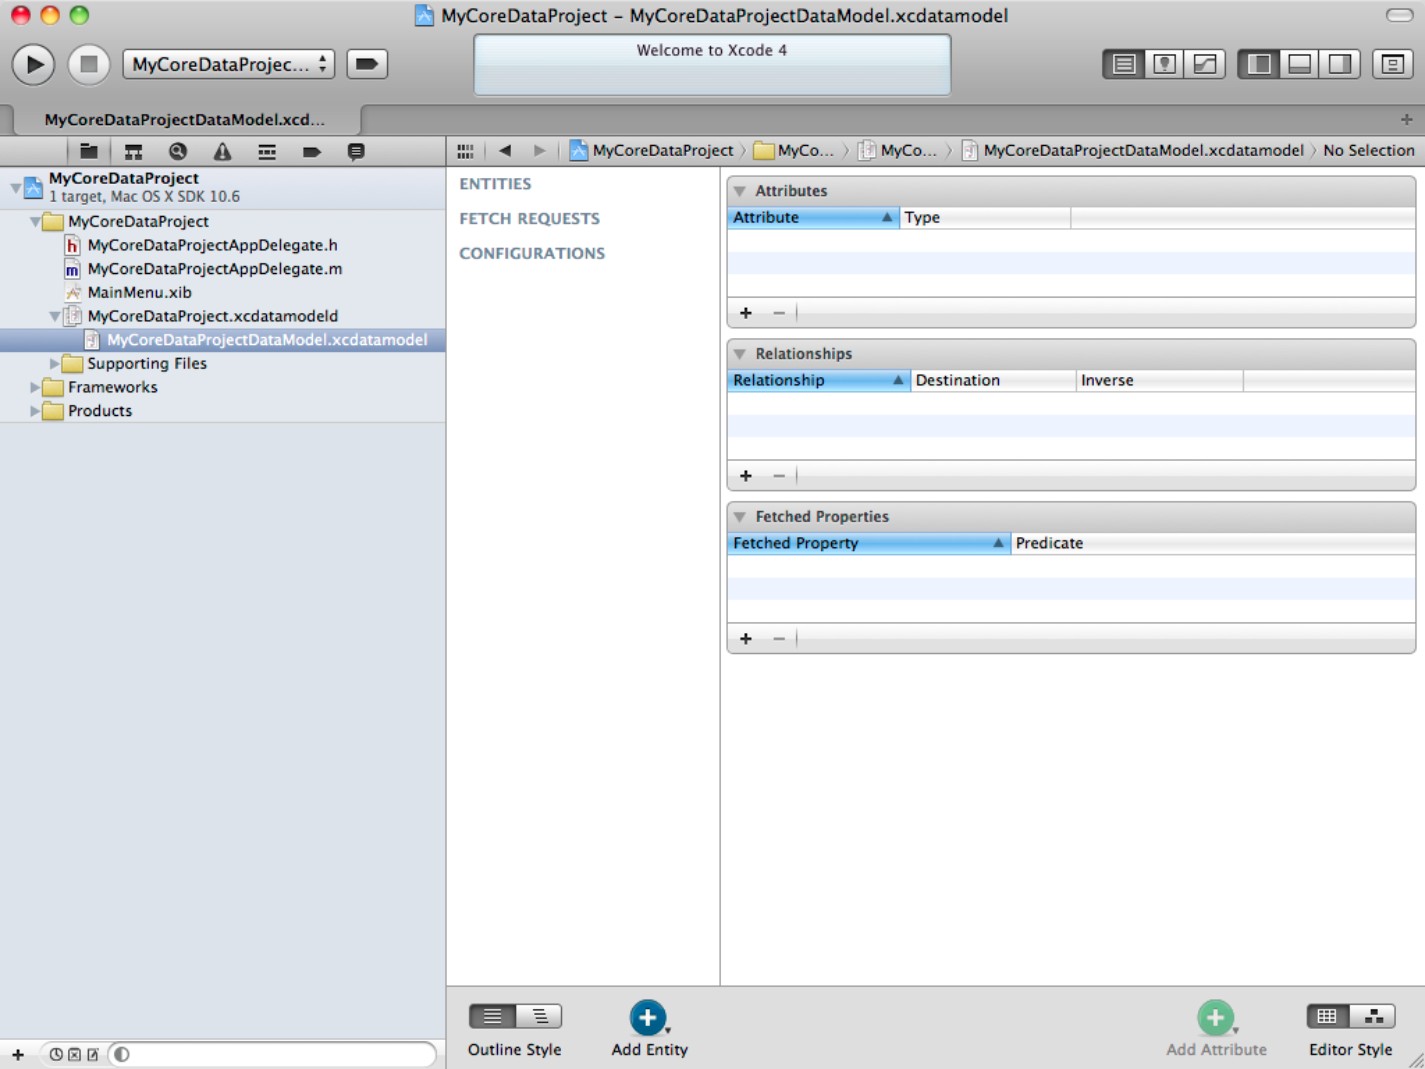
Figure B.10
A first look at the graph editor

Creating a simple data model
As a very simple example of a data model, you'll add a couple of entities with a handful of attributes and create a relationship between them.
To create an entity, follow these steps:
1. Begin in the table editor, and click the Add Entity button near the bottom left of the window, as shown in Figure B.11.
A new entity appears in the Entities list at the top left.
2. Give the entity a name such as Entity1.
![]() NOTE
NOTE
As soon as you create an entity, a new configuration named Default appears under the Configurations header. You can select the Default configuration to view a list of entities in the file with associated class names. By default, each entity is an instance of Cocoa's NSManagedObject class. In a more complex project, you can subclass entities to customize them with special features, but you can use Core Data successfully without subclassing.
Figure B.11
Creating a new entity

![]() CAUTION
CAUTION
Entity names cannot contain spaces or special characters. Only letters, digits, and underscores are allowed. Names must begin with a letter.
To add attributes, follow these steps:
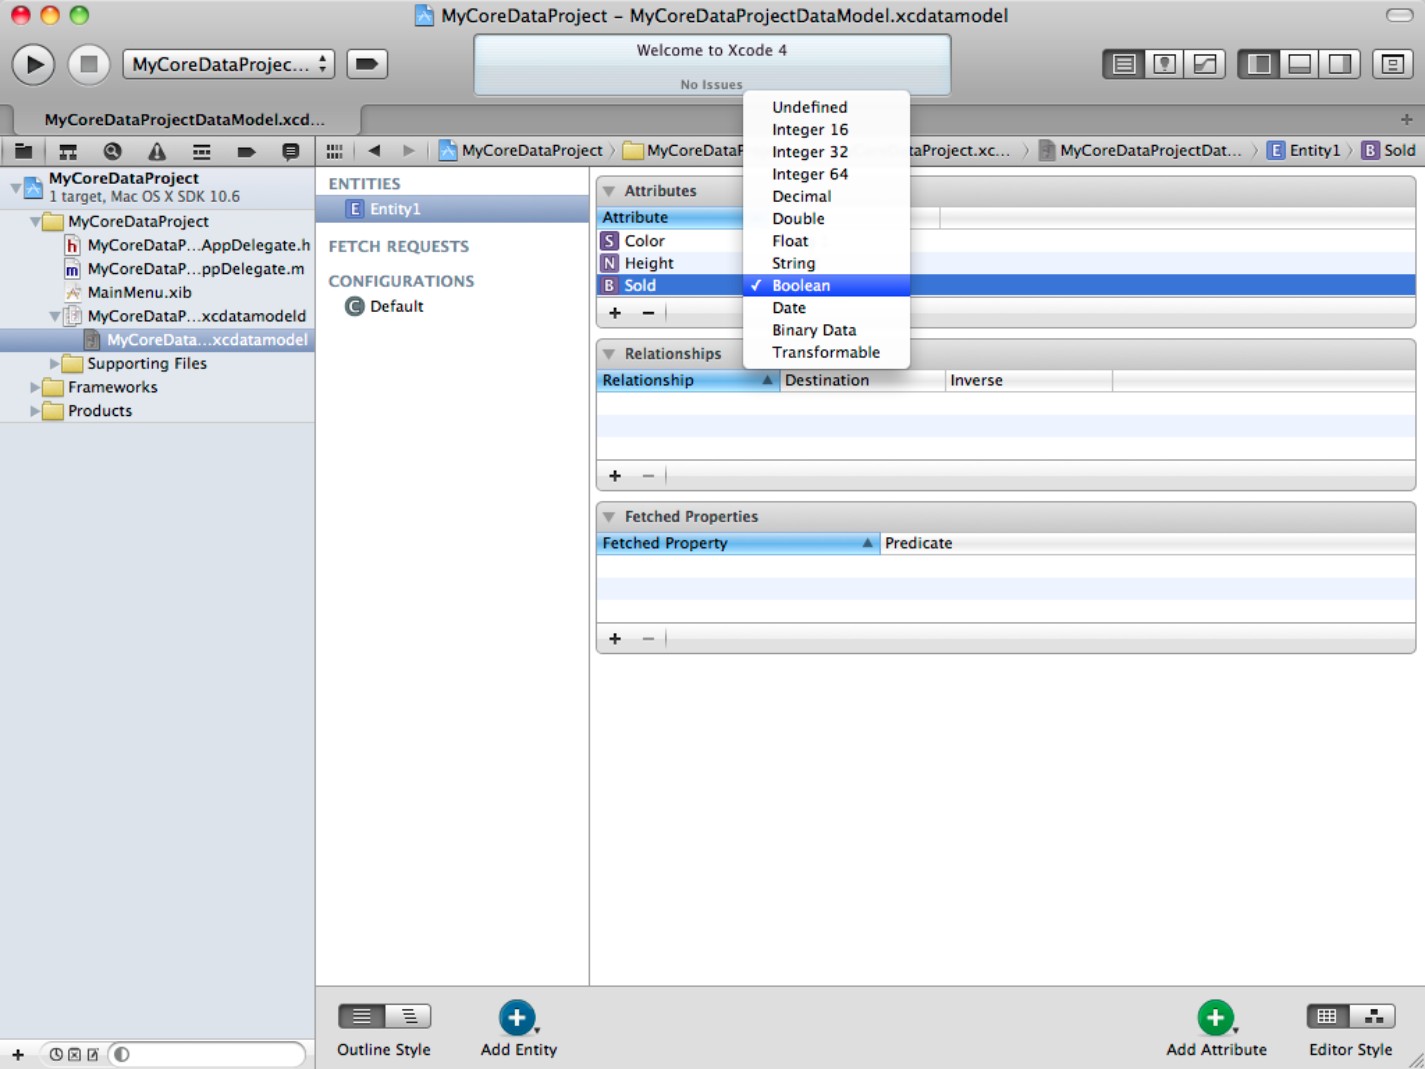
1. Click the + button at the bottom of the Attributes pane, and type a name.
2. Left-click (not right-click) in the Type column to set the type.
Figure B.12 shows an entity with three attributes.
3. To remove an attribute, click the − button.
![]() CAUTION
CAUTION
Although you can modify entities and attributes at any time, if your project has a data collection, you need to reversion the data. Reversioning is a complex topic outside the scope of this book; in outline, you must create a new extended data model and then merge the existing data with it. If you change the data model and re-import an existing data collection, Core Data crashes. It's good practice to finalize the design of the entities, attributes, and relationships in a data model before you begin working with live data.
Figure B.12
Adding attributes
To create relationships, follow these steps:
1. Add another entity, and add a property.
Name this Entity2.
2. Select Entity1 again, and click the + button in the Relationship pane.
You'll see a new relationship called “relationship.”
3. Left-click under the Destination header to select Entity2 as a destination, as shown in Figure B.13.
This creates a simple one-way link between Entity1 and Entity2.
4. Select Entity2.
You'll see the relationship in the Relationships pane.
5. Select Entity1 as a destination and select relationship again under the Inverse header.
These steps create a mutual two-way link between Entity1 and Entity2. In your code, you can use the relationship to share data between Entity1 and Entity2.
Figure B.13
Creating relationships

Using the graph editor
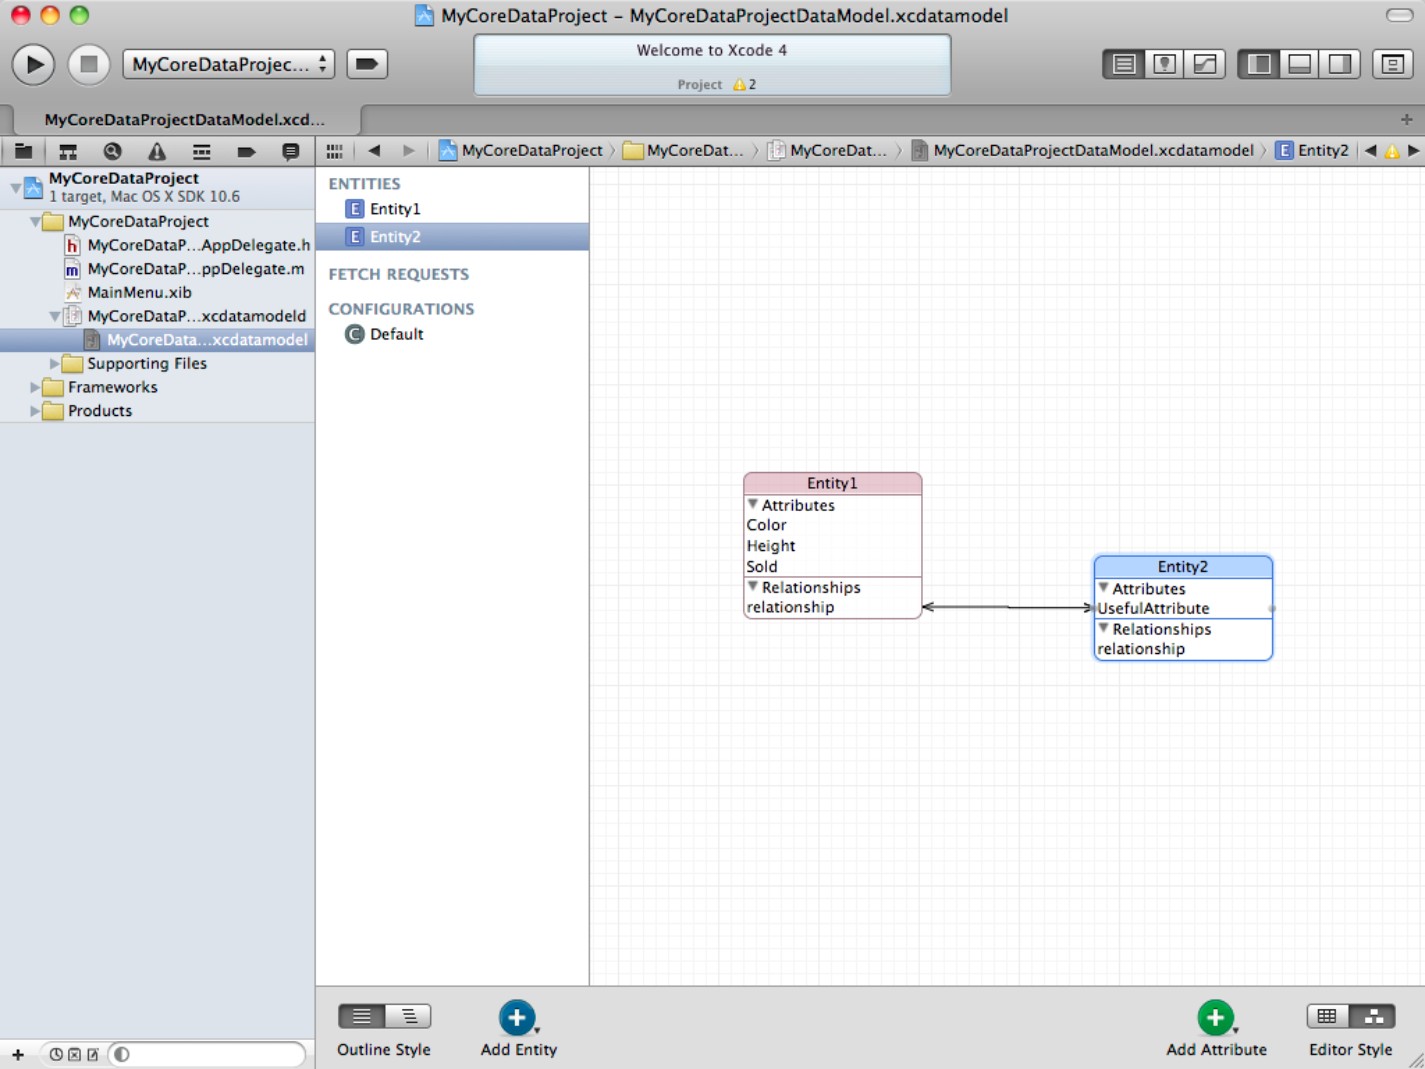
Select the graph editor to view the entities and their relationship visually, as shown in Figure B.14. The graph view is notional. The contents of each entity and the arrows that indicate relationships are significant. You can move entities by dragging them. Entity positions on the graph aren't important, so you can rearrange them for clarity. You also can add an attribute by selecting an entity and clicking the Add Attribute button near the bottom right of the editor.
Figure B.14
Viewing entities and relationships in the graph editor
![]() TIP
TIP
Arrowheads include information about relationship. A one-way relationship has a single arrowhead at one end. Two-way relationships have an arrowhead at each end. To-many relationships have double arrowheads. Note that you can have a one-way to-many relationship; this appears as a double arrowhead at one end, while the other end of the link has no arrowhead.
Using other options
You can add fetched properties in the Fetched Properties by clicking the + button. To add a predicate filter rule, click twice under the Predicate header and type the predicate as a string.
When the data model editor is selected in Xcode, a number of menu items become available under the main Xcode menu Editor header. Some options duplicate the buttons in the main editor; for example, the Add Entity menu item duplicates the Add Entity button.
However, this menu includes unique options that lack corresponding buttons:
![]() Add Configuration.
Add Configuration.
![]() Add Fetch Request: This defines a fetch request used to read data from records that match a selected entity type and also match an optional list of attribute conditions. Figure B.15 shows an example.
Add Fetch Request: This defines a fetch request used to read data from records that match a selected entity type and also match an optional list of attribute conditions. Figure B.15 shows an example.
![]() Create NSManagedObject subclass: Use this option to create a customized version of one or more of your entities, with extra code features. By default, each entity is an instance of
Create NSManagedObject subclass: Use this option to create a customized version of one or more of your entities, with extra code features. By default, each entity is an instance of NSManagedObject. This class provides basic read, search, and write options for an entity. If your entity needs to do more—for example, it might need to interact with the rest of your application whenever data is accessed—this option creates code files for a subclass.
![]() Import: Use this option to import an existing data model from a saved file.
Import: Use this option to import an existing data model from a saved file.
![]() Create Model Version and Convert to Versioned Model: Use these options to manage multiple versions of a model file and convert data between versions.
Create Model Version and Convert to Versioned Model: Use these options to manage multiple versions of a model file and convert data between versions.
![]() CAUTION
CAUTION
Xcode 3 included a useful UI generator feature. To create an OS X UI from a Core Data model, you could select every entity in the graph editor and drag and drop the objects into an Interface Builder document. The resulting file created an application with a working UI and basic search and editing feature. No extra code was needed. This feature isn't yet implemented in Xcode 4, but it may appear in later versions.
Using external editors
In Xcode 3, you could define the external editors used to open supporting files such as text, graphics, audio, and so on. Currently, Xcode 4 has no equivalent.
In Xcode 4, selecting an item, right-clicking, and selecting the Open With External Editor menu option loads the default editor or viewer for that file type. To open a file with some other editor, select the Show in Finder option, right-click the file, and use Finder's Open With option.
Figure B.15
You can define arbitrary fetch requests in code, but it can be easier to define standard requests in the model editor. You can then load them and use them as needed.

Summary
This appendix introduced plists and four different ways to edit them. It explained how a project's info.plist file gets special treatment in Xcode in the project's build settings. It also demonstrated how to use the main Xcode plist editor to edit other plist files.
Next, it sketched the key features of Core Data and explained how to use Xcode's new Core Data model editor. Finally, it ended with a brief note about using external editors for other file types.