
Chapter 3: Building Applications from Templates
In This Chapter
Using the OS X Application templates
Using the iOS Application templates
Customizing the standard templates
Assembling the ingredients of an application by hand in Xcode isn't a trivial process. It's faster and more convenient to start from a ready-made template, extending it as needed.
Xcode includes templates for different types of iOS and OS X applications, including plug-ins and other special projects for OS X developers. Getting started with a template is easy. All templates include a bare skeleton of essential code and are guaranteed to build and run successfully.
You can make development more efficient by adding your own templates to Xcode's collection. The standard templates are very simple and limited. Some include features that you may not need, and most leave out useful features that can simplify development.
You can use the template system to create complex skeleton apps with almost any amount of code. For example, you could create a game template for iOS that includes a custom framework for graphics management, collision detection, and user input. This template could be reused as the starting point for a series of game projects.
Getting Started with Templates
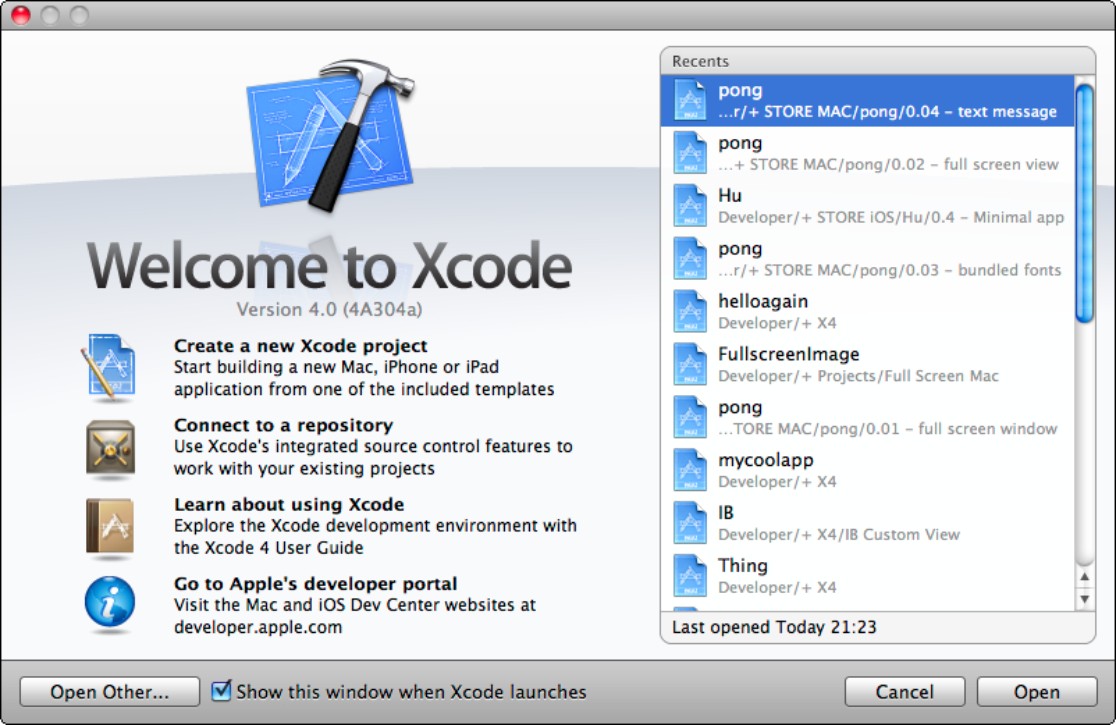
You can access Xcode's template screen in two ways. Figure 3.1 shows Xcode's startup window. By default, this window appears when you launch Xcode. To show the templates, select the Create a new Xcode project option from the list at the left.
![]() TIP
TIP
You can stop Xcode from showing this window by unchecking the Show this window when Xcode launches option near the bottom of the window. The Recents pane at the right is useful, so typically you'll want to see this screen.
Figure 3.1
Xcode's initial boot screen shows recent files, access to Open Other for not so recent files, and the Create a new Xcode project option that gives access to the templates.
You also can select File⇒New⇒New Project at any time, as shown in Figure 3.2.
Either option displays the drop-down panel shown in Figure 3.3. This is the unified list of templates for both iOS and OS X. The list of categories at the top left separates the two target operating systems and groups templates for each into categories. The Application category is the most useful, but many developers also use items from the Framework & Library collection. Application and System Plug-ins are more specialized, and the Other category includes a complete blank project for iOS and OS X, and an External Build System template for OS X only that can work with an external makefile and command-line compiler. Table 3.1 summarizes the categories.
![]() TIP
TIP
You can ignore the categories and show every template for an OS by clicking the iOS or Mac OS X headers.
Figure 3.2
To show the templates after you've started working and the boot window is no longer visible, select the New Project option from the Xcode menu tree.

Figure 3.3
The list of standard templates is long, but typically you start with an Application template. The other templates are for more specialized projects.


Building a project from an application template
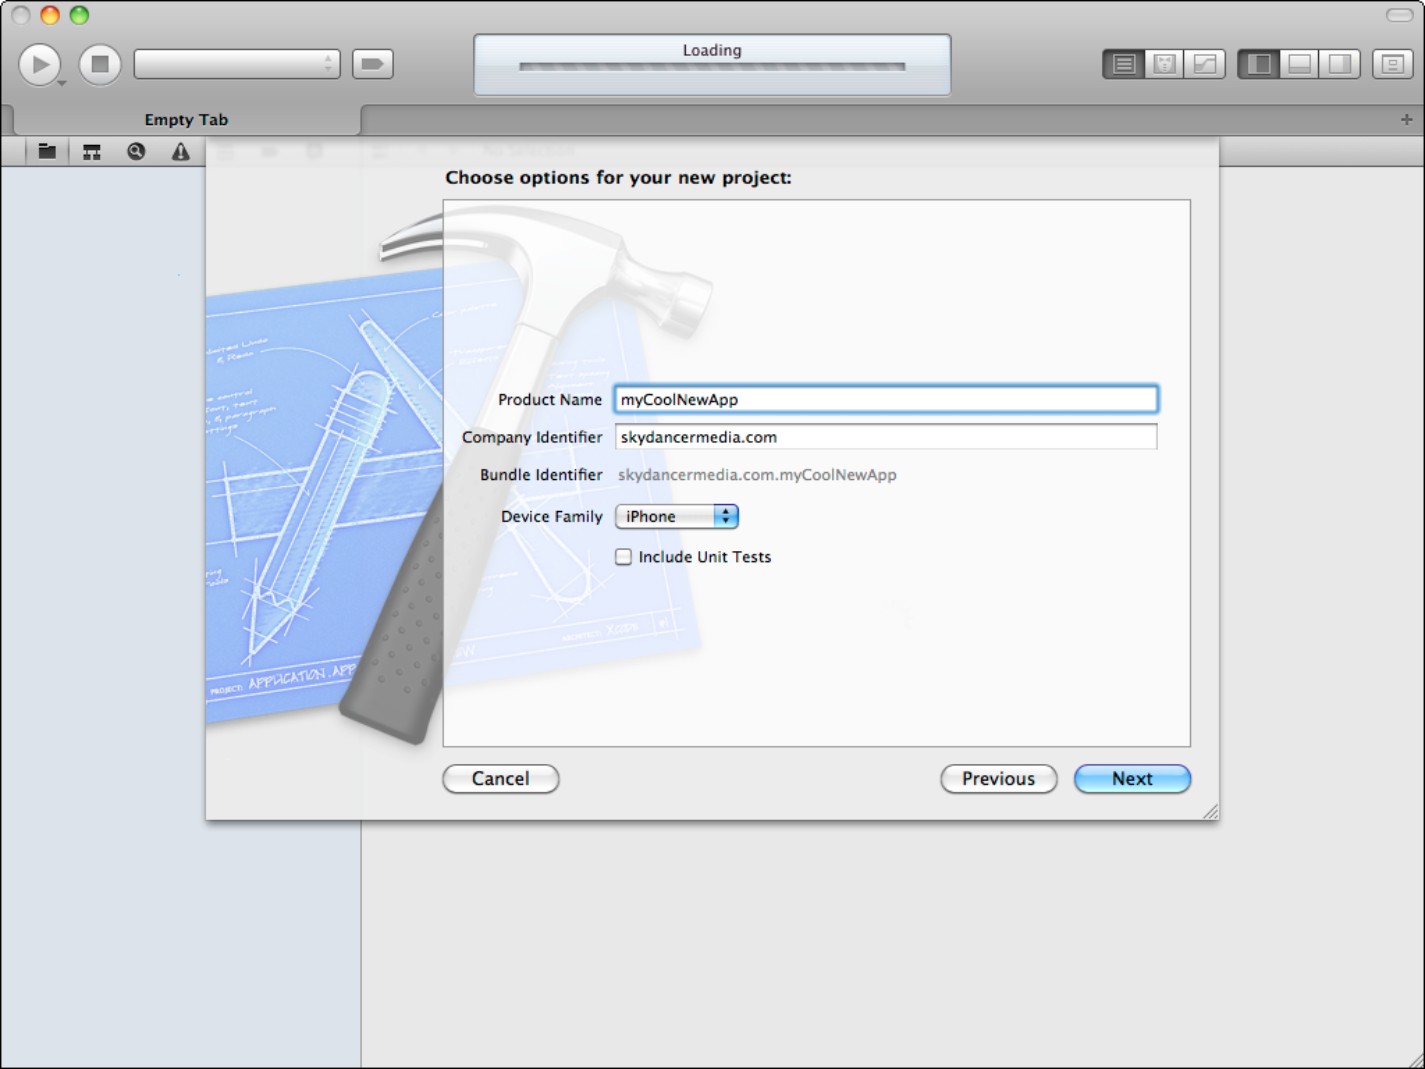
Application templates are guaranteed to build successfully. For example, to build a simple iOS application for the iPhone or iPad, start by selecting the iOS application page in the templates pane, and select the View Based Application template. Click Next, and select a target device using the Device Family pop-up menu in the bottom third of the panel, as shown in Figure 3.4.
Type a name for the App into the Product Name box. This name is used as a prefix for the main source files in the project, and it also defines the name that appears under the app when it's installed in Springboard This is called the product name. You can change it later using the build settings described in Chapters 12 and 13. You can also rename the files, but this is a more complex process, and isn't usually helpful or necessary.
![]() CAUTION
CAUTION
Although most of the iOS templates include options that can create either an iPhone or an iPad app, only the Window-based template includes complete support for a truly universal app that can run on either platform without further changes. The other templates require extra manual effort, which includes a conversion stage that is discussed in Chapter 8. It's unfortunate that the templates don't support universal apps more consistently.
![]() NOTE
NOTE
Leave the Include Unit Tests option unchecked. This option adds features you can use to add automatic tests to your code. It's described in Chapter 17.
Figure 3.4
Most iOS templates include iPad and iPhone variants, but they're not presented in a consistent way, partly because the two device families support different UI features.
When you create an app from a template, a name and a copyright field that matches the company name are added to the top of every code file in the project. The easy but unexpected way to set the defaults for this content is to create a card with personal details in Address Book and choose Make This My Card from the Card menu. Xcode reads the information from Address Book when it creates a new project. You also can enter the following in Terminal on a single line:
defaults write com.apple.Xcode PBXCustomTemplateMacroDefinitions ‘{“ORGANIZATIONNAME”=”<OrgNameHere>”;}'
The bundle identifier is used as a file access tag by iOS and OS X and by code in your project. It's calculated automatically by Xcode. You can ignore this field for now. It's used when submitting apps to the App Store, and is described in later chapters.
![]() TIP
TIP
Keep iOS app names short: Eight characters or less is ideal. Longer names are truncated with ellipses (…), which look bad and don't help the user. The app name isn't fixed, so you can change it later.
Select Next again, and click Create as shown in Figure 3.5. By default, Xcode automatically creates a new project folder, with the name you gave your app. Select the New Folder option at the bottom left only when you want to create a new enclosing folder for a number of related projects.
![]() CROSS-REFERENCE
CROSS-REFERENCE
The Source Control at the bottom of the dialog box is described in Chapter 14. This is another feature you ignore for now.
Figure 3.6 shows the initial new project page. There's a list of items that look like folders at the top left and various project options, including the supported versions of either iOS or OS X, at the right. The folders are called groups, it's important to understand that they do not exist on disk. They're for Xcode's internal use and to help you keep project files organized efficiently.
Figure 3.5
Create a new project folder. The New Folder option is used only when you need to create a new folder one level up from the project folder. The project folder itself is created automatically.

Figure 3.7 shows the files and directories that have been added and how they're arranged on disk. The folder structure is completely different. This seems confusing—and sometimes it is confusing.
Figure 3.6
The new project appears in Xcode. The virtual folders have been opened so you can see the files inside them.

The pane with the folder-like icons at the left of Xcode is known as the Project navigator. It does not show a standard directory listing.
In earlier versions of Xcode 3, the items listed in this pane were similar to web links; they looked like a directory and folder listing, but in fact they were loose symbolic links to items on disk. They were so loose you could rename them without changing the files on disk.
This created almost limitless confusion, especially when the links became broken—which they often did. So in later versions of Xcode 3 the relationship was simplified. If you renamed an item in this pane, it was also renamed on disk. If you deleted an item, you could choose to move it to the trash or to remove it from the project but leave the file on disk. Xcode 4 uses the same system.
The folder-like icons remain entirely abstract. They're included to help you keep related files together in the Project navigator, but they don't exist on disk.
Figure 3.7
The new files as they appear on disk. Although the arrangement of files and folders is different, you don't usually need to access this folder directly; typically, you can use the more abstract view available in Xcode without worrying about the differences.

The symbolic link system may seem counterintuitive, but it makes it possible to add files to a project without copying them. For example, you can create a library or framework in a folder on disk, and import it into various projects as a collection of symbolic links that access the original files in their original source folder. Similarly, you can keep image files or fonts in a single folder and import them via links into multiple projects without having to create multiple copies.
![]() CROSS-REFERENCE
CROSS-REFERENCE
For more information about using the Project navigator and the other new navigators in Xcode 4, see Chapter 4.
The other key element to notice in Figure 3.6 is the Scheme/Destination menu near the top left. The Destination sets the platform—for example, the Simulator, or a hardware device for iOS, and either a 32-bit or 64-bit environment for OS X. Schemes manage the internal features of the build process. They're introduced in Chapters 12 and 13.
You can't test apps on a hardware device until you follow the provisioning steps described in Chapter 11. So for now, use this menu to select the Simulator, as shown in Figure 3.6.
You can now click the Run button at the top left of Xcode to build and run your skeleton app. Xcode takes a while to pre-compile the project's headers, build the app, and load it into the Simulator. The first time you build an app or an application for a new target, the build and install process takes some time because Xcode must perform various one-time operations to complete the build. Subsequent builds happen more quickly, because Xcode has much less work to do. Builds also take time to install, so the first time you run an app in the Simulator you see a black screen. The screen usually persists for 10 seconds or so, but occasionally it can last for up to a minute.
Eventually the app loads and runs, as shown in Figure 3.8. The empty gray window isn't very exciting. It does nothing at all, but internally it is a complete skeleton app. You can now go back and begin editing the source files shown in Figure 3.6 to create the UI for the app.
Figure 3.8
Run the template application in the Simulator. As a skeleton application, it does nothing except paint the window gray.

![]() CAUTION
CAUTION
The Simulator is a separate application. Xcode launches it and disappears into the background. The Simulator menu replaces the Xcode menu while the former is foregrounded. Typically you float the Simulator window on top of Xcode, so you can re-foreground Xcode by clicking anywhere around the Simulator. You can also use the Dock to switch between Xcode and the Simulator.
Although this example creates an iOS application, the steps for an OS X application are almost identical, with the difference that an OS X application runs in a new window—not in the Simulator. The features of the different OS X and iOS templates are listed in more detail below.
![]() CROSS-REFERENCE
CROSS-REFERENCE
For more about editing, see Chapter 4. For an introduction to UI design, see Chapter 7.
Looking inside the Application templates
Most applications are built using Cocoa or Cocoa Touch. You can start with a minimal windowed application, or you can select a more complex template that includes one or more supporting views. The Cocoa and Cocoa Touch templates always include the following:
![]() Class implementation files that define the basic elements of the application: For Cocoa and Cocoa Touch applications, the elements always include an application delegate that receives and processes application management messages from the OS—for example, one message is sent when the application finishes loading, another when the application is about to quit, and so on. Depending on the template, the default classes may also include at least one UI view controller, which receives and processes user actions generated by the UI.
Class implementation files that define the basic elements of the application: For Cocoa and Cocoa Touch applications, the elements always include an application delegate that receives and processes application management messages from the OS—for example, one message is sent when the application finishes loading, another when the application is about to quit, and so on. Depending on the template, the default classes may also include at least one UI view controller, which receives and processes user actions generated by the UI.
![]() Class header files to support the implementation files: The headers include
Class header files to support the implementation files: The headers include #import directives for the essential UI framework on each platform. In templates with more than one class, the headers are imported correctly complete throughout.
![]() One or more nib files with a .xib extension: Nib files are OS X and iOS resource files that define the basic properties of a window, and optionally of a UI view. These files have a dual purpose. They define the look and feel of the application UI. You can edit them to add UI objects such as images, buttons, sliders, and other controls. OS X applications include the menu tree in their nib files. Internally, nib files are treated as a general purpose inventory of objects to be loaded and initialized when the application runs. It's one of the open secrets of Cocoa development that you can add any object or class to a nib file.
One or more nib files with a .xib extension: Nib files are OS X and iOS resource files that define the basic properties of a window, and optionally of a UI view. These files have a dual purpose. They define the look and feel of the application UI. You can edit them to add UI objects such as images, buttons, sliders, and other controls. OS X applications include the menu tree in their nib files. Internally, nib files are treated as a general purpose inventory of objects to be loaded and initialized when the application runs. It's one of the open secrets of Cocoa development that you can add any object or class to a nib file.
![]() CROSS-REFERENCE
CROSS-REFERENCE
For more information about creating, editing, and using nib files, see Chapters 7 and 8.
![]() Links between the nib files and the class files: In Apple development, code can control and respond to UI objects only when these links are defined. They appear in two places: in the nib file, and in special directives within the class headers and the implementation code.
Links between the nib files and the class files: In Apple development, code can control and respond to UI objects only when these links are defined. They appear in two places: in the nib file, and in special directives within the class headers and the implementation code.
![]() A prefix header file with #import directives for the essential application frameworks: When you build an application, the headers added to this file are pre-compiled only once.
A prefix header file with #import directives for the essential application frameworks: When you build an application, the headers added to this file are pre-compiled only once.
![]() A plist (property list) file that includes a dictionary of application settings: You can edit this dictionary to implement standard user preferences for the application. For details, see Appendix B.
A plist (property list) file that includes a dictionary of application settings: You can edit this dictionary to implement standard user preferences for the application. For details, see Appendix B.
![]() An English localization folder. This includes a strings file that is used to localize the application so it supports other languages in addition to English: The strings file includes pairs of strings. One string is used as a key in the application. The other string defines the text that appears when that string is used. Each language you support has its own strings file, with different output strings for each key. The templates contain English localization only.
An English localization folder. This includes a strings file that is used to localize the application so it supports other languages in addition to English: The strings file includes pairs of strings. One string is used as a key in the application. The other string defines the text that appears when that string is used. Each language you support has its own strings file, with different output strings for each key. The templates contain English localization only.
![]() A main.m file: This is a short block of boilerplate startup code that loads the application and creates a memory pool for it. You can usually ignore this file.
A main.m file: This is a short block of boilerplate startup code that loads the application and creates a memory pool for it. You can usually ignore this file.
![]() NOTE
NOTE
OS X projects can also link code to the UI using bindings—indirect links between properties and UI elements. The standard OS X templates don't include any bindings; if you want to use them, you have to add your own. Bindings aren't available in iOS.
Using the OS X Application templates
Although there are only three OS X Application templates, all include extra options.
Using the Cocoa Application template
The Cocoa Application template includes the ingredients listed earlier. The two options are shown in Figure 3.9.
You can create a Document-Based Application, which is designed for multi-document applications. Each document loads and creates an instance of the same nib file. The template uses Cocoa's NSDocument class to implement the document's features. It includes extra set-up and tear-down features that aren't needed in an application that uses a single window, but it isn't a full implementation of a complete document-based application. You need to add file save/load features, recent file support, and undo code.
The Use Core Data option creates an application with support for Core Data storage. The code implements automatic archiving and loading of the data, but it doesn't implement specific editing features. It also doesn't define a data model. For a brief introduction to Core Data, see Appendix B.
Figure 3.9
Select a Cocoa Application template, and set the two options. The grayed-out Spotlight Importer option isn't available, and you can ignore it.

![]() NOTE
NOTE
Core Data isn't a full relational database. Its features are more limited, but it can still be a useful way to manage data objects that can include multiple attributes.
Using the Cocoa-AppleScript Application template
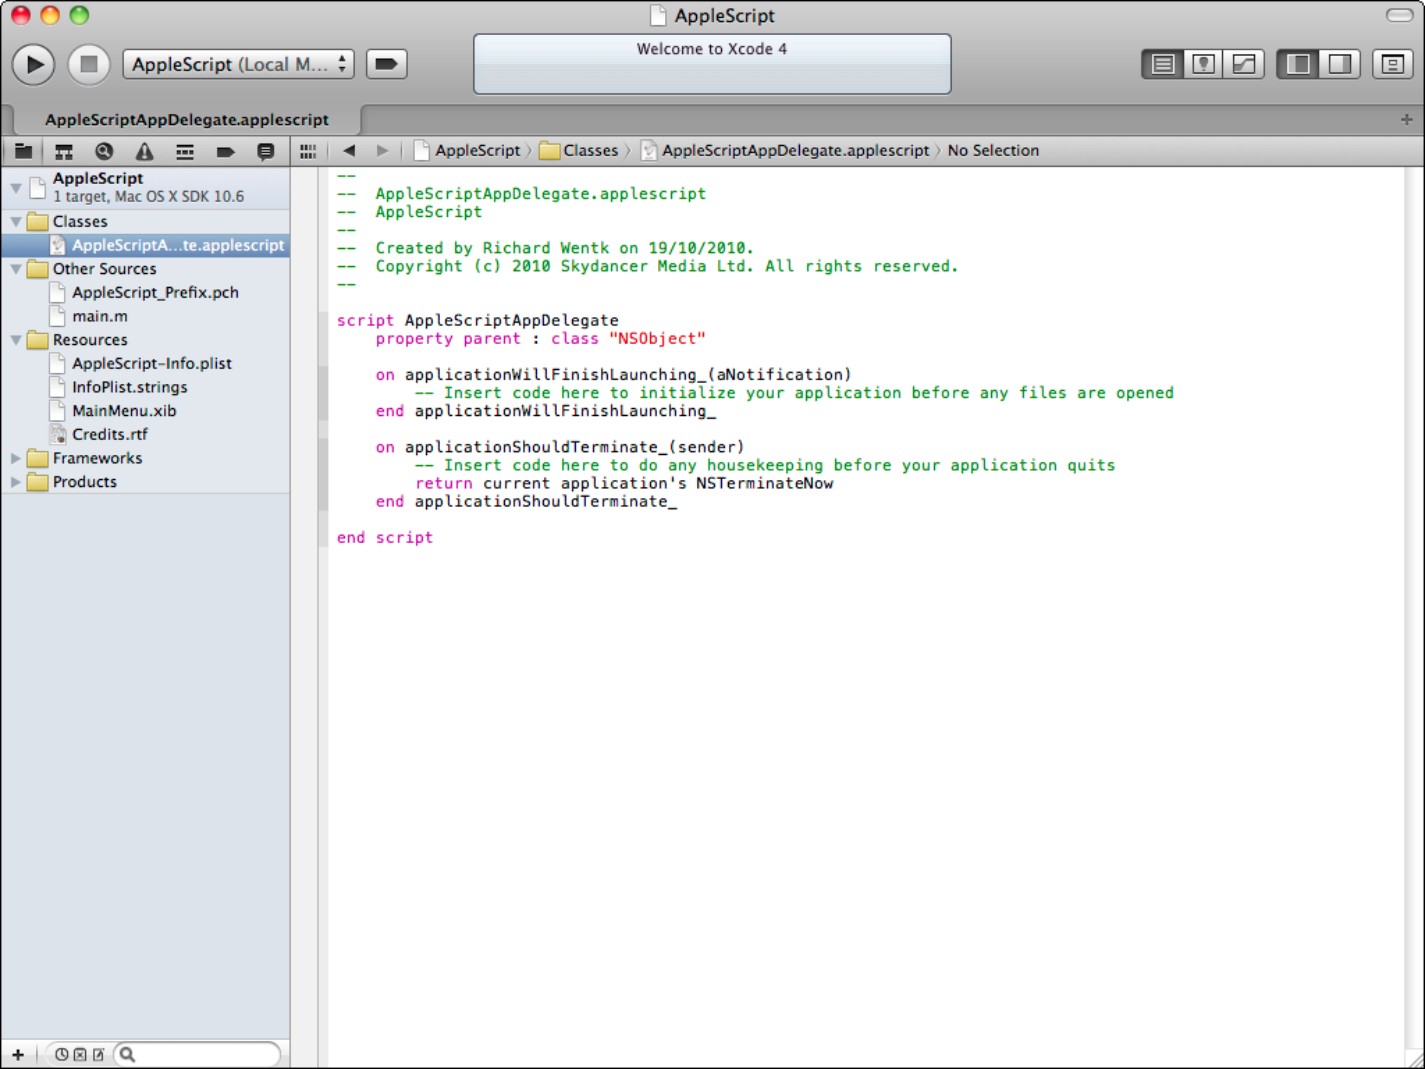
The Cocoa-AppleScript Application template, shown in Figure 3.10, creates a minimal AppleScript application. It's effectively a drastically simplified version of the standard Cocoa Application template, rewritten in AppleScript instead of Objective-C. Only two methods appear here: applicationWillFinishLaunching and applicationShouldTerminate. Real applications are likely to need more in the way of set-up, so this template is a prime candidate for replacement with a more advanced template of your own design.
![]() TIP
TIP
For a guide to developing AppleScript applications, see the companion AppleScript in Wiley's Developer Reference series.
Figure 3.10
The Cocoa-AppleScript template creates a very simple AppleScript application, which launches and…does nothing.
Using the Command Line Tool template
In a Cocoa application, main.c loads and runs the application, and you can ignore it. In a command-line application, main.c is the application. As you might expect, the Command Line Tool template creates a C or C++ file designed to run from the command line. Parameters are passed in argc and argv[] in the usual way. After building, the tool runs in the Console window, which is introduced in Chapter 4. You also can run the tool from Terminal.
As shown in Figure 3.11, you can select one of six templates for the tool. This is less flexible than it sounds. The different variations link against the named OS X libraries. In practice, this means they differ only in the #include directive at the top of the file. For example, if you select the Core Foundation option, the template's code looks like this:
#include <CoreFoundation/CoreFoundation.h>
int main (int argc, const char * argv[]) {
// insert code here...
 CFShow(CFSTR(“Hello, World!
”));
return 0;
}
Figure 3.11
Create a Command Line tool, a text-based application that doesn't use a GUI (Graphical User Interface). The menu simply preselects different headers in a #include directive.

Understanding the iOS Application templates
The default iOS templates include bare-bones examples of various possible iOS UI configurations. Understand that these outlines are a starting point, not a definitive guide to UI design. Real iOS applications rarely have much in common with the templates. As you become more experienced, the limitations of the templates become more obvious and more restrictive, and you'll almost certainly want to modify them or create new templates of your own.
![]() TIP
TIP
You'll find it useful to build and run each of the templates in turn. Be sure to save a version of each template to a special templates folder so you can explore each template again later without having to re-create it.
Using the Navigation-based template
The Navigation-based template, shown in Figure 3.12, includes a window that displays a single instance of the UITableView class. iOS doesn't support drop-down menus. Instead, you build menu-like navigation trees by combining a Navigation Controller object with one or more of these table views. Selecting a cell—an item in the table—is similar to selecting a menu item. Your code can respond by displaying the next table in the tree, or it can perform some other action.
Figure 3.12
Run the Navigation-based template. The navigation controller creates the gray bar at the top of the UI, and the table view generates the table cells under it. You need to add code to set the title, fill in the contents of the cells, and respond when the user taps a cell.
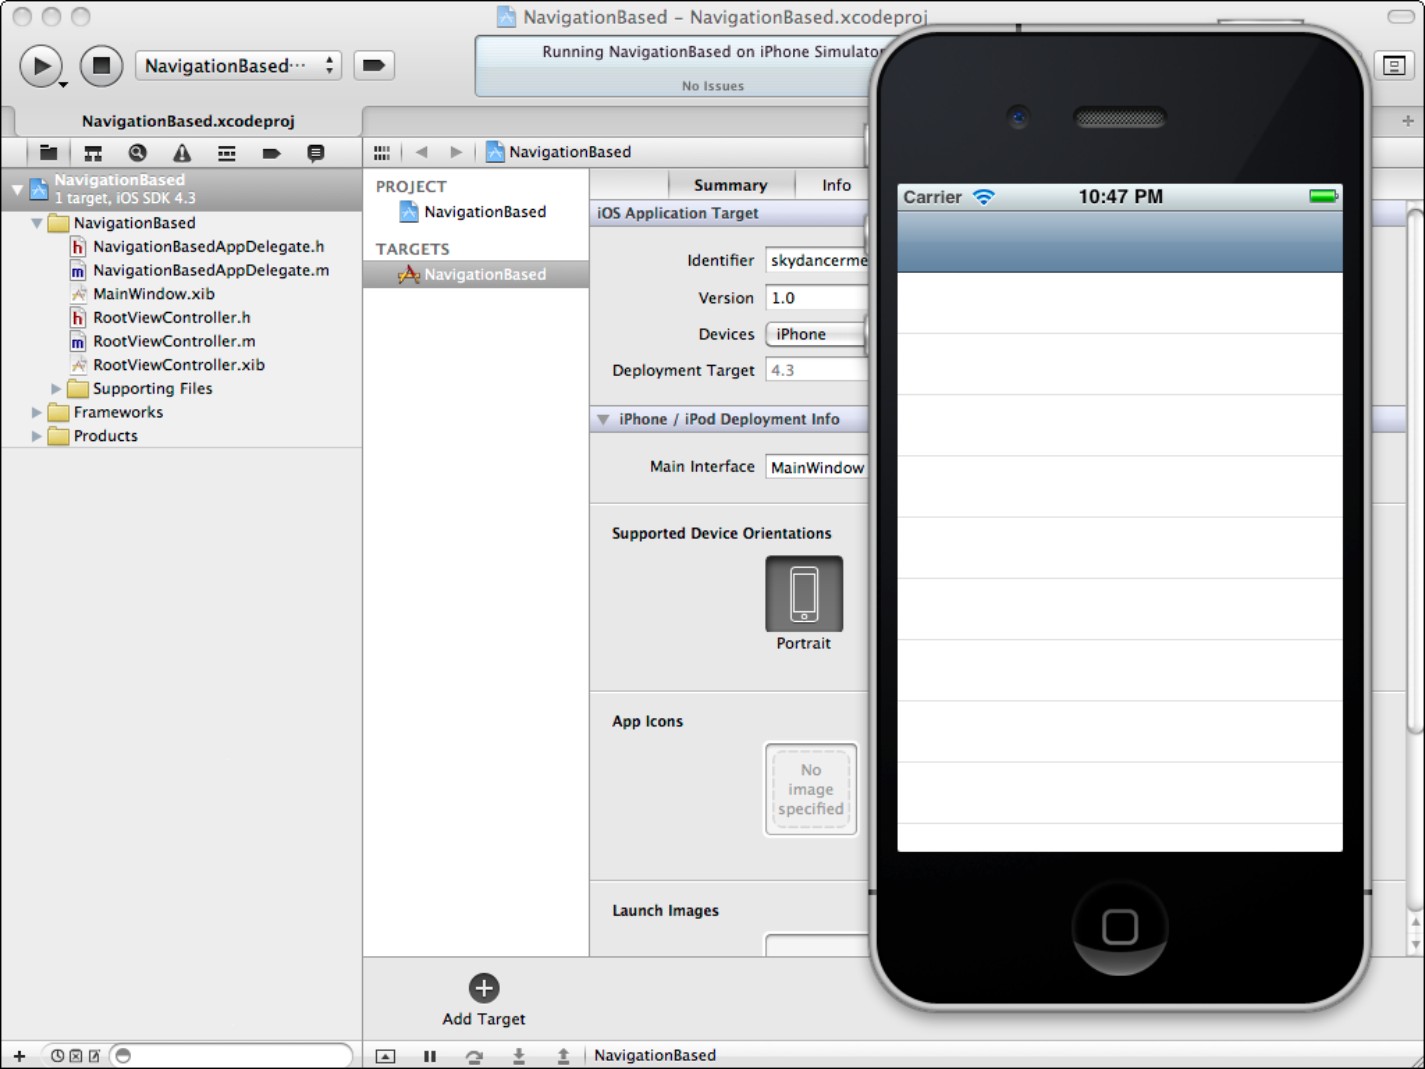
Navigation is managed by an instance of UINavigationController, which handles movement through the tree and displays a title and back/forward buttons. As a top-level item, the navigation controller is included in the main window nib. Although it's not entirely obvious from the code, you typically modify the code in this template so it loads another table view when the user taps a cell.
The Navigation-based template is iPhone only. For iPad projects, use the SplitView-based template—it has similar features but supports the iPad's more complex navigation options.
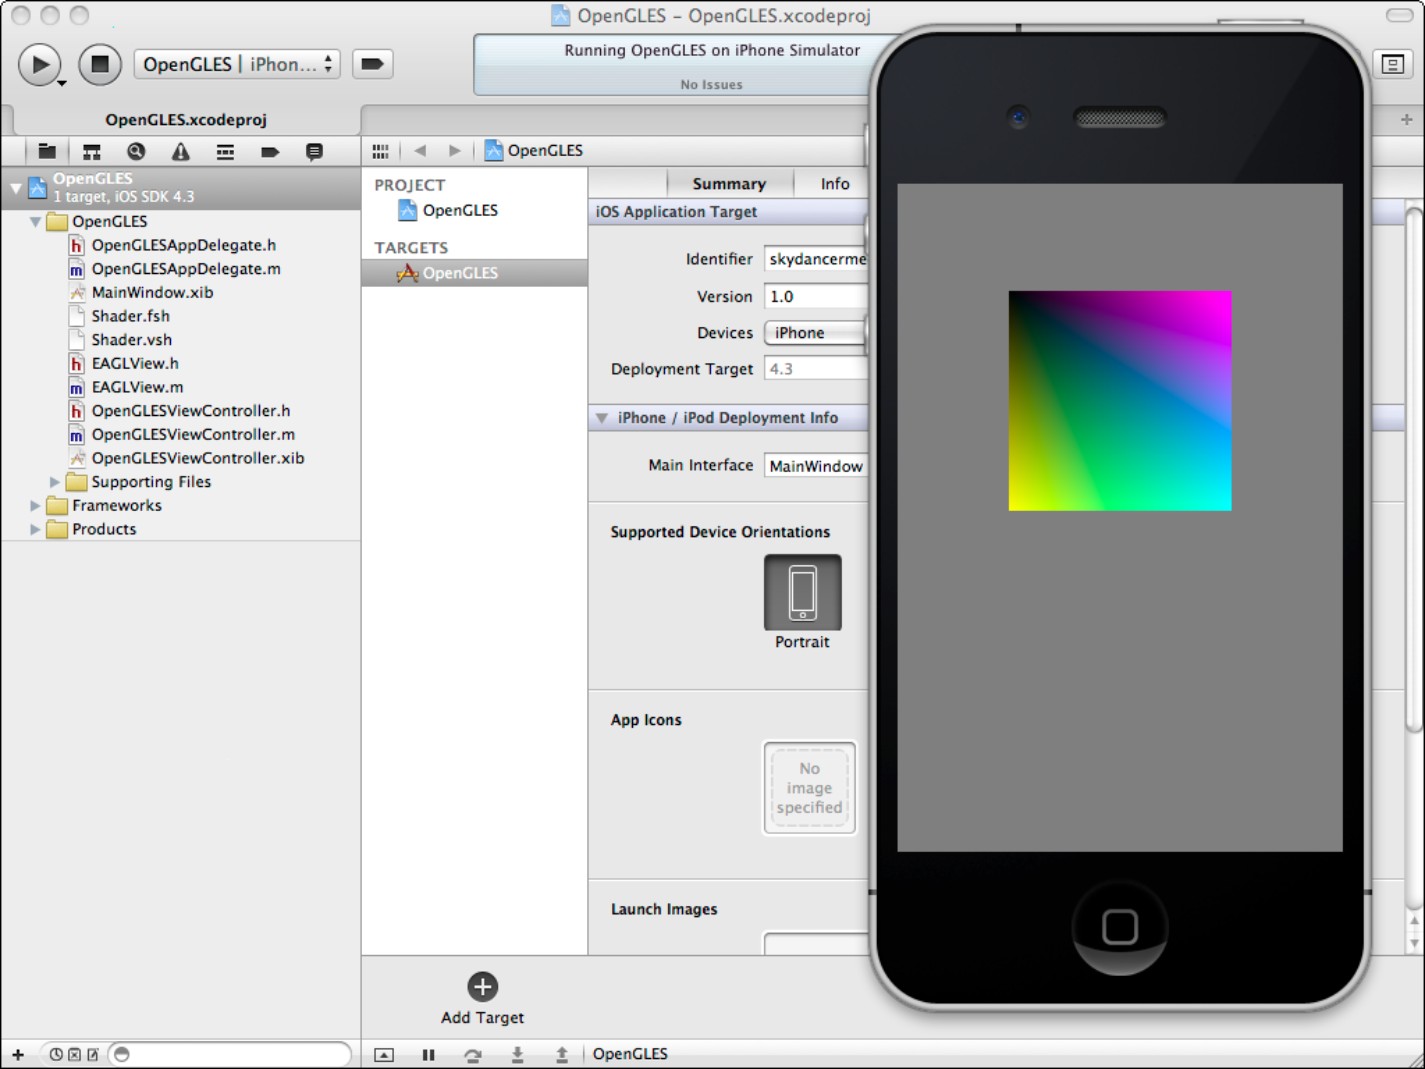
Using the OpenGL ES template
The OpenGL ES template, shown in Figure 3.13, includes set-up and tear-down for an application that uses the OpenGL ES graphics subsystem. OpenGL ES is used for games and for complex custom UIs. It's a specialized high-performance graphics environment, and you can ignore it unless you need to create complex 3D or 2D animations.
The graphics are wrapped inside a class called EAGLView, which selects and runs one of the two rendering classes—ESRenderer1 and ESRenderer2—which support OpenGL ES 1.5 and OpenGL ES 2.2 code, respectively.
Figure 3.13
The code of the OpenGL ES template animates a moving shaded square. Significant set-up and tear-down code is needed to make this animation possible.
Older models of the iPhone—the 2.x, 3G, and the iPod Touch second generation support OpenGL ES 1.5 code only. In practice, you add your backward-compatible code to ESRenderer1.m and current code to ESRenderer2.m. Alternatively, you can comment out the renderer selection and force your project to run the older code, which is supported on all hardware but lacks some of the powerful features in the OpenGL ES 2.2 specification.
The default code in both renderer files draws a colored square and also maintains an animation counter. The wrapper view includes an animation timer that calls each renderer repeatedly. Your rendering code is responsible for calculating the updated view at each animation frame.
Using the SplitView-based template
The SplitView-based template illustrated in Figure 3.14 is the iPad equivalent of the Navigation-based template. The iPad's larger screen makes it possible to view a list of menu items in a split view, which is next to a detail view that can display relevant information for each item or for the application as a whole. Navigation code is similar to that used in the Navigation-based template. When the iPad is vertical or in portrait mode, the split view appears when the user taps the navigation button at the top left, floats above the detail view, and disappears when the user taps outside it. When the iPad is horizontal landscape mode, the split view always appears at the left.
![]() TIP
TIP
You can change the rotation in the Simulator by selecting Hardware⇒Rotate Right or Rotate Left. You can also scale the iPad simulator by selecting Window⇒Scale 50% or 100%. The 100% view requires a monitor with a width or height of at least 1200 pixels.
Using the Tab Bar Application template
The Tab Bar Application template shown in Figure 3.15 can create an iPhone or iPad application. You can choose the hardware target using the menu in the Options bar above the template description. The user taps the buttons on the Tab Bar to select different views.
Figure 3.14
This illustration shows the iPad Simulator window with 50 percent scaling in portrait mode using the SplitView-based template.

Figure 3.15
The Tab Bar Application template displays and switches views automatically, using the UITabBarController class to manage the switching and UITabBar class to display the buttons and respond to user taps.
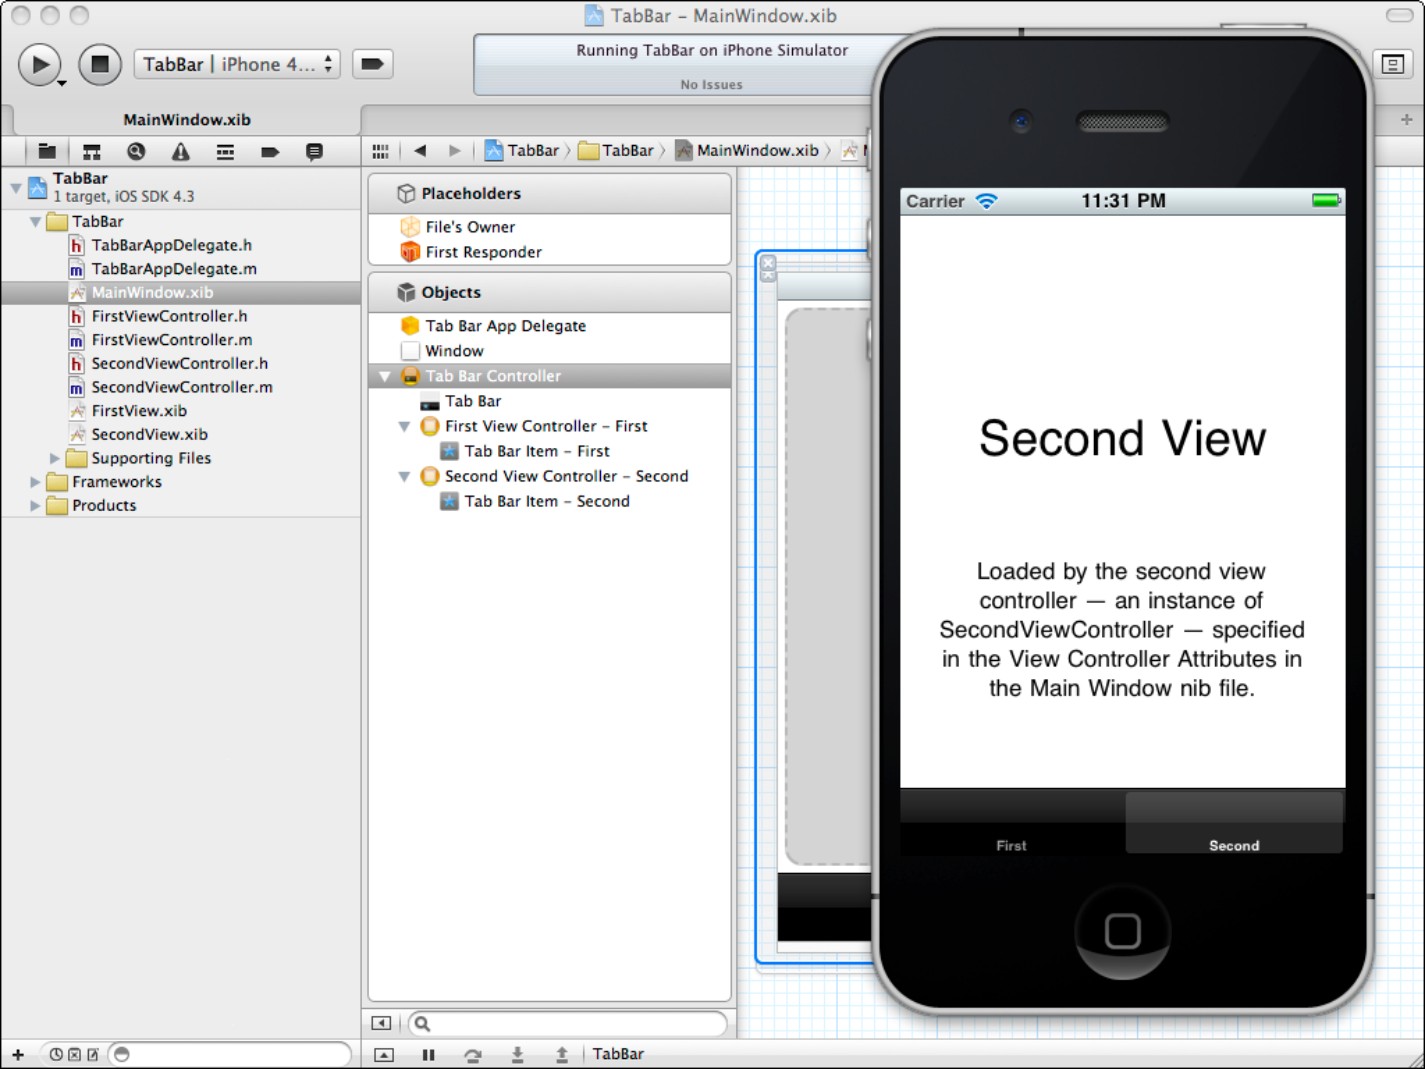
This is one of the more confusing templates, because the code doesn't appear to do anything. In fact, the Tab Bar Controller manages view switching for you automatically. The template includes two view controllers and their associated nib files and code. You can use Interface Builder to add further views—pages—to the template by adding further view controllers to the list inside the Tab Bar Controller in the MainWindow.xib file. There isn't space in this chapter to include a full step-by-step guide to this process, but once you've explored IB in the next few chapters, you can return to this template and experiment with copying view controllers in the MainWindow.xib file, creating new view controller classes, and assigning them to the duplicated view controllers.
Using the Utility Application template
The Utility Application template shown in Figure 3.16 creates an iPhone application with an info button at the bottom right. Tapping the button reveals a flip-side view with a navigation bar and a Done button. The two views have separate controllers. The flip view is typically used for preferences and other application features that don't need to be permanently visible. There is no iPad option for this template.
Figure 3.16
Think of the Utility Application template as a design example than a practical application starting point. Many apps use the main/flip view design idiom, but it's often implemented in simpler and more flexible ways.
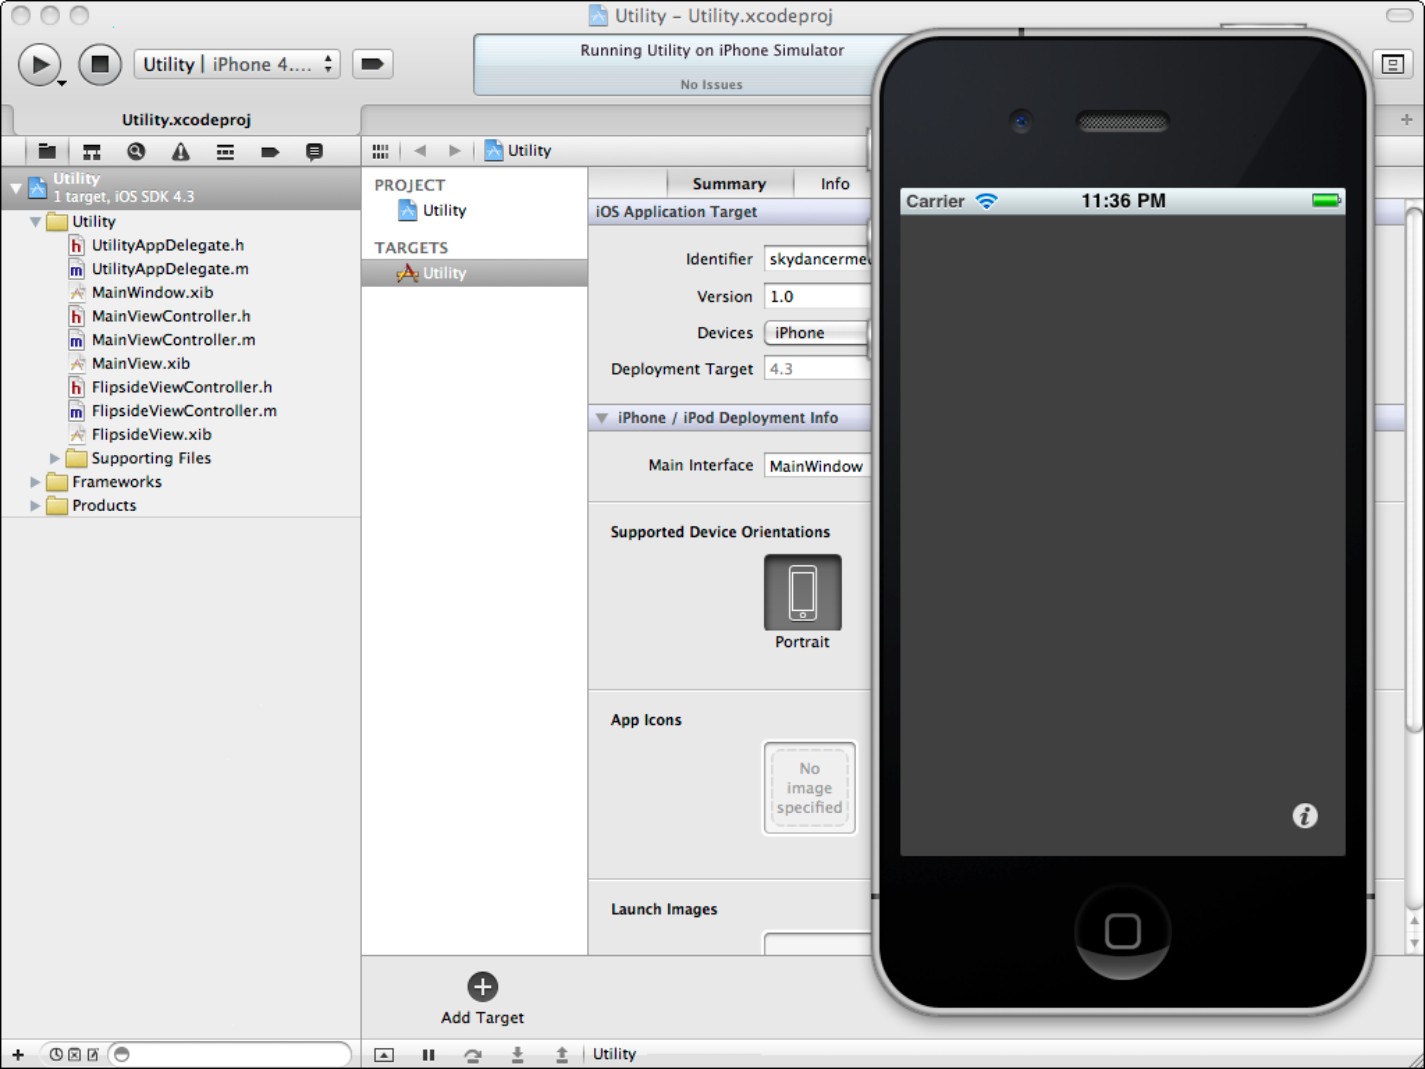
Although you can use this template as is, it has some nonessential features. The navigation bar on the flip-side wastes space. Note that it's simply a navigation bar—a holder for a button, and not a navigation controller. Often, you'll replace the bar and the button with a single return button at the bottom of the screen, perhaps with a custom graphic.
![]() TIP
TIP
For Cocoa experts, the flip code triggered by the Done button uses a protocol method call to the superview. Replacing this with a simpler call to dismissModalView: animated: in the flip view works just as well. You can use self as the modal view parameter. The call automatically finds the superview, so you don't need to specify it.
Using the View-based Application template
You can create either an iPad or an iPhone view-based application with this template, which is shown in Figure 3.17. This is the standard vanilla template used by most developers. It includes a window, a view controller, and a view. The view controller is already subclassed, so you can start adding code to it immediately. The view isn't subclassed, so you can't add code to it. But typically you only need to subclass it if you plan to add custom drawing code for animations or unusual graphics. Otherwise, use the view controller to manage user interactions and to control updates. Add items to the view controller nib to lay out your interface.
Note that this template produces iPad or iPhone applications. If you want to create a universal iPhone and iPad application, use the Window-based template.
As a lazy shortcut, all iPhone applications run automatically on the iPad using the built-in emulation mode, which displays them in a half-sized sub-window. The sub-window can be zoomed to fill the screen, but this doesn't increase the resolution—it simply makes iPhone apps look large, but fuzzy.
There's no iPad emulator for the iPhone; iPad apps don't run on an iPhone at all.
Using the Window-based Application template
The Window-based application template is a minimal template with just a window that contains a single label, as shown in Figure 3.18. This is the only iOS template that includes a full universal option and can create a single app that runs on both the iPhone and iPad.
Figure 3.17
The View-Based Application template is the most useful starting point for app design.

In fact this template simply creates two separate apps, with two separate nibs, and two app delegates The iOS app loader automatically selects the appropriate nib for each platform at run time.
The template doesn't create any view controllers. So to create a true universal app you typically add two separate view controllers, each with a nib that defines a unique UI, and perhaps some shared data classes. You have to add links between each view controller and its window in IB.
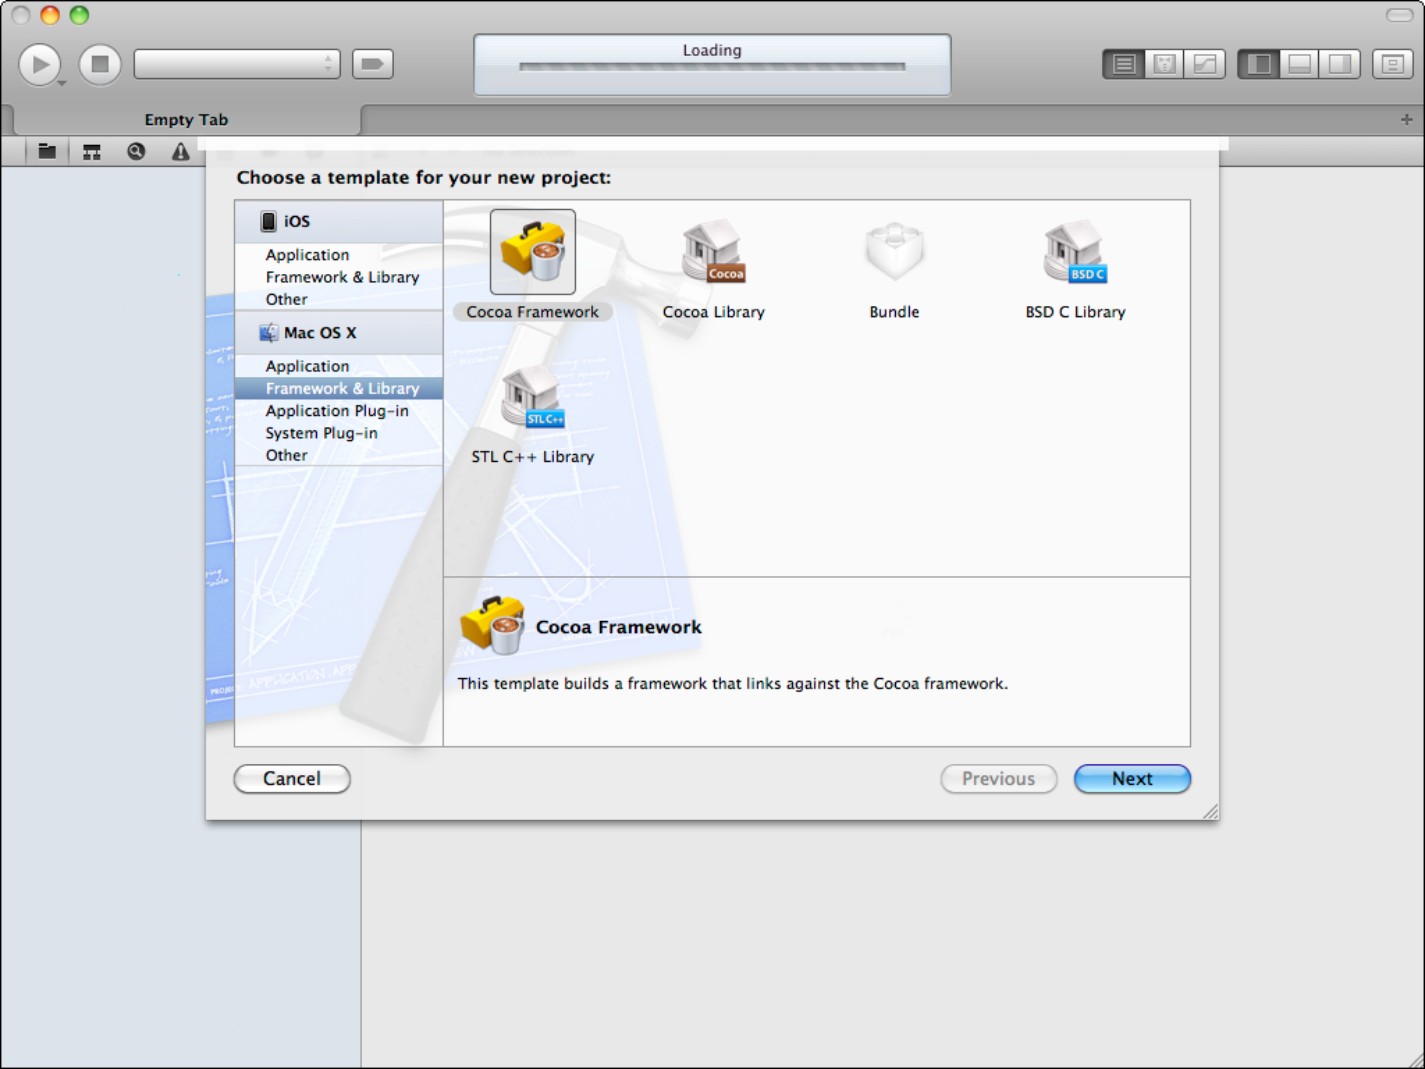
Introducing the Framework and Library templates
iOS supports only static libraries. You can't create or add a framework to an iOS project. As shown in Figure 3.19, OS X is less limited. You can create a Cocoa framework, a Cocoa library, a BSD C library, or a Standard Template Library (STL) C++ project add-on. The Bundle option groups together a collection of Objective-C files into a format that can be used to create extensions for languages such as Ruby. It can reference the Cocoa or Core Foundation (Carbon) frameworks.
Figure 3.18
Although the Window-based template includes a universal option, in practice, it simply creates two separate nibs with supporting code classes. There's some overlap between the platforms, but creating a dual platform app from this template requires lots of time, thought, and effort.
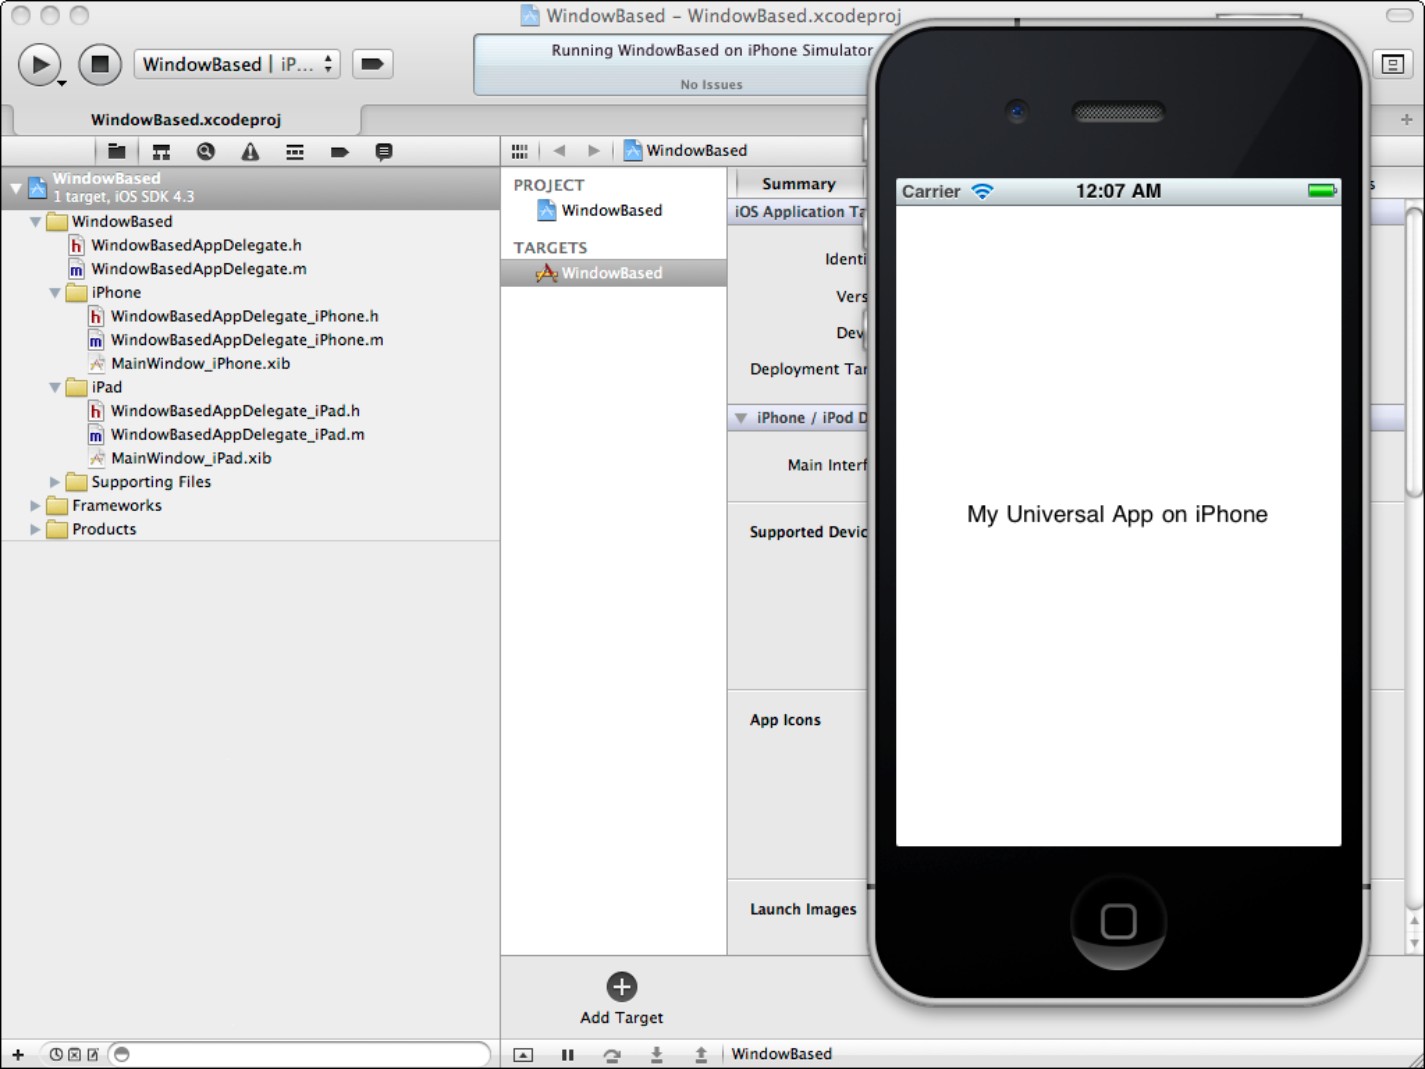
Figure 3.19
You can used the Framework & Library option in the OS X templates to create a range of supporting frameworks and libraries for your projects—and potentially, for the projects of other developers.
![]() NOTE
NOTE
A library is usually just a collection of code, with source files. A framework typically builds a single binary and supplies a list of headers for a #import directive. Frameworks can include media content, property lists, and other information as well as code. The framework's folder structure is fixed. In theory, frameworks include a complete class architecture, with implied usage patterns and relationships, while libraries are more likely to contain isolated discrete components. In practice, the distinction is sometimes less clear-cut.
Introducing Plug-in templates
The plug-in templates are specialized, and the details of plug-in design are outside the scope of this book.
In outline, the Application Plug-in templates are designed to add custom features to existing Apple applications, such as Address Book, Automator, and so on. These applications are designed with a standard interface, and the plug-in templates generate code and resource files that match their specific requirements. Experienced developers can use them to add new features to these applications. For example, you can use the Interface Builder plug-in to define your own collection of UI objects and add it to the standard list already built into IB.
The System plug-ins are more low level and can work with more than one application. For example, the Quick Look Plug-in can implement a preview of a custom data type used in your applications. Some of the plug-in templates are minimally complex. The IOKit driver plug-in creates a complete empty C++ file and links it against the Kernel framework. If you're a newcomer to Apple development, you can ignore these more advanced options.
![]() NOTE
NOTE
The plug-in templates support only Apple-standard APIs. If you want to develop a plug-in for some other application, such as an Adobe Photoshop 8BX plug-in or a VST (Virtual Studio Technology) music synthesizer or sound processor, you typically need to download a suitable SDK or framework and add it to Xcode by hand.
Changing the Standard Templates
It's important to understand that no template is complete. Templates include a bare minimum of features and are designed to eliminate repetitive set-up chores. They're not tutorials, and they're certainly not examples of best practice.
Many useful methods from these classes are missing from the templates, and you should review the class reference documentation, described in Chapter 6, to learn more about them. Typically, your applications rely on methods and properties that don't appear in the standard templates. The most productive templates are likely to be the ones you create yourself. Custom template creation is an advanced topic and is introduced in Chapter 12. But editing the existing templates is relatively easy and can save you time even on simple projects.
Finding the template files
Currently, you can find the iOS template files in /<Xcode Folder>/Platforms/iPhoneOS.platform/Developer/Library/Xcode/Project Templates
The OS X templates are in /<Xcode Folder>/Library/Xcode/Project Templates
For both platforms, the application templates are in /Application, and the others are in correspondingly named folders.
![]() CAUTION
CAUTION
If you are developing with multiple versions of Xcode, by default they all load their templates from these directories—usually. These locations may change without notice in future versions of Xcode.
Figure 3.20 shows a view of the template file structure, with a list of files. The contents of each template are a standard Xcode project. You can open the project in Xcode by double-clicking the .xcodeproj file.
Figure 3.20
Locating the iOS template files

Note that some of the templates have multiple versions; for example, the Cocoa Application template is really a group of six different templates with optional Core Data, Document, and Spotlight features. You can ignore the templates you never use. But understand that if you change one template, the others aren't updated automatically. To create a complete set of modified templates, you must add the changes to every template you plan to use.
![]() NOTE
NOTE
Each group of templates, such as Cocoa Application, includes a TemplateChooser.plist file. If you're comfortable with plists and Cocoa dictionaries, you can open this file to explore how the different options are organized and selected, and how the plist controls the options that appear in Xcode's templates pane.
Customizing the template files
When Xcode uses the files to build a template, the filenames with their underscores are interpreted as macros and replaced with the Save-As name you choose. But if you open the project directly, as shown in Figure 3.21, you can edit the files as if they were a standard project. You also can build and run them. This means you can modify any template as if it were a standard project and save it in the usual way. The next time you use that template, it loads with all your changes.
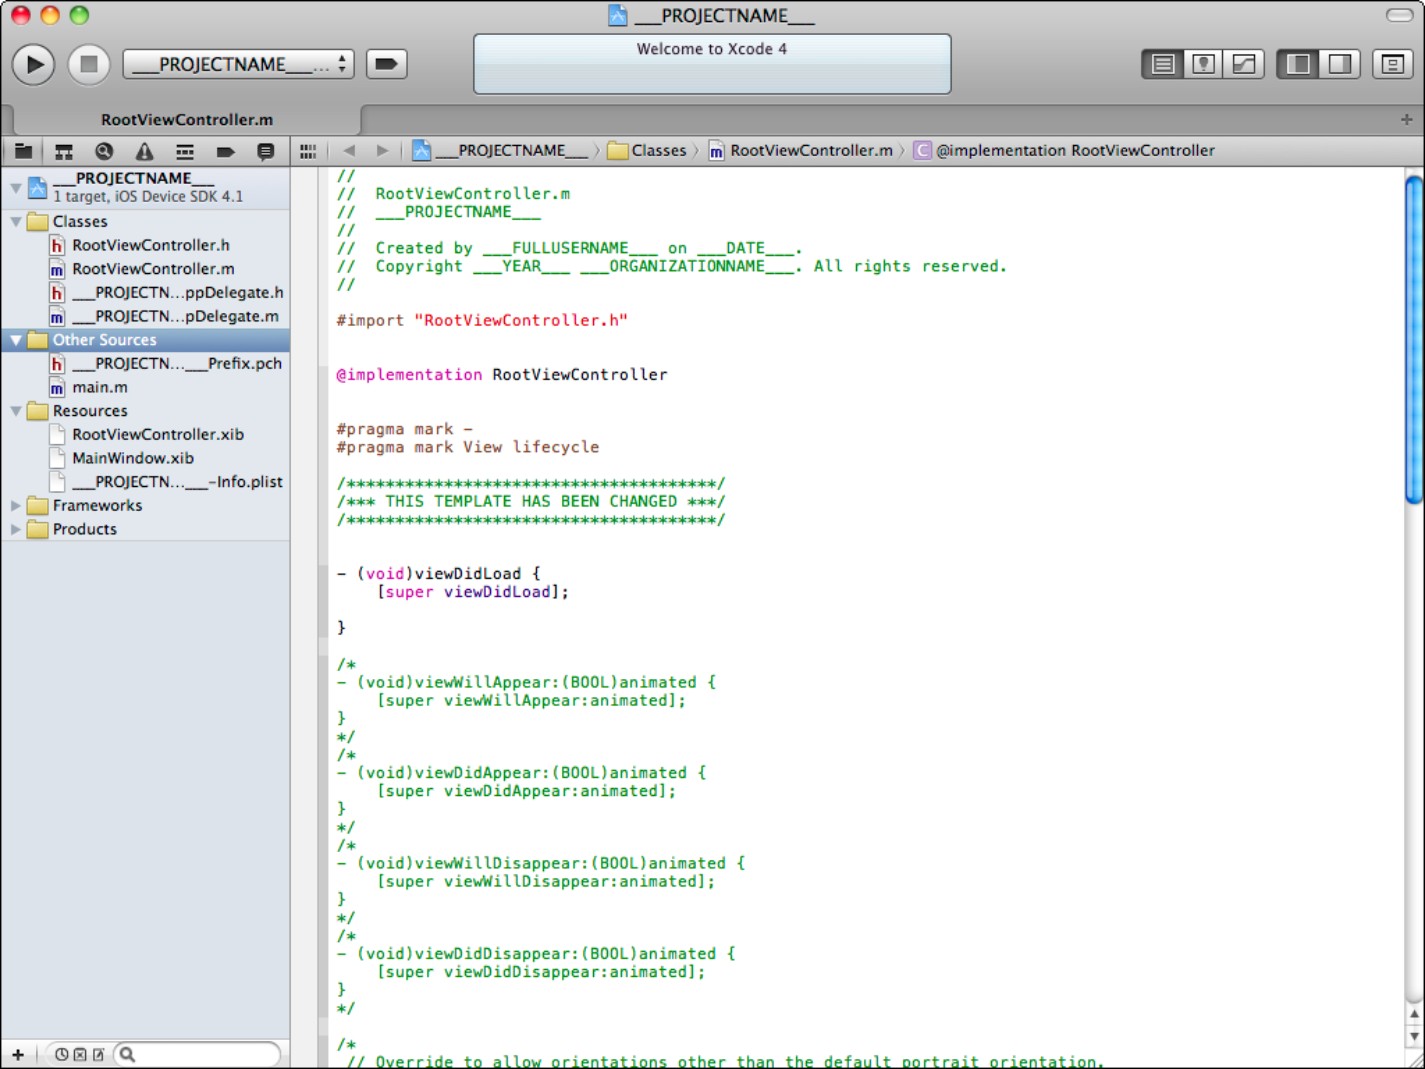
Figure 3.21
Modifying an OS X template. This trivial change adds a comment, but you have complete freedom to change each file in a template to suit your needs.
Because the templates are limited, customization is highly recommended. After your first few projects, you can review your code, see which features are reused regularly, and add them to the equivalent template.
![]() CAUTION
CAUTION
Whenever you update Xcode, the standard template directories are overwritten. Whether you're using edited templates or a collection of custom templates, you must keep copies in a folder outside the /Developer directory and copy them back by hand after every update. If you don't, your edits are destroyed. (In theory you should be able to keep custom templates in ~/Library/Application Support/Developer/ Shared/Xcode/Project Templates, but this feature isn't working the first release of Xcode 4.)
Summary
This chapter looked at the Xcode templates and introduced a simple template-based build sequence. It examined the features of the different template types and explored the application templates for both iOS and OS X in some detail. It also explained how to modify the templates to improve them and create useful and full-featured starting points for further development.