2. Working with Email
In This Chapter
• Setting up an iPad to work with your existing email accounts
• Using the Mail app to compose, send, and manage emails
• Sending email from within other iPad apps
As long as your iPad has access to the Internet via a Wi-Fi, 3G, or 4G connection, it has the capability to securely access virtually any type of email account. In fact, using the tablet’s preinstalled Mail app, you have the ability to manage multiple email accounts simultaneously without having to open and close accounts to switch between them.
Any model iPad can access an optional 4G Personal Hotspot device via Wi-Fi, or any other wireless device that offers a 4G tethering feature.
Your iPad is also capable of viewing certain types of attachments that accompany emails, including PDF files, photos, and Microsoft Office documents and files. Plus, if you have access to an AirPrint-compatible printer, you can print incoming or outgoing emails from within the Mail app.
Using your iPad, you can easily send and receive email messages, and manage personal and work-related email accounts at the same time, yet keep the content of the various accounts totally separate.
Before you can manage one or more email accounts from your iPad, it’s necessary to access the Settings app to configure your tablet to work with your email account(s).
Setting Up Your iPad to Work with Existing Email Accounts
The email account setup process described here works with virtually all email accounts. If you have an email account through your employer that doesn’t initially work using the setup procedure outlined in this chapter, contact your company’s IT department or Apple’s technical support for assistance.
The process for setting up an existing email account to use with your iPad and the Mail app needs to be done only once per account.
Follow these steps to set up your iPad to work with your existing email account:
1. From the Home screen, tap the Settings app icon.
2. On the left side of the main Settings app screen, tap the Mail, Contacts, Calendars option.
3. When the Mail, Contacts, Calendars options display on the right side of the screen (see Figure 2.1), tap the Add Account option that’s displayed near the top of the screen, below the Accounts heading. If you’ve already set up iCloud on your iPad when you initially set up the tablet, your iCloud-related email account is already listed under the Accounts heading, just above the Add Account option.

Figure 2.1. Tap the Mail, Contacts, Calendars option from within Settings, and then tap the Add Account option.
4. From the Add Account screen, select the type of email account you have: iCloud, Microsoft Exchange, Gmail, Yahoo! Mail, AOL Mail, MobileMe, or Other. Tap the appropriate option (see Figure 2.2). If you have a POP3- or IMAP-compatible email account, tap the Other option and follow the onscreen prompts.

Figure 2.2. Select the type of email account you are setting up by tapping the appropriate icon.
If you have an existing Yahoo! Mail account, for example, tap the Yahoo! icon. When the Yahoo! screen appears (shown in Figure 2.3), use the iPad’s virtual keyboard to enter the Account Name, Email Address, Password, and a Description for the account.

Figure 2.3. Using the iPad’s virtual keyboard, enter the details pertaining to your existing email account.
5. Tap the Next button that’s located in the upper-right corner of the window.
6. Your iPad connects to the email account’s server and confirms the account details you entered.
7. After the account has been verified, a new window with multiple options, such as Mail, Contacts, Calendars, and Notes, is displayed. (The options listed vary based on the type of email account you’re setting up.) Each option has a virtual On/Off switch associated with it. These options relate to what account-related data will sync with your iPad.
8. Tap the Save button that’s located in the upper-right corner of this window.
9. Details about the email account you just set up are added to your iPad and accessible from the Mail app.
10. If you have another existing email account to set up, from the Mail, Contacts, Calendars screen within the Settings app, again tap the Add Account option, and repeat the preceding steps.
As you’re setting up your email account and responding to onscreen prompts within the Settings app, the Name field should include your full name. This is what is later displayed within the From field of all email messages you send. The Address is your email address, and you should enter it in the yourname@mailservice.com format.
The Password is the password you currently use to access your existing email account. For the Description, you can enter any text that helps you differentiate the email account from others, such as “AOL Mail Account,” “Yahoo! Email,” or “Work Email.”
If you’re trying to set up a POP3, IMAP, or Microsoft Exchange account, for example, and you’re prompted for information you don’t have, such as your Incoming Mail Server Host Name, Incoming Mail Server Port Number, Outgoing Mail Server, or Outgoing Server Authentication Type, contact your Internet service provider or the company that provides your email account.
Depending on the type of email account you’re setting up for use with your iPad, the information you are prompted for varies slightly.
When you purchase an iPad, it comes with free technical support from AppleCare for 90 days. This includes the ability to make an in-person appointment with an Apple Genius at any Apple Store to get help setting up your email accounts on your tablet. To schedule a free appointment, visit www.apple.com/retail/geniusbar. Or call Apple’s toll-free technical support phone number and have someone talk you through the email setup process. Call (800) APL-CARE.
Customizing Your Email Account Settings
From the Settings app, as you look at the Mail, Contacts, Calendars screen, you see a variety of customizable options that pertain to your email accounts. Tap each of these customizable options, one at a time, to personalize the settings based on your preferences and needs.
Fetching New Data
Set up your iPad to automatically access the Internet and retrieve new email messages by tapping the Fetch New Data option and adjusting its settings. You can also make sure the Push option, listed at the top of the Fetch New Data screen (see Figure 2.4), is turned on. This allows the iPad to automatically retrieve new emails from the server on an ongoing basis.

Figure 2.4. Turn on the Push option to allow your iPad to automatically check for new emails and retrieve them from the server.
If you turn off the Push option, set the Fetch option to check for new emails every 15 minutes, every 30 minutes, hourly, or manually. Two reasons why you might consider turning off the Push feature and use Fetch to periodically check for emails (or do this manually) is to reduce your 3G or 4G wireless data usage, and to extend your tablet’s battery life between charges. (Constantly checking for new emails and downloading those emails depletes the iPad’s battery life faster.)
When you signed up for a 3G or 4G wireless data plan, you were given a pre-determined wireless data allocation per month. Having your iPad constantly check for new incoming emails (using the Push feature) quickly uses this allocation. This is not a concern, however, if you’re using a Wi-Fi Internet connection.
Keep in mind, downloading and reading emails with large attachments, such as photos, Microsoft Office, or PDF files, depletes your monthly wireless data allocation much faster, as does having your iPad check for new emails often.
Customizing Mail Options
Under the Mail heading of the Mail, Contacts, Calendars screen are a handful of additional customizable features pertaining to how your iPad handles your email accounts. These options include the following:
• Show: This feature determines how many messages within a particular email account the Mail app downloads from the server and displays at once. Your options include 50, 100, 200, 500, or 1,000 Recent Messages.
• Preview: As you look at your Inbox using the Mail app, you can determine how much of each email message’s body text is visible from the Inbox summary screen, in addition to the From, Date/Time, and Subject lines.
• Minimum Font Size: Regardless of the font size used by the sender, your iPad can automatically adjust the font size so messages are more easily readable on the tablet’s display. The default option is Medium, which is acceptable to most iPad users.
• Show To/Cc Label: To save space on your screen as you’re reading emails, you can turn off the To and CC label within each email message by tapping the virtual switch associated with this option.
• Ask Before Deleting: This option serves as a safety net to ensure you don’t accidently delete an important email message. When this feature is turned on, you are asked to confirm your message deletion request before an email message is actually deleted. Keep in mind that, by default, you cannot delete email messages stored on your email account’s server. When you delete a message, it is only deleted from your iPad.
• Load Remote Images: When an email message has a photo or graphic embedded with it, this option determines whether that photo or graphic is automatically downloaded and displayed in conjunction with the email message. You can opt to have your iPad refrain from automatically loading graphics in conjunction with email messages. This reduces the amount of data transferred to your tablet, and it can help to protect against spammers who use image tracking to verify valid email addresses. You always have the option to tap an icon within the email message to download the graphic content of that message, including photos.
• Organize By Thread: This feature enables you to review messages in reverse chronological order if a single message turns into a back-and-forth email conversation, where multiple parties keep hitting Reply to respond to messages with the same topic. When turned on, this makes keeping track of email conversations much easier, especially if you’re managing several email accounts on your iPad. If turned off, messages in your Inbox are displayed in reverse chronological order, as they’re received, and are not grouped together by subject.
• Always Bcc Myself: To ensure you keep a copy of every outgoing email you send, turn on this feature. A copy of every outgoing email is sent to your Inbox if this feature is turned on.
• Signature: For every outgoing email that you compose, you can automatically add an email signature. The default signature is “Sent from my iPad.” By tapping this option, you can compose one or more customized signatures. A signature might include your name, mailing address, email address, phone number(s), and so on.
After you make whatever adjustments you want to the Mail app-related options from within the Settings app, exit the Settings app by pressing the Home button on your iPad to return to the Home screen. You’re now ready to begin using the Mail app to access and manage your email account(s).
Managing Your Email Accounts with the Mail App
The Mail app that is preinstalled on your iPad is loaded with features to make managing multiple email accounts a straightforward process.
If you need to manage multiple email accounts with your iPad, it’s important to understand that although the Mail app enables you to view email messages in all of your accounts simultaneously (when the All Inboxes option is selected), the app actually keeps messages from your different accounts separate.
As you view your incoming email messages, by default, the app groups emails together by message thread, enabling you to follow an email-based conversation that extends through multiple messages and replies. When turned on, this feature displays emails within the same thread in reverse chronological order, with the newest message first.
To send and receive emails using the Mail app, your tablet must be connected to the Internet via a Wi-Fi, 3G, or 4G connection.
After you’ve initially set up your existing email accounts to work with the Mail app, you can use this app to manage your email accounts from anywhere. Launch the Mail app from the Home screen.
To alert you of incoming messages, without having the Mail app running, access the Settings app to have the iPad display a badge on the Mail app icon that’s displayed on the Home screen as new emails arrive.
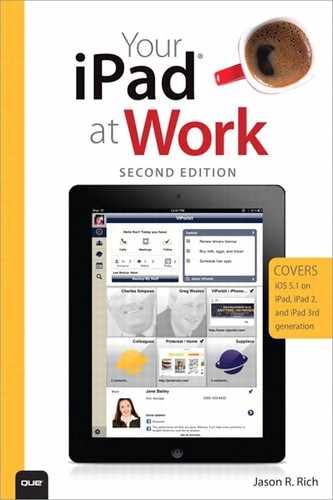
A badge is a small number that appears in the upper-right corner of the Mail app’s icon on the Home screen. In this case, it indicates how many new emails your iPad has received. Refer to the bottom of Figure 2.5 to see what a badge looks.
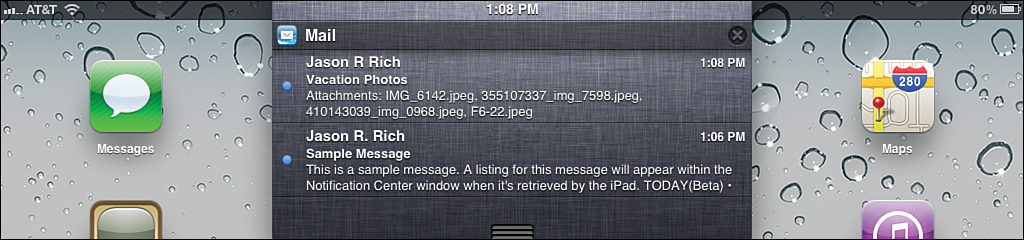
Figure 2.5. This is what the Notification Center window looks like when incoming email message alerts are displayed.
Plus, you can set the Notification Center to list incoming emails. If the Notification Center window displays an incoming message alert (shown in Figure 2.5), tap it to automatically open the Mail app and display that new message. You learn more about the Notification Center in Chapter 4, “Using the Calendar, Reminders, and Notification Center Apps.”
Upon launching the Mail app, you can access the Inbox for one or more of your existing email accounts, compose new emails, or manage your email accounts. Just like the Inbox on your main computer’s email software, the Inbox of the Mail app (see Figure 2.6) displays your incoming emails.

Figure 2.6. The Mail app’s inbox screen. In this example, just one email account is set up to work with the app.
Working with the Inbox
On the left side of the Mail app’s Inbox screen is a list of the individual emails within your Inbox. A blue dot to the left of a message indicates the message has not yet been read.
As shown in Figure 2.7, a blue dot displayed within your Inbox, next to a message on the left side of the screen, indicates that a message is new and unread. A flag icon indicates the message is urgent. A circular, left-pointing arrow icon indicates you have already sent a reply to that message. A straight, right-pointing arrow indicates you have forwarded the message to one or more recipients.
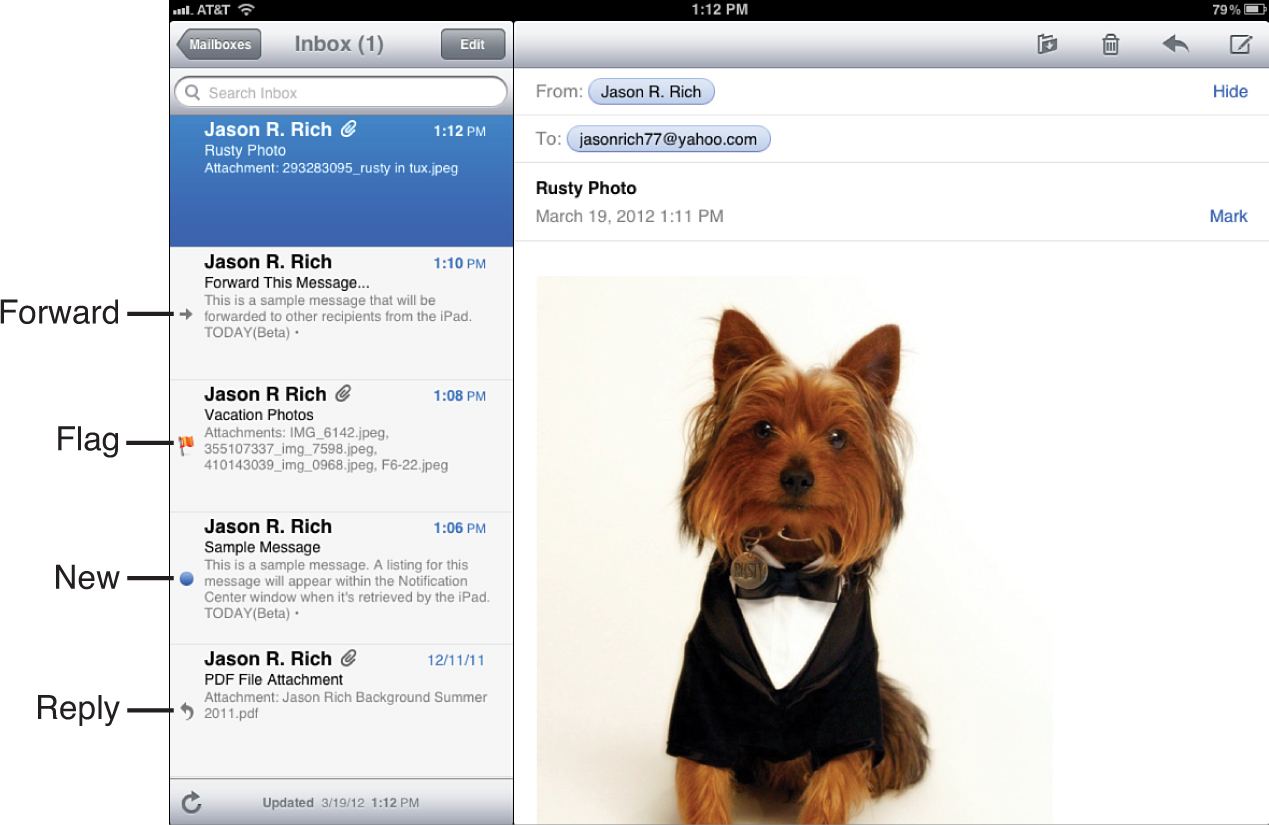
Figure 2.7. Small graphic icons displayed to the left of each email message listing within your Inbox indicate different things.
Based on the customizations that you made from within the Settings app that pertain to the Mail app, the Sender, Subject, Date/Time, and up to five lines of the message’s body text are displayed for each incoming message.
The email message that’s highlighted in blue on the left side of the screen is the one that’s currently being displayed, in its entirety, on the right side of the screen. Tap any email item on the left side of the screen to view the entire message on the right side of the screen.
At the bottom of the Inbox message listing (on the left side of the screen) is a circular arrow icon. Tap this icon to refresh your Inbox and manually check for new incoming emails. The Updated message, accompanied by the date and time, indicates the last time your Inbox was refreshed.
At the top of the Inbox message listing are two buttons labeled Mailboxes and Edit. Between these two icons is the Inbox heading, along with a number that’s displayed in parentheses. This number indicates how many new, unread messages are currently stored in your inbox.
Just below the Inbox heading is a Search field. Tap this Search field to enter a search phrase and quickly find a particular email message. You can search the content of the Mail app using any keyword, a sender’s name, or email subject, for example.
Organizing Mailbox Actions with the Mailboxes Button
When looking at your Inbox, the Mailboxes button is displayed in the upper-left corner of the screen. If you’re managing just one email account with the Mail app, when you tap on this icon, you can immediately access your Drafts folder, Sent Message folder, Trash folder, Bulk Mail folder, or other folders associated with your email account.
However, if you’re managing multiple email accounts using the Mail app, when you tap the Mailboxes button, you see a listing of each mail account’s Inbox, as well as each email account, displayed on the left side of the screen.
Tabs for each email account’s Inbox are displayed to the upper left. At the top of this listing is an All Inboxes tab. Tap this icon to view a listing of all your incoming emails, from all your accounts, on a single screen. (These messages are displayed together but are actually kept separate by the Mail app.)
When you’re managing multiple accounts, you can tap the Mailboxes tab to switch between individual email account Inboxes. Under the Accounts heading, you can also access the Inbox, Drafts, Sent, Trash, Bulk Mail, or other folders for each account separately.
Depending on the email account, you might be able to add new folders for storing email messages on your iPad. As you’re looking at the current list of folders associated with one email account, tap the Edit button that’s displayed at the top of the screen next to the Mailboxes heading. Now, at the bottom of the screen, in the lower-right corner of the left mailbox folder column, you see a new button labeled New Mailbox (shown in Figure 2.8).

Figure 2.8. For most types of email accounts, you can create an unlimited number of mailbox folders (each with a custom name) for organizing email messages.
Tap the New Mailbox button to manually enter the name of a new folder, and decide under which email account (Mailbox Location) the folder will be displayed.
Selecting Messages for Use with an Edit Button
Located on top of the Inbox message listing (to the right of the Inbox heading) is an Edit button. When you tap this button, you can quickly select multiple messages from your Inbox to delete or move to another folder (see Figure 2.9).
Figure 2.9. After tapping the Edit button you can quickly delete or move multiple email messages currently stored in your Inbox.
After you tap the Edit button, an empty circle displays to the left of each email message summary. To move or delete one or more messages from this Inbox listing, tap the empty circle for that message. A red-and-white check mark fills the empty circle when you do this, and the Delete and Move buttons are displayed at the bottom of the screen.
After you’ve selected one or more messages, tap the Delete button to quickly delete the messages from your Inbox (which sends them to the Trash folder), or tap the blue-and-white Move button, and then select which folder you want to move those email messages to.
Deleting Individual Incoming Messages
As you’re looking at the listing of messages in your Inbox, with most types of email accounts, you can delete individual messages, one at a time, in several ways. Swipe your finger from left to right over a message listing on the left side of the screen. A red-and-white Delete button displays on the right side of that email message listing. Tap this Delete button to delete the message.
Another way to delete a single message from your Inbox (or any folder) is to tap the message listing that’s displayed on the left side of the screen, which highlights the message in blue. At the same time, the entire message is displayed on the right side of the screen. To then delete the message, tap the Trash Can icon displayed near the upper-right corner of the screen.
Viewing Your Email
When a single email message is highlighted on the left side of the Inbox screen, that message is displayed, in its entirety, on the right side of the screen. At the top of the message, you see the From, To, Cc, Bcc, Subject, and Date/Time lines.
In the upper-right corner of the email message is a blue Hide command. If you tap this, some of the message header information is no longer displayed. This enables you to display more of that email’s message on the tablet’s screen. To make this information reappear, tap the Details command that appears in the upper-right corner of the message.
Located to the right of the Date and Time the email was received is a blue Mark command. When you tap this Mark tab, two new command icons appear, labeled Flag and Mark As Unread.
If you Flag a message, a small orange flag appears next to its listing on the left side of the screen (as shown in Figure 2.10), which indicates the message is urgent. If you tap the Mark As Unread option, that message remains in your Inbox with a blue dot next to it, indicating that it’s a new message that has not yet been read.

Figure 2.10. As you’re reading any incoming email message on your iPad, you can flag it to indicate to yourself that the message is urgent.
Accessing Incoming Email Attachments
The Mail app enables you to access certain types of attachment files that accompany an incoming email message. You can view and access the following files: photos (in the .JPEG, .GIF, .PNG, and .TIFF format), audio files (in the .MP3, .AAC, .WAV, and .AIFF format), PDF files, as well as Pages, Keynote, Numbers, Microsoft Word, Microsoft Excel, and Microsoft PowerPoint files.
If an incoming email message contains an attachment that is not compatible or accessible from your iPad, you see that an attachment is present but you aren’t able to open or access it. In this case, you must access this content from your primary computer.
To open a compatible attached file within an incoming email message, tap and hold down the attachment icon for one to three seconds. If the attachment is compatible with an app that’s installed on your iPad, you are given the option to transfer the file to that app and directly open or access the file using that app. Or, you can open a compatible attachment in the Mail app’s own viewer.
Transferring Messages to Other Folders
As you’re viewing an email message on the right side of the screen, you can move it from your Inbox to another folder in one of two ways. First, you can tap the Edit button, or you can tap the file folder-shaped icon that’s displayed in the upper-right corner of the screen. When you tap this icon, the various folders available for that email account are displayed on the left side of the screen. Tap the folder to which you want to move the message. The folders available vary for different types of email accounts.
Forwarding, Replying, and Printing
From within the Mail app, you can reply to the message, forward any incoming message to someone else, or print the email by tapping the left-pointing arrow icon that’s displayed in the upper-right corner of the main Inbox screen (next to the Trash Can icon). A menu is then displayed in the upper-right corner of the screen (see Figure 2.11).
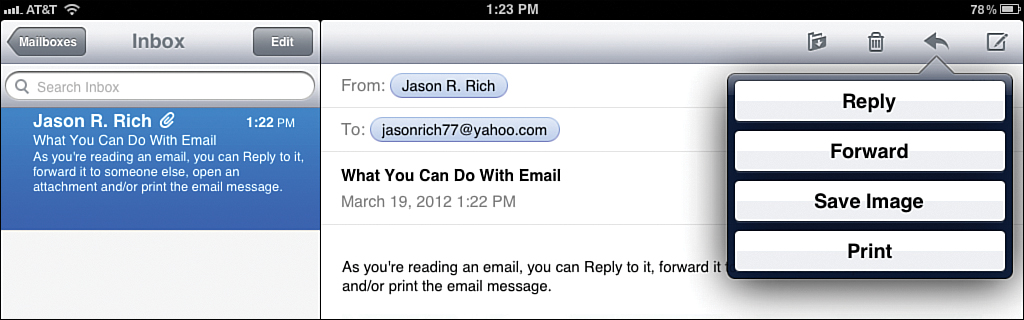
Figure 2.11. As you’re reading any email message, tap the left-pointing arrow icon to Reply To, Forward, Save/Open Attachments, or Print that message.
To reply to the message you’re reading, tap the Reply button. A blank email message template appears on the screen. See the “Composing Messages” section later in this chapter for details on how to write and send an email message from the Mail app.
To forward the email you’re reading to another recipient, tap the Forward button. If there’s an attachment associated with this email, you are asked if you want to include the attachments from the original email. You see two icons, labeled Include and Don’t Include. Choose the appropriate response.
When you opt to forward an email, a new message template displays. However, within the body of the email message are the contents of the message you’re forwarding.
Start the message forwarding process by filling in the To field. You can also modify the Subject field (or leave the message’s original Subject) and then add to the body of the email message with your own text. The newly added text displays above the forwarded message’s content.
To forward an email to multiple recipients, enter each person’s email address in the To field of the outgoing message, but separate each address with a comma. You can also tap the plus icon (+) that appears to the right of the To field to add more recipients.
If you’re sending an email to a contact that’s stored within your Contact app’s database, instead of manually typing the personal’s email address, you can begin typing the person’s name. The Mail app offers suggestions based on the information stored within the Contacts app.
When you’re ready to forward the message to one or more recipients, tap the blue-and-white Send button that appears in the upper-right corner of the email message window. Or tap the Cancel button (located in the upper-left corner of the message window) to abort the message forwarding process.
If you have a wireless printer set up to work with your iPad, you can print incoming or outgoing emails directly from your tablet using the Print command. To learn more about wireless printing from your iPad, see Chapter 8, “Wireless Printing and Scanning via Your iPad.”
Composing Messages
From within the Mail app, you can easily compose an email from scratch and send it to one or more recipients. To compose a new email, tap the Compose icon that’s displayed near the upper-right corner of the main Inbox screen. The Compose icon looks like a square with a pencil on it.
When you tap the Compose icon, a blank email message template (shown in Figure 2.12) displays. Using the virtual keyboard, fill in the To, Cc, Bcc, and Subject fields. At the very least, you must fill in the To field with a valid email address for at least one recipient. The other fields are optional.
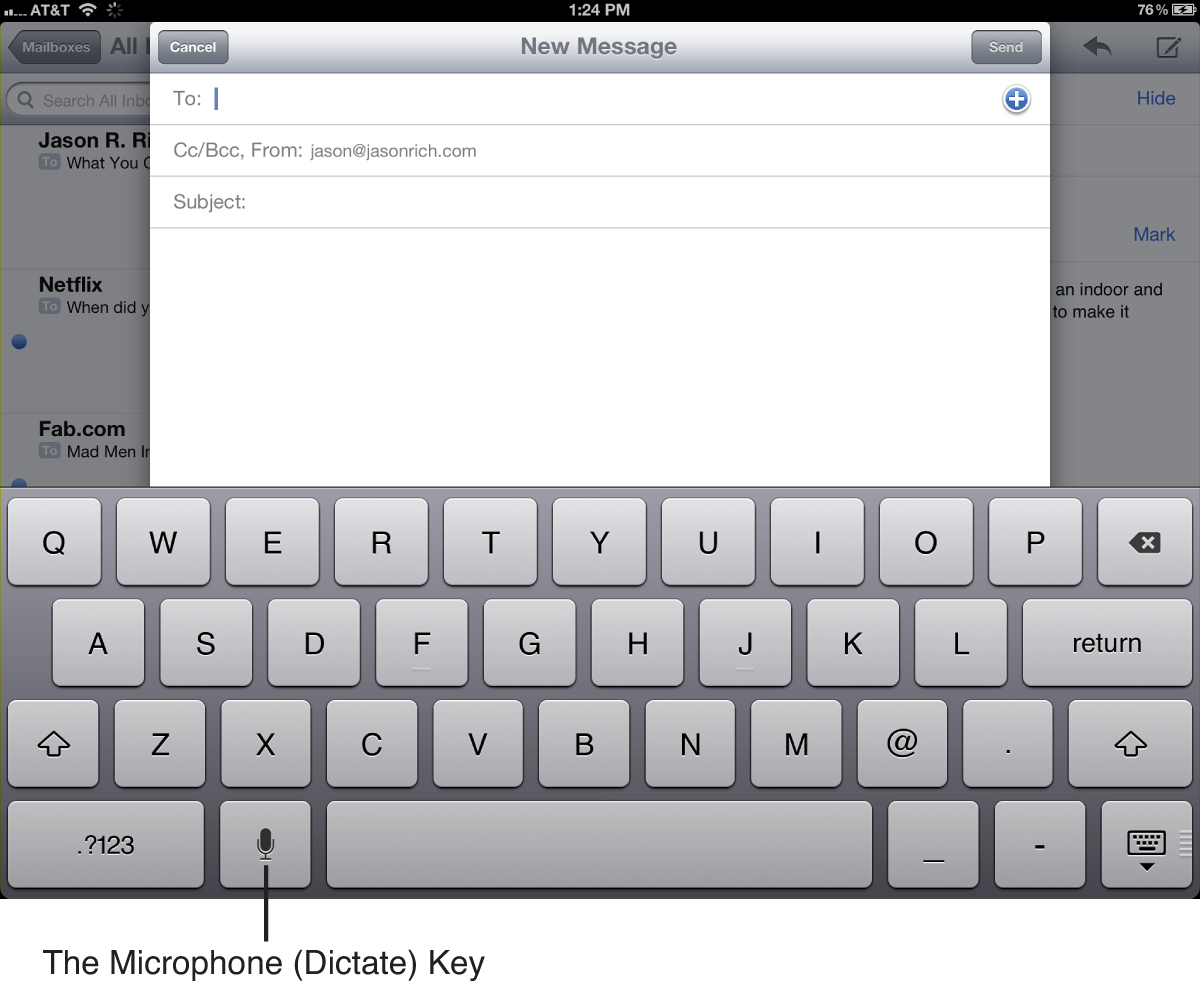
Figure 2.12. After tapping the Compose icon you can create an email from scratch and send it from your iPad.
You can send the same email to multiple recipients by either adding multiple email addresses to the To field, or by adding additional email addresses to the Cc or Bcc fields.
If you’re managing just one email address from your iPad, the From field automatically fills with your email address and is not displayed. However, if you’re managing multiple email addresses from the tablet, tap the From field to select the email address from which you want to send the message.
Tap the Subject field and use the virtual keyboard to enter the Subject for your message. As you do this, the Subject displays in the title bar of the Compose window.
To begin creating the main body of the outgoing email message, tap in the main body area of the message template and use the virtual keyboard (or the external keyboard you’re using with your iPad) to compose your message.
If you have a new iPad, instead of manually typing an email message, you can use the Dictate feature. To do this, tap the microphone key on your new iPad’s virtual keyboard. When then icon enlarges and you hear a tone, begin speaking (dictating) the body of your email message. When you’re done, tap the Dictate button again.
Whatever you said is translated by your iPad from speech to text and promptly inserted into the body of your outgoing email message. To learn more about this feature, see the section called, “Using the New iPad’s Dictation Feature,” at the end of Chapter 1.
If you have the Auto-Correction or Spell Check feature turned on (both of which are adjustable from the Settings app) as you type, the iPad automatically corrects anything that it perceives as a typo or misspelled word.
Be very careful when using these features because they are notorious for plugging the wrong word into a sentence. Especially if you’re creating important business documents and emails, make sure you proofread whatever you type on your iPad carefully before sending it. Typically, these features are helpful, but they do have quirks that can lead to embarrassing and unprofessional mistakes.
The Signature you set up in the Settings app is displayed automatically at the bottom of the newly composed message. You can return to the Settings app to turn off the Signature feature, or you can change the signature that appears.
When your email is fully written and ready to be sent, tap the blue-and-white Send button in the upper-right corner of the Compose window. Within a few seconds, the message is sent from your iPad, assuming the tablet is connected to the Internet. A copy of the message goes to your Sent or Outbox folder.
Saving Unsent Drafts of an Email Message
If you want to save a draft of an email (within your Draft folder, for example), without sending it, as you’re composing the email message tap the Cancel button that appears in the upper-left corner of the Compose message window. The Delete Draft and Save Draft buttons display. To save the unsent draft, tap Save Draft. This draft is permanently saved in your Drafts folder until you either send it or delete it.
Sending an Email with an Attachment
To send an email message that contains an attachment, such as a Pages document or a photo, those attachments must be sent from within a specific app, not from the Mail app.
For example, you can send a Pages, Word, or PDF document from within the Pages app, a Numbers or Excel (spreadsheet) file from within the Numbers app, or a photo from within the Photos app. Other apps also enable you to attach app-specific files to outgoing emails that are composed and sent from within that app. To do this, tap the Share icon that’s displayed within the app and choose the Email option.
Additional Mail App Features
As you begin using the Mail app to manage one or more email accounts on your iPad, you’ll probably discover that this app offers much of the same functionality as the email program you use on your primary computer or on the Web.
In addition to utilizing a built-in spell checker, for example, Mail is compatible with the Select, Copy, Cut, and Paste features built in to the iOS operating system. This enables you to move text and email message content between messages or into other apps with ease.
Plus, the Mail app automatically links with the Contacts app to pull email addresses from your Contacts database. So instead of entering someone’s email address into the To field of a message you’re composing, you can begin typing the recipient’s name, and the app automatically pulls email addresses from your Contacts database and gives you a list of potential recipients.
Using the Web or Other Apps to Access Email
In addition to using the Mail app to access your email, for some types of email accounts, you can also use the Safari web browser to access your email account directly from the server.
By visiting the App Store, you can also find third-party iPad apps that can replace the Mail app and help you better manage one or more email accounts. To find these apps, launch the App Store app, and within the Search field, enter the keyword “email.”
If you’re a Microsoft Outlook user, for example, you’ll discover the Outlook Web Email app ($4.99) or Outlook Mail Pro app ($9.99). For sending emails to groups of people, you can use the MailShot Pro app ($3.99). For people who use Google Gmail, the free Gmail app enables you to better manage this type of email account from your iPad.