8. Wireless Printing and Scanning via Your iPad
In This Chapter
• Using iOS 5’s AirPrint feature
• Other wireless printing options for non-AirPrint printers
• Scanning documents into your iPad
Unlike laptop or netbook computers, the iPad does not contain a USB port that can be used to directly connect a printer or scanner to your tablet. However, built into iOS 5.1 is the AirPrint feature, as well as Bluetooth, which are two separate technologies that allow printers or scanners, for example, to wirelessly communicate with your tablet.
As a result, any app that integrates the AirPrint feature, or taps into the iPad’s Bluetooth capabilities, can be used to access and utilize external peripherals, such as a printer or scanner. When it comes to wireless printing, Apple has teamed up with several printer manufacturers to incorporate AirPrint technology into a growing number of printer models. You learn more about AirPrint functionality shortly.
However, if your home or office printer is not AirPrint compatible, there are options for making your iPad compatible with your existing laser, inkjet, or photo printer. You must use third-party software, such as Printopia 2, on your Mac that’s connected to the same wireless network as your iPad, or you can connect a peripheral, such as the Lantronix xPrintServer, to your home or office wireless network. The xPrintServer enables you to share printers currently being used by PCs or Macs with an iPad or other iOS devices.
In addition to wireless printing functionality that’s available from an ever-growing selection of iPad apps, including Contacts, Calendar, Safari, Mail, Photos, Pages, Numbers, Keynote, and PDFpen, several companies have released portable scanners that can be connected to the iPad, enabling you to take paper-based documents and photos and scan them into the tablet to create full-color digital files that can be viewed on the tablet’s screen, manipulated using compatible apps, and then shared with others. You learn more about scanning options later in this chapter.
Wireless Printing from Your iPad
Depending on your printer make and model, there are a variety of ways to establish a wireless connection between an iPad and a laser, inkjet, or photo printer. The option you ultimately choose is based on the printer make and model you’ll be using.
If your printer is AirPrint compatible, you do not need any additional software, apps, or hardware to establish a wireless connection between the printer and iPad, as long as they’re both connected via Wi-Fi to the same wireless network. If your printer is not AirPrint compatible, additional software and/or hardware is necessary to wirelessly print from your tablet.
Unlike a desktop, laptop, or netbook computer, your iPad does not have the ability to connect directly to a printer using a USB cable connection. Thus, some type of wireless connection must first be established before you can utilize the Print command that’s now built into many iPad apps.
Using the AirPrint Feature to Wirelessly Print from Your iPad
AirPrint is a wireless printing feature that enables you to connect your tablet to a compatible printer without using cables. The printer and iPad, however, need to be connected (wirelessly via Wi-Fi) to the same network.
After the wireless connection is made, you can freely use the Print command that’s built into an ever-growing selection of apps. So, if you’re creating or editing a document using Pages, for example, and you’re ready to print the document, follow these steps:
1. Tap the wrench icon in the upper-right corner of the Pages screen.
2. Tap the Share and Print option (shown in Figure 8.1).

Figure 8.1. To wirelessly print a document from within any of the iWork apps (Pages, Numbers, or Keynote), tap the wrench icon and choose the Share and Print option.
3. Select the Printer option from within the Share and Print window.
4. Choose which printer you want to utilize (shown in Figure 8.2).

Figure 8.2. After tapping the Print option, choose which compatible printer you want to print to.
5. Determine the number of copies of the document you want to print.
6. Tap the Print command icon within the Printer Options window.
The Print command has been incorporated into many popular apps, including Safari (shown in Figure 8.3). After you set up the AirPrint feature once to establish the wireless connection between your tablet and an AirPrint-compatible printer, printing from your tablet is easy.

Figure 8.3. From within many apps, including Safari, to print a file, image, or document, first tap the Share icon and then select the Print option.
As you’re using many apps, such as Safari or Photos, for example, you’ll discover the Print command by tapping on the app’s Share icon.
Within the past two years or so, Brother, Canon, Epson, HP, and Lexmark have released AirPrint-compatible laser, inkjet, and/or photo printers. Thus, there are currently approximately 100 printer models that are AirPrint compatible, starting in price at less than $100.00.
The AirPrint feature only works between an AirPrint-compatible printer and the iPad when the two devices are connected wirelessly (via Wi-Fi) to the same wireless network. A printer that is connected to a wireless network using Bluetooth or a USB cable connection does not support the AirPrint feature.
To see an up-to-date list of compatible AirPrint printers, visit http://support.apple.com/kb/HT4356. Click or tap the Brother, Canon, Epson, HP, or Lexmark heading to view a listing of compatible printer models from each manufacturer.
Printing from an iPad to a Non-AirPrint–Compatible Printer
If your printer is not AirPrint-compatible, there are three options for establishing a wireless connection between your tablet and printer. These options include
1. Using the Printopia 2 software on your Mac (or similar software). The Mac can be connected to the printer using a Wi-Fi, Bluetooth, USB, or Ethernet connection, but the Mac needs to be connected to your network via a Wi-Fi connection.
2. Connect the Lantronix xPrintServer device to your home or office network’s wireless router via an Ethernet cable. Up to 10 printers that are on a network (connected to other PCs or Macs within the network) instantly become AirPrint compatible and accessible from your iPad regardless of the printer make and model.
3. Download and install a third-party app on your iPad that enables you to connect wirelessly to your home or office’s wireless network in order to print from your tablet to printers that are connected to that network.
Using the Printopia 2 Software via a Mac
Printopia 2 ($19.95, http://ecamm.com) is an easy-to-use program that enables an iPad to wirelessly access any printer that’s already connected to a Mac, as long as the Mac is also connected via Wi-Fi to a home or office network.
When Printopia 2 is installed on the Mac, the printers that are connected to that Mac are displayed on your iPad whenever you access the Print command from an AirPrint-compatible app. This works even if the printer itself is not AirPrint compatible (as shown in Figure 8.4).

Figure 8.4. The Samsung laser printer that’s shown here is not AirPrint compatible, but it can be used with an iPad as if it were AirPrint compatible when the Printopia 2 software is running on a Mac.
AirPrint Activator 2 for the Mac is offered as freeware and offers functionality similar to the Printopia 2 software. To download this software, visit http://netputing.com/airprintactivator/airprint-activator-v2-0/.
Using xPrintServer to Access Printers on a Network
Regardless of whether you utilize Windows-based PCs or Macs, if you have a home or office wireless network, when you connect the xPrintServer device ($149.95) to your wireless router, up to 10 different printers that are also on that network (no matter how they’re connected to the network) instantly become AirPrint compatible, enabling you to access them from your iPad as long as the iPad can connect wirelessly (via Wi-Fi) to the same network.
Developed by Lantronix (www.lantronix.com), the xPrintServer is a small device (measuring 4.5″ × 2.37″ × .87″) that connects directly to any network’s wireless router using a standard Ethernet cable connection (an RJ45 connector). When the device is connected to a network, it seeks out all printers on that network and instantly makes them AirPrint compatible. Within seconds, each printer becomes accessible from an iPad that’s running any AirPrint-compatible app (or an app with a Print command). Absolutely no configuration, special printer drivers, or optional software is required.
The xPrintServer works with laser, inkjet, or photo printers from HP, Toshiba, Lexmark, Canon, Brother, Xerox and Epson. In some cases, the printer must connect to the network via Wi-Fi or an Ethernet cable (as opposed to a USB connection) to work properly from an iPad using the AirPrint feature.
The xPrintServer device is available online, directly from the Lantronix website (800-422-7055, www.lantronix.com).
Using a Third-Party Printing App on Your iPad
There are a variety of third-party apps available from the App Store that enable the tablet to connect wirelessly to specific printer makes and models that are connected to the same wireless home or office network as the iPad. In some cases these apps first send the document, image, or file to a PC or Mac that’s also connected to the network, and then prints the desired content from that computer.
If you’re interested in creating prints from digital images stored on your iPad (within the Photos app), there are also apps available from the App Store, such as Kodak Gallery (free), that enable you to order prints, photo books, or photo gifts directly from the Kodak Gallery service via the Web and have them shipped directly to you.
To determine whether there’s a specialized iPad app available that can facilitate wireless printing using your existing printer, visit the App Store. In the Search field, enter the manufacturer of your printer, such as Epson, Canon, or Kodak.
Scanning Documents On the Go into Your iPad
Depending on the type of work you do, you might find it extremely useful to be able to scan paper-based documents directly into your iPad while you’re on the go. This might include letters and documents, research materials, receipts, reports, photos, or other paper-based printed content.
Using one of several portable scanners currently available from Brookstone and Doxie, for example, you can scan any document or image into your iPad to save it, and then you can store, view, edit, annotate, print, and share it using a variety of third-party apps.
The iConvert Scanner for iPad ($149.00, www.brookstone.com) is an extremely lightweight and portable, 300 dots-per-inch resolution scanner that enables you to scan any full-color or black-and-white document or photo that’s between 2″ and 8.5″ wide.
The scanned documents are then saved in a JPEG format, which is compatible with a variety of iPad apps. The iConvert Scanner (shown in Figure 8.5) comes with a free iConvert Scan scanning app that gets downloaded from the App Store. This app is used to scan and save the JPEG files. Then, you can use other apps to view, organize, store, edit, annotate, and share the digitally scanned files.
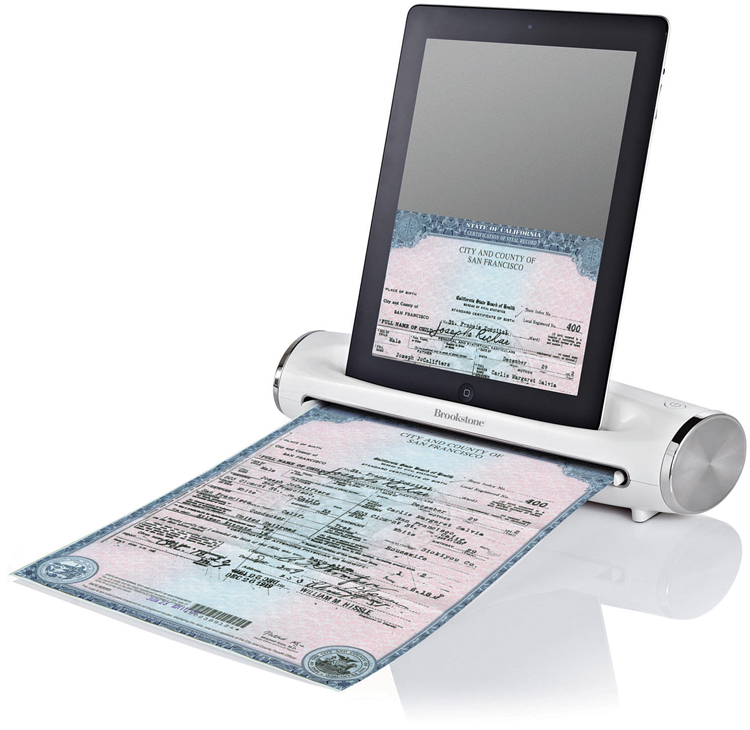
Figure 8.5. The iConvert Scanner for iPad is available from Brookstone stores, as well as from www.brookstone.com.
Unlike other scanners that are compatible with the iPad, the iConvert Scanner connects to the tablet via the tablet’s built-in Dock port. This port is located on the bottom of the tablet. Thus, to use the scanner, simply set the iPad on top of the scanner and launch the iConvert Scan app.
The scanner itself measures 12.1″ × 4.4″ × 2.8″, and it weighs 1.44 pounds. The iConvert Scanner is not battery powered, so you need to plug it in to an AC power source to operate it.
Another portable scanning option is the Doxie Go + Wi-Fi portable scanner from Apparent Corporation ($239.00, www.getdoxie.com). This is a compact, battery-powered scanner that you can use anywhere.
After you scan paper-based documents (up to 8.5″ wide) into the scanner, the scanner connects to any wireless network via Wi-Fi, and transfers the scanned documents to the online (cloud-based) service of your choice, such as iCloud, Dropbox, Flickr, or Evernote. The files can also be sent directly to your own FTP site.
After being uploaded, you can access the scanned files using an iPad that’s connected to the Internet so that you can view, save (in a choice of formats), edit, and share them using your tablet.
Unlike the iConvert Scanner from Brookstone, the Doxie Go + Wi-Fi can create searchable PDF files from scanned documents, so you can use optional third-party apps, such as PDFpen or Evernote, to edit or annotate the scans. Or, if the scanned file is a graphic or photo, you can save it in the JPEG format and use it with the iPad’s Photos app (or any third-party photo-editing and sharing app).
The Doxie Go + Wi-Fi Scanner measures 10.5″ × 1.7″ by 2.2″, weighs 14.2 ounces, and can easily be transported within a briefcase or computer bag, making it perfect for a mobile executive.
The Doxie Go + Wi-Fi scanner has a 600 dots-per-inch resolution and can scan an 8.5″ × 11″ page in eight seconds (in 300 dpi resolution). The scanner’s internal memory holds up to 600 pages or 2,400 photos. You can connect an optional USB flash drive or SD card to the scanner to provide more internal storage until you can sync files with an iPad or computer.
Using either of these scanning solutions with an iPad, it’s easy to manage, access, and store documents, files, and photos from virtually anywhere. When combined with wireless printing capabilities and the functionality of various apps for viewing, editing, and sharing documents, photos, and files, the iPad gains capabilities that were once exclusive to desktop or notebook computers.
Use a portable scanner with your iPad to create a more paper-free work environment for yourself while maintaining full access to your important documents, files, and photos on the go.
A scanner that utilizes OCR technology (Optical Character Recognition), such as the Doxie Go + Wi-Fi, can convert text-based information from a scanned document into data that can be manipulated or edited using a spreadsheet app, expense manager, word processor, or annotation app on your iPad.
Also, in addition to scanning photos, these scanners can be used to import and store digital versions of drawings or other graphics on your tablet, which you can then view, edit, and share using various third-party apps related to photography.
Understanding File Formats Created by Scanners
A scanner that utilizes OCR technology can take a text-based paper document and transform it into an editable digital file accessible from your iPad. You can edit it using Pages, Evernote, Notes, or another word processing app. An applicable word processing or text editing iPad app is required to view, edit, print, or share the scanned text-based document.
If the scanner can transform the scanned document into a PDF file, using a third-party app, such as PDFpen (available from the App Store), you can annotate and edit any PDF file, as well as view, print, and share it from within the app.
The scanned documents or files created by a scanner that can only create JPG files are treated like digital photos by your iPad. You can view, print, or share them using the Photos app or another photography-related app that’s available from the App Store. Some photography apps, such as Skitch for iPad, enable you to annotate digital images.