10. Working with Pages, Numbers, and Keynote
In This Chapter
• New features added to the iWork for iPad apps
• Use Pages, Numbers, and Keynote with Microsoft Word
• Sync iWork files with iCloud, your Mac, and your iPhone
For business users, three of the best designed, most versatile, and feature-packed apps available for the iPad are Pages, Numbers, and Keynote, which together make up Apple’s trio of iWork for iPad apps. Each app, however, is sold separately for $9.99. Although each has its own purpose, they all utilize the same basic user interface and menu structure. This design similarity between apps greatly reduces the learning curve for getting the most use out of them.
If you’re not familiar with what each app in the iWork for iPad trio is designed for, here’s a quick overview:
• Pages is a full-featured word processor for the iPad. It is Microsoft Word (for PC and Mac) compatible, as well as fully compatible with the Pages software for the Mac.
• Numbers is an extremely powerful spreadsheet management tool that was designed specifically for the iPad. However, its capabilities rival Microsoft Excel running on a desktop computer. In fact, Numbers is compatible with Excel (for PC and Mac), as well as with the Numbers software for the Mac.
• Keynote is a versatile digital slide show presentation tool that enables you to create and showcase presentations on your iPad. After you create a presentation, you can connect your iPad to an HD television or LCD projector, for example, in order to share it with a group. Or, you can take advantage of the new iPad’s superior Retina display to convey information graphically (using animated digital slides) to one or two people at a time. Keynote is compatible with both Microsoft PowerPoint (for PC and Mac) and Keynote for the Mac.
In addition to enabling you to import Word, Excel, or PowerPoint documents or files into the appropriate app in order to view, edit, print, or share them, you also have the ability to create documents or files from scratch and export them into Word, Excel, or PowerPoint format, as well as PDF format, before transferring them to your primary computer or another device.
If you use iWork for Mac (Pages, Numbers, or Keynote), files transfer easily between a Mac and iPad without requiring that you change file formats during the import or export process. Pages, Numbers, and Keynote (sold separately) are available for the Mac from the Mac App Store for $19.99 each.
One of the most useful features of the iWork for iPad apps is that you have several options for easily importing and exporting files between your Mac or PC (or another iOS device) and your tablet. You can email files as attachments to or from the iPad, or you can sync files using the iTunes Sync process. However, the easiest method of transferring files is to use iCloud or another compatible cloud-based file-sharing service.
Unlike most other iPad apps, Pages, Numbers, and Keynote can be seamlessly integrated with iCloud, so your files and documents always remain synchronized (wirelessly) with your primary computer and other devices.
Using this feature, if you make a change to a Pages document on your iPad, for example, within seconds, the revisions are transferred to iCloud and sent to all of the computers and iOS devices that are linked to the same iCloud account. The process happens in the background and is fully automated.
Because Pages, Numbers, and Keynote require significant data entry, consider using these apps with an optional external keyboard. In addition to making touch-typing easier, an external keyboard offers navigational arrow keys that make moving around within a document or file more efficient. All three apps, however, make excellent use of the iPad’s virtual keyboard.
Thanks to Pages, Numbers, and Keynote, the capability of your iPad to serve as a powerful business-oriented tool increases exponentially. Using these apps, many businesspeople find they can rely on their iPads for a much broader range of tasks while on the go, and they can often leave their laptop computers or netbooks behind in favor of being able to work directly from the iPad.
If you’re using a new iPad, data entry is possible using the tablet’s new Dictation feature. Instead of typing, tap the Dictate button on the virtual keyboard, and when prompted, begin speaking.
New Features Offered by the iWork for iPad Apps
When iOS 5.0 was released for the iPad, the Pages, Numbers, and Keynote apps underwent a major redesign to incorporate a handful of new features, including iCloud integration. In conjunction with the release of the new iPad and iOS 5.1 in March 2012, the trio of apps were again updated by Apple to include some impressive new features.
Make sure you’re running the most current version of Pages, Numbers, and Keynote (version 1.6 or later) on your iPad. To check for updates, launch the App Store app, and then tap the Updates button near the bottom-right corner of the screen. If new app updates are available, tap the Update All button (in the upper-right corner of the screen) or tap on the Free icon that appears next to the app listing on the Updates screen.
In addition to a newly designed menu structure which has been streamlined, giving you easier access to various commands and features within the three apps, the iWork for iPad apps now fully support the new iPad’s Retina display, and they all allow for the creation and incorporation of colorful 3D bar, line, area, and pie charts into documents and files.
What’s New in Pages
When you launch Pages, Numbers, and Keynote, the main Library screen showcases thumbnails of the documents or files stored within that app in much the same way as it was in the previous versions of the apps (shown in Figure 10.1).

Figure 10.1. The main Library screen of Pages. From here, you can manage, import, or export your document files. Similar functionality is offered by Numbers and Keynote.
From the Library screen, you can create a new document or file from scratch; rename a document; or import a document or file manually by tapping on the plus-sign icon. Or, you can tap on the Edit icon to select and then share (export), copy, or delete a document or file from the app you’re working with.
When exporting a Pages, Numbers, or Keynote document or file from your iPad, you can keep it in its current format or export it in Word, Excel, or PowerPoint format (depending on which app you’re using). All three apps also allow files to be exported as PDF files.
To open a document or file, tap on its thumbnail while viewing the Library screen. When in the document-editing mode of Pages (shown in Figure 10.2), at the top of the screen there are some new command icons. Near the top-left corner of the screen is the Documents button, which returns you to the app’s Library screen. To the immediate right is the Undo icon. It enables you to undo your most recent actions within the app.

Figure 10.2. The main editing mode screen of Pages.
Displayed near the top-center of Pages’ editing mode screen is the active document’s filename. Near the top-right corner of the screen are three new command icons.
The paintbrush icon is context sensitive and adapts based on what type of content you’re working within Pages. For example, if you’re working with traditional text, tapping this icon reveals a pop-up window containing menu options for formatting text. Near the top of this window are three command tabs: Style, List, and Layout (shown in Figure 10.3).
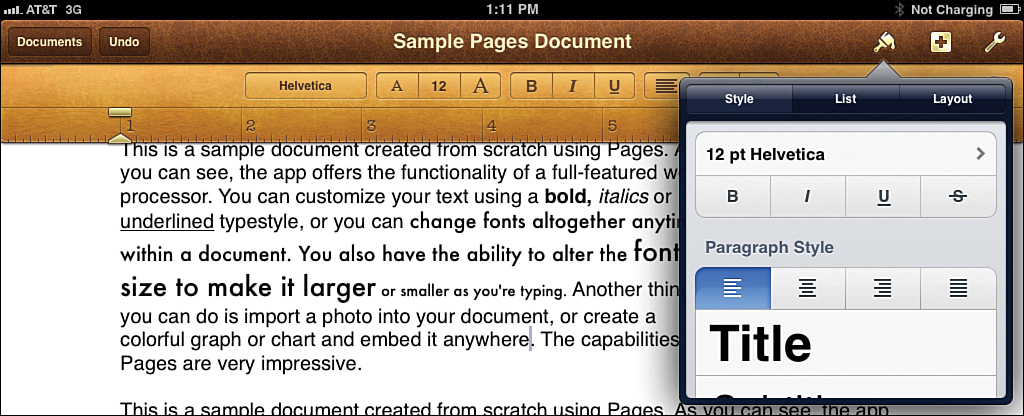
Figure 10.3. The Paintbrush command icon reveals a pop-up menu window with three command tabs.
When you tap on the Style tab, you can easily apply a font, type style (bold, italics, underlined, and so on), paragraph style, heading style, add a bulleted or numbered list to a document. You can also create a header and footer.
Upon tapping on the List tab, you can adjust tabs and indents and format a bulleted or numbered list. For example, you can control the size of the bullet or opt to use letters or numbers for creating an outline. Tap the Layout tab to create multiple columns within a document and control line spacing.
The Plus-Sign Icon Within Pages
When you tap on the new plus-sign icon that’s displayed near the top-right corner of the Pages’ editing mode screen, a pop-up menu window displays with four command tabs along the top. Each command tab reveals separate submenu options.
Tap the Media tab to import a photo that’s stored on your iPad into the document you’re working on. Tap the Tables tab to create and format a table within the document. When you tap the Charts tab, two additional command tabs appear to enable you to create colorful 2D or 3D bar, line, area, or pie charts that can be fully customized. As you’re looking at this menu, be sure to scroll up and down, as well as left and right, within the menu window in order to reveal all of your chart options.
Tap the Shapes tab to import and customize colorful shapes into your document. You can resize these shapes and place them over or under text, or you can make the text wrap around the shapes.
Accessing the Tools Menu Within Pages
By tapping on the Tools icon, which is the wrench icon that’s displayed near the top-right corner of the Pages app’s editing screen, the Tools menu is revealed (shown in Figure 10.4).

Figure 10.4. The Tools icon reveals a handful of submenu options for customizing documents in Pages. Similar functionality is offered when you access this menu in Numbers or Keynote.
The following options are available from the Tools menu:
• Share and Print: Reveals a submenu that enables you to email a document from within Pages, print a document wirelessly to a printer that’s set up to work with your iPad, or upload and share the document you’re working on via iWork.com, iDisk, or WebDAV (which are cloud-based file-sharing services that the iWork for iPad apps are all compatible with, in addition to iCloud).
• Find: Enables you to search for any keyword or phrase within the document you’re using. When the Search field appears, tap the gear icon to access the Find, Find and Replace, Match Case, and Whole Words features. Or, if multiple results are found for your search, tap the left- or right-pointing arrow keys to scroll through and display each result within the document.
• Document Setup: Enables you to adjust the margins of the document you’re working with, including the header and footer. For example, from the Document Setup screen you can add and format page numbers or line breaks.
• Settings: Enables you to control the auto Spell Check feature built into Pages, as well as the Word Count feature. You can also turn on or off the Center Guides, Edge Guides, and Spacing Guides that can be displayed within a document. These guides are useful when sizing and placing photos, charts, or graphics into a document.
• Help: Accesses the interactive help feature that’s built into each iWork for iPad app.
Many of the document formatting commands available under the Style command tab are also available within the main toolbar that’s displayed near the top of the main Pages editing screen (just above the ruler). However, to save on-screen real estate, you can remove the toolbar and ruler by tapping the “X” icon that’s displayed to the extreme right of the toolbar.
Using the New Document Navigator Feature
If you’re working with a multipage document, you can easily scan thumbnails of the entire document thanks to the newly designed Document Navigator (shown in Figure 10.5). As you’re viewing, creating, or editing a document, hold your finger on the right margin of the document. An oversized magnifying glass icon displays along with a vertical slider. Drag your finger up or down to scan the entire document.
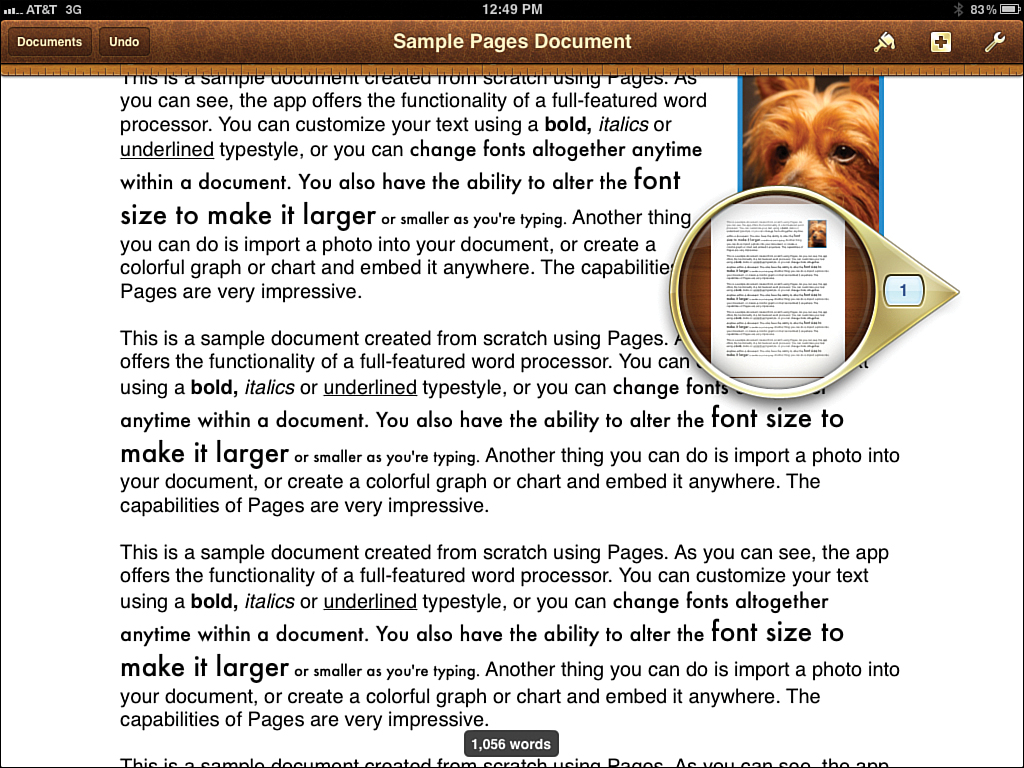
Figure 10.5. The Document Navigator feature is exclusive to the new version of Pages. It makes it easier to scroll through a long document to see thumbnails of each page or jump to a specific page within the document you’re using.
Using the Document Navigator, you can scroll down within a document by dragging your finger. When you release your finger, you can continue viewing or editing the page you scrolled to in the document.
Working in Full-Screen Mode
As you’re proofreading a document, or if you’re using an optional external keyboard for typing, position your iPad in portrait mode and take advantage of Pages’ full-screen viewing mode to fully utilize the on-screen real estate to view your document (shown in Figure 10.6).
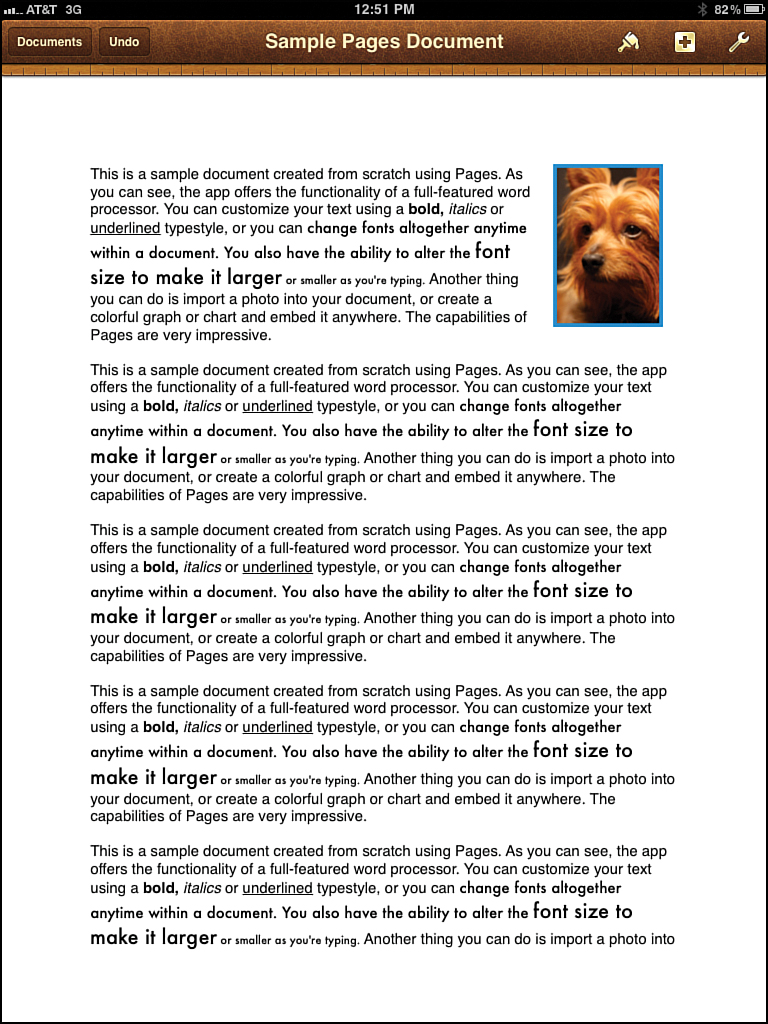
Figure 10.6. When you position your iPad in a portrait position and use the full-screen viewing mode, you can see an entire page on the screen at once.
When typing using the iPad’s virtual keyboard, the individual keys appear larger on the screen when the iPad is positioned in landscape mode. The larger keys make it easier to touch-type. However, less of your document can be displayed on the screen at any given time.
In full-screen mode, most of the formatting buttons, the on-screen ruler, and the virtual keyboard disappear, giving you almost the entire screen to see and read your document.
To remove the on-screen keyboard, tap the hide keyboard key on the virtual keyboard. It’s the key located at the bottom-right corner of the keyboard.
To remove the formatting bar and on-screen ruler from the screen, tap the circular X icon that’s displayed on the right side of the toolbar.
Swipe your finger on the screen to scroll up, down, left, or right while in full-screen mode. Tap and hold your finger anywhere on the screen (within the document) for a second or two to exit out of full-screen mode.
What’s New in Numbers
Like Pages, the Numbers app has been updated to now fully utilize the new iPad’s Retina display. However, the app continues to function perfectly on the iPad 2 and various iPhone and iPod touch models. Whereas Pages is for word processing, the Numbers app is used for organizing, analyzing, and crunching numbers and for creating powerful spreadsheets and beautifully rendered, full-color charts and tables that showcase numeric data graphically.
The latest version of Numbers offers the ability to create, display, and print customizable, 3D bar, line, area, and pie charts in full-color using spreadsheet data (as shown in Figure 10.7). Plus, when it comes to navigating your way around a complex spreadsheet, the app also now offers a series of highly intuitive sliders, steppers and pop-up menus that makes it easier to work with your numeric data on the tablet’s screen.
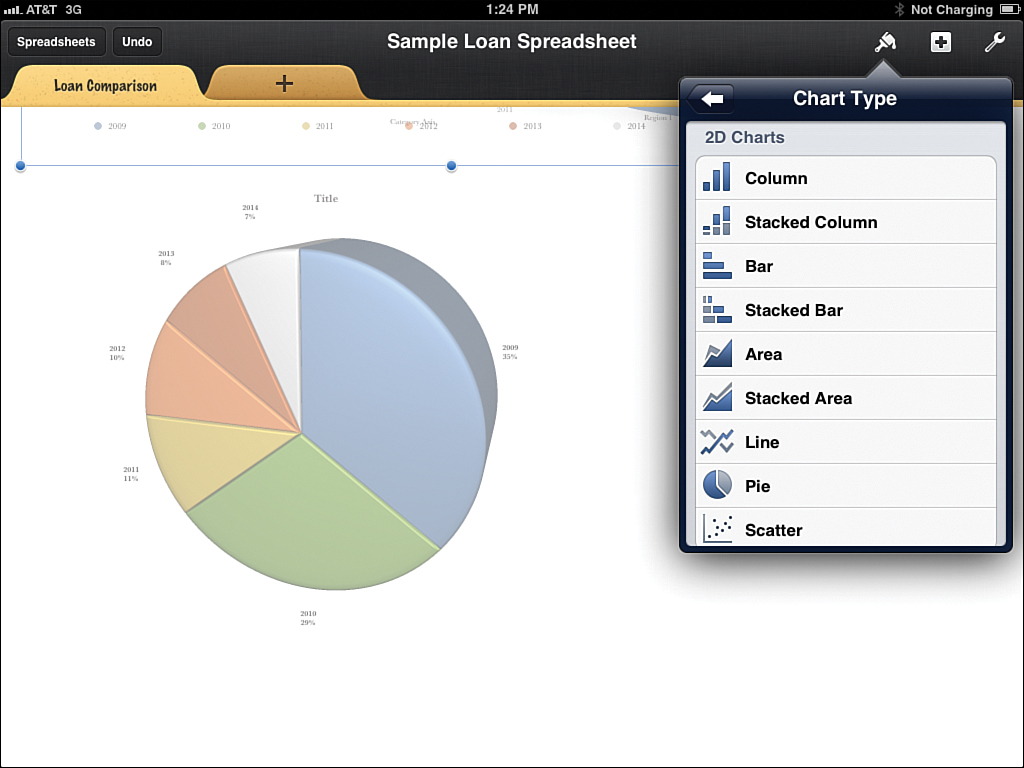
Figure 10.7. Create 3D charts from spreadsheet data that look amazing on the new iPad’s Retina display. Charts created in Numbers can be cut and pasted into Pages documents or Keynote presentations.
When it comes to performing complex mathematical calculations, Numbers has it covered. Built into the app is a calculations engine that can handle more than 250 different functions. When the numbers have been crunched, you can decide exactly how you want to view them in either a spreadsheet, table, or graphical form, and you can customize every aspect of the product you choose.
Like all the iWork for iPad apps, Numbers is fully AirPrint compatible. Before printing, however, you can see an on-screen preview of exactly what a spreadsheet, chart, table or graph will look like. Then, you can format the printed page with headers, footers, and page numbers.
If you’re already familiar with the Pages app, the Numbers app (and the Keynote app) offer a very similar user interface and menu layout. Upon launching the Numbers app, you see the Library screen. From here, you can create a new spreadsheet from scratch, rename an existing spreadsheet, open a spreadsheet file that’s stored on your tablet, or import a spreadsheet from iTunes, iDisk, or WebDAV. (Remember, iCloud file syncing can be automatic.)
By tapping the Edit icon on the Numbers’ Library screen, you can select a file and then share (export) it via email, iWork.com, iTunes, iDisk, or WebDAV, copy the file (to make a duplicate of it with a different filename), or delete the file altogether from your iPad.
To open a spreadsheet file, tap on its thumbnail on the app’s Library screen. Just like within the Pages app, as you’re viewing, creating, or editing a spreadsheet within Numbers, you see a handful of command icons displayed along the top of the screen.
Located near the top-left corner of the screen is the Spreadsheets icon. Tap it to return to the Library screen within Numbers. Next to the Spreadsheets icon is the Undo icon. Tap on it to undo the last actions (or last several actions) you performed within the app.
Displayed near the top-right corner of the Numbers screen are three new command icons (which are similar to what’s offered within Pages). These icons include the Formatting icon (which is shaped like a paintbrush), the plus-sign icon, and the Tools menu icon (which is shaped like a wrench).
The Formatting Icon Within Numbers
When you tap the Formatting icon, it reveals a pop-up menu window. However, the command tabs and menu options displayed within this window vary based on the type of data you currently have selected within the spreadsheet.
For example, if you have a headline or text highlighted, the command tabs that are displayed at the top of the menu window are Style, Text, and Arrange. Upon tapping on any of these command tabs, various formatting options are revealed. However, if you have a specific cell within a spreadsheet highlighted, the command tabs displayed are Table, Headers, Cells, and Format, and the command options relate to the number-crunching features of the app.
Likewise, if you have a chart or graph selected when you tap the Formatting icon, you see an entirely different selection of submenus, which you can use for creating and editing 2D or 3D charts and graphics.
The Plus-Sign Icon within Numbers
When you want to import a photo or shape into your spreadsheet, or you want to create a table or chart from scratch, tap the plus-sign icon. The pop-up window that appears displays four command tabs at the top: Media, Tables, Charts, and Shapes. Each of these command tabs reveals a separate submenu. Tap the Chart tab (shown in Figure 10.8) to select a chart style and color scheme that you can fully customize.

Figure 10.8. The latest version of Numbers for the iPad 2 or new iPad enables you to choose between full-color 2D or 3D graphs.
Accessing the Tools Menu Within Numbers
The Tools menu includes a Share and Print submenu option, along with Find, Settings, and Help features. The menu layout and what’s offered here is very similar to what’s offered within Pages.
When you opt to create a document from scratch in Pages, a spreadsheet from scratch in Numbers, or a presentation from scratch in Keynote, the app gives you a selection of templates to choose from. Numbers, for example, offers 16 different templates, including Blank, Checklist, Loan Comparison, Budget, Mortgage Calculator, Expense Report, Invoice, Employee Schedule, and Auto Log. Each template, within each app, is fully customizable.
What’s New in Keynote
When it comes to creating, viewing, and giving presentations on the iPad, one of the most powerful tools at your disposal is the Keynote app. Using Keynote, you can create a digital slide show, complete with animated slides and eye-catching transitions. Or, you can import and utilize presentations created on a PC or Mac using Microsoft PowerPoint.
To give presentations to groups, you might want to check out the Keynote Remote app ($0.99). It enables you to control a Keynote presentation on your Mac, iPad, iPhone, or iPod touch from another iPad, iPhone, or iPod touch in the room as long as both devices are connected to the same Wi-Fi network.
In addition to the revamped user interface offered by the latest version of Keynote, version 1.6 (or later) enables you to create, animate, and display visually impressive 3D bar, line, area, and pie charts within your presentations.
The new version of Keynote also includes a handful of new slide animations and animated slide transition effects. The functionality available from the Library screen of the app (when it’s launched) is pretty much the same as in the previous version. You can create a new presentation from scratch; rename an existing presentation; import a presentation from iTunes, iDisk, or WebDAV; email a presentation; export a presentation to iTunes, iDisk, or WebDAV; copy a presentation and save it with a new filename; or delete a presentation from your iPad.
It’s from the Library screen that you can also load an existing presentation in order to view or edit it. Tap any presentation thumbnail to load it from the iPad’s internal storage into the app.
Just as with Pages and Numbers, iCloud integration is built into Keynote. After you initially set it up, the integration works automatically, in the background, to make sure all of your presentation files are synchronized between your iPad, other iOS devices, and the Mac(s) that are linked to the same iCloud account.
After you begin creating or editing a Keynote presentation, the now familiar command icons from the other iWork for iPad apps are displayed along the top of the Keynote screen.
Tap the Presentations button to return to the Library screen of the app. Use the Undo button (displayed to the immediate right of the Presentations button) to undo the last action you took using the app. The presentation’s filename that you’re working with is displayed near the top-center of the screen.
Near the upper-right corner of the Keynote screen are four command icons, including the Formatting, Plus Sign, Tools, and Play icons. As you can see in Figure 10.9, the thumbnails for each slide in your presentation are displayed along the left margin of the screen while you’re creating or editing slides.

Figure 10.9. You can change the order of slides by using your finger to drag their thumbnails (displayed along the left margin of the screen) up or down.
The Formatting Icon Within Keynote
When you tap the Formatting icon (the paintbrush) within Keynote, you see three command tabs: Style, Text, and Arrange. Each reveals a separate submenu you use for formatting text within slides. For example, from the Style command tab, you can change the appearance of text, including font and background colors, borders, shadows, and other effects.
The Text command tab offers menu options for choosing a font, type size, type-style, and justification, among other things. Tap the Arrange tab to access the Move to Back/Front feature to create layers within a slide. You can also adjust text alignment, adjust spacing, or add multiple columns to a slide.
However, if a graphic or photo is selected within a slide, the paintbrush icon reveals the Style and Arrange tabs, which offer commands used for customizing the appearance of graphics and photos.
The Plus-Sign Icon Within Keynote
Just like in the other iWork for iPad apps, tapping the plus-sign icon enables you to import photos or shapes into a slide, create or modify tables, or create 2D or 3D charts, depending on which command tab you tap.
Accessing the Tools Menu Within Keynote
From the Tools menu within Keynote, you can access the Share and Print, Find, Help features (which are similar to the what’s found in Pages and Numbers).
The Tools pop-up window also reveals a Transitions and Builds submenu you can use to add animations to individual slides or to establish slide transition effects for the presentation (as shown in Figure 10.10). There’s also a Presenter Notes feature that enables you to compose and later view notes to yourself as you’re giving the presentation.

Figure 10.10. The latest version of Keynote includes new slide animations and transitions, such as Iris, Shimmer, Wipe, Flame, Perspective, Swing, Object Push, Object Zoom, and Face Through Color. Each looks spectacular when viewed on the new iPad’s Retina display, but the features also work with the iPad 2.
The Advanced menu option enables you to automatically number each slide in the presentation, add on-screen guidelines when formatting your slides, incorporate interactive hyperlinks into slides, set up a presentation type, turn on and off the Loop presentation or self-playing features, and turn on or off the Enable Remotes feature (also used when giving a presentation).
The Play Icon Within Keynote
The Play icon (the right-pointing arrow) is used to transition the Keynote app from the slide creation and edit mode to the app’s presentation mode. Tap it to display your presentation in full-screen mode. You can use the iPad’s AirPlay feature (or optional cables) to showcase the presentation on an HD television, monitor, or LCD projector.
Using the iWork for iPad Apps with iCloud
After you set up a free iCloud account (see Chapter 9, “Syncing Your iPad via iTunes or iCloud”), you can set up Pages, Numbers, and Keynote to automatically sync documents and files with your other Mac and iOS devices via iCloud.
For each of the iWork for iPad apps, the iCloud functionality needs to be set up separately. However, after you’ve set it up, as long as your iPad has access to the Internet changes you make to a document or file are reflected almost instantly on your Mac and other iOS devices.
Most other apps that are compatible with iCloud have a manual sync feature. Pages, Numbers, and Keynote are among the very few apps that offer automatic iCloud integration and file synchronization that works behind the scenes.
To set up Pages, Numbers, and Keynote on your iPad to work with iCloud, follow these steps:
1. After installing Pages, Numbers, and Keynote onto your iPad, launch the Settings app from the tablet’s Home Screen.
2. From the main Settings menu, tap the iCloud option.
3. At the top of the iCloud screen, turn on iCloud functionality and enter your Apple ID and password.
4. Also on the iCloud screen within Settings, tap the Documents & Data option.
5. When the Documents & Data screen is displayed, tap the virtual switch associated with Documents & Data to turn it on (as shown in Figure 10.11). If you want your iPad to automatically sync your iWork for iPad documents and files using a 3G or 4G cellular network (as opposed to Wi-Fi), which utilizes some of your monthly wireless data allocation, turn on the virtual switch that’s associated with the Use Cellular option. Otherwise, to only sync files and data when your iPad is connected to the Internet using a Wi-Fi connection, leave the Use Cellular option in the default off position. (This applies only to iPads capable of accessing a 3G or 4G data network.)
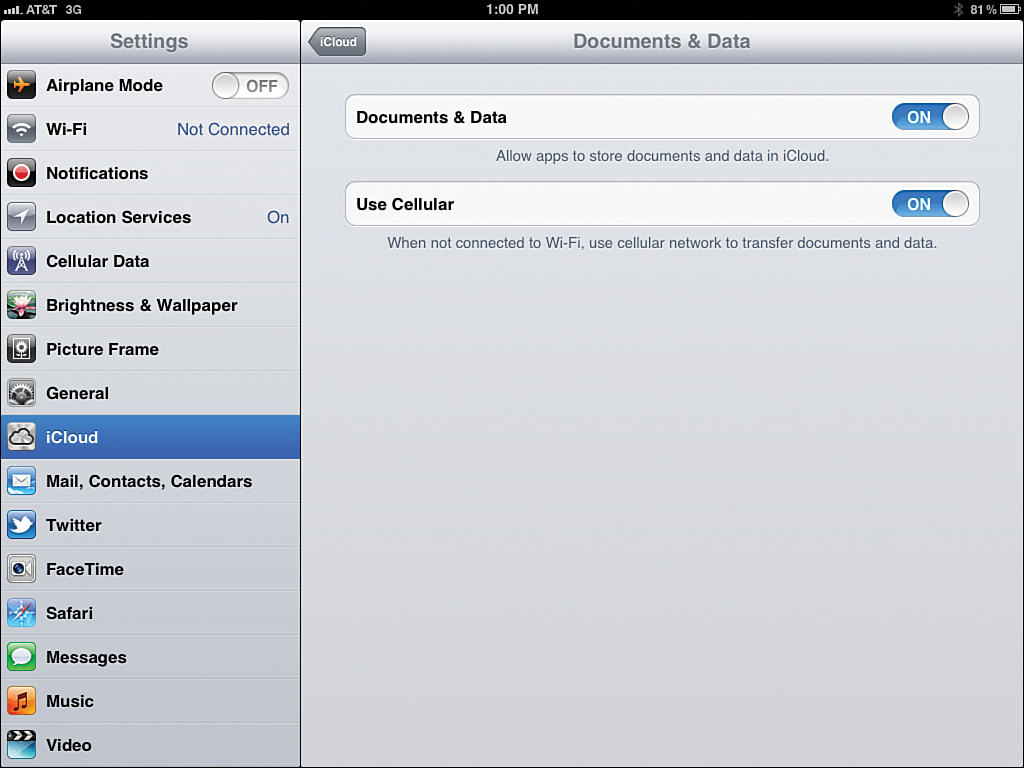
Figure 10.11. For iCloud file syncing to work with Pages, Numbers, and Keynote, the iCloud feature needs to be turned on from within Settings.
6. If you have Pages installed on your iPad, on the left side of the Settings screen, scroll down within the Settings menu to the Pages option and tap it.
7. When the Pages screen appears within Settings (shown in Figure 10.12), tap the virtual switch that’s associated with the Use iCloud feature to turn on the auto file syncing feature with iCloud that kicks in each time the Pages app is launched. Repeat steps 6 and 7 for the Numbers and Keynote apps, if applicable.
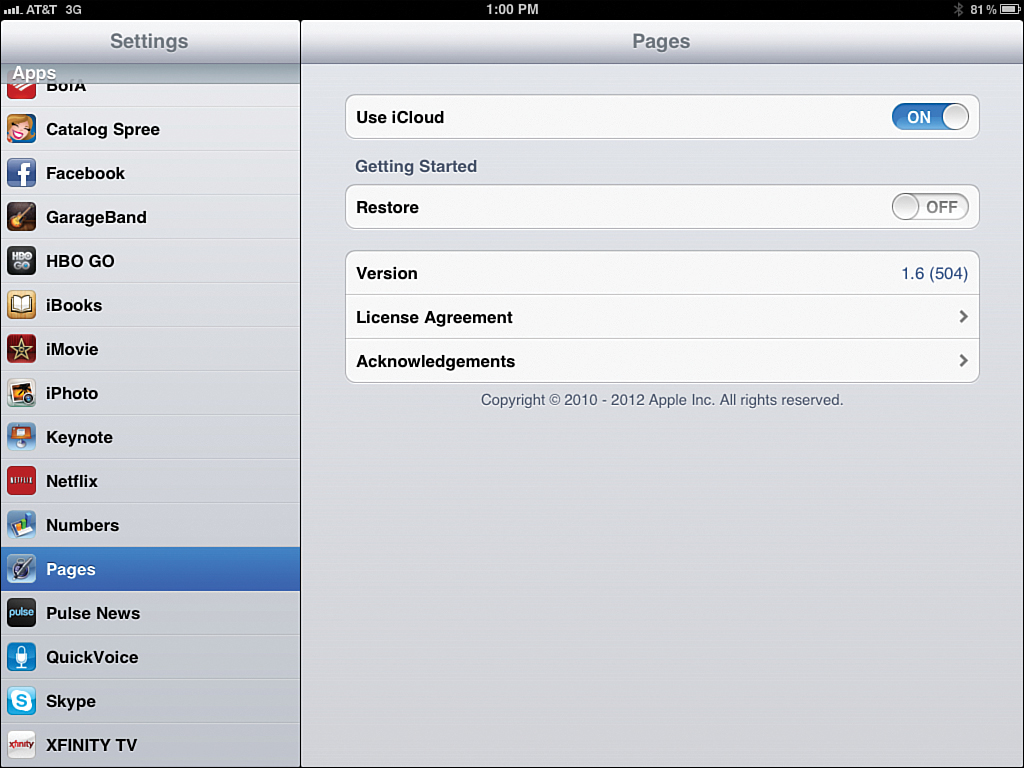
Figure 10.12. In addition to turning on the Documents & Data feature from the iCloud menu screen within Settings, you also need to turn on the iCloud feature for Pages, Numbers, or Keynote separately.
8. Repeat this process on each of your other iOS devices that you have Pages, Numbers, and Keynote installed on, including your iPhone and your iPod touch.
9. On your Mac, launch System Preferences.
10. From the System Preferences menu, click the iCloud icon (displayed under the Internet & Wireless heading).
11. When the iCloud window appears, make sure you sign into iCloud using the same account username and password as you used on your iPad (and other iOS devices).
12. On the right side of the iCloud window (on your Mac), add a check mark to the checkbox associated with the Documents & Data option.
13. Within the Pages, Numbers, and Keynote software running on your Mac, turn on the iCloud functionality for each program.
When you begin experiencing the word processing capabilities of Pages, the number-crunching functionality of Numbers, and the digital-slide creation and viewing tools offered by Keynote on your iPad, and combine these capabilities with your iPad’s 10-hour battery life and other functionality, you’ll see why so many businesspeople are incorporating the iPad into their daily work lives instead of using laptop computers or netbooks.