
5. Working with the Contacts App
In This Chapter
• Getting started using the Contacts app
• Syncing data with other contact management software
• Using Contacts data with other apps
The art of networking is all about meeting new people, staying in contact with them, making referrals and connections for others, and tapping the knowledge, experience, or expertise of the people you know to help you achieve your own career or work-related goals.
If you become good at networking, regardless of which field or industry you work in, over time you establish a contact list comprised of hundreds, or even thousands, of individuals.
In addition to the contacts you establish and maintain within your network, your personal contacts database might also include people you work with, customers, clients, family members, people from your community who you interact with (doctors, hair stylist, barber, dry cleaners, and so on), and friends.
The easiest way to keep your contacts database organized is to utilize some type of contact management application on your primary computer. On a Mac, you might use the popular Address Book or Contacts software, or Microsoft Entourage. Or, on a PC, Microsoft Outlook is a popular tool. There are also many web-, network-, and online (cloud)-based contact management applications available that are used by businesses of all sizes.
If you’ve updated your Mac to run the OS X Mountain Lion operating system, you’ll notice that the Address Book app is now called Contacts, and it looks even more like the iOS version of the Contacts app currently running on your iPad.
Customizing the Contacts App
Chances are that the contacts database that you rely on at your office can be synced with your tablet and made available to you using the Contacts app. As you’re about to discover, Contacts is a customizable contact management database that works with several other apps that also came preinstalled on your iPad, including Mail, Calendar, Safari, FaceTime, and Maps.
Of course, Contacts can also be used as a standalone app on your iPad, enabling you to enter new contact entries as you meet new people and need to keep track of details about them.
The information you maintain within your Contacts database is highly customizable, which means you can keep track of only the information you want or need. For example, within each contact entry, you can store a vast amount of information about a person, including the following:
• First and last name
• Name prefix (Mr., Mrs., Dr., and so on)
• Name suffix (Jr., Sr., Ph.D., Esq., and so on)
• Job title
• Company
• Multiple phone numbers (work, home, cell, and so on)
• Multiple email addresses
• Multiple mailing addresses (work, home, and so on)
• Multiple web page addresses
• Facebook, Twitter, Skype, Instant Message, or other online social networking site usernames
You can also customize your contacts database to include additional information, such as each contact’s photo, the person’s nickname, associated spouse’s and assistant’s names, birthdays, as well as detailed notes about the contact.
Using the Contacts app, your entire contacts database is instantly searchable using data from any field within the database, so even if you have a database containing thousands of entries, you can find the person or company you’re looking for in a matter of seconds.
For each entry within Contacts, you can enter as much or as little detail about each person as you want. However, the more information you include, the better. Several other apps on your iPad automatically tap into your Contacts database to obtain relevant information as it’s needed.
Allowing the Contacts App to Work Seamlessly with Other Apps
After your contacts database has been populated with entries, other apps can utilize that information in a handful of ways. Here are some examples:
• When you compose a new email message from within Mail, in the To field you can begin typing someone’s full name or email address. If that person’s contact information is already stored within Contacts, the relevant email address automatically displays within the email’s To field.
• If you’re planning a trip to visit a contact, using the Maps app, you can pull up someone’s address from your Contacts database in order to obtain driving directions to the person’s home or work location.
• If you include each person’s birthday in your Contacts database, that information can automatically be displayed within the Calendar app to remind you in advance to send a card.
• As you’re creating each contact entry, you can include a photo of that person by either activating the Camera app from within the Contacts app to snap a photo, or use a photo that’s already stored in the Photos app and link it with a contact.
• From within FaceTime, you can create a Favorites list of people you video conference with often. You can compile this list from entries in your Contacts database, but access it from within FaceTime.
• From within the Messages app, it’s possible to access your Contacts database when filling out the To field as you compose new text messages to be sent via iMessage. As soon as you tap the To field, an All Contacts window appears enabling you to select contacts from your Contacts database (or you can manually enter the recipient’s info).
• If you’re active on Facebook, for example, you have the option of adding each contact’s Facebook profile page URL within the contact entry. When you use the official Facebook app, however, you can download each entry’s Facebook profile picture and insert it into your Contacts database.
Getting Started Using the Contacts App
When you first launch this app, its contents are empty. However, you can create and build your contacts database in two ways. The first way is to sync the Contacts app with your primary contact management application on your computer, network, or on an online (cloud-based) service, such as iCloud. You can also manually enter contact information directly into the app.
Ultimately, as you begin using this app and come to rely on it, you can enter new contact information or edit entries on either your tablet or within your primary contact management application, and keep all the information synchronized, regardless of where the entry was created or modified. (The easiest way to do this is with iCloud, if you want to sync data with your primary computer, iPhone, or other iOS devices that are linked to your iCloud account.)
From the iPad’s Home screen, tap the Contacts app to launch it. On the left side of the screen are alphabetic tabs. Near the top of the screen is the All Contacts heading, and below it is a Search field (as shown in Figure 5.1).

Figure 5.1. This is the main Contacts screen when the contacts database is empty. Tap the plus-sign icon to create a new entry.
After you have populated your contacts database, the entries are all listed alphabetically on the left side of the screen below the Search field. Quickly find a particular entry by entering any keyword associated with an entry, such as a first or last name, city, state, job title, or company name, into the Contact app’s Search field. You can also use the Spotlight Search feature of your iPad, which is accessible from the Home screen, by swiping your finger from left to right or by pressing the Home button once from the Home screen.
You can also tap a letter tab on the left side of the Contacts screen to see all entries “filed” under that letter by either a contact’s last name, first name, or company name, depending on how you set up the Contacts app from within the Settings app’s Mail, Contacts, Calendars option.
To see the complete listing for a particular entry, tap its listing on the left side of the screen. That entry’s complete contents are displayed on the right side of the screen (as shown in the sample entry in Figure 5.2).

Figure 5.2. When you select a contact entry from the left side of the screen, all information pertaining to that particular contact displays on the right side of the screen. The entry highlighted in blue is the selected entry.
Creating New Contact Entries
To create a new contact entry, tap the plus icon that’s displayed near the bottom center of the Contacts screen. When you do this, the main Contacts screen is replaced by an Info screen and the iPad’s virtual keyboard displays.
Within the Info window are a handful of empty fields related to a single contact entry, starting with the First Name field. By default, the fields available in this app include First Name, Last Name, Company, Photo, [Mobile] Phone Number, Email Address, Ringtone, Home Page (Website) URL, Address, and Notes (see Figure 5.3).

Figure 5.3. From the Info window, you can enter details about a new contact and create a new entry in the Contacts app.
Some of these fields, including Phone, Email, and Mailing Address, enable you to enter multiple listings, one at a time. So you can include someone’s home phone, work phone, and mobile phone numbers within the entry. Likewise, you can include multiple email addresses, as well as home and work addresses for an individual.
Begin by filling in one field at a time. To jump to the next field, tap it. For example, after using the virtual keyboard to fill in the First Name field, tap the Last Name field to fill it in, and then move on to the Company field, if applicable, by tapping it.
For each type of field, the iPad’s virtual keyboard modifies itself accordingly, giving you access to specialized keys. You can change the label associated with certain fields (which are displayed in blue), by tapping the field label itself. This reveals a Label menu, offering selectable options for that field.
For example, Figure 5.4 shows the Label options for the Phone Number field, which include Mobile, iPhone, Home, Work, Main, Home Fax, Work Fax, Pager, and Other. At the bottom of this Label window, you can tap the Add Custom Label option to create your own label if none of the listed options apply. Tap the label title of your choice. A check mark appears next to it, and you are returned to the Info window.

Figure 5.4. For any field that has a blue label, you can tap that label (not within the empty field) to change the label. Upon doing this, a Label window displays. Tap on your new label selection.
As you’re creating each contact entry, you can fill in any fields you want. You can always go back and edit a contact entry to include additional information later.
When you enter a contact’s phone numbers, it’s important to differentiate between a mobile phone number and an iPhone phone number. If you know someone has an iPhone, use the iPhone label because the FaceTime and Messages apps use what’s in this field to identify someone’s FaceTime or Messages User ID (which, if they’re an iPhone user, is usually their iPhone’s phone number).
As you scroll down in the Info window and fill in each field, at the bottom of the window you discover an Add Field option. Tap this to reveal a menu containing additional fields you can add to each contact entry, such as Middle Name, Job Title, Nickname, Instant Message username, Twitter username, Facebook Profile, or Birthday.
There’s also a field to add Related People, such as the names of your contact’s mother, father, parent, brother, sister, child, friend, spouse, partner, assistant, manager, or other. You can even add your own titles for the Related People field.
A green-and-white plus icon next to a field (on the left) means that you can have multiple entries for that field, such as several phone numbers, email addresses, or mailing addresses.
If there’s a field displayed that you don’t want to utilize or display, tap the red-and-white minus sign icon to delete the field from the Info window.
When entering a phone number, you can simply enter the 10 digits of that number. There is no need to include parentheses around the area code or a dash between the exchange and main number. This formatting is done for you by the app. The Contacts app can also accommodate international phone numbers, along with related country codes or dialing prefixes.
Adding a Photo to a Contact Entry
To the immediate left of the First Name field is a square box that says Add Photo. When you tap this field, a submenu with two options, Take Photo and Choose Photo, is displayed. If you tap Take Photo, the iPad’s Camera app launches from within the Contacts app so that you can snap a photo to be linked to the contact entry you’re creating.
If you tap on the Choose Photo option, the Photos app on your iPad launches so that you can choose any digital image that’s currently stored on your tablet. When you tap the photo, a Choose a Photo window displays on the Contacts screen, enabling you to move and scale the image with your finger, as shown in Figure 5.5.
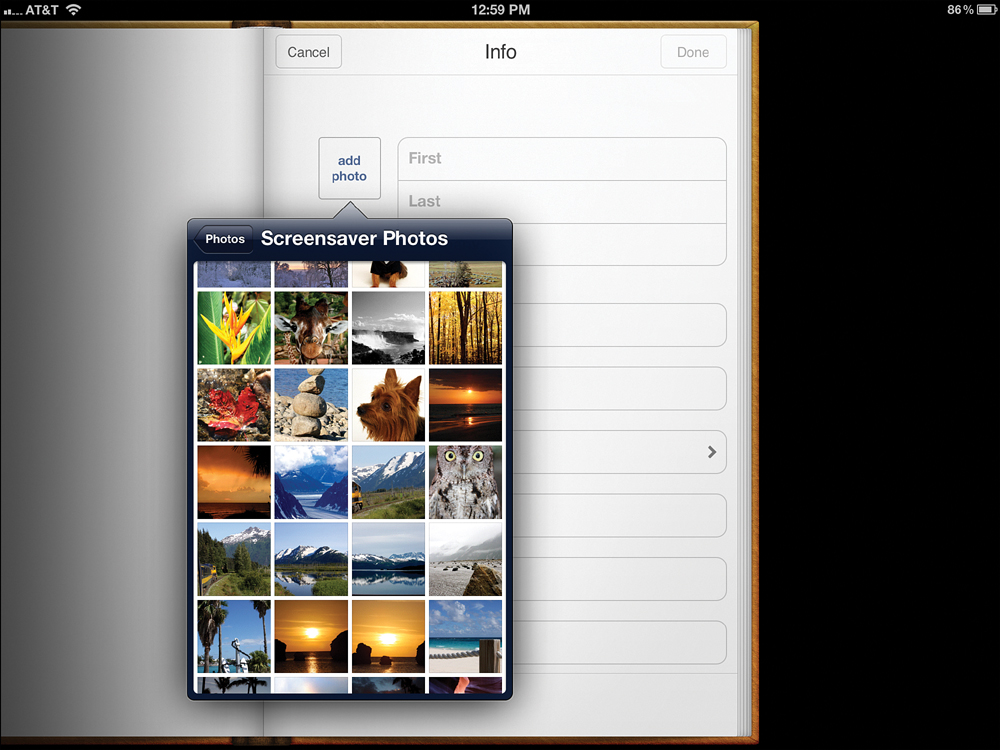
Figure 5.5. Select a photo stored within the Photos app and link it to someone’s contact entry. After choosing the photo, you must move and scale the image.
After cropping or adjusting the photo selected, tap the Use button in the upper-right corner of the Choose Photo window to link the photo with that contact’s entry.
If you also use an iPhone or use FaceTime on your iPad, from the Ringtone option in the Info window you can select the ringtone you hear each time the contact calls you. Your iPad has 25 preinstalled ringtones (Marimba is the default); however, from iTunes, you can download thousands of additional ringtones, many of which are clips from popular songs.
Each time you add a new mailing address to a contact’s entry from within the Info screen, the Address field expands to include a Street, City, State, ZIP, and Country field (as shown in Figure 5.6).

Figure 5.6. Using the virtual keyboard, you can add multiple addresses, one at a time, for each contact in your Contacts database. This enables you to include a home address and a work address, for example.
In the Notes field, you can enter as much information pertaining to that contact as you want. Or, you can paste content from another app into this field using the iOS’s Select, Copy, and Paste commands and the multitasking capabilities of your iPad to quickly switch between apps. Press the Home button twice to access multitasking mode in order to quickly switch between apps.
Contacts is fully compatible with the new iPad’s Dictation feature. Instead of manually typing information into any of the contact entry fields, including the Notes field, tap the Dictation key on the tablet’s keyboard, and then say the information you want to include within each field. For more information about using the new iPad’s Dictation feature, refer to the “Using the New iPad’s Dictation Feature” section at the end of Chapter 1, “Activating and Customizing Your iPad.”
After you have filled in all of the fields for a particular entry, tap the Done button, which is in the upper-right corner of the Info window. Your new entry displays within your contacts database.
Editing or Deleting an Entry
As you’re looking at the main Contacts screen, you can edit an entry by selecting it from the left side of the screen. Tap its listing to view the complete entry on the right side of the screen. Now, tap the Edit button displayed near the bottom of the screen to edit the selected entry.
When the Info window appears, tap any field to modify it using the virtual keyboard. You can delete any fields by tapping the red-and-white minus icon.
You can also add new fields within an entry by tapping any of the green-and-white plus icons and then choosing the type of field you want to add.
When you’re done editing a contact entry, be sure to tap the Done button to save your revisions. If you have the iCloud sync function activated, your revisions are automatically reflected on your primary computer and other iOS devices within seconds.
You can also delete an entire entry from your Contacts database. As you’re editing a contact entry and looking at the Info window for that entry, scroll down to the bottom of it and tap the Delete Contact button. Keep in mind that if you have your Contacts database set up to use the iCloud sync feature, the entry is also immediately deleted from all of the computers and devices that are linked to your iCloud account.
Whenever you’re viewing a contact entry, tapping a listed email address causes the iPad’s Mail app to launch, which enables you to compose an email message to that recipient. The To field of the outgoing email is filled in with the email address you tapped from within Contacts.
Likewise, from within any Contacts entry, tap a website URL that’s listed and the iPad launches the Safari web browser with the appropriate webpage automatically loaded.
This technique also works with the Twitter field (if you have the Twitter app installed). Or, if you tap a street address, it automatically launches the Maps app, which displays that address. (From that point you can tap the Directions icon that’s displayed near the upper-left corner of the screen to obtain directions to that contact’s location.)
When you’re in edit mode to modify content within a contact’s entry, scroll down to the very bottom of the window (below the red-and-white Delete contact icon) to find a small icon with a silhouette of a head with a plus sign next to it. Tap this icon to link this contact with one or more other contacts in your database.
Sharing Contact Entries
From the main Contacts screen, tap a contact from the left side of the screen that you want to share details about. When the contact’s entry is displayed on the right side of the screen, scroll to the bottom of the entry until you see the Share Contact button displayed (see Figure 5.7) and tap it.

Figure 5.7. From within Contacts you can share someone’s contact entry with other people by tapping the Share Contact button displayed at the bottom of each contact entry.
An outgoing email message form displays on your iPad’s screen. Fill in the To field with the person or people you want to share the contact info with. The default subject of the email is Contact; however, you can tap this field and modify it using the virtual keyboard.
The contact entry you selected (stored in .vcf format, which is an industry standard format used by many contact management applications) is already embedded within the email message. When you’ve filled in all the necessary fields in the outgoing email form and added additional text to the body of the message, tap the blue-and-white Send icon that’s located in the upper-right corner of the Contact window to send the email message to the intended recipient(s). After doing this, you are returned to the Contacts app.
Within a minute or two, the recipient should receive your email. When she clicks on the email’s attachment (the contact entry you sent) she can automatically import that data into her contact management application as a new entry, such as within Address Book on her Mac or Contacts on her iPad or iPhone.
If someone sends you an email with a Contacts entry attached, it is displayed within the body of the email as an attachment. After tapping the email’s attachment icon, tap the Create New Contact or Add to Existing Contact option to incorporate this information into your Contacts database.
Syncing Contact Data with Other Contact Management Software
If you maintain your primary contacts database using Address Book or Contacts on your Mac, for example, you can sync the Contacts app via an iTunes Sync, or you can sync the contacts wirelessly using iCloud (which is a more convenient and fully automated method).
You can also synchronize your contacts database on your iPad with Microsoft Outlook on a PC, Microsoft Entourage on a Mac, any Microsoft Exchange-compatible contact management software that is running on your company’s network, or a variety of other online (cloud)-based contact management tools. To synchronize contacts data wirelessly, you must first do some initial setup (just once) using the Settings app on your iPad.
Syncing Contacts Data from Your iPad with iCloud
After setting up a free iCloud account, access the Settings app on your iPad. On the left side of the screen, tap the iCloud option and enter your Apple ID and password to turn on the main iCloud functionality. Next, scroll down the iCloud menu screen and make sure the virtual switch associated with the Contacts option (shown in Figure 5.8) is turned on.
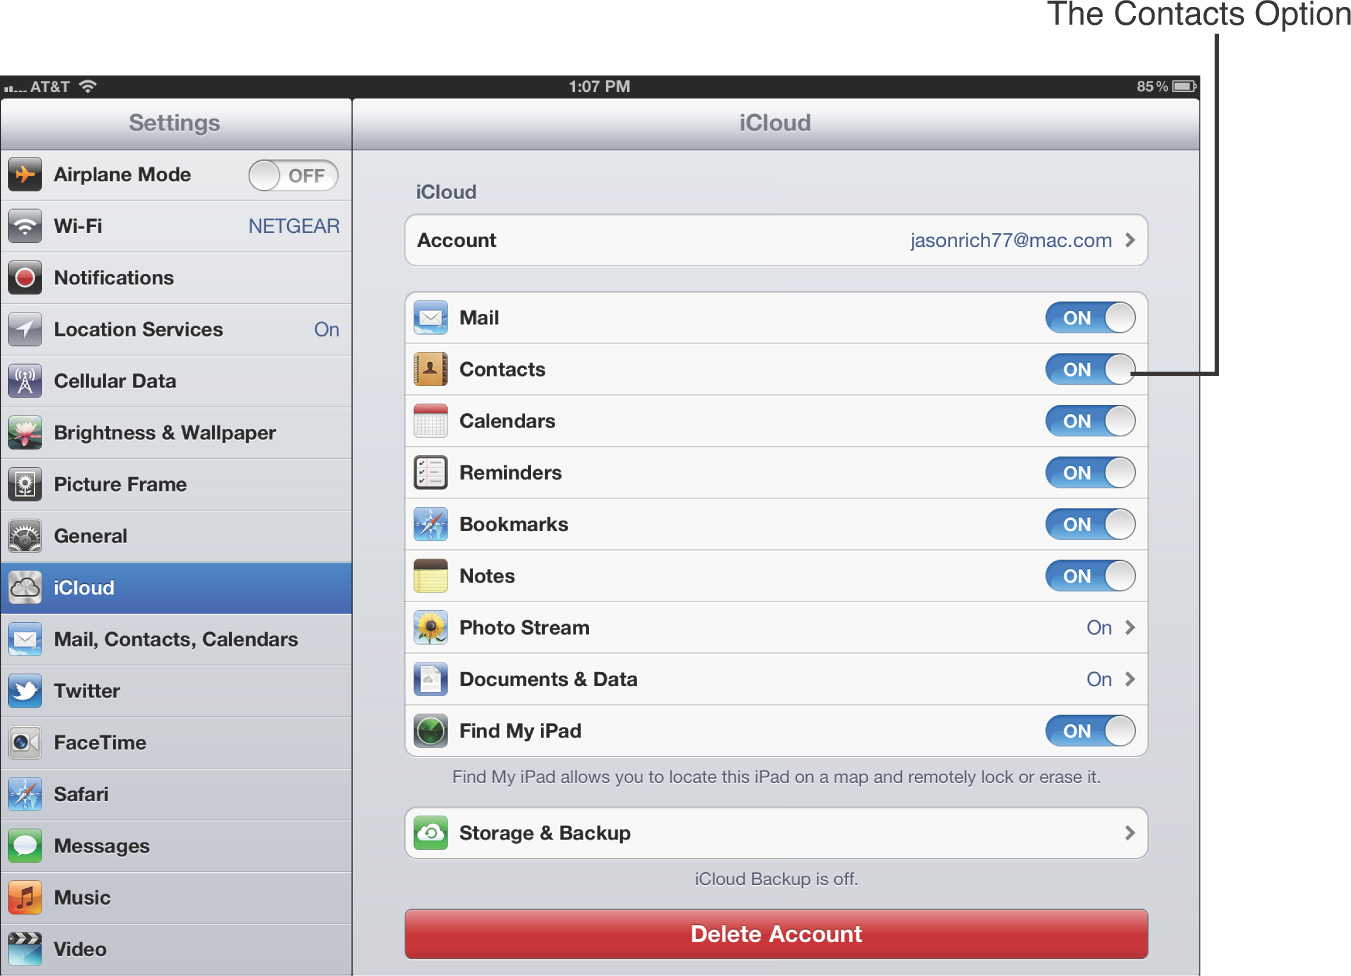
Figure 5.8. For the iCloud sync feature to work with Contacts, it must be turned on from within the Settings app.
From the Settings app, tap on the Mail, Contacts, Calendars option to personalize settings related to the Contacts app. Scroll down on this screen to the Contacts heading.
Turning on the Contacts option enables your iPad to automatically sync your Contacts data with your iCloud account (as long as your tablet is connected to the Web). Also make sure you turn on iCloud functionality—as well as the Contacts sync feature—for your primary computer, iPhone, and other iOS devices that are linked to the same iCloud account.
After your Contacts data is automatically syncing with iCloud, you can access your contacts database from any computer or web-enabled mobile device by pointing its web browser to www.icloud.com/#contacts. Sign in using your iCloud username and password (which is typically your Apple ID and password) to access a free, online-based app that is almost identical to the Contacts app. It contains all of your up-to-date contact entries.
Syncing with Microsoft Exchange-Compatible Applications
From the iPad’s Home screen, tap Settings, and then choose the Mail, Contacts, Calendars option. Tap the Add Account option displayed under the Accounts heading on the right side of the screen. Choose to set up a Microsoft Exchange account. When prompted, enter your email address, domain, username, password, and an account description. This is information that should be supplied by your network administrator or IT department. Next, turn on the contacts option and save your new settings.
Contacts is compatible with any contact management software that uses the industry-standard CardDAV and LDAP format. Thus, if you have a Microsoft Exchange account and activate the contacts sync feature, you can wirelessly keep your primary contacts database perfectly synchronized with your Contacts database as long as your iPad has access to the Web.
Syncing with CardDAV- or LDAP-Compatible Applications
To set up the wireless sync process between a CardDAV-compatible application and Contacts, access the Settings app on your iPad and select the Mail, Contacts, Calendars option. From under the Add Account heading, tap the Other option. Next, choose either the Add LDAP account or Add CardDAV account option, depending on the application you are syncing with.
You are prompted for a server address, username, password, and an account description. Obtain this information from your network administrator or company’s IT department.
How Does Syncing Your Contacts Info Help You?
After the iPad is set up to sync your Contacts app with another contact management application, whenever you make a change, deletion, or addition to your contacts database (either from your iPad, your primary computer, or your smartphone that’s also synced with the database), those modifications are automatically reflected on all of the devices that you access your contacts database from.
If you have questions about how to configure your iPad to sync correctly with your primary contact management application, make an appointment with an Apple Genius at any Apple Store or call AppleCare’s toll-free phone number at (800) APL-CARE, and have a technical support specialist talk you through the setup and initial data sync process.
In addition to or instead of using the Contacts app to manage your contacts, the App Store has a selection of optional third-party apps that offer slightly different, or sometimes enhanced, functionality when compared to Contacts. When visiting the App Store, enter the search phrase “Contact Management” or “Contacts” into the Search field. There you can also find utility apps, such as Remove Duplicate Contacts ($0.99), which can help you streamline your contacts database and avoid duplicates.