9. Syncing Your iPad via iTunes or iCloud
In This Chapter
• Sync your iPad with your computer using iTunes Sync
• Sync your iPad with your computer using iTunes Wireless Sync
• Take advantage of iCloud for backing up and syncing files and data on your iPad
Thanks to the iOS 5.1 operating system, your iPad is designed to work seamlessly with Apple’s online-based iCloud service, enabling you to maintain a backup of your tablet wirelessly, plus sync app-specific files and data with both iCloud and your Mac(s) and other iOS devices that are linked to the same iCloud account.
Apps such as Contacts, Calendar, Music, iBooks, Safari, Photos, Reminders, Notes, iTunes, Videos, Pages, Numbers, Keynote, and iPhoto, for example, all have iCloud functionality built in, so data, files, and documents utilized by these apps can automatically back up and sync to the iCloud service.
For iCloud functionality to work, you must set up a free iCloud account, turn on the iCloud feature from within Settings on your iPad, and also activate iCloud with each app it’s compatible with. After doing this once, however, your tablet syncs data and backs itself up to iCloud.
When used with iCloud, your iPad no longer needs to be connected to your primary computer (a PC or Mac), via a USB cable, in order to transfer documents, sync data, or back up files. However, this continues to be a viable option. The benefit to using iCloud for data syncing and file backups is that you can access important information from anywhere your iPad has an Internet connection because the files are stored “in the cloud.” When you use iTunes Sync, the backup or synced files are stored on your primary computer, and you must connect the tablet to that computer. This is not necessarily conducive if you’re away from your primary computer or traveling, for example.
With iCloud turned on, you can back up your tablet directly to the iCloud service via the Internet. Meanwhile, the iTunes Sync process stores backup files and synced data on your primary computer. A third option for backing up and syncing data is to use iTunes Wireless Sync, which enables your iPad to wirelessly back up and sync data with your primary computer as long as both devices are connected to the same wireless network.
When it comes to syncing or backing up data related to your iPad, using the iTunes Sync process is considered “old school.” Let’s explore how the iTunes Sync process, which is a viable option for many iPad users, works.
If your business has a need to keep multiple iPad tablets uniformly synced so they all contain the same information, configuration, and apps, Apple offers easy solutions to do this. To learn more, visit www.apple.com/support/ipad/enterprise.
Making the iTunes Sync Connection
Whether you use a PC or Mac, you need to download and install the most current version of iTunes onto your computer to take full advantage of the iTunes sync process. To do this, visit www.apple.com/itunes, or while iTunes is running on your computer, click the iTunes pull-down menu at the top of the screen and select the Check for Updates option.
You use the iTunes software for your PC or Mac for a variety of purposes. You can initiate the iTunes Sync process between your computer and iPad, or you can use iTunes on your computer to access the iTunes Store and make content purchases. You also use the software to manage and enjoy your iTunes content on your primary computer.
On your iPad, however, you use the iTunes app specifically to acquire music, movies, TV show episodes, audiobooks, podcasts, and iTunes U content. To listen to audio content on your iPad, you use the Music app. To watch video content obtained from iTunes, you use the Videos app.
Next, connect the white USB cable that came with your iPad to a USB port on your computer (or to a USB hub that’s connected to your computer) as well as to the 30-pin dock connector port that’s located on the bottom of your tablet.
If your computer is turned on when the two devices are connected, the iTunes software automatically launches on your computer and establishes an iTunes sync connection.
On your primary computer, iTunes is designed to handle a range of tasks, from managing your digital music library to enabling you to purchase (or, in some cases, rent) a vast selection of content, including apps, eBooks, digital newspapers, digital editions of magazines, music, TV show episodes, movies, audiobooks, and podcasts.
Ultimately, from your primary computer, you can use the iTunes Sync process to handle the following iPad functions:
• Initially set up your iPad after purchase.
• Create and maintain a backup of your iPad’s data, apps, personalized settings, and content. You can also restore your iPad from a backup using iTunes.
• Transfer or sync digital music.
• Transfer or sync apps.
• Transfer or sync address book, contacts, Safari bookmarks, notes, and email accounts. (If you’re using the online Calendar apps offered by Google or Yahoo!, for example, these too can be synced using iTunes.)
• Transfer or sync TV show episodes and movies.
• Transfer or sync digital photos.
• Transfer or sync your iBooks eBook library, as well as digital editions of newspapers and magazines.
• Transfer or sync podcasts and other digital content.
• Transfer or sync certain app-specific files and data, such as documents, spreadsheets, and presentations for use with the Pages, Numbers, or Keynote apps.
• Update the iOS operating system of your iPad (when Apple releases updates that you need to download and install).
These tasks can also be accomplished wirelessly by using Apple’s iCloud service, which eliminates the need to connect your tablet directly to your primary computer via a USB cable. An Internet connection is required, however.
After you make the iTunes Sync connection between your primary computer (a Mac or PC) and tablet, you can customize the iTunes software’s settings to automatically transfer or sync only the data, apps, and content you want or need. Thus, you should set up the iTunes software and customize the sync process to best meet your needs.
Customizing the iTunes Sync Process
After making the iTunes sync connection between your primary computer and iPad, under the Devices heading on the left side of the iTunes screen, you see your tablet listed. Click this listing to select and highlight your tablet.
Near the top of the main iTunes screen, when the two devices are connected, you see a handful of options, including Summary, Info, Apps, Music, Movies, TV Shows, Books, and Photos. Based on content stored within iTunes, options for Ringtones and Audiobooks might also be listed. The default is the Summary screen, which is displayed in the main area of the iTunes screen on your Mac or PC.
Each command option reveals a separate screen containing additional (relevant) menus for customizing the iTunes sync process. From these screens, you can control the flow of data, content, and information between your iPad and your primary computer. You must adjust the settings within the iTunes software on your computer to customize the sync process; you cannot customize the sync process from your tablet.
Understanding the iTunes Summary Screen
The Summary screen within iTunes on your computer (shown in Figure 9.1) is comprised of four sections: iPad, Version, Backup, and Options. Near the top of the Summary screen is the iPad section. Within this box, your iPad’s device name (which you created when you first set up the tablet), its memory capacity, what version number of the iOS operating system is installed on the tablet, and its serial number are displayed.

Figure 9.1. When your computer and iPad make a connection via the iTunes Sync process, the main iTunes Summary screen looks like this.
Within the Version section of the iTunes Summary screen is an option to check for updates related to the iOS operating system running on your tablet. Click the Check for Update button to determine if an updated version of the operating system is available.
If an iOS update is available, follow the on-screen prompts to download the new version of the operating system from Apple and then install it on your iPad. This process is almost totally automated, but it can take as long as 15 minutes.
Should you have a problem with your iPad that requires you to restore its entire contents from a saved backup, use the Restore option that’s displayed within the Version section of the Summary screen. This option also enables you to restore your iPad to its factory settings, which undoes any settings you’ve adjusted yourself.
From the Backup box of the Summary screen within iTunes, you can determine if your iPad backs itself up wirelessly to the iCloud service or to your primary computer using the iTunes Sync or iTunes Wireless Sync process.
The Options section of the Summary screen includes a handful of other customizable settings. To turn on any of these options, use the mouse to add a check mark within the checkbox that corresponds to the desired option.
The first option displayed in the Options section enables you to set iTunes to automatically launch as soon as you connect the iPad with your computer using the USB cable. The second option, for example, enables you to perform an iTunes Wireless Sync, which works exactly the same as the iTunes Sync process, but it’s done wirelessly (without a USB cable connection) when your computer and tablet are connected to the same wireless network.
If you’re using your iPad for storing data that you need to keep private, be sure to add a check mark next to the Encrypt Local Backup option that’s displayed within the Backup box of the Summary screen.
Activating the Encrypt Local Backup option encrypts the data within the iPad backup files that are stored on your computer, making it much more difficult for an unauthorized person to access this data from your primary computer.
On the iPad itself, you should also activate the Passcode option from the Settings app. This protects the data stored on your tablet and keeps unauthorized people from using your iPad because it is passcode protected.
Adjusting Sync Options with the iTunes Info Screen
If you’ll be using the iTunes Sync or iTunes Wireless Sync process to back up or sync app-specific data between your primary computer and iPad, tap the Info tab that’s displayed near the top of the iTunes screen in order to adjust settings related to syncing data from Contacts, Calendar, Notes, and Mail, as well as your Safari bookmarks.
Syncing Your Apps with the iTunes App Screen
The iTunes App Screen is used to manage all the apps you’ve downloaded from the App Store. It enables you to determine which apps should be installed on your iPad. To use the features within this section of iTunes, first add a check mark next to the Sync Apps heading.
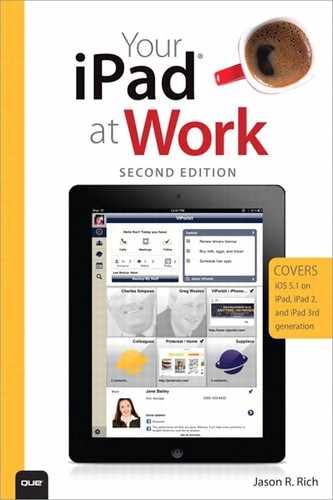
On the left side of the iTunes App screen (shown in Figure 9.2) is a complete list of all apps you’ve downloaded and that are stored (or backed up) on your primary computer. On the right side of the iTunes App Screen is an interactive re-creation of your iPad ‘s Home screen, which displays all of the apps currently installed on your tablet. Use the mouse to move apps around on your Home screen to change their location.
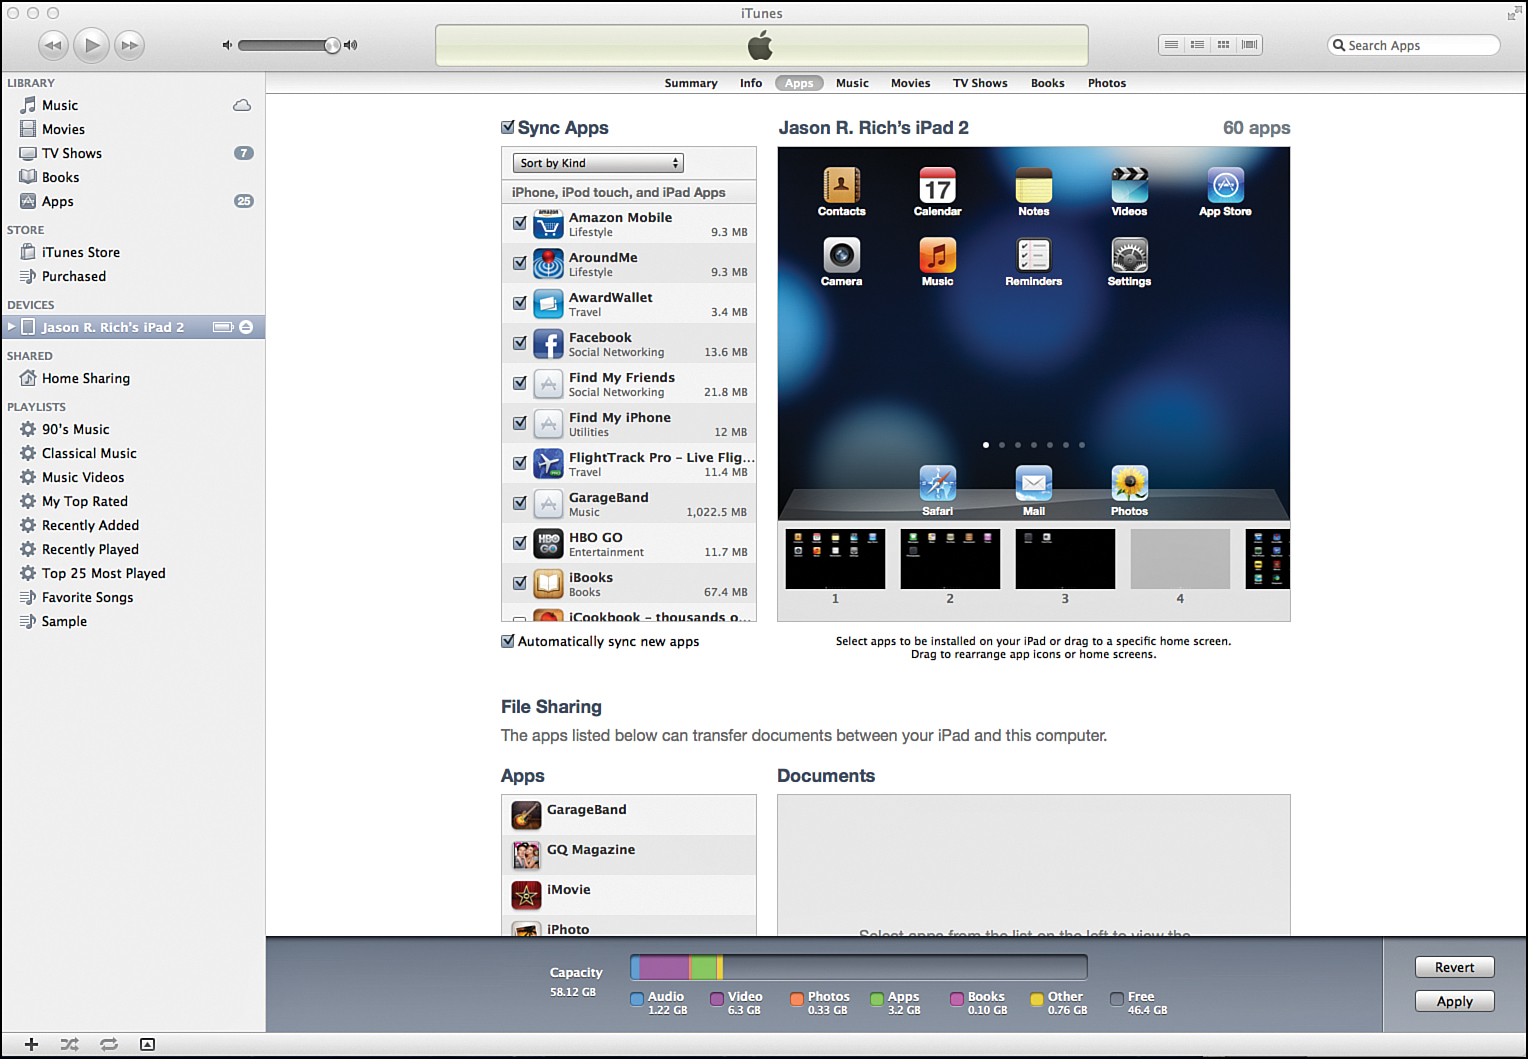
Figure 9.2. When your iPad is connected to your computer and you access the App screen, your iPad’s Home screen is re-created on the computer screen, plus you can view a complete list of apps that you own.
From the left side of the screen, add check marks to the apps stored on your primary computer that you want to transfer and install on your iPad. You can also remove check marks that correspond to listed apps to uninstall them from your tablet, but still keep copies of the apps stored on your primary computer.
At the bottom of the app listing, on the left side of the screen, is the Automatically Sync New Apps option. When this option is turned on, anytime you purchase a new app on any device from within the App Store, that new app is automatically transferred to and installed on your tablet when a sync is next initiated.
If you make any changes to the options displayed within the App screen, be sure to click the Apply icon, found in the lower-right corner of the iTunes screen, to save those changes.
Transferring App-Specific Data or Files Between Your Computer and iPad
Some apps, such as Pages, Numbers, Keynote, and many others, enable you to use the iTunes sync process to transfer app-specific data between an iPad app and specific software on your primary computer, such as Microsoft Word, Microsoft Excel, and Microsoft PowerPoint.
If you install an app that allows for app-related files to be transferred using the iTunes sync process, those apps are displayed within the File Sharing section, which appears at the bottom of the App screen of iTunes on your computer.
To transfer an app-specific file, from the File Sharing section (shown in Figure 9.3), click the app name listed on the left side of the screen, under the Apps heading. If you click on Pages, for example, on the left side of the screen, a Pages Documents section within iTunes displays. Click the Add button in the lower-right corner of the screen to choose documents stored on your computer’s hard drive to be transferred to your iPad during the next sync.
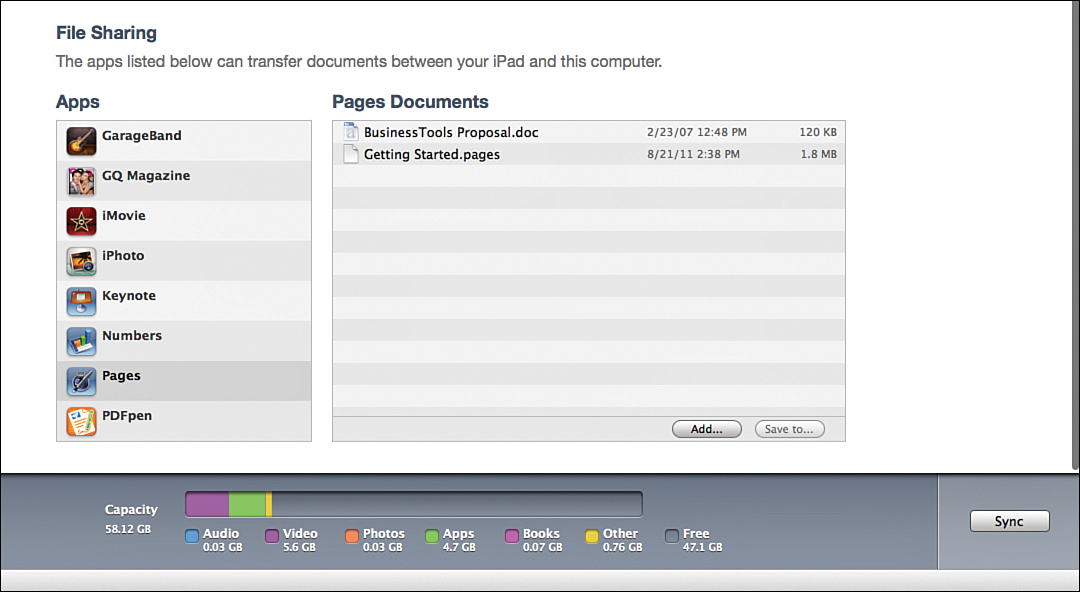
Figure 9.3. Under the File Sharing heading, you can set up the iTunes Sync process to synchronize app-specific data between your iPad and computer. This feature works only with compatible apps, such as Pages, Numbers, and Keynote.
Syncing Your Music with the iTunes Music Screen
If you use iTunes on your primary computer to manage your digital music library, and you want to transfer some or all of your music so you can enjoy it on your iPad using the Music app that comes preinstalled on the tablet, click the Music option near the top of the iTunes screen and then place a check mark next to the Sync Music heading.
If you’re a paid subscriber to Apple’s optional iTunes Match service ($24.99 per year), your tablet is capable of accessing your entire digital music library directly from iCloud. To learn more about this premium service, visit www.apple.com/itunes/itunes-match.
Within the Sync Music section are several customizable options that enable you to determine which music files should be synced with your iPad. For example, you can sync your entire music library, or choose specific songs, playlists, genres, or artists. You can also select entire albums to be synced between the two devices, not just individual songs.
Syncing Your Movies with the iTunes Movies Screen
If you have purchased and downloaded movies from iTunes and want to transfer those movie files to your iPad to view them using the Videos app, click the Movies option displayed near the top of the iTunes screen and then place a check mark in the checkbox displayed next to the Sync Movies heading. You can choose which movies you want to transfer to your iPad (or vice versa).
However, if you have used iTunes to rent movies, you need to click on the Movies option and use the Rented Movies section to choose which movies you want to transfer from your primary computer to your iPad (or vice versa) by clicking the Move icon that’s associated with each rented movie.
On the left side of the screen (shown in Figure 9.4) are the rented movies currently stored on your primary computer. The box on the right side of the Rented Movies screen represents your tablet and the rented movie content stored (or to be stored) on it.

Figure 9.4. Movies rented from iTunes can only be stored on one computer or iOS device at a time. So, if you download a rental movie on your primary computer but want to watch it on your iPad, you first need to transfer the file using the Move button.
Unlike movies you have purchased, rented movies can only be stored on one system or device (your primary computer or your iPad) at any given time.
Syncing Your TV Shows with the iTunes TV Shows Screen
From the iTunes Store, you can purchase TV show episodes or entire seasons of your favorite TV series. If you’ve used the iTunes software on your primary computer to acquire and download this content, you can transfer it to your iPad by clicking the TV Shows tab and then adding a check mark in the checkbox next to the Sync TV Shows heading.
You can purchase movies, TV episodes, and complete TV series seasons from the iTunes app that comes preinstalled on your iPad (if you’re using a Wi-Fi Internet connection) and then later transfer those files to your primary computer using the iTunes sync process.
Or, while the files are stored on your tablet, you can use the AirPlay feature with an Apple TV device to stream the TV show or movie content from your iPad to your HD television set or home theater system.
After you add a check mark to the Sync TV Shows heading, determine which TV show episodes or seasons should be transferred between devices during the next sync. For example, you can select all unwatched episodes, or pick one or more TV series, and then select specific episodes of those series.
Syncing Your eBooks with the iTunes Books Screen
In addition to finding, purchasing, and downloading eBooks from iTunes on your primary computer (from Apple’s iBookstore), you can manage your eBook library from iTunes and decide which eBook titles to keep on your iPad and which to store on your primary computer.
Click the Books tab at the top of the iTunes screen, and then add a check mark next to the Sync Books heading if you want the iTunes sync process to automatically back up your eBook library. With this option selected, you can choose to sync all eBook titles or only selected titles.
If you scroll down when viewing the Books screen within iTunes, you also see a section for syncing audiobooks. If you plan to download audiobooks from iTunes and want to listen to your audiobooks using the Music app on your iPad, add a check mark next to the Sync Audiobooks option.
If you enjoy listening to audiobooks, in addition to buying audiobook content from iTunes to listen to on your iPad using the Music app, you can download the optional Audible app, and then purchase audiobook content from Audible.com (which is owned by Amazon.com).
Syncing Your Digital Images with the iTunes Photos Screen
If you’re a Mac user, the iPhoto software that came bundled with your computer is designed to work seamlessly with the Photos app (and optional iPhoto app) on your iPad. Thus, you can quickly and easily transfer digital images between the two devices using the iTunes sync process.
To sync digital images (pictures) between the two devices, click the Photos option displayed near the top center of the iTunes screen and add a check mark to the Sync Photos From heading.
You can then choose to sync photos from a particular application on your primary computer, such as iPhoto, or choose a specific directory on your computer’s hard drive (such as Pictures) that contains images that you want to copy over to your iPad.
iCloud’s Photo Stream feature is a wireless method of syncing photos between your primary computer, iPad, and other iOS devices. Your iPad requires a Wi-Fi Internet connection to utilize this feature.
From this screen, you can also sync videos you’ve shot that are stored on your primary computer or videos that you shot using the Camera app of your iPad. As you scroll down the Photos screen within iTunes, you can pick and choose which images you want to sync.
For example, if you use a Mac you can choose specific Albums or Events from iPhoto or choose specific people based on iPhoto’s Faces face-recognition feature. The photos you transfer from your primary computer are then accessible from the Photos app (or optional iPhoto app) on your iPad, or from other apps that can access images stored on your tablet (such as Contacts or optional photo-editing apps, such as Photoshop Touch).
Based on your selections, the number of photos to be synced between your primary computer and tablet is displayed in the upper-right corner of the screen. Keep in mind that this is a syncing process, so your images remain intact at their current location, but you can also duplicate, transfer, and save them on the other device.
As always, after you make your selections from the Photos screen, be sure to click the Apply or Sync button in the lower-right corner of the screen to save your changes.
Additional iTunes Commands and Features
When your iPad is linked with your primary computer via the iTunes sync process, you can see a graphic depiction of your tablet’s memory near the very bottom of the iTunes screen. This display (shown in Figure 9.5), shows how much of the iPad’s internal storage space is currently being utilized and what type of data is taking up the space.

Figure 9.5. Using the iTunes software, you can quickly see how much of your iPad’s internal storage is being utilized and by what type(s) of data.
After you adjust the settings to personalize the iTunes sync process, those settings are utilized the next time you initiate the sync process. At any time, however, you can adjust the settings to change what data, files, apps, and content are transferred or synced between your primary computer and tablet.
During the actual sync process, a rotating circle is displayed in the upper-left corner of the iPad’s screen (to the immediate right of the 3G/4G and Wi-Fi signal indicators). At the same time, the progress of the sync is displayed at the very top of the iTunes screen on your primary computer.
Maintaining a backup of your iPad’s contents and data is a smart strategy to use on an ongoing basis. Get into the habit of performing a sync at least once every few days, or more often if you make significant changes to data stored on your iPad or need additional apps or content transferred between your tablet from your primary computer.
Charging Your iPad’s Battery While It’s Connected to Your Computer
Depending on your primary computer, the USB connection between the PC or Mac and your iPad might be adequate to charge your iPad’s battery. If this is the case, the battery icon displayed in the upper-right corner of your tablet’s screen shows a lightning bolt within it to indicate that the device is charging.
However, if you see the Not Charging message next to the battery icon, your computer’s USB port (or its USB hub) does not provide enough power to the iPad to recharge its battery. If this is the case, you need to connect the two devices to perform an iTunes sync, but you ultimately need to plug your iPad into an electrical outlet (using the USB cable and the power adapter supplied with your tablet) to charge its battery. Or, you can use another charging method.
Working with iCloud
iCloud is a remote file-sharing service that stores your music, photos, apps, calendar data, contacts, documents, and other types of files and makes them available (wirelessly) via the Internet to your various computers and iOS devices.
The majority of services offered by iCloud are free. When you set up your free iCloud account, you’re given a unique email address and 5GB of online storage space. You can purchase additional online storage space if you need it. Extra space is provided for free to accommodate all of your iTunes Store, App Store, iBookstore, and Newsstand purchases.
Think of iCloud as a remote hard drive storage solution in cyberspace that gives you access to all the data and files you transfer to it.
Apple’s iCloud service does much more than just store data and files in cyberspace. It can automatically sync your iPad with your primary computer and other iOS devices (such as your iPhone or iPod touch). It even manages and automatically stores all of your iTunes purchases so they’re always available on all of your computers and devices that are connected to the Internet.
For example, you can purchase a song on iTunes using your computer, store that song on your computer’s hard drive (and automatically on the iCloud service), and then wirelessly and almost instantly access that song purchase (for no additional charge) on your iPad, iPhone, or iPod touch via the Internet.
If you upgrade your iCloud account to include the iTunes Match feature (for an additional fee of $24.99 per year), you can wirelessly share your entire music collection, including content not purchased from iTunes, between your Macs, Apple TV, and all your iOS devices. This includes music you’ve ripped from your own CD collection or recorded yourself.
When your iPad syncs Contacts, Calendar, iCloud Mail, or iWork for iPad documents and files with iCloud, you can access this data from any computer or mobile device that’s connected to the Internet. Visit www.iCloud.com, log in using your Apple ID and password, and then click the Mail, Contacts, Calendar, or iWork icon that’s displayed on the screen.
For sharing digital photos between computers and mobile devices linked to the same iCloud account, use the Photo Stream feature. It enables you to store up to 1,000 digital photos on the iCloud servers.
When using the Photo Stream service through iCloud, a complete master photo library is maintained on your PC or Mac; however, up to 1,000 images remain instantly accessible to all your devices via iCloud.
One of the most convenient features of iCloud is that you can easily transfer (wirelessly) documents, data and work-related files between your primary computer and iPad. Thus, you can take a Microsoft Word, Excel, or PowerPoint file created on your PC or Mac; for example, transfer it into a Pages, Numbers, or Keypoint file format, send it to iCloud, and make it instantly accessible to your iPad that’s connected to the Web.
Not only does this feature make it easy to transfer files and documents between your devices, it also insures that each computer and device always has the latest edited version of your file or document.
Your iPad can also use iCloud to back up and access your collection of apps and eBooks. All your app purchases, whether they’re currently stored on your iPad or not, are automatically stored in iCloud, and they’re accessible to you at any time (assuming your iPad is connected to the Web). iCloud also keeps a backup of all your Newsstand purchases.
To find out how iCloud can be used to sync your Safari bookmarks, see Chapter 3, “Surfing the Web.”
Discover how iCloud can sync your Reminders and Calendar data by referring to Chapter 4, “Using the Calendar, Reminders, and Notification Center Apps.”
To learn how iCloud can be used for syncing your Contacts data, see Chapter 5, “Working with the Contacts App.”
Maintaining a Backup of Your Entire iPad via iCloud
Instead of backing up your iPad by connecting it to your primary computer via a USB cable and using the iTunes sync process, you can create and automatically maintain a daily backup of your tablet wirelessly using iCloud.
To make the backup process quick, only information that has changed on your iPad is sent to the iCloud service and is incorporated into your backup archive. The backup files are stored in cyberspace (on the iCloud servers), not on your primary computer.
After a backup has been stored on iCloud, you can perform a wireless restore if something goes wrong with your tablet causing data to be deleted. When you initially set up your iPad, you are prompted to set up a free iCloud account. You can then customize that account from within the Settings app.
At any time, however, you can turn on the iCloud Backup feature. To do this, launch Settings from your iPad’s Home screen. On the left side of the screen, tap the iCloud option.
When the iCloud screen appears on the right side of the screen (shown in Figure 9.6), turn on the iCloud feature and then scroll to the bottom of the screen and tap the Storage & Backup option.
Figure 9.6. You can control iCloud features available to your iPad from this iCloud screen, which is accessible from within Settings.
From the Storage & Backup screen within Settings (shown in Figure 9.7), tap the virtual switch associated with the iCloud Backup option to turn it on. Next, tap the Backup Now icon to create a manual backup of your iPad that is stored on iCloud. This can be done at any time (to supplement or replace the automatic daily backup).

Figure 9.7. Access the Storage & Backup screen to turn on or off the iCloud Backup feature, to manually initiate an iCloud Backup, or to return your iPad from iCloud backup files.
When the iCloud Backup feature is turned on, your tablet automatically creates an updated back up once per day, as long as it’s plugged into an external power source, has access to a Wi-Fi connection, and is not otherwise being used. While some iCloud features work with a 3G/4G or Wi-Fi Internet connection, the iCloud Backup feature must be used with a Wi-Fi connection.
Keep in mind that, to access the iCloud service from your iPad the tablet must have access to a Wi-Fi or 3G/4G Internet connection. If you know you’re about to board an airplane that doesn’t offer Wi-Fi, or if you’re leaving a 3G/4G wireless data coverage area, access and transfer whatever files you need on your tablet from iCloud before the Internet connection is shut down or lost.