3. Surfing the Web
In This Chapter
• Discover how to use the Safari web browser
• Syncing your Safari bookmarks with your computer and other iOS devices
• Accessing Twitter, Facebook, Google+, LinkedIn, and other online social networking services
Back in the sixteenth century, long before people even dreamed of iPads and the Internet, Sir Francis Bacon stated, “Knowledge is power.” In today’s cut-throat business world, this statement is truer than ever.
People who possess knowledge, and who consistently stay up to date and in the know, have a distinct advantage over the masses who don’t keep their skill set, knowledge, toolset, and education current.
The Safari web browser that comes preinstalled on your iPad offers the ability to access the Internet from virtually anywhere there’s a Wi-Fi, 3G, or 4G signal. As a result, your tablet can place a vast amount of information at your fingertips exactly when you need it. Like never before, the iPad is a tool that can keep you in the know and can provide the knowledge you need to be a powerful force in the business world.
Your iPad enables you to visit virtually any website and navigate around the World Wide Web with ease using now-familiar finger motions on the tablet’s touch-screen.
As you visit web pages using Safari, you can utilize hyperlinks or activate command icons with the tap of the finger, scroll up or down on a web page with a finger swipe, perform a reverse pinch or double-tap to zoom in on specific areas of a web page, or flick your finger to scroll left or right.
If you’re already familiar with how to surf the Web on your primary computer using a web browser, such as Microsoft Internet Explorer, Firefox, Google Chrome, or the Mac version of Safari, you should have little trouble surfing the Web on your iPad. The iPad’s version of Safari was custom-designed specifically for your tablet to give you the most authentic and robust web surfing experience possible from a mobile device.
Customizing Safari Settings
The Safari app offers a handful of user-customizable settings adjustable from the Settings app on your iPad. Several of these settings relate to security and privacy.
To access and personalize the settings for Safari, tap the Settings app icon that’s displayed on your tablet’s Home screen, and then tap the Safari option listed on the left side of the screen under the Settings heading. On the right side of the screen, a handful of Safari-specific options are displayed.
At the top of the Settings screen (on the right), when the Safari option is selected (on the left), you see a General heading with four options below it: Search Engine, AutoFill, Open New Tabs in Background, and Always Show Bookmarks Bar.
As you’re actually surfing the Web and looking at the main Safari screen (see Figure 3.1), note the Search field in the upper-right corner of the screen, just below the battery icon. From the Settings app, you can determine whether your default search engine should be Google, Yahoo!, or Bing. This determines which search engine Safari utilizes when you perform a keyword search as you surf the Web.

Figure 3.1. The main Safari browser screen looks similar to the web browser screen of a computer.
The AutoFill option has two main uses when it’s activated. First, as you’re surfing the Web, whenever you’re asked to enter your personal information—such as your name, address, phone number, or email address—Safari automatically inserts the information into the appropriate fields on the website.
To use AutoFill, make sure the virtual switch that’s associated with the Use Contact Info option is turned on. You also need to tap the My Info option and select your own contact entry from your Contacts database.
Farther down on the AutoFill screen is the Names and Passwords option. This is the second main use for AutoFill. When it’s turned on, this feature remembers your usernames and passwords for the websites you visit and automatically enters them whenever you revisit websites that require you to otherwise manually enter a username or password.
If you’re concerned about security and other people accessing personal information about you from the Web when they use your iPad, make sure you keep the Names and Passwords option turned OFF. This prevents other users from accessing your account(s) or signing in to websites as you.
The Clear All option at the bottom of the AutoFill screen resets all the names and passwords data from websites you’ve visited and deletes this information from your tablet.
The next option found under the General heading is the Open New Tabs in Background feature. Safari enables you to open multiple web pages at once using tabs and then instantly switch between them with a tap of the finger.
With the Open New Tabs feature turned on, when a new web page is opened automatically (and a new tab is created), that page does not take precedence over the web page you’re currently viewing. You need to tap on the new page’s tab to access it.
Also under the General heading is the Always Show Bookmarks Bar option. This option is accompanied by a virtual On/Off switch on the right. As you’re surfing the Web using Safari, under the Title Bar command icons at the top of the screen, you can opt to display your personalized Bookmarks bar.
When the Always Show Bookmarks Bar option is turned on, the Bookmarks bar is displayed at all times, giving you one-tap access to your favorite websites. You can assign which websites appear along your Bookmarks bar, or you can sync this information with the browser you use on your primary computer.
When the Always Show Bookmarks Bar option is turned off, one line of onscreen real estate is conserved. The Bookmarks bar, however, is displayed automatically whenever you use the Search field within Safari to perform a search, or when you tap on the address bar.
Under the Privacy heading of the Safari screen within Settings, you can customize a handful of security-related options. For example, you can turn on or off the Private Browsing option, which keeps Safari from storing cookies or other data pertaining to the websites you visit. By default, this option is turned off.
You can also opt to keep Safari from saving cookies related to the websites you visit, or delete cookies that have already been stored by Safari by tapping on the Remove Website Data option that’s found under the Privacy heading.
The Accept Cookies option enables Safari to store certain information relating to specific websites you visit so that those sites remember you on subsequent visits. By selecting the From Visited option, only information that relates to websites you have chosen to visit is saved.
Safari automatically keeps a detailed listing of every website you visit. When you tap the Clear History button, this listing is reset and deleted.
Under the Security heading of the Safari screen with Settings, you can turn on or off the Fraud Warning option. By default, this option is turned on and should remain on for your protection. This option helps prevent you from accidentally surfing to imposter or fraudulent websites, for example.
Don’t mess with the default settings for the next two options, JavaScript and Block Pop-ups, unless you know what you’re doing or are instructed by a specialist to change these settings. The JavaScript option enables you to visit and access websites that utilize JavaScript programming. The Block Pop-ups option prevents those annoying pop-up windows (which are usually ads) from cluttering your screen as you’re surfing the Web.
Unless you have a programming background or you’re told to do so by an AppleCare technical support specialist, refrain from changing any settings found under the Developer or Databases submenus, if and when these options are displayed on the Safari screen within Settings. Simply leave the default settings as is.
To exit the Settings app and automatically save your changes, press the Home button on your iPad. This returns you to the Home screen. From here, you can launch Safari and begin surfing the Web.
Where’s the Flash?
The one main drawback to surfing the Web using Safari on your iPad is the web browser’s inability to display Adobe Flash-based graphics and animations. This limitation is not due to lack of technological capability of your tablet, however. It’s the result of ongoing disagreements between Apple and Adobe in regard to offering Flash compatibility through the iOS operating system.
Unfortunately, websites that rely heavily on Flash are not accessible using Safari. However, the optional Photon Flash Web Browser app does support Flash as you surf the Web from your iPad. You can also use a remote desktop app, such as Splashtop, to control your primary computer from your iPad’s screen, which enables you to run your computer’s web browser to surf the Web to access Flash-based websites.
You learn more about the Photon Flash Web Browser and Splashtop apps in Chapter 13, “Discovering ‘Must Have’ Business Apps.”
You’re Ready to Begin Surfing
To access the Web using your iPad, make sure it’s connected to the Internet, and then tap the Safari app icon that’s displayed on the tablet’s Home screen. The main Safari web browser screen appears.
Using Safari’s ToolBar Features
Located along the top of the Safari screen is the toolbar, which includes a handful of command icons that you use to navigate around the Web. Although the icons might look different than what you’re used to when surfing the Web using the browser installed on your primary computer, their features and functions are similar.
As you surf the Web using Safari, you can hold your tablet in portrait or landscape mode. Landscape mode makes the portion of the websites you’re viewing appear larger on the screen, but portrait mode enables you to see more of the web page vertically.
Located in the upper-left corner of the Safari screen are the Back and Forward arrow-shaped icons used for jumping to a previous web page you’ve visited.
The icon of the open book on the toolbar (shown in Figure 3.2) enables you to access your Reading List, History, Bookmarks bar, and the bookmarks you’ve added to your bookmarks list. Later in this chapter, you learn how to sync your bookmarks between Safari on your iPad with the bookmarks stored on your primary computer’s web browser software.
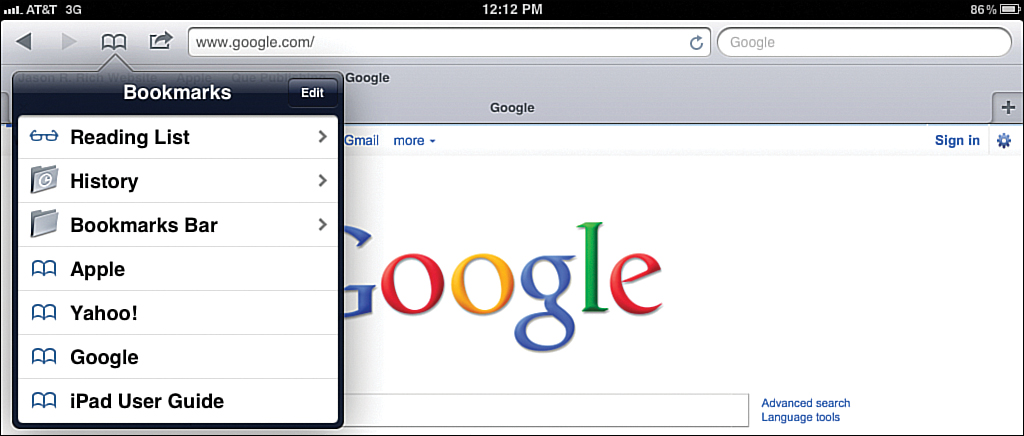
Figure 3.2. Tap the icon of the open book to access your Reading List (which is explained shortly), as well as your History, Bookmarks Bar listing, and saved bookmarks.
When you’re visiting any website, you can tap the rectangular icon with a right-pointing arrow sticking out of it (the Share icon) that’s located to the immediate left of the address field to access a submenu with the following five options (see Figure 3.3): Add Bookmark, Add to Reading List, Add to Home Screen, Mail Link to This Page, and Print.

Figure 3.3. This submenu offers several useful web surfing options.
If you have Twitter set up on your iPad (from within the Settings app), a sixth option, labeled Tweet, is displayed within the Share menu, enabling you to send a tweet to your followers, containing your 140-character message and a link to the website you’re viewing.
The Share menu offered in other apps, such as Photos, YouTube, and Maps, also displays a Tweet option if you have Twitter turned on and you’re signed in to your Twitter account from within the Settings app.
The Add Bookmark command adds the website URL for the page you’re currently viewing to your Bookmarks menu or Bookmarks bar. When you tap the Add Bookmark command, the Add Bookmark window displays.
Using the virtual keyboard, enter the title for this web page, or use the default title, and then choose whether you want to store the bookmark within your Bookmarks menu or display it on your Bookmarks bar.
The Bookmarks menu is a pull-down menu that lists your favorite bookmarks. It is a listing you can create and maintain as you’re surfing the Web. You can access it by tapping on the open-book icon at the top of the Safari screen.
Be sure to tap the blue-and-white Save button in the upper-right corner of the Add Bookmark window to save your changes before returning to the main Safari screen.
The Add to Reading List option immediately stores the webpage you’re viewing in the iPad’s memory and enables you to access it later (even if you’re offline). When you add a website to your reading list, you can access it by tapping the open-book icon and then tapping the Reading List option. This feature is particularly useful if you find an interesting article or blog entry that you don’t have time to read at the moment, but you know you want to refer to later.
Instead of adding a bookmark to the Bookmark menu or the Bookmarks bar, both of which are only visible when Safari is running and you’re surfing the Web, you can create a bookmark icon for a specific web page on your Home screen using the Add to Home Screen command.
When you tap a Home screen bookmark icon, the Safari browser launches and automatically loads the bookmarked web page. This enables you to access your favorite websites directly from the iPad’s Home screen. Home screen bookmark icons look similar to app icons on your Home screen. However, instead of launching an app when you tap one, Safari launches and opens the specific web page the icon is associated with.
When you tap the Add to Home Screen command, an Add to Home window displays. Using the virtual keyboard, enter the title of the bookmark in the displayed field and then tap the blue-and-white Add button displayed in the upper-right corner of the window. After doing this, when you access your Home screen, the new Home screen bookmark icon appears.
After you add a Home screen bookmark icon, you can treat it like any Home screen app icon, which means you can tap it to launch the website, move it around on the Home screen, or place it into a folder.
When you tap the Mail Link to This Page command, an email message screen displays. Fill in the To field to specify who should receive the email. A link to the website you’re currently viewing is automatically placed in the body of the email. You can add additional text to the body of the email before tapping the Send button.
If you have a printer linked to your iPad that’s compatible with the AirPrint feature, you can print web pages you’re viewing using the Safari app. Tap the Print command icon to do this. See Chapter 8, “Wireless Printing and Scanning via Your iPad,” for more information about using your tablet with a printer.
Editing Your Bookmarks
As you’re viewing your Bookmarks menu, tap the Edit button displayed in the upper-right corner of the window to edit your bookmarks listing.
After you tap on the Edit command, the Bookmarks menu displays additional icons to the right and left of each bookmark title (see Figure 3.4). On the left side of each user-added bookmark listing is a red-and-white circular icon with a minus sign in it. Tap this icon to delete the bookmark from your Bookmarks menu.
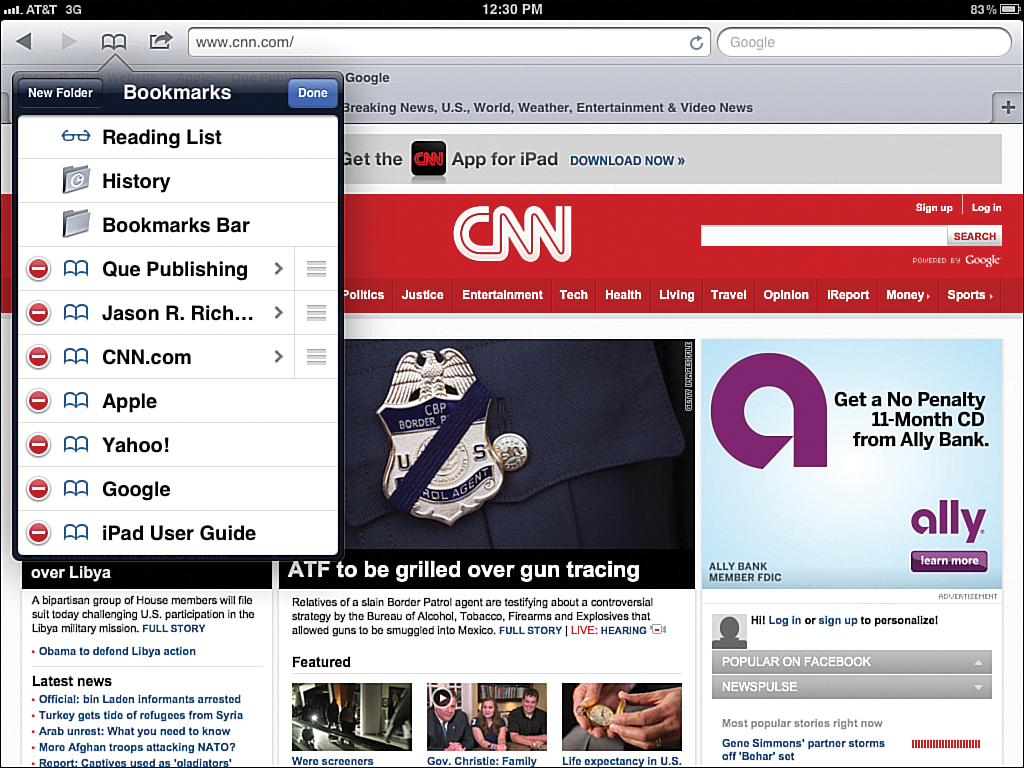
Figure 3.4. You can edit the bookmarks listed in your Bookmark menu or Bookmarks bar by tapping the Edit button in the upper-right corner of the Bookmark menu window.
Use the open-book icon or the > symbol (displayed to the right of each bookmark title) to edit the bookmark’s title, URL, or where the bookmark is listed.
Located to the extreme right of each user-added bookmark title is an icon with three horizontal lines. Place your finger on one of these icons to drag a bookmark listing up or down on the Bookmarks list, and change the order of the list.
In addition to having all of your bookmarks displayed in one long list within the Bookmarks menu, you can tap the New Folder button in the upper-left corner of this Bookmarks menu window to create separate folders that you can use to better organize your bookmarks by sorting them into custom categories. When you create a new bookmark folder, you must also assign a custom name to it.
When you’re done editing the Bookmark menu, be sure to tap the blue-and-white Done button in the upper-right corner of the window to save your changes and return to the regular Bookmark menu.
Accessing and Managing Your Reading List
To access and manage your reading list, tap the open-book icon, and then tap on the Reading List option. A new Reading List window appears. Under the Reading List heading are two tabs: All and Unread.
To open a reading list entry, tap its listing, or swipe your finger from left to right across the entry to delete an entry from your reading list. When the red-and-white Delete icon appears, tap it.
To exit out of the Reading List window, either tap on the Bookmarks icon that’s displayed in the upper-left corner, or tap anywhere on the tablet’s screen that’s outside the window.
Your Reading List can be comprised of websites or specific web pages you want to refer to later, in order to read a specific article, new item or blog entry, for example. At any time, if you’re reading an article on a website, another way to add it to your reading list is to tap the open-book icon, select the Reading List option, and then tap the plus (+) icon in the upper-right corner of the Reading List window.
Safari’s Address Field
Located at the top of the main Safari screen is the address bar. When you tap it, the iPad’s virtual keyboard appears and you can manually enter the website address (URL) for any website you want to access, as shown in Figure 3.5. As you begin typing, a list of suggestions, based on past websites you’ve visited, is displayed.
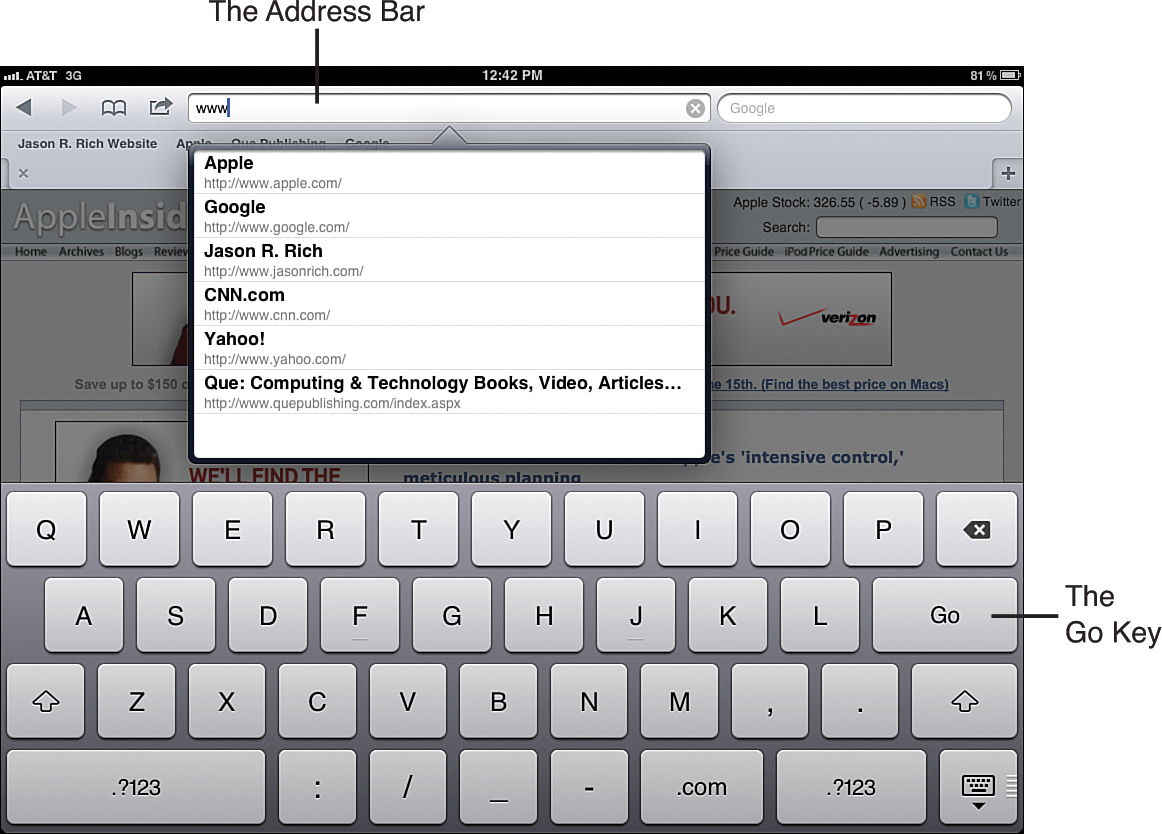
Figure 3.5. Enter the URL for any website into the address bar, and then tap the Go key on the virtual keyboard to visit any website.
If a website is already displayed within the address bar, tap the X icon displayed at the right end of the address bar to delete the address bar’s contents.
In Safari, the virtual keyboard includes several specialized keys associated with entering URL addresses, including a colon (:), backslash (/), underscore (_), dash (-), and .com. These keys are located along the bottom row of the virtual keyboard.
These keys enable you to more quickly enter the URL for the website you want to visit. When you’re done entering the URL, tap the Go key on the virtual keyboard to surf to that site.
Also, if you hold down the .com key on the virtual keyboard, a pop-up menu enables you to choose .net, .org, .com, .us, or .edu, which are common website extensions.
Using the Search Field
Located in the upper-right corner of the screen is Safari’s Search field. Here, you can enter any keyword or search phrase to perform a web search using Google, Yahoo!, or Bing, depending on which default search engine you previously selected from the Settings app.
Using Tabs
Tabs enable you to load multiple web pages within Safari simultaneously and then instantly switch between them. The tab bar is displayed below the Bookmarks bar, near the top of the Safari screen.
When you first load Safari, only one tab is open. However, at any time, you can tap the plus (+) icon that’s displayed to the extreme right of the tab bar to open a new browser window and create a new tab.
You can have multiple tabs displayed at the top of the Safari screen. When multiple tabs are open, tap any of them to switch to the website to which the tab corresponds.
The website that’s actually displayed on the iPad’s screen is the active tab. To the left of the active tab’s title is an X icon. Tap this X to delete the tab and close the web page associated with it. To keep the web page open but view a different web page, tap on another displayed tab or open a new tab and manually surf to another website.
The ability to quickly switch between web pages that are open (which is referred to as tabbed browsing), makes surfing the Web on the iPad fast and convenient.
Using Safari’s Reader Feature
Sometimes, web pages are cluttered with ads, graphics, menus, and other content that makes reading a text-based article confusing. The Reader option that’s built in to Safari enables the web browser to automatically strip away this clutter, allowing you to read the text-based article more easily and with no onscreen distractions.
When this option is available, a small Reader icon appears to the right of the website’s URL in the Address field of Safari (as shown in Figure 3.6). Tap this icon, and the text-based article displays in a new, clutter-free window.

Figure 3.6. When the Reader icon appears in the Address Bar of Safari, you can tap it to read the text-based content on that site on a clutter-free screen.
As you’re reading a text-based article in Reader, in the upper-left corner of the screen is an aA icon. Tap it to increase or decrease the size of the onscreen text.
Understanding the Web Page Viewing Area
Getting back to surfing the Web, displayed below the title bar and the Bookmarks bar (if you have this option turned on) is the main website viewing area of Safari. As you view website content, you can scroll around on the page using upward, downward, left, or right finger swipes.
To instantly jump back to the top of a web page, tap anywhere on the status bar at the top of the iPad’s screen (above the title bar). The status bar displays the Internet connection’s signal bars, the current time, and the battery life indicator.
To zoom in or out of a particular area of a web page, either double-tap on the area that you want to zoom in on or perform a reverse-pinch finger motion. To zoom out, double-tap on the screen again or perform a pinch finger motion.
If you see a hyperlink or a command button displayed within a web page, tap it to follow the link or activate the button. To see where the link takes you before actually surfing there, hold your finger on the link or button for two to three seconds. The link’s URL address is displayed along with a menu containing three commands:
• Open: This opens the web page that the link directs you to.
• Open in New Page: This opens the web page that the link directs you to but does so within a new Safari browser window.
• Copy: This copies the website URL to your iPad’s virtual clipboard so you can paste this information elsewhere.
As you’re viewing almost any graphic or photo that’s displayed within a website, you can hold your finger on the image to save it on your iPad, where it becomes accessible from the Photos app.
If for some reason a web page doesn’t fully load or you want to refresh the information displayed on a web page you’re currently viewing, tap the circular arrow icon that’s displayed to the extreme right of the address bar. However, if you want to stop a web page as it is loading, tap the X icon to the extreme right of the address bar during the web page loading process.
Any time you need to enter text or numerical data in a field on a website you’re viewing, tap the empty field, which causes the iPad’s virtual keyboard to display. To move to another field that requires data entry, either tap your finger on the next field or tap the Next or Previous icon that appears on the screen above the virtual keyboard.
Syncing Bookmarks with Your Primary Computer
To ensure your web surfing experience is similar to when you’re exploring the Web using the web browser on your primary computer, you have the option to sync your bookmarks between your computer and your iPad.
There are two methods for syncing your Safari bookmarks. One happens automatically using the iCloud service, and the other is done through an iTunes sync procedure when your tablet is connected to your primary computer via a USB cable. This sync process works with Safari for the Mac, Microsoft Internet Explorer on a PC, as well as a variety of other popular web browser applications.
If you use the iCloud online service, you can automatically sync your bookmarks wirelessly between your tablet and primary computer (as well as your iPhone). To set this up, after you have an iCloud account, access the Settings app from your tablet’s Home screen, and tap the iCloud option that’s displayed on the left column. When the iCloud screen appears on the right side of the Settings screen, turn on the Bookmarks option.
Accessing Social Networks on Your iPad
Whether you use Facebook, Twitter, Google+, or LinkedIn to promote your business, a product, or service to help position yourself as an expert in your field, to meet new people, or simply to stay in touch with your friends and family, you can fully utilize these online social networking sites using specialized apps available from the App Store.
The ability to share information on social networks from virtually anywhere using your iPad brings a new level of interactivity to these services.
Working with Facebook
The official Facebook for iPad app (free) is available from the App Store. It offers almost all of the functionality of Facebook on your tablet’s screen, including the ability to access your Wall, update your Status, send/receive messages, manage your photo albums, upload and share photos shot using your iPad, and chat in real-time with your Friends.
Tweeting from Your iPad
There is an official Twitter app, designed specifically for the iPad (free), as well as dozens of third-party apps that work with Twitter.
The official Twitter app, as well as Twitter functionality, has been fully integrated into iOS 5.1, so you can tweet from a variety of different apps as long as the official Twitter app is loaded on your tablet.
To initially set up Twitter on your iPad, access the Settings app and tap the Twitter option displayed on the left side of the screen. On the right side of the screen, you have the option to install the official Twitter app by tapping the Install Now icon.
After installation, launch the Twitter app on your iPad. You can then sign in using one or multiple Twitter accounts, or create a new account (which is also something you can do from the Twitter screen within Settings, by tapping the Create New Account option).
You can use the official Twitter app to create and send tweets, access your Twitter timeline, and see what the people you’re following are tweeting about. In addition, various other core apps—including Photos, Safari, Camera, Contacts, YouTube, and Maps—are fully integrated with Twitter and allow you to send tweets with an app-related attachment.
For Twitter integration to work with the core apps built in to your iPad (as opposed to just the official Twitter app), you need to sign in to your Twitter account from within Settings just once.
Figure 3.7 shows the Twitter option in Photos, which is displayed when you view a photo and tap the Share icon. When the Share menu appears, the last option is to tweet the photo from directly within the Photos app.
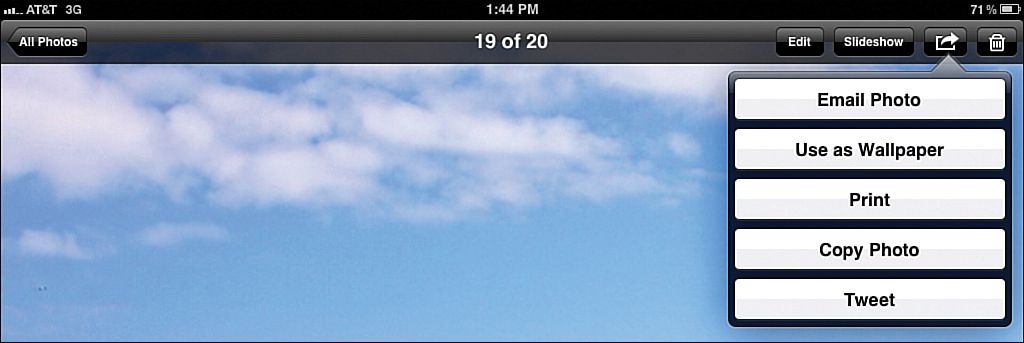
Figure 3.7. You can send tweets from within the Photos app as you’re viewing a photo. Tap the Share icon, and then choose the Tweet option.
Tap the Tweet option, and within Photos, a Tweet window appears (shown in Figure 3.8), enabling you to compose an outgoing tweet that automatically attaches the photo. If you tap the Add Location option in the lower-left corner of this window, your exact location is automatically added to the outgoing tweet as well.
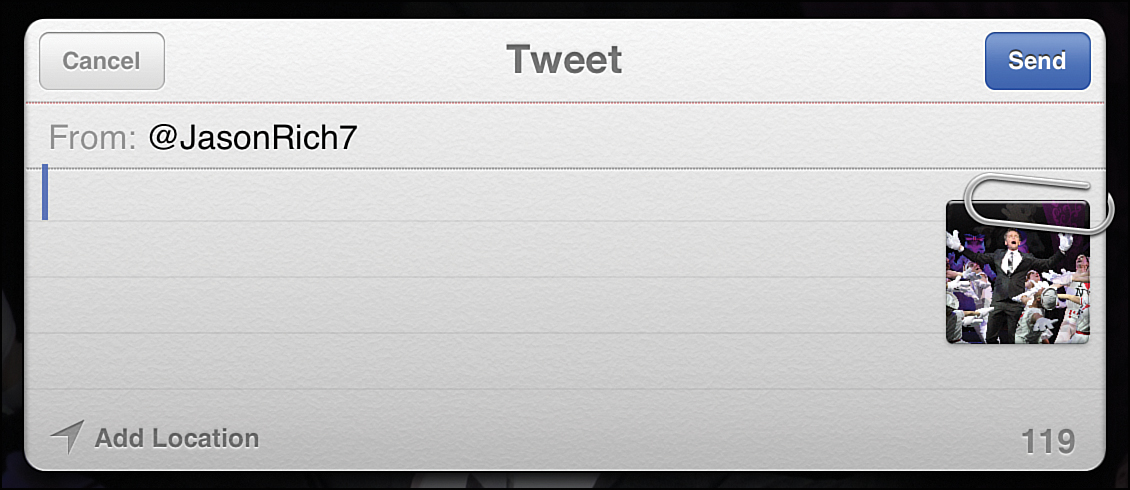
Figure 3.8. When you choose to send a tweet from within an app, a special tweet window appears enabling you to compose and send the 140-character message and (if applicable) automatically attach a photo, URL, or your exact location.
Tapping in to LinkedIn to Network with Business Professionals
More than 65 million business professionals, working in thousands of different fields and industries, are active participants on the LinkedIn online social networking service (www.linkedin.com).
To access LinkedIn from your iPad, download the free LinkedIn app, called IN. It’s available from the App Store. IN is designed for the iPhone, but works flawlessly on the iPad.
Managing Your Google+ Account From Your iPad
Also available from the App Store is the free Google+ app. It enables you to manage most aspects of your Google+ account directly from your tablet. However, the official Google+ app was designed as an iPhone-specific app that works on an iPad, but doesn’t fully utilize the tablet’s large screen.
In addition to visiting websites, using your iPad to manage multiple email accounts, and accessing the Internet to manage your Facebook page or Twitter account, for example, you also can stream audio and/or video content directly from the Web. To learn more about how to stream content, see Chapter 15, “Downloading Versus Streaming Online Content.”
When using any app, including Safari, you can unlock the virtual keyboard from its fixed location at the bottom of the screen and move it up on the screen. To do this, place and hold your finger on the right edge of the Hide Keyboard icon (located in the lower-right corner of the virtual keyboard) and drag it upward. Or, when a pop-up window with the Undock and Split options appear, tap the Undock option. The virtual keyboard jumps to the middle of the screen. Now, place your finger again on the right edge of the Hide Keyboard key, and drag it up or down to move the virtual keyboard around. To return the keyboard to its default position at the bottom of the screen and lock it there, hold your finger on the edge of the Hide Keyboard key and select the Dock command that appears in the pop-up window. This is a new feature added to iOS 5.1.