So far we have been sculpting characters with a focus on primary and secondary forms—that is, the skeletal anatomy, the muscular anatomy, and the major forms of fat and flesh. The first three projects lack any kind of fine tertiary details. This was intentional because I wanted to illustrate that form is the most important consideration before you start to detail your character. Good form is what makes the sculpture believable, not pores and wrinkles. High-frequency details on top of bad form will do little to help the overall effect of the sculpture.
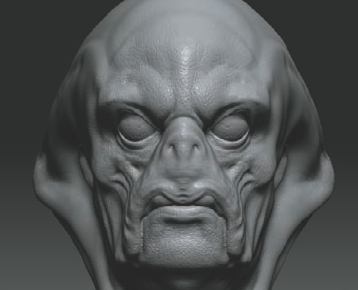
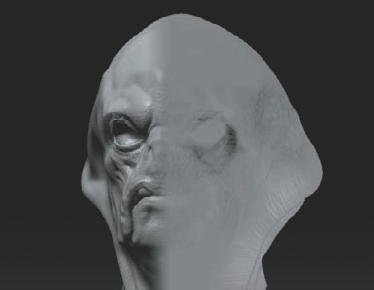
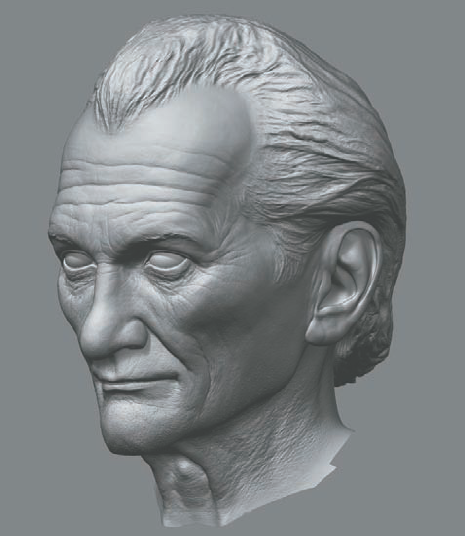
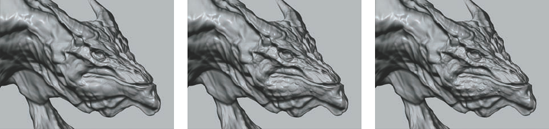
Form can be broken down into three categories. The primary form represents the largest basic shapes of the character. Secondary forms are muscle forms and folds of flesh. Tertiary details are things like pores, fine wrinkles, and scale details. For a sculpture to work, the primary and secondary forms are the most important. As we discussed in Chapter 1, a sculpture with form that is resolved will work even without fine details. The tertiary forms are icing on the cake and cannot make a bad sculpture good. Figure 4.1 illustrates these three levels on a single character.
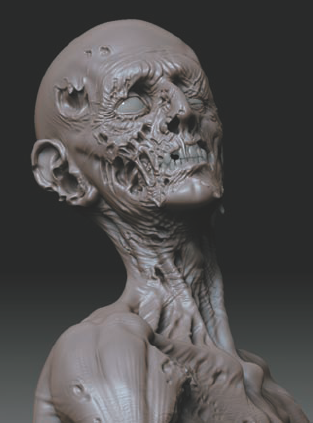
Once you have the form established and the character works without detail (Figure 4.2), you are ready to use ZBrush's alphas to add the fine details for which the program is so well known. This is where the ability to subdivide into millions of polygons starts to shine. Figure 4.3 shows a mummy sculpted by ZBrush artist and sculptor Alex Oliver. Notice how the details in this mummy serve to support the overall character.

In this chapter we'll take our sculptures to the next level by adding fine tertiary details. We'll discuss alphas and strokes. We'll also look at ways of creating your own alphas from existing photography or sculpting them from scratch in ZBrush. Finally, we'll explore the dynamics of wrinkle patterns and how to create natural patterns on the skin.

Figure 4.1. These images illustrate what constitutes (left to right) primary and secondary form and tertiary details.

Alphas in ZBrush are grayscale images that serve three major functions: they can be brush shapes, texture stamps, and stencils. You load, export, and manipulate alphas via the Alpha menu located at the top menu bar. There is also an Alpha palette on the side tray on the left (Figure 4.4). This is an abbreviated Alpha menu since it offers only a few menu options, but it provides easy access to the entire alpha library currently loaded. Combined with various stroke settings, alphas offer a powerful tool for adding high-frequency details to your sculpture.

Note
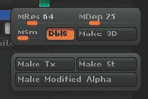
Alphas are 16-bit grayscale images that serve three purposes in ZBrush: brush shapes, stencils, and texture stamps. You can also use alphas to generate 3D objects by clicking the Make3D button under the Alpha menu.
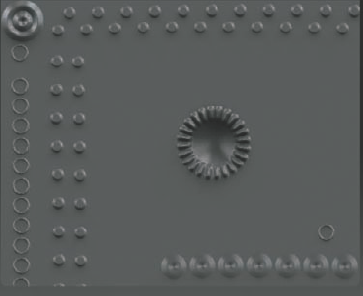
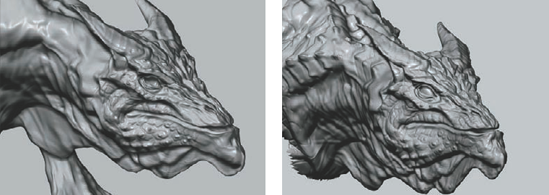
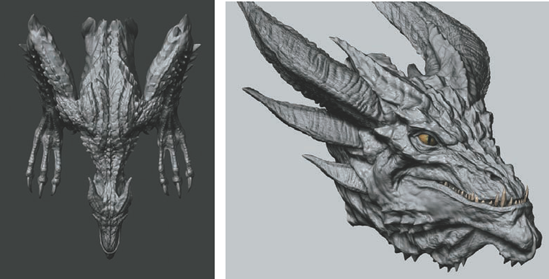
With alphas you can alter your brush shape to sculpt in high-frequency details like rivets (Figure 4.5) or fine organic details like the withered skin on this creature (Figure 4.6). They may also be used as texture stamps to add pores and scales. Alphas can be used to create stencils to assist in the sculpting or painting process by masking out complex areas of texture. Finally, you can use alphas to quickly create actual 3D geometry that can be inserted into your mesh.
There are two locations where you can find settings that pertain to alphas. On the bar at the left of the screen is the Alpha palette, which contains an abbreviated selection of the main alpha menu options. Here you will find your currently loaded alphas and a few selected options for basic conversions and operations. These menu options are also accessible in the main Alpha menu at the top of the screen; we'll look at the main Alpha menu in depth now (Figure 4.7).
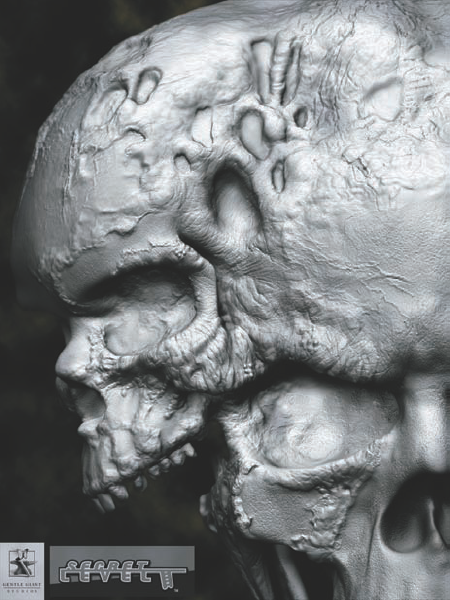
Figure 4.6. The fine details on this skeleton monster were created by using alphas and freehand sculpting. (Image courtesy SecretLevel/Sega and Gentle Giant Studios.)

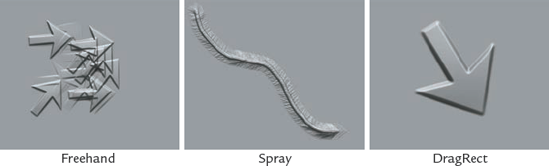
The Alpha menu allows you to import and export images to use as alphas; grab the canvas as an alpha; select already loaded alphas; manipulate the images once they are loaded; and convert the selected alphas to stencils, geometry, or textures. The most common use of alphas is to alter the shape of your currently selected brush. In Figure 4.8, a Freehand stroke is drawn on the model surface with different alphas selected. Notice how the radial alphas create a seamless fluid stroke while the arrow or other alphas with a more directional appearance will follow the stroke, reorienting as you drag. A description of each Alpha menu setting is available in Table 4.1.
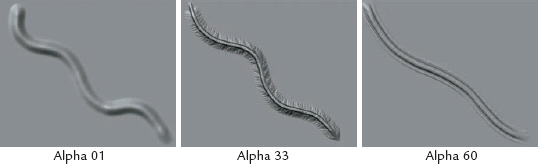
Table 4.1. The Alpha Menu Options
Alphas can be used as texture stamps in conjunction with the Stroke menu. By changing to a nonradial alpha like Alpha 07, which is a bump alpha, and using the DragRect stroke, you can add surface details as if stamping them directly from the alpha image (Figure 4.9).
Note
ZBrush comes with an alpha library loaded by default. If you have a selection of alphas you want to load, when ZBrush starts simply save them in the ZStartup/Alphas folder of your ZBrush installation. Make sure they are not in a subfolder because ZBrush will load the files only in that directory and not in any subdirectories. ZBrush 3 comes with a selection of the Gnomon Alpha library as well. These can be found in the Gnomon-AlphaLibrary subfolder in the ZBrush3 folder. To load these alphas, copy them into the ZStartup/Alphas folder and restart ZBrush.
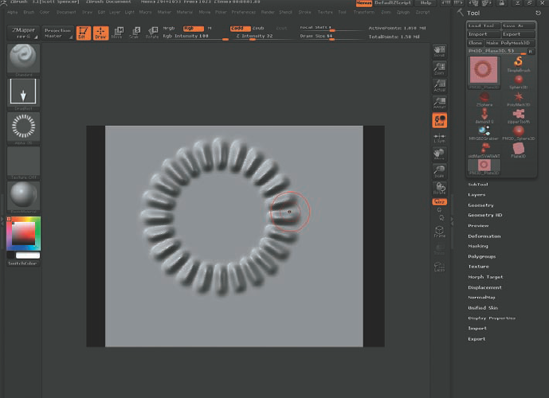
The way the currently selected alpha is applied to the surface of your sculpture is controlled by the stroke selection. In this section we'll experiment with various types of alpha and stroke combinations (Figure 4.10).
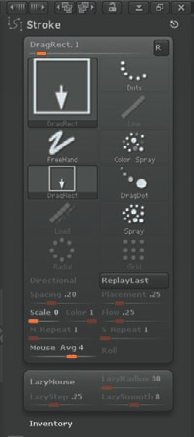
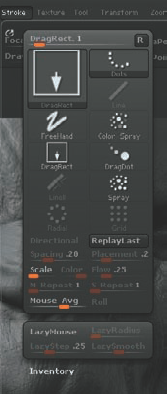
Understanding the Stroke menu and settings opens up a world of interesting and useful alpha effects. We'll look at the various settings by sculpting on a 3D plane. The Stroke palette is located on the left side of the screen directly under the Brush palette (Figure 4.11). Here you will find the available strokes as well as an abbreviated selection of the options from the main Stroke menu (Figure 4.12).
Select the Plane3D tool from the Tool menu. Be sure to make it a polymesh and draw it on the canvas. Enter Edit mode and subdivide the mesh several times. When you are detailing the model, it is important to be at the highest possible subdivision level your system can handle.
From the Brush palette select the Standard brush, and from the Alpha palette at the left side of the screen select Alpha 01. From the Stroke palette just above the Alpha button, select a Freehand stroke.
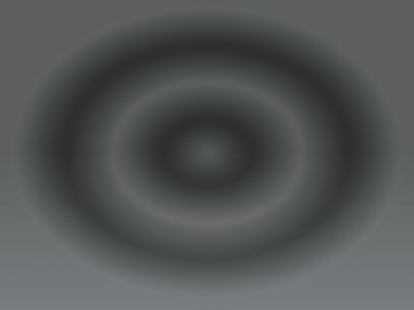
Start to draw strokes on the surface of the plane. Notice how with this brush combination you get a smooth-flowing line. As you stroke an alpha, the image rotates to follow the direction of your stroke. Since Alpha 01 is a radial round alpha with no directionality, this effect is not apparent (Figure 4.13).
Change from Alpha 01 to Alpha 33. Notice that this alpha is an arrow shape as opposed to a circular alpha (Figure 4.14). This shape has a definite direction, so the rotation with your stroke should be apparent. Draw a stroke on the plane surface. Note how the arrow is drawn repeatedly over the course of the stroke, reorienting to your direction (it should look like the Spray image back in Figure 4.10). This is how the Freehand stroke works; it draws multiple instances of an alpha along the course of the stroke. If the instances are close enough together and the alpha nondirectional, it looks like a smooth line. There are ways to space out the instances for other effects, as you'll see shortly. If your stroke seems too staggered because your machine is slower or the geometry is extremely dense, you can raise the mouse average setting.
Turn on the Roll modifier in the Stroke menu. Activating the Roll button will draw a single instance of the alpha tiled along the stroke. This is useful when you have a tileable alpha to draw on the surface.
Click Stroke from the main menu bar at the top of the screen. At the bottom of the Stroke menu you can access the sliders for each stroke. Freehand has only one slider: MouseAverage. By default, this is set to 4. Raising this value smooths the stroke more and adds a slight draw delay; lowering it reduces the delay but can create a stagger in the stroke if your computer's memory is being taxed by numerous subdivision levels.
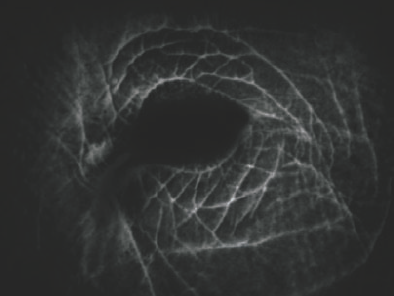
This Freehand stroke behavior can be used to create interesting wrinkle effects. Change your alpha selection to Alpha 58. This alpha consists of several sketched lines running in one direction. Use the Freehand stroke to draw circular patterns on the plane. Notice that the instances of the alpha rotate while you draw, thus creating a realistic crosshatched wrinkle pattern from this very simple alpha. You may need to adjust your ZIntensity if the effect is too strong.


Now that you understand the Freehand stroke, let's try a different one. Create a new 3D plane or undo your strokes from the previous section. We'll now look at the DragRect stroke. DragRect is great for applying alphas as stamps to include surface detail.

Select the DragRect stroke from the Stroke menu and Alpha 07 from the Alpha palette. Alpha 07 is a bumpy alpha (Figure 4.15).
Click and drag on the plane. This will draw an instance of the alpha. You can rotate while you draw by moving the mouse to the left and right, allowing you to scale and rotate the alpha to fit as you like.
Continue to add strokes to the surface. Notice how quickly an area can be textured with surface details using this stroke. You can also easily vary the scale and orientation (Figure 4.16).
A useful trick when adding alpha texture is to use the Replay Last command under the Stroke menu (Figure 4.17); this will repeat the last stroke, which is helpful when trying to detail skin. When stamping a texture with an alpha, it can be easy to make the texture too strong, causing you to have to undo and reapply. Using Replay Last in conjunction with the DragRect stroke can help you create more subtle surface details by gradually building strokes at a low ZIntensity setting. In the following section, we will apply an alpha to a 3D plane using multiple instances of replay last.
Create a new plane3D on which to draw or undo your previous strokes.
Make sure the DragRect stroke and Alpha 07 are still selected.
Set your ZIntensity to 60 and draw an instance of the alpha on the surface of the plane. It will be overstated at this stage. The point is to get the size and placement where you want it. Once the stroke is complete, undo and lower your ZIntensity at the top of the screen to 4.
Under the Stroke menu at the top of the screen, click the Replay Last button, or press Ctrl+1. This will repeat the last DragRect stroke but use the new ZIntensity settings. You can repeat the Replay Last several times, watching the texture build up softly on the surface. Replay Last works with any stroke on the canvas. If you were to move your model by clicking and dragging in the document window and then use Replay Last, the mesh would continue to rotate on the screen.
Now that we've looked at the Freehand and DragRect strokes, let's explore the Stroke menu overall. All strokes have a set of modifiers that can be accessed either through the Stroke palette on the left of the screen or in the main Stroke menu at the top of the screen. Notice that the Stroke palette is broken into two sections. The top section are strokes that can be used in 3D sculpting as well as 2.5D, while the bottom section contains 2.5D-only strokes. Table 4.2 lists the various 3D strokes and their subsettings.
Table 4.2. The Stroke Menu Options
Stroke | Description |
|---|---|
Dots | Places continuous instances of the alpha on the canvas. |
DragRect | Creates one instance of the alpha with the ability to rotate and scale the stroke. |
Freehand | Similar to the dot stroke, except it creates extra instances between each dot, giving the impression of a smooth stroke. |
Color Spray | Applies random instances of the alpha. When painting RGB, it modulates the selected color based on the two selected colors in the active and secondary swatches. |
Spray | Same as colorized spray, except the stroke modifies the intensity of the selected color unless the color modifier slider is set to 0. |
DragDot | Applies one instance of the current alpha. Allows you to click-drag to place. Rotation and scale is not available. Brush size is used to determine the size of the alpha. |
Some strokes, like Line, Conic, and Radial, are available in only 2.5 D mode. The two strokes you use most commonly when sculpting are Freehand and DragRect; the other more specialized strokes can come in handy for hard surface or mechanical modeling, or texture painting (as in the case of the Spray stroke).
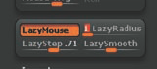
The freehand stroke creates a smooth line by drawing many instances of the selected alpha close together over the course of the stroke. The Dot stroke is essentially a freehand stroke with more space between each instance of the alpha. It is possible to increase this distance between the steps using LazyMouse. This is useful when you're trying to apply high-frequency concentrated details across a large surface area. An example of this is stamping a repeating texture, such as skin pores over a head. With the pore alpha loaded; select the Dots stroke, turn on LazyMouse, and set the LazyRadius and LazySmooth sliders to 0. Raise the LazySteps slider to about 1.25.Apply the stroke to the surface. The texture will apply in concentrated single stamps along the direction of the stroke. Using this technique, you can quickly and easily cover a large surface area with fine texture.
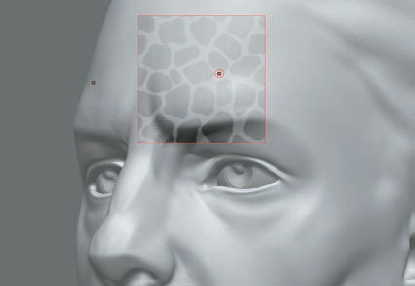
While alphas may serve as brush shapes or texture stamps, they may also be used as stencils. In ZBrush, stencils function much in the same way as they do in the real world. A stencil is a piece of cardboard with a shape cut out. Typically you will spray paint through the cardboard. Some areas are blocked while the openings allow paint through. This allows you to paint complex shapes quickly. Stencils in ZBrush function the same way, but they may be used for painting or for sculpting. Stencils become complex movable masks that can be interactively placed and rotated on the surface as well as tiled and wrapped to the shape beneath them. In this demonstration we'll use a ZBrush alpha as a stencil:
Open the demo head from the
ZBrush3/ZToolsfolder. Draw it on the canvas and enter Edit mode. From the Alpha menu at the top of the screen, select Alpha 59.In the main Alpha menu, click the button marked Make St. This will make a stencil from the current alpha (Figure 4.18).
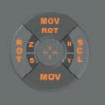
The document window will now be light gray with a red box in the center. Inside this box is the Alpha 59 (Figure 4.19). This is the stencil. Press the spacebar to bring up the coin operator, which allows you to move, rotate, and scale the alpha in relation to the ZTool. Left-clicking and dragging in each quadrant will execute that action (Figure 4.20). For example, move the alpha over the forehead of the ZTool. You can still move and rotate the ZTool with the standard mouse movements. Press the spacebar and click in the quadrant marked Move. Drag the mouse to place the alpha.
To scale the alpha, press the spacebar and click in the bottom section marked Move. Notice the top section is marked Mov Rot; this will move your alpha along the surface, rotating it to the surface normal. Do not use this option.
To scale the alpha down, click in the right section marked Scale. Notice that there are two other smaller sections here marked H and Z. H will allow you to scale in horizontal; V scales in vertical. The stencil should now be placed as shown in Figure 4.21. When rotating and scaling a stencil, note that the action occurs around the spot where the coin operator is. So if you want to scale a stencil from the left side, move to the left side, press the spacebar to bring up the coin operator, and scale.
The alpha is now placed and ready for use. In the Alpha palette at the left of the screen, change to Alpha 01. Since Alpha 59 has been converted to a stencil, you can select any other alpha to sculpt through it. Sculpt some strokes through the stencil. Notice how the white areas block your stroke (Figure 4.22).
Note
If you are accustomed to using the right-click menu to access your brush settings, be aware it is disabled when in Stencil mode. Instead, use the brush control sliders at the top of the screen or the hotkeys: S for Draw Size, I for RGB intensity, and U for Z Intensity.
Move the stencil and continue to sculpt. Try to rotate and scale the alpha as well.
You may notice that the stencil sits just above the surface of your model. It does not conform to the shape beneath it, so sculpting across areas like the nose or cheeks can be tricky. It is possible to make the stencil conform to the shape beneath it. For this and other more advanced stencil options, we'll look at the Stencil menu.
From the top of the screen, select the Stencil menu (Figure 4.23). Use the radial button to tear this menu off to the side tray on the left. This menu is the control hub for how stencils behave and display. The first button is marked StencilOn. This is the on/off switch for the stencil. The Invr button will invert the stencil, flipping the black and white values.
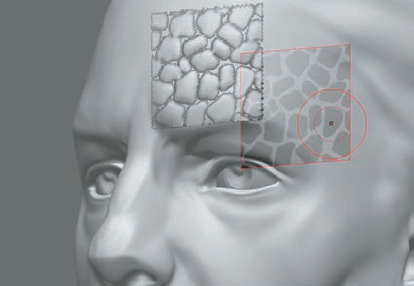
Beneath these first two buttons are the remainder of the Stencil options. The Alpha Repeat slider will tile the current stencil. Set this to 6 to see how a seamless scale texture is created. This is because Alpha 59 itself is a seamlessly tileable alpha (Figure 4.24). We'll cover how to make your own tileable alphas later in this chapter.
The buttons marked Stretch Actual Horiz and Vert will fit the current stencil to the canvas. Stretch will stretch the stencil to fit; Vert will fit it vertically. See Figure 4.25 for an example of these buttons in action. When these buttons are on, Interactive will turn off. Interactive will reactivate as soon as you invoke the coin operator to go back into interactive placement mode.

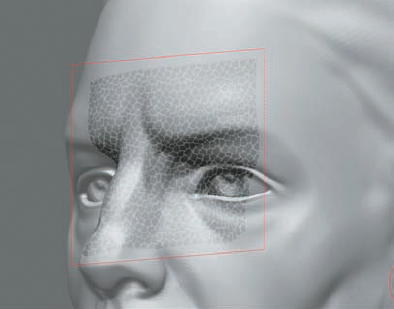
Wrap mode is one of the most useful stencil modifiers. Wrap mode will project the stencil so that it conforms to the shape of the underlying mesh. Figure 4.26 shows the stencil in Wrap mode. Notice how it conforms to the shape of the nose and eye socket instead of just sitting above it. You can further define how tightly the stencil wraps to the underling detail by using the Res and Smooth sliders.
The final selection of buttons in the interface deals with the way in which the stencil is displayed. Sometimes the stencil can be distracting when sculpting. You can turn off Show to keep the stencil active, but it will not be visible unless you have pressed the spacebar to change its position. You can use the R, G, and B buttons to change the color of the masked area when using a stencil in Show mode. The Elv button displays the alpha in Elevation mode. This creates an elevation map display of the stencil as opposed to the masked view (Figure 4.27).

Stencils for complex mechanical shapes are easy with ZMapper. By defining a custom selection in Photoshop, you can generate a stencil back in ZBrush. Use the following steps for this process.
Create a Cube 3D primitive from the Tool menu. Click Make Polymesh 3D and draw the tool on the canvas. Enter Edit mode and subdivide as high as possible.
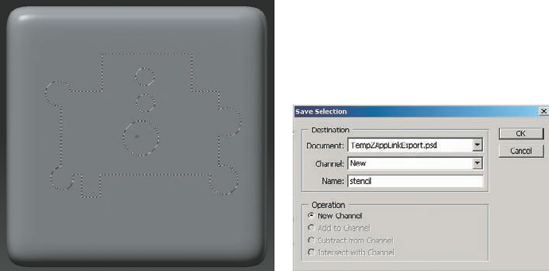
Center the cube in the document window and press the Ctrl+Shift+S to call ZAppLink. Deselect all the check boxes in the ZAppLink window that appears and click Drop Now. ZAppLink will open Photoshop and load a copy of your ZBrush document (Figure 4.28).
Create a selection in Photoshop, and save it by choosing Selection → Save Selection. Name the selection stencil (Figure 4.29).
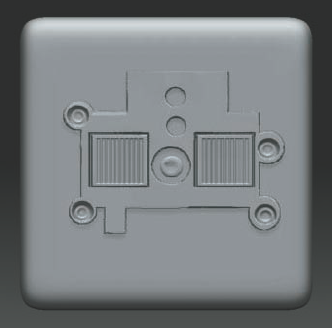
Save the Photoshop document and return to ZBrush. When you return to ZBrush, click the OK (Unchanged) button, and your stencil will automatically load and apply to the model (Figure 4.30).

You may now sculpt through the stencil to create hard-edged details. By repeating this process with multiple selections, you can build complex shapes quickly and easily (Figure 4.31).

Any image may be loaded into ZBrush and used as an alpha. The file formats ZBrush supports for import are PSD, BMP, and 16-bit TIFF (single-channel grayscale). To import an alpha, open the main Alpha menu at the top of the screen and click the Import button. Browse to the file you want to load.
Note
There is no shortage of great texture reference that can be used as alphas: on the Internet, in books, even around you. Try taking photographs of plants and fruits for use as texture stamps. For the best all-around skin alpha set, I recommend checking ZBrushCentral. Rick "Monstermaker" Baker made some of his skin alphas available in his Old Man thread. This is a fantastic selection of pore, wrinkle, and bump alphas.
When a photograph is loaded into the Alpha menu, it is automatically converted to 16-bit grayscale. In the Alpha menu beneath the active Alpha boxes there are several sliders that will allow you to postprocess the alpha and make various alterations to the image. With these modifiers, you can maximize the range (similar to autoleveling in Photoshop) by crunching the levels, thus giving you the maximum displacement between black and white. You can also use the Blur slider to slightly blur your image, removing artifacts from JPEG compression or other noise. See Tables 4.1 and 4.2 earlier in this chapter for a description of what each of these menu options does.
Note
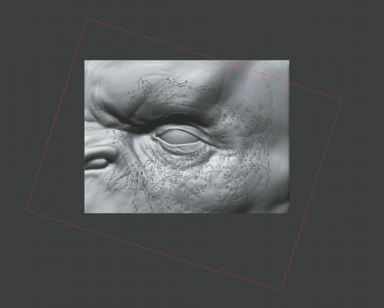
In this section we'll import an image of skin detail and use it as an alpha (Figure 4.32).
From the DVD, load
skinswatch.psdinto the Alpha menu by clicking Import.This is a skin detail from a photograph. To optimize it for use in ZBrush, click the Max button in the Alpha menu. This will maximize the value range to help get better details. You will also want to raise the Rf slider to 10 to add a faded border. This prevents the alpha from leaving a square artifact when used.
From the Tool menu select the Sphere3D tool. Click MakePolymesh3D and draw the sphere on the canvas. Enter Edit mode and divide the sphere as high as possible on your system.
Select the Standard brush, set ZIntensity to 12, select the DragRect stroke and the SkinSwatch alpha. Drag the alpha on the surface. Figure 4.33 shows the sphere with the custom pore alpha applied.
The image file has a bit of noise from both JPEG compression as well as high contrast lighting. You can reduce this with the blur slider. Raise Blur to a value of 2 and redraw the stroke. Try adjusting the other sliders such as Contrast and Noise.


It is important to understand that changes made with these sliders are applied as a process to the imported alpha. If you want to save the alpha with these changes applied, you must "bake" them into a new instance of the alpha. To save a modified version of the alpha, follow these steps:
With your alpha active in the Alpha palette, set the modifiers you want to adjust and save. This can include turning on the Max button, adding a Blur, and adjusting the Rf slider.
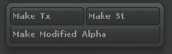
When the Alpha is to your liking, click the Make Modified Alpha button in the Alpha menu. This will create a new alpha in the palette that has the modifier settings "baked" in.
Select this new alpha and in the main Alpha menu click the Export button. This will save a copy of the currently selected alpha as the default PSD file type. Save the alpha in the
ZStartup/Alphasfolder if you want it to load by default each time ZBrush starts.
There may be occasions when you'll need a specific kind of surface texture that is unavailable in photo reference or perhaps you'll have two alphas you want to combine into a single alpha. In these cases, you can use ZBrush's 2.5D canvas to sculpt the texture you want by hand and then capture the sculpted detail to a grayscale alpha.
To use the brush document window to sculpt your own alpha, follow these steps:
First resize your document to 300 × 300 pixels. From the Document menu, click the Pro button to disable Constrain Proportions. Click in the Length slider to activate it, and enter 300. Repeat the same process for the Width slider. Now click the Resize button to create a new canvas that is 300 pixels square. Alphas need to be square so as not to distort when redrawn with the sculpting brushes. If you intend the alpha to be used only as a stencil, it can be any proportion.
You now need a surface on which to sculpt the alpha. Since the alpha is derived from depth information you want to select a flat surface on which to sculpt. From the Tool menu, select the Plane3D icon. Click MakePolymesh3D and draw the plane on the canvas. Enter Edit mode and divide the plane as high as possible by pressing Ctrl+D or choosing Tool → Geometry and clicking the Divide button. You want as many subdivisions as possible to support the fine details we'll sculpt in the next step. Note that the material selection will have no effect on the alpha created in this step—your surface material can be anything you prefer. In this case, I used White Cavity.
Scale the 3D plane up to fill the canvas window. Now select the Standard brush and Alpha 01. From the Stroke menu, select Freehand. Begin to sketch in a wrinkle pattern on the 3D plane. In Figure 4.34 I have sculpted a crosshatched wrinkle pattern suitable for high-frequency skin texturing.
When you have completed the sculpt, select the Alpha menu at the top of the screen. Scroll to the bottom of the menu and click the GrabDoc button. This button grabs a snapshot of the ZBrush canvas depth information. Remember that ZBrush's canvas is depth enabled, so the 3D plane will be read as white (no displacement) while your strokes will be captured as shades of gray.
Note
If you had used ZAdd instead of ZSub, the alpha would be white on black. This is important to note. If you had used a combination of both ZAdd and ZSub, ZBrush would record the depth of the plane as 50% gray. This is because it's compensating for pushing out as well as in. This is an acceptable way of making an alpha. However, you will have to use a radial fade; otherwise each alpha stroke will have a visible border when used on a model. This can be remedied by adding a radial fade with the Rf slider under the main Alpha menu.
The canvas snapshot is now loaded in the Alpha palette. Since it captures black strokes on white (ZBrush sees subtraction as shades of gray beneath 50% gray), you need to invert the alpha. Under the main Alpha menu, click the Invr button. We'll now reapply it to the canvas. Undo your previous strokes or create a new Plane3D so you have a clean surface on which to sculpt.
With the Standard brush selected, pick the DragRect stroke and your new alpha. Click and drag on the plane surface to watch your alpha draw. As you now know, any surface texture that you can sculpt can be captured as an alpha. To save your custom alpha, from the main Alpha menu click the Export button. Save the alpha as a PSD file.
Note
As you start adding details to your sculptures, you may want to isolate your detail passes on separate layers. With details isolated in layers, you can turn the details off and experiment with new variations. You can also adjust the layer intensity and fade the surface details if they are too strong. In this section we'll add two layers to the demo head and adjust their intensities.
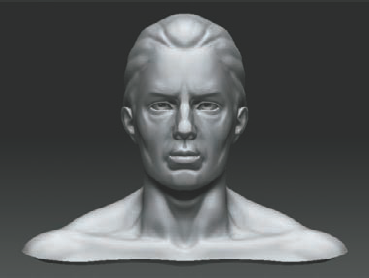
Load the demo head ZTool from the default ZBrush ZTools folder (
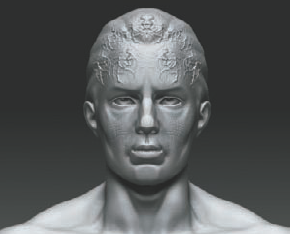
Pixologic/ZBrush3/ZTools). Subdivide to the highest subdivision level (Figure 4.35). When you make a new layer, make sure you create your layer at the highest subdivision level. You can create as many layers as you like and add details to each. The details will be separated on each layer, and you can independently adjust their settings or turn them off entirely.To create a new layer, open the Layer menu under the main Tool menu. Click the New button to create a new layer. With the layer selected, click the Rename button and name this layer sculpting (Figure 4.36).
Step down a few subdivision levels and use the Move brush to change the shape of the head (Figure 4.37). Even though the changes are made at a different subdivision level, they are stored in the sculpting layer. You can only change a layer's settings while you are on the same subdivision level where you created it. That is why the layer name will be inactive until you return to the highest level.
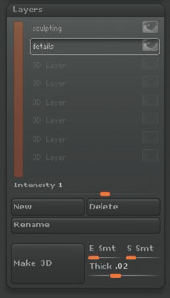
When you have finished, return to the highest subdivision level to create a new layer. Name this layer details. Make sure the details layer is active. The active layer is the one with the white rectangle around the name (Figure 4.38).
You are now on the details layer. Select an alpha and create some texture on the model's surface (Figure 4.39).


We have created two layers and added different elements to each. Let's now look at changing layer settings such as Intensity and Visibility.
If you are not already there, return to the highest subdivision level. Under Tool → Layers, select details by clicking its name in the list. Click in the Intensity slider and set this value to 0.5. Notice how these details become softer (Figure 4.40). Select sculpting and set the Intensity value to 1.5. This increases the strength of the sculpting layer. Notice that even those changes made at the lower subdivision levels can be adjusted with the layer intensity.
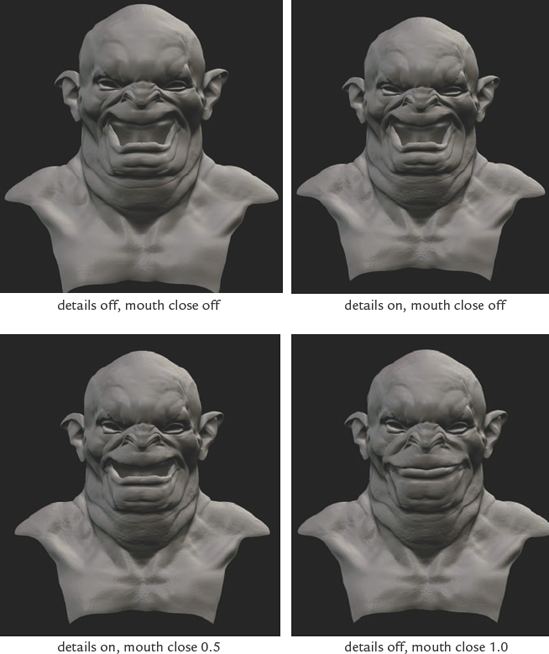
You can turn off layers entirely by clicking the eye icon in the Layer menu. Figure 4.41 shows the effect turning off the sculpting layer while keeping the details layer on.


Layers are a useful tool when you're organizing your character sculpting. You can even use them to store different facial expressions. Figure 4.42 shows a character with the mouth open in one layer and closed in another. By changing the layer intensity, you can adjust the amount that the mouth is open. This is the same as a blend-shape modifier in Maya.
Note
The Layer menu under Tool is different from the main Layer menu. The Tool → Layer menu is for sculpting details on a ZTool and storing the details in a layer. These are saved with your ZTool file. The Layer menu is only used in 2.5D illustration and cannot be saved with a ZTool. Consider these more akin to Photoshop layers that happen to also have depth control.

Note
Now that we have covered the various applications of alphas in ZBrush, we'll apply what we have learned to a character head. We'll also look at some design considerations when sculpting skin texture. We'll use the creature from Chapter 3 to demonstrate skin detailing with alphas. You can follow along with your own ZTool or load the Stingerhead ZTool available on the DVD.
Load the Stingerhead model from the previous chapter; this file is also available on the DVD. Step up to the highest subdivision level of the ZTool. Remember that you will always get the best results when detailing at the highest subdivision levels. If the subdivision level is set too low, your fine strokes will have a jagged, faceted appearance when on the surface.
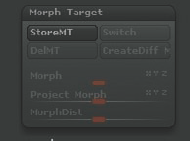
Create a new layer for the wrinkle details. Choose Tool → Layers and click New. Rename this layer wrinkles. While at the highest subdivision level, also store a morph target. To do so, choose Tool → Morph Target and click the StoreMT button (Figure 4.43). This stores a copy of the mesh as it looks at the highest subdivision level. This will allow you to use some techniques for blending details later in this section.
Note
By storing a morph target of the highest subdivision level, you can use the Morph brush when you are on the highest level to blend between the current model and the stored shape. This brush can be used as a blender, helping you to feather texture or erase it completely without disturbing the form. If you only used layers, the texture could only be faded as a whole; the Morph brush allows you to stroke over areas you would like to fade out, retaining the detail in other areas.
Select the Simple brush and Alpha 43 and a Freehand stroke. Lower your Draw Size and ZIntensity to 12. Using short, sketchy strokes, rough in an overall wrinkle map for the entire head. This pass will give you an idea of how the wrinkles will flow and where they will be most concentrated. Figure 4.44 shows this initial wrinkle map pass. In the first image, I have painted color with the stroke to more clearly define the direction and gesture of the lines. I never consider this initial pass to be final; in fact, many of these strokes will be covered up by subsequent passes of texture and smoothing. The point here is to plan out the face as a whole instead of starting in one area and working around the head bit by bit. This helps keep everything unified.
Load the alphas from the Gnomon Alpha library. Remain on the Standard brush but change to a DragRect stroke. Selecting the Leathery Skin alphas, stamp in more areas of texture; take care to vary the scale and placement as well as the alpha selections (Figure 4.45).
Continue to manually adjust the patterns applied by the texture stamp, resculpting where necessary and blending the textures into one another. Notice the crosshatched waffle pattern at the cheek in Figure 4.46 where the wrinkles from the eye meet and cross those on the cheek.
In these first stages of texturing, you can smooth the work back into the surface so that it is still slightly visible and then continue to build up over this smoothed layer. Use the Smooth brush set to ZIntensity 15 and BrushMod to –100. This will only smooth the details while retaining the larger forms. Don't smooth the detail away entirely; just push it back so it is barely visible. This approach helps introduce a level of randomness to the final product (Figure 4.47).


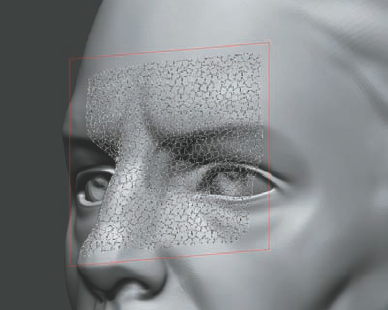
To add the wrinkles around the eyes, we can use a stencil. A stencil will allow you to select an image of eye wrinkles and place it directly on the model where you want that texture applied. Then you can sculpt through the stencil with any brush and only the area defined by the stencil will be affected.
Included in the Gnomon Alpha library you will find an alpha in the LeatherySkin folder called LeatherySkin67 (Figure 4.48). If it is not already loaded, import this alpha now in the Alpha menu. Click the Make St button under the Alpha menu.
Under the Stencil menu turn on Wrap mode. Place the stencil over the eye area. Rotate and scale it to the correct placement (Figure 4.49).
Once the stencil is placed, turn off Show under the Stencil menu to make your sculpting easier to see. I find it difficult to work with the Stencil visible; turning off Show keeps the stencil active but only shows it when the spacebar is pressed.
Change to Alpha 1 and keep the DragRect stroke on. Set the ZIntensity to 5. Draw a stroke on the model. The stroke will be very light because of the low ZIntensity. Use the Replay Last command under the Stroke menu to gradually build up the detail. The stroke will repeat and increment the depth of the eye wrinkles (Figure 4.50). You can continue to replay the last stroke to build up the wrinkles to an appropriate depth. Ctrl+1 is the hotkey for the Repeat Last operation.
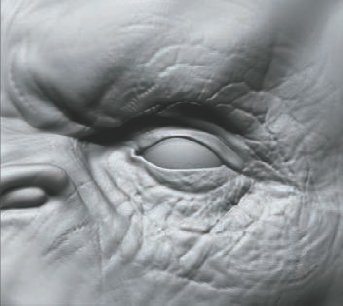
Whenever you are using alphas as texture stamps, be sure to go back over the detail freehand sculpting. This helps tie the texture together with other areas of the face and avoids a "stamped" look. Here I have feathered the wrinkles at the corner of the eye and added a sense of direction and flow that follows the secondary forms of the head in this area.
When you're sculpting skin details like pores and wrinkles, keep in mind certain aspects of how these tertiary forms tend to flow on the skin. The skin has a tendency to wrinkle in the opposite direction of the muscle fibers beneath. Take the mouth area, for instance. As you may recall from Chapter 2, the mouth muscle, the Orbicularis oris, runs around the mouth in a circular pattern (Figure 4.51). The primary wrinkles around the mouth should radiate out and transverse the direction of the mouth muscles (Figure 4.52).
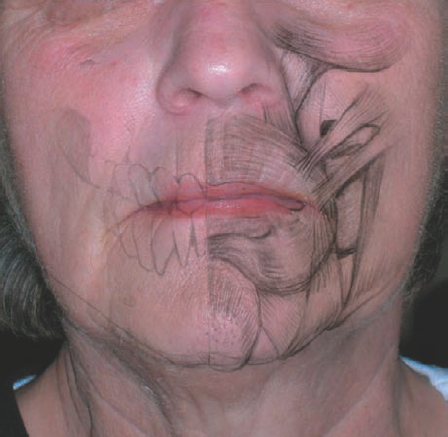
Figure 4.51. The Orbicularis oris muscle around the mouth. Wrinkles in this area tend to run against the direction of this muscle; as a result, they radiate out from the mouth.

Wrinkles also have a tendency to be broken, sketchy lines and not straight grooves carved into the skin (Figure 4.53). Be careful not to make the wrinkles too deep or too regular. Crosshatch them with secondary wrinkles that run in the opposite direction. When crosshatching wrinkles, give consideration to line weight (Figure 4.54).
Line weight is a design term. It refers to the relative heaviness of one line when compared to another. In Figure 4.55 are two lines: notice how line A is darker and thicker than Line B. Because of this it can be said to have a heavier weight. Lines with heavier weight seem to advance in front of thinner lines. They also tend to command more attention and seem more important. In a design sense, the heavier line has more visual impact.
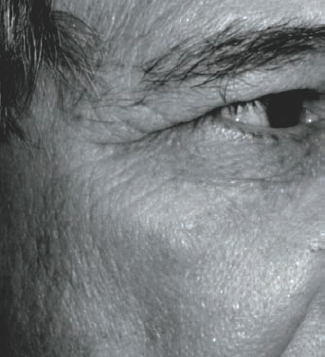
Figure 4.53. Notice how the wrinkles in this image are composed of several broken, sketchy lines. Also notice how some are more visible than others. This disparity in heaviness is known as line weight.
When detailing your characters, let some wrinkles have more line weight than others (Figure 4.56). This helps add variety and realism to the surface. The manner in which the skin wrinkles can also reveal a lot about a character. If there are prominent frown lines, a character appears to be angry. Skin wrinkles can be considered more than just a polishing pass on the character. Use them as a design tool and guide the eye around the face. See Figure 4.57 for an example of how wrinkle patterns can be used as a design element.


Figure 4.56. Crosshatched wrinkles with varied line weight. Notice the wrinkles that radiate from the mouth have a heavier weight than those that crosshatch them.

Figure 4.57. Wrinkles can help guide the eye around the face and have a logical flow that is determined by the character, underlying anatomy, and aesthetic choice.
Note
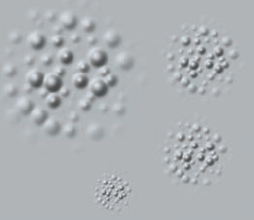
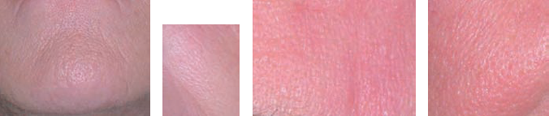
Skin pores can vary in size shape and density. The pores at the nasolabial folds beside the nose tend to be more oblong than those on the forehead, which can be finer and more densely packed. Figure 4.58 shows different sections of pores isolated from the same subject. Notice how much difference exists between areas. Be sensitive to the variations in skin texture rather than just applying the same scale pore alpha over the entire head.
To stamp in the pore textures, follow these steps:
Import
pores.tiffrom the DVD. Select the Simple brush with a Freehand stroke and Pore alpha. Under the Stroke menu turn on LazyMouse. Set LazyStep to .71 and LazyRadius to 1 (Figure 4.59).Create a new layer by selecting Tool → Layers and clicking the New button. Click the Rename button and name the layer pores. Draw a stroke on the surface with ZSub on. These brush settings will scatter the pore texture stamp by increasing the steps in the stroke (Figure 4.60). You can then go in with the DragRect stroke and individual pore texture stamps to vary the shape and size in different areas of the face.
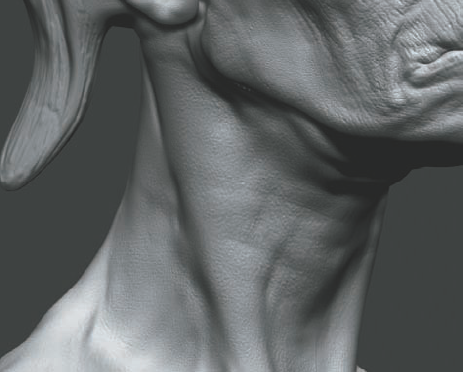
When detailing the neck area it is good to add some gooseflesh bumps. Figure 4.61 shows a detail of the neck bumps. This little detail can help add a lot of realism to your characters. The neck typically has tiny raised bumps that can be created with the same pore alpha—simply change to ZAdd (Figure 4.62).

Note
For the back horn we'll use the Projection Master script. ZBrush has many useful 2.5D illustration tools for use on the canvas. On the DVD you will find a bonus section from Chapter 1 that details many of these tools.
Projection Master allows you to temporarily drop the model to the canvas and sculpt or paint in 2.5D mode. You may then pick up the model and the work is projected into the high-res mesh. Sculpting done in Projection Master actually displaces the geometry of the surface just like viewport sculpting. The only difference is that Projection Master allows you to use the 2.5D tools. Projection Master is also useful for making fluid strokes at extremely high subdivision levels when your regular strokes may stutter or be too slow even with LazyMouse. While it is still useful, Projection Master is starting to become replaced by entirely viewport-based sculpting. I am covering it here in the interest of competition, but many of the same effects we are building on the horn can be achieved with the Slash brush in the viewport.
We'll use one of the 2.5D brushes on the horn called the Deco brush. The Deco brush
Start Projection Master by pressing the Projection Master button in the upper left of the screen or by pressing the G hotkey. In the Projection Master window, since we'll be sculpting and not painting, turn on Deformation and turn Color off. Turn on Fade and Double Sided (Figure 4.64). Double Sided mode will project the details from the side you are working on through to the opposite side. This might give unexpected or undesired results if you are not snapped to an orthographic view.

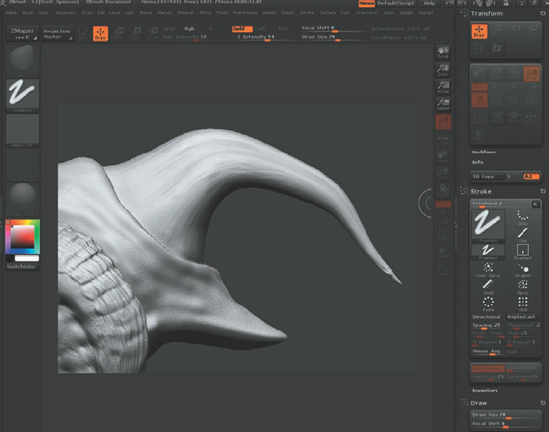
Select the Deco brush. Turn off RBG and turn on ZSub. Turn off the texture on the left side of the screen. Lower your Draw Size and sketch lines on the horn (Figure 4.65). Deco brush strokes are long and calligraphic.
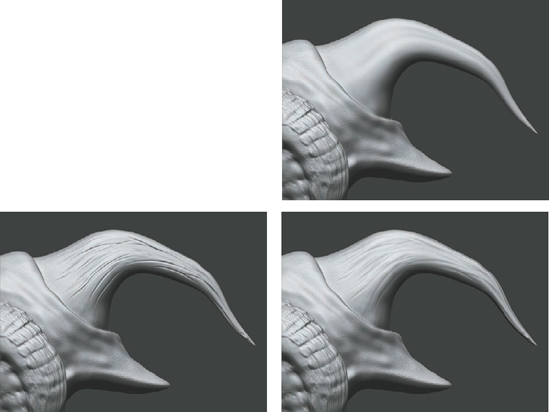
Select the Blur brush. Turn on ZAdd and soften the strokes. When using the Blur brush, be careful not to stroke across the edge. If you blur with ZAdd on, it can create artifacts across the edge when you're picking up from Projection Master (Figure 4.66). If this happens, switch to the Morph brush and stroke out the artifacts.
When you are finished in Projection Master, pick up the model by clicking the Projection Master button again or pressing G. The Projection Master window will appear again, but his time the button will ask you to pick up now. Make sure Double Sided is on and click the Pickup Now button (Figure 4.67). The details will now be applied to the ZTool on both sides. You can rotate and drop again to continue detailing. Be sure to turn off Double Sided if you are on an area that is not symmetrical.


By isolating detail passes into layers and storing a morph target, we have given ourselves several ways to adjust the intensity of the sculpting we just did.
If you find that the details layer is too strong, you can soften it by adjusting the layer intensity. From the main Tool menu, open Layers and click in the Intensity slider on the details layer. Set this to 0.5 and notice how the details are softened overall. Raising this value above 1 can make the details appear even stronger (Figure 4.68). Experiment with the Intensity sliders on both your layers. Layers can be turned off entirely by clicking the eye icon.
When adding details to your character, you'll find it beneficial to have a morph target stored. The morph target we stored at the beginning of this section will allow you to soften details or remove artifacts. Using the Morph brush can be similar to lowering the intensity of your layer, with the benefit that you can soften just areas and not the entire details layer (Figure 4.68).
Select the Morph brush from the Brush menu. Set the ZIntensity to 5 and stroke on the surface. Notice how this pushes details back. Now set the brush to 100% and see how it can erase details entirely.
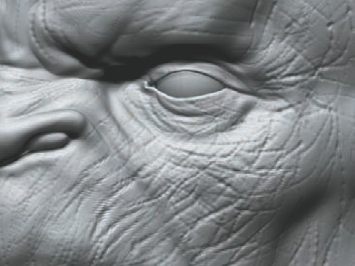
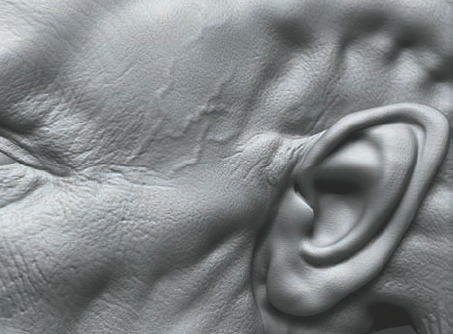
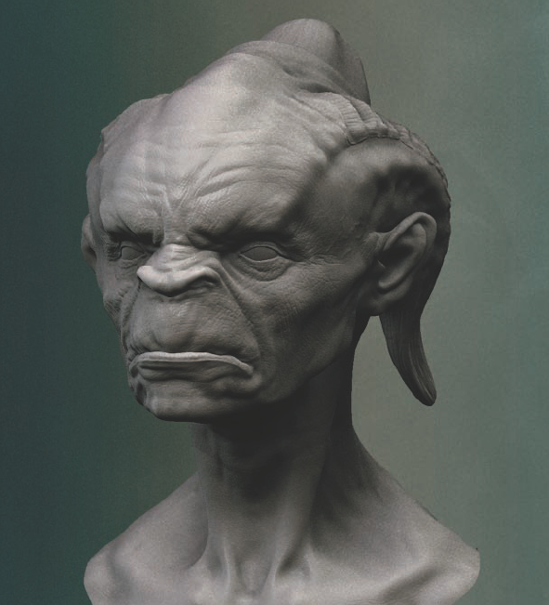
Figure 4.69 shows the final detailed Stingerhead character. To achieve details this sharp, you must be able to subdivide well above 1 million polygons on your system. As we saw in Chapter 3, this is often just a matter of dealing with an optimal base mesh. In situations where system resources will not allow you to divide high enough, there is an alternative, which we'll look at in the next section.

Note
Depending on your system resources, you may not be able to divide as high as you would like to achieve a fine skin texture. In this case you can use a ZBrush material to paint a bump map instead. Bump maps give the illusion of fine detail by perturbing the surface normal at render time. This does not affect the geometry but does create the impression of fine details. This is an ideal solution when you're faced with diminished system resources and an inability to divide high enough to create a fine detail pass. Often bump maps are used in a production pipeline to carry fine details when putting them directly into the displacement map would be expensive in terms of render time and little if any actual gain in quality would be visible.
Note
The Bump Viewer material is available under the Standard Materials menu. The material reads a grayscale color value and displays it as a bump or recess. Using this material, we can paint on the model in grayscale but see our strokes as if we were sculpting. Because of this, I will refer to painting in this section even though we are seeing sculpted strokes. Understand that ZBrush is interpreting a grayscale value and showing you a bump or valley. In reality we are applying grayscale color values as we work with this material. On the DVD, you will also find a video demonstrating the bump viewer material in use.
The Bump Viewer material will work with PolyPaint, but if you are unable to divide to a high level, the results will not be satisfactory. A better solution in this case is to use UV texturing. Follow these steps to use the Bump Viewer material with Projection Master:
Open the main Material menu and select the BumpViewerMaterial.
Load your ZTool you wish to detail or load the fishguy.ztl from the DVD. Draw the tool on the canvas and enter Edit mode. At the lowest subdivision level, create UVs by selecting Tool → Texture → AUV. If you already have UVs assigned, you can skip this step.
Open the System menu by clicking Tool → Color → SysPalette. This opens the system color picker. You want to select 50% gray for your base texture. Select the RGB value 128 128 128. This value is read by ZBrush as neutral and consequently there's no displacement. When we paint on this material with shades of white and black, it will render as a bump for white and a recess for black.
With 50% gray as the active color, create a new texture by choosing Texture → New. Make sure your resolution is set to 4096×4096.
Make sure the Bump Viewer material is the active material. Under the Transform menu, turn off the Quick button to disable Quick Render mode. This mode can create artifacts in the bump display.
You are now ready to start detailing. Figure 4.70 shows the character in the viewport with the Bump Viewer material assigned. Since we'll be painting in UV space, we need to use Projection Master. Because we are projection painting, we'll only be able to work from a single view at a time.
Orient the model to the front view. Turn off Perspective mode by clicking the Persp button under the Draw menu. Drop to the canvas using Projection Master by pressing the G hotkey. In the Projection Master window, make sure Color is on and all other options are not checked. Click Drop Now. Figure 4.71 shows the face oriented to the viewplane and the character dropped to the canvas ready for texturing.
The model is now temporarily dropped to the canvas. From the Tool menu select the Simple brush. Turn off ZAdd and turn on RGB. Select a Freehand stroke and Alpha 42. From the color picker, choose black. We'll use RGB intensity to control how strong our stroke appears instead of ZIntensity.
Start sketching in your texture for the front view. If you want to fade or erase strokes, simply select the same 50% gray value and paint over your previous strokes.
When you are ready to apply the strokes and pick up the model again, press G. Make sure Color is the only option on and click Pickup Now.
Note
If you want to drag alphas onto the surface and rotate them while you place the texture, select the Directional brush. Turn on RGB and turn off ZAdd. Also turn off Texture. Select the alpha you want to use and a DragRect stroke. This brush behaves like the standard sculpting brushes when it comes to dragging and rotating alphas.
This will bake the strokes you just made with the Simple brush into the UV texture. Figure 4.72 shows the strokes baked into the texture map of the character head and displaying as a bump map. The map tries to display on all subtools, which is why you see the bump detail on the eyes as well. This is not a problem since the bump map will be exported and applied separately in another application. The eyes will not be affected. You may now rotate to another view and drop again, then continue to detail.
When you have finished detailing, the bump map can be exported for use in another application. From the Texture menu, click Export and save the bump map as a PSD file.


As you work I recommend not finishing any view but keep picking up and rotating around the model. This will help keep the texture unified and help you bring the whole character to a finish at one time. Figure 4.73 fades between the Bump Viewer material on the left and the Flat Color shader on the right so you can see the color map under the material. Notice that the surface is not sculpted at all; the color values are being interpreted by the material to display bump detail.
This section was contributed by featured artist Jim McPherson.
In detailing a ZBrush character, it's important to arrange the details into a system. Too often we see the same detailing at the same intensity all over the entire model. Variation in the detail is important. But not just variation for its own sake—variation with a logic.
A cheek would have more detail than an ear. A forehead would have a different texture than a neck. Continuing this concept, a sculptor can divide a head into quadrants, with an appropriate texture in each area. Transitions between the quadrants become important. How does one kind of detail blend into another in a pleasing and believable way?
The forms the detail is applied to is more important than the quality of the detail. The details often follow the direction of the wrinkles. The pores and small lines will compress in a similar manner as the wrinkles themselves.
An important concept is that the details are actually forms themselves. Just as you would sculpt a well-defined nose, you should sculpt the detail with the same care. Are some areas flatter? Are other areas more crisply defined? Perhaps the shapes of the eye wrinkles are like tiny plateaus. What direction does the wrinkle cut in at? Does a wrinkle have more weight on one side? Pores and bumps can follow a direction but also a spacing pattern.
A study of life casts can help make you more sensitive to the details of skin and organic form. Or you could carefully study your own face or the faces of others.
An additional important concept to consider is that, although most people do not sculpt, they have a strong awareness and observation of details. They perhaps would have an opinion of what kind of textures that are pleasing and what type are ugly. Therefore you must consider if your texturing is complementary and appropriate to the character you are creating. For instance, does the detail make a heroic character look a bit ugly? Does the detailing call too much attention away from the expression of the face?
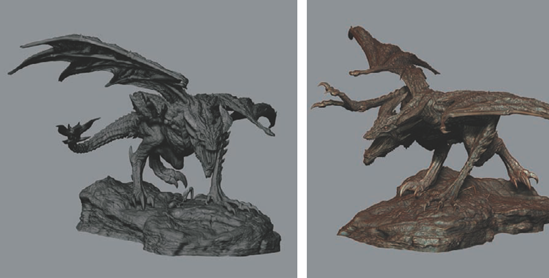
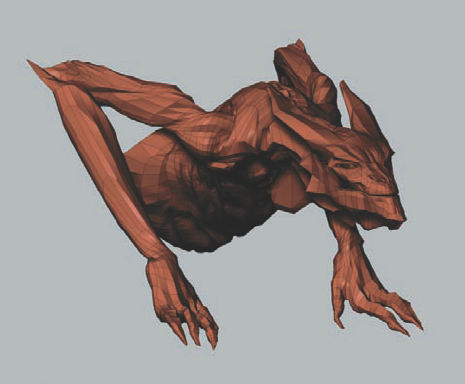
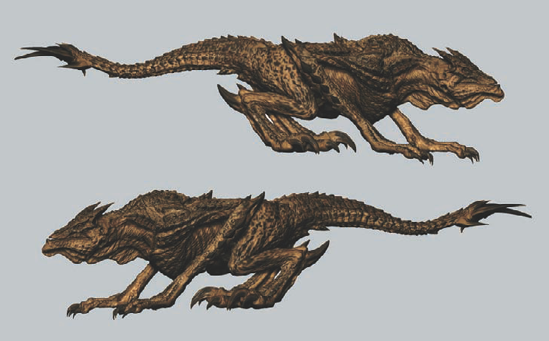
If you carefully consider the detailing, you could start to develop more original ideas. Could a frightening creature have a flowing scale pattern? The following is a rough mesh layout just quickly roughed out in Maya:
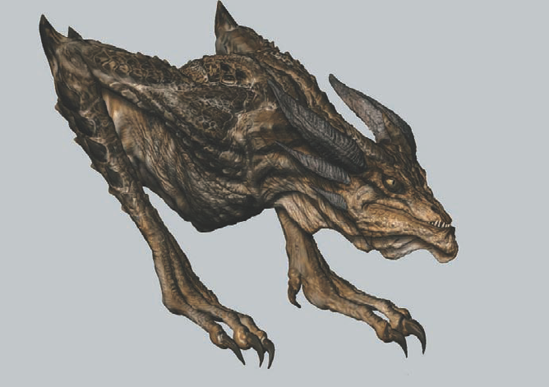
The next image is a higher level. I've drawn in the crests on the deltoid but haven't smoothed them in yet; I've started to block in the scales on the head. I've just indicated the spacing on the tendons on the hand. This is where you can work out the spacing, or transition between small to big scales.

I try to lay out the patterns of the scales at this point: the directions of the flow, and small-to-large relationships. You can do lots of erasing and reworking at this point. You are now trying to design the scales, a judge whether they are complementary to your character. It's not just outlining the scales. I think of them as flattened forms. The outlining can strengthen the forms.
I've done similar steps on the neck. I also use the Move tool to pull the directional spikes:
I applied the same techniques on the arm, with some scales just outlined in on the chest. I roughed in some hand scales. In the following image, there's a lot more small scale drawing in the areas between the big scales. I used the DragRect stroke to pull Alphas 07 and 08 over the figure to give some high-frequency breakup. I also placed horns and teeth.
I like to paint as I sculpt. It's a nice luxury you get in ZBrush. The next image is only three colors:
Yellow Ochre base
Lighter Yellow Ochre for the underside of the body with cavities masked
Black with some yellow for the scales on the top of the body, with cavity masking
The back end is unmodified cavity masking. On the front part I filled in some of the scales more in black. And I added some light color in the cavities around the shoulder:
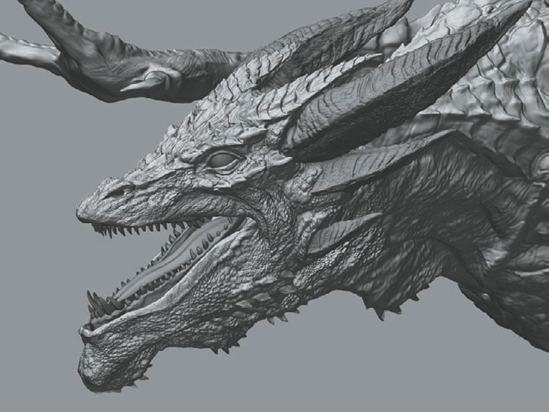
I'm doing more pinching on the tops of the scales and in the cavities. Also I'm trying to refine the directional flow. I decided to go for smaller scales around the mouth and started using alphas, and cavity masking to draw in directional wrinkles between the scales:
I finished up with more pinching and drawing lines around the scales. Here's the posed version: