One of the most exciting aspects of ZBrush is the way it allows the artist to interface directly with the model and create in a spontaneous and organic fashion, just as if working with balls of digital clay. Thousands of years of artistic tradition have given us a wealth of technique when it comes to the discipline of sculpting. While traditional painters have had applications like Painter and Photoshop to open the doors to the digital realm, sculptors were out in the cold—until ZBrush.
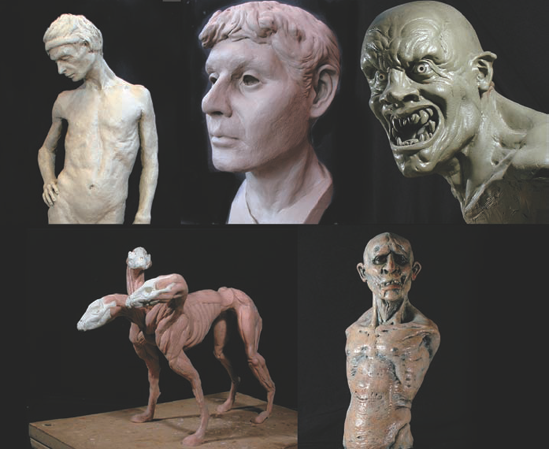
When learning to become a better digital sculptor, you will benefit from the same traditions and tenets that guided traditional sculptors for centuries. Just like drawing and painting, all the fundamental artistic lessons applicable to sculpting are true on the computer as well. Whether we are sculpting an alien, a princess, a warrior, a horse, or abstract form exploration, our primary concerns will always be the same (Figure 1.1).

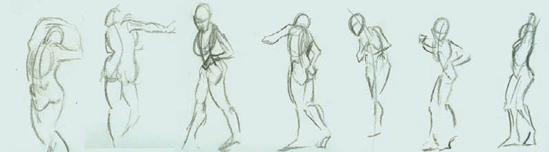
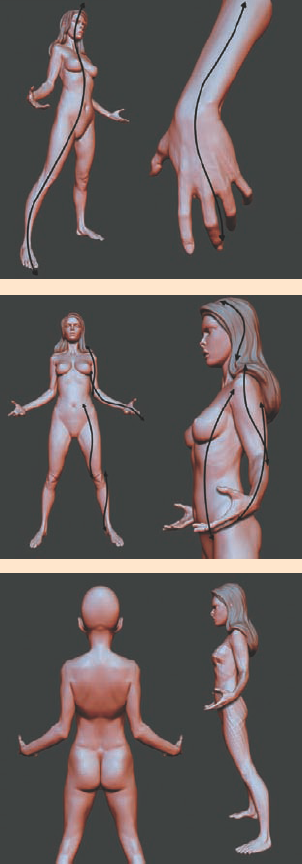
Gesture represents the dynamic curve of the figure. In life drawing, these lines are quickly laid down on paper and do not necessarily seek to describe the contour or form of the figure at all (Figure 1.2). The function of the gesture drawing is to capture the rhythm and motion of the pose, the thrust of the figure, and the action inherent in its posture (Figure 1.3). Keeping a sketchbook of quick, loose sketches you don't intend to show is a great way to train yourself to find the gesture and rhythms in a figure. These kinds of exercises help sharpen your eye, and this translates into better figures when sculpting from the imagination.
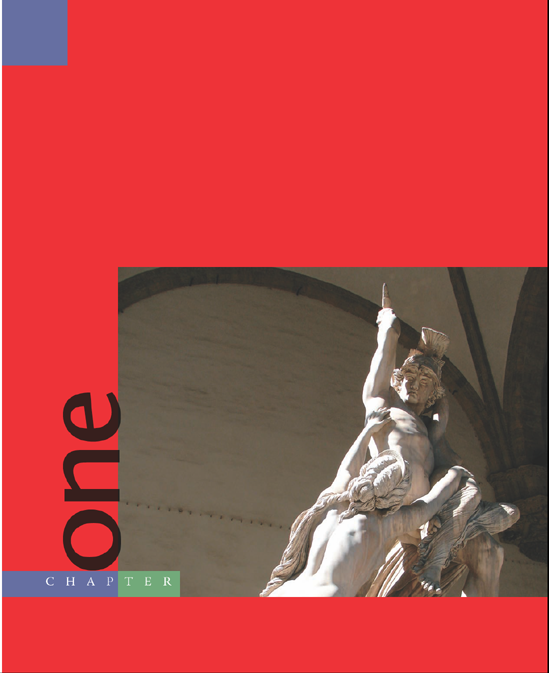
Gesture is the source of the life of a drawing or sculpture. It must be addressed from the outset—if the gesture is poor, it can be difficult to introduce it later into the process. If you start with a strong gesture, the sculpture will be appealing and alive from the start. A wooden, stiff pose with a poor gesture can have acceptable anatomical form and skin details while still being fundamentally unappealing (Figure 1.4).
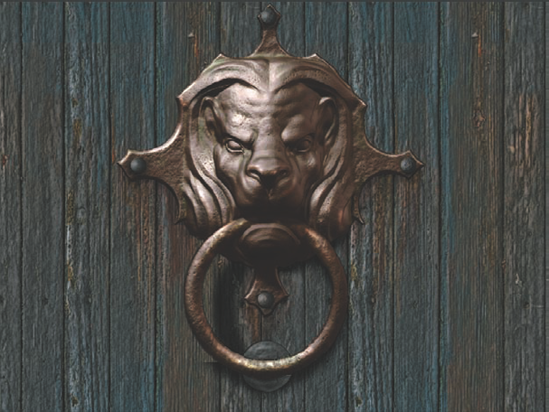
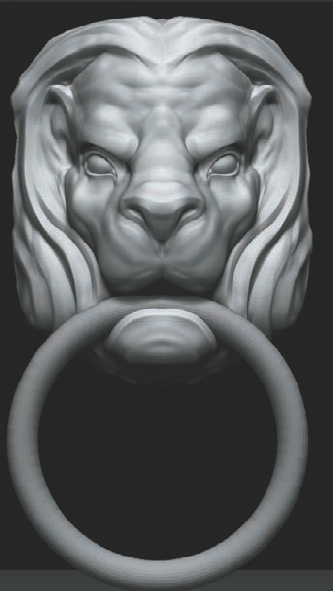
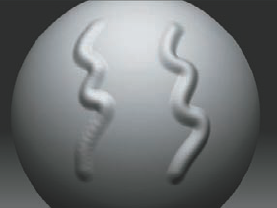
The rules of gesture apply to even a sculpture that is not a figure. Notice in the lion's head how the gesture of the lines in the mane serve to create a sense of flowing action down toward the ring (Figure 1.5). These lines are more of a graphic consideration and can almost be considered in the abstract. Their presence serves to strengthen the visual impact.

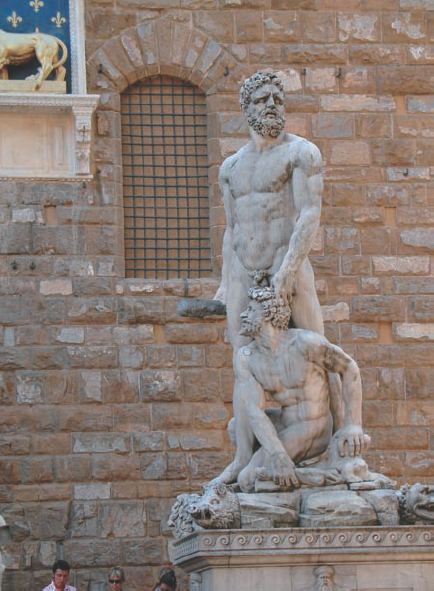
Figure 1.4. This Hercules from the Piazza della Signora in Florence, Italy, is an example of bad gesture in an otherwise good sculpture.
Closely linked to gesture is the concept of rhythm. Master draughtsman George Bridgman describes rhythm as "in the balance of masses the subordination of the passive or inactive side to the more forceful and angular side in the action." That is to say, the interplay between the active and passive curves in the body combines to create a sense of rhythm in your sculpture (Figure 1.6).
Gesture is an important consideration no matter what you may be sculpting. It is gesture that makes a sculpture exciting, whether it is a door knocker, a monster, or a human. Especially when dealing with figurative sculpture, a well-executed gesture with special attention to rhythm helps establish a sense of weight and balance to the figure.

Although ZBrush excels at adding fine details to a model, form is always of primary concern when sculpting. Many sculptors rush to the detailing phase while overlooking the importance of developing the form, anatomy, and structure of the model. This makes for a weaker sculpture overall. Take Michelangelo's David, for instance; it's a perfect example of a masterful sculpture but there is not a single pore or wrinkle on the body. The figure lives and breathes because the interplay of forms of the surface gives the impression of skin, fat, and bone. David appears to be a living being in an inanimate material. This is true even when you are working on a completed 3D model from a third-party application. There is no replacement for the subtle variations in surface shadow and transitions you can add with ZBrush's sculpting tools. Adding a more organic sense of the artist in the work will create a far more appealing character. It may not seem like much, but taking away the perfect parametric nature of a polygon model can push a character's believability well into the next level before the first wrinkle or pore is applied.
Form in general refers to the external shape, appearance, and configuration of an object. In drawing and painting, you are describing form by directly applying light and shadow—from the highlight to the midtone to the core of the shadow. In sculpture, you are creating these halftones and value changes by altering the shadow casting surface. By altering the underlying shape, you can model the way light plays on the surface. Without shadow, there is no form. You can see this if you turn on Flat Render in the ZBrush window, thus removing all the shadows and highlights. Only a flat silhouette remains (see Figure 1.7).
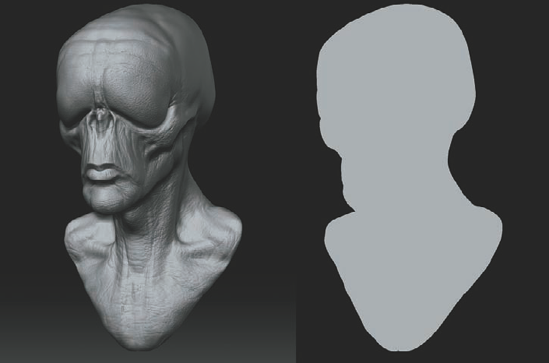
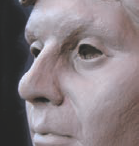
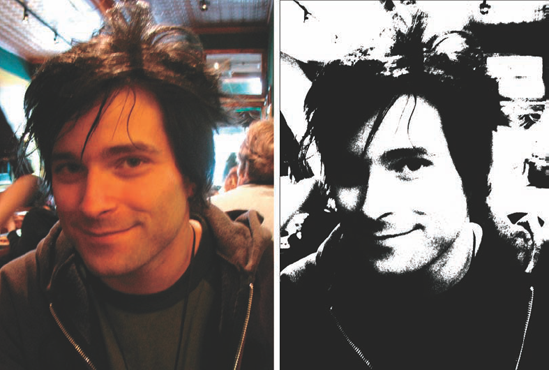
It can be helpful when sculpting to remember that the shapes you are making with your brush will affect how light and shadow interact on the surface. That is how the shapes are created. If the light is turned off, all form goes away. Creating good form as you sculpt it requires an understanding of both the shape itself as well as the quality of the shadows created by that shape under different lighting conditions. As a further example of how shadow describes form, we can take a lesson from painting and drawing. Here is a photograph of a face next to the same photo posterized. With all the midtones removed so only the extreme highlights and shadows remain, you can still identify the fact that this is a face. When you're reading a surface, the shadows tell you everything about what you are looking at (Figure 1.8).
This gradient between the lightest light and darkest dark is called value. Paintings and drawings have what's called a key or value range—the set number of steps from lightest light to darkest dark found within the image. When you're sculpting, it is good practice to be sensitive to these gradations on the surface of your own work. Even though you are not applying value directly, you are affecting the values the eye perceives by the height of the shape you are sculpting or the depth of the recess. Examine how the shadows interact on the surface; to darken a shadow, you may deepen the crevasse or add to the mass of the adjacant shape. Moving the light often as you work can help you spot these value changes from different lighting conditions.
Note
You can move the light interactively in ZBrush. Set your material to one of the standard materials and choose ZPlugin → Misc Utilities → Interactive Light from the main menu. Move the mouse to see the light moving around your sculpture as you work. See the DVD for a video showing this feature in action.
When you're dealing with form, it also becomes important to address transitions that create space between forms and how one feeds into another. Figure 1.9 shows how deepening a crevasse or raising a high point can darken your shadow and give it a harder edge. This will change the character of the transition.
Try to be sensitive to the transitions between your forms and the variation you create. If the transitions between all your shapes are the same hard edged shadows the figure will be visually bland.
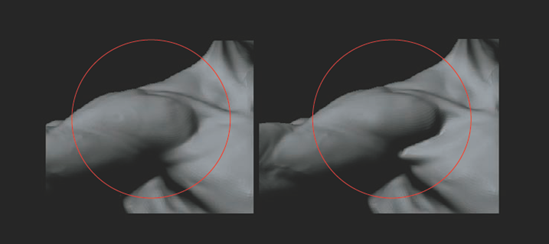
Figure 1.9. By deepening the furrow next to the deltoid, the character of the shadow changes, changing the feeling of the transition. Notice how the relative darkness of the shadow changes from the clavicle to the arm in the first image. Also note how in the second image this value has now become one consistent value and thus less visually interesting.
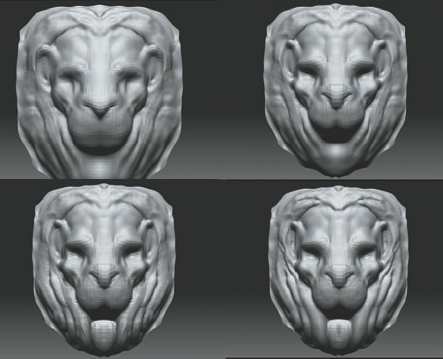
An important concept to bear in mind while you sculpt is to reduce everything to its base form and work on big shapes first. Just as a painter will tackle the big shadows and big lights first, then work down to details, the same is true in sculpting. This is one of the most important aspects of this section to remember—by working on big shapes and then refining, not only do you ensure that you resolve the major shapes first, but it helps your mind organize the complex forms of the figure into easy-to-manage sections. The final result may appear complex and intricate, but you approached it in small portions one at a time (Figure 1.10).
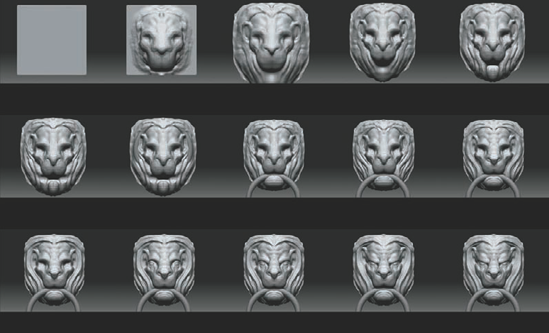
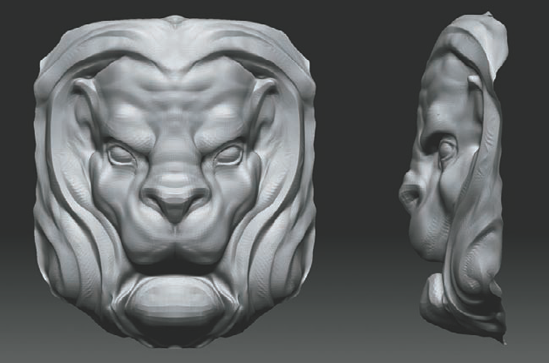
Figure 1.10. These images show the progression of the lion head sculpture from the most basic, broad strokes down to the finer lines.
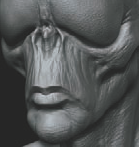
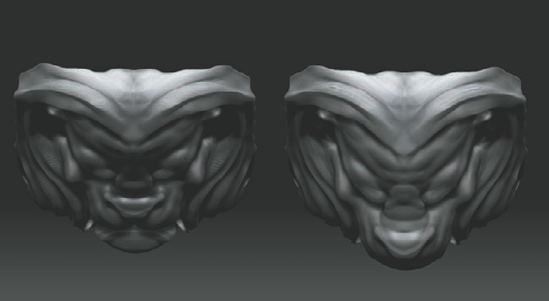
All forms can be broken down to their base shapes and planes. Complex shapes like the face mass can be reduced to aggregate planes for easier study and execution. This is called planar analysis. While sculpting you will find it helpful to always be thinking of what the basic forms are in your character and how they relate to one another (Figure 1.11). The viewer will have different reactions to a character based on the relationships between its basic forms. This relationship between forms is called proportion.

Figure 1.11. By reducing this creature to its most basic shapes, the form relationships and proportions become apparent.
The proportions between the basic forms have a visual impact on the viewer. These reactions can change based on how the artist manipulates these relationships. For example, a character with a huge, bulbous head on a small body will create a different reaction than one with a tiny head and an oversized body.
Note
I often get asked how densely to subdivide the model while working. This is never a set number. The subdivisions you can get on your machine will vary depending on how much RAM is installed. The polygon count of your level 1 mesh will also influence how densely you can subdivide.
Note
Artistically the best approach in my opinion is to divide to the lowest level at which you can represent the shapes you are trying to sculpt. By avoiding detailing too early and refining the basic forms of the character you will find that excellent results can be attained from lower polygon counts. Only then, when the form is resolved, are you ready to detail. The fine detail passes need to be done at the highest possible subdivision levels. In most cases this is 2million or more polygons. Later in this book we will look at detailing characters and ways to get sharper details from lower polygon counts.
Proportion refers to the relationship between the overall size of an object and the relative sizes of its parts. Many books have been written on the balance of these measures, and the fundamental rules of proportion have been understood as far back as the ancient Egyptians.
When you're sculpting a figure, it is important to understand proportion as it pertains to the human form. Proportional canons are sets of rules to help guide artists in creating a specific type of figure.
There are many systems, or canons, of proportion. Michelangelo often used a heroic eight heads to measure the figure, while a more ordinary human measure is 7~HF heads high. No proportional system is "law," and there are variations in all people. These are intended as an idealized system of measure. Straying too far will result in a figure that looks "off."
By understanding the proportional canon you are working with, you can make educated decisions about the character you are creating by changing the proportion.
Use these guidelines as you sculpt:
Work from big to small; focus on the basic shapes first, then refine the details.
Move the light often to check the shadows on your form.
Don't feel the need to outline every muscle or shape with a recess—some shapes can and should be subtler than others. This adds variety and interest to the surface.
Smooth as you work—by building up form and then smoothing back, you can create a subtler surface and avoid the "lumpy" look.
Try to use the largest sculpting brush size for a particular shape; this helps keep you focused on the big forms first and ensures you don't get bogged down in details too soon.
Work at the lowest subdivision that can support the form you are trying to make. This also keeps you focused on big shapes over details, and it helps avoid the lumpy look of some digital sculptures.
Step up and down your subdivision levels often. Don't work at the highest the whole time unless you are working with the Rake and Clay tools.
Rotate the figure often and work on all areas at once. You shouldn't finish the head before the arms; each part should always be at the same level of finish. This keeps you from having to match one area of the sculpture to another, creating disconnection between the shapes.
Another Take: Gesture, Rhythm, Proportion
You don't have to worry about gesture, rhythm, and proportion in all of your sculpts—only in the ones that you don't want to look lifeless.
Being aware of these foundational concepts, and what they can bring to your art, marks the first step down the endless path that leads toward perfecting your skills. I say endless because the more you learn about these concepts, the more you will realize just how complex and intricate their execution can be. To infuse your work with gesture and rhythm is to give it life, and to give it life is to create a work that can transcend its basic visual concept and become a true masterpiece.
No matter the subject—from animal, to human, to creature, to foliage—I always start by trying to understand its gesture and, more importantly, what its gesture is going to convey about the character. A powerful superhero archetype will have a distinctly different gesture than a cowering villain. There are countless conscious and subconscious gesture cues that give instant insight into the nature of your character. Hero types lead with their chest; from a side view, the character's chest is the farthest point forward on the figure. The head is typically pulled back creating a straighter line from the base of the skull to the upper area of the back where the neck inserts into the torso. By pulling the head back and pushing the chest forward, you are automatically creating a larger distance between the front and back of the arm. This allows our hero character to have wider shoulders and larger-than-life upper arms. It's the setup of the gesture, from the head to the chest, that allows all of these proportional cues to be possible. In this respect, the gesture truly is the foundation for our character to be built on.
Rhythm is linked directly with gesture and refers to the visual lines that flow through your character. Increasing your awareness of this concept is the first step toward mastering it. These rhythms are what lead your eye around the form and, when executed properly, convey a sense of movement and direction, even in a static sculpture.
Proportion is a relative thing. When I stand next to Hulk Hogan, my gigantic and, if you will, super-toned upper body might make him appear small. However, we all know that relative to the general public, this is not the case. He is indeed a large man. The same philosophy about relative size can be applied to individual parts that make up a character. For example, one way to make a character appear taller is to make its head smaller. Other, subtler cues to let our viewer know the innately taller stature of our character might be to widen the shoulders while keeping their overall mass smaller. We can also add a slight downward angle to the clavicle as it goes from the sternum to its end at the top of the shoulder. These cues are all taken from real-life proportions of extremely tall people and are therefore subconscious traits that can help convey the believability that our character is indeed tall.
Remember, mastering these concepts can take a lifetime, but becoming aware of them can happen as soon as you would like, and that's all it takes to begin the journey. (Well, that and a gnarly-looking old walking stick. Preferably one with some kind of killer animal head carved into the handle. I would suggest an Orca or some form of rogue badger. This will help get you there in style.)
In the following example, from my sculpting the female figure tutorial on Gnomonology.com, I've drawn black lines over the form to represent the gesture. These long, flowing curves are what the forms were developed around and help give the sculpture character. I typically start by visualizing these curves on screen while I sculpt, then try to push and pull the forms to match them.
In the next example, we can see the lines of rhythm that flow throughout the sculpture. Note their interaction as they overlap and traverse the form. Even in this somewhat standard pose, the rhythms should be visible and help to indicate a sense of movement.
Proportion plays a key role in defining the "character" of any design. The final image shows how enlarging the head on this sculpture affects the viewer's impression of it. The design appears more childlike, and seems to have a smaller overall stature. An important part of this exercise is to also be aware that none of the finite details were changed. This shows us just how secondary and inconsequential the finite surface details can be if we don't first establish the proper foundation.
At first glance, the ZBrush interface (see Figure 1.12) can be a daunting sight, especially if you have previously worked in software like Autodesk Maya, 3ds Max, or XSI. The truth is, it looks far more complex than it actually is. Many menus you won't often visit, and a few will form the backbone of your workflow. In this section, I will give you a brief overview of the interface and the location of some of the major palettes and their functions. This tutorial is designed to introduce you to the sculpting brushes and some of their basic settings. We'll also explore ZBrush's 2.5D Illustration brushes and briefly discuss lighting and rendering within ZBrush. By completing an illustration in ZBrush, we'll touch on each facet of the program and introduce tools and workflows that will be valuable as you progress through the book. We'll delve into each menu in more depth as it becomes pertinent. To begin, it will be good to have a fundamental understanding of what is where and why.
Upon opening ZBrush, you will see the default interface. The central window is called the document window. This is where all the sculpting and painting takes place. In ZBrush you import OBJ files as "tools" and sculpt them in the document window. OBJ files are a standard polygon model format most 3D applications will export. For more information on importing to ZBrush see Chapter 3.
Flanking the document window are two columns that contain some quick links to other menus. The left side has fly-out icons linked to the brush, stroke, alpha, texture, and materials menus. Here you will also find a color picker for selecting colors while painting.
The right side contains a selection of icons primarily concerned with navigating the document window and the display of your active tool. It is important to note all these options are available in the top row menus and often the menus (as in the case of Brush, Stroke, Alpha, Texture, and Material) are abridged in the form found here. For all the options, visit the full menu at the top of the screen (the area marked "Brush controls" in Figure 1.12).
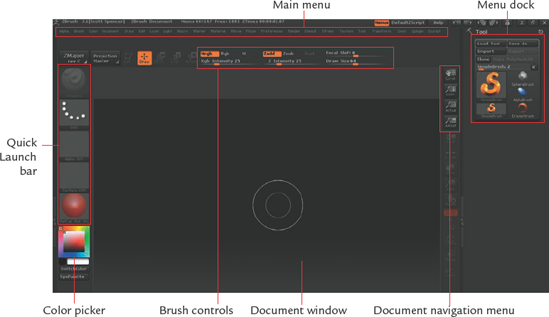
The top menu bar allows you to change the various aspects of your active sculpting tool. It contains an alphabetized list of the complete ZBrush menus. The ZBrush interface allows you to work in a circular fashion, picking menus and options as needed. Any main menu can be torn off and docked on the side of the screen by clicking the round radial button. Table 1.1 provides a breakdown of each menu and its major contents.
Table 1.1. ZBrush Menus
Menu | Description |
|---|---|
Alpha | Options to import and manipulate alphas, grayscale images primarily used as brush shapes, stencils, and texture stamps. |
Brush | Contains the 3D sculpting and painting tools. |
Color | Options for selecting colors as well as filling models with color or material. |
Document | Options for setting document window size as well as exporting images from ZBrush. |
Draw | Settings that define how the brushes affect surfaces. These include ZIntensity, RGB Intensity, ZAdd, ZSub, as well as settings that are specific to 2.5D brushes. This menu also contains the perspective camera setting. |
Edit | Contains the undo and redo buttons. |
Layer | Options for the creation and management of document layers. These differ from sculpting layers and are typically only used in canvas modeling and illustration. |
Light | Create and place lights to illuminate your subject. |
Macro | Records ZBrush actions as a button for easy repetition. |
Marker | This menu is for MultiMarkers, a legacy ZBrush function that is mostly obsolete with the advent of Subtools. |
Material | Surface shaders and material settings. These include both standard materials and MatCap (Material Capture) materials. |
Movie | This menu allows you to record videos of your sculpting sessions as well as render rotations of your finished sculptures. |
Picker | Options pertaining to how the brushes deal with the surfaces on which they are used. Flatten is one sculpting brush that will be affected by the Once Ori and Cont Ori buttons. For the most part, these options are not used in sculpting. |
Preferences | Options to set up your ZBrush preferences. Everything from interface colors to memory management is handled here. |
Render | Options for rendering your images inside ZBrush. This menu is only used when doing 2.5D illustration. |
Stencil | A close associate of the Alpha menu. Stencil allows you to manipulate alphas you have converted to stencils to help in painting or sculpting details. |
Stroke | Options governing the way in which the brush stroke is applied. These options include freehand and spray strokes. |
Texture | Menu for creating, importing, and exporting texture maps with ZBrush. |
Tool | This is the workhorse of the ZBrush interface. In this menu you will find all options that affect the current active ZTool. Here you will find Subtools, Layers, Deformation, Masking, and Polygroup options as well as many other useful menus. This is the menu in which you are likely to spend the most time (next to Brush). The Tool menu allows you to select tools on which to sculpt as well as select the wide variety of 2.5D tools for canvas modeling and illustration. |
Contains document navigation options such as Zoom and Pan and buttons to alter the model's pivot point as well as sculpting symmetry settings and poly frame view. | |
Zoom | Shows an enlarged view of portions of the canvas. This menu is not often accessed other than to find the Zoom and AAHalf buttons to affect document display size. These buttons are usually available to the screen right menu. |
ZPlugin | For accessing plug-ins loaded into ZBrush. Here you will find MD3, which is used for creating displacement maps, as well as ZMapper and other useful utilities. |
ZScript | Menu for recording saving and loading ZScripts. |
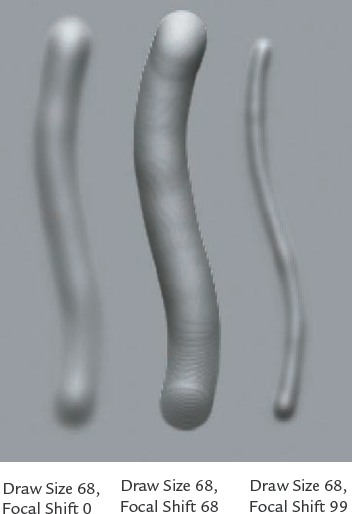
At any time while you are working on a model in Edit mode, right-clicking the mouse will open a pop-up menu at your cursor location. Here you can quickly access your ZIntensity, RGB Intensity, Draw Size, and Focal Shift settings.
Draw Size and Focal Shift control the size of your brush. Draw Size, as is apparent, controls the overall size of the brush, while Focal Shift adjusts the inner ring of your brush icon. This inner circle defines the falloff of the tool or the general hardness of softness of the brush. Falloff means how quickly or gradually the effect of the tool fades at the edges of the stroke. A smaller ring is a much more gradual falloff while a bigger one is an abrupt falloff. If an alpha is selected, the Focal Shift slider acts as a modifier on the alpha softness. Figure 1.13 shows the effects of several Draw Size and Focal Shift combinations. If you want to enter a value manually to the curve, use the slider for brush control at the top shelf of the ZBrush interface.
Brushes can be set to several modes, which determine how they affect the surface. At the top of the screen are buttons for MRGB, RGB, M, Zadd, ZSub, and ZCut. ZAdd and ZSub control whether the brush adds material or takes away with the stroke. MRGB adds material and RGB color, while RGB adds only color and M adds only material. Typically the brushes are set to ZAdd when you are sculpting. It is easy to switch to ZSub by simply holding down the Alt key while you sculpt. This will temporarily swap the modes while the key is pressed. ZCut is used in Pixol (2.5D) mode.
When a tool is loaded in the document window and you are in Edit mode, navigation is accomplished through a variety of mouse and key combinations.
Rotating is the simplest movement to accomplish. With the mouse off your model in the document window, notice that it becomes a circular arrow. Left-click and drag, and the model will rotate with your movements. To zoom in and out from the model, hold down the Alt key and left-click somewhere on the document window other than the model, release the Alt key, and move the mouse up and down. The object will now appear to zoom in and out. In reality it is scaling, but this differentiation is not important when navigating a ZTool. Panning is accomplished by the same combination of Alt and left-click but you don't release Alt. Simply move the mouse and the object moves with you.
If your model is off center and you want to return to the default view, press the F key to bring it back into focus. Another useful option is the Local button found on the right side of the screen or under the Transform menu. Click Local and your rotations will occur around the last point you edited on the model.
These movements and combinations may take some practice and may seem strange if you are used to other programs, but with a little experience you'll find they become second nature. You can always use the quick navigation icons at the right side of the screen if the button combinations are too difficult.
In this section we'll explore the ZBrush sculpting tools by creating a lion head door knocker from a 3D Plane tool. This tutorial will expose you to many of the ZBrush sculpting brushes, modifiers, and masking tools.
Note
In ZBrush you can work with models, tools, or documents. For sculpting characters we'll focus on tools and models. When creating final rendered images in ZBrush, you make use of the Document settings.
ZBrush works with essentially three types of objects; models, tools, and documents. Models are geometry that you either create in ZBrush using Primitives and ZSpheres, or obj models imported from third-party applications like 3ds Max or Maya. These models can then become tools when you begin to subdivide and sculpt or paint on the surface. ZTools are a ZBrush file type for storing 3D models with multiple levels of subdivision as well as texture information. Documents are essentially images. Documents are a hybrid between painting and rendering. You can place your ZTools in the document space, light, shade, and render them as a 2.5D illustration.
Note
2.5D illustration is a ZBrush term for an illustration tool that allows you to paint color, materials, and depth. The ZBrush canvas is "depth enabled," which gives ZBrush its powerful image-creation capabilities.
The ZBrush workspace is called the document window. This is where we'll sculpt and paint our characters. The document window has many powerful and unique aspects that are often overlooked when you are not using ZBrush as a purely illustration or concept design tool.
The artist can "drop" tools in the document window, interactively lighting and shading them in 2D. You can even continue to sculpt on your illustration. Although many of the document-based tools are not useful to a production environment outside of the art department, I feel it is important to cover them here as they form the basis of ZBrush's toolset and influence how many of the tools and menus behave.
Note
Documents can make use of layers as well as interactive lighting and rendering, but these cannot be rotated and edited in 3D space; they are composed of pixols. Pixols are special pixels that carry color information as well as depth and material data.
For the purposes of sculpting and painting characters, we typically do not use the document settings, but there are some cases where these tools will come in handy. Some brushes, especially those we use in the Projection Master plug-in, are document based, so it is important to understand the distinction between documents and tools as well as how to use them effectively together.
The purpose of this tutorial is to introduce you not only to sculpting in ZBrush but to the different methods of working in the program. While making this door knocker we'll be using primitives, the standard sculpting tools, alphas, and brush strokes. First we'll use ZBrush primitives to sculpt and assemble a door knocker.
Note
You will begin by sculpting the lion head. For the lion bas-relief we'll use a ZBrush primitive, the Plane3D tool. I want to remind you that I am constantly moving the ZTool as I work, sculpting from all angles. You can see this in the video captures of the tutorial sessions on the DVD with this book. Each tutorial step is cross referenced with the video time code of that section on the video tutorial capture.

Before we can edit this, we need to enter Edit mode. Press T on your keyboard or click the Edit button at the top of the screen (Figure 1.14). If you neglect to enter Edit mode after drawing a model on the canvas, ZBrush will continue to add copies to the document window, dropping each one to the canvas as you go.
To change materials, open the Material menu. ZBrush has several default materials available to you. Typically I use the MatCap White Cavity shader over the default red wax. The translucency in red wax makes spotting surface form a little tricky. Click the current material box at the left of the screen or under the Material menu to open the Material Palette window. From this palette select the icon swatch for the material you prefer. For this tutorial I used the White Cavity shader. It is under MatCap Materials in the Material Browser.
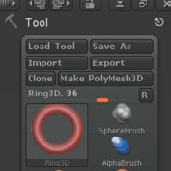
The plane is now in Edit mode, but this is a ZBrush primitive and not a polymesh. Polymeshes are polygonal 3D models that can be subdivided and sculpted inside ZBrush. Models imported into ZBrush are polymeshes by default, but meshes we create from primitives need to be converted with the Make PolyMesh3D button under the Tool menu. This converts the ZBrush primitive into a polymesh, which we can now use to sculpt on.

Figure 1.14. Edit mode can be accessed via this button at the top of your screen or by pressing the T key.
At this stage, let's activate sculpting symmetry. This allows you to sculpt one side of the lion's face while the other side automatically mirrors your changes. To turn on Symmetry, press the X key on the keyboard to activate X symmetry. The full symmetry options are located under the Main Transform Menu at the top of the screen. To access the options click select Transform → Activate Symmetry. You'll see a red dot on the other side of your model that mirrors your brush strokes. It is generally a good idea to start a sculpture with Symmetry turned on. Always turn off Symmetry in the final stages to add another level of realism by breaking the perfect balance between the forms, or adding little differences between the sides.
At this time you may also turn on Perspective Camera. By default ZBrush uses an orthographic camera, but if you want a view that is more natural click Draw → Persp to activate the perspective view. Focal length can be adjusted with the Focal Length slider. Figure 1.15 shows the visual difference between Perspective and Orthographic modes.
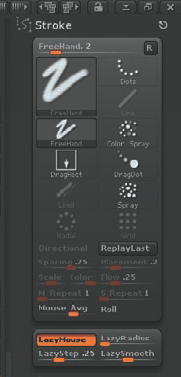
You may now sculpt on the surface of the plane. At the top of the screen select the Brush menu and tear it off with the circle icon so it docks to the side of the screen for easy access. Click the active tool icon and select the Standard brush. You want to make sure your Stroke is set to Freehand and that Alpha is turned off. Set your Draw Size to about ~QF the plane size and leave Focal Shift at 0 and ZIntensity to 20. Your Brush, Alpha, and Stroke settings can also be accessed via the left screen menu shown in Figure 1.16.
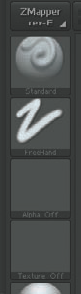
Figure 1.16. This menu at the left side of the screen allows you to select your brush, alpha, stroke, and texture.
Mouse Average and LazyMouse
Under the Stroke menu you will find several options that affect how your brush is drawn across the surface of the sculpture. The Freehand stroke is the most widely used as it behaves like a paintbrush tool in Photoshop. Mouse Average is used to average the instances of each alpha as you stroke along the surface. This can reduce "stuttering" in the stroke or dotting when working at higher subdivision levels. When working on lower levels, keep this set to1.
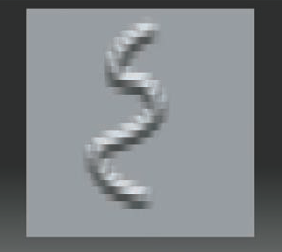
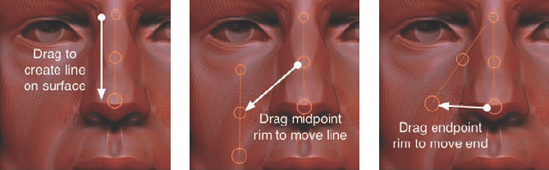
Also in this menu you will find LazyMouse. LazyMouse is another averaging utility that delays your pen stroke so it appears at the end of a red line extending from your brush center. This is very useful when you're trying to sculpt long, sweeping curves that might otherwise be extremely difficult to achieve freehand. The image here illustrates the differences in these two stroke options; the staggered stroke on the left was created without LazyMouse, and the smoother stroke on the right was drawn with LazyMouse.
Click and draw on the model surface now, and you will see it begin to pull at the polygons. The effect is faceted because we are currently at the lowest subdivision level (Figure 1.17). You can add geometry by subdividing the model once with Tool → Geometry → Divide to add one subdivision level.
Note
To add a subdivision level use Ctrl+D; to step up your subdivision levels, press D; to step down, press Shift+D.
Begin to block in the basic form of the lion head (Figure 1.18, video time code: 00:02:17). Remember to add as well as subtract with your brush and rotate often around the shape. Don't get overwhelmed with making little details at this stage. Instead, establish the primary forms of the lion's face and their positions in relation to each other.
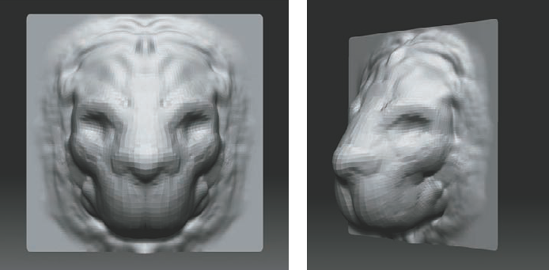
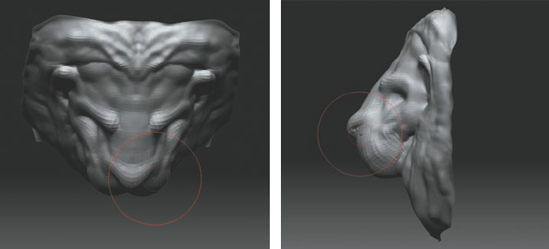
This is easier to do by moving often and working the entire sculpture at once. If you spend too long in one view, the sculpture tends to flatten out. If you sculpted entirely from one view, it may look great until you move the model. A single view can be misleading. Looking at the sculpt in Figure 1.19, it is difficult to perceive the flattening, which is obvious when viewed from the side. This is why you want to be sure to rotate often while you work. Figure 1.20 shows how I corrected the flattening from the top view.
Note
Don't neglect looking at the sculpture from the top and bottom. Typically the viewer won't see it from such an extreme view, but it helps you quickly identify whether the forms of the face are flattening out or turning nicely in space, as shown in Figure 1.20.
While working, establish the forms that are advancing in space, like the snout and brows, as well as those that recede, such as the eye sockets and mouth (video time code: 00:09:49). You can cut in with your brush by clicking the ZSub button at the top menu bar or by simply holding down the Alt key while you sculpt.
To quickly bring the faces of the snout forward and create depth in the head, in a three-quarter view use the Move brush (Figure 1.21). The Move brush will grab and pull vertices underneath the draw radius. Use the Intensity slider to increase the strength of the move. I also use the Move brush to pull the points of the square plane into silhouette with the outline of the lion's mane.

Everyone uses the sculpting tools differently. You find the combination that works for you through experimentation and emulation. Sketching character heads or faces on primitive spheres and planes makes for great practice.
At this stage you can add another subdivision level to allow yourself more material to sculpt on. Continue to use the Standard, Inflate, and Clay brushes to define the head and mane. Notice that I am stroking in a general direction for the sculpted hair as I mass out its form (Figure 1.22).
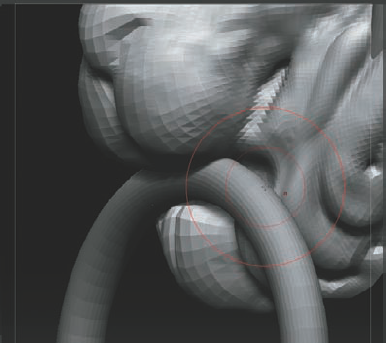
At this point I begin to carve away the recess where the ring will fit into the lion's mouth (Figure 1.23, video time code: 00:20:25).

Now that the basic form of the lion is established, let's add the ring to his mouth. Adding the ring at this stage will allow us to sculpt the forms of his mane and mouth around the ring so it appears that the two parts are interacting.

To make this ring ready for inclusion with the rest of the lion head, convert it to a polymesh. Click the Tool menu at the top of the screen and click the Make PolyMesh3D button (Figure 1.25).
To add this to the lion head as a subtool so you can manipulate both models on screen at once, you must append it to the current tool. At the top of the screen click Tool → Subtool. In the Subtool menu is a button marked Append; click it and a flyout menu will appear showing all the currently loaded ZTools. From this menu select the Lion tool. This will add the Lion ZTool as a subtool to the ring (Figure 1.26). Subtools combine multiple ZTools together into one, allowing you to sculpt and manipulate each separately while retaining their positional relationship to each other. Later in this book we'll use them for placing eyes and other accessories into a character while retaining multiple levels of subdivision on each tool.
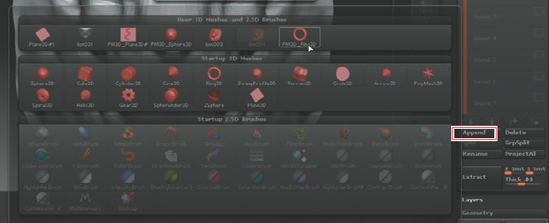
Figure 1.26. Clicking the Append button will open a menu from which you can select the tool you want to add as a subtool.
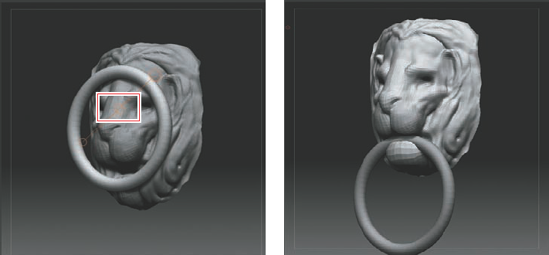
The ring should now be centered in the lion's head. It must be moved down into the mouth area we created for it. There are three methods of moving objects and faces in ZBrush that are useful for different tasks (described in a moment). To move the ring, we'll use the Transpose tools.
Enter Transpose mode by pressing W. You will now have a transpose line on the screen. Click on the 3D ring and drag to a point on the canvas to draw a new transpose line (Figure 1.27). Because we are in Move mode at the top of the screen, this will allow us to move the ring (Figure 1.28, video time code: 00:23:02). Notice that there are two other buttons, for Scale and Rotate, respectively. If these buttons are active, the transpose line will scale or rotate the ZTool instead of moving it. The transpose ring can be repositioned by clicking on the line itself, or to move an endpoint click on one of the three circles. To use the transpose line to manipulate the currently selected subtool, click inside one of the three circles and drag with the mouse.
Click in the center circle and drag. You can see how the Ring3D tool can be easily moved and placed in space. If you need to move it back from your view, simply rotate the model so you are looking down on it. Place it approximately in the lion's mouth. We'll use the Move brush to adjust the shape of the mouth to better grip the ring (Figure 1.29).


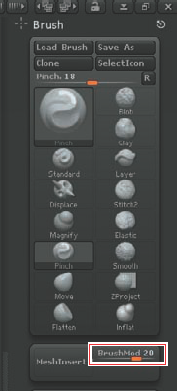
Now that we have roughed in the lion head and placed a subtool, we can begin to refine the forms of the sculpture overall. In this section we'll continue to use the sculpting brushes to make the rough shapes relate to each other and create a sense of rhythm in the forms. Before we start, let's take a moment to look at some of the new tools and modifiers we'll use in this section, specifically the LazyMouse Pinch brush and BrushMod sliders.
At this stage, let's develop the mane. Add another subdivision level by pressing Ctrl+D. There will be a level of stylization to the planes of the hair. We want to create sweeping arcs that transition from the top of the head to the chin. To create smooth-flowing strokes like this with hard edges, use the Pinch brush. Select the Pinch brush and set your BrushMod slider to 60 and your ZIntensity to 15 (Figure 1.30). As you stroke along the surface, notice how it pulls the edges together and up (Figure 1.31, video time code: 00:27:11).
If you set the brush slider to –60, the inverse happens: it presses in while it pinches. I keep the slider at 60 and use the Alt key to invert my stroke to press in when needed.
You can further control the sweep and smoothness in the strokes of the mane by using the LazyMouse option. This technique will average the stroke and help you create a sweeping line. Press the L hotkey or select Stroke → LazyMouse (Figure 1.32).
The red line that trails slightly behind your stroke is the center of the influence (Figure 1.33). This delay built into the LazyMouse stroke is what allows you to make long sweeping motions with the brush tools that would otherwise be difficult, if not impossible, with an unassisted freehand approach.
With the ring in place, return to Draw mode by pressing Q. Change the selected subtool from the ring back to the lion head (select the subtool from the Tool → Subtool menu or by Ctrl+Shift-clicking the lion head in the document window). You will notice the lion head becomes a lighter shade when selected.
Select the Move brush from the brush palette and tumble to a side view. Adjust your draw size and pull the lower jaw up and around the ring (Figure 1.34, video time code: 00:25:07). If the Move tool isn't working strong enough, raise your ZIntensity slider to increase its power. You may also want to turn on subtool transparency with the Transp button at the right side of the screen. This allows you to see through subtools in front of your active tool but also allows your tool to sculpt through to the hidden surface.
Continue to pull strokes in the mane, keeping in mind the gesture of the lines and how they flow down into the ring. Keep looking for the overall graphic quality of the shapes and trying to maintain a visually appealing rhythm. When using LazyMouse for a long fluid stroke, try setting your ZIntensity lower than necessary and using the Replay Last command to repeat your stroke, building up to the form you want by repeating. Replay Last is found on the Stroke menu, or use the Ctrl+1 shortcut. Each time you use Replay Last, the same stroke repeats and thus builds up its effect on the surface.
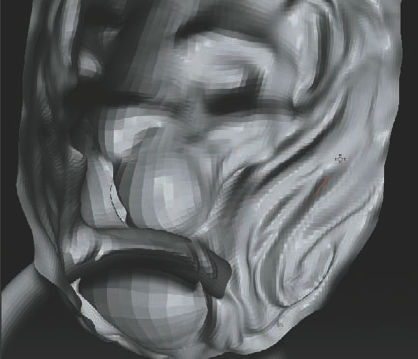
Some of the deep recesses could benefit from being tightened. Doing this from the front of your sculpture can sometimes be tricky if the area you want to tighten is small or close to other details you want to remain unchanged. Often you will pinch the faces on either side and inadvertently change areas you wanted to remain unchanged. Masking into tight areas can also sometimes be a challenge. One unique solution to this in ZBrush is that you can sculpt from inside the model as well as the outside.
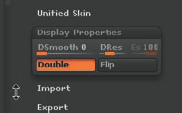
Select Tool → Display Properties and click the Double button to activate double-sided rendering (Figure 1.35). Now when you rotate around the back of the lion head, you can sculpt from the inside (Figure 1.36). This is very helpful in tight areas like the creases in the hair or the eyelids.
From the front, draw a masking line by Ctrl-clicking and dragging to mark the area you want to pinch. This is just a visual note so the same area can be seen easily from the inside. Masking displays on both sides of a face (Figure 1.37).

Figure 1.37. With double-sided rendering on, you can sculpt from inside the model as well as outside for reaching tight areas (the right image shows the mask stroke as seen from the back of the mesh).
Note
You can mask out areas you don't want to affect with your strokes by pressing the Ctrl key. Your cursor turns yellow to let you know you are in masking mode. To paint out part of a mask, use Ctrl+Alt-click. To mask large areas, Ctrl-click outside the model and drag a masking rectangle. Also experiment with the Lasso tool for making more specific and complex mask selections. Turn on Lasso with the Lasso button

Rotate to the back and locate your masked line. Clear the mask by Ctrl-dragging on the document window or by choosing Tool → Masking → Clear and using the Pinch brush to deepen and sharpen the line. Use a BrushMod setting of 60 and a small Draw Size and Focal Shift of 0. I also use the Pinch brush to refine the planes in the head. I want to add a stylized planar feel to the lion's face while still maintaining the character of a lion.
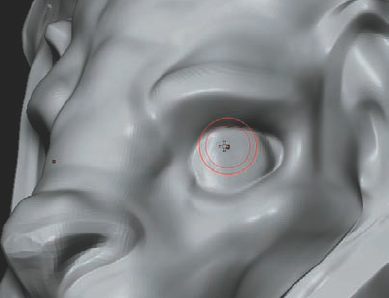
To sculpt eyes directly into this mesh, begin with the Inflate brush at a low intensity and build up the spherical shape of the eyeball (Figure 1.38, video time code: 00:58:58).
Adding the eyes is easy with masking. While holding down Ctrl, draw a mask in the shape of the eyelids over and around this basic sphere shape. Once the shape of the exposed eye is masked in, you can invert the mask by Ctrl-clicking the document window somewhere off the model (Figure 1.39).
Your eye is now unmasked while the rest of the head is masked. Use the Move brush from the side view to pull the eye in slightly (Figure 1.39). This will create the thickness of the eyelids. Using the Inflate brush, build out the sphere of the eyeball and corneal bulge.
Ctrl-click off the model to invert the mask so the eye surface is masked. Refine the edge of the eyelid with the standard brush and LazyMouse, adding some thickness here.
Note
While you sculpt, be sure to move between the subdivision levels. Always work at the lowest level that can support the form you are trying to add. If you sculpt the entire time at the highest level, it becomes very hard to make big changes to the shape without creating a lumpy surface.
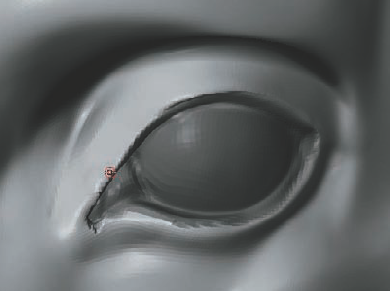
With the Pinch brush and LazyMouse on, pinch the outer edge of the eyelid (Figure 1.40). Be sure to reduce your draw size. At this stage, I also alternate to pinching in with the Alt key to add some subtle wrinkles around the upper eyelid and indicate the furrow at the bottom of the eye where the sphere of the eyeball dips into the skull (video time code: 01:06:36).
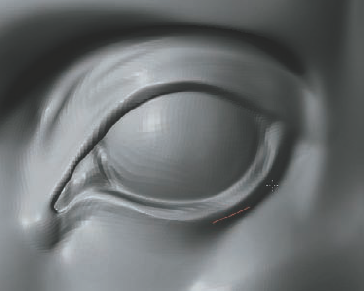
Pinch the inner edge closest to the eyeball (Figure 1.41). Hold down Alt to pinch in instead of out. Add the medial canthus of the eye and tear duct with the standard brush. Mask out the little dot of skin in the corner of the eye to create the membrane. Invert the mask and inflate slightly with a low intensity.


The following list represents some of the edits to this sculpture to bring it to completion:
Add the tear duct to the eyes. These little details are extremely important, even on a stylized eye such as this.
Raise the ears higher on the head to give a more feline-like appearance.
Increase the slope in toward the jaw and pull the side curls out at an angle. While I made these edits I was looking for a visually pleasing stylization to the lines in the head and hair. The gesture of the curves implied by the mane leads your eye in a figure-8 around the sculpture.
At this stage, the basic sculpture of the lion's head is complete, but so much more is possible here. If you would like to see how this sculpture is incorporated into a 2.5D illustration — with additional details like a backing plate and with the door textured and stained — please see the DVD for a PDF file which continues this project as an illustration (Figure 1.42). I encourage you to look at this material since ZBrush is a powerful illustration tool and many of its sculpting techniques are built on this foundation.
These techniques are useful to the digital illustrator as well as when conceptualizing a character with ZBrush. Even though you can export your work to external renderers for animation and rendering I wanted to show the power of ZBrush as a rendering and illustration tool in itself. These are often overlooked aspects of the program but they are powerful tools to have in your arsenal even if you never do 2.5D illustration. Many of these tools are usable on 3D models in edit mode using the Projection Master script. Projection master will allow us to blend 3D sculpting with the 2.5D tools to create highly detailed models for export to other applications. In Chapter 2 we'll look more in depth look at sculpting a bust in ZBrush.