
In this chapter we'll continue to explore the tools and techniques for sculpting in ZBrush. We'll start by using a ZBrush primitive sphere as a base to sculpt a human skull. During this process, we'll pay special attention to the anatomical forms and relative proportions of the skull. Once the skull is roughed in using the Rake and Clay tools, we'll mass out the muscular tissues and build a human head.

In this chapter I'll introduce many of ZBrush's powerful sculpting tools as well as some important aspects of human anatomy. It is important to inform your character work with real anatomy—even if it is a fantasy character. If you understand the bone and muscle that influences surface forms, your creature and character work in ZBrush will be all the more convincing.

Note
Starting a head from a simple sphere primitive has several benefits. Sculpting character heads from spheres in ZBrush is a valuable exercise, similar to sketching on paper or with a digital ball of clay. Also, approaching a complex form in ZBrush from such a simple primitive helps to illustrate how topology in ZBrush is not a major concern, provided that the polygon count of your base model is low enough that it can be subdivided to the maximum level. The higher your subdivision levels, the more polygons you will have to push and pull into the shapes you need. Please see the DVD for a video of the head sculpture from this chapter. You will also find a bonus DVD of an alien sculpture which was created from a ZBrush primitive sphere.
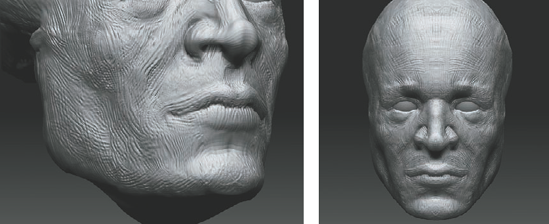
At this time I'd like to introduce you to the concept of multiresolution editing. Multiresolution editing means that changes you make at level 1 on a ZTool telegraph all the way up to the highest subdivision level; changes at the high levels are telegraphed down to level 1 (Figure 2.1).

Figure 2.1. The head on the left was altered with the Move tool at level 1. Stepping up to level 3, the changes are telegraphed through each subdivision level and affect each one. (Head by Ryan Kingslein)
Because of this interaction between subdivision levels, when the artist works at the lowest possible level, any forms made will translate to the higher levels. This workflow helps reinforce the "big shapes to smaller details" we discussed in Chapter 1. When you create the big shapes first and work down to the details, your sculpture maintains a solid sense of form. By working at lower subdivision levels, you won't deal with enough geometry to become lost in details. This ensures that you focus on big shapes first and then add details as you begin to subdivide. This is the process we used in Chapter 1 for the lion head. This kind of approach also helps create a smooth and organic surface without the "lumpiness" seen in some ZBrush models.
Although it is desirable to work at the lowest possible subdivision level for the form you are creating, some ZBrush brushes work differently at the higher subdivision levels. The Rake and Clay brushes, for example, are more effective at the higher subdivision levels. The kind of form that these brushes build is rough, so the focus is still on building basic large shapes first and then working down to the details. This is closer to sculpting in actual clay, as you use larger rakes and broad strokes to create base forms and then refine them with tighter and smaller strokes until the surface is smoothed and finished. This latter process is the one we'll use for the human head sketch in this chapter. I use a combination of both working on the lowest levels with some brushes and then higher levels with Clay and Rake tools, but it is important to understand each approach and its merits. Most of all, always remember to work on the biggest shapes first and work your way down to the details.
The Brush menu contains all the real-time sculpting tools that you will use while working on an active tool in the document window. These brushes can be used on the model at multiple subdivision levels while you freely rotate in Edit mode.
You may notice there are brushes available under the Tool menu. One of these brushes is called the Simple Brush. We explore these in the bonus Chapter 1 on the DVD. These are 2.5D painting brushes and are not to be confused with 3D sculpting brushes, which can be found in the Brush palette. In this chapter, we'll focus on the Brush palette tools, which can be used on a model that is in Edit mode. The Brush palette contains a versatile selection of brushes and brush modifiers (see Figure 2.2). It also allows artists to create and store their own custom brush variations that are loaded each time ZBrush starts. Several specialized masking options are also available, as well as control curves to facilitate altering the way the brushes interact with the surface.
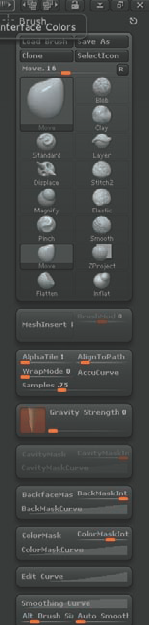
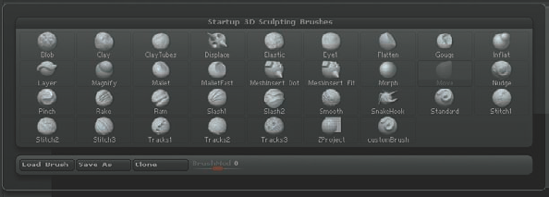
At the top of the Brush Manager window you will find a selection of brush icons. These represent the most recently used brushes and are not representative of the full brush set. To access the complete selection of brushes, click the active brush icon. The active brush icon is the large button in the upper left of the Brush menu as well as the upper left of the standard interface. This opens the brush fly-out menu (Figure 2.3).
Beneath the brush icons are several sliders, curves, and icons. These represent the many different modifiers you can apply to your brush. The most important is the BrushMod slider. The BrushMod slider affects each brush differently depending on the brush selected. For instance, when Pinch is selected BrushMod determines whether the brush pinches in or out (Figure 2.4); however, when you're using the Smooth brush, BrushMod controls the height of the smoothing effect (Figure 2.5). We used this slider to affect the Pinch brush when working on the lion head in Chapter 1.

Figure 2.4. The BrushMod slider changes each brush differently. When using Pinch, the slider determines if faces pinch in or out.
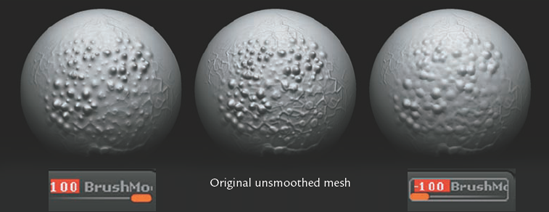
Figure 2.5. Figure 2.5a: The BrushMod slider determines if the smooth brush affects the recesses or the high points of the sculpted detail. (The center image is the original, unmodified mesh.)
Table 2.1 describes the most frequently used ZBrush sculpting tools.
Table 2.1. The Essential ZBrush Sculpting Brushes
For more information on the brushes, visit the ZBrush wiki: http://www.zbrush.info/docs/index.php/Brush_Types
Note
The Difference between the Standard and Inflate brushes lies in how the faces are pulled out from the surface. The Standard brush pulls all faces beneath the brush out or in a single direction. The Inflate brush pulls faces out along the normal of the face. The surface normal is the direction that points straight out from any 4 points. The image in Figure 2.5b illustrates this difference.
Other brushes such as Mallet Gouge and Stitch are available. These are specialty brushes, which are created by combining existing brushes, strokes, and alphas. These specialty brushes are based on macros from ZBrush 3.0. Experiment with these brushes on a sphere or plane to see the effect they have.
In addition to BrushMod, the Brush menu contains several more options for modifying brush behavior. See Table 2.2 for descriptions of these other options.
Table 2.2. The Brush Menu Options
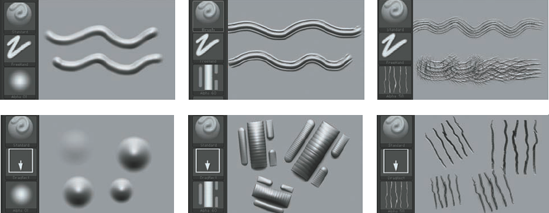
Brushes are further modified by alphas and strokes. Alphas are grayscale images that are imported into ZBrush or selected from the default alpha set. They serve as the shape of the brush itself. Alphas can also serve as stencils or texture stamps, which we'll cover in Chapter 4. Figure 2.6 illustrates the effect of various alphas combined with different strokes.
Note
Alphas are grayscale images that control the shape of the brush. Strokes control how the alpha is applied to the surface by the selected brush.
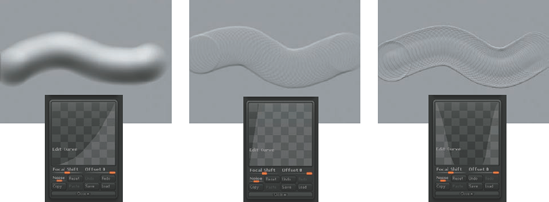
The Edit curve controls the strength of a brush over the course of its center to the outermost falloff ring. The point on the left of the curve represents the brush strength at its outer radius, whereas the point at the right represents the strength of the effect at the brush's center. Manipulating the Edit curve can create many interesting brush effects, as you can see in Figure 2.7.
One common edit I make to the Edit curve is what I call creating a "plateau" with the brush curve. By selecting the Inflate brush and changing its Edit curve to that shown in Figure 2.8, I can drastically alter the manner in which the brush adds form to the surface. By giving the brush a more subtle falloff, strokes build in a more gradual fashion, thus making it easier to create changes in the surface that are less pronounced.
Backface masking is useful when you're working on thin meshes such as clothes, wings, or other objects where the front and back faces are close together. If you are dragging a stroke on an object where the thickness is less than the size of the brush, often the stroke will carry over to the opposite side. Backface masking eliminates any faces other than the ones on the side on which you are working, thus reducing this problem.
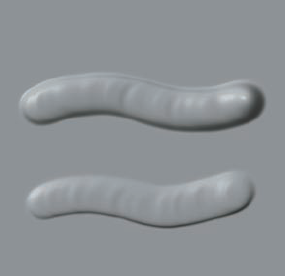
The Gravity modifier helps reproduce the effect of gravity or wind on a surface. Faces are shifted in the direction of the arrow in relation to the model's current position on screen. To use this modifier, select the Gravity arrow and position it in the direction you want the force to pull. Then, adjust the slider for the correct strength. This works well for folds of skin with the Inflate or Elastic brush; it helps introduce the effect of weight on hanging folds of flesh. The Gravity modifier is also helpful when you're sculpting drapery—positioning the arrow horizontally can create the impression of wind billowing in a fabric. In Figure 2.9, the elastic brush was used to create the strokes on the top. On the bottom, the same brush was used with the addition of a Gravity modifier. Notice how the weight of the stroke is along the bottom edge as if it is being pulled down. Keep in mind that this effect is relative to the model's position on the canvas at the moment of the stroke, not its pivot point.
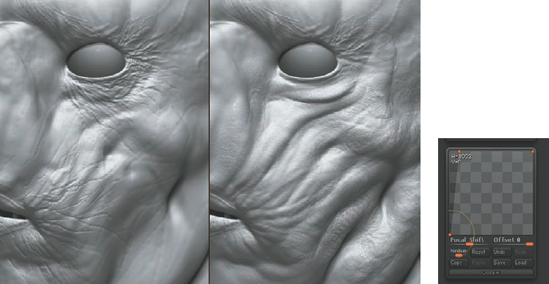
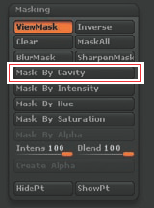
Cavity masking masks out the recessed areas of the sculpture, allowing you to paint and sculpt only on the high points. This effect can be blurred or inverted with the options available in the Cavity Masking menu. This same mask is also available under Tool → Masking → Mask by Cavity. Figure 2.10 illustrates the effect of this button. The difference between the cavity masking in these two areas is that the Cavity Masking command in the Brush menu is controlled by the curve but there is no visual indication of what areas are masked. Brush-based cavity masking is a real-time masking function that updates and changes as you sculpt the mesh, whereas the command in the Masking submenu is applied once and does not change in real time. When using Tool → Masking → Mask by Cavity, you'll see which areas are masked; however, the lack of a curve offers less control over the strength and spread of the masking effect. In addition, there is no real-time update as you sculpt (Figure 2.11).

The Brush Manager makes saving your own custom brushes simple. In this section, you will create a custom version of the Smooth brush. This brush will be saved in the default ZBrush brushes folder, where it will be loaded each time ZBrush starts.
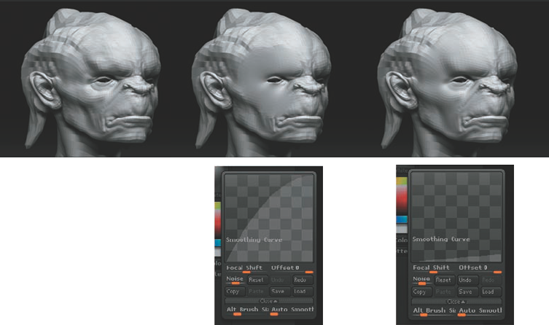
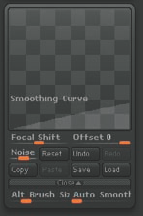
In Figure 2.12, notice how the Smooth brush can overpower the surface, removing much more form than you might intend. By adjusting the Smoothing Curve and Smooth brush settings, we'll create a brush that does not have this effect. We can then save it as a custom brush for later use.
Note
On the book's DVD you'll find a selection of custom brushes, including this one, called softSmooth. Experiment with these brushes and make your own. After getting some experience with the ZBrush toolset and customizing some brushes, you can build a personal library of brushes. Follow these steps to create and save your own custom brush.
Here are the steps to create a custom brush:
Select the Smooth brush from the Brush palette. Set BrushMod to 0 and click the Clone button. This creates a copy of the Smooth brush that we can alter rather than replacing the brush.
Scroll to the bottom of the Brush menu. Expand the Smoothing Curve window by clicking on it. Select the farthest right point and drag it down. The curve should look like Figure 2.13.
This ensures the brush will be weaker at its center of influence than the default Smooth. The far-left point represents the strength of the brush at the outermost ring; the right point represents the strength at the center of the brush. Try this brush on a surface. Notice how the effect is much softer and less destructive.
To save this brush, click Save As and name the new brush
softSmooth. If you save inZbrush/Zstartup/brushPresets, the brush will be available each time you start ZBrush. The Brush Manager will also save any alpha and stroke settings when you save the brush.
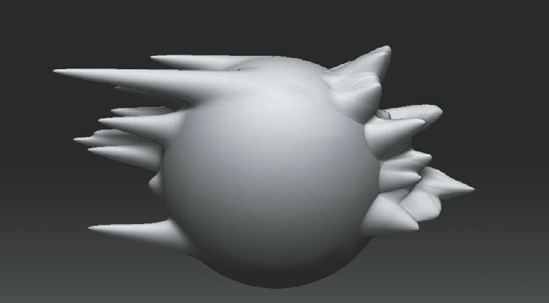
ZBrush 3 includes several brushes designed to take advantage of the ability to interactively sculpt millions of polygons. These brushes work on the highest subdivision levels of the ZTool; I call them the Clay brushes. They include Clay, Claytubes, Snakehook, and Rake, as well as several brushes that are variations on these, such as Mallet, Slash, and Gouge.
The Clay brushes are designed to take advantage of the capability to manipulate millions of polygons in real time. Unlike the Standard, Inflate, and Layer brushes, the Clay brushes function best when the mesh is at a higher subdivision level. These brushes add material in a loose organic stroke, which feels like actual clay. Figure 2.14 shows the difference in the same stroke on a low poly sphere and a higher subdivided one. The sphere on the left is 8,000 faces while the one on the right is 2 million. ZBrush will allow you to subdivide any mesh to a level that the current machine can handle based on how much physical RAM is installed. In Chapter 3 we'll discuss base meshes and optimizing for ZBrush in more detail.
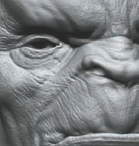
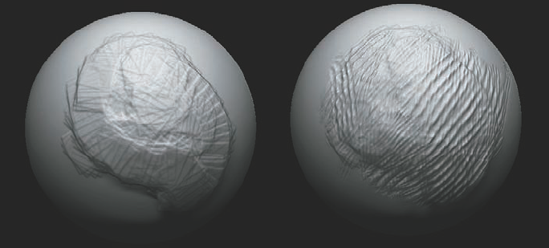
The Rake tools in ZBrush are based on a real-world sculpting tool. In clay sculpting, rakes are small, serrated blades that are used to scrape down clay at levels determined by how sharp and deep the teeth are (Figure 2.15). Rakes allow the sculptor to rough in forms in a loose manner, then refine them by using smaller and smaller rakes until the whole surface is smoothed. In Figure 2.16, I started the ogre bust with basic planes using rake strokes; as I work the surface, the rakes become smaller and the surface finer.
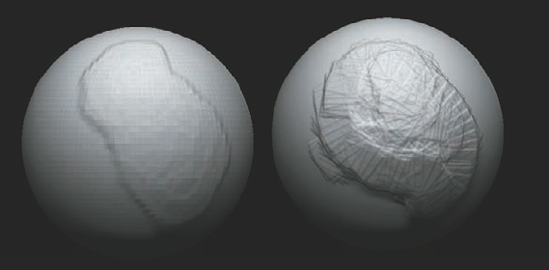
Figure 2.14. Claytubes and rakes on both a low-res and high-res mesh. Notice the increased fidelity of the brush effect on the higher-resolution mesh.

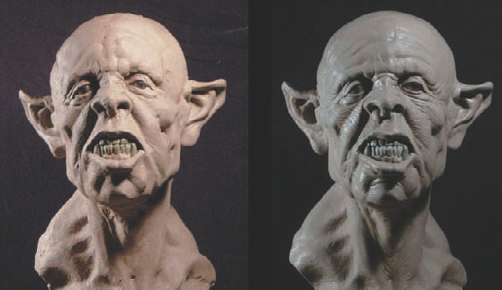
Figure 2.16. The ogre on the left consists of just the basic forms with prominent rake marks; the right image shows the ogre bust after the rakes have been refined and the surface detailed.
The procedure for working with rakes is to crosshatch across the form you are trying to refine, using smaller draw sizes with each pass. Figure 2.17 shows how this is done in water-based clay. With a combination of crosshatching and stroking along the direction of the form, you can attain a pleasing surface and easy transitions between forms.
Typically, forms are built up with any combination of the Claytubes, Standard, and Inflate brushes and then raked down into more specific forms with the Rake tool (Figure 2.18). This may be a difficult concept to fully grasp without seeing it in action. To see rakes in use, watch the video files included on the DVD for this chapter.
What Is a Rake?
A rake is a tool used by sculptors to remove excessive material, such as clay, from a sculpture. By employing the rake, we are able to shape and define the forms of our creation.
In sculpture, there two methods of creation. One is additive in the form of clays. The second is subtractive, as in marbles. Each method utilizes the rake in its sculptural process. With marble, we use various chisels with ever-refining teeth to form, shape, and polish the piece. We use clay rakes in a similar manner to define the silhouette and curvature of our forms, refining them to a smooth finish (if that is the desired effect).
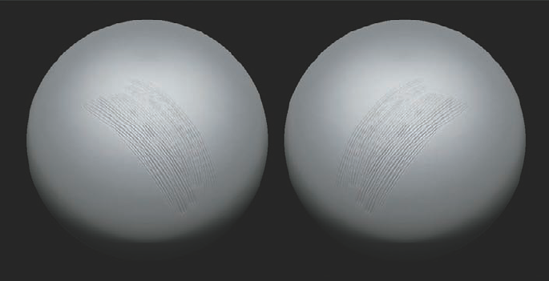
Here we have a sphere in which I have dragged two opposing strokes across the surface. It is where the two strokes meet that the most material is being removed (below left).
By pulling the brush in the direction of the form we want to express and countering the stroke in the opposite direction, we'll slowly shape the contour. As we repeat this technique over and over, we create the desired form or shape (below right).

We continue this process with smaller and smaller diameters or brushes. The finer the teeth and density of our mesh, the closer the surface will resemble flesh (below left).
In the following image, we have a sphere with a wavy line down the center. Notice how the bounce of light is enhanced by the directionality of the rake groves. This effect creates a tidy path for light to travel down and within (below right).

This idea of strokes and patterns manipulating light patterns is not a new one and in fact has been utilized by oil painters on their canvases for centuries. Strokes are an essential part of sculpture and drawing, and you should pay attention to them. Whether we intend it or not, we are sending a message with the quality of our strokes.
Here we see the same form with two different stroke patterns. Notice how the light is perceived differently. Also notice how your eye follows the direction of the strokes.
Directionality is obviously the goal here. Observe your face in the mirror. Notice how there is a natural tension to the surface of your skin as it is stretched over fat, muscles, and bones. There is a directionality to your pores, which in turn are affected by gravity and such.
If you are aware of these rules, you can employ them in your sculpture and have light travel over your forms.
Of course, if you use this method, avoid smoothing your model completely or removing all the Rake tool markings. Such markings lend an energy to the sculpture. By utilizing finer rakes and or smaller diameters, you can define the forms more precisely, eventually reaching a point where you're defining the most minute surface patterns of the skin. Rakes were not the only tool and brush utilized to create our final image, but they were the foundation.
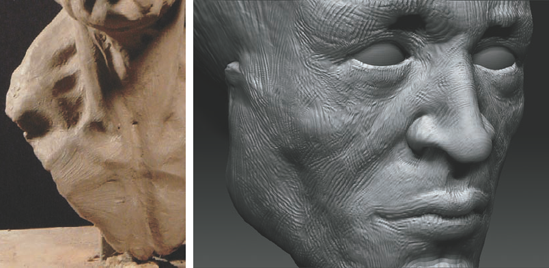
The approach used to sculpt the head in Figure 2.19 is called ecorche. Ecorche is derived from the French word for "skinned" and generally refers to a sculpture of a human or animal with the skin and subcutaneous fat removed so the muscle and skeletal systems are visible, as in Figure 2.19. As a method of anatomical study, ecorche sculpture involves a constructive approach to building the figure by sculpting the bones and overlying muscles layer by layer, working up to the surface forms. This allows the artist to gain a deeper level of insight into how bone, muscle, and fat combine to create the human form.

Figure 2.19. Examples of ecorche sculpture sculpted by artist Andrew Cawrse, available at freedom-of-teach.com. © freedom-of-teach 2008
ZBrush layers and clay sculpting tools allow us to use this same approach in a digital medium. Starting with a PolySphere tool, we'll mass in the forms of the skull, add the major facial and epicranial muscles, and then add the skin and fatty tissue that fills out the transitions. This exercise is inspired by a video produced by digital sculptor Ryan Kingslein, available at www.zbrushcentral.com.
Note
In this exercise I approach the head, neck, and ear separately for the sake of clarity in illustrating the steps. In reality I would sculpt all parts simultaneously, thus keeping a unified level of finish to the whole head as it progresses. See the DVD for a video of this sculpture from start to finish.
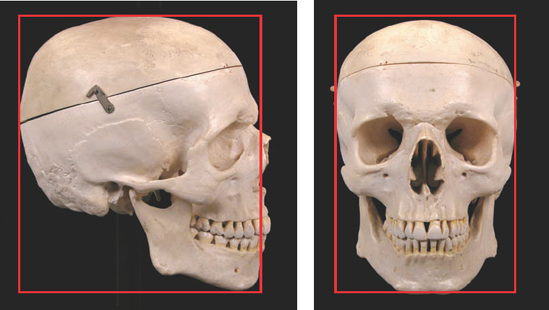
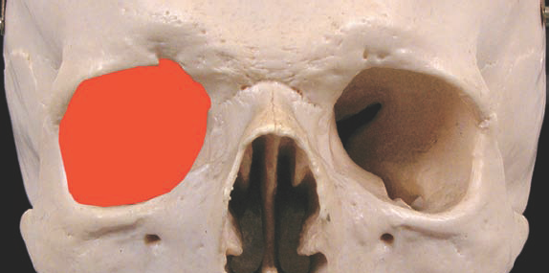
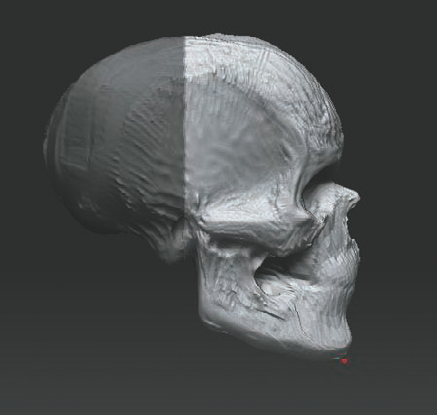
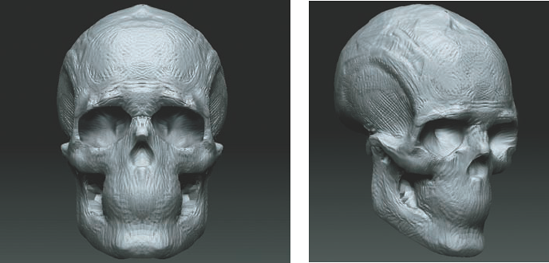
Before we begin sculpting, let's take a moment to look at the human skull and note some particulars about its shape and the proportion of the masses to one another. The skull can be divided into the cranial mass and the facial mass; these are color-coded in Figure 2.20. The cranial mass is an ovoid shape that forms the protective covering around the brain. Hanging off the front of this ovoid shape is the wedge of the facial mass.
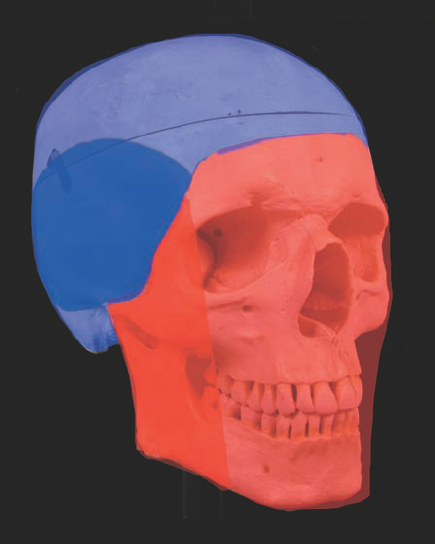
A common mistake is to make the face too big on the head by neglecting the cranial mass. We as humans are constantly focused on the faces of those around us, particularly the eyes. Because of this, our natural inclination is to enlarge these parts. By paying special attention to bony landmarks, proportions, angles, and measures between each part of the head, we can ensure the shapes maintain their proper relation to each other.
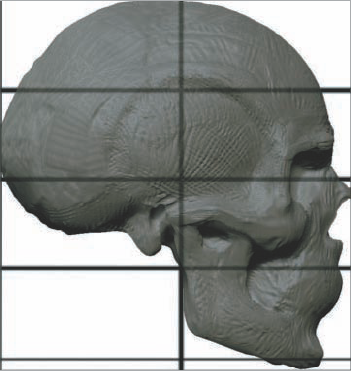
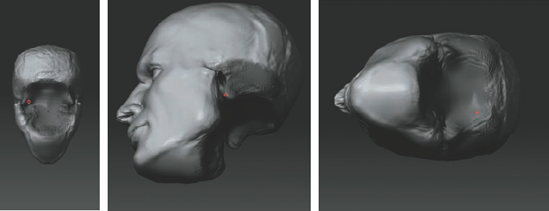
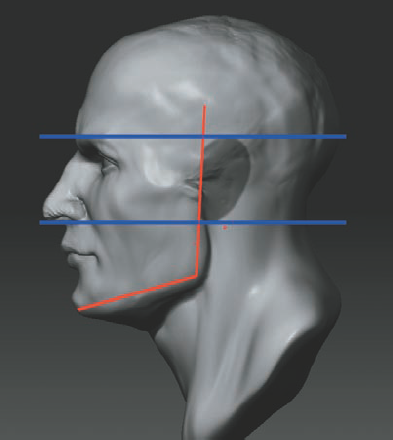
In the following sections I'll provide a few guidelines for you to follow. In Figure 2.21 notice that the skull can fit in a box. The centerline of the Y-axis of the skull passes through the auditory meatus, also known as the ear hole (Figure 2.22). This is a key landmark when sculpting the head because it represents an immobile point from which you can make all your comparative measurements. The lateral midline of the skull passes through the eye sockets and nasal bone (Figure 2.23).

To begin, you will sculpt a generalized human skull from a ZBrush primitive sphere. This exercise describes a high-resolution sculpting method. The sculpting process begins at a higher subdivision level, and the form will be built using the Claytubes and Rake brushes.
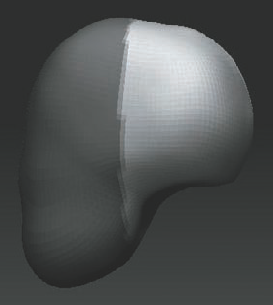
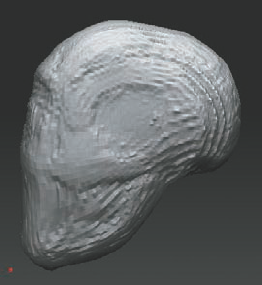
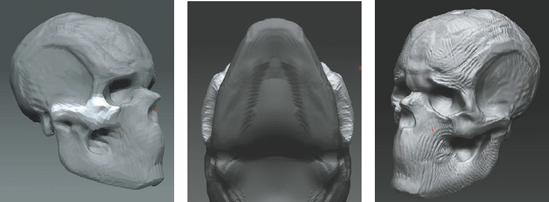
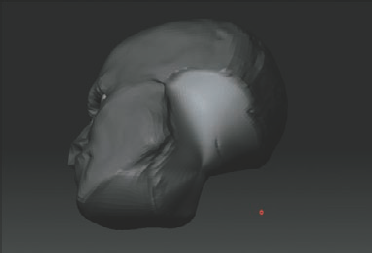
As discussed in Chapter 1, complex shapes can be broken down into simpler forms for easier study and replication. The initial shape you want to strive for is shown in Figure 2.24. Notice the rounded facial plane and the overall simplification of the head into a single basic shape. By working toward this first step and building all the secondary forms on it, you can maintain a sense of structural integrity throughout the sculpting process.

During this exercise there are several bony landmarks that will be of interest. These are points that we want to find in the sculpture and ensure are in correct spatial relationship to each other. Failure to find these points or keep them consistent makes it easy to drift off proportions and make a head that appears strange. Figure 2.25 shows several major landmarks labeled on a skull.
Create a sphere by selecting the Sphere3D tool—be sure not to select the ZSphere but the Sphere3D tool. Draw it on the canvas and enter Edit mode with the T key. Rotate the sphere so the poles are at the top and bottom. You can see the poles clearly in frame model by pressing Shift+F. Poles are the points at the top and bottom of the sphere where all the edges meet. Often this will be the place where you will get a pinch or strange tweaking in the mesh while you sculpt. By ensuring they are at the very top and bottom of the head, you'll make them easy to avoid. Remember to convert the sphere to a polymesh by clicking the MakePolyMesh3D button on the Tool menu.
Note
You may choose to use the PolySphere.ztl tool for this demonstration instead of the Sphere3D tool. You can find the PolySphere tool in the ZBrush3/ZTools folder; it is not loaded by default. Take care not to select the Sphere3D or the ZSphere tool. The benefit of using the PolySphere ZTool is that the model has no poles. To Load this tool, click the main Tool menu and select Load Tool. Browse to the ZBrush3/ZTools directory and select PolySphere.ztl.
From the Brush menu select the Move brush. Turn up ZIntensity to 90 so the move effect is stronger. Begin to create an egg shape from the sphere. Make sure X symmetry is turned by choosing Transform → Activate Symmetry.
Rotate to a side view, hold down the Shift key while you click, and rotate to snap to a side orthographic view. From the side, rough in the plane of the face and the rear of the cranial mass.
Finally move to a top view and make sure the head tapers slightly toward the face.
At this point, Ctrl-drag from a point off the model to drag a mask marquee over one half the head from a side view. This helps you determine the halfway point and ensure the masses are the same on either side (Figure 2.26). Based on this midpoint, correct the masses at the back of the head.
Note
To create a mask marquee, hold down the Ctrl key and drag from a point off the model. A dark marquee will appear. Anything inside this box when you release Ctrl will be masked. If you have an alpha selected, the mask will be shaped like the alpha unless you release Ctrl. If you press Ctrl+Alt, the mask will invert and you will be unmasking what is within the marquee.

At this stage we have roughed in the form of the head, taking into account its most basic shape from front, top, and side views. These changes were made at a lower subdivision level since it is easier to make large form changes when the model has fewer faces. In the next series of steps we'll subdivide the model and start adding secondary masses with the Rake and Clay brushes.
Subdivide the mesh so there are enough faces that the Clay brushes will be effective. Usually 500,000 or more faces will suffice. Press Ctrl+D to divide the mesh three times, or choose Tool → Geometry → Divide.
Now switch to the Rake tool. Using the Rake set to ZAdd, begin to mass out the side planes of the head. Work around to the lower-back portion of the skull. Then move to the front and crosshatch across to create the plane that will ultimately become the face. There should be a slight curvature to this plane.
Once these surfaces are indicated, switch to ZSub by pressing the Alt key and start carving back and defining the edges between the planes with more clarity. Throughout this process we are alternating between ZAdd and ZSub with the Alt key (Figure 2.27).
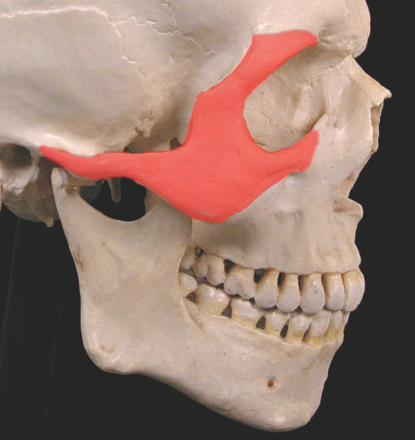
Using the Rake, place the zygomatic bone, also known as the cheekbone (Figure 2.28). This is a major bony landmark on the face. Be sure it angles back and up on the side of the head. This bone will point to the center of the ear.
From the side, continue the curve up the side of the skull suggesting the temporal ridge. Switch to ZSub and start to hollow out the temple of the skull (Figure 2.29).
Note that the skull tends to look sad because of the slight downward angle to the eye sockets (Figures 2.30). Switch to the Standard brush and with ZSub active begin to carve out the hollows of the eye sockets, keeping this ovoid shape in mind.

Now let's move on to sculpting the facial mass:
Carve away the shape of the nasal cavity from the front. Now move to a side view and tug the area between the nose and eyes back to create the ridge of the nasal bone. This is an important landmark in the profile, so be sure to introduce it now to avoid flattening of the face (Figure 2.31).
From the side, tug the cheekbones back with the Move brush.
From the front, adjust the angle from the cheekbones up to the corners of the eye sockets so they taper back as they move up. This area is called the zygomatic process and is visible as the lateral upper corner of the eye socket on the finished head (Figure 2.32). Make sure the mouth area has a slight curvature to it. Consider this a cylinder shape on the head. This is important because later when you add lips to the head, they will lie more naturally on the face if they are sculpted around a curved base (Figure 2.33).
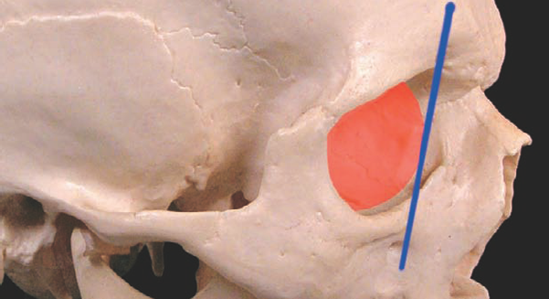
Using the Standard brush with ZSub on, carve away the hollows at the sides of the head (the temples). This region is called the temporal fossa, and we'll fill it with an important muscle in the next section.
Don't worry about the rough surface—we'll refine that later. For now, focus on the integrity of the shapes you want to create. Remember that these rake marks will be refined later with a combination of smaller, finer rake strokes and the Smooth brush.
Using the Move brush, pull the underside of the cheekbones in to create the deep hollows seen there. This area is empty on the skull, but in this case tuck these faces deep into the head (Figure 2.34).
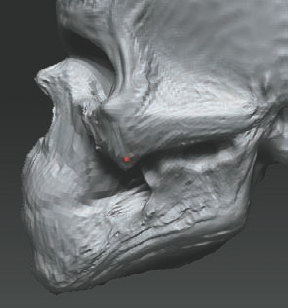
The glabella is a raised trapezoidal shaped formation between the brows. It wedges into the nasal bone from between the superciliary arches and creates the shape of the center of the brows (Figure 2.35). Mask the bridge of the nose so you can create a hard line between this form and the one we'll now add. Create the shape of the glabella by sculpting against the mask (Figure 2.36).
Using the Move brush, create the ear hole, or auditory meatus. Remember that this hole in the side of the skull lies just behind the halfway line between the front and back halves (you can see it in Figure 2.22). It should be placed just below the end of the zygomatic bone. Using Move, hold down the Alt key to move in and out from the point under the brush. This constrains the movement and makes it easy to slide the faces into the head, creating the deep hole.
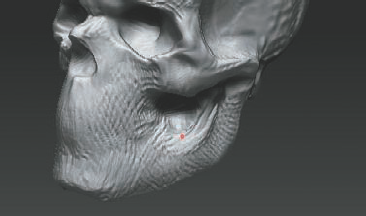
From beneath the auditory meatus comes the mastoid process (Figure 2.37). This is a small mound protrusion just behind the jaw. Using the Move brush again, pull the mastoid process down from the auditory meatus. The mastoid process will serve as a landmark later on when we sculpt the neck; this is the insertion of the most prominent neck muscle, the sternomastoid.
Delineate the cheekbone from the jawbone with the Standard brush set to ZSub. Carve away between these two shapes to help separate them. Begin to sculpt the shape of the mandible or jawbone.
Use a mask again to check proportions between the halves, adjusting the face to compensate for the angles of the profile. I take this moment to correct the angles in the face as well as the length of the jawbone (Figure 2.38).
The zygomatic bone should be the widest part of the skull when looking from the front. To move this part out from the rest of the sculpture without disturbing the other forms, mask the zygomatic bone, then invert the mask by Ctrl-clicking somewhere off the model on the document window. Using the Move brush, pull the form out. Remember to hold down Alt while you use the Move brush to pull the faces out in the direction of the surface normal.
Check the width from the bottom as well as other angles to ensure it is correct (Figure 2.39).
Select the Rake brush and lower the draw size. This has the effect of making the rake smaller and the strokes finer. Using this tool, crosshatch the strokes already on the model. Crosshatching strokes helps to bring together the forms sculpted so far (Figure 2.40). If you use the rakes with ZAdd on clay, add in the recessed areas first. This reduces the roughness of the surface and begins to tie the shapes together.
Using rakes over the entire skull, resolve the forms to a point that the major shapes are clearly defined. Since we'll add muscle and skin over this skull, don't be concerned with taking it to a smooth finish. We won't add details like individual teeth since we just need the rounded shape of the mouth to serve as a basis for lips later. If you want to take the skull to a finer level of finish, use the Smooth brush with a BrushMod setting of 100 to smooth the recessed areas and reduce the rake marks on the surface. Figure 2.41 shows the skull to this point.

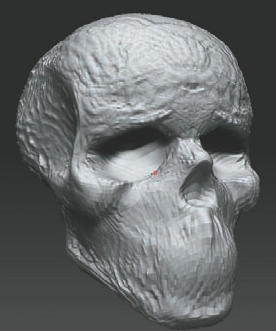


This skull remains rough since we are only interested in the gesture form and proportions not the surface quality. In the next step this skull will guide us in placing the muscles of the face as we work toward a realistic human head from a sphere.
In this section you will add the muscles to the skull. We'll take a simplified look at the muscles of the face, focusing on those major muscle groups directly influencing the surface forms. The muscles we'll add are shown in Figure 2.42.

For the muscles let's change to the Red Wax material to help you see the placement of each muscle as it is sculpted. To paint on a second material while preserving the first, fill the ZTool with a base material; otherwise, when you select the Red Wax material the whole ZTool will change to display the new material.
Although we're using multiple materials for clarity in this lesson, filling objects with a material is also useful for keeping subtools the same color. When a subtool is inactive, it changes to a darker shade compared to the active one. If you fill a subtool with a material, this overrides the default behavior and all subtools display with their full material settings. To fill a model with a material, follow these steps:
From the Material menu, select the White Cavity material. At the top of the screen in your brush controls make sure that MRGB, RGB, ZAdd, and ZSub are off. Only M should be active. With the White Cavity material selected in the material swatch, choose Color from the main menu and click the FillObject button. This will fill the skull with the White Cavity material.
Change to Red Wax in the Material Browser, and the material on the skull remains unchanged.
Set the Rake brush to M and ZAdd. Now when you rake the surface of the model, the brush will add form as well as change material.
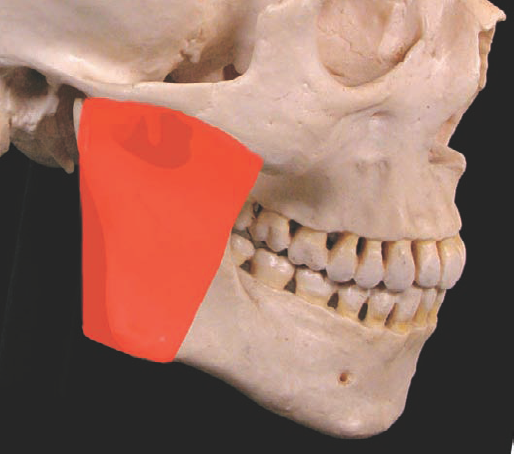
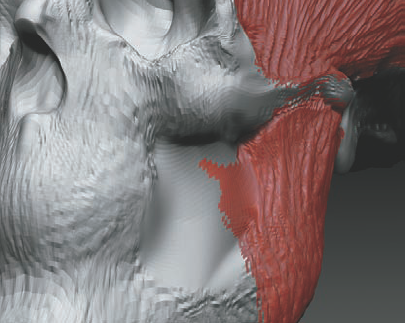
Begin by opening the Skull ZTool from the first lesson (Figure 2.43). Add the masseter muscle (the chewing muscle that fills out the space between the lower jaw and the cheekbone; see Figure 2.44). Its form can be simplified into the shape shown in the second image in Figure 2.44.
Use the Clay brush to mass out the width between the zygomatic bone and the mandible. Make sure the Claytubes brush is set to ZAdd, and use M Taper to move this shape down to the lower jaw.
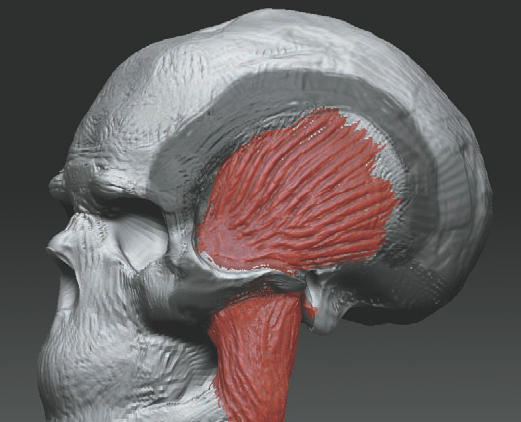
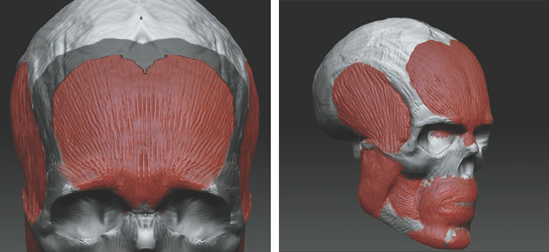
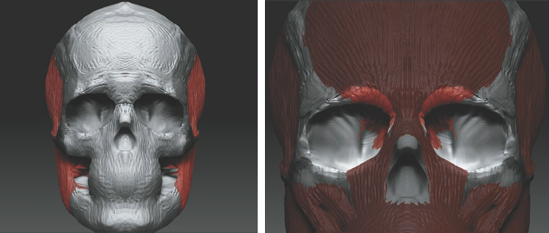
Now add the temporalis. The temporalis muscle fills out the hollow at the sides of the head (Figure 2.45). This large muscle actually feeds under the hollow of the zygomatic bone and has a hand in moving the jaw. Mask out the zygomatic bone and the temporal ridge by using the Rake with ZAdd on.
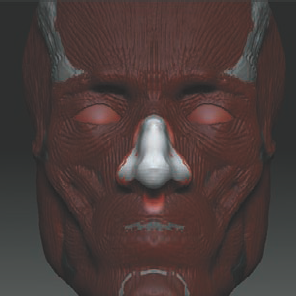
From the front view, notice how when these muscle forms are added you can begin to see the front profile of a human head begin to take shape (Figure 2.46).
Step down a subdivision level and smooth out the hollow under the cheekbone; we'll use this area to add the buccinator muscle later. Masking out the surrounding areas can help isolate and pull those deep faces back to the surface (Figure 2.47).
Mask out a shape similar to a clown mouth for the Orbicularis oris muscle. The Orbicularis oris is a circular muscle that surrounds the mouth and lips. Invert the mask and rake in a circular motion (Figure 2.48).
Add two triangles of muscle on either side of the chin. These are called the triangularis muscles. These muscles pull the corners of the lips down in a frowning expression. Add a dot in the center of the chin to represent the mentalis muscle. These shapes combined with the bottom of the Orbicularis oris create the subtle W-shaped form changes seen in the chin.
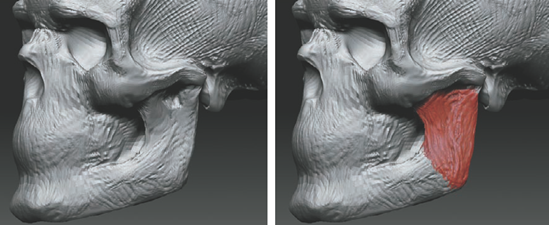
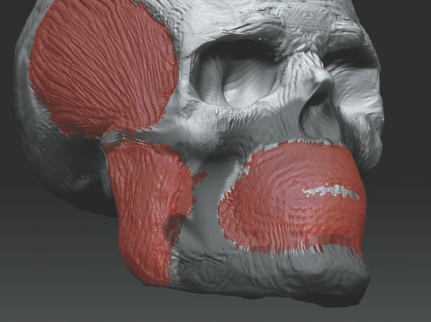
Add the buccinator. The buccinator emerges from beneath the jaw and the masseter to insert at the corners of the mouth. This muscle serves to pull the corners of the mouth back. The step down between the masseter and the buccinator creates an important plane change at the cheek, which is often visible in very built individuals (Figure 2.49).
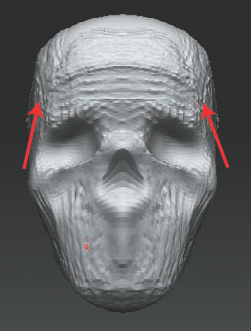
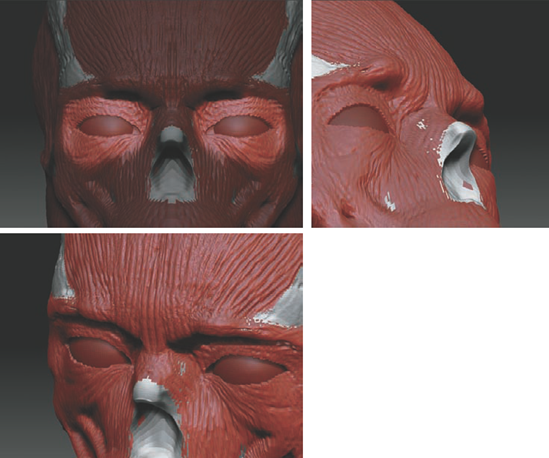
The forehead is covered by a thin pair of muscles called the frontalis. These muscles have the main function of raising the brows. Be careful not to lose the shape of the frontal eminence of the structure of the skull. Notice that the frontalis has a small "tail" that inserts into the medial of the eye socket (Figure 2.50).
The zygomaticus major and minor connect the cheekbones to the corner of the mouth. They create the plane change from the face to the cheeks. These muscles help in creating the smiling expression.
Using the Clay brush, add the two-pronged shape here. Notice how it connects to the corners of the mouth. When we add skin, the combined effect of the zygomatic major and minor, buccinator, and triangularis creates an important form on the skin since they all pull that one area (Figure 2.51).
Mask out the recesses of the eye sockets. Stepping down subdivision levels (so the effect of the brush is stronger) smooths the faces to pull them closer to the surface (Figure 2.52).


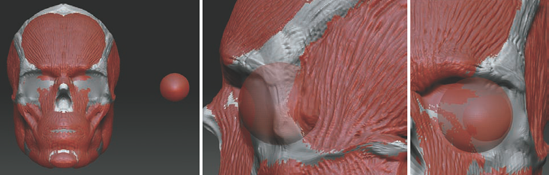
We'll now create a sphere for the eyeball and add it as a subtool to the current model. The typical human eyeball is about 28 mm. It's best to make sure the sphere fills out the socket with a slight give on each corner. The depth of the eye can be determined by the angle in Figure 2.53. A diagonal drawn between the brow bone and the cheekbone should just touch the corneal bulge of the eyeball. Remember that you can fill the eye subtool with a material so it will display the same value as the other tools.
To create the eye, save your current ZTool. Drop it to the canvas by exiting Edit mode by pressing the T key. Press Ctrl+N to clear the canvas. Select the Sphere3D tool and draw it on the canvas. Enter Edit mode and select Make Polymesh 3D from the Tool menu.
Now return to the head ZTool and choose Tool → Subtool → Append. From the Append menu, select the sphere to add it into the current tool. It is likely the sphere will be too large for an eye. Using the Transpose tools, scale it down and move it into place, as shown in Figure 2.54.
Once the eye is placed, you need to copy and mirror it. To do this, select the Eye subtool by Ctrl+Shift-clicking the ball. Under Tool, select Clone. This makes a new tool based on the position and scale of the current eye. Click Tool → Subtool → Append.
Notice that the eye is in the same place as the other; mirror it to place on the other side. Using the Rake with ZAdd on, create the circular muscle of the Orbicularis oculi. This wraps around the brow and ends on the cheekbone (Figure 2.55).
Mask out the shape of the eyelids. Be sure to keep the angle up to the outer edge (Figure 2.56).
Invert the mask and using Claytubes with ZSub on, press the inner eyelid into the head. Invert the mask again and, using Move, tug at the edges. Be sure to work from multiple angles to turn the lids around the sphere of the eyeball (Figure 2.57).
To add the nose, mask the nasal cavity and invert the mask. Be sure to keep the nasal bone masked out since this is a bony landmark on the skinned face and we don't want to alter its original shape too much from the skull (Figure 2.58).
Using Inflate and Claytubes, pull the profile of the nose out and mass out the nostrils (Figure 2.59).
Using Rakes with ZAdd on, add the upper lip. Be sensitive to the corners where the zygomatic muscles insert (Figure 2.60).
Keep a gesture to the upper lip that looks somewhat like the letter M. Be sure the upper lip overlaps the lower.
The underside of the chin is filled out with the digastric and mylohyoid muscles. Mask out the jawline and, using Rakes, create these muscles. They are thickest at the neck, tapering and becoming thinner toward the chin, thus creating an important aspect of the profile. These muscles connect to the Adam's apple (Figure 2.61).


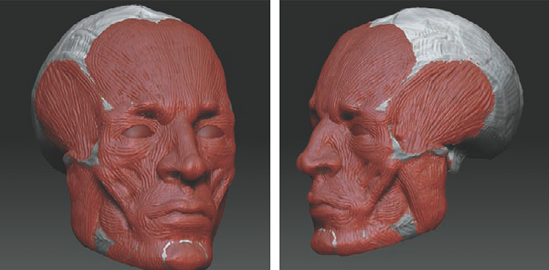
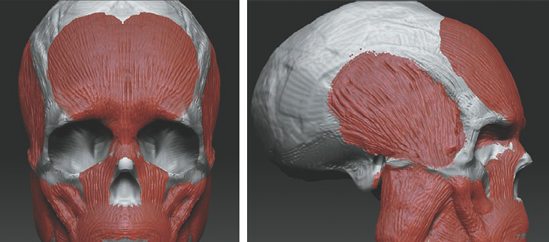
Congratulations! You have now added the major muscle forms to the face (Figure 2.62). This is an abbreviated list of facial muscles, but the major forms are there that influence surface details. Now let's move on to transitions and skinning.

In this section we'll bring it all together by adding the skin and fatty tissue over the bone and muscle sculpted so far. Having the structural elements of the skull and muscles in place makes this is a much simpler process.
Begin by filling the head with the White Cavity material using Color → Fill Object while only M is active and the White Cavity material is selected. Then follow these steps:
Using the Claytubes brush with a low ZIntensity setting, begin to refine between the rake marks of the cheeks. The Clay brushes have the nice effect of adding material to the low points first, making this an ideal way to fill out rake marks on a sculpt.
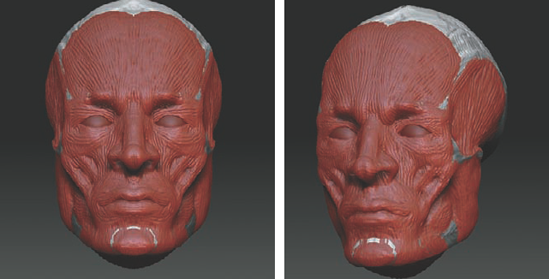
There are fat deposits at the cheeks; sometimes these can be thinner in more built individuals showing the line of the masseter muscle as a delineated plane change. Continue up the face, taking care not to disturb the form as much as fill out the recessed areas (Figure 2.63).
Using a smaller rake size with ZAdd on, move across the transitions between forms, trying to tie them together. Take care to rake in the direction of the flow of the form (Figure 2.64).
To reduce the roughness of the surface and take down the rake marks while maintaining the form you have created, select the Smooth brush and set the BrushMod slider to –100. Then lower your ZIntensity and smooth out the rakes (Figure 2.65).
Mask out the area next to the nose (this is called the nasolabial fold). While most prominent in the old or obese, it is present in all faces and we want to accentuate the plane change here (Figure 2.66).
Add the fold in the upper eyelid and the fatty tissue and skin between the outer edge of the eye socket and the eyeball. Mask out the line, and then invert (Figure 2.67).
Using the Standard brush with low Draw Size and Intensity settings, gently add the width of the lower lid.
Mask the upper lid and mass out the flesh that hangs between the brow and the sphere of the eye, giving it some sense of gravity by pulling on the skin and moving it slightly down at the corner.
Add a recess at the lower lid where the sphere of the eyeball curves back into the socket (Figure 2.68).
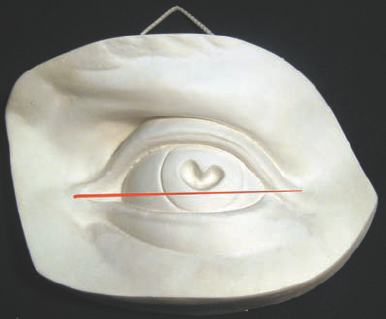
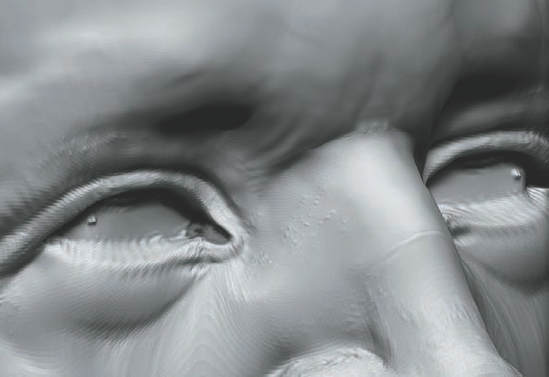
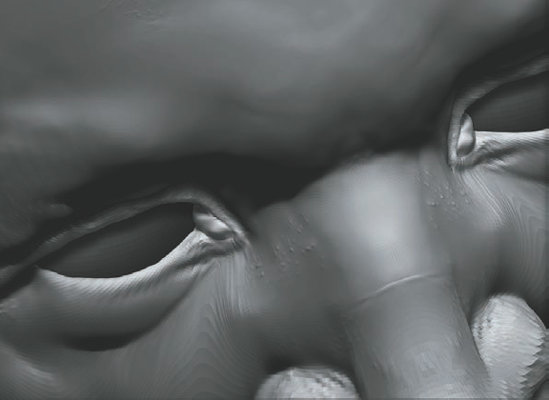
While sculpting the eyes, take care that the outside corner is slightly higher than the inside corner, or canthus of the eye. This is an important consideration when dealing with the eyes; placing both corners on the same level would create an unnatural look. See Figure 2.69 for an example of how to place the medial canthus.
Hide the eyeballs and mask out the medial canthus (Figure 2.70). Using the Inflate brush, add the small pink tissue in the corner of the eye. It is important to include this node, called the lacrimal caruncle, when sculpting the eye (Figure 2.71).


I left the neck for last to show how it is possible to pull large forms directly out of a highly subdivided mesh. When adding the neck to the head, you can pull the geometry directly from the faces at the base of the head. We will add new forms directly to the existing sculpt by using the geometry that is there.
Mask out the underside of the head and invert the mask. Use the Move brush to pull the faces down (Figure 2.72). Be sure to mask up to the digastric and include the mastoid process and occipital region (the back of the skull).
Once the area where the neck will connect to the head is masked out, invert this mask by Ctrl-clicking it. This will mask the rest of the head, leaving unmasked the area we painted in (Figure 2.73).
Use the Smooth brush set to ZIntensity 100 and BrushMod set to 0 to smooth out the unmasked areas. You want to remove the nuances to the form, thus making a smooth distribution of edges that can be pulled down into the shape of the neck. This may be easier from a lower subdivision level. If the Smooth brush is not responsive, step down a level from the top.
Using the Move brush in combination with the Alt key to pull along the normal direction, then start to tug the unmasked faces out from the base of the skull, as shown in Figure 2.74.
From the side, pull the faces down and back from the head (see Figure 2.75). The head pictured here is at subdivision level 4 so it is easier to grab large groups of faces and move them together. These changes will telegraph through all subdivision levels because of the ZBrush multiresolution editing approach discussed earlier in this chapter.
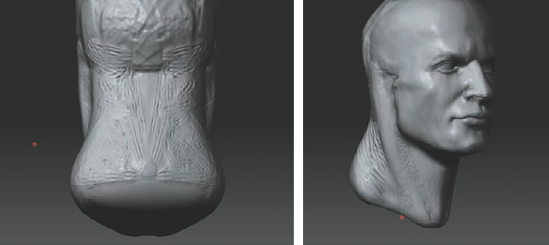
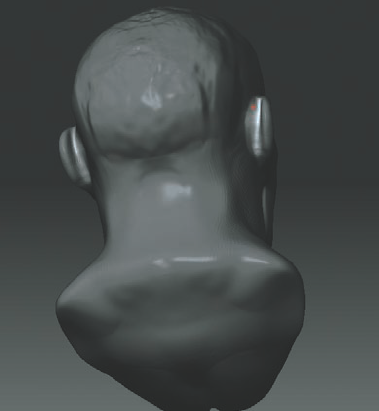
From the back, the neck is very narrow. Using the Move brush, pull the sides out until they are even with the base of the skull. See the example in Figure 2.76.


Now that the overall shape and gesture of the neck has been established, step back up to a higher subdivision level so we may again use the Clay brushes. When you step back up, because of ZBrush multiresolution editing the details of the mastoid process and the base of the skull are reapplied to the shifted faces. In this case, we don't want to retain the former high-resolution details; instead, we'll sculpt new ones. Using the Smooth brush, remove these remaining details (Figure 2.77). Try to give the neck the shape of a cylinder.
Hold down Ctrl to make a mark with the Masking brush on the neck to represent the start and end of the sternomastoid muscles. The sternomastoid originates at the pit of the neck, and its insertion point is behind the ear at the mastoid process. By making a mark for the insertion and origin, we can easily draw the direction and flow of the muscle as it turns around the cylinder shape of the neck. When the shape is masked in, Ctrl-click the background to invert the mask (Figure 2.78).
Using the Claytubes brush, mass in the muscle form. Try to keep it thicker at the top than the bottom. When it reaches the pit of the neck, the sternomastoid splits into two distinct heads.
Invert the mask again to start roughing in the trapezius muscle. The trapezius forms a sheet of muscle over the back of the neck and turns around to attach to the shoulders (Figure 2.79).
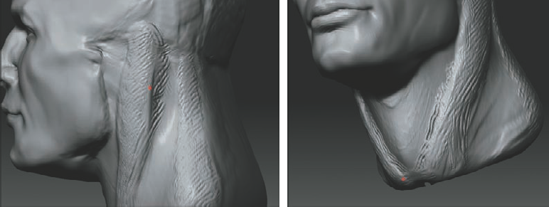
Using the Rake, stroke across the forms of the sternomastoid and the trapezius. The intention here is to start to tie the two shapes together more. Notice the use of ZAdd rakes in the recess on either side of the sternomastoid. This softens the transition between the muscle and the rest of the neck (Figure 2.80).
With a ZAdd rake, continue to rough in the trapezius from behind. An important distinction to be aware of is that, from behind, the sternomastoid should be just visible on either side of the neck (Figure 2.81).
Rotating around to the front, the neck is raked further and the two heads of the sternomastoid are suggested at the pit of the neck in Figure 2.82. With a combination of raking and smoothing, you can gradually build up the form. By smoothing as you work, you can make the shapes flow into one another in a graceful and subtle manner.
Using the Move tool, adjust the shape of the shoulders. Then use the Claytubes brush to fill in the transition between the sternomastoid and the neck a bit more (Figure 2.83).
The goal is to change the character of the shadow so that it's less pronounced, thus making the appearance of the sternomastoid less overt. We want to make the muscle appear to be under a layer of skin, not inflated out from its surface.
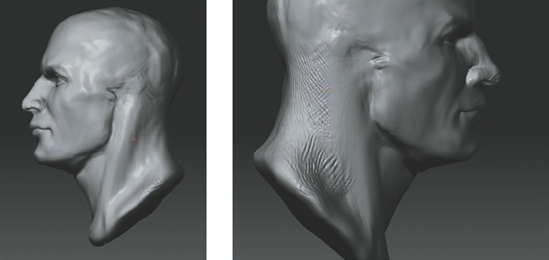
Figure 2.84 shows the neck after some smoothing and adding for form between the shapes. By crosshatching ZAdd rakes, the transitions can be worked further.
Once you've added some clay to the transition with the Rake, use the softSmooth brush we created earlier in this chapter to smooth out this area. This helps push the rakes back into the surface, thus softening the strokes (Figure 2.85).


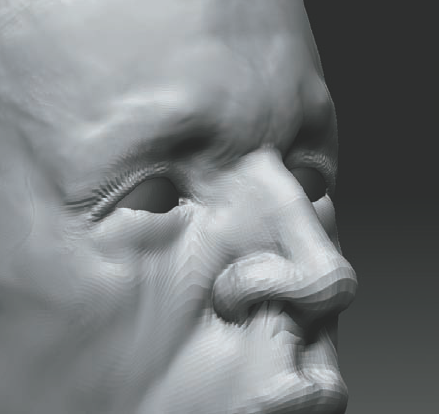
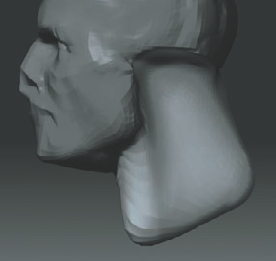
We'll now sculpt the ear directly from the side of the head. Since we began with a low poly sphere, we can easily divide the geometry up to millions of polygons. In the case of this mesh, it is currently 2 million polys. The secret to pulling protruding shapes such as ears and noses from a sphere is to ensure the underlying edges are evenly distributed in this area. In cases where the underlying geometry is stretched to the point of artifacting, then the ZBrush tool Reproject Highres Details can be used to correct these areas. We'll use Reproject Highres later in this section.
Complex compound shapes like ears are easier to dissect and re-create if you break them into their individual parts. We'll examine the ear and its anatomy, and through a combination of sculpting and masking, we'll sculpt the ears on the head.
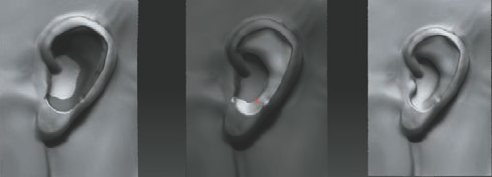
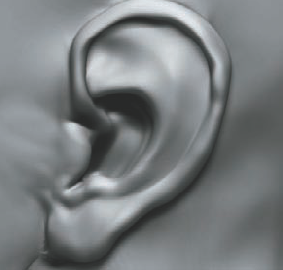
Figure 2.86 shows a human ear with its parts labeled.

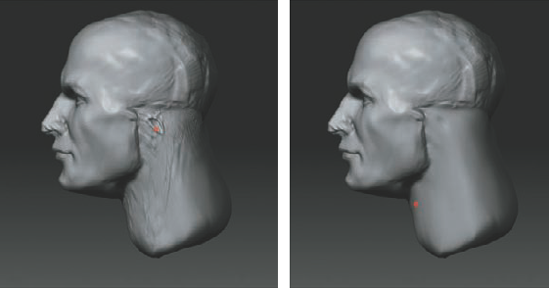
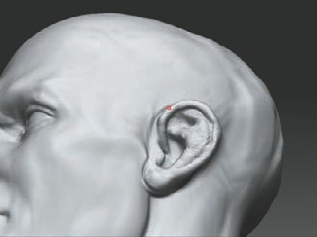
Using a mask with the Standard brush, sketch in the placement of the auditory meatus again (Figure 2.87). This represents the ear hole and tragus. Finding this first helps place the ear correctly on the head. The ear itself lies just behind the midline of the head. It sits at an angle roughly equal to the angle of the jaw (Figure 2.88). Notice as well that the top of the ear is roughly in line with the brow bone, while the earlobe is in line with the bottom of the nose.
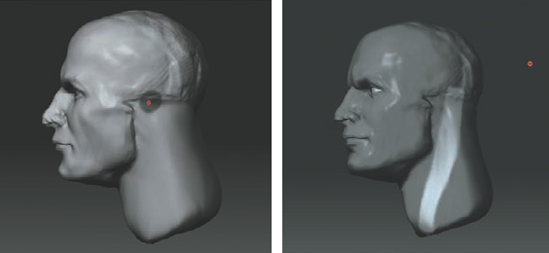
Invert the mask and step down a subdivision level. Using the Claytubes brush, pull the ear out. Take care to make it thicker near the back of the head so that it blends off in a wedge shape to the side of the head (Figure 2.89).
Masking behind the ear allows you to pull the helix out as well as invert the mask and press the back of the ear in creating a draft behind the ear (see Figure 2.90).
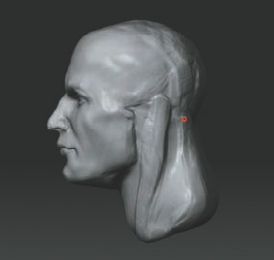
Using Ctrl+Shift-click, draw a show marquee around the ear to hide the rest of the face. In Figure 2.91 you can see the ear isolated from the rest of the head. With the mask inverted, use the Standard brush with ZSub on to press the internal faces of the ear to make room for the antihelix and conch of the ear. The masked helix will remain in place.
The helix has an extension that dips down and terminates into the conch, or bowl, of the ear. This is called the leg of the helix. Mask out the leg of the helix. Invert the mask, and using the Standard brush, sculpt the extension of the helix that sweeps down into the conch of the ear.
Mask out the shape of the antihelix (Figure 2.92). Invert the mask, and using the Inflate brush, build the general shape of the antihelix inside the ear. Rotate the model around as you work, and be sure not to take any part to a finish yet—just suggest the general shapes. Use the Move brush to pull out the shape of the tragus and deepen the conch of the ear.
Using the Inflate and Standard brushes, refine the shape of the antihelix, as shown in Figure 2.93.
If you find in the process of editing the ear that the underlying edges are spread apart or flowing off in another direction that interferes with the form you are trying to make, you can easily correct this. ZBrush has a tool called Reproject Higher Subdiv (Figure 2.94).
This tool allows you to let ZBrush relax the edges of your underlying subdivision levels while retaining the higher resolution sculpting you have already applied. This is useful when you are pulling large protruding forms from the mesh—you can reduce artifacts by redistributing the edges in a more efficient manner. To use Reproject Higher Subdiv, first mask out the area you want to correct at the highest subdivision level. Step down a couple of levels and smooth the surface gently with the softSmooth brush or a smooth brush with a low ZIntensity. The idea is to gently relax the edges without destroying all the form.
Select Tool → Geometry → Reproject Higher Subdiv, and ZBrush will reproject the detail onto this new subdivision level, retaining your work while taking advantage of the new edge distribution. See Figure 2.95 for these steps in action. Notice how the last wireframe shows edges that are evenly spaced and not spread apart as in the first wire.
You can deepen the furrow between the helix and antihelix by masking into this area and inverting the mask. Use the Standard brush with ZSub on to press in, thus creating the necessary draft.
Using the Pinch brush with LazyMouse on and BrushMod set to 10, you can finesse the planes between the ear's parts. Adding these touches helps reduce the lumpiness of the ear and gives it that structural cartilaginous quality (Figure 2.96).
After a few more passes with the Pinch brush, the ear is complete. If you have X Symmetry turned on, the changes are mirrored to the other ear as well. While it is easier to create the depth and draft on actual protruding geometry rather than pulling it from the surface of a sphere, it is important to know how much is possible with just very basic geometry. There may be times you want to sculpt an element that has no underlying topology to support it. Instead of letting the topology dictate your design, these shapes can be pulled from the existing surface. Later in this book we'll use ZBrush's topology tools to create an organized mesh from this head. Once the topology is optimized, you can make even more specific edits if you wish to refine the surface further.
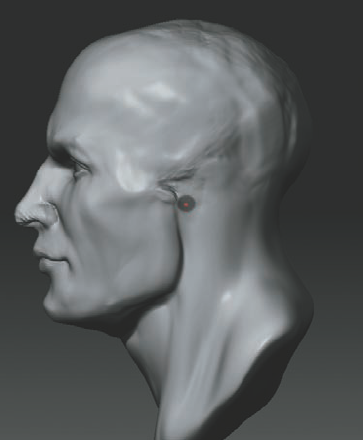


This MatCap material, by Ralph Stumf, is available in his Creature Core thread at www.zbrushcentral.com. To use it, simply load it into the Material menu and fill the object by choosing Color → Fill Object (be sure that M is on).
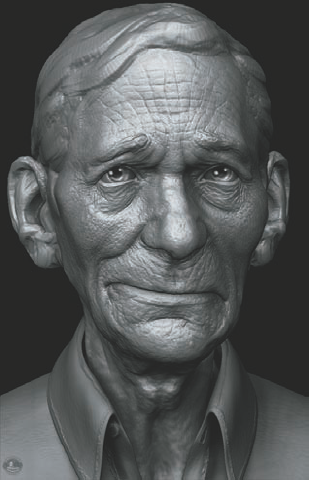
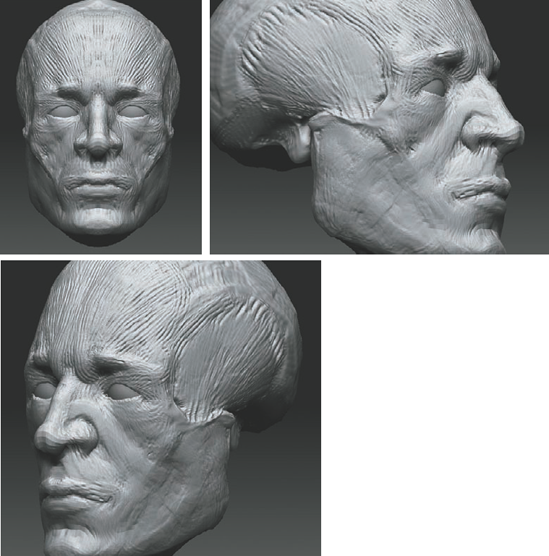
Congratulations! You have now completed a human head sculpt from nothing more than a ZBrush primitive sphere (Figure 2.97). Although this mesh is not animation ready, ZBrush comes with a suite of remeshing tools that will allow you to take all your sculpted details and transfer them to a completely new level 1 mesh that is suitable for animating and rendering in a third-party application. See Chapter 10, where we'll remesh this head into an animation-ready model. In the next chapter, we'll move away from ZBrush primitives and explore sculpting on polygon models.
