
In this chapter, you'll move from the torso into the arms. In Chapter 4, I touched on the transitional areas of the shoulder into the arm. Muscles such as the Deltoid as well as the Teres major of the scapula were shown, but only in surface detail. In this chapter, you will revisit these areas and look at the manner in which they interconnect into the form of the arm. Examining the origins and insertions of these muscles will, I hope, clarify the mechanism of the shoulder area.

Figure 5.1 shows the arm as it will appear when you've completed this chapter. This chapter's look at the arms will end at the wrist, because the intricate complexities of the hands and feet require a chapter of their own; you'll return to them in Chapter 7.
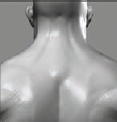


The arms of the figure form one of the two parts of the appendicular skeleton, which con-sists of the arms and legs; the center trunk is known as the axial skeleton (Figure 5.2). When artists deal with the appendicular skeleton, a common mistake is to make the proportions of the limbs too long or short compared to the figure as a whole. Luckily, there is an easy way to determine the length of the arms in relation to the body.
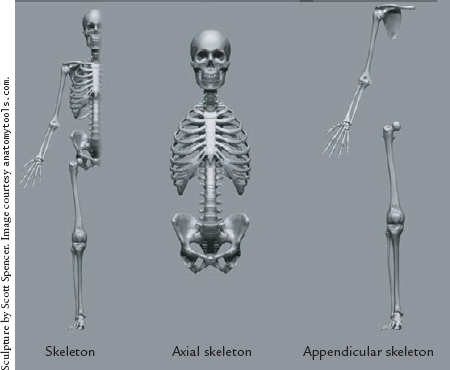
On an eight-head figure, the total width of the arms and shoulders—the arm span— is itself eight heads. You can see this in Figure 5.3, where the arm span has been placed in relation to the standing body. This measure is longer than people often imagine. Try standing now, and place your arms at your side; notice how far down the thigh your fin-gertips actually touch. Many new sculptors place the hands too high on the arm or gener-ally misrepresent this proportion. Because this is an area of common confusion, it is impor-tant to take care that the arms fall within an acceptable measure. Other important mea-sures include the elbow, which falls at nearly the bottom of the rib cage. You can see these two measures in Figure 5.4. (Note that the lowest ribs are deeper inside the figure and are usually not visible on the surface.) This is one of those situations where having the tool of a canon of measure is helpful. Otherwise, you would be left to guess or place the arms on sight alone.

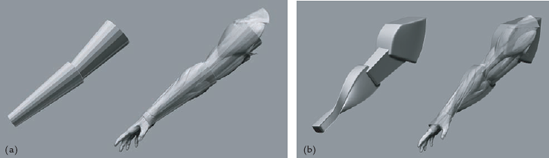
Before looking at the more specific shapes of the arm determined by its muscles and bone landmarks, let's take a look at the shape of the arm in its most simplified whole. You can see the arm overall as a cylindrical shape (Figure 5.5(a)). This is the simplest dimen-sional representation of the arm and the easiest to visualize. If you add another level of com-plexity, you can picture the arm as box forms, as shown in Figure 5.5(b). Notice the way the upper arm box wedges into the forearm box. Also note the forearm and how it tapers at the wrist. I recommend taking the time to build a model similar to this as an exercise. Although it may appear simple at first, you can learn a lot by building these block forms of the figure. I recommend loading the mid-resolution version of the figure supplied on the DVD and experimenting with building a simplified block model over it in a polygon modeling pro-gram, similar to the figures shown here.
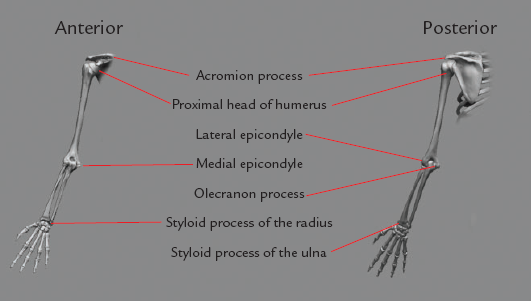
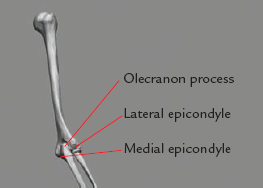
The arm itself consists of three bones. The upper arm is the humerus bone (Figure 5.6). The lower arm consists of two bones: the radius and the ulna. The ulna bone rotates in a hinge fashion around the distal end of the humerus and creates the bony protrusion of the elbow (Figure 5.7). This protrusion is an important skeletal landmark and is called the olecranon process (Figure 5.8), commonly called the elbow.

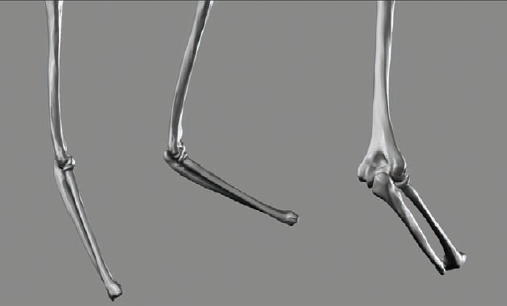

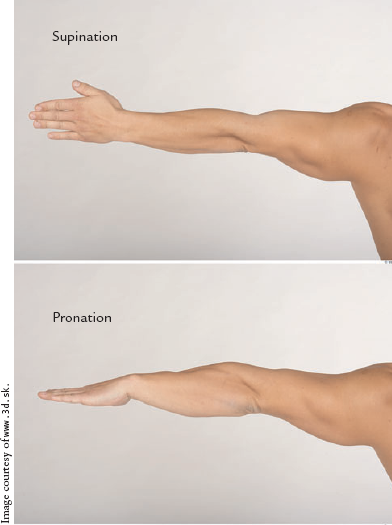
The radius bone rotates with the ulna, but also has the ability to rotate around its own axis, crossing the ulna bone, into two positions known as pronation and supination, as pic-tured in Figure 5.9. As you may recall from Chapter 1, the default anatomical position is with the arm in supination.
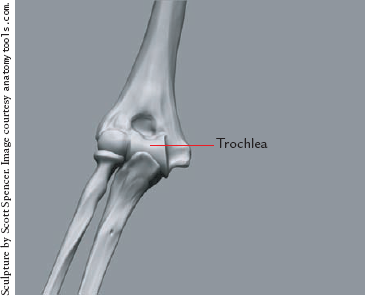
It is also important to notice that the bones of the upper arm are not in a straight line in relation to those of the forearm. This is a result of the joint between the humerus, radius, and ulna. The ulna rides in a groove on the humerus called the trochlea (Figure 5.10). Because of the angle created by this structure, the fore-arm actually angles out slightly from the median line of the body. This allows the arms to swing freely without striking the pelvis or legs. This effect is known as the carrying angle and is an important subtlety to be aware of while sculpting the arm (Figure 5.11).


While you are looking at the joint between the humerus and the radius and ulna, I'll point out two important bony landmarks on the humerus, the lateral epicondyle and medial epicondyle (Figure 5.12). These will come into particular impor-tance when you sculpt the forearm muscles, because they repre-sent the points of origin for many of the surface muscles in this area.
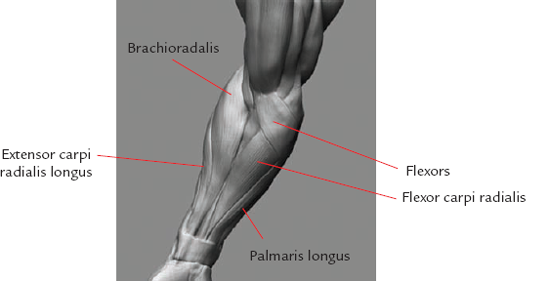
The lateral epicondyle is located toward the outside of the arm, the lateral aspect of the body. It is the location of the uni-fied extensor tendon, which is the point from which the Extensor muscles originate. This landmark is visible from the posterior view of the arm (Figure 5.13). From the front view, it is covered by the Brachioradialis and Extensor carpi radialis and Extensor longus radialis muscles, as shown in Figure 5.14.
The medial epicondyle is located toward the body—the medial aspect. It is the location of the Flexor tendon and therefore the origin of the Flexor group of mus-cles on the forearm (Figure 5.15). This bony protrusion comes close to the surface and forms a plane break in the silhouette of the arm (Figure 5.16).


Figure 5.16. From the front view of the arm, you can see the medial epicondyle creates a pronounced plane break in silhouette.
As you continue with this chapter, you will be working on the specific skeletal and muscle landmarks illustrated in Figure 5.17.
When you work on the forearm, you will deal with a somewhat abbreviated number of muscles so that you can focus on those muscles that have the most direct and apparent influence on the surface anatomy. Although I highly recommend taking an in-depth look at the muscles and bones of this area, I should stress that doing so is not entirely necessary for sculpting a convinc-ing and natural forearm.
The forearm is one of the more complex areas in terms of the interweaving of a num-ber of muscles from a deep to a superficial layer. One of the most in-depth and educational dissections I was fortunate to do during the course of my research was of the forearm. By taking back each layer, I acquired a new appreciation of the beauty as well as intricacies of the structure.
I do not believe this level of examination is necessary, however, to learn to sculpt the forms of the forearm. In the interest of keeping this tutorial concise and clear, I have chosen to simplify this section and illustrate how to envision and represent the complex surface land-marks and forms of the forearm by focusing on the most important muscle groups, illus-trated along with the associated landmarks in Figure 5.18.
These images should prove a useful reference as you move forward and start to look at the steps of sculpting the arm. Also remember to reference the écorché ZTool I have included on the DVD. This is the final heroic male sculpture with the major muscles sculpted in.
You are nearly ready to begin sculpting the arms. There is still quite a bit of anatomical detail you need to learn about, however, so I will pause to discuss those details at several points along the way.
To begin sculpting, you'll isolate the torso and arms from the rest of the figure using a hide marquee:
As before, hold down Ctrl+Shift and click-drag a marquee around the legs.
Release Shift to make the marquee red. When you release, the legs will be hidden. I recommend working on the arms with the torso visible because it helps relate the parts to the whole.
I have included a video on the DVD of the sculpture in progress as well as several other segment videos dealing with specific areas. In theses videos, you will see how I apply the information in the text with an overall approach to sculpting.
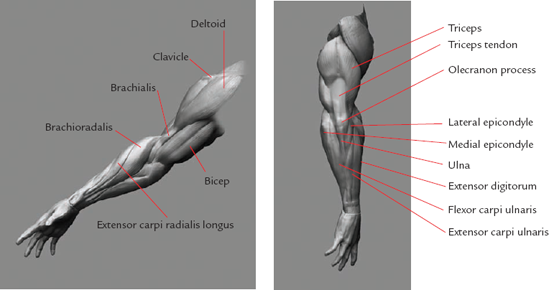
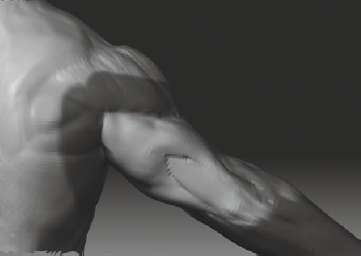
You're going to begin sculpting with the anterior view of the upper arm. In order to do that, you need to understand what muscles compose the shapes you see and how these muscles relate to one another. You will begin by revis-iting the Deltoid muscle. The Deltoid consists of three distinct heads (Figure 5.19), which originate on the clavicle, the acromion pro-cess, and the spine of the scapula; they are called the clavicular head, acromion head, and scapular head, respectively. Muscle heads are seen often as furrows on the surface of the skin. One of the most defined examples of this you have seen so far is the delineation between the clavicular and sternacostal heads of the pectoralis in Chapter 4. These divisions are important to note because even if they are simply hinted at on the surface of the figure, they can add an enormous amount of visual interest to the surface as well as a sense of anatomical veracity.

Figure 5.19. The Deltoid muscle consists of the acromion head, the clavicular head, and the scapular head.
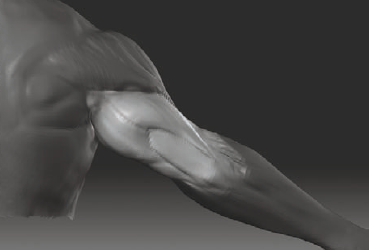
Notice how the Deltoid wraps around the humerus, inserting almost halfway down the shaft. This point of insertion is equal to the second head measure down or the nipples on a feshed human. The insertion of the Deltoid muscle can appear misleading from the outside. The Deltoid appears to flow into another muscle that lies under the Biceps. This muscle is called the Brachialis.
The Biceps does not lie against the humerus; rather, it lies over two muscles called the Brachialis and Coracobrachialis. The Brachialis is visible on the surface of the arm just beneath the Deltoid insertion as well as on the underside of the Biceps. The Coracobrachials is visible under the Biceps extending up into the armpit. Figure 5.20 shows the Biceps pulled away so the Deltoid, Brachialis, and coracobrachials are visible, as is their effect on the sur-face of the final arm.
The Biceps muscle lies over these two muscles. It originates at the head of the humerus and inserts on the radius. This is counterintuitive because the angle of the muscle makes it appear that it is inserting on the ulna. When sculpting, it is important to note this subtle inclination of the flow of the muscle from the lateral to the medial (Figure 5.21).
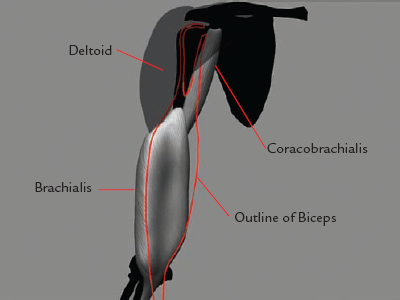
Figure 5.20. You can see how the Coracobrachialis and Brachialis lie beneath the Biceps, and only a small portion is actually visible on the surface.

Armed with this information concerning the underlying muscular structure of the anterior aspect of the upper arm, let's start sculpting. When you sculpt, try to stroke along the direction of the muscle flow of each muscle from origin to insertion. This is a technique I use often. I find this approach helps develop form in a fluid manner and also helps me main-tain a sense of rhythm.
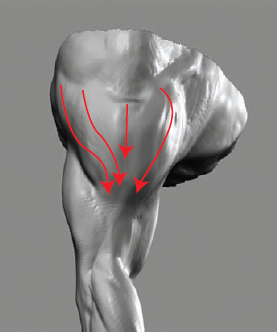
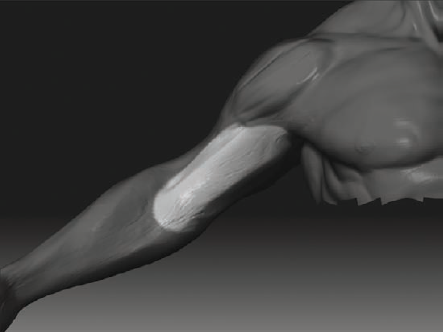
Begin by isolating the Deltoid with a mask. Select the Claytubes brush, and stroke the muscle in the direction of each head discussed earlier (Figure 5.22). Make sure the strokes emanate from the location of each origin to the shared insertion on the arm. For the front of the figure, this would be from the clavicle to the insertion point (Figure 5.23). As you sculpt, keep the profile of the figure in mind, particularly the crests of the silhouette. The Deltoid has two crests, shown in Figure 5.24. Try to avoid letting the silhouette become too soft.
Subtract from the mask the area for the Biceps. You can do this by holding down Ctrl and Alt while painting. You will now be subtracting from the mask instead of adding as you paint. Clear the area for the Biceps, as shown in Figure 5.25.
Using the Claytubes brush, mass in the volume of the Biceps muscle (Figure 5.26(a)). Carry each stroke of the tool in one motion along the full length of the muscle. Making long strokes at this roughing-in stage is a good habit and, as said before, helps keep your approach loose and gestural as you work. This is analogous to gesture drawing where lines are created to communicate action and force. In this case, you are sculpting lines of action in terms of the direction or flow of the muscle form. Notice that I have continued the unmasked area on the underside of the arm, as shown in Figure 5.26(b).
As you sculpt the Biceps (Figure 5.27), make sure to take into account the trap-ezoid shape in the profle of the muscle. The Biceps, like most muscles, has a defned shape. Muscles are not blobby bundles of tissue that are held together by skin. Instead, they have structural forms that defne the outward appearance of the body. The Biceps is not spherical volume in its fnal shape; it appears as more of a trapezoid in cross section. You can see this in Figure 5.28.
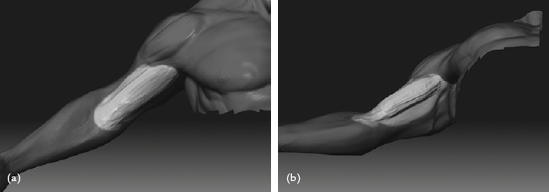
Now move to the top view of the arm. Clear the masked area just beneath the insertion of the Deltoid by painting out the mask while holding down Ctrl+Alt. You will now sculpt the portion of the Brachialis muscle that is visible beneath the Biceps on the outside of the arm.
Using the Standard brush, mass in this area, as shown in Figure 5.29. Notice here I have deepened the division between the Triceps at the back of the arm and the Deltoid for clarity. From the front view, you can see how the Brachialis is visible peeking out from beneath the Biceps.
Rotate to the underside of the arm. Clear the masking from the entire arm by holding down Ctrl and dragging a marquee somewhere off the model. When the mask is clear, with the Ctrl key held down, click once on the document window to mask the entire model.
You will now unmask just the area for the Brachialis and Coracobrachialis muscles. Holding down Alt and Ctrl, paint out the areas shown in Figure 5.30. These will be the Brachialis and the Coracobrachialis. The Brachialis muscle is seen both on the underside of the upper arm as well as on the outside just beneath the insertion of the Deltoid. The Coracobrachialis extends from the middle of the upper arm into the armpit. It connects deep inside the shoulder on the scapula. The only visible portion of the Coracobrachialis is in the armpit area just beneath the Bicep. Both of these muscles are massed in using the Infate brush with alpha 01 (Figure 5.31).


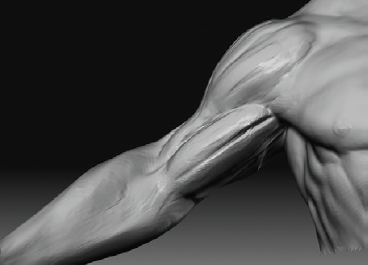
As you have already seen in many cases, the naming of the muscles seems more com-plex at first sight than it really is. The Biceps is a good example of this; it gets its name from the fact it has two heads. Compare this to the Triceps muscle, which has three heads.
The two heads of the Biceps muscle are not often visible, but sometimes on individuals with more muscle definition, you can discern the divi-sion between the two heads of the Biceps as it extends up into the armpit. We will etch this divi-sion in using the Standard brush. It will be more pronounced in these stages, but this form will be refined and become more subtle as you work the area. Using the Standard brush with a draw size of 25 and alpha 01, etch this dividing line as in Figure 5.32.
With the muscles of the anterior aspect of the upper arm sculpted in, you can now move on to the back of the arm.
From the back, the entire upper arm is encom-passed by the Triceps muscle, so called because it has three heads. Each of the heads has its own origin, and they all insert into a single large, flat tendon called the Triceps tendon, which ends at the olecranon process or elbow. As viewed on the body, this muscle appears to originate from beneath the Deltoid and continue down the length of the back of the arm to the elbow (Figure 5.33).
You will take a brief look at the various heads of the Triceps, but the focus will ultimately be on the shape as it appears on the final figure. As in many other areas of sculpting, the underling physiology, although it's helpful to understand, is not always as important as the combined shape that is created in relation to other muscles, bone, and fat.
You can see the three heads of the Triceps muscle in Figure 5.34; they are called the long head, the medial head, and the lateral head. The long head and the medial head are both located on the inside of the arm toward the medial line of the body. The lateral head, as can be surmised by the name, is on the outside or lateral aspect of the arm.


The three heads of the Triceps insert into a common tendon that grabs the olecranon process of the ulna. These three heads function to extend the forearm after it has been bent at the elbow.
Now you have broken down the Triceps into its individual parts and examined how they lie on the skeleton. With this information in hand, you will now sculpt this form on your model.
To sculpt this shape, isolate the area for the Triceps with a mask, as shown in Figure 5.35. Make sure the mask extends from the torso to the olecranon process.
Select the Claytubes brush, and mass in the volume of the Triceps. Don't worry about the heads yet; just get a mass in place at this time. Notice in Figure 5.36 how I am massing in as a horseshoe shape around the space for the tendon.
Select the Flatten brush, and use it to fatten out the length of the Triceps tendon, as shown in Figure 5.37. This tendon is pointed at the end toward the body and extends into the elbow, wrapping around the bone. As you saw earlier, this allows the muscle to act on the forearm, straightening out the arm.
Rotate to the underside of the arm, and mass in the medial and long heads. Notice how they extend all the way to the center of the underside of the arm. These are two large, thick muscle heads and should mass out the underside of the arm entirely (Figure 5.38).
At this stage, you need to make some further refinements to the underside of the Triceps. With the Standard brush, accentuate the divisions between the muscles, and smooth the entire area gently with the Smooth brush at 20 intensity. Remember to make sure the Smooth curve is adjusted to help soften the effects of the brush.
Mask the torso, and inflate the Triceps against the masked area, as shown in Figure 5.39. This has the effect of puckering the mesh in this area and giving the impres-sion of compressed flesh. Use this technique judiciously because it can introduce prob-lems when remeshing a figure or generating normal maps.
Select the Flatten brush, and dial the ZIntensity down to 20. Gently add some planes to each head of the muscle. You don't want to create geometric shapes with the brush; rather, you are trying to create areas of plane breaks that catch shadow and add to the structural sense of the form. Figure 5.40 shows the result at this stage.
Moving to a top view, you can see that the Triceps muscle is too flat. Select the Move brush and pull its shape back, massing out the back of the arm, as shown in Figure 5.41. This is another good example of the importance of moving constantly around the sculpture. Problem areas may not always be readily apparent until you look at the figure from a new point of view.


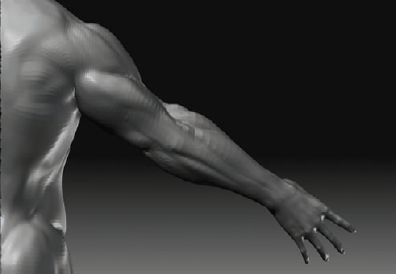
At this stage, you can take an overall look at the upper arm as you have sculpted it so far. The point here is to refine the muscles and their relationships to each other. This is not a final refinement pass but more a continuing process of reexamining the sculpture as it progresses. By allowing yourself to work on areas as a whole like this and continuing to reshape them as the sculpture progresses, you can keep the work unified.
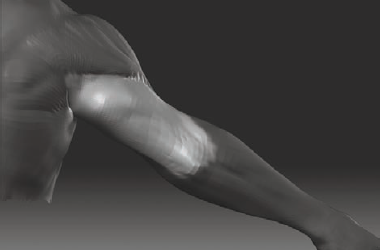
From the front view, use the Standard brush with a low ZIntensity to slightly accentuate the divisions between the muscles. Selecting the Claytubes brush and turning off the alpha, you can fill in the deep recesses with a simple stroke, making the divisions more subtle. Figure 5.42 shows my work at this stage.
Using the interactive light script or your hot key, move the light source. Check the shadows and highlights under different lighting circumstances. This will help call out areas that may need more attention.
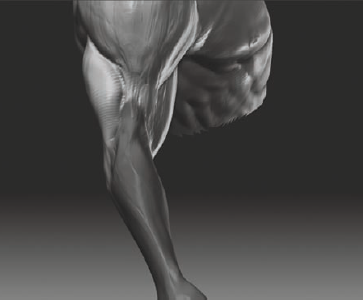
At this stage, you are ready to move on to the lower arm. Once the figure is completed, you will make another refining pass, but this is as far as you should go with only one half of the limb completed. Notice that with the upper arm sculpted, there are two distinct triangles of space with no muscle, as shown in Figure 5.43. These areas represent where the Flexors and Extensors of the forearm originate. These two groups of muscles form the majority of the surface forms of the lower arm. Visually, the forms of the upper and lower arm are tied together by this overlapping of Flexors and Extensors. It is common for new sculptors to misunderstand this relationship. Without this interlocking of shapes, the arm would look more like a bent tube than an arm. Let's now move on to the forearm in detail.

The forearm is one of the more daunting and complex areas for most artists. That's because there are so many muscles here, needed to manipulate the five digits of the hand. Adding to the complexity is that these muscles do not lie in a straight line along the length of the bone; they actually appear to radiate across the forearm.
It is my hope in this chapter to demystify these shapes and render them easier to recognize and reproduce. By breaking down the complex forms of the forearm into two distinct sets of muscles divided by the bone of the ulna, the form is much easier to sculpt. Let's begin by looking at the bony landmarks of the elbow and how these influence the placement of the forearm muscles.
The elbow is composed of several bony landmarks. There are three of these bony landmarks that will be important to you. Two are deep under the flesh but serve as central points of origin for many of the forearm muscles. The third is the elbow itself, the olecra-non process of the ulna. This is the bony end of the ulna that sockets into the distal end of the humerus rotating around its head (Figure 5.44).
The other two bony landmarks are the lateral and medial epicondyles, also shown in Figure 5.44. These are the bony protrusions on either side of the elbow, and they are each apparent on a different side of the arm. The lateral epicondyle is visible from the back of the arm (Figure 5.45). This point is the central location for the Extensors of the hand.
The medial epicondyle can be felt easily just under the skin, and it serves as a point of insertion for the Flexors of the hand. By understanding these two points and the muscles that extend from them, you are well on your way to a better understanding of the forearm.

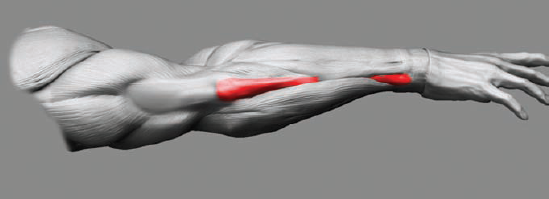
The forearm muscles can often be simplified into two triangular shapes. From the back of the arm, you can see the Extensors, as shown in Figure 5.46(a). On the anterior view of the forearm, the Flexors radiate in a similar manner, as you can see in Figure 5.46(b).
Together these two groups of muscles radiate out from their insertions and curve around the forearm. The ulna bone serves as the dividing line between these two groups, the Flexors and Extensors (Figure 5.47).

Now that you have an understanding of the forearm as a whole, let's look at the process of sculpting these muscles:
Begin by masking all but the forearm, leaving the triangle of space between the Triceps and Brachialis unmasked. Here you will see that I have also smoothed the forearm.
You will begin by sculpting in the forearm muscles that originate on the humerus. These are the Brachioradialis and the Extensor carpi radialis longus (Figure 5.48). Select the Standard brush, lower your draw size to 20, and select alpha 01. Sketch in the division between the Trapezius, Brachialis, and these two muscles. This serves to accentuate the triangle of origin here.
Using the same brush, sketch in the division between the Extensor carpi radialis longus and the Brachioradialis as they turn around the forearm, as shown in Figure 5.49(a). Rotate around to the front view of the arm and continue these lines, turning them to point toward the thumb, as shown in Figure 5.49(b).
From the back of the arm, notice the triangular shape left between the elbow and the Extensor carpi radialis longus. Select the Standard brush again, and sketch in the outline of another muscle form here, as shown in Figure 5.50(a). This is the Extensor digi-torum and represents one of the most visible Extensors, because it is a large, flat muscle that extends to the wrist, where it splits into several tendons for the fingers (Figure 5.50(b)).
At this stage, you need to mask out the length of the ulna bone. You can trace this by starting at the elbow and tracing a line to the pinky-finger side of the wrist. Notice that the line is not exactly straight. There is a slight jog to the length, so the elbow itself will appear higher than the bony landmark at the termination of the bone at the wrist. Ctrl-click to invert this mask, and sketch in the ulna with the Claytubes brush (Figure 5.51). The ulna will serve as a dividing line between the Flexors and Extensors.
With the Claytubes brush, mass the Extensor digitorum, allowing it to overlap the ulna (Figure 5.52). This shape is actually a second narrower muscle called the Extensor carpi ulnaris, but you will treat it as one form here to simplify the shape.
Continue to sculpt the flow of the Extensor muscles with the Claytubes brush, as shown in Figure 5.53. Drag the brush along the length of the arm in strokes that mimic the fow of the muscles. I find that by sculpting in this manner, not only can I create the shape more easily, but it also results in stray tool marks—"happy accidents"—that find their way into the final surface and add to the realism. Experimentation will illustrate this for you in your own work.
Mask out the Biceps and Brachialis. By masking these muscles, you can sculpt against them, sharpening the definition in the muscle form here. From the front view, continue to refine the form and fow of the Brachioradialis muscle, as shown in Figure 5.54.
Mask out the Triceps muscle. Select the Move brush, and pull on the origin of the Brachioradialis and Extensor carpi radialis longus (Figure 5.55(a)). You are trying to establish the plane breaks here that are visible in the figure silhouette (Figure 5.55(b)).
Move to the back view, and continue to adjust the volume of these forms, as shown in Figure 5.56. Select the Inflate brush with no alpha and the ZIntensity set to 10, and brush over the muscles to increase their volume.
At this stage, the forms at the back of the forearm have become soft. With the Standard brush, etch the outline of the Extensor digitorum again (Figure 5.57). Create a deep sharp "V" here so the form will remain after the next step.
At this point, you need to push the forms back into the surface with a low ZIntensity pass of the Smooth brush. The intent is not to erase the shapes but to make them more subtle. Press the Shift key to access the Smooth brush settings. Lower the ZIntensity to 40 and adjust the curve under the Brush menu as shown in Figure 5.58a, and stroke along the surface. After the surface is softened a bit, you may choose to reintroduce some volume with the Claytubes brush, as shown in Figure 5.58(b).
From the back view, repeat this process. In Figure 5.59 I have taken the further step of etching some divisions back in with a Standard brush using alpha 01 and a ZIntensity of 10. From the top view, reinforce the fow of the Extensor carpi radialis longus and Brachialis.


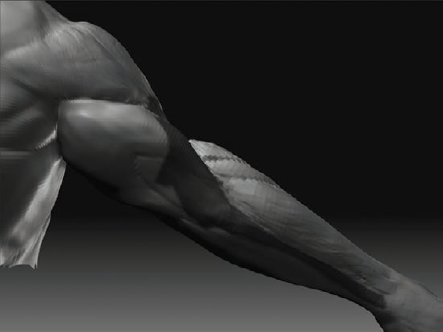


Figure 5.58. Pushing the forms back: (a) lowered smoothing curve (midrange), (b) the surface smoothed and further sculpted
You are now ready to add the Flexors. The Flexors encompass the anterior aspect of the arm. Rotate to the underside of the arm. From this view, you can see the area where you will sculpt the Flexors radiating from the medial epicondyle, as shown in Figure 5.60.
Isolate the area for the Flexor muscles with a mask, as shown in Figure 5.61.
Accentuate the depression of the Lateral epicondyle, as shown in Figure 5.62(a). On the underside of the arm, repeat this process, adding a small protrusion for the medial epicondyle (Figure 5.62(b)).
At this stage, take an overview of the arm. From the front view in silhouette, the high point of the forearm Extensors should be a crest. This high point coincides with the crest of the Flexors on a diagonal line, as shown in Figure 5.63. Use the Standard brush with a draw size of 20 and alpha 01 to pick out the shadow between the muscles and generally refine the forms. Be sure to check your work from unusual angles, as shown in Figure 5.64.


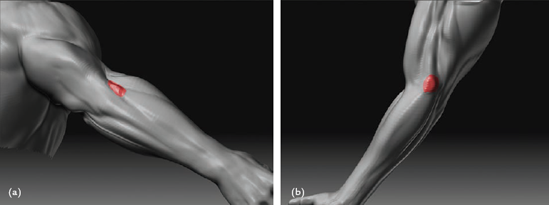
Figure 5.62. Accentuate the depression: (a) accenting the lateral epicondyle, (b) accenting the medial epicondyle
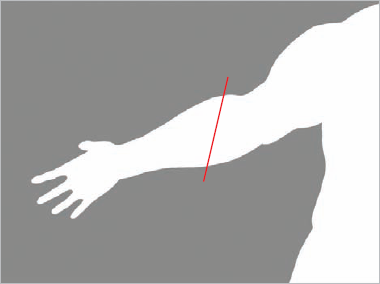
Figure 5.63. The line here shows the angle from the highest crest in the top and bottom profiles of the arm muscles.
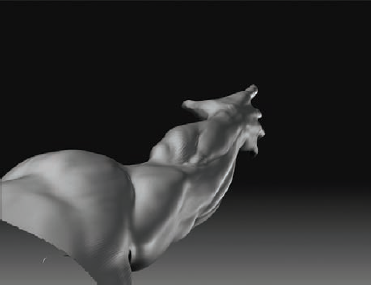
Figure 5.64. Looking at the sculpture from unusual angles can call to attention volumes that need adjustment.
At this stage, I think the arms need a slight rotation. This is a purely aesthetic choice on my part and can be skipped, but I'll cover the process here to show how you can accomplish it. For a video of this process, please see the DVD.
To rotate the forearm, you use ZBrush transpose rotation tools. To enter the transpose Rotate tool, press the R key on the keyboard, or click the Rotate button at the top of the screen.
Step down a few subdivision levels. Lower divisions are easier to manipulate with the transpose tools than denser meshes. In this case, my mesh is at level 4 with a total of 71,000 polys. I want to mask the body down to the point I want to rotate, in this case the lateral epicondyle.
To mask, you use ZBrush's topology-based mask feature. While in rotate mode, hold down the Ctrl key and click-drag down the arm. A mask will appear that seems to follow your cursor. This is topology-based masking. When the mask appears as in Figure 5.65, release the mouse button.
Now click and drag the mouse from the end of the mask to the tips of the fingers. Move to the top view, and move the first orange circle to center on the lateral epicondyle. You can move the circle by clicking the orange circle, not inside (Figure 5.66).
Now click and drag inside the center circle, and the forearm will begin to twist (Figure 5.67). This may require some resculpting once it is complete, but it is a very quick way to repose a figure. You will look at transposing in more depth in Chapter 11.
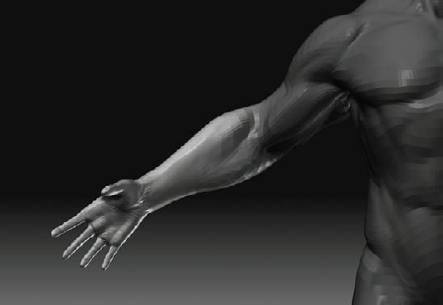

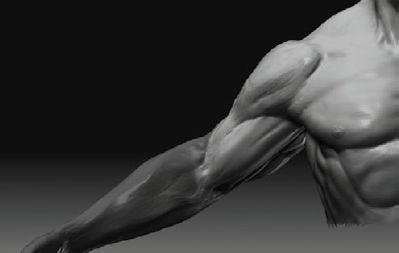
Congratulations! You have completed the arm. Figure 5.68 shows the final result. You have learned about the skeletal and muscular anatomy of the arm and put this information into practice.

You will return to the arm in Chapter 9 when you sculpt the finishing pass over the entire body, adding a sense of fat and skin as well as details such as superficial veins. At this point, you have all the information to sculpt a human arm convincingly. Let's move on to look at how to sculpt the pelvis and legs.