Starting with the figure as you left it in Chapter 3, in this chapter you will address the central pillar of the human body: the torso, abdomen, and pelvis. This area includes the chest, back, shoulders, waist, and hips. The shoulders and hips are areas of transition that you will address again in later chapters on the arms and legs, where you will explore how these forms transition into the limbs. For now, you will keep these areas rough in relation to the areas of current focus.
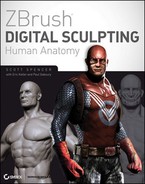
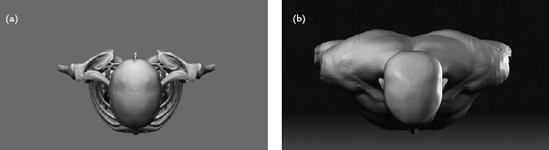
In Figure 4.1, you can see the torso of the fnished hero with the skin and fat removed. I have created this sculpture as a reference for you while you work, and the ZTool is available on the DVD. In this chapter, you will pay attention to specific bony landmarks on the surface as well as muscle groups. Those landmarks are as follows:
Sternum
Sterno-clavicular notch
Thoracic arch
Acromion process
Spine of the scapula
Superior anterior iliac crest
Superior posterior iliac crest
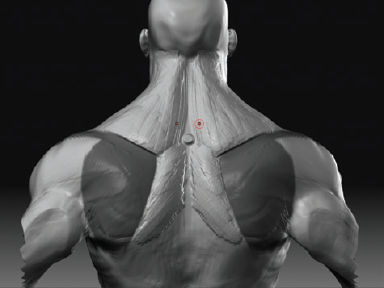
You will also be dealing with some specifc muscle groups:
Pectoralis | Rhomboids |
|---|---|
Rectus abdominis | Teres major |
External oblique | Infraspinatus |
Serratus | Deltoid |
Trapezius | Erector spinae |
Latissimus dorsi |
Figure 4.2 identifies these groups on the hero character.

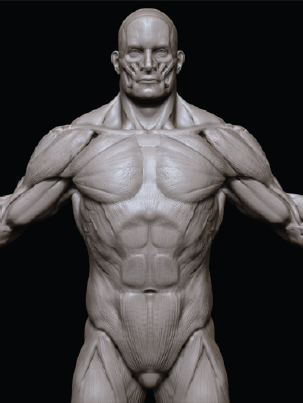
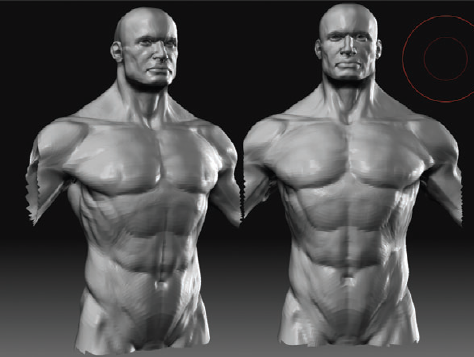
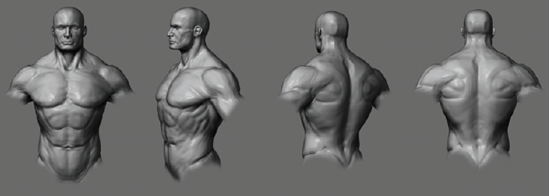
You will begin by making some general changes to the mass of the torso. The gesture sculpt you created in Chapter 2 was of a generic human male physique (Figure 4.3). In this chapter, you'll give this character more heroic proportions. You will do this by adding muscle mass to the chest and back as well as slightly changing the relation between the chest mass and pelvis mass. This creates a more arched back posture. By thrusting the chest out, you can create a heroic stance. Figure 4.4 illustrates the differences.

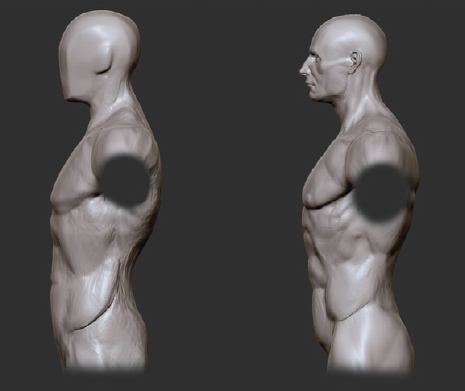
Figure 4.4. This comparison image illustrates some of the changes you will make to the torso to bring it more in line with a heroic figure.
Before you start to sculpt, let's store a morph target of the figure in its current state. As you may recall from Chapter 3, a morph target is a copy of the mesh in its current state that ZBrush stores in memory. Once you've stored a morph target, you can switch between the current version and the stored target at any time by clicking the Switch button. Another use-ful aspect of a stored morph target is that you can use the Morph brush to blend between different versions of the sculpture.
Because you will be working on the torso independently of the arms and legs in this book, it's a good idea to keep the original mesh stored in memory as a morph target. This way, you can easily correct any problems that may arise later where the torso meets the arms or legs. For example, if you find that the shoulders have moved too far in relation to the arms, it's a simple matter to use the Morph brush to blend off the difference.
Having a stored morph target also has the added beneft that you can check the changes you have made between the original gestural sculpt and the more refined sculpt. Check the DVD for a video illustrating morph targets and how they are stored and used.
To store a morph target, step to the highest subdivision level of the ZTool. Under the Tool menu, open the Morph Target fyout menu, and click the Store morph target button. This will store a morph target that you can recall at any time by clicking the Switch button.
You will now isolate the head and torso from the rest of the figure as you work. From the front view, draw a show marquee by holding down Ctrl+Shift, click-dragging, and pulling the green marquee around the torso and head (Figure 4.5). This will isolate it from the legs and arms since you will be focused on this area.

In this section, you will begin by adjusting the mass of the torso into a more heroic shape. The underlying skeleton of the existing torso is consistent with what you want in the end; however, the mass of the overlying muscle needs to be greater, creating the bulky torso apparent in superheroes.
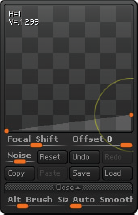
The first change to make is increasing the mass of the chest and back. Whenever you make large form changes like this, the Move brush is the best choice, so switch to that brush. Lower the ZIntensity setting to make it easier to create subtle changes (Figure 4.6). Using the Move brush, pull the width of the shoulders and chest out to match Figure 4.7. What you are doing here is adding muscle mass more than changing the skeletal structure, so do not pull too far.
These changes may also be easier to make if you step down in subdivision levels. By making large shape changes like this at lower subdivision levels, you are moving fewer points to affect the high-resolution mesh. Remember that changes in the lower subdi-vision levels telegraph up in ZBrush.
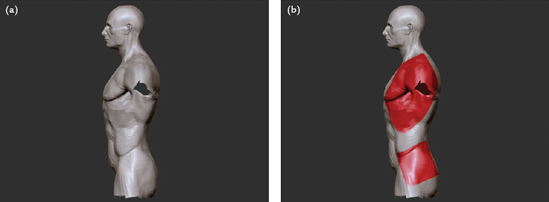
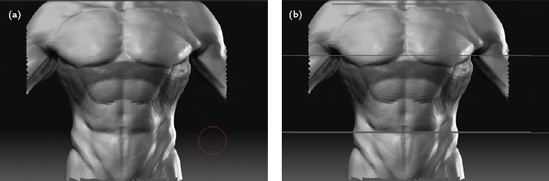
Move to the side view, and adjust the form of the chest, as shown in Figure 4.8(a). Notice how the upper chest is pulled out and the overall egg shape is adjusted from the back as well. In Figure 4.8(b) you can see the masses of the chest and pelvis in overlay.
At this stage, switch to silhouette mode (the Flat Color material) to check the profile of the figure. Always remember that this is an invaluable way to see the overall shape of your work quickly and clearly (Figure 4.9).
Note that you are adjusting the arch of the back, and as a result, you affect the angles between the chest and pelvis. Figure 4.10 shows the major plane breaks at the end of this stage.


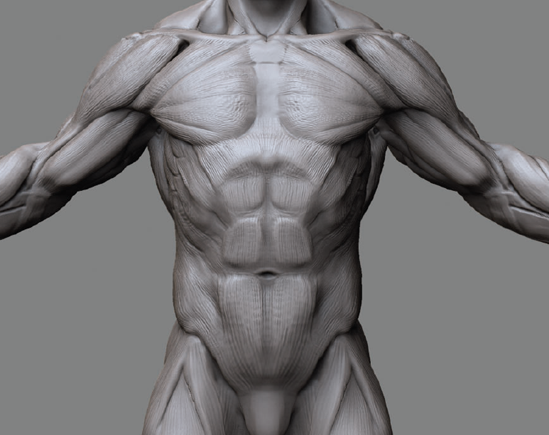
With the masses in place, you can now start addressing specific muscle groups of the figure. In this section, you will begin with the Pectoralis muscles. These are the large chest muscles that make up the upper torso (Figure 4.11). They attach at the clavicle, sternum, and humerus bones.
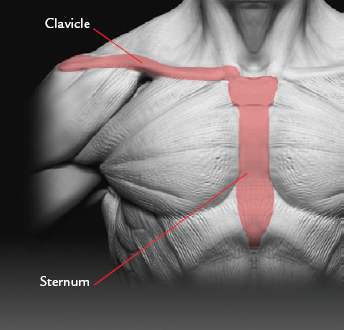
Figure 4.11. The two most prominent parts of the Pectoralis muscle originate at the clavicle bone and the sternum.
It is important to note that these muscles originate at the sternum of the rib cage and insert on the upper arm bone or humerus. You also need to understand that this muscle is actually three sepa-rate sections or heads. This becomes important in the ways they affect the surface of the fleshed figure. The first two heads are the most visible and create important highlights and shadows. These two are the sterno-costal head, which connects to the center of the rib cage, and the clavicular head, which attaches to the collar bone, or clavicle (Figure 4.12).
The division between the sternocostal and clavicular heads of the Pectoralis often makes a visible line on the chest, especially in individuals with more definition. It also serves to cre-ate a small hollow between the chest and the shoulder, known as the infraclavicular fossa, as shown in Figure 4.13. The Pectoralis muscle appears to radiate out from the upper arm.
To sculpt this muscle form, mask out the area of the Pectoralis muscle, and invert the mask so the area of interest is isolated. Select the Standard brush, lower your draw size to 10, and with ZSub etch in a line from the clavicle to the armpit, as shown in Figure 4.14.
This will start to create the clavicular head of the Pectoralis muscle. Using the Standard brush, lower the draw size, and add some striations in the direction of the muscle fow. I will often sketch in directional lines like this as I work. They will often be smoothed down by the end but will remain as subtle highlights and shadows on the final figure. As you work, be careful to retain the planes sculpted in Chapter 2. You don't want to obliterate them; instead, you want to keep them as a guide since the muscle shape and placement are just as important as the crests and planes of its form. Figure 4.15 shows this process.
To refine the shape you've made, you need to smooth it. Edit the smooth curve by going to Brush Smooth curve and lowering the point (Figure 4.16). This allows you to smooth with less adverse effects. Smooth the surface gently, being careful not to destroy the work so far. Remember to hold down the Shift key while changing the brush curve so it only affects the Smooth brush.
You will now build up the mass of the muscle. Select the Claytubes brush, and con-tinue to sculpt in the shape of the Pectoralis. This will fill in the recesses first and generally build up the forms (Figure 4.17). Smooth back the surface, and with a mask, isolate the area for the clavicular head of the Pectoralis. Continue to refine the Pectoralis shape against the mask.
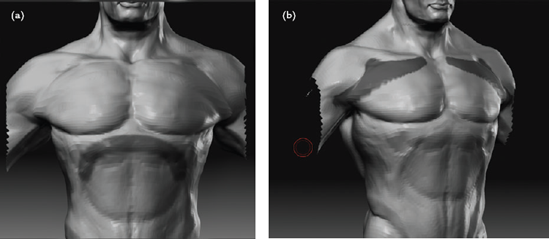
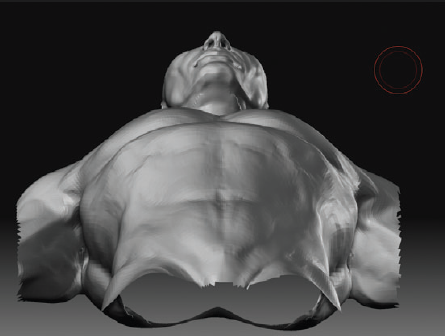
When working on the figure, always be sure to move it often so you can see every angle as the shapes develop. In particular, I find it useful to look at it from the top and bottom to make sure the shapes are turning back in space correctly. In Figure 4.18, you first see the chest from the front. It appears to be normal; however, by tilting the figure back in space, you see the chest is entirely too fat.
Use the Move brush to accentuate the cylindrical shape of the chest form, and make sure the muscles appear to wrap naturally around this shape (Figure 4.19).
Here I use the Flatten brush with a ZIntensity of 10 to reintroduce the planes you worked out in Chapter 2. As I show how to sculpt throughout this book, I will reintro-duce these plane changes as you add and alter volumes. By revisiting the planes, you can help keep the muscled figure from looking overly "inflated." It also helps to main-tain a sense of structure to the form.


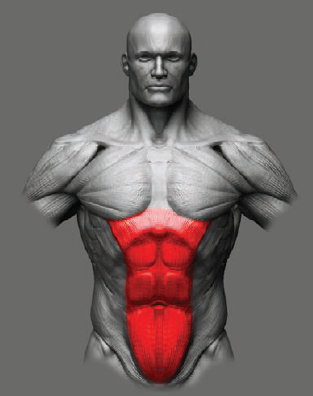
In this section, you'll move down the torso into the abdominal region. Here you will be looking at the Rectus abdominis (Figure 4.20). The abdominals are often called the "six-pack," but if you were to take away the skin and look at this sheath of muscle, there are actually eight units of muscle fiber instead of six. The confusion stems from the fact that the first two are rarely visible except on the fittest of individuals.
These muscles form a central pillar from the arch of the rib cage down to the pubic bone of the pelvis. To sculpt them, you will mask out the lower border of the rib cage.
Paint a mask over the arch of the rib cage, as shown in Figure 4.21. Make sure the abdominals fow down from the ribs but do not alter the shape of the barrel of the chest.
Select the Standard brush, and lower your draw size. With this brush, sketch the flow of the muscle as it feeds up into the rib cage. The striations fow diago-nally off, as shown in Figure 4.22. Note the "W" shapes. Notice also that the navel remains in place; this was your third-head measure, and you want to keep it from migrating off measure.
Move to the side view, and select the Move brush. Notice from Figure 4.23(a) that the abdominals are out too far from the core of the figure. There is also no plane change at the waist. Move the forms back, as shown in Figure 4.23(b). Also note the plane change. The body bends at this point. You will often see the flesh bunch and fold here as the torso is in motion.
The abdominal muscles terminate in a rounded form at the pubic bone, as shown in Figure 4.24. Here the Rectus abdominis and the External oblique flow together and attach along the dividing line between the pelvis and legs. Use the Standard brush to sketch in this shape, and use the Claytubes brush to mass it in. You will address the oblique in the next section.


From the side view, the torso is dominated by two muscle groups, the Serratus and the External oblique. The Serratus are the small fingerlike muscles that cover the sides of the ribs. Often they may be mistaken for ribs themselves, but as you can see in Figure 4.25(a), they are independent shapes. The External oblique is a long sheet of muscle that inter-weaves between the Serratus and extends down the sides of the figure, attaching to the pel-vis as well as weaving into the abdominals. The character of all the muscles of the core, or trunk, is that they weave together in a complex web that allows the great compression and extension of the trunk.
From the side view, press in the hollow of the armpit using the Standard brush with ZSub (Figure 4.26). Mask out the area for the Serratus, and invert the mask as shown in Figure 4.26(b) to isolate the area for sculpting.
Using the Standard brush, sketch in the four fingers of the Serratus. They flow off the scapula like fingers to each rib; however, usually only four are actually visible on the fleshed figure. Unmask some more areas for the oblique. Using the Standard brush, lower your draw size, and select alpha 01 to create a fine-tipped brush. With ZSub turned on, sketch in the interweave and lines that descend over toward the abdominals (Figure 4.27).
You now need to adjust the Latissimus dorsi muscle that forms the back wall of the armpit. You will look at this muscle in more depth in the next section as I discuss the back.
This muscle wraps around the underside of the arms and inserts on the humerus bone of the arm. The External oblique fows diagonally down from the Serratus toward the abdominals. It creates a triangular shape into which the External oblique fits (Figure 4.28).
With the Standard brush and a low draw size, sketch in the Latissimus, as shown in Figure 4.29.
Mask the Latissimus, and add striations for a sense of directional flow (Figure 4.30). You'll smooth these back later, but for now they serve to help add visual interest to the surface and guide the eye.

Figure 4.26. Sculpting the torso muscles: (a) pressing in the hollow for the armpit, (b) the area for the Serratus unmasked
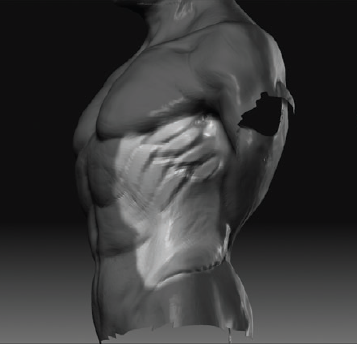
Figure 4.27. As you sculpt the Serratus muscles, note the striations of the External oblique as well.
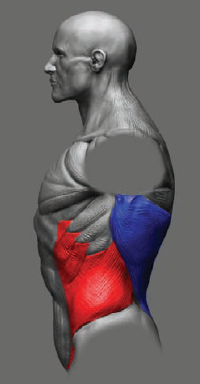
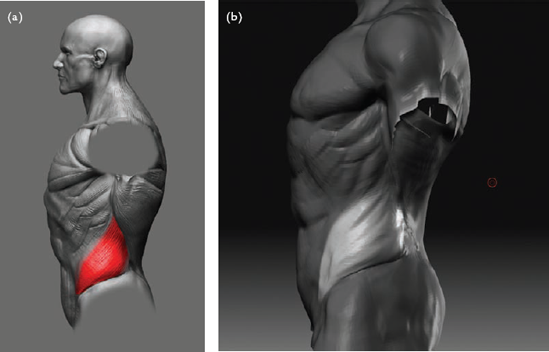
Figure 4.28. The insertion of the oblique in relation to the Latissimus. The oblique is shown in red; the Latissimus dorsi is shown in blue.
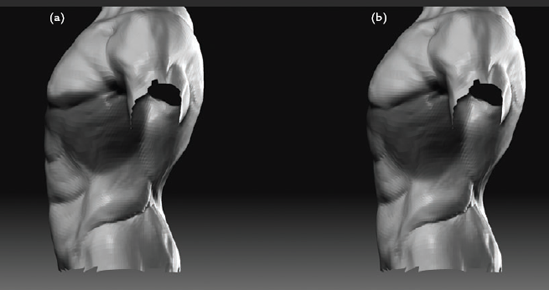
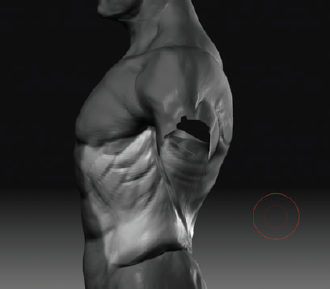
With the Latissimus in place, you can now further refine the External oblique. The oblique also forms the Flank pad muscle shown in Figure 4.31(a). In Figure 4.31(b), you can see the muscle area isolated with masking and the striations sculpted in with the Standard brush. Notice that it flows diagonally from the top to bottom and inserts beneath the lat.
From the front view, notice how the oblique flows over the bony protrusions of the iliac crests of the pelvis. These are very important bony landmarks on the figure, especially when you deal with the muscles of the anterior or frontal aspect of the leg in Chapter 6. For now note how their presence influences the direction of flow of the External oblique as it wraps around the abdomen to insert in the crotch (Figure 4.32).


At this stage, your torso should look like Figure 4.33 in the front and on the side. As always, be aware of the rhythms of both the profile curves of the form and the internal forms and how they relate. This gestural flow between parts is what makes the sculpture feel alive. These relationships are ultimately more important than anatomical accuracy.
At this point, you are ready to move to the back of the torso and examine the muscles that compose the complex surface forms visible when viewing the figure from behind.

The back is the most complex area of the torso. It has the greatest number of muscles visible at the surface of the figure, as well as complex movable bony landmarks. This complexity is mostly created by the mechanism of the shoulder girdle, whose muscles are most prominent on the posterior or back view of the figure.
The shoulder girdle is a mechanical system composed of the clavicle, scapula, and associated muscles. Its function is to allow the great range of motion we enjoy in our arms. Were it not for this complex machinery, the arm would never rise beyond 90 degrees from the side.
Many of the muscles in the upper back manipulate the scapula. Although it is beyond the scope of this book to examine the mechanics of this structure, I will cover the major landmarks created by the scapula and clavicle.
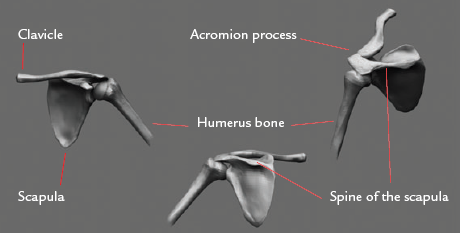
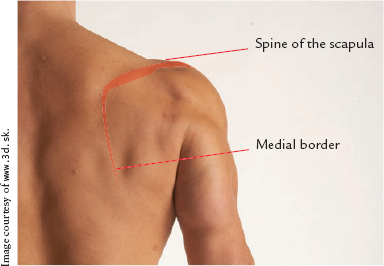
The shoulder girdle creates several important surface bony landmarks that I must note now to assist you in placing the muscles of the back and arm (Figure 4.34). The first landmark is the acromion process, and it is created at the join between the scapula and the clavicle at the center of the Deltoid, or shoulder.
From the acromion process, you can trace the line of the spine of the scapula back diagonally toward the center of the back. This is an important landmark from which many back muscles originate. The spine of the scapula is visible on the fleshed figure in most cases as a raised ridge. In the case of a more muscular person, especially a heroic body type, the increased muscle mass on either side of the bone makes it appear as a recess.
You can see all of these landmarks in Figure 4.35.

Now that you have an understanding of the skeletal structure of the shoulder girdle, let's try sculpting the muscles of the back. First let's look at the overall form as a whole. Just as the chest needed to be adjusted from the bottom view to correct an unnatural flattening from the top view, notice in Figure 4.36(a) how the back has become rather flat. You need to correct this by adding the plane changes that are created by the scapula bones and back muscles, as shown in Figure 4.36(a).
Follow these steps to correct this:
Select the Move brush, and from the top view, pull the scapulas out from the back. Notice the "W" shape they create in outline, as shown in Figure 4.36(b). This will cre-ate an important plane change in the back and also set the stage for the inclusion of the Rhomboid muscles, which connect the scapulas to the spine.
Rotate to the back view, and using the Standard brush, mask out the line of the spine of the scapula (Figure 4.37). Remember this can be traced from the point at the Deltoid where the clavicle and scapula meet. Figure 4.38 shows the shape of the scap-ula in overlay over the figure.
With the spine of the scapula masked, select the Claytubes brush, and start to mass the Trapezius muscle up to the base of the skull, as shown in Figure 4.39. You will return to this muscle as the back progresses. Because it is such a thin sheet, it is defined mostly by the shapes of the muscles it lies over.
At this stage, mask out the shape of the scapula as a whole. This will allow you to add the Rhomboid muscles (Figure 4.40). The Rhomboids originate at the medial border of the scapula (the edge toward the center of the body) and insert at the spine.
You will now add the Latissimus dorsi muscle. The lat muscle, as it is also known, was addressed earlier in this chapter while you worked on the sides of the figure. Isolate the shape of the muscle, as shown in Figure 4.41. This muscle wraps around from the armpit to extend down the back and originate at the pelvis.
With the area for the Latissimus dorsi unmasked, select the Claytubes brush. Start to mass in the shape of the muscle. Do not make it too thick because this is a sheet of muscle that lies almost like a cape against the back (Figure 4.42).
At this stage, you will return to the Trapezius muscle, which flows from the base of the skull to the clavicles, spine of the scapula, and spinal cord. The Trapezius muscle is very much like a cape draped over the shoulders. Isolate this area with a mask, and use the Claytubes brush to mass in the muscle form as it flows from the skull to the spine of the scapula, extending it further down the length of the back (Figure 4.43).
Moving again to a bottom view, you can see the scapulas still lay a little flat against the back. You need to reinstate the crest between the medial border and the Rhomboids. Select the Move brush, and pull the borders of the scapulas out (Figure 4.44). These kinds of breaks and plane changes ultimately add up to a more believable figure. It is always very important to continually evaluate your progress from every possible view. As you watch the video of this figure sculpt in progress, notice how often I move around the form. You can never move enough.
With the Smooth brush, smooth the noise on the back, as shown in Figure 4.45.
At this point, you will be working on the muscles that directly attach and flow off the scapulas. These are complex in that they are partially visible on the surface in some areas while elsewhere they flow deep under other muscles. I have tried to clarify this with écorché images at different depths to illustrate the muscle shape and placement.
You will now accentuate the posterior head of the Deltoid muscle where it attaches to the spine of the scapula (Figure 4.46). Mask the under-side of the Deltoid, as in Figure 4.47. Using the Standard brush with a small draw size and a low intensity, stroke along the edge. Use the ReplayLast button found in the Stroke Palette. This will repeat the last stroke drawn in ZBrush.
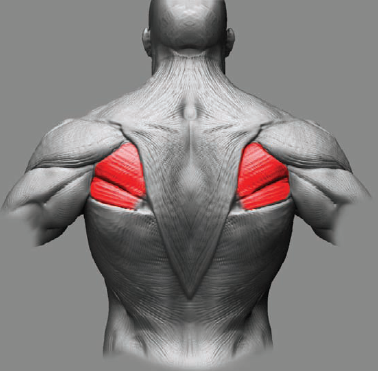
You will now indicate two prominent muscles that originate on the scapula and attach to the humerus bone. These are the Infraspinatus and Teres major (Figure 4.48). Clear the masks from your figure. Select the Standard brush, and with a small draw size, etch in the division shown in Figure 4.49. These two muscles are often visible on the surface of a feshed figure (Figure 4.50).
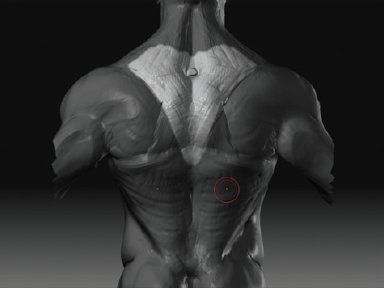
You will now extend the Trapezius to the bottom of the rib cage. This is a very thin muscle and is defned more by the shapes of the muscles beneath it. Mask out the sur-rounding areas, and indicate the shape lightly with the Claytubes brush, as shown in Figure 4.51.
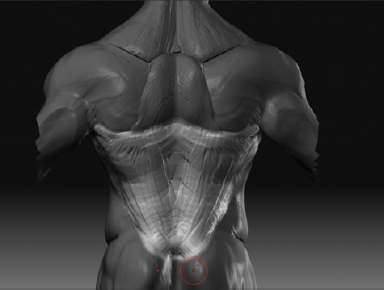
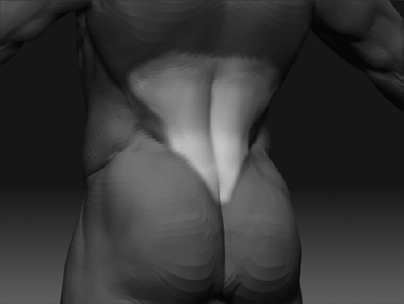
At the base of the back, you will find two pillars of muscle that extend from the sides of the tailbone up the back (Figure 4.52). These are the Erector spinae muscles. They manifest as two thick muscle forms on either side of the spine.


At this stage, it's a good idea to zoom back from the figure and look for any areas that need to be refined. Remember to keep an eye out for the planes I have discussed as well as the silhouettes. Now use the interactive light to move the light source and check how the shadows react under different lighting conditions. Are the shadow shapes correct and con-sistent? If not, revisit those areas, and continue to massage them from a lower subdivision level, making subtle changes and then stepping back up to the higher levels. In Figure 4.53 you can see the final torso.
Congratulations, you have completed work on the torso! In this chapter you looked at sev-eral complex areas, including the back and shoulders. You examined the muscle groups of the core of the figure as well as some transitional areas such as the hips and shoulders that will serve you in later chapters on the legs and arms. Let's move on to sculpting the arms.