Now that you have looked at the arms, you will move on to the second part of the appendicular skeleton, the legs. As we did in the previous chapter, in looking at the limbs I will also talk about the transitional areas between the limbs and the trunk. In this case, you will begin by sculpting the pelvis and buttocks.

As you saw in Chapter 5, the limbs can be reduced to their simplest shapes as boxes or cylinders. Just as you reduced the arms to basic geometric shapes, you will do the same here with the legs. By simplifying the shapes, you can better understand their more complex forms. You may also better examine how the masses of the upper and lower legs relate to each other by looking at them in more simplified terms. As I have already discussed, in many cases it is the relationship between the masses—the gesture, rhythms, and silhouette—that is more important than isolating the individual anatomical forms.
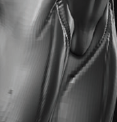
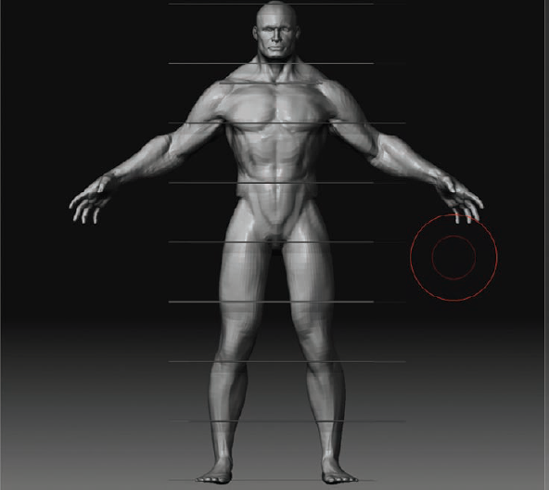
The legs can be most simply represented as two cylindrical forms, as shown in Figure 6.1. These two cylinders have a slight taper from the top to bottom.
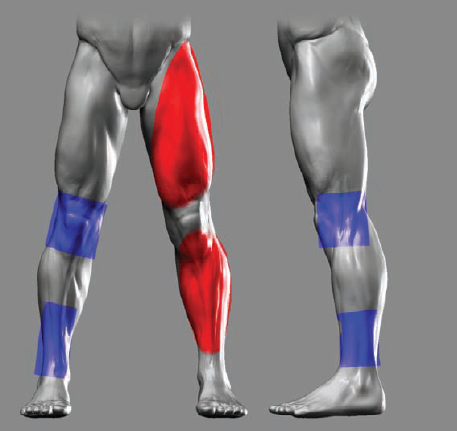
The internal shapes of the leg are composed of several oval forms, as shown in Figure 6.2. The red areas illustrate the oval shapes, and the blue areas represent the more boxed form of the structure of the knee. The heads of the tibia and femur bones are quite close to the surface at the knee, which is why the shape maintains a more structural quality. You will look at this in more depth later in this chapter when I discuss the bony landmarks known as condyles.

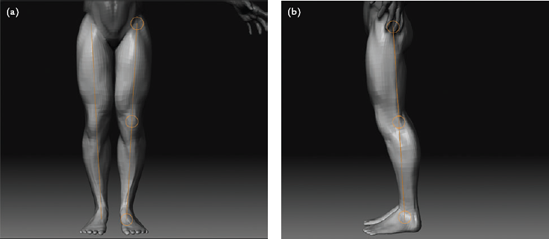
As you have seen before, the silhouette of the figure can offer many cues to accurate muscle and bone placement in the form of important plane breaks or crests in the outline. For example, Figure 6.3 shows the major breaks on the silhouette of the leg. You need to keep these in mind as you work. Try to refer back to these points of reference as you sculpt; it can become quite easy to lose sight of the overall outline when facing the complex internal forms of the sculpture.

When you forget to introduce and maintain these breaks in the silhouette, the figure takes on a softer appearance. This is one of the main reasons some sculptures may look "soft," or undefined, even when the internal anatomic forms are in place. Figure 6.4 shows the outline created by these interlocking shapes in the leg. These are not specific anatomical forms in themselves. These are simply points on the silhouette of the figure where the outline typically is broken by a high or low point. Being aware of these points helps create an accurate profile, which in turn guides you when placing internal forms.
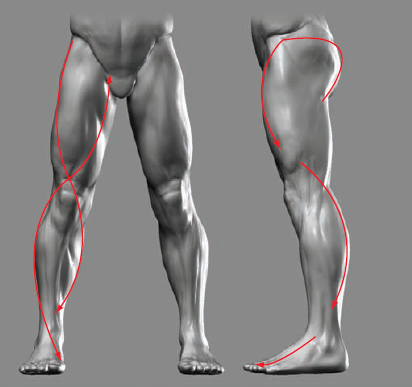
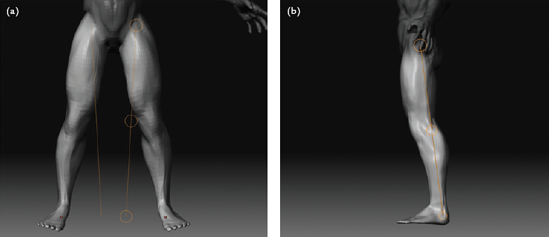
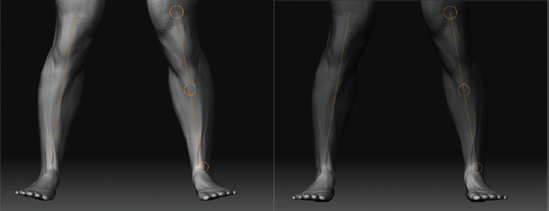
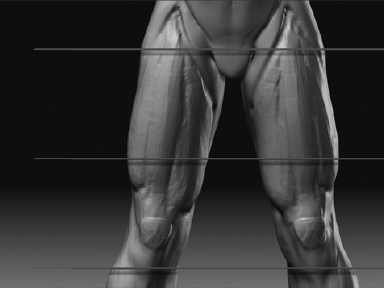
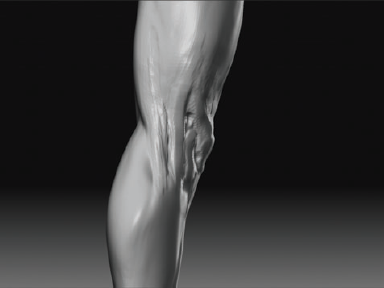
Another useful visual cue to bear in mind concerning the silhouette of the leg is the relationship of high to low points on the upper leg and lower leg. While working on the muscles of the leg, it is useful to keep in mind the consistent relationship between the crests on the outer and inner profles of the leg. Figure 6.5 shows these angles and how they may be drawn on the figure. Avoid evening these out or accidentally making them too flat. The result will be a limb that appears too much like a cylinder or a sausage (Figure 6.6).
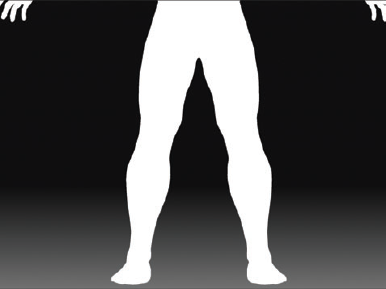
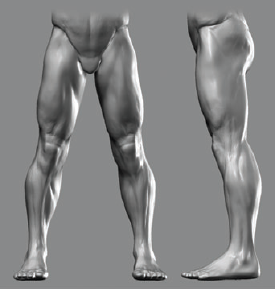
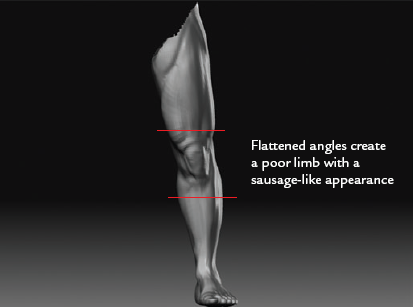
Figure 6.6. When the angles and crests of the limb are flattened, it takes on an unnatural sausagelike appearance.
As you sculpt, try to keep these visual cues in mind. Step back from the sculpture often, and try to reintroduce the rhythms and crests that may have been lost in the process of working the surface. I find when I sculpt there is a constant interplay between working on internal shapes and then relating those shapes to the expected profiles of the figure as a whole (Figure 6.7). Before you move into sculpting, let's take a moment to look at the skeleton and musculature in more detail.
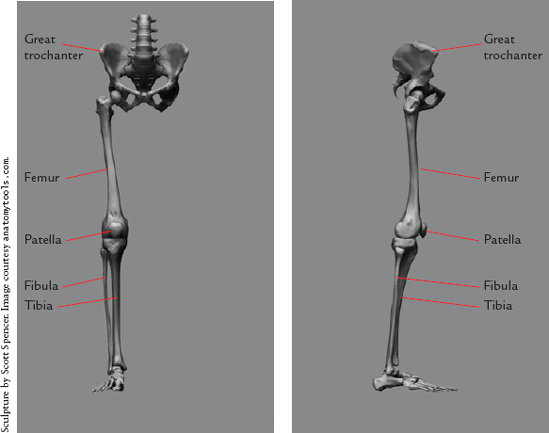
In this section, you'll survey the major bones and muscles of the lower limbs. Note that you'll learn more about many of these features during the sculpting process. Figure 6.8 illustrates the bones of the hip and leg. They consist of the pelvis, femur, patella, tibia, and fibula. The pelvis consists of the two hip bones joined at the sacrum, or tailbone. The upper leg consists of the long and very strong femur bone. The lower leg is composed of two bones, the tibia and fibula. These are similar to the radius and ulna of the lower arm bones, but they lack the rotational abilities of the forearm. The joint between the femur and tibia is protected by the kneecap, or patella bone.
Figure 6.9 illustrates the major skeletal landmarks. These consist of the great tro-chanter, the iliac crest, the patella, the condyles of the tibia and femur, and the malleolus (or anklebones). The great trochanter, illustrated in Figure 6.10, is the bony protrusion at the side of the femur. It lies approximately at the midpoint of the figure and is often used as a starting measure, since it can be considered the midline. You will look at this landmark as it relates to the Gluteus muscles later in this chapter.


The iliac crest is the bony spine of the top of the hip bone. It is mainly visible at the front of the figure and serves an important anchor point for the muscles of the upper leg, as illustrated in Figure 6.11.

The patella is also known as the kneecap. It serves to protect the space between the femur and tibia when the leg bends and the area within the joint may be exposed. When the knee bends, the patella slides over the joint, protecting the exposed space between the bones.
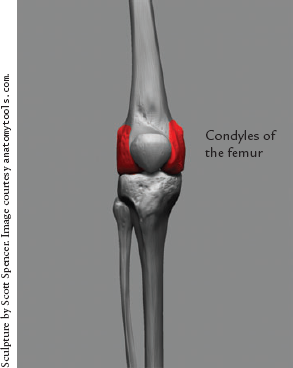
Figure 6.12 shows the distal head of the femur and the proximal head of the tibia. When you start sculpting the knee, it will be important to recognize these landmarks. The head of each bone has what are called condyles. There are two condyles per bone: the lateral condyles (found at the sides) and medial condyles (found toward the middle). Figure 6.12 also shows these forms labeled. They will become important when you begin sculpting the knee, along with the muscles of the lower leg.
The anklebones are actually protrusions from two separate bones. The inside ankle-bone is called the medial malleolus of the tibia. The outside anklebone is the lateral malleo-lus of the fibula. Figure 6.13 identifies these landmarks. Notice how the naming helps show the placement. The lateral malleolus of the fibula is on the outside, or lateral aspect, of the leg, while the medial malleolus of the tibia is on the inside.

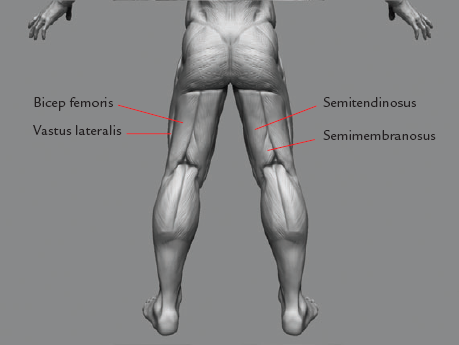
The pelvis and legs are composed of several important muscles. You will look at some of the major ones in this chapter that have a direct influence over surface form. Figure 6.14 shows these muscles labeled on the écorché of the figure.
In many cases, two muscles may lie so close together they seem more like one form on the surface of the figure. As you sculpt, you will mass in shapes like this together. One example of this is the combination of the Soleus and Gastrocnemius, the two muscles that together form the mass of the back of the calf. These two muscles are most easily addressed as a single form. You will also see this effect with the Gluteus medius and maximus muscles.
Although there are in fact two glute muscles visible on the surface form of the sculpture, you will address them as one shape when sculpting. The following list covers the muscles of the leg you will be looking at in this chapter. There are other muscles, but these are the ones that have the most pronounced effect on the surface forms of the sculpture:
The Muscles of the Buttocks | Rectus femoris |
Gluteus maximus | Bicep femoris |
Gluteus medius | Semitendinosus |
Semimembranosus | |
The Muscles of the Upper Leg | |
Tensor fasciae lata | The Muscles of the Lower Leg |
Sartorius | Extensor digitorum longus |
Gracilis | Gastrocnemius |
Great trochanter | Peroneus longus |
Iliotibial band | Tibialis anterior |
Vastus lateralis | Soleus |
Vastus medialis |

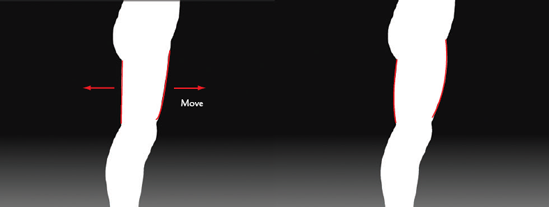
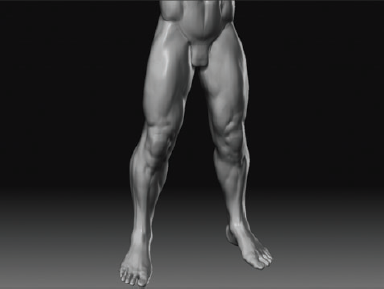
You will now begin to sculpt the legs using the information presented so far. The frst step will involve using the transpose tools to shift the pose of the legs into a more dynamic position. You will open the stance and shift the legs back slightly so the fgure's weight appears to thrust forward, adding a more heroic appearance.
Before you start sculpting this area, I'll show how to adjust the pose. Although you want to keep the fgure somewhat neutral for ease of remeshing and rigging, you also want it to have a sense of life. To do this, you will use the transpose move tools to shift the legs back and spread the fgure's stance wider. By moving the legs back, you make the fgure appear to lead more with his chest. By opening the legs wider, you give his stance a more solid and heroic feel (Figure 6.15). This process is shown in a video on the DVD; take the following steps to tr y it you rself.
To move the legs, step down to subdivision level 3. You want to be at a lower subdivision level to make working with the transpose tools easier. Higher subdivision levels have too many polygons and tend to be harder to manipulate. Press the R key to enter transpose rotate mode, or use the Rotate button at the top of the screen (Figure 6.16).
Hold down the Ctrl key, and click-drag from the torso to the leg. This activates topology masking and will allow you to mask the figure down to the legs. Make sure that X symmetry is on for this process by pressing the X key on the keyboard. At this point, the legs should be unmasked (Figure 6.17).
Note
You can also fnd the X symmetry option, along with Y symmetry and Z symmetry, on the Transform palette, which is accessible by clicking the Transform menu at the top of the screen. Click the Activate Symmetry button and the X modifer to engage the X symmetry option. You can also press the X hot key.
Click and drag the mouse to draw a transpose line along the front of the leg from the center to the bottom of the foot (Figure 6.18(a)). Rotate to a side view of the figure, and move the transpose line back into the center of the hip (Figure 6.18(b)). Now rotate back to the front view.
Click in the center of the lowest circle, the one at the foot. Drag out to the side to rotate the leg out (Figure 6.19(a)). Move to the side view and repeat the process, but this time, rotate the leg back, as shown in Figure 6.19(b). You will now want to adjust the ankles so the feet appear to rest on the ground plane.
Click and drag again on the leg from the front view to draw a new transpose line. This time, end at the ankle (Figure 6.20). Hold down Alt, and click-drag in the last circle to rotate the ankle so the foot lies on the ground plane. When pressing Alt in transpose mode, the effect changes to what is called bone posing. Bone posing rotates from the last circle of the transpose line and allows you to bend limbs as though they were rigged with a skeleton. The algorithm contains a skinning process that helps prevent the mesh from collapsing at the point of rotation.
At this point, turn on guide marks, and check the proportions (see Figure 6.21). You need to move the pubic bone down as well as the feet based on the figure position in relation to the measure lines shown here. You'll do that in the next stage.

At this stage, you are ready to begin sculpting the transition from the trunk into the pelvis. You will start by etching in the general fow of the major muscles of the buttocks as well as the pelvis.
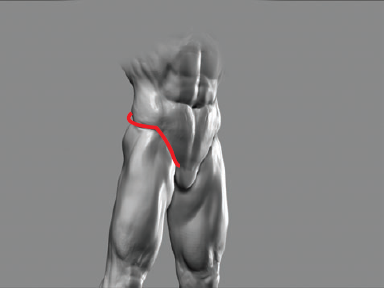
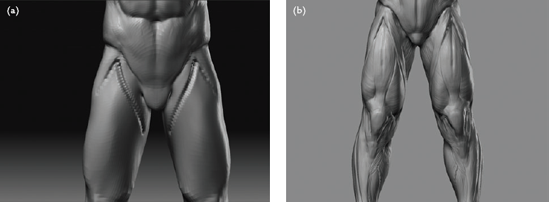
Select the Standard brush. Set your draw size to 8, and select alpha 01 to help create a smaller etched line. From the front view, sketch in the inverted "V" shown in Figure 6.22. This will represent the hollow just under the iliac crest created by the origin of several muscles. Also carve the furrow where the lateral Oblique fows over the iliac crest and down toward the pubic region. Notice in Figure 6.23 how the Oblique muscle breaks its fow at the iliac crest.
Select the Move brush, and pull the groin down to account for the genitals, as shown in Figure 6.24(a). This region lies beneath the fourth head measure, which corresponds to the pubic bone and great trochanter. Leaving it off can seriously affect your ability to judge proportions and the general fow of muscle and skin in the groin. Using the Move brush, adjust the shape of the furrow at the waist, as shown in Figure 6.24(b).
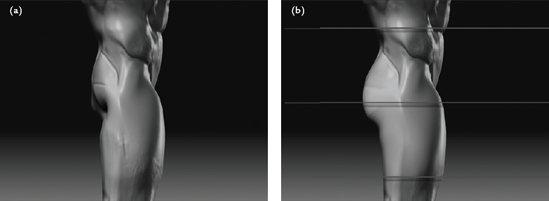
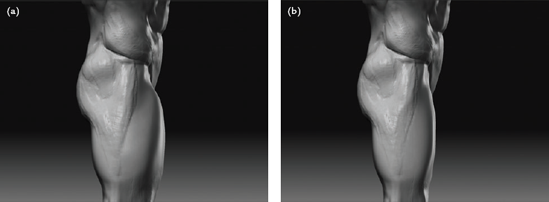
Move to the side view so you can address the muscles and shape of the buttocks. As you can see in Figure 6.25(a), it is too shallow at this time and lacks any real defni-tion. Turn on the measure guides, and use the Move brush to pull the buttocks back. The cleft between the buttock and the leg is created by a fatty deposit. This point should lie just beneath the fourth head measure line (Figure 6.25(b)).
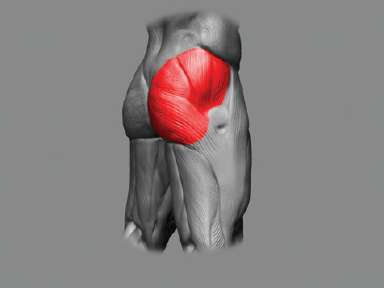
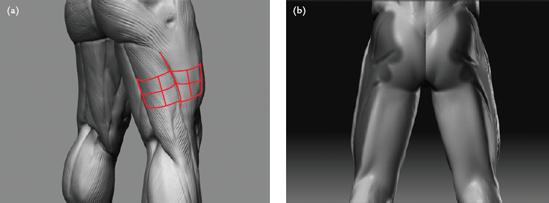
Turn off the measure guides, and select the Claytubes brush. Mass in the Oblique muscle, as shown in Figure 6.26(a). Move to the back view, and use the Claytubes brush to continue to mass in the glute muscles, as shown in Figure 6.26(b). There are two glute muscles, the Gluteus maximus and Gluteus medius. You can see these muscles in écorché in Figure 6.27. I usually consider them as one shape, and they are often referred to as the glutes when addressed together as a group.
Notice that I am sculpting the fow of the muscles as I work even when using the Claytubes brush. The glute muscles can be seen to radiate out from around the great trochanter (Figure 6.28).
Move to the side view. Here you can see that the upper thigh is far too thick; the silhouette is off. Selecting the Move brush, shift the front profle back in place, as shown in Figure 6.29.


You will now address the forms of the upper leg. In this section, you will look at how the leg transitions from the pelvis into the limb.
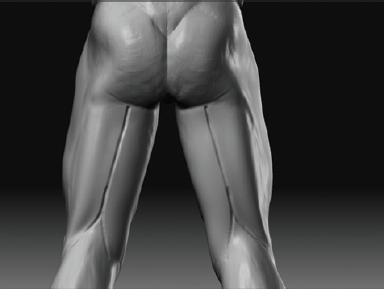
Return to the front view. You will now etch in the major muscles of the upper leg, starting from the inverted "V" you created earlier (Figure 6.30(a)). This "V" represents the origin of the Tensor fasciae lata (TFL), as well as the Sartorius and the Rectus femoris muscles (Figure 6.30(b)). This makes it an ideal point to start sketching in the muscles.
With the Standard brush, make sure your draw size is around 10 and you have alpha 01 selected. Start by extending the medial leg of the "V" down to the inner thigh, as shown in Figure 6.31(a). Notice how this line hooks around a teardrop shape near the inside of the knee. This is where the Sartorius muscle curves around the Vastus medialis muscle, which you will address shortly. Figure 6.31(b) shows these muscles in écorché.
Moving to the front view, etch in the Rectus femoris muscle, as shown in Figure 6.32(a). This long muscle attaches to the kneecap and extends up into the furrow just beneath the iliac crest, as you can see in Figure 6.32(b).
Now move to the side of the leg, and etch in another teardrop shape; this is the Vastus medialis muscle. In Figure 6.33 you can also see the shape of the Vastus medialis on the inside of the left leg.
When taken together, these muscles are called the quadriceps group. You may notice I've mentioned only three muscles, but quad would indicate there must be four. There is a deeper muscle beneath the Rectus femoris called the Vastus intermedius. Because it is not visible on the surface of the fgure, you will consider only the shape of the surface muscles it influences. You can see the group as a whole in Figure 6.34.
Move to the front view. Now that you have the outlines of the muscles etched in, you will select the Claytubes brush to mass in their forms. Figure 6.35(a) shows the Rectus femoris massed in using the Claytubes brush. Be careful not to add too much here because it will disturb the silhouette of the leg. You simply want to give some form to the outline you have created. Figure 6.35(b) shows the Vastus medialis massed in with the same technique. Now move to a side view, and mass in the Vastus lateralis with the same brush, as shown in Figure 6.35(c).
At this stage, turn on the measure guides. Using the Claytubes brush, indicate the kneecap. Notice in Figure 6.36 that I've placed it just above the sixth head line. Remember that the head measure falls not on the knee but on the bony protrusion of the tibia.
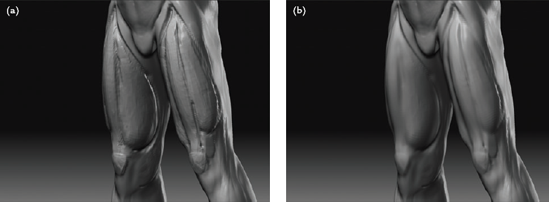
Turn off the measure guides, and select the Standard brush. Etch in the divisions again where they may be getting lost, as shown in Figure 6.37(a). At this point you are less concerned with the surface finish and the appearance of flesh than with the placement of muscles and the rhythms between them. You will take the surface to a finer fin-ish later when the muscles are placed. Also note on this image the angle between the Vastus lateralis and Vastus medialis. In Figure 6.37(b), notice how the lateral head is higher.
Smooth back with a softened Smooth brush to achieve the results shown in Figure 6.38.
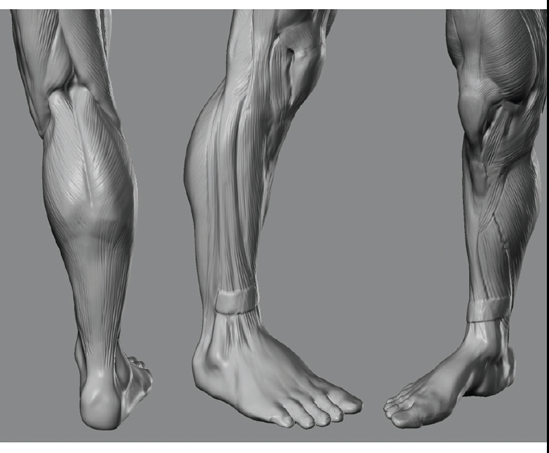
Move to the side view, and isolate the area for the TFL and the iliotibial band (ITB) with a mask (Figure 6.39). With the Claytubes brush, stroke down this unmasked area lightly. The ITB is actually a thin strong tendon sheath that wraps around the Vastus lateralis. It gets its shape from the underlying muscle it encases.
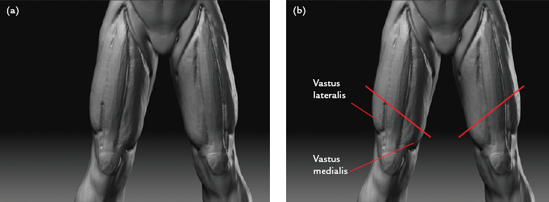
Figure 6.37. Working on the knee: (a) etching in divisions again, (b) the angle of the Vastus lateralis to the Vastus medialis
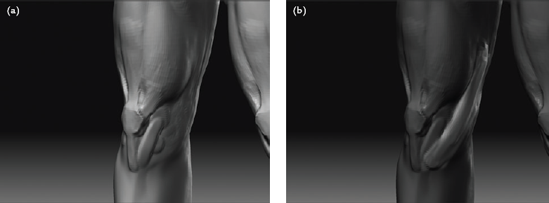
The important thing to note is that it sticks out from the side of the leg and is actually visible from the back. You can see this in écorché in Figure 6.40(a). Moving to a back view, you can see how this step starts to take form after massing in the unmasked area with the Claytubes brush (Figure 6.40(b)).
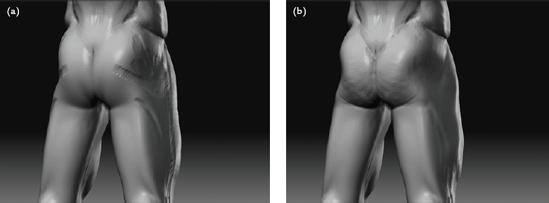
From the back view, continue to mass in the shape of the glute muscles, as shown in Figure 6.41. Use the Claytubes brush with no alpha and a ZIntensity of 10 to mass in this area. By removing the alpha, you give the Claytubes brush a much smoother surface effect.
Move down to the back of the thighs. The backs of the thighs are covered by three large muscles: the Bicep femoris, the Semitendinosus, and the Semimembranosus. The last two sit directly on top of each other, and for these purposes you will consider them as a single shape (Figure 6.42). Together these muscles are sometimes called the hamstring group.
Select the Standard brush, lower the draw size, and select alpha 01. Etch in the division between the two muscles, as shown in Figure 6.43. Select the Claytubes brush with alpha 28, and mass in the shape of the Semitendinosus muscle, as shown in Figure 6.44. Notice how it wraps around the heads of the tibia and femur, bulging toward the midline of the body.
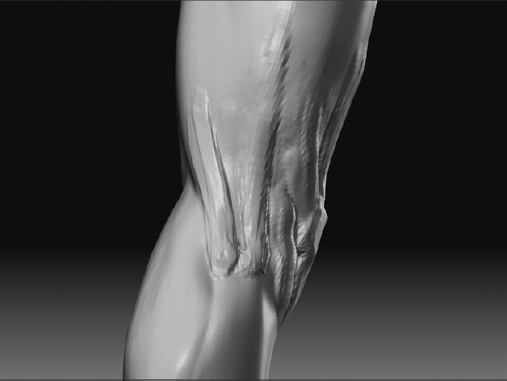
Repeat this process for the Bicep femoris, as shown in Figure 6.45(a). Notice how these two muscles together form a kind of tongs shape that seems to grip the calf muscles (Figure 6.45(b)).
At this stage, you can reevaluate the silhouette of the legs. Switch to the Flat Color shader, and move to the side view. Here you can see that the profiles of the upper leg are off. The leg appears too straight in silhouette and lacks any of the gestural curves. Using the Move brush, shift them back into place (Figure 6.46).


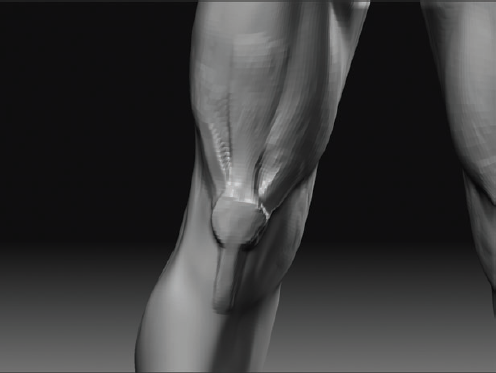
In this section, you will address the knee. The knee will require some examination in écorché before you move into sculpting. Like the ear, the knee is an apparently complex form that is easily demystified by understanding its individual parts. Figure 6.47 shows the knee in écorché.
Notice that the patella sits above the division between the head of the tibia and the head of the femur. The boxlike shape of the knee is formed by these two bone heads meeting. The majority of the bone surface is covered here by tendons only.

Note as well that the quadriceps group grasps the patella from the top by a tendon, while the bottom of the patella is attached to the tibial tuberosity, which is also the sixth head measure landmark.
From the front view, attach the patella via three tendons to the Vastus medialis and lateralis and via the Rectus femoris (Figure 6.48).
The box of the knee can be defned by the bony landmarks of the corners of the femur head and tibia head. Using the Claytubes brush, mark in bony landmarks of bone heads, as shown in Figure 6.49(a). You can see these in detail on the skeleton in Figure 6.49(b).
Select the Claytubes brush, and turn off the alpha. Sketch in the tendons of the knee, as shown in Figure 6.50.
Continue the tendon of the Bicep femoris to the head of the fibula, as shown in Figure 6.51. There is a small bump here on the surface where this tendon attaches. Just in front of this, extend the tendon of the ITB down to the tibia. This will join with a muscle on the shin later in this chapter.
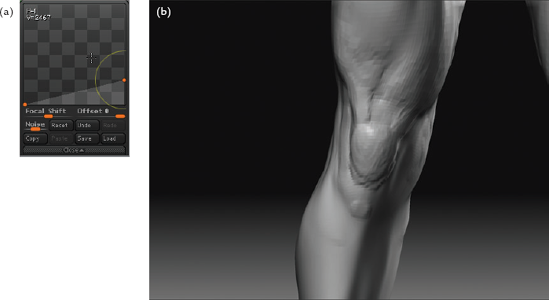
Now is a good time to smooth back what you have etched in so far. By applying what I call a soft smooth pass over the work, you can push it back into the surface and start creating a more subtle surface form. You can do this by editing the smoothing curve. Hold down the Shift key and open Brush → Curve. Match the curve in Figure 6.52(a). When you edit this curve while holding the Shift key it only applies to the Smooth brush. Step down a subdivision level, and, as shown in Figure 6.52(b), smooth the areas just enough to soften them, being careful not to destroy detail.
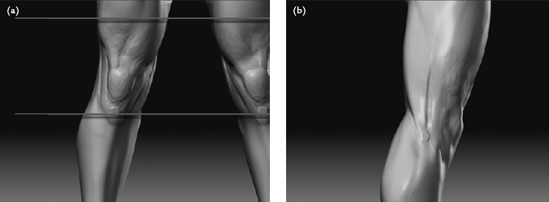
At this stage, I turn on the measure guides again to check the placement of the tibia based on the head measures, as shown in Figure 6.53(a). Use the Flatten brush to fatten the tendons shown in Figure 6.53(b). Also be sure to check the knee from the side view (Figure 6.54).
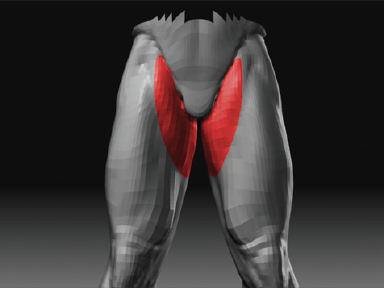
Using the Inflate brush, mass in the inner thighs. This area is composed of the Adductor muscles in the deep layer of the figure. There is also a pad of fatty tissue here that helps fill in this area. Figure 6.55 shows this area massed in with the Inflate brush at a lower subdivision level. Working at lower levels for more general forms keeps the surface from becoming "lumpy."

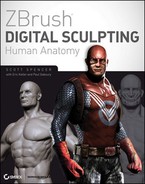
The lower leg is similar in many ways to the lower arm; however, thanks to the limited mobility of the toes compared to the fingers, the muscles are far simpler on the lower leg. In this section, you will look at some of the major muscle forms visible on the surface of the fleshed figure. Figure 6.56 shows the lower leg in écorché view.

You will begin by etching in the front edge of the tibia, as shown in Figure 6.57. This is called the anterior crest of the tibia, and it feels like a sharp ridge of bone just beneath the surface of the skin on the shin. An interesting note is this bone is in fact straight, but it has the appearance of being curved because of the way the muscles of the lower leg lie against it, as you will see shortly.
Using the Standard brush, add the anklebones. These are the medial and lateral mal-leolus bones shown in Figure 6.58. In the écorché view of Figure 6.59, notice the line between these two bones. It is important to maintain this angle because the inner anklebone is always higher than the outer anklebone.
From the side view, adjust the calf as shown in Figure 6.60(a). Make sure it comes far enough back to where the crest of the silhouette breaks. Move to the front view, and check the silhouette and angles, as shown in Figure 6.60(b). The écorché view in Figure 6.61 shows the profle of the calf from the side view.
You will now add one of the most prominent muscles of the lower leg. The Tibialis anterior muscle originates on the lateral condyle of the tibia just beneath the insertion of the tendon of the iliotibial band (they sometimes appear to flow into one another) and inserts into the medial arch of the foot. What is important to note is that this muscle crosses over the tibia and gives the shaft of the bone the appearance of a curve, as shown in Figure 6.62. Isolate the area for the Tibialis muscle with a mask, and mass it in with the Claytubes brush.
Next to the Tibialis anterior, you will mass in the form of two muscles, the Peroneus longus and the Extensor digitorum longus (EDL). These manifest as furrows on the outer side of the lower leg on the feshed fgure, as pictured in Figure 6.63. Isolate the area with a mask, and mass in the form. Figure 6.64 shows the area for these two muscles unmasked. The shapes have been massed in with the Claytubes brush.
Rotate to the back view, and with the Standard brush, etch a dividing line down the center of the calf, as shown in Figure 6.65(a). This will be the bifurcation between the lateral and medial heads of the Gastrocnemius. The majority of the back of the calf is composed of the Gastrocnemius muscle, which lies over the Soleus muscle. You will treat them here as one shape. Mass in the form with the Claytubes brush (Figure 6.65(b)). Figure 6.66 shows an écorché view of the Gastrocnemius.
Rotate to the front view. Using the Claytubes brush, mass in the Gastrocnemius and Soleus muscles as they wrap around to attach to the tibia, as shown in Figure 6.67.
Rotate to the side view. Here you can see that the flow of the muscles down the side of the calf is uneven. Using the Move tool, shift these back into a more even sweep, as shown in Figure 6.68.
Now you want to add the division where the Soleus is visible beneath the Gastrocnemius from the side view. Select the Standard brush with alpha 01, and etch this form as shown in Figure 6.69. The lower leg muscles appear as long furrows on the side of the leg, and knowing which muscles are here and the direction of their flow helps you sketch them in on the surface of the sculpture.
From this view you can also see that the shape of the heel is awkward. Rotate to a back view, and isolate this tendon with a mask. Using the Inflate brush, I mass this area in and, moving back to the side view, correct the shape with the Move brush, as shown in Figure 6.70.
The heel has two distinct hollows between the tendon of the heel and the malleolus bones of the ankle. Use the Standard brush to etch in these hollow areas, as shown in Figure 6.71; this will catch shadow and help accentuate the anatomy of the ankle and heel.
At this stage, I decide to accentuate the tendon on the side of the knee. In Figure 6.72 you can see the area isolated with a mask. I use the Claytubes brush with no mask to work this area.
Moving to the front view, you can see that the Soleus and Gastrocnemius should be slightly visible, peeking out from the outside of the shin. Isolate them with a mask, and pull them out until they form the outermost silhouette of the lower leg, as shown in Figure 6.73. Figure 6.74 shows the results viewed from the front.
Using a Visibility mask, hide one of the legs. You can do this by holding down Ctrl+Shift and click-dragging a green marquee over the leg. Figure 6.75 shows the result. With the other leg hidden, you can now more easily adjust the forms on the inside of the leg. You will mirror any changes across to the other leg later when using Smart Resym.
Once the edits to the isolated leg are complete, you need to copy the changes to the leg that was hidden. Hidden geometry will not be edited.
Unhide the hidden leg and mask the leg you just edited.
Click Tool → Deformation → Smart Resym to copy the shapes from the masked side to the unmasked side, as shown in Figure 6.76. You may find this process is more accurate if you start from a lower subdivision level and work up, clicking Smart Resym each time as you step up to a higher subdivision level. This is because by running a resym at lower levels, you reduce the total number of points ZBrush has to examine as you step up.
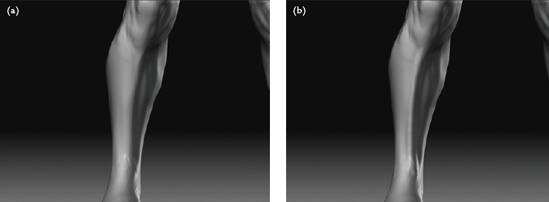


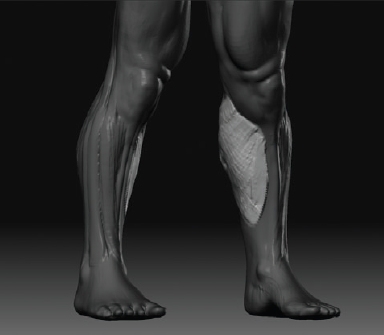
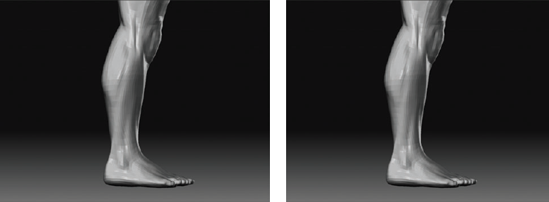
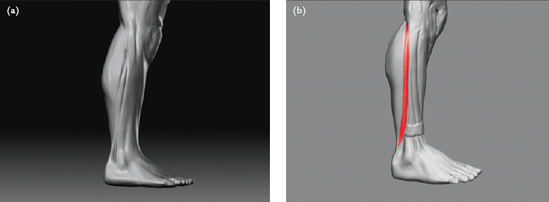

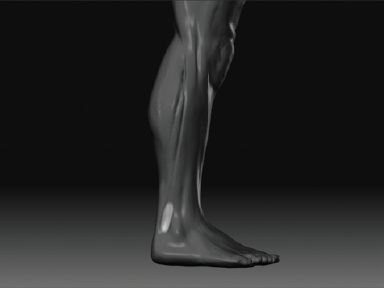


Figure 6.75. One leg is hidden to make working the inside of the leg easier.

At this stage, you need to move back from the figure to look at the leg as a whole. It is easy to become distracted from the overall form when you are spending so long looking at individual aggregate parts. Rotate the leg, and move the interactive light so you can see how the forms react under different views and lighting conditions. Figure 6.77 illustrates some of the changes I make to the legs at this point to make them more attractive.
Next you will start sculpting hands and feet. You will address the skeletal structure of the hands and feet as well as the basic forms of the palm, fingers, and toes with special attention given to the way in which the shapes interlock to create the complex and expressive forms of the hands and feet.