In this chapter, you will work on the head and neck of the figure you've been building in previous chapters. You will establish the head by first sculpting the form of the skull on the established basic shape. From there, you will begin to address the major bony forms of the skull by looking at how they influence the face. As you work the sculpting steps in this chapter, I will illustrate how certain muscles, as well as the bony protrusions of the skull, are influencing the final fleshed form.
You will address the neck by its major muscle forms and points of attachment to the torso, that is, the spine of the scapula and the clavicles. There is some overlap here with the work you will do on the torso in the next chapter, but that is good since it is difficult to address the full figure as just its aggregate parts. You must consider each in relation to the whole. Because of this, you will find that I revisit certain areas in relation to the parts around them.

You will be using a limited number of brushes in this chapter: the Claytubes, Rake, Move, and Standard brushes with a few instances of Flatten, Masking, Pinch, Inflate, and Smooth. You will also be using the M, or Material, modifier on the brush to add surface materials as you sculpt. I'll explain this process in the "The Facial Muscles" section.
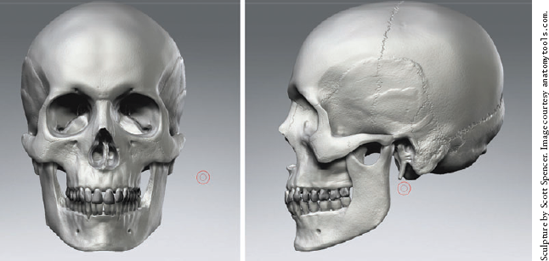
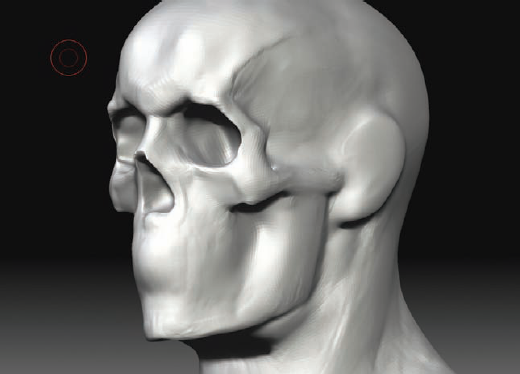
The skull represents the entire bony structure of the head (Figure 3.1). It consists of several distinct parts, but for the purpose of artistic representation and understanding the masses, you can divide it into two major shapes: the cranial mass and the facial wedge (Figure 3.2). These two masses joined together create the basic form of the skull.
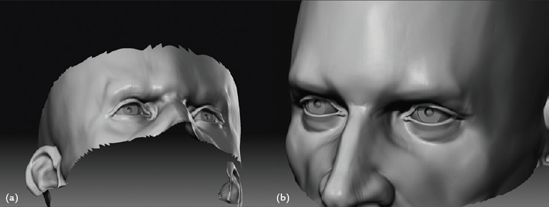
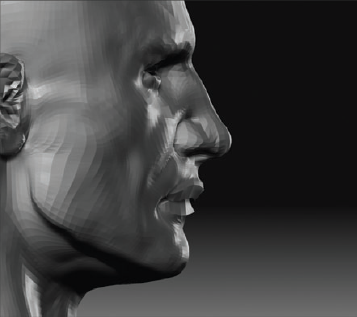
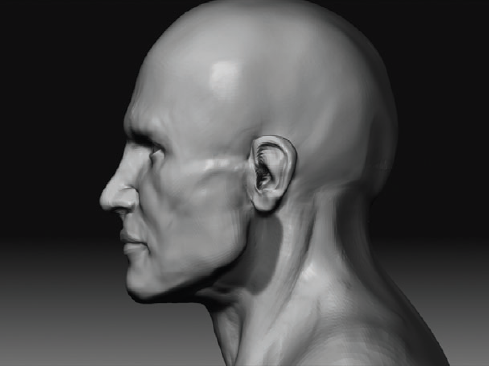
The cranial mass is the cranium, the protective casing of the brain, which has an ovoid form. The facial mass consists of the eye sockets, zygomatic bones, maxilla or upper jaw, and the mandible or lower jaw. Figure 3.3 shows multiple views of the head in rotation.
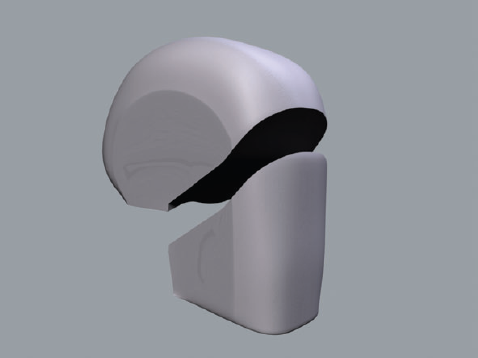

You can further simplify the forms of the head. Figure 3.4 shows the head and facial features broken down into basic geometric shapes. This model has a somewhat humorous robotic look, but what it represents is important to understand.
By seeing the head in these basic blocks and cylinders, you can understand the basic shape of each area and the kinds of shadows cast. Remember that when you sculpt, you are most concerned with the shape and quality of the shadows cast on the surface of the form. Notice how the eyes are simple spheres deep set in a wedge-shaped recess. Also notice the mouth represented by a cylinder. These shape analogies can be very helpful as a tool to help build up the sculpture from a solid base.
Because of this high concentration of bony landmarks in the head, you will approach this chapter slightly differently than you will the rest of the figure. In other chapters, you will take a more fluid approach, sculpting muscle and bone together. However, since the skeletal framework of the head is so visible, you will take a more layered approach here with the head sculpture. This approach is called écorché, French for "fayed."
This is a learning device in which a human figure is displayed with fat and skin removed so the muscle and or bones are exposed. Many art classes use écorché as a teaching exercise. The figure is built up starting with the skeleton, and then major muscles are laid over until a final figure is achieved.

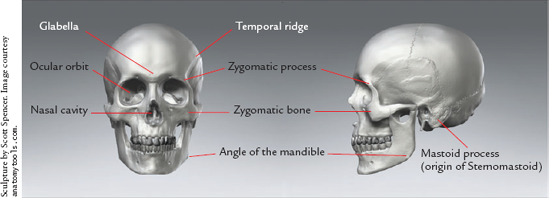
Before you begin, you need to examine the skull and its major landmarks. Figure 3.5 shows a human male skull in rotation with major landmarks called out. You will refer to these points in the course of the first part of this chapter. Refer to this image for reference. These points are typically visible on the surface of the fleshed head and easily felt through the skin.
As you sculpt the head, you need to be aware of the relative placement of the facial features. To do this, you will adopt a canon of measurement just as you did for the figure. By having a set of rules to follow as you work, you will ensure the features lie in acceptable spaces relative to each other. Without guidelines like this, it is very tricky to sculpt a convincing human head.
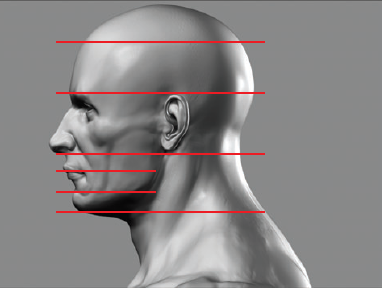
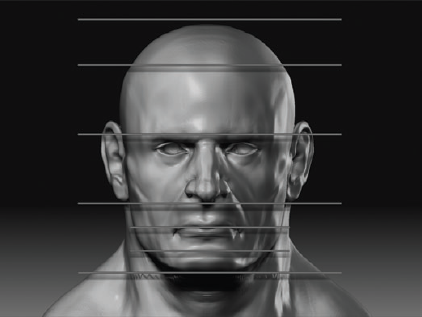
You can plot the features by using the rules described in this section. From the front view, mark off the top and bottom of the head. Now place a mark for the hairline. The rest of your measures will be based on this line (Figure 3.6).
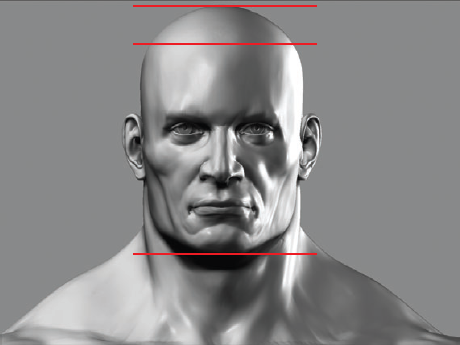
If the rest of the head is divided into thirds, you can see how the first third marks the brow line, while the second is the bottom of the nose (Figure 3.7).
The space between the bottom of the nose and the chin can be divided again into thirds. The first line represents the line between the lips, as shown in Figure 3.8. Notice that the inner corners of the eyes are on the same line as the wings of the nostrils, while the inner edge of the iris falls on the same line as the corners of the mouth.


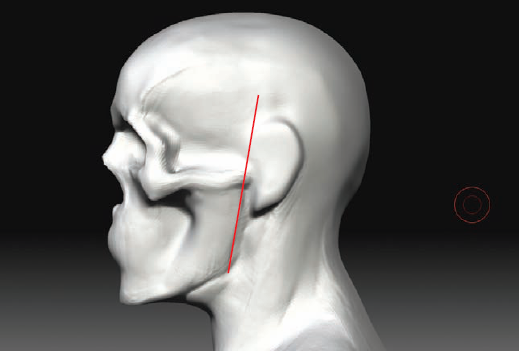
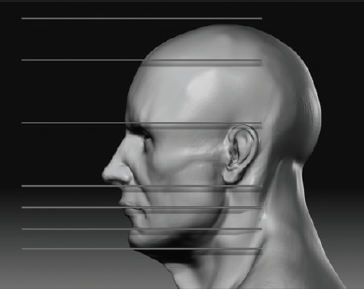
From the side view, the ear should be at an angle just behind the midline of the head. It falls between the brow line and the bottom of the nose (Figure 3.9). On this image also note the important angles that have been marked in red. These include the angle of the ear, the angle between the brow line and the cheekbone, the angle of the jawbone, and the plane break present at the hairline.
These rules are not to be taken as law but merely as guidelines to direct you as you sculpt. What makes a likeness or character is how much these rules are actually deviated from. It is important to have these as a road map to place your features since it helps create a head that feels rooted in reality. You'll need to refer to these measures a little later in this chapter, so keep them in mind. Now let's talk about sculpting the bony and muscle masses of the head.
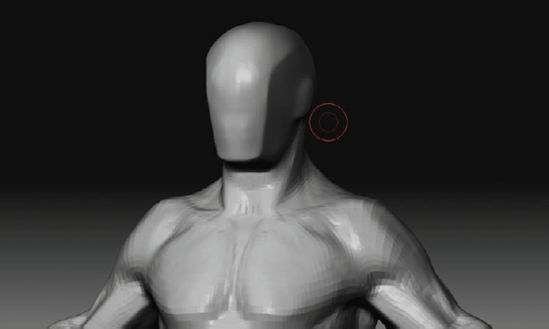
To begin, you will load the final gesture sculpture from Chapter 2. This is the iteration before the planes were sculpted in. The basic shape of the skull should appear as shown in Figure 3.10. This is the overall mass of the skull, including both the cranial and facial sections discussed earlier.
Begin by sketching in the location of the major landmarks, starting with the eye sockets and nasal cavity. Place the eye openings approximately in the center of the head.
You can see these measures on the head in Figure 3.11. On the final head, the pupils will lie on the midline of the skull. Take this into account when sketching in the sockets. Use the Standard brush with ZSub to etch these openings into the head.
Using the Claytubes brush, rough in the shape of the zygomatic bone. Commonly called the cheekbone, this consists of the zygomatic bone as well as the zygomatic process (Figure 3.12). These form the bony structure of the eye sockets and cheeks, landmarks that are visible on the fleshed surface of the figure. The zygomatic bone ends at the center of the ear. Take notice that the zygomatic bone is not a straight line but more of a zigzag shape. A common error is to make the zygomatic bone a straight line pointing back to the middle of the ear.
Figure 3.13 shows the zygomatic bones as well as the angle of the jawbone roughed in with the Claytubes brush. Also start to mass in a bulge for the mouth. It is important not to let the mouth remain a flat plane, as you will see shortly. Figure 3.14 shows the temporal region of the skull isolated and scooped in using the Claytubes brush with ZSub.
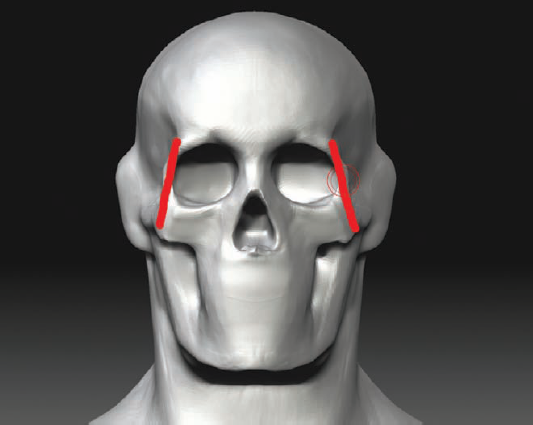
Using the Move brush, adjust the shape of the eye sockets to match Figure 3.15. Notice that the eyes of a skull have an almost plaintive or sad look with their upward slant. At the center of the eyebrows, create the trapezoid shape of the glabella of the skull (Figure 3.16). This bony protrusion forms the raised planes just above the nose and between the eyebrows. This landmark influences the shape of the brows considerably and is important to address. A common error for beginners is to make the brow line a single uninterrupted ledge.
Make sure to pull the zygomatic process out in a crest to the sides of the sockets (Figure 3.17). There should be a consistent angle or plane from the zygomatic process down to the sides of the zygomatic bone (Figure 3.18). This plane helps set the foundation for an important plane change in the finished head. This form manifests as the line down the side of the face where highlights catch or a shadow starts to turn on the cheek of the head.
Rough in the jawline using the Claytubes brush. Add negative space for the division between the mandible (jawbone) and maxilla (upper teeth). Notice the angle of the jawline from the front view (Figure 3.19).
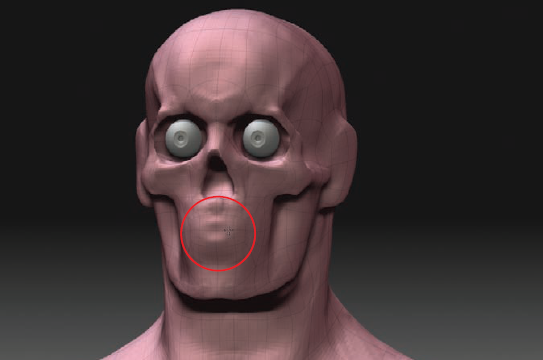
From the side, continue to work the jawline, taking care to maintain a sharp delineation. This is also a good time to build up the cylinder of the mouth. While I will not go into the details of sculpting individual teeth, note that the most important aspect of the mouth area to get right is the barrel shape the maxilla and mandible create (Figure 3.20). A common mistake is to make this area too flat, which creates a very unnatural mouth and lips on the final head. The lips should be curved as if lying over a cylinder. Using Claytubes, build up this cylindrical form. You will be building the lips around this shape, so having an accurate base is a huge step toward making a realistic mouth (Figure 3.21).
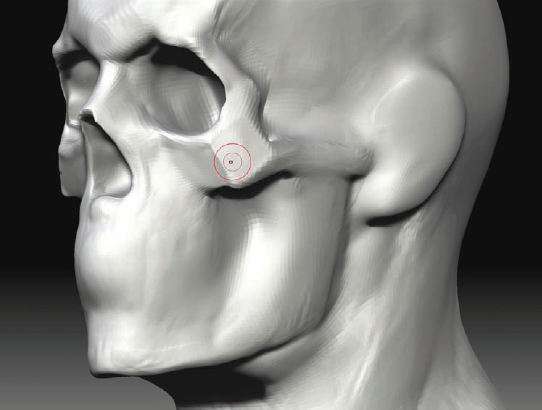
Adjust the angle of the ear in relation to the jaw-line and zygomatic bone. The ear follows the same angle created by the mandible (Figure 3.22). Using the Move brush, shift the base of the ear into place. Do not worry about sculpting details at this phase, because I will address the ear specifically later in this chapter. For now, you just want to make sure it sits at the correct angle and general placement on the head.
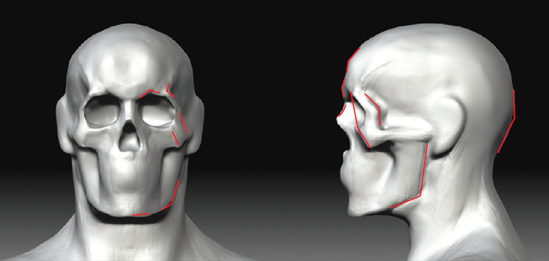
Switch to silhouette mode by changing to the Flat Color material (Figure 3.23). Using Flat Color here will allow you to check the general angles of the skull and profile as well as the smaller, subtler angles of the individual parts of the profile. I cannot stress enough how important it is to be sensitive to these details early on in the process. By keeping these angles accurate, you'll make the final sculpture all the more natural, realistic, and effective. Often when I have almost completed a sculpture, I will return to the flat shade mode and deliberately refine the profiles, adding the sharp breaks and curves that can often get lost in the process of finishing a sculpture.
Check the skull and head from the front and side views. See Figure 3.24 for the major angles you should be sensitive to. From the side, check the nasal bone and the angles of the overall profle. Although there is a lot of character that can be developed in a sculpture by experimenting with these angles, for this exercise you want to maintain them in a more natural and general range.


In the final pass, I typically use the Clay Finish brush to reinforce the planes created between the bone forms sculpted so far:
Select Flatten, and turn down the intensity to about 50. You want to establish the plane changes in the skeletal portions of the face to help guide you as you work. Remember that crests, planes, and angles all influence light and shadow. The way light and shadow react on the surface of your sculpture is what adds visual interest and a sense of structure. Figure 3.25 shows the planes of the zygomatic bones.
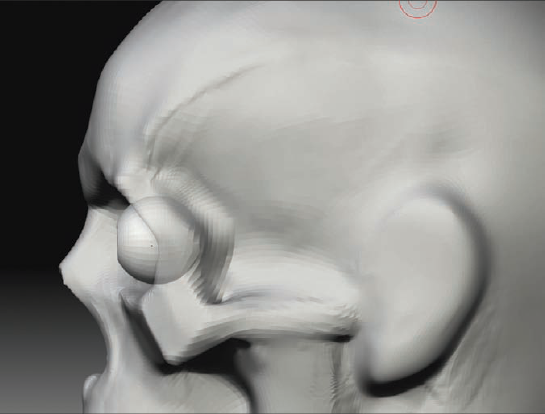
At this point, you are ready to place the eyes in the skull. The eyeball should not fill the entire eye socket; instead, it rests within the socket and is held in place by a combination of fatty tissues and muscle. From the DVD, load the file eyeballs. ztl (Figure 3.26). This is an eyeball model that you will place in the head model. Remember that the pupils will lie on the centerline of the head (Figure 3.27).
Load the eyeball ZTool into ZBrush, and switch back to the figure ZTool.
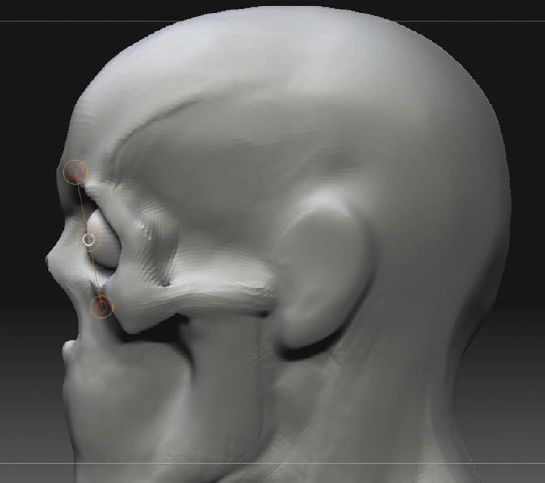
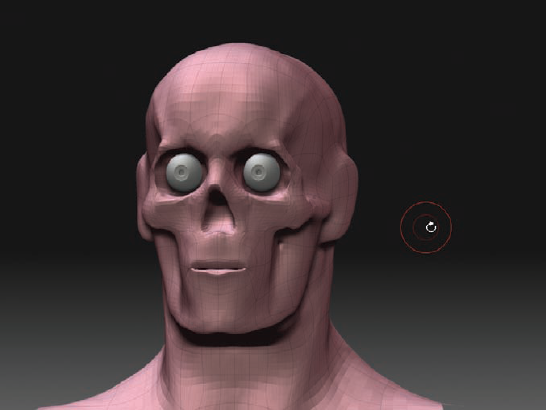
Append the eyeball ZTool into the mesh using Tool → Subtool → Append. Make sure the eyeball subtool is active, and press the W key to activate the Move Transpose tool. Using the Transpose tools Move and Scale, move the eyeball into place in the eye socket. When placing the eye, be aware of the diagonal line created between the brow and the cheekbone (Figure 3.28). You may want to activate transparency by clicking the Transparent button on the right side of the screen to make it easier to see the eye in relation to the head (Figure 3.29).
Once the eye is properly placed and scaled, you will want to duplicate it to the other side of the head. The simplest method is to use the SubTool Master script, a plug-in developed by Pixologic and available for free download from the Pixologic website:
http://www.pixologic.com/zbrush/downloadcenterYou can install the plug-in by extracting the fles into the
ZStartup/ZPlugsfolder.SubTool Master allows for a number of operations to be performed on multiple subtools. Since you want to mirror-duplicate the eye across X, make sure the eye is selected.
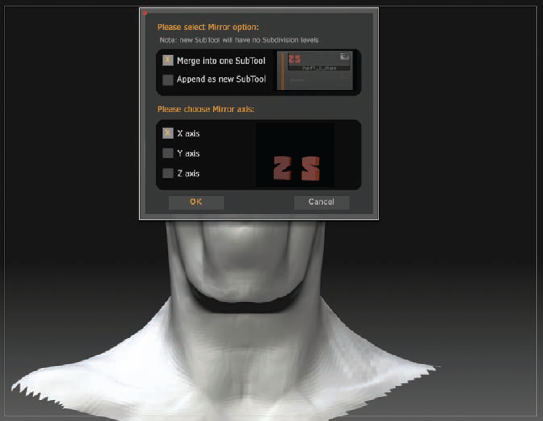
Run SubTool Master by clicking the button under ZPlugin → SubToolMaster. This will open the SubTool Master menu (Figure 3.30). Click the Mirror button. In the Mirror subtool options (Figure 3.31), select the Merge Into One Subtool option and the option to mirror across the x-axis.
This will create a single new subtool of both eyes mirrored across the x-axis.
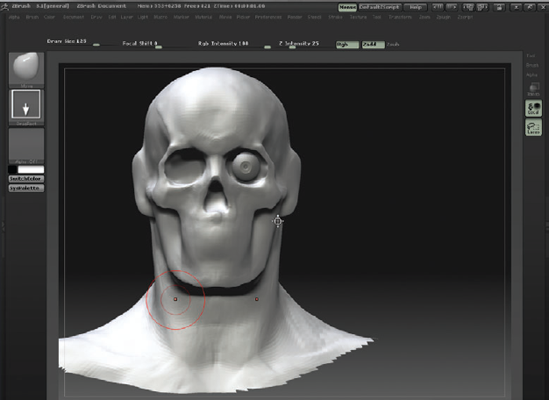
You will now want to create lips for your head. Instead of simply sculpting them from the surface, you will want some form of mouth bag to facilitate later work when you want to turn this head into an animatable mesh.
Switch to wireframe by pressing the Shift+F hotkey, and you will be able to see the edge loops you placed for the mouth in Chapter 1 (Figure 3.32).
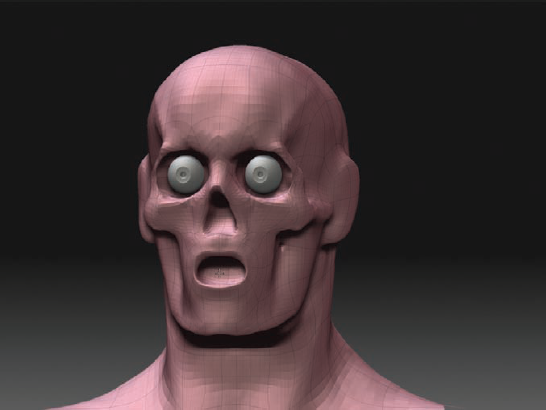
Using the Standard brush with ZSub on, press the interior of the mouth in to create a cavity for the teeth and tongue (Figure 3.33). Don't press too deeply because it will stretch the face in the area of the lips where you will want more detail later.
Use the Move brush to tug the mesh back together (Figure 3.34). You will further refine the lips later in this chapter, but for now you just want to establish a general location and depth to the cavity of the mouth.


The muscles of the face can be broken down into two groups: the muscles of expression and the muscles of mastication. Mastication means to chew, so those muscles are most directly involved in closing and grinding the jaw. Muscles of expression are involved in displaying emotion with the face, one of the most telling parts of our bodies. So much of our nonverbal communication is accomplished with subtle facial cues, as muted as the twitch of a brow or the turning of a corner of the mouth. We are all intensely attuned to the subtleties of the human head, so it is no wonder that animating realistic humans is such a diffcult task.
For sculpting the muscles, you will rely mostly on the Rake and Claytubes brushes. The Rake brush in particular is well suited to this task since it creates the muscle stria-tions as it builds up form, helping you to spot the direction and fow of the muscle fibers (Figure 3.35).
As a visual guide while you work, you will be using the brush to add material as well as form. This means that, as you sculpt, each new stroke will display as a new material on the model, specifcally the Red Wax shader.
To make it clear where you are sculpting the muscle forms, you will use the Material functionality of ZBrush's brushes. You can sculpt paint as well as add material using a sculpting brush in ZBrush. By adding a material while you work, you'll make it clear where each muscle is placed. To do this, you need to make sure the Basic Material is selected and the M modifier is turned on at the top of the screen.
Click Color → FillObject. This will fill the model with the Basic Material, allowing you to switch to a new material and have it added as you sculpt.
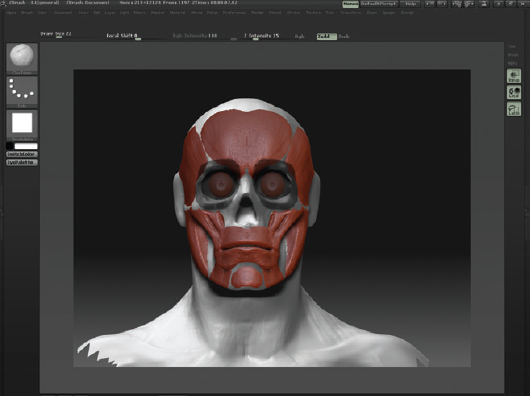
From the Material menu, select the Red Wax material. Since you have filled the model with Basic Material, it will not change appearance at this time; however, any strokes you make on the model will also apply this new material. Select the Claytubes brush, and make sure both M and ZAdd are on. Now when you sculpt the muscles, they will appear in the new material (Figure 3.36).
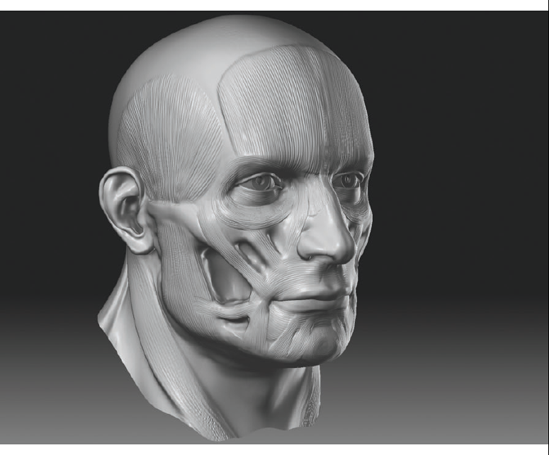
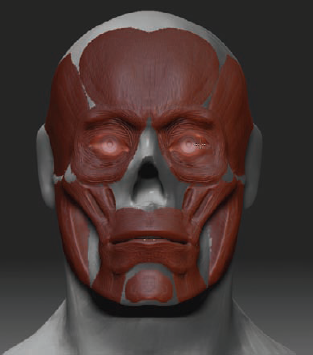
The muscles you will be examining in this chapter are only a few of the muscles of the face. They are, however, the major muscles that influence the surface form of the most basic planes of the head, and for that reason alone they are valuable to know and understand. Figure 3.37 shows these muscles labeled on the skull, and Table 3.1 lists the muscles and describes the origin, insertions, and functions of each one.

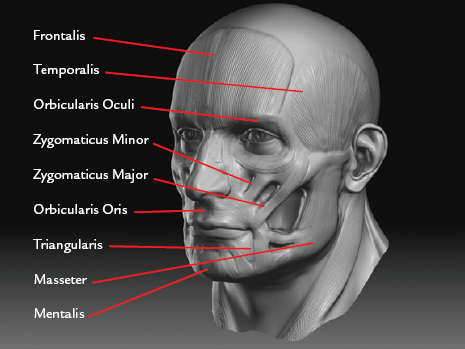
Table 3.1. The Functions, Origins, and Insertions of This Chapter's Muscles
Muscle | Function | Origin and Insertion |
|---|---|---|
Frontalis | Raises the eyebrows | Origin at top of the forehead; inserts at skin of eyebrow |
Temporalis | Closes the jaw | Origin at the temporal ridge; inserts at angle of the jawbone |
Masseter | Clenches the teeth | Origin at the bottom of the zygomatic bone; inserts at the angle of the jawbone |
Zygomaticus major and minor | Pulls the angle of the mouth upward | Origin at zygomatic bone; inserts at nodes of lips |
Orbicularis oris | Opens and closes mouth | Attaches at nodes of the lips |
Orbicularis oculi | Opens and closes eyes | Outer border of the eye socket |
Triangularis | Pulls the angle of the mouth down | Origin at bottom edge of jaw; inserts at the nodes of the lips |
Buccinator | Pulls the corners of the mouth back | Origin on the jaw; inserts at the nodes of lips |
Mentalis | Raises the chin | Origin at the bottom of the lower teeth; inserts into skin of the chin |
Laying the muscles on the skull in this manner helps you see how the primary planes of the face are composed. It is my hope that this exercise will help you learn not only about the structure of facial anatomy, but also how the underlying muscle and bone combine to create the very specific highlights and shadows on the human face; this understanding is in many ways more important. Remember, all form is merely light and shadow. To be a good sculptor, you need to learn how to manipulate the way a surface is affected by the light fall-ing on it.
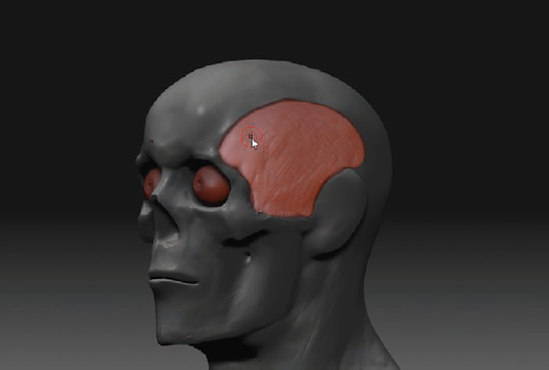
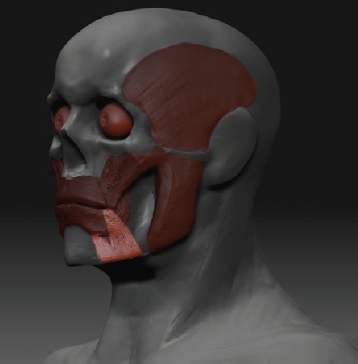
You will begin by sculpting the Masseter and Temporalis muscles. These are muscles that are concerned primarily with moving the jaw. They also fill out the hollows under the cheekbone and the temporal regions of the skull (Figure 3.38).
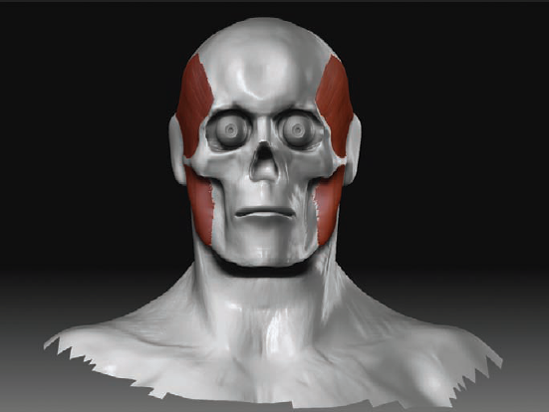
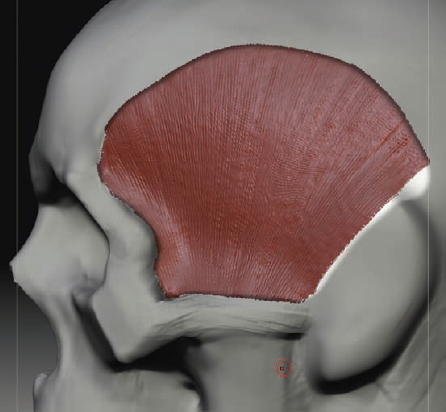
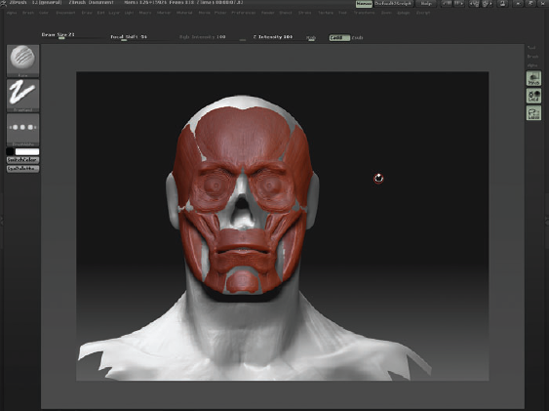
Mask out the area for the Temporalis, as in Figure 3.39. The Temporalis fills the hol-low at the temple of the skull. It originates at the temporal ridge and inserts on the jawbone. Using the Rake brush, mass in the Temporalis muscle.
The Masseter is masked in much in the same way as the Temporalis. Start by using Ctrl-click masking to paint the shape of the muscle; then Ctrl-click the background to invert the mask so you can sculpt the muscle. Figure 3.40 shows the Masseter sculpted in place.

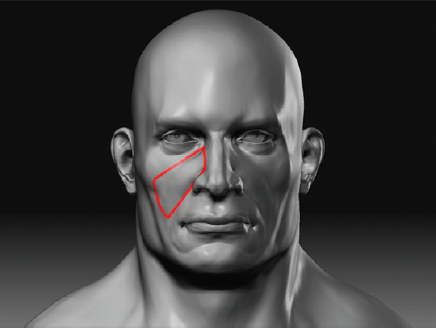
Next you will place the Zygomaticus major and minor muscles. These muscles raise the lips and, most important, form the long edge of a major plane on the face. This plane is called the infraorbital triangle because it is inferior, or below, the orbital or eye socket (Figure 3.41). The Zygomaticus minor is the top, shorter muscle; the major is the lower, longer muscle (Figure 3.42). The minor originates on the front of the cheekbone, while the major originates on the side. Both muscles weave into the Orbicularis oris, or circular mouth muscle, which you will sculpt next.

The Orbicularis oris is the circular muscle that surrounds the mouth and allows you to express many emotions by changing the shape of the lips; it also assists in speech and eating.
Mask out the shape, as shown in Figure 3.43.
Invert the mask by Ctrl-clicking the background, and then use the Rake tool to sculpt the muscle as shown on the right. Take care not to make it too thick because the muscles of the face, with the exception of the Masseter and Temporalis, are actually extremely thin. The Orbicularis oris has an appearance similar to a frowning clown mouth. The two dips on the sides of the chin are important to note since they are always visible on the fleshed surface of the figure (Figure 3.44).


For the chin, you will add two muscles, the Triangularis and the Mentalis. The Triangularis muscles are on either side of the chin. Needless to say, the Triangularis muscle has a trian-gular shape. It is extremely thin and not often noticeable on the face except by its effect on expression. Figure 3.45 shows the Triangularis sculpted in place.
The Mentalis is a small oval muscle at the center of the chin. It is often visible on the surface as a subtle bump, and it merits mention for the way its shape interlocks with the W form of the Orbicularis oris (Figure 3.46). Interestingly, the Mentalis is a rare muscle that turns out to connect to the skin instead of bone. When you grimace, as if eating a sour lemon, the small crevices on your chin are created by the fbers of the Mentalis muscle where they are attaching to the deep tissues of the chin.
Isolate the area for the Triangularis muscle with a mask. Select the Rake brush, and sculpt its form into place. It weaves into the corners of the lips.
Using the Rake brush, sculpt in a circular form for the Mentalis muscle. These two forms are very thin, so take care not to mass them out too much. The effect on the sur-face of the face is apparent but subtle.

The forehead is covered by a thin sheet of muscle called the Frontalis. The Frontalis furrows the brow and also pulls up on the eyebrows. It is extremely thin except for the small tail that inserts into the eye socket.
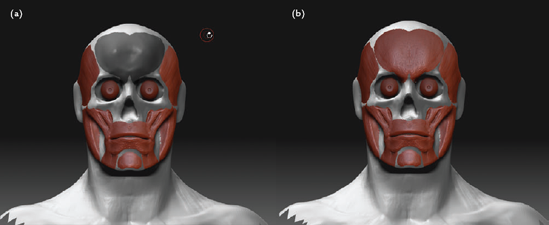
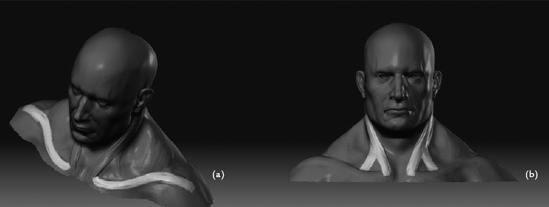
Using the Masking brush, paint in the shape of the Frontalis, as shown in Figure 3.47(a).
Once you are satisfied with the shape, invert the mask, and then use the Rake brush to add the muscle. Be sure not to make it too thick; the Frontalis is extremely thin, and its shape is more defined by the frontal eminence of the underlying skull than the muscle, as shown in Figure 3.47(b).
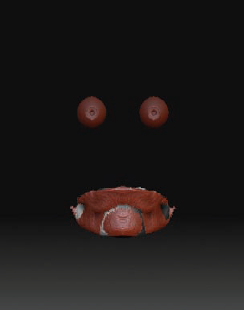
You will now turn your attention to the muscles of the eye. These muscles are circular in form, similar to the Orbicularis oris. The eye muscles are called the Orbicularis oculi. They lie like goggles over the eye sockets and form the eyelids (Figure 3.48).
To create the Orbicularis oculi, mask into the eye sockets. Invert the mask, and then use the Claytubes brush to fill out the hollows and bring the faces to the front. It may be helpful to turn on transparency in order to see through the eyeballs while you work.
Using the Rake brush, sculpt the muscle using a circular stroke around the circumfer-ence of the eye socket (Figure 3.49).
To create the eyelids, first mask the shape of the interior of the eye (Figure 3.50). Invert the mask, and then use Claytubes with ZSub to press the unmasked faces into the head. On the right you can see that activating transparency makes it easier to move the eyelids in relation to the sphere of the eyeball.
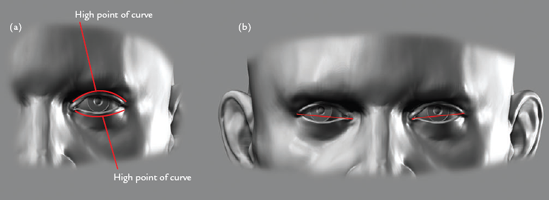
Isolate the eyes and mask the bony areas of the eye socket, as shown in Figure 3.51(a). It is important to preserve the bony shape of the orbit because you want to retain a sense of soft fatty areas as well as sharp bony areas around the eye. Using the Move brush, pull the lids forward so that they lie against the surface of the eyeball. The upper eyelid should lie over the lower. To facilitate this, mask out the lower lid, and then use the Move brush to gently pull the upper lid out slightly, as in Figure 3.51(b).

Figure 3.51. Masking the bony areas of the eye socket: (a) pulling out the eyelids, (b) pulling the upper lid out
When working on the eyelids, it is important to understand their shape. The two cor-ners of the eyes are called the canthus. The one on the side is the lateral canthus, while the one in the center is the medial canthus. Notice in Figure 3.52(a) that the lateral canthus is slightly higher than the medial. In Figure 3.52(b) you can see the rhythms of the eyelids. Notice how the crest of the upper lid is toward the center, while the crest of the lower lid is toward the outside.
Continue to sculpt the eyelids, using transparency mode to facilitate manipulating the faces inside the eyeball and pulling them out to the surface. Don't forget that the eye-lids have thickness. If you make them too thin, it will be diffcult if not impossible to catch a highlight on the lower lid, which will make the eye look unnatural.
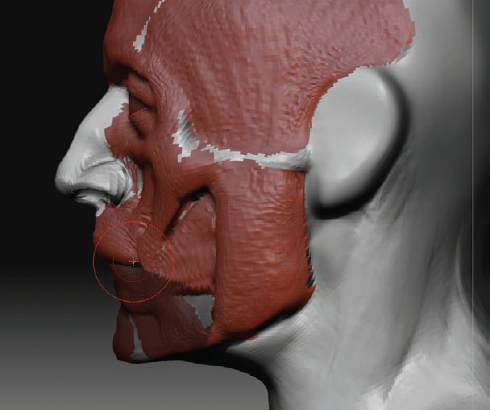
At this stage, you will add the Buccinator muscle. The Buccinator is a deep-layer muscle and is not apparent on the surface of the face, but I chose to add it in here to help fill in the hol-low area of the cheeks. This muscle originates on the jawbone and inserts into the corner of the mouth at the Orbicularis oris muscle (Figure 3.53).
Use the Claytubes brush to mass in the muscle and fill out the deeper areas of the cheeks. Do not bring it to the same level as the Masseter, however, because there is fatty tissue covering both of these muscles that will fill out the side planes of the cheeks.

So far, you have built up the skeletal and muscular anatomy of the face. In the interest of making this look more like a human, you need to add the facial features like the nose, lips, and ears. You will start adding these features now, as well as the muscles of the neck, so you can better evaluate the head sculpture as you move into finer forms.
The nose is a complex shape when taken as a whole. Much like the ear, which I'll address later in the chapter, it is primarily cartilage and composed of many subtle planes. For ease of understanding, Figure 3.54 shows the four parts of the nose: the tip, or alar cartilages; the wings of the nostrils; and the lateral cartilages at the bridge of the nose.
To start sculpting the nose, mask out the inside of the nasal cavity. Invert the mask, and use the Claytubes brush to fill out the cavity (Figure 3.55). Use the Move brush to pull the nose out from the face and start to establish it in silhouette.
Move to the front view, and start to pull the wings of the nostrils out from the sides (Figure 3.56(a)). The nose takes patience; just as with the mouth, very tiny changes here can drastically alter the appearance of a character. With the bridge of the nose and wings in place, use the Standard brush with ZSub to press the nostrils in (Figure 3.56(b)).
From the side view, pull the septum down, and curve it into the upper lip. The septum is the bit of skin and card ledge between the nostrils.
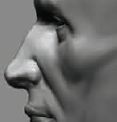
At this point, you have the general shape of the nose, but you will need to use the Flatten brush to introduce the hard planes that give the nose its characteristic and complex shape.
Start by establishing the planes of the alar cartilage. The alar looks like a diamond on the top of the nose, as shown in Figure 3.57(a). Moving up, flatten the bridge of the nose and the sides that meet the face. Figure 3.57(b) shows the nose refined on the final sculpture.


To facilitate ease of sculpting the mouth, you will want to isolate the upper and lower lips into separate polygroups. Polygroups are sets of faces in ZBrush that you can easily hide or display by Ctrl+Shift-clicking them. They are visible in PolyFrame mode as different-colored mesh segments. Figure 3.58 shows the mouth with the upper and lower lips polygrouped.

Begin by storing a morph target of the mouth in its current closed position. To do that, choose Tool → Morph Target → Store MT. This keeps a copy of the current mesh position and shape stored in memory. This shape can be recalled at any time by returning to the subdivision level where the morph target was stored and click-ing the switch button. Only one morph target can be stored at a time per subtool. You may also find that you cannot access the switch button if you are either on a different subdivision level than the target was stored or if you have part of the mesh hidden.
Using the Smooth brush, smooth the mouth to separate the lips (Figure 3.59).
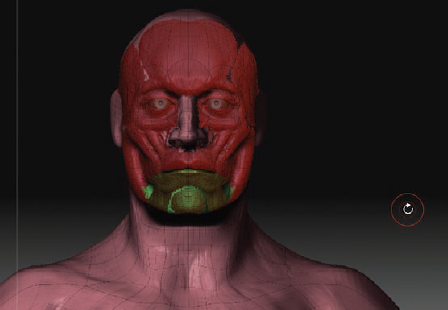
To mask the lower jaw, click the Lasso button on the right side of the screen to turn on lasso mode, and then hold down Ctrl while dragging a masking marquee around the lower jaw (Figure 3.60). Anything inside this gray region will be masked when you release the mouse, while anything outside will be unmasked.
With the lower jaw masked, select Tool → Morph Target → Switch. The mouth will now close again, but the lower jaw will remain fully masked (Figure 3.61). To avoid having to repeat this process each time you want to mask the upper or lower lips, you will use the polygroups function in the next steps.
With the lower jaw still masked, click Tool → Masking → HidePt. This will hide the unmasked faces of the rest of the body, leaving the lower jaw isolated (Figure 3.62).
With only the lower jaw visible, select Tool → Polygroups → Group Visible. This will polygroup the lower jaw faces currently on the screen. Ctrl+Shift-click the backdrop to reveal the rest of the model again.
Press Shift+F to see the model in PolyFrame view. You will notice the lower jaw is now a different color (Figure 3.63). Ctrl+Shift-clicking the jaw will now isolate it and allow you to mask it quickly.
You can now move the lips of the upper mouth without affecting the lower.
Simply isolate the jaw polygroup with Ctrl+Shift-click and mask it; then reveal the rest of the model again.
Using the Move brush, pull the lips together.
To invert your mask, Ctrl+click the background. This will allow you to move the lower lip.


At any point now you can Ctrl+Shift-click the jaw to isolate it and mask it indepen-dently of the rest of the head. Figure 3.64 shows the lower lip masked to facilitate pulling the upper lip over it.
At this point, the head is at a level of form that you can start thinking about the neck. In this section, you will move away from the face and start to refine the muscles of the neck so you can anchor the head to the shoulders and make it look more natural. It is also good to move around often as you work, so by moving to the neck now, you can take a break from the face before you return for a final pass of refinements.
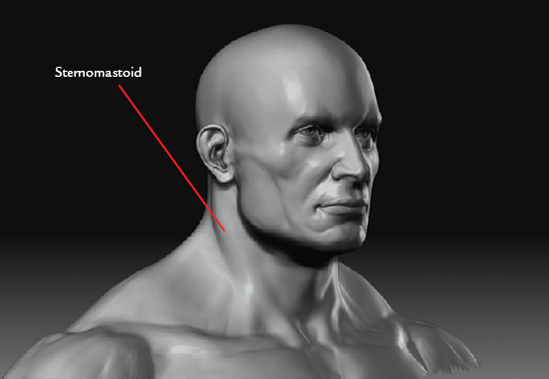
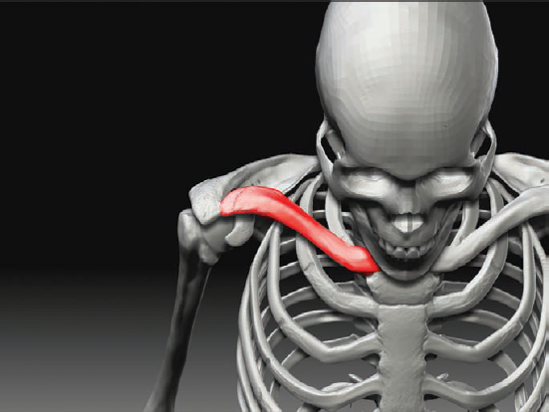
You will begin the neck with the Sternomastoid muscles. The Sternomastoids origi-nate behind the ear and insert at the pit of the neck. They specifcally attach to the clavicles. Consider them as ribbons of muscle wrapping around the cylinder of the neck (Figure 3.65).
Rough in the Sternomastoid with the Rake brush, as shown in Figure 3.66. Try to stroke in the direction of the muscle flow; this will help establish the rhythm of the muscles of the neck as they interlock with the chest. The Sternomastoid has two heads; one connects to the sternum at the pit of the neck, and the second head branches off and attaches to the back of the collar bone.
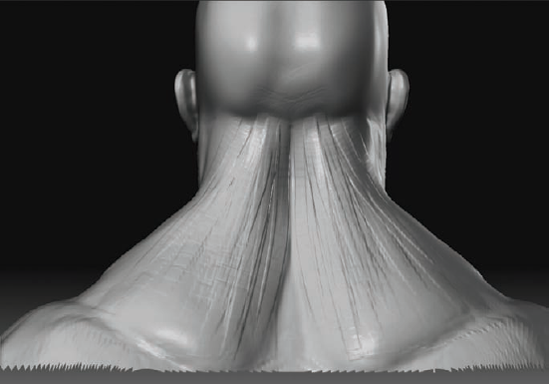
It is important to note that the Sternomastoid should be visible from the back of the figure, as shown in Figure 3.67. If this is not the case, then they are too thin or the Trapezius is too large.
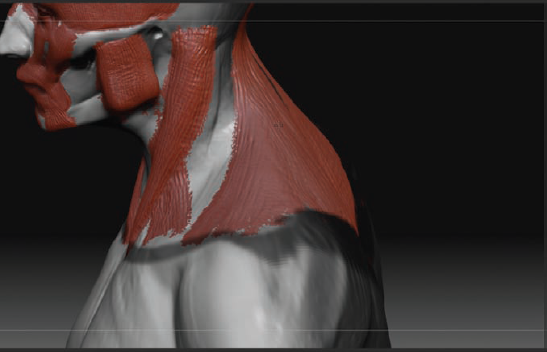
The Trapezius muscle originates at the base of the skull and flows down to the scapu-las and the posterior border of the scapula (Figure 3.67). Use the Claytubes brush to build these up.
Because you are working on a heroic figure, you'll want to adjust the silhouette to make the traps appear bulkier. This increases the apparent mass of the shoulders as well as makes the head appear smaller. This helps give the impression of a more mas-sive and heroic figure (Figure 3.68).
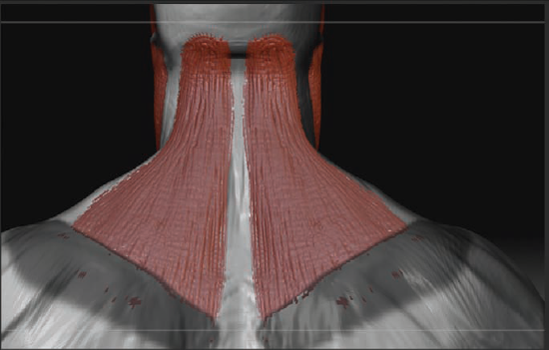
Figure 3.67. From the back view, you can see the flow of the Trapezius from the base of the skull to the spine of the scapula. (Note as well that the Trapezius also attaches to the clavicles, as shown in Figure 3.68.)
At this point, you can use the Claytubes brush to reinforce the clavicles, which sweep back from the center of the chest much like handlebars on a bicycle. Figure 3.69 shows these shapes. Notice that there is a definite step or sweep back to the bone.

You have now filled in many of the major muscles of the face that have a direct impact on the gross shape or form. There are indeed many more muscles that I could discuss, but they do not have such a visible effect on the shape you know as the head.
At this point, you will fill in the red color of the muscles and start to reinforce the planes that these muscles create. I want to stress again that it is important to understand not just the muscles, but also the planes and shapes they combine to create.
Make sure the Basic Material is selected, and select Color → Fill Object to fll the head with the Basic Material.
Using the Smooth brush, take down the strokes of the Rake brush. You will now start to suggest the skin and fatty tissues that cover the muscles of the face. Begin with the cheek. With a mask, isolate the area shown in Figure 3.70. As mentioned earlier, this is called the infraorbital triangle. You will mass in the fatty tissues of the front of the face in this area.
The infraorbital triangle is the location of a small deposit of fat that creates a fold of skin called the nasolabial fold. The nasolabial fold becomes more pronounced with age as the fatty tissues are pulled down by gravity. Figure 3.71 shows the head with the addition of the nasolabial fold as well as some fatty tissues filling out the cheek area.

The ear is a shape similar to the nose in complexity, and it becomes much easier to sculpt when broken into its aggregate parts. Figure 3.72 shows the ear labeled. The parts of the ear can be quite easy to remember because they mostly consist of a name and its inverse.
For example, you have the helix on the outside of the ear as well as the antihelix directly inside the helix. Another example is the small nub of flesh and cartilage that covers the audi-tory meatus, or ear hole; this part is called the tragus. Directly opposite the tragus is the antitragus.
To sculpt the ear following the steps below, you will use a combination of masking, the Standard brush, and the Flatten brush to create the ear. Because you have some geometry in the base mesh to support this form, you should be able to get fine detail and sharp planes quite easily.
Begin by moving the edge loops for the ear into position. The top of the ear should line up with the brow ridge, while the lobe should line with the bottom of the nose. Make sure the ear tips back on the head at the same angle as the jawbone. Figure 3.73 shows the outside of the ear masked to facilitate pulling the helix up and out over the rest of the head. You will be able to see the edge loops of the base mesh by turning on PolyFrame mode with the Shift+F hotkey.
Once the ear is in place, use Claytubes to mass in the form of the ear. You will also want to use the Move brush to pull the general shape of the ear out from the head. Use Claytubes with ZSub to scoop out the inside of the helix, making room for the anti-helix and conch (Figure 3.74). Right now don't worry about anything but creating the outermost form, or helix and lobe of the ear.
With the interior of the ear scooped out, clear the mask by holding down Ctrl and dragging on the background. Mask the interior of the ear, and invert the mask. Using the Claytubes brush, rough in the shape of the antihelix. Notice that it continues down to join the tragus in the antitragus (Figure 3.75).
Using the Standard brush with ZSub, press in the hollow basin of the ear known as the conch. At this stage, you also sculpt the leg of the helix, which is the terminating point of the helix that dips into the ear (Figure 3.76). Pull out the tragus using the Move brush.
You can further refine the ear with the Pinch brush and Lazy Mouse. Try to establish the planes and structural form of the ear by pinching with a low intensity. I usually keep the brush between 15 and 20 ZIntensity.
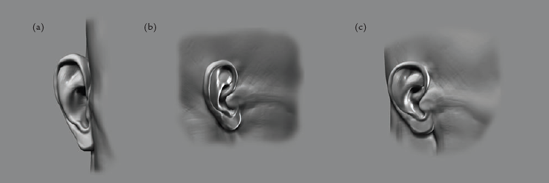
From the front view, make sure the antihelix extends out from the helix (Figure 3.77(a)). Also check the angle of the ear in relation to the skull from the back (Figure 3.77(b)). It is rare that the ear lies perfectly fat against the head; this tends to look awkward and should be avoided. Figure 3.77(c) shows the final ear.


At this point, you will return to the face to make subtle adjustments to help create a sense of character.
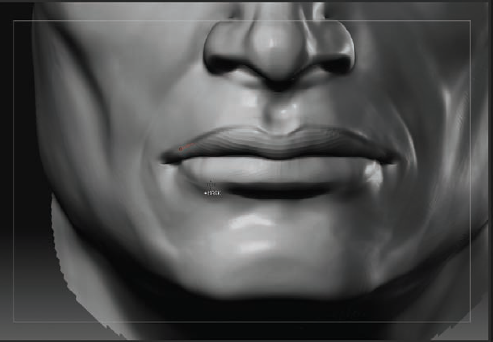
The lips are roughed in at this stage but still incomplete. You need to address the pillows of fat that compose the lips themselves as well as a very important surface feature called the nodes of the lips.
The nodes of the lips are small, doughnut-shaped areas of fat and skin at the corners of the mouth. They are created by the lower lip tucking under the upper lip as well as by the tension in the area generated by the Zygomaticus and other muscles pulling on the corner of the mouth.
With the Infate brush set to 10 intensity, mask the corners of the lips, and sculpt in the nodes, as shown in Figure 3.78. This is a subtle and tricky area, so move the light as well as the camera often as you work.
The lips are also defined by a sharp division along their border where the fatty tis-sue abuts the rest of the face. This again is a subtle area best approached with low ZIntensity settings and from many angles. Sculpt in the shelf of the upper lip, as shown in Figure 3.79, with the Standard brush and alpha 41. This helps create a fne, sharp line to delineate the plane change.
The lower lip has a similar plane change, but notice in Figure 3.79 how the shelf is most pronounced at the center just above the chin. As you move out from the center of the lower lip, the plane change becomes much more subtle as the lip feathers into the W shape of the Orbicularis oris discussed earlier.
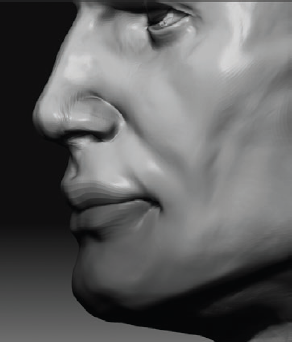
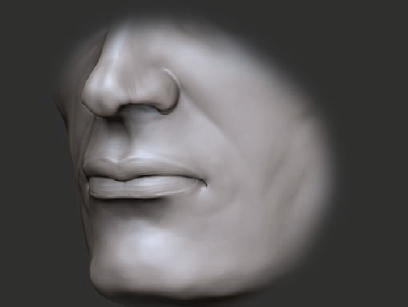
Lastly, the philtrum, or "cupids bow," is the little division just below the septum of the nose. To create it, use the Standard brush with a ZIntensity of 10. You can further sharpen the lips using the Pinch brush with Lazy Mouse on. Keep your intensity low, between 10 and 20 to avoid creating too harsh a line. Figure 3.80 shows the final lips in detail.
When sculpting the nose and lips especially, you may find that the underlying geometry has become stretched to a point that unappealing artifacts are occurring on the surface of the sculpture. Figure 3.81 shows an example of this. Luckily, ZBrush has a built-in tool for eradicating these problem areas. It is called Reproject Higher Subdivision level.
Figure 3.81 also shows the wings of the nostrils in wireframe. Notice how the edges are pulled far to the left and cause a pinch at the nostril.
To correct this issue, step down to a middle subdivision level; in this case, I have moved to level 4. Select the Smooth brush, and set ZIntensity to 20. You want to gen-tly smooth the edges to bring them back into alignment.
Smooth the problem area. Take care not to destroy all the sculpted form, but merely massage the edges back into line (Figure 3.82).
Under the Tool → Geometry menu, click the Reproject Higher Subdiv button. This will reproject the higher subdivision level onto the newly smoother edges, reintroduc-ing the form without the awkward pinch.
ZBrush will now calculate for a few moments, and when complete, the model will return to the highest subdivision level. You can repeat the projection process again if needed to further correct the problem area. Figure 3.83 shows the wireframe of the nose area after the reprojection. Notice how the severely tweaked edges are gone and the form of the nostril is still there.


At this stage, you will adjust the placement of the features to fall more accurately within the canon discussed at the start of this chapter. For this purpose, I have created a ZTool with the head measures marked. You will load this as a subtool and shift the features to line up with the correct lines.
This ZTool is on the DVD. If you have followed to this point with the base mesh provided on the DVD, the guide ZTool will load correctly oriented to the head of the ZTool. If you created your own base mesh, there is a chance it will not align. In that case, use the transpose tools to shift it into place, making sure the top mark aligns with the top of the head.
Begin by loading the facial landmarks ZTool into ZBrush. Select your sculpture, and append the landmarks ZTool by clicking the append button under Tool → Subtools. You will now see the landmarks guide (Figure 3.84). Turn off Perspective if it is on by pressing the P key.
Select the Move brush, and step down to subdivision level 4. You want to be at a sub-division level where the forms are apparent but there are not so many faces that large changes are diffcult to make.
Shift the eyes down so the brow line falls on the first measure line below the hairline (Figure 3.85). You will also want to shift the eyeballs again so they line up correctly with the pupils on the centerline of the head.
At this stage, you will refine the lids of the eye. Zoom in on the eyelids, and isolate them with a show marquee. Select the Standard brush and alpha 01. Etch in the fold of the upper eyelid, as shown in Figure 3.86.
Placing Eyeballs
Getting the eyeball placement just right can be challenging. Tiny variations in how much of the iris is visible and which parts are covered can make huge changes in the nature of the character's gaze. When placing the eyes, I like to make the lower eyelid just barely overlap the bottom of the iris. This helps create a natural, relaxed gaze (
eyeplaced.tif).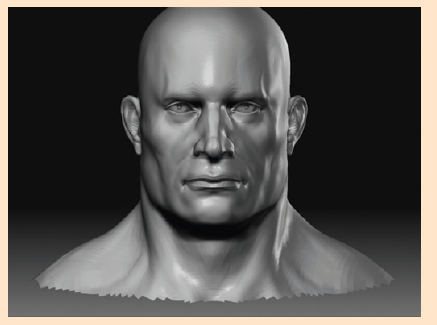
Select the Pinch brush, and press L to activate Lazy Mouse. Pinch the edges of the eyelids to sharpen the ledge where they meet the eyeball (Figure 3.87(a)). Select the Standard brush, and turn down the draw size. You need to add the small bump of fesh seen inside the medial canthus of the eye; this small pink piece of flesh is called the lacrimal carnucle. You can see this in Figure 3.87(b).
With the Move brush, move the bottom of the nose down to coincide with the second measure line, as shown in Figure 3.88, where you can also see that the bridge of the nose is adjusted. Notice that the plane break at the bridge of the nose should fall even with the eyelids. Move to a side view, and check the silhouette of the nose. Further adjust the bridge from the side view, as shown in Figure 3.89.
Move the lips down so the line between them falls on the first of the smaller lines dividing the bottom of the head into thirds, as shown in Figure 3.90. There you can also see that I have reinforced the nasolabial fold again. At this stage they appear too strong, which ages the head, but you will reduce their mass and therefore the shadow they cast as the head is refined.
Mask out the lower lip to allow the upper lip to be shifted out and over it. You do this at the lower subdivision levels so there are fewer points to shift to make the change. By moving points at a lower level, the lips will not appear lumpy as they might if you tried to move their shapes at the higher subdivision levels (Figure 3.91).
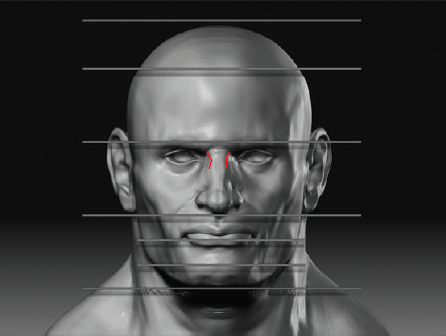
Figure 3.88. Shifting the nose down to the second measure line. Notice the break in silhouette at the top of the nasal bone.
Move to a side view, and check the placement of the ears. They should fall between the brow line and the bottom of the nose. Figure 3.92 shows the ears shifted back into place. Also note the ears should be at an angle just behind the midline of the side of the head.
From the side, check the mass under the chin. In Figure 3.93 you can see I have shifted this back, taking care to add a plane break at the Adam's apple. Now change to flat color mode to view the silhouette. Here I adjust the profiles of the head, taking care with the plane breaks at the hairline and top of the head (Figure 3.94).
At this stage, you can sharpen the edge of the Masseter muscle at the angle of the jawbone. So mask out the angle and mass in the muscle using the Inflate brush (Figure 3.95).


At this point, you can refine and strengthen some of the muscles of the neck. They have gone a little soft in the process of working and need to be reintroduced and, in some cases, strengthened to match the heroic quality of the figure you are sculpting.
Mask out the clavicles, and mass them in with the Claytubes brush (Figure 3.96(a)). The collar bones or clavicles will be important in the next chapter when you work on the torso since they form the attachment for the Deltoid and Pectoralis muscles. Here you will attach the Sternomastoids (Figure 3.96(b)).
Using the Claytubes brush, stroke in the Trapezius muscle. You will look at this mus-cle in more detail in the next chapter. For now, sculpt it in from the base of the neck, as shown in Figure 3.97.
Use the interactive light script to move the light, and check the sculpture under dif-ferent lighting conditions. Interactive light is located under ZPlugin → Misc Utilities. Click the interactive light button to move the light source with your mouse. This will work only on standard materials and not Matcap materials. Remember to check the shapes of the shadows and look for areas that are too defined or lacking form. Adjust them accordingly (Figure 3.98).

Note
You may want to load an earlier iteration of your skull sculpture as a subtool. By turning visibility on and off with transparency on, you can check to see that the general form of the skeletal understructure has remained consistent with the original skull. If not, use the Move brush to make any adjustments necessary at a lower subdivision level.
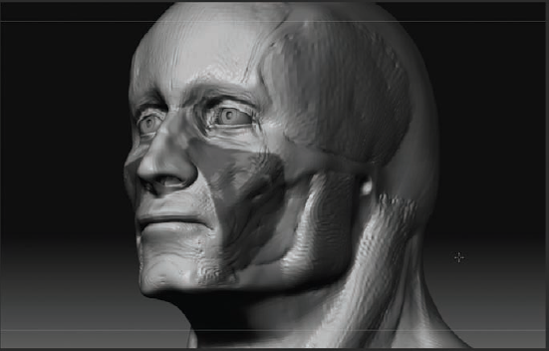
Congratulations! You have completed the sculpture of the human head. The head is by far one of the most difficult parts of the body to sculpt well, owing to the intense level of familiarity we all have with the way a human head should look. Figure 3.99 shows the fin-ished head sculpture.

