As this book progresses, you will be examining the body of our character by specifc parts. That is to say, you will look at the arm independently of the leg in different chapters. Although this is necessary for a survey of sculpting the figure in detail, it is important to understand the figure as a whole before you begin. Think of this as a jigsaw puzzle. When you start a puzzle, you don't begin examining individual parts; instead, you look at the picture on the front of the box. This chapter is about that overall picture. Once you have a grasp of this overall form, you can move on to examining the aggregate parts of the body. Just as you focus on big shapes first and then work down into the finer details, you need to be able to see the figure as its overall outline.
In this chapter, you will be looking at the figure as a whole unit together. Instead of looking just at the relationships between bone and muscle landmarks, you will sculpt the shape the entire figure makes.


Note that I will avoid most proper names of muscles and bones in this chapter. When discussing the clavicles, for example, I will defer to common usage and call them collar bones. This is so as not to overwhelm you if you're not fully comfortable with some of the more technical names for the parts of the body. As we progress into later chapters, I'll introduce the proper nomenclature for bones and muscles, but I thought that this chapter was best left simple so you can focus on the process of making shapes.
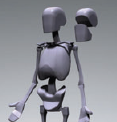
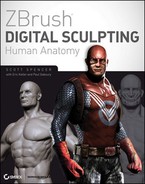
You must understand the overall shapes and major mass relationships of the normal human anatomy before you can push that into a heroic figure (Figure 2.1). You can stretch the limits even further into fantasy but keep your work grounded in some realism, as shown in the werewolf in Figure 2.2.

Figure 2.2. Fantasy characters like this werewolf work best when the anatomy has some basis in reality.
Crests and valleys are the points in the figure outline that are high or low. By knowing where on the outline the lines crest or valley, you can more quickly and accurately sculpt a human figure. Figure 2.3 points out the crests, or points where the silhouette is highest, and points out the valleys, the points where it is the lowest. The place where two lines meet in a crest or valley I call a break. By sculpting a figure with attention to the silhouette, you are working from the biggest shapes down to the smallest. The most valuable piece of advice I have been given as an artist is to always focus on the most basic aspects of the figure first and foremost, and only then refine finer and finer forms until you arrive at the final figure. It is a natural inclination to jump into details too soon, and we have to make a conscious effort to avoid that.
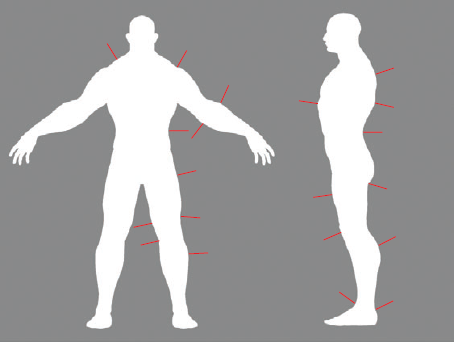
Figure 2.3. This figure shows many of the crests and valleys as seen in the silhouette of the figure.
These crests and valleys will guide your hands as you place anatomical forms internally. For example, in Figure 2.4 you can see the crest and valley in the shoulder. It is important to understand the gesture and inclination of this line. If you look further at the shaded view of the same sculpture, you can see how a valley is created by the Deltoid, or shoulder, muscle inserting in front of the Triceps muscle at the back of the arm (Figure 2.5). These muscle insertions are internal forms that combine to create the silhouette you are accustomed to seeing. By keeping an accurate silhouette in mind, you can maintain a direction while you sculpt. Having a goal in mind always makes the process of sculpting flow easier. There are times when many artists, including me, may find themselves moving points around on the surface, trying to "make it look right." Often in these moments it is best to step back and examine the figure from the silhouette inward.


Figure 2.5. The same figure in shaded view; see how the internal forms combine to create the outline shown in Figure 2.4.
By examining the planes and profiles of the figure, you can further understand how the different basic shapes interlock and form the figure. In Figure 2.6, you see a basic eight-head model human rendered in a planar form by simply using the Pinch and Flatten brushes in ZBrush. You may also use the Clay Finish and Polish brushes to accomplish this process. I do not recommend trying to use the Planar brushes for this tutorial, as they are more suited to creating chiseled edges based on a specific normal and do not lend themselves to the sketching quality of this process.
As you are working, always be aware of the crests and valleys of the silhouette as well as the crests in the internal forms, because the plane changes on the three-dimensional forms of the body.
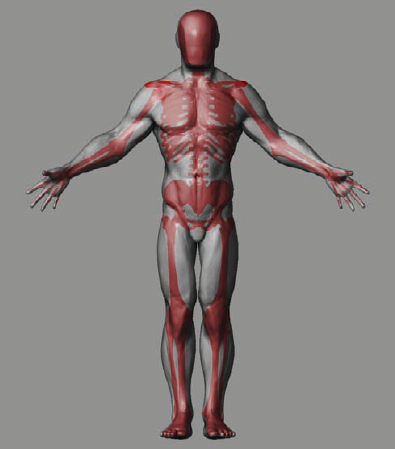
Keep in mind as you work how the skeleton influences these forms. Figure 2.7 shows the same planed figure with the skeleton visible as an overlay. Notice how the clavicles, knees, anterior crests of the pelvis, and rib cage come close to the surface and influence the shape of the body directly. We will be examining these skeletal landmarks in detail throughout the book.

This tutorial is intended to guide you through sculpting a rough representation of the figure. This model will be the basis for all the following chapters in the book. You shouldn't be as concerned with the internal forms here as you are in establishing a relationship between the masses of the body and the interlocking of their shapes. As you work, constantly try to maintain an accurate silhouette. Also note that an exercise like this needs to be repeated often to be the most beneficial. Learning about sculpting the figure is so fascinating for me because of the many layers of understanding you can gain each time you work. If you return to this exercise and sculpt the rough figure again after having completed the book, you will find you understand the shapes you create in a different way and ideally learn more from your own work in the process.
Note
Please be sure to check the DVD for a complete video of this entire chapter's tutorial.
For this tutorial, you will use the Maya base mesh created in the first chapter. Load the Maya mesh you created and use this as a starting point. I have created a a ready-to-load ZTool with the measure planes as a subtool to help check proportions as you work. You can load this from the Chapter 2 folder on the DVD.
You will use a limited palette of ZBrush brushes in this tutorial. Table 2.1 lists the brushes to be used along with each one's function.
Table 2.1. Brushes Used in the Gesture Sculpt
Take the following steps to get started sculpting a basic figure:
Import the Maya mesh by going to the Tool menu and selecting the Polymesh Star tool from the Tool palette. This is a generic 3D mesh tool that allows you to import other models into ZBrush. With the star selected, click Tool

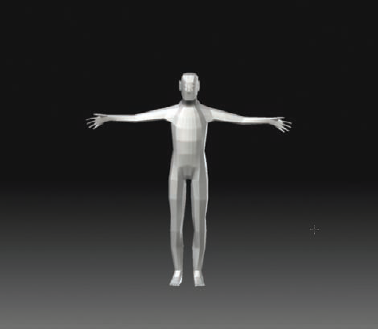
Draw the mesh on the canvas, and enter edit mode with the T hotkey (Figure 2.8).
You will be using the Claytubes brush extensively in this exercise, so you will want to begin with several subdivision levels. Claytubes is one of the Clay brushes that come with ZBrush. These brushes add to the surface in a very gestural manner, similar to soft clay on a sculpture. They don't have the same bloating effect as the Standard and Inflate brushes. For this reason I like to use the Clay brushes to build up form. They tend to work best with several subdivision levels rather than at the lower divisions.
Add three subdivisions to the ZTool by selecting Tool
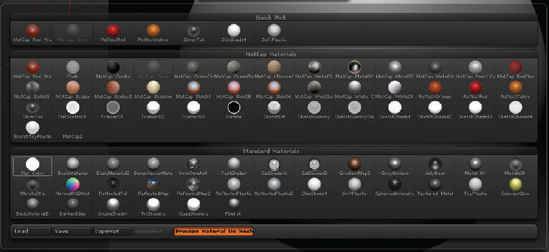
Select the Claytubes brush from the Brush palette, and you are ready to begin sculpting. As you can see from the silhouette view (Figure 2.9), there is little detail in the outlines of this figure. If you build based on the image planes provided, the proportion will be correct, but the profiles will be as simple as possible. This tutorial will show you how to sculpt with attention to the profiles. Throughout this tutorial you will switch to silhouette view often. To do this, you'll use the Flat Color material (informally known as a shader). One of the standard ZBrush Startup materials (Figure 2.10), Flat Color, will remove all shading information and show just the flat color of the object.
To select the Flat Color material, simply click the Material palette icon on the left dock, and from the flyout menu select Flat Color.
To simplify moving quickly between the Basic Material and Flat Color, it's a good idea to use a hotkey for both Flat Color and Basic Material.
To set up a hotkey, open the Material palette from the left side of the screen, and while holding down the Ctrl key, click the Flat Color material icon. At the top of the screen you will see ZBrush asking you to set a hotkey: "Press any key combination to create hotkey –or– Press ESC or Mouse button to cancel."
Any key you press now will be assigned to this material; for this exercise, press Alt+Q.
Repeat this process for the Basic Material, and assign it Alt+W. Now you can quickly switch between materials as you work, checking the progress of the silhouette.

You will begin with the central pillar of the human body, the head and torso. This is also known as the axial skeleton. The torso is composed of three movable masses: the head or cranial mass, the rib cage or thoracic mass, and the hips or pelvis mass. You will begin by sketching in the masses of the rib cage and the pelvis because these will be the central pillar of the body from which you will build all the other forms. Figure 2.11 shows the three masses as basic geometric shapes.

Start by sketching in the outline of the rib cage from the front (Figure 2.12). Use the Claytubes brush to create the egg shape of the rib cage. Make sure to continue the form around the sides and back. At this point, quickly block in a box for the pelvis, as shown in Figure 2.13.
Using the Transpose Tools
At this point, you'll want to lower the arms into a more relaxed posture. To do this, you will use the transpose tools. These are valuable tools for adjusting gesture and proportions as you work because they allow you to quickly pose and orient the mesh like you would bend a wire armature or pose a puppet.
You can access the transpose tools by clicking the Move, Rotate, or Scale buttons at the top of the screen, as shown here.

To use the transpose tools to rotate the arms down, press the R key to enter rotate mode, or click the Rotate button at the top of the screen.
The transpose tools work by affecting unmasked parts of the mesh, so you need to make sure the body from the shoulders in is masked and immovable. You could manually paint a mask by holding down the Ctrl key while you sculpt, which would place your brush in masking mode. But this can be a difficult approach, especially when you have a large area to mask. The easiest way to accomplish this is with the transpose feature Mask By Topology.
Hold down the Ctrl key, and drag from the shoulder toward the arm.
A mask will grow from the center of the body toward the arm. Release the mouse and Ctrl key, and the mask is complete.
This approach is easy to master and helps you quickly and gesturally mask large or small parts of the mesh for the purpose of posinig the figure. It works based on the underlying edge loops, which makes ZSphere meshes or simplifed box models like our mesh ideal.
Mask the mesh as described earlier, and draw a transpose line from the shoulder to the wrist by clicking and dragging the mouse. The transpose line looks like an orange line with three circles along its length (Figure 2.14).
Click the Rotate button at the top of the screen; then click in the last circle by the wrist, and drag to rotate around the first circle.
When the arms are rotated down, click the Move button at the top of the screen, or use the W hotkey, and click in the center circle and drag to place the arms in relation to the shoulders.

Note
The transpose tools can be challenging for new ZBrush users, particularly with their masking options. Be sure to check the video of this chapter's tutorial on the DVD to see how I've used them.


At this point, you will start to establish the major shapes of the legs. The legs are, of course, composed of several interlocking muscle groups, but for this chapter you should be concerned only with the most basic internal shapes and the silhouette. For this rough sculpture, you will establish this basic form and then in later chapters refne it into the individual muscle shapes.
Turn on the measure line's subtool to help guide the placement of these basic shapes. Using the Claytubes brush, rough in an oval teardrop shape, as shown in Figure 2.15. Notice that the bottom of the teardrop shape dips just below the fifth head measure from the top. Eventually this will be the muscle bulge just above the knee, as you can see in Figure 2.16.
Still using the Claytubes brush, rough in a box form for the knee, as shown in Figure 2.17. This box shape will span from the bottom of the teardrop form to the sixth head measure line down. This will represent the form of the knee area that takes on a box shape because of the close proximity of the bones of the leg to the surface of the skin in this area. I also make a curved stroke from the bottom of the knee to the foot. This will represent the curvature seen in the shin.
Now move to the side view. You want to create the characteristic curvature of the leg in silhouette. Use the Move brush to pull the upper leg out and the back of the lower leg, the calf, back. You can see this change in Figure 2.18. In this figure I have marked the signature curves you will want to establish. These alternating curves create a rhythm in the shape of the leg.
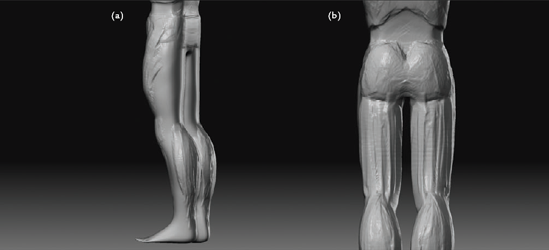
Move to the back of the legs. With the Claytubes brush selected, mass in an oval form, as shown in Figure 2.19(a). Then on the back of the upper leg, mass in a shape like that shown in Figure 2.19(b). You will also want to indicate the bottom. This can be as simple as creating a volume for each side of the rear. These shapes will represent the muscles of the back of the leg. Notice how the lower leg muscles wedge into the upper leg muscles (Figure 2.20). As you work, you may want to step down in subdivision levels and smooth the geometry to reduce some shapes and generally have more control over the sculpture. When smoothing the geometry, make sure to adjust the intensity of the Smooth curve so as not to destroy the form you have already sculpted.
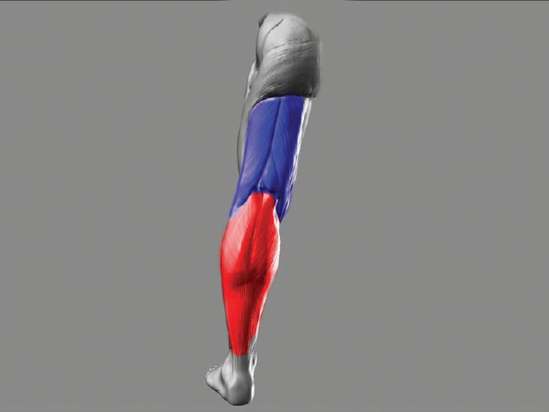
Figure 2.20. Notice how the shapes of the upper and lower legs wedge into each other on the final figure.
Using the Smooth Brush
As you build up forms, you'll need to use the Smooth brush to push back when the shape is becoming too inflated. At its default setting, the Smooth brush is very strong and will obliterate your sculpture, as shown here.

You need to adjust the smoothing curve to reduce the overall strength of the Smooth brush. This allows you to have a full range of 0 to 100 ZIntensity, while reducing the intensity of the 100 percent setting.
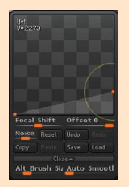
To reduce the smoothing curve, click the Brush palette at the top of the screen, and scroll down to Curve. While holding Shift down, click in this menu to open the Curve control. When Shift is depressed, the curve will control the Smooth brush.
In ZBrush you cannot select the Smooth brush directly. Changes you make to the brush controls while holding Shift affect the selected Smooth brush. In the Brush palette, there is a selection of Smooth brushes available, from the normal smooth to smooth peaks, which only smoothes high points, and smooth valleys, which only affects the low points. When a Smooth brush is selected, it will become active only when the Shift key is pressed.
Click Reset, and then drag the rightmost point down.
The left point represents the strength of the Smooth brush in the furthest outer rim of the brush, while the right point represents its strength in the center. The curve between the two points represents the falloff over the course of the brush's effect, as shown here. You can also adjust the ZIntensity of the brush while holding Shift to further soften the effect of the smooth.
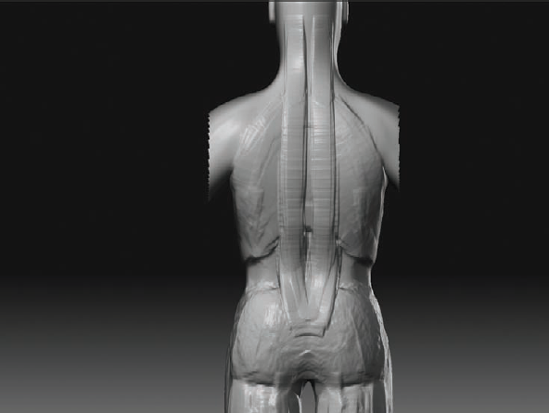
Moving up the back, sculpt in two pillars from the buttocks to the base of the skull (Figure 2.21). These will be clear in later chapters as major muscles of the back. For now they will serve to link the pelvic mass and the rib cage, as well as to help establish the profile of the torso as seen from the side by transitioning between the pelvis and the rib cage.
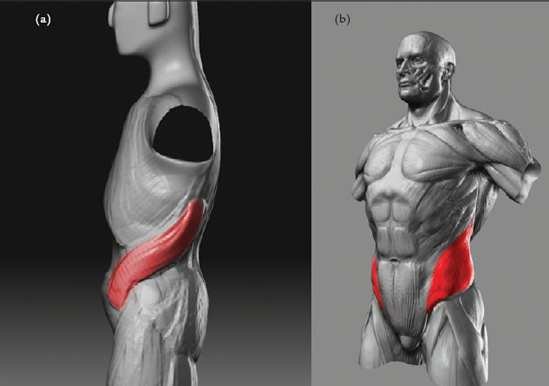
Move to the side view. Here you will add a transitional shape between the ribs and the pelvis again. This S-shaped form, shown in Figure 2.22(a), flows from the back of the rib cage to the front of the hips. This form is a simplification of the flank muscles of the torso shown in Figure 2.22(b). The point here is to unify the torso with the pelvis, linking the two basic shapes together.


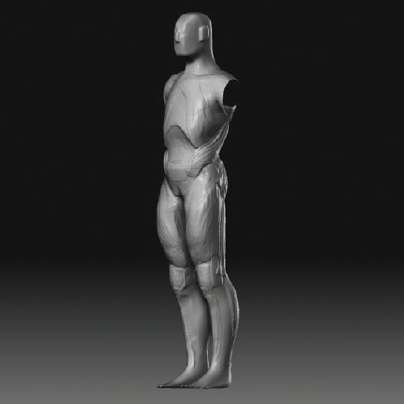
Now you will move up to the chest and shoulders. Figure 2.23 shows the rough figure at this stage from a full-body view. Remember to keep checking your work against the measure guide subtool as you sculpt, and check the profiles often in flat shade view.
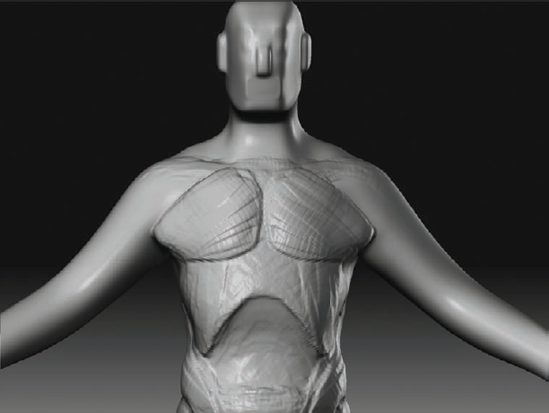
From the front view, sculpt the shape of the chest muscles, as shown in Figure 2.24. These look like two steaks that taper toward the armpits. They will start right on the collar bone line of your measure guide. This is because these chest muscles originate from the ribs as well as the collar bones or clavicles.
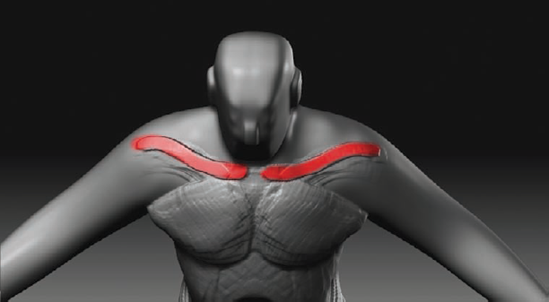
Once the chest muscles are established, tip the figure forward, and sculpt the collar bones, as shown in Figure 2.25. Notice the sweep the shapes take as they fow out to the shoulders. Collar bones are very much like the handlebars on a bicycle. Make sure to end the collar bone at the center of the shoulder.
Using a mask, isolate the area for the shoulder muscle, as shown in Figure 2.26. This muscle will start on the last third of the collar bone and continue around the back of the figure. Notice how the muscle looks somewhat V-shaped and tapers to a point in the middle of the upper arm. This muscle is called the Deltoid because it looks like the Greek letter delta (δ) upside down. For modern people, it's easiest to think of it as a triangle wrapped around the shoulder.
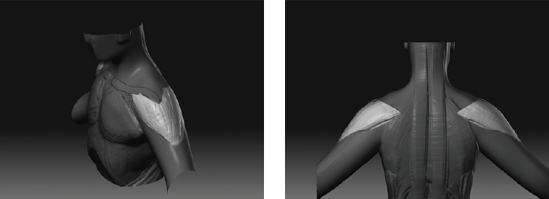
You will now sculpt the shape of the shoulder blade on the back. Isolate the area for the shoulder blade, as shown in Figure 2.27(a). Create it using the Claytubes brush. You will notice here that the back of the shoulder muscle overlaps the shoulder blade. You will look at this attachment in detail in Chapter 4. The shoulder blade is important enough to include in this very rough model because it influences the shape of the back as seen from the side (Figure 2.27(b)). It is also important, because even in this simpli-fled figure, it serves as a central point of attachment for the shapes of the back of the arm and back of the neck.
You will now add the muscles of the back of the neck. This muscle form is called the Trapezius, and you will look at it in more detail in the next two chapters. For now, you want to isolate its shape with a mask and sculpt the form using the Claytubes brush, as shown in Figure 2.28(a). In the silhouette view in Figure 2.28(b), notice that it flows from the base of the skull to the line where the shoulder muscle, or Deltoid, overlaps the shoulder blade.
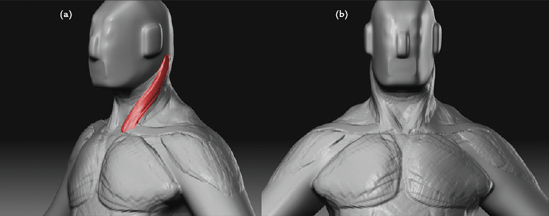
To finish off the shoulder area, rotate to the front, and add in the two neck muscle shapes shown in Figure 2.29(a). These are called the Sternomastoids, and you will be looking at them in more depth next chapter. For this sculpture, simply make sure the form flows around the neck starting from the base of the skull to the point between the collar bones, as shown in Figure 2.29(b).
At this stage, take a look at the overall figure again. Turn on the measure guide sub-tool, and make sure the measures fall where they should. Remember, the midpoint of the figure should be at the fourth head line, and the sixth line should fall just below the knee. Notice as well that the collar bones fall on the smaller line just below the first head measure. At this stage, make any adjustments to the silhouette in flat color view before you move on to the arms.


Now that you have worked up the figure from the legs to the neck, you will look at the arms. Just as with the legs, you should be most concerned with the overall profiles of the arm and the way in which the upper arm wedges into the lower arm. Be careful not to become too involved with smaller forms. In this sculpture, you will represent the arm with the minimum of simple volumes.
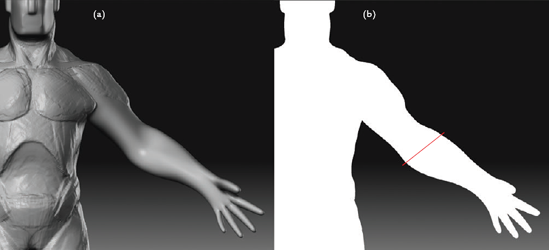
You will start the arm by addressing the silhouette from the front. As you can see in Figure 2.30(a), the arm is a very simple tube shape at the moment. Using the Move brush, pull the outline into the shape shown here. Be sure to notice the angle between the crests of the silhouette on the outside of the arm as it relates to the crest on the inside. A common error is to make these crests even when they should be offset, as shown in Figure 2.30(b).
You will now sculpt the Biceps muscle. Using the Claytubes brush, mass in the rectangle of the Bicep from the armpit down to the forearm (Figure 2.31). Be sure to continue it into the forearm slightly because this is part of the interlocking between the upper- and lower-arm shapes. You can see this interlocking of form in Figure 2.32.
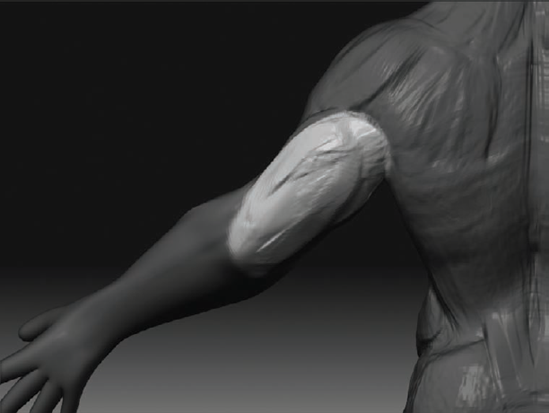
Now rotate to the back of the arm. You are going to sculpt an oval shape here that will taper from the armpit to the elbow. This will represent the Triceps muscle, which encompasses the entire back of the arm. Isolate the area, and mass in the shape using the Claytubes brush (Figure 2.33).
To better define the joint between the upper and lower arm, you will now bend the elbow. Use transpose masking to mask down to the elbow. Draw a transpose rotate line that ends at the point of the elbow, as shown in Figure 2.34. Hold down Alt and drag in the last circle to bend the elbow.


You will now rough in some basic hands for this figure. As in the previous sections, you are most concerned with the gross form and overall shapes. The hands themselves will be addressed in detail in Chapter 7.
Use the Smooth brush to reduce the volume of the fingers until they are even, narrow tubes (Figure 2.35(a)). Isolate the thumb with a mask, and using the Inflate brush with a low ZIntensity setting, mass in the fleshy portion of the base of the thumb (Figure 2.35(b)).
Moving to the back of the hand, start to indicate the bones of the back of the hand with a few strokes of the Standard brush. These don't have to be overstated, just simple lines leading to the base of each finger (Figure 2.36).
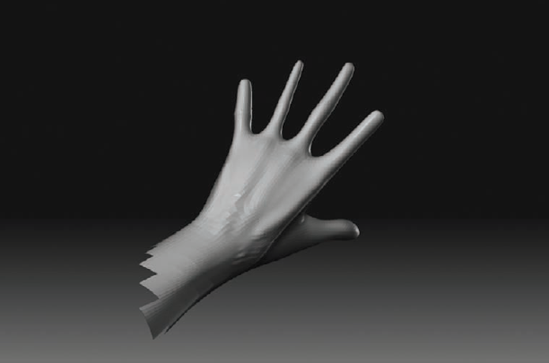
Use the Claytubes brush to refine the back of the hand. As shown in Figure 2.37, pull the webbing between the fingers up on the palm side of the hand. This is an important form feature of the hand. The fingers attach at a bevel, not straight on.
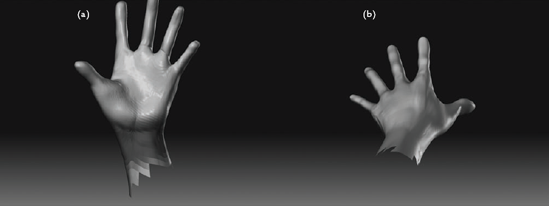
Rotate to the palm of the hand, and mask out the wrist. Using the Inflate brush, create the masses of the palm, as shown in Figure 2.38(a). Be sure to rotate around the hand and check the shapes from many angles (Figure 2.38(b)). Do not become too involved with the fingers at this stage. You can indicate the knuckles with a slight touch of the Inflate brush.


You are now in the final stretch, and the gesture sculpture is almost done. All you have left now are the head, abdomen, and toes. In the following steps, you will begin by filling out the abdomen of the figure:
Returning to the front of the figure, isolate the abdomen with a mask, as shown in Figure 2.39(a). Use the Claytubes brush to mass in a column of muscle from the ribs to the pubic bone (Figure 2.39(b)). Be sure to check your work here from the side view as well (Figure 2.39(c)).
Use a mask to isolate six areas, as shown in Figure 2.40. These are the abdominal muscles commonly called the six-pack. There are actually eight of these muscles, but only on very rare and fit people are all eight visible. Use the Claytubes brush to indicate these muscles. Turn on the measure guides, and place the navel at the third head measure down (Figure 2.41).
Move down to the legs, and turn on flat shade mode (Figure 2.42). Make sure your silhouette is correct and you have the crests and valleys in place.
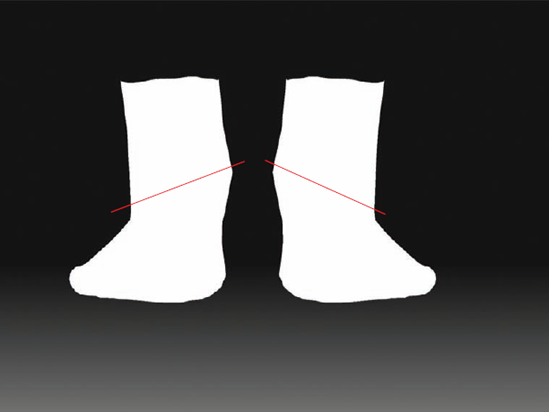
Since you'll be working on the feet next, I will point out one very important angle. In Figure 2.43, notice the angle between the anklebones. Make sure the inner anklebone is higher than the outer one.
Rotate to the top of the feet. Notice that the toes are somewhat evenly spaced and all the same size (Figure 2.44(a)). You will correct this by stepping down to the lower subdivision levels. Select the Move brush, and adjust the points of the toes so they follow an arc, as shown in Figure 2.44(b).
Use the Move brush and the Inflate brush to refine the toe shapes. Note the gap between the big toe and the other digits. Also note the arc created by the front of the foot (Figure 2.45).


With the abdomen and toes complete, you are at the last stage. Now you will create the most basic head form possible for this figure. This will be a primitive head shape that contains the volume of the skull but with no features. You will sculpt the head in detail in the next chapter.
From the front and side views, smooth back the extrusions for the ears and nose, as shown in Figure 2.46. Be sure to adjust the smoothing curve, the intensity of the Smooth brush, or both, to keep from smoothing away the head form. The topology created by these extrusions will remain and be helpful for pulling shapes out of these areas later in the sculpting process.

Use the Pinch brush with Lazy Mouse to pinch the line, as shown in Figure 2.47(a). You can activate Lazy Mouse by pressing the L hotkey. This plane change will represent the side of the skull. Repeat this process for the front of the skull, as shown in Figure 2.47(b). Check the shape of the head in flat color mode. Figure 2.48 shows the sculpture with flat shade (silhouette) on.
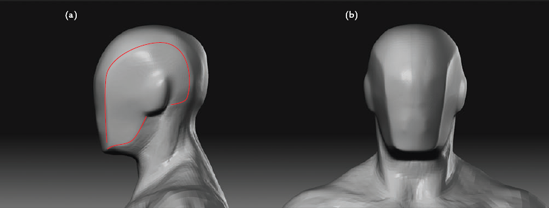
Figure 2.47. Working on the head: (a) pinching the plane at the side of the skull, (b) pinching the sides of the skull from the front view
That completes the rough gesture sculpture (Figure 2.49). Check your work in flat shade mode as well as with the perspective camera on and off.
Congratulations, you have completed the gesture sculpture tutorial. You have now finished sketching in a figure with attention to the silhouette and basic forms of the body. This may not seem vital now, but it is one part of the foundation on which the rest of this book is built. You will move on now and begin to look at the parts of the body in more detail, focusing on how muscle fesh and bone forms combine to create the human body.
At this point, save your ZTool. You will be using it again for the remaining chapters.


Before you move on to Chapter 3, I would like to call your attention to a bonus tutorial available as a narrated video on the DVD. Now that you have a rough figure sculpture, you can take it a step further by addressing the geometric planes created by the internal forms of muscle and bone (Figure 2.50).
Planes are important in sculpture because they define the quality and placement of the shadows on your figure. A sculpture with poorly defined planes will appear soft. By sculpting with attention to the planar breakdown of the forms, you can give your work a more solid structural integrity and make it feel like flesh and bone rather than soft lumps of polygon clay blended together.

I have chosen to include this as a video since the process may be diffcult for you if you have never sculpted the human form or are unfamiliar with many of the muscle and bone landmarks referenced. In these cases, I recommend working through the remainder of the book and then revisiting this tutorial to help develop your sense of structure and form when dealing with the figure as a whole.
Congratulations, you have completed this tutorial in sketching a human body. You have learned about the importance of the silhouette as well as plane breaks and crests in both the outline and the muscle form. Much of what we did this chapter is the foundation for the rest of this book. What you learned here will inform the sculptural decisions you make for the rest of the figure. Without understanding plane crests, breaks, and profiles, all the muscle knowledge in the world won't help.
Let's move on to sculpting the head and shoulders using what you have learned so far!