14. Other Ways to Share Your Digital Photos
In This Chapter
![]() Explore ways to display photos on your HD television set
Explore ways to display photos on your HD television set
![]() Discover more ways to showcase, sync, and share your photos
Discover more ways to showcase, sync, and share your photos
After you’ve taken photos with your iPhone or iPad, or you have digital images stored on your iOS mobile device, you can sync those images with all of your other computers and mobile devices, share them with other people online, and showcase them in the real world.
Display Your Digital Photos on Your HD Television Set
You can use several easy methods to share the images that are stored on your iOS mobile device with others by displaying them on your HD television set. One method is wireless. It involves using the optional Apple TV device ($99.00, www.apple.com/appletv) and the AirPlay feature that’s built in to iOS 7.
The second method is also wireless. It involves using iCloud’s My Photo Stream or Shared Photo Stream feature. From your iPhone or iPad, create a My Photo Stream or a shared photo stream album, which is ultimately stored in the cloud, in your online-based iCloud account. Then, use Apple TV (which is connected to your TV) to access your iCloud account using its Internet connectivity to display the images stored in your My Photo Stream or the shared photo stream album you select.
The third method utilizes the USB cable that is supplied with your iPhone or iPad, and a special adapter, called the Apple Lightning Digital AV Adapter ($49.00) or the Apple 30-Pin to Digital AV Adapter ($39.99). You must physically connect your iPhone or iPad to your HD television set via the television’s HDMI port.
After your iPhone or iPad and HD television set are linked using one of these methods, you can view images that you’d otherwise display on your device’s screen in vivid detail on your large-screen HD television set.
You can display images manually, one at a time, or you can easily create animated slideshows (complete with a visual theme, slide transitions, and background music) to display on your television set for yourself or an audience.
Display Digital Images on Your HD Television Using Apple TV
The Apple TV device is optional. It’s available from Apple for $99.00, and it connects simultaneously to your HD television set and to the Internet. After an Apple TV is connected to your TV, it can access and play any compatible content acquired from the iTunes Store, including TV show episodes, movies, music videos, or music.
Tip
When using Apple TV to access any images or albums stored in your iCloud account, you must first log in to your iCloud account from your Apple TV device. This needs to be done only once, unless you need to switch between multiple iCloud accounts. To do this, from the Apple TV main menu, select the Settings option. From the Settings menu, select the iCloud option. When prompted, enter your Apple ID/iCloud username and password, and follow the onscreen prompts.
In addition, Apple TV can access and display images stored in your My Photo Stream or shared photo streams, plus play video clips or home movies you’ve shot and that are stored in your iCloud account.
Note
Apple has also teamed up with dozens of third-party program producers and television/cable networks to provide free and paid programming via Apple TV channels. Once selected, this on-demand programming streams from the Internet to your Apple TV device and appears on your HDTV. You also have the option of accessing your Netflix or Hulu Plus account from Apple TV and streaming programming from these subscription-based services to your HDTV.
Tip
For more information about what Apple TV is capable of, and for directions on how to use its various features, visit www.apple.com/appletv.
Display Images Stored on Your iOS Mobile Device on Your HD Television Set via AirPlay
If you have your Apple TV device connected to the Internet via a Wi-Fi Internet connection, it’s possible to use the AirPlay feature that’s built in to iOS 7 and Apple TV’s operating system to showcase, wirelessly, the images stored on your iOS mobile device on your HD television screen. This is done using either the Photos or iPhoto app (or any other third-party photography app that supports AirPlay).
To take advantage of this feature, turn on your Apple TV so that the main Apple TV menu is displayed on your television set. Next, from your iPhone or iPad, turn on Wi-Fi, and then launch the Photos or iPhoto app.
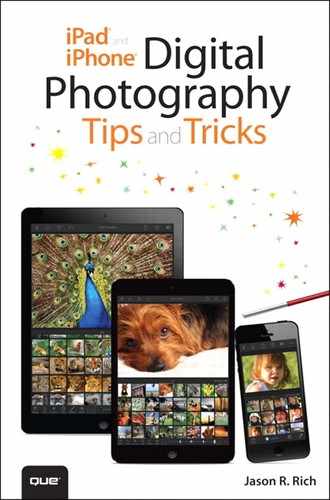
Open any album within the Photos or iPhoto app, and select an image to view. As you’re viewing a single image, tap on the Share Menu icon. From the Share menu, tap the AirPlay option (see Figure 14-1).
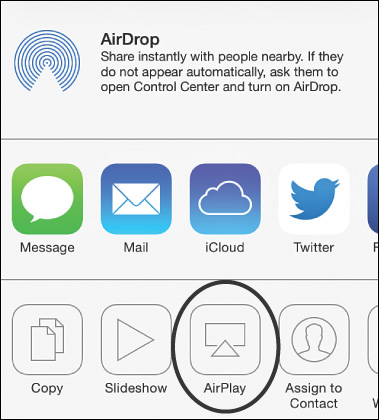
When the AirPlay pop-up window opens, select the Apple TV option (see Figure 14-2). Now, the image you’re viewing on your iPhone or iPad is simultaneously displayed on your HD television set. Using finger gestures on your iOS mobile device, swipe left or right to manually scroll through the images in the album (and see them displayed on your television set).
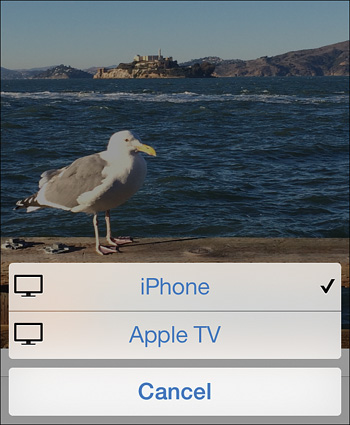
FIGURE 14-2 When you tap on the Apple TV option when Apple TV and AirPlay are available, images that are displayed on your iPhone or iPad’s screen can be streamed and viewed on your HD television set.
Although you can zoom in or out when viewing images on your iOS mobile device, this feature does not currently work on the images displayed via Apple TV.
Instead of viewing individual images manually, as you’re viewing the thumbnails that represent the images from the album on your iPhone or iPad, tap on the Share icon and select the Slideshow option (using the device’s screen).
From the Slideshow Options window displayed on your iOS mobile device, select the Apple TV option (see Figure 14-3). Next, tap on the Transitions option to choose which animated slide transition effect you want to use, and turn on the Play Music option if you want to select and play background music (that’s stored on your iOS mobile device).
FIGURE 14-3 There are several ways to present a slideshow on your HD television set that features your images.
Tap the Start Slideshow option to begin viewing the slideshow on both your iPhone or iPad’s screen and your HD television set. In this case, the images remain stored on your iPhone or iPad and are wirelessly streamed to the Apple TV device. Your Apple TV is not accessing images stored online in your iCloud account. (Although from the Photos app, you can access and display images from My Photo Stream or a shared photo stream album.)
Create Your Own Apple TV Screensaver
When Apple TV and your television set are turned on but not being used to show programming, or if the Apple TV is streaming just music, you can create an animated screensaver that displays your digital images on your television set using a themed, animated slideshow format.
To set up the Apple TV Screensaver feature, access Apple TV’s main menu screen and follow these steps:
1. Select the Settings option to access the Apple TV Settings menu.
2. From the Settings menu, select the Screen Saver option.
3. From the Screen Saver submenu, adjust any or all of the five menu options. First, select the Start After option and choose how long your Apple TV should remain inactive before displaying the screensaver. Options range from Never to 30 minutes.
4. Select the Show During Music option and decide whether you want the screensaver to be displayed when Apple TV is playing just music. This includes music you’ve purchased from the iTunes Store or music that’s streaming from iTunes Radio, for example. If you select the Yes option, anytime just music is playing via your Apple TV, the screensaver that features your images is displayed on the television set.
5. Select the Photos option and choose which iCloud album you want to showcase in your Apple TV screensaver. You can select either your My Photo Stream or any of your shared photo stream albums.
6. Choose a theme for your screensaver. Apple created more than a dozen different animated themes to choose from. Each includes different types of slide transitions and graphics.
7. Select the Preview option to see a preview of what your Apple TV screensaver will look like.
8. When all of the options are adjusted and the screensaver is to your liking, exit out of Settings to save your changes and activate the newly created screensaver.
Display an Image Collage, One Image at a Time, or Create an Animated Slideshow
Using Apple TV and the images stored in My Photo Stream or a shared photo stream album, it’s possible to set up Apple TV to display your images one at a time and enable you to manually scroll through them. Alternatively, you can create an animated slideshow to display your images.
This method for displaying images on your HD television set requires you to first transfer images stored on your iOS mobile device to your online-based My Photo Stream or into an online-based shared photo stream album using one of these iCloud-related features. This can be done directly and wirelessly from your iPhone or iPad.
To display images on your HD television set that were taken using your iPhone or iPad, but that have been since transferred to iCloud, follow these steps:
1. From iCloud’s main menu screen, select the iCloud Photos channel.
2. Choose either your My Photo Stream, or one of your shared photo stream albums that are stored online in your iCloud account. They’ll all be accessible from your Apple TV.
3. The images from your selected album appear in a collage format on your television set. Using your Apple TV’s remote, scroll up or down, or select a single image by pressing the round Select button (in the center of the directional buttons on the remote) to view just that image.
4. When viewing a single selected image, use the Apple TV remote to scroll left or right, and view the remaining images within that album, one at a time, displayed on your screen. Press the Menu button to return to the collage screen.
To display the images from the selected album as an animated slideshow, from the collage screen, press the Slideshow button, which can be found near the top-right corner of the screen. When the Slideshow menu is displayed, customize the various slideshow options before selecting the Start Slideshow option (used to view the animated slideshow on your television screen).
The Slideshow menu options include the following:
![]() Shuffle Photos—Turn on this option to randomize the order in which images from the selected album appear. When turned off, the slides display in the order in which they’re stored in the album.
Shuffle Photos—Turn on this option to randomize the order in which images from the selected album appear. When turned off, the slides display in the order in which they’re stored in the album.
![]() Repeat Photos—Turn on this option if you want the slideshow to continue indefinitely, until you manually turn it off.
Repeat Photos—Turn on this option if you want the slideshow to continue indefinitely, until you manually turn it off.
![]() Default Music—Select the music you want to play in the background as your slideshow plays. You can select any song(s) stored in your iCloud account that you’ve previously acquired from the iTunes Store, for example. If you’re an iTunes Match subscriber, it’s also possible to choose any song(s) from your entire digital music collection. If no music is selected, no music plays when your slideshow runs.
Default Music—Select the music you want to play in the background as your slideshow plays. You can select any song(s) stored in your iCloud account that you’ve previously acquired from the iTunes Store, for example. If you’re an iTunes Match subscriber, it’s also possible to choose any song(s) from your entire digital music collection. If no music is selected, no music plays when your slideshow runs.
![]() Shuffle Music—Turn on this feature if you want Apple TV to randomly play music that’s stored in your iCloud account, as opposed to specific music you select.
Shuffle Music—Turn on this feature if you want Apple TV to randomly play music that’s stored in your iCloud account, as opposed to specific music you select.
![]() Theme—Apple TV has more than a dozen different animated slideshow themes to choose from. Select your favorite. This determines what graphics and animated slide transitions appear with your images. Based on which theme you select, additional options, such as how long each slide appears, may become available.
Theme—Apple TV has more than a dozen different animated slideshow themes to choose from. Select your favorite. This determines what graphics and animated slide transitions appear with your images. Based on which theme you select, additional options, such as how long each slide appears, may become available.
After you’ve adjusted each of the slideshow-related options, select the Start Slideshow command to begin playing the slideshow on your television screen.
Display Images from Your iOS Mobile Device on Your Television Set Without Apple TV
Instead of investing in an Apple TV device, it’s possible to display images from your iPhone or iPad on an HD television set if you connect the two devices via the USB cable that came with your iOS mobile device, along with a special Digital AV Adapter (sold separately).
To use this option, if you own an iOS mobile device with a Lightning Port, purchase the Apple Lightning Digital AV Adapter ($49.00). If you own an older iOS mobile device with a 32-pin Dock Connector port, purchase the Apple 30-Pin to Digital AV Adapter ($39.99). These adapters are available from Apple stores, Apple.com, or Apple authorized resellers.
Next, plug in the appropriate end of the USB cable that came with your iPhone or iPad to the bottom of the iOS mobile device. Plug in the other end of the cable to the Digital AV Adapter, and plug in the opposite end of the Digital AV Adapter to the HDMI In port of your television. On your television set, select the appropriate HDMI In input setting. (This is typically done by pressing the Video Input button on the TV’s remote control.) At this point, just about anything that appears on your iPhone or iPad is mirrored, in real time, on your HD television set (with the exception of copyrighted video and certain apps).
After you see everything on both your iPhone or iPad and your television set, launch the Photos or iPhoto app and use any of the app’s features to display your images. If you’re using iPhoto, for example, you can showcase a web journal or slideshow on your HD television set that’s controlled from your iOS mobile device.
Transfer Images from Your iOS Mobile Device to Your Computer Using iTunes Sync
The easiest way to share images between your iPhone or iPad and your computer is to use iCloud or another online-based image sharing or cloud-based service. However, the iTunes Sync option remains viable.
Note
Keep in mind that since Apple made the iCloud service available, the iTunes Sync process has become somewhat antiquated as a way to sync and share data between your computer(s) and mobile device(s).
iTunes Sync requires that you use the iTunes software installed on your Mac or PC to link that computer with your iOS mobile device. This is done using the USB cable that came with your iPhone or iPad, or you can use the iTunes Wireless Sync process if both your computer and iOS mobile device are linked to the same home wireless network via Wi-Fi.
Launch the iTunes software on your computer, and then connect your iOS mobile device to your computer. When the link is established, check the sidebar of the iTunes software. Your device will be listed below the Devices heading (shown in Figure 14-4).
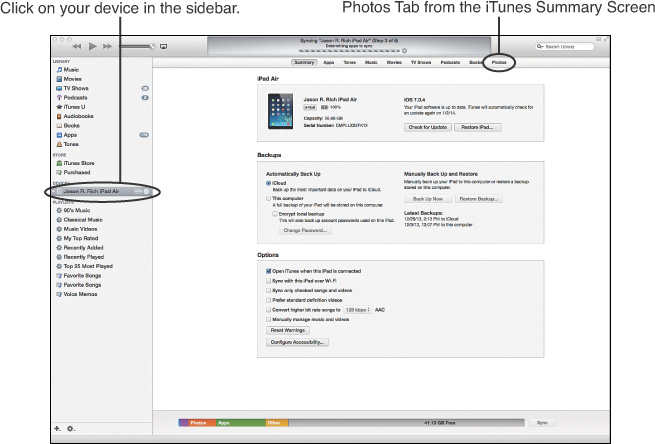
FIGURE 14-4 Click on your device’s listing under the Devices heading in the sidebar of the iTunes software.
Click on the device listing. Then, when details about your device appear in the main area of the iTunes screen (on your computer), click on the Photos tab. Next, add a check mark to the Sync Photos From option. From the pull-down menu to the right of this option, select iPhoto or images from a specific folder, such as Pictures. You can then add a check mark to the All Folders option, for example, to sync all images stored on your computer with your iPhone or iPad, or select specific folders or albums. This is done by adding check marks next to the appropriate album or folder listing(s).
Click on the Sync button that appears near the bottom-right corner of the screen to sync the image albums or folders you’ve selected between your computer and iOS mobile device.
Unlike iCloud’s My Photo Stream and/or shared photo streams, the iTunes Sync process for syncing photos is a manual process and happens only when you connect your computer with your iOS mobile device. The syncing does not happen automatically when new photos are added to your computer or iOS mobile device.
After you sync the images stored on your iOS mobile device with your Mac, for example, use the iPhoto or optional Aperture software (on your computer) to view, organize, edit, enhance, print, share, and archive your images.
Quickly Transfer Images Between iOS Mobile Devices Using AirDrop
If you’re using iOS 7 on any of the latest model iPhones or iPads, when you tap the Share menu, AirDrop is an option for wirelessly sharing digital photos from within the Photos or iPhoto apps with other iPhone, iPad, or iPod touch users who are in close proximity to you.
To turn on the AirDrop feature, access the Control Center by swiping your finger from the very bottom of your iPhone or iPad’s screen in an upward direction. From the Control Center window (see Figure 14-5), tap on the AirDrop option.
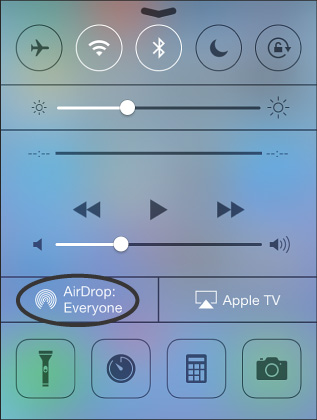
The AirDrop menu contains four options—Off, Contacts Only, Everyone, and Cancel. Tap on Contacts Only to turn on AirDrop but make it so you can share images wirelessly only with people who have an entry in your Contacts database and who are in close proximity to you. Tap on the Everyone option to wirelessly send/receive images from any other iOS mobile device user who is in close proximity to you.
When the Contacts Only or Everyone feature is turned on, to send someone an image from the Photos app, launch Photos and select the photo you want to share via AirDrop. When you’re viewing the image, tap on the Share icon to access the Share menu. Tap on the AirDrop option.
Tip
Instead of selecting just one image, you can select a group of images to send to someone via AirDrop.
All iOS mobile device users who also have AirDrop activated and who are in close proximity are displayed (see Figure 14-6). Tap on the name or profile image of the person you want to send an image to. In this example, an image is being sent from a user’s iPhone 5s to their own iPad Air wirelessly using AirDrop.

FIGURE 14-6 From the Share menu, with AirDrop activated, decide who the recipient of the selected image(s) will be, and tap on his or her name or profile photo. Here, an image is being sent from an iPhone 5s to the user’s iPad Air.
Within seconds, on the recipient’s screen (in this case, the user’s iPad Air), an AirDrop pop-up window appears, regardless of what the recipient is doing (see Figure 14-7). A thumbnail of the image and Accept and Decline buttons are displayed. If the recipient taps on the Accept button, that image is transferred wirelessly from your iPhone or iPad to the recipient’s device and stored in his or her Camera Roll folder. However, the image remains stored on your device as well.
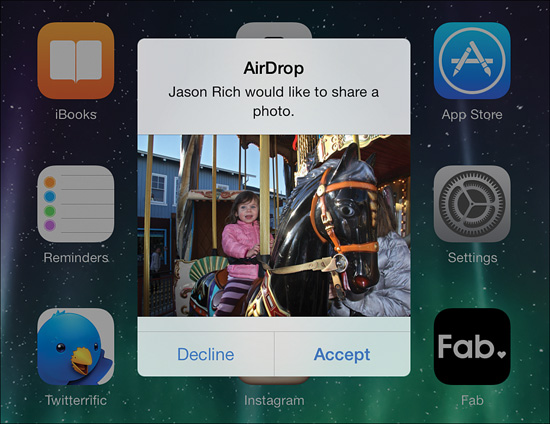
FIGURE 14-7 The AirDrop pop-up window that appears on the recipient’s screen (in this case, the user’s iPad Air) after an image sent to their device by another iOS mobile device that’s in close proximity.
When the image is received (or if it’s declined) by the intended recipient, a message is displayed on your device’s screen.
Put Your Newfound Knowledge to Use
Taking pictures of what happens around you; of your friends, family, and/or co-workers; as well as the things you experience and the places you visit; is a fun and easy process using apps built in to your iPhone or iPad. Never before has it been so easy to capture memories that you can cherish for many years to come—or share immediately with others, regardless of where you are.
As you now know, after you’ve taken photos using the cameras that are built in to your iPhone or iPad, you can use apps to view, organize, edit, enhance, print, and share them, plus take advantage of the Internet to showcase your images in many different ways.
Even if you don’t consider yourself to be a creative or artistic person, you can easily edit and enhance the photos you take to transform them into eye-catching images that you’ll be proud to showcase and share. Keep in mind, many of the image editing and enhancement apps you’ve learned about and that are available from the App Store offer one-touch special effect filters that you can mix and match to dramatically alter or improve the appearance of an image within a few seconds.
Tip
Experiment using different special effect filters and/or combinations of filters to quickly give your images a unique, professional, or artistic appearance.
Then, when you’re ready to share your images, it’s possible to choose from many different ways to accomplish this using the Internet, including email, text message, AirDrop, shared photo streams, online social networking services (such as Facebook, Twitter, or Instagram), online photo sharing services (such as Flickr.com, Smugmug.com, and Snapfish.com), or using cloud-based file sharing services (such as Dropbox, Amazon Cloud Drive, or Microsoft OneDrive).
There are also countless ways to showcase your photos in the real world. As you’ve discovered, creating prints from your digital images (directly from your iPhone or iPad) is an easy process. Plus, you can create enlargements that are printed on poster-size photo paper, canvas, glass, or other materials using a service like Shutterfly.com, FotoFlot.com, CanvasWorld.com, FotoForms.com, Zazzle.com, or ImageOnGlass.com.
Having your images imprinted on products, like iPhone or iPad cases, mouse pads, mugs, T-shirts, holiday ornaments, or custom printed greeting cards, for example, is also possible, as is creating one-of-a-kind photo books (either directly from your iOS mobile device or by first transferring your images to a Mac or PC). The possibilities are truly limitless, yet typically very affordable.
Almost every month, new and innovative ways to showcase and share your images are being made available right from your iPhone or iPad. We’re living in an exciting time, when taking and sharing pictures is easier than ever using the feature-packed smartphone or tablet that you’re already carrying around with you.
Using the knowledge you’ve gathered from iPad and iPhone Digital Photography Tips and Tricks, get into the habit of taking photos frequently. Then, decide how you want to sync, archive, showcase, and share them. Most important, have fun taking and sharing your digital photos!