
Chapter 6. Use the iPad’s Built-In Apps
Apps, also known as “programs that run on the iPad” (and iPhone and iPod Touch), make Apple’s tablet a versatile device, beyond its role as a Web window and portable email reader. As mentioned back in Chapter 1, the iPad gives you a few of its own apps right on the Home screen, alongside the previously discussed Safari and Mail apps.
Three of these apps handle personal organization tasks: Calendar (for keeping your appointments), Contacts (your address book), and Notes (for jotting down bits of text to yourself). One app, Maps, helps you find yourself and chart your course, and two other apps (iTunes and the App Store) point the way to shopping Apple’s online stores.
Aside from the Settings app (described in Appendix A), the rest of the iPad’s Home screen icons are there to entertain you: YouTube, Photos, Videos, and iPod. And if you have a second-generation iPad, you have three other fun apps to play with: Camera, FaceTime, and Photo Booth, all devoted to creating pictures and video clips right there on your tablet, wherever you may be.
And remember, these are just the apps that come with the iPad. Once you get to know these built-in apps, you’ll be ready to tackle any of the gajillion other goodies in the App Store. But that’s for another chapter (7, to be exact).
Set Up Your Calendar
Just as iTunes can sync bookmarks and mail settings from your computer to your slab, so it can snag and display a copy of your daily or monthly schedule on your iPad—if you happen to use Outlook on your PC or iCal on your Mac. You can also use Entourage 2004 or later by choosing, in Entourage, Preferences→Sync Services and checking the option to have Entourage share its info with iCal. (Alas, Outlook 2011 for the Mac doesn’t sync calenders yet.)
To get your life in sync between computer and iPad, fire up iTunes and then:
Connect your iPad to your computer and click the iPad’s icon when it shows up in iTunes’ Source list.
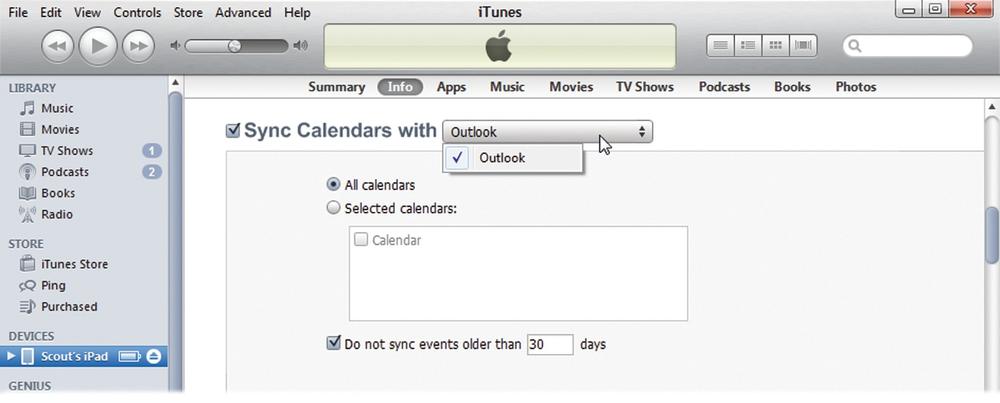
In the main part of the iTunes window, click the Info tab. Scroll down past Contacts to Calendars.
Turn on the checkbox next to “Sync Calendars with Outlook” (Windows) or “Sync iCal Calendars” (Mac). If you have multiple calendars—like for work, home, and school—select the ones you want to copy to your ‘Pad.
In the lower-right corner of the iTunes window, click the Apply button.
If your iPad doesn’t automatically start updating itself with your date book, choose File→Sync iPad. If you haven’t changed any calendar settings (like turning off the iCal sync) but want to update your appointments, you won’t see an Apply button; rather, you’ll see just the Sync button, and you can click that instead of going up to Menuville.
Tip
If you prefer to sync wirelessly, and you have a MobileMe or Microsoft Exchange account, you can update your MobileMe/Exchange calendar over the airwaves. Choose Settings→Mail, Contacts, Calendars and then tap MobileMe or Exchange. Tap the Calendars button to On to keep your calendar current across devices you configured to work with MobileMe or Exchange.
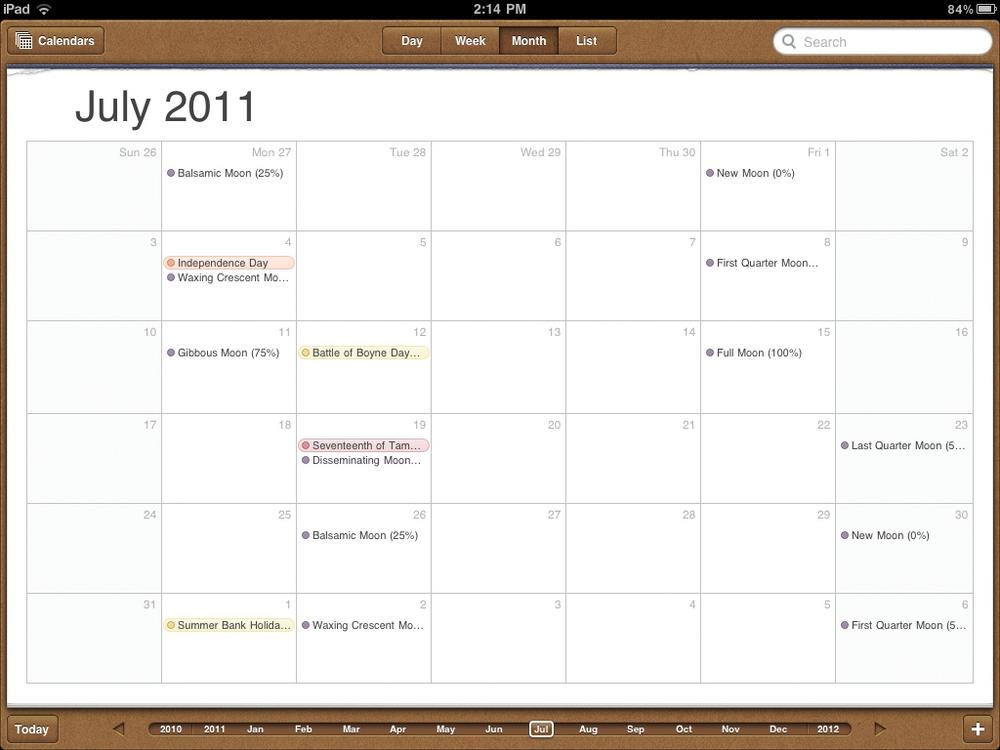
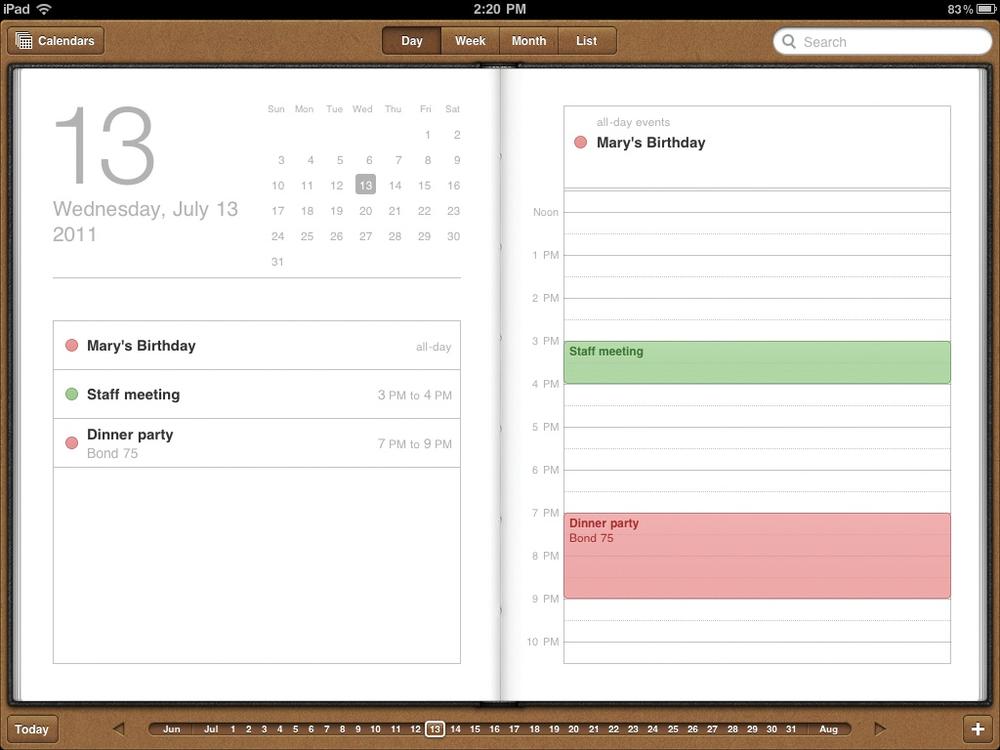
On the iPad, tap the Calendar icon on the Home screen to see your schedule unfold in glorious color. If you have multiple calendars, tap the Calendars button to select one and see its events—or you can consolidate your appointments into one uber-calendar. Use the search box to find specific events.
Along the top of the screen, tap List, Day, Week, or Month to see your schedule for the short or long term, color-coded by calendar type (home, work, school, and so on). Tap the Today button to see what’s in your immediate future. List view displays your scheduled events one after the other. No matter which view you choose, the iPad shows the year’s months in a bar below the calendar. Tap the triangles on either side of the bar to go forward or backward in time.
Use the iPad Calendar
The iPad isn’t a static version of your calendar. You can add events to and delete them from it and sync them back to your computer (or to your MobileMe or Exchange accounts). The iPad’s calendar also lets you subscribe to online calendars to keep you apprised of events on Web-based Google and Yahoo calendars—or even your favorite sports team’s schedule.
Add a Calendar Event
To punch in a new appointment or event, tap the ![]() button in the lower-right corner of the calendar screen. In the box
that pops up, fill in all the necessary information, like the name of the event, location,
and starting and ending times. (There’s also an All-Day option for those outdoor rock
festivals and softball tournaments.) Tap Alert to be reminded about an appointment in
advance—from five minutes to two days beforehand.
button in the lower-right corner of the calendar screen. In the box
that pops up, fill in all the necessary information, like the name of the event, location,
and starting and ending times. (There’s also an All-Day option for those outdoor rock
festivals and softball tournaments.) Tap Alert to be reminded about an appointment in
advance—from five minutes to two days beforehand.
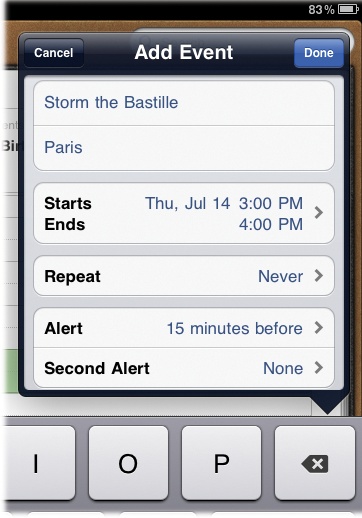
If you need a standing appointment, like a weekly banjo lesson or staff meeting, you have the option to repeat the event every day, every week, every other week, every month, or every year (like for your wedding anniversary or spouse’s birthday). There’s also a little Notes field in the Add Event box in case you need to remember some additional information about the appointment, like “Bring Q3 report” or “Take cat-allergy meds before leaving.”
Edit or Delete an Event
Schedules change, especially if you work in the high-powered corporate world or have teenage children—or both. To change the time of an event, find it on the calendar, tap the event, and then tap the Edit button. If you need to cancel an appointment completely, flick down to the bottom of the box and tap the red Delete Event button.
Set Up an iPad Alert
To make the iPad pipe up with a text and audio alert for a looming event, tap Settings→General→Sounds and flip Calendar Alerts to On. At the predetermined nag time, a reminder box flashes on-screen, accompanied by an R2-D2-like booping noise. If the iPad is off, the message appears when you turn it on, but the audio alert doesn’t play.
Subscribe to an Online Calendar
To see a shared calendar or one you subscribe to, add it to the iPad. If it’s a specific calendar on the Web, choose Settings→Mail, Contacts, Calendars→Add Account→Other. Select the Add CalDAV Account option (when you want to add a datebook like a Google calendar; see http://bit.ly/iYvA5 for instructions) or Add Subscribed Calendar. Enter the calendar’s URL and any other account information you need to subscribe, like your user name and password.
Want to instantly add customized online calendars for all sorts of topics, including religious holidays, schedules of your favorite sports teams, movie release dates, and more—right on your iPad? Crank up the Safari browser and visit iCalShare.com (http://icalshare.com). When you find a calendar you want to add to your iPad’s collection, tap the Subscribe to Calendar button on the page, and then confirm your decision in the box that pops up. The new calendar gets added to your subscription list, and you see its events on your schedule. Tap the Calendars button and select it to show (or hide) those dates.
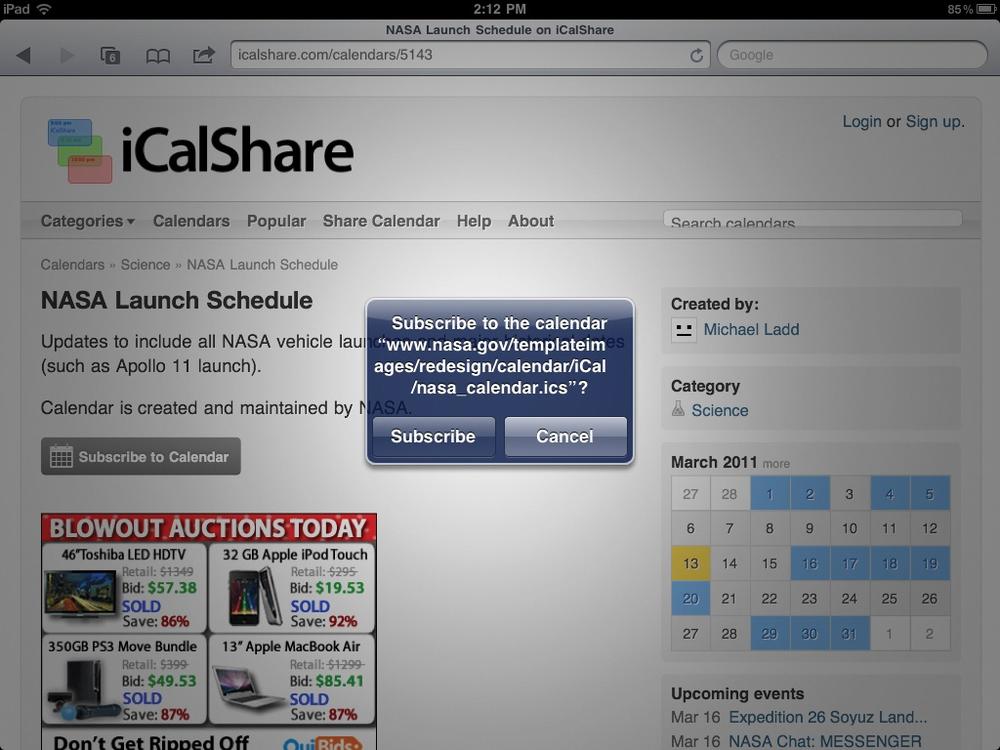
Calendars you add by subscription over the Internet are read-only, so you can’t add your own events to them. If you want to delete a calendar subscription, tap Settings→Mail, Contacts, Calendars. In the Accounts list, tap the name of the calendar and tap the red Delete Account button.
Tip
If you have an iPad calendar set up to sync with an Exchange account, you can respond to Outlook or Entourage meeting
invitations that your colleagues send you. When you get a new invite, it lands on the
scheduled date and time in your calendar with a dotted line around the event. You
respond to it by tapping it on the calendar or by tapping ![]() to see pending invites. Select the one you wish to reply to. Tap
Invitation From to get all the details, like who called the meeting and who else got
invited. When you get an invitation, you can tap Accept, Maybe, or Decline to send off
your RSVP. And if you get your meeting invitations by email instead, tap the Invite icon
attachment on the message to open it up and respond to the sender. If you accept, the
iPad adds the event to your calendar.
to see pending invites. Select the one you wish to reply to. Tap
Invitation From to get all the details, like who called the meeting and who else got
invited. When you get an invitation, you can tap Accept, Maybe, or Decline to send off
your RSVP. And if you get your meeting invitations by email instead, tap the Invite icon
attachment on the message to open it up and respond to the sender. If you accept, the
iPad adds the event to your calendar.
If you get a lot of meeting invitations and want to know as soon as they arrive, tap Settings→Mail, Contacts, Calendars. In the Calendars area of the screen, tap the On button next to New Invitation Alert.
Maintain Contacts
Putting a copy of your contacts file—also known as your electronic address book—on your iPad is quite easy, as long as you use up-to-date software. Windows users need to have their contacts stored in Outlook Express, Outlook 2003 or later, Windows Contacts, or the Windows Address Book (used by Outlook Express and some other email programs).
Mac folks need to use at least Mac OS X 10.5 and the Mac OS X Address Book, which Apple’s Mail program uses to stash addresses. You can also use Outlook 2011 or Entourage 2004 and later, but you first have to link before you sync: In Entourage, choose Preferences and click Sync Services. Then turn on the checkboxes for sharing contacts with Address Book. Outlook or Entourage share the info, and Address Book syncs it up.
To turn your iPad into a big glass address book, follow these steps:
Connect your iPad to your computer and click its icon when it shows up in iTunes’ Source list. (If you use Outlook or Outlook Express, launch that now, too.)
In the main part of the iTunes window, click the Info tab.
Windows owners: Turn on the checkbox next to “Sync Contacts with” and then use the drop-down menu to choose the program whose contacts you want to copy. Mac owners: Turn on the “Sync Address Book contacts” checkbox. If you want to sync contact groups, select them from the “Selected groups” box. You can also choose to import the photos in your contacts files.
Click the Apply button in the lower-right corner of the iTunes window.

The iPad updates itself with the contact information stored in your address book. If you add new contacts while you have your iPad plugged in, choose File→Update iPad or click the Sync button in iTunes to manually move the new data over to your tablet.
Tip
You can add contacts right on the iPad as well—tap the ![]() button at the bottom of the screen and type the person’s information
into the form. If you’re on a synced Exchange server, tap Settings→Mail, Contacts,
Calendars, tap your account name, and tap the Contacts button to On to pull new addresses
into the iPad over the air.
button at the bottom of the screen and type the person’s information
into the form. If you’re on a synced Exchange server, tap Settings→Mail, Contacts,
Calendars, tap your account name, and tap the Contacts button to On to pull new addresses
into the iPad over the air.
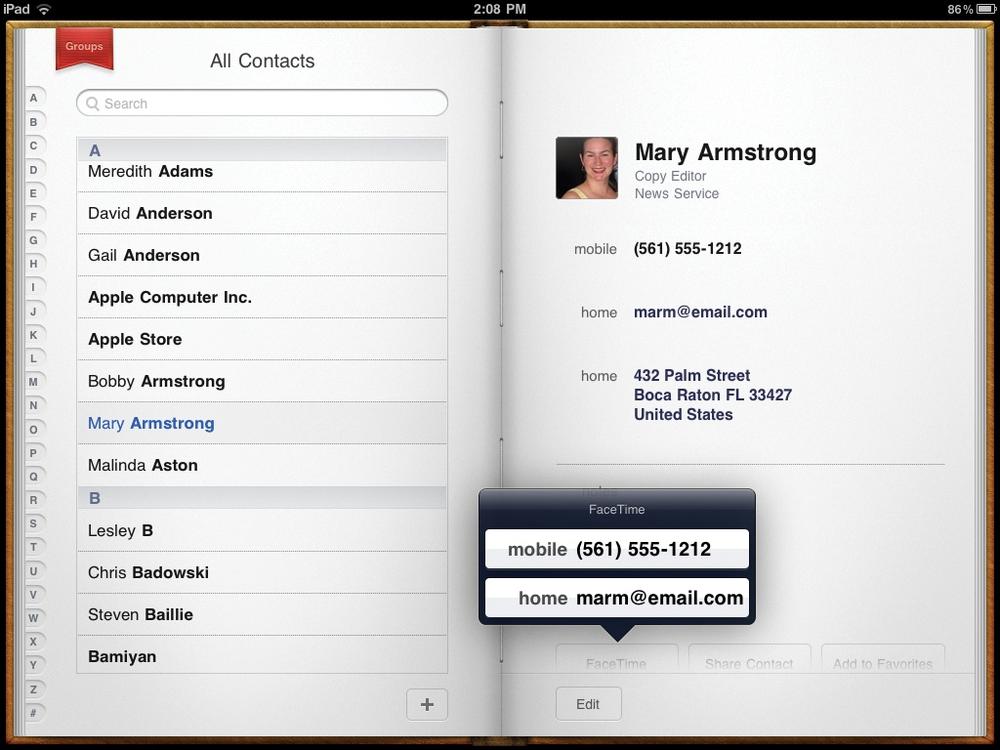
To look up a pal on the iPad, tap the Home screen’s Contacts icon. Use the search box or, on the Contacts list, flick to the person’s name on the left side of the screen (take a shortcut by tapping the letter tab on the outer edge). Tap the name to see the person’s details. Here are some of things you can do now:
Change the information. Need to update an address or change a phone number? Tap the Edit button at the bottom of the contact screen.
Add a photo. Pictures in your desktop contacts program should be here on the iPad. You can also add a picture to a contact from your iPad’s Photos app. Open the contact file, tap Edit, then tap Add Photo. Find the picture you want, then pinch and zoom to crop it to the right size.
Map an address. Tap an address to open the Maps app and see the location highlighted.
Send a message. Tap the person’s email address to open up a pre-addressed Mail message.
Pass along the information. Tap the Share Contact button on the contact’s page to attach the information as a .vcf file (the format most computer address books use) and attach it to a new message.
Start a FaceTime video call. Tap the FaceTime tab and then tap the phone number or email address your pal uses for FaceTime (Make Video Calls with FaceTime).
To delete a contact, whack it from your computer’s address book and the person will disappear from your iPad the next time you sync up. To delete a contact directly on the iPad, tap it open, tap Edit, and then tap Delete Contact.
Take Notes
Need a piece of virtual scratch paper to jot down a few thoughts? Have to type up a memo to email to colleagues, but don’t own the Pages app described in Chapter 10? Want to copy a recipe off a web page and save it for future reference, when you may not have online access? The iPad’s Notes program is here to serve. To get started, return to your Home screen and tap Notes. The program opens, and here’s where Apple’s designers got really creative.
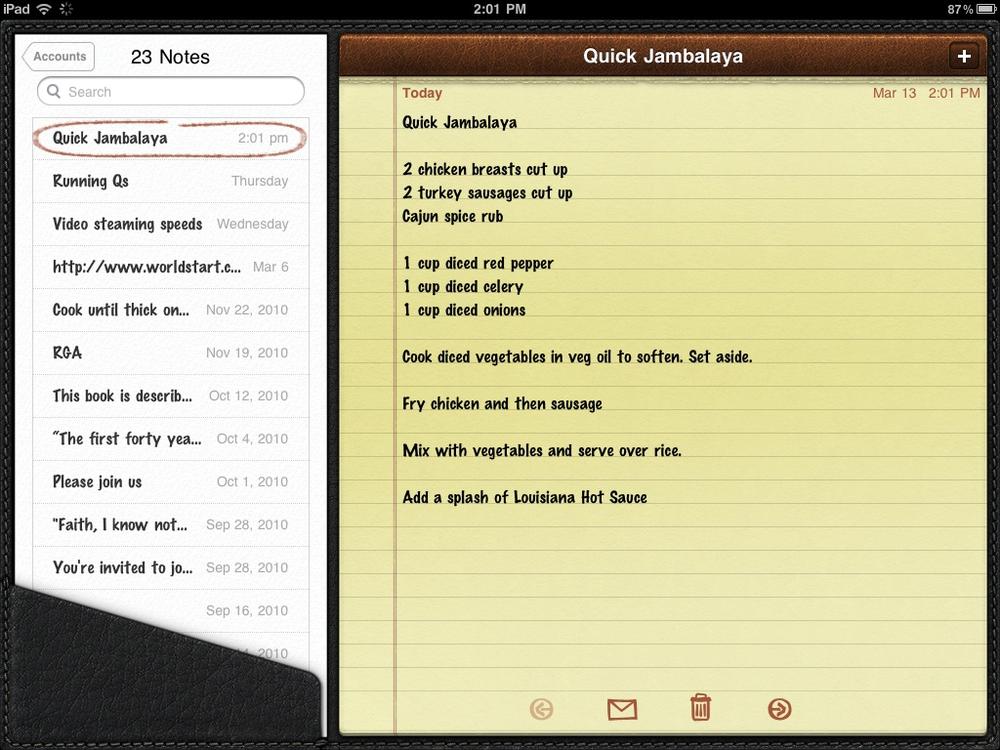
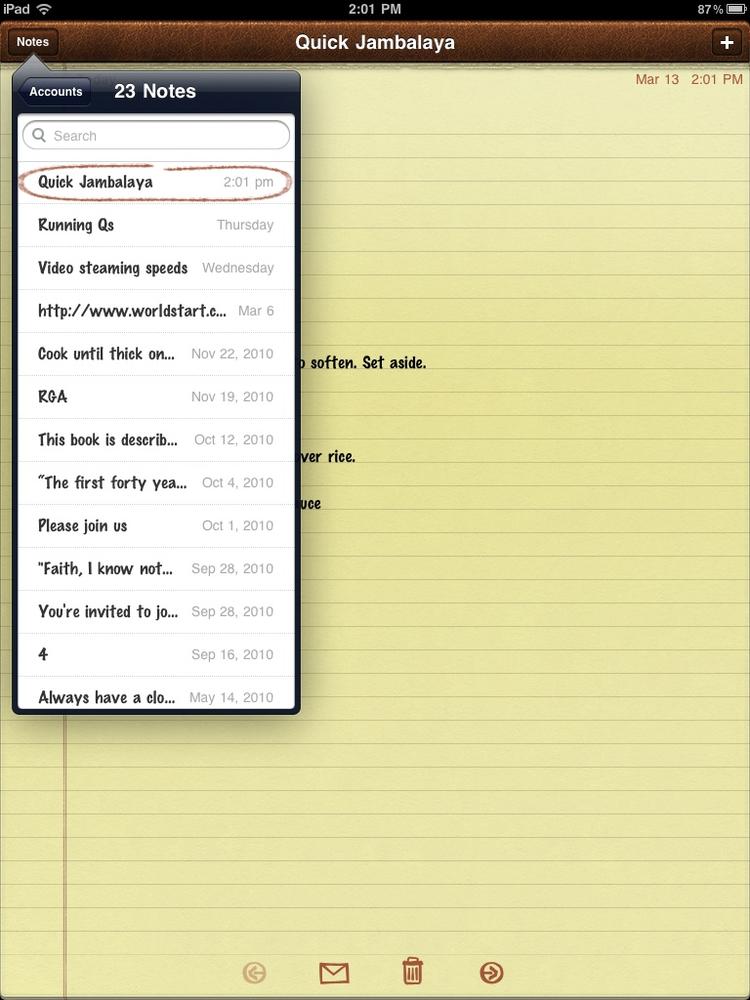
When you hold the iPad in portrait mode, it looks like one of those yellow lined pads of paper you used to scribble lecture notes in school. But hold the iPad in landscape mode, as shown above, and the yellow pad shrinks down to size and shares the screen with a virtual slip of index paper, all tucked inside a faux leather folio, the kind made to sit on top of your desk and look fancy. You can even see stitches in the digital leather.
Tip
Although it’s hard to change your own handwriting in a real pen-and-paper situation, the iPad’s Notes program gives you a choice of three fonts to hold your thoughts. To see your options or to change the current font, go to the Home screen and tap Settings→Notes. Here, you can choose from Chalkboard, Helvetica, and a font called Market Felt, which was the jaunty original (and, at that time, only) typeface Notes used.
When you hold the iPad in portrait mode, you can see the same index of all your stored notes by tapping the Notes button in the upper-right corner of the screen. Tap any entry in the list to jump to that particular note and open it so you can read it—or add more text to it. All of the Cut | Copy | Paste | Replace functions described back in Chapter 2 work in Notes, so you can paste in gobs of text you copy from web pages and elsewhere. You can’t, however, paste picture files—you just get a string of text with the image file’s name and location.
To start a new note, tap the ![]() icon in the upper-right corner to generate a blank sheet of “paper.”
Tap the yellow Note itself to summon the iPad’s keyboard for a little good-old-fashioned
text entry. You can sync notes to and from a MobileMe or Windows Outlook account, too (see
Sync Info).
icon in the upper-right corner to generate a blank sheet of “paper.”
Tap the yellow Note itself to summon the iPad’s keyboard for a little good-old-fashioned
text entry. You can sync notes to and from a MobileMe or Windows Outlook account, too (see
Sync Info).
If you’re looking for a certain word or words, type them into the search box to call up
a list of all the notes where the words appear. To flip forward or backward through your
collected notes, tap the arrow keys at the bottom of the screen. You can even email the
contents of a note by tapping the ![]() icon down below. (Hey, it costs the price of a stamp to do that with a
paper note nowadays, so you just saved a little cash.)
icon down below. (Hey, it costs the price of a stamp to do that with a
paper note nowadays, so you just saved a little cash.)
Use the Camera for Photos and Videos
The second-generation iPad arrived in March 2011 sporting a feature many had hoped for and wanted: cameras on the front and back. This one-two camera punch gives new iPad owners the same hardware iPhone and iPod Touch folks have for FaceTime video calls, shooting movies, and snapping photos.
With its huge slab screen, the iPad is probably one of the more unwieldy point-and-shoot cameras out there, but it’s not exactly bursting with megapixels. While the rear camera can shoot 720p high-definition video at 30 frames per second, still photos from the rear camera have a resolution of just 1280 x 720 pixels (an average digicam has a resolution of about 1600 x 1200 pixels). And while the front camera’s VGA quality—640 x 480 pixels—is fine for online video chats, your regular digital camera shouldn’t feel threatened.
Taking Still Photos
To shoot a digital photo, make sure you set the little slider in the bottom-right
corner to ![]() (still camera). Line up your shot and press the shutter button
(
(still camera). Line up your shot and press the shutter button
(![]() ). Your newly snapped picture ends up in Photos→Camera Roll. A preview
of the last shot you snapped also appears in the bottom-left corner of the screen; tap it
to jump right to the photo in the Camera Roll album.
). Your newly snapped picture ends up in Photos→Camera Roll. A preview
of the last shot you snapped also appears in the bottom-left corner of the screen; tap it
to jump right to the photo in the Camera Roll album.
The iPad cameras offer a few controls for better photos:
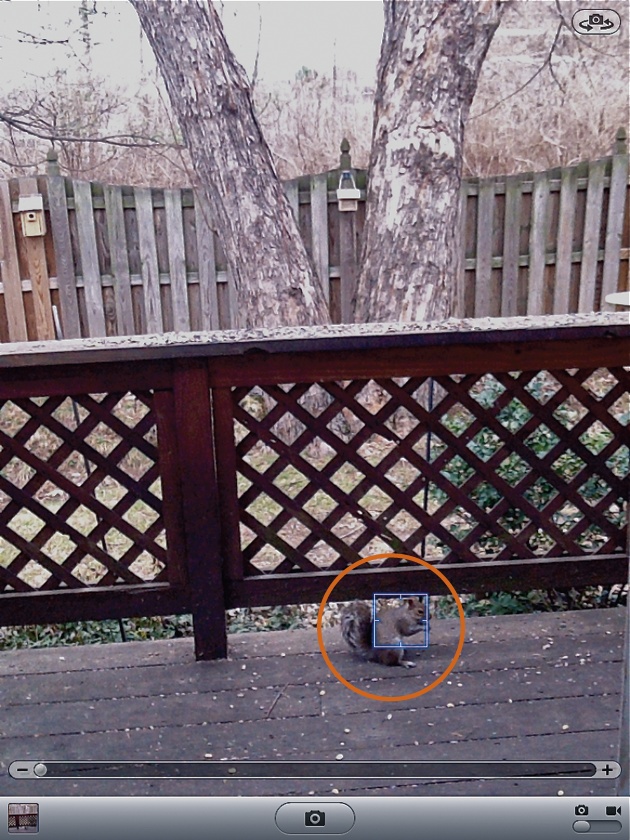
Exposure adjustment. Lighting is an important part of photography, and while the iPad doesn’t have a flash, it does let you adjust the exposure (the overall lightness or darkness) of an image. If you have a shot lined up, but one part of the frame is cast in shadows, tap a lighter area of the image. A blue-white square (right) appears briefly and the iPad’s camera adjusts its exposure settings based on that area. Now you can snap the pic.
Zoom. Tapping the screen to readjust the photo’s exposure also brings up the zoom slider (right). If you want to narrow in on your subject and lose distracting background elements, tap the screen and drag the slider to the right until you have the framing you want. Drag the slider the other way to zoom back out.
To change cameras and take a self-portrait with the front camera, tap the Switch Cameras icon (![]() ) in the upper-right corner of the photo screen.
) in the upper-right corner of the photo screen.
Shooting Videos
To shoot a video, tap the Camera icon on the iPad’s Home screen and nudge the slider
over to ![]() . When you’re ready to start filming, tap the
. When you’re ready to start filming, tap the ![]() button. It flashes red to indicate that you’re recording. The time
stamp in the upper-right corner of the screen shows the current length of your
video-in-progress. The tiny microphone on the back of the iPad records the audio. When
you’re ready to virtually yell “Cut!”, tap the
button. It flashes red to indicate that you’re recording. The time
stamp in the upper-right corner of the screen shows the current length of your
video-in-progress. The tiny microphone on the back of the iPad records the audio. When
you’re ready to virtually yell “Cut!”, tap the ![]() button again to stop recording.
button again to stop recording.
Like the still camera, you can tap an area of the screen to adjust the exposure, but there’s no zoom feature for video. You can hold the iPad vertically or horizontally to shoot video, but portrait-shot clips may get letterboxed if you upload them to a site that displays video in the horizontal orientation.
Share and Upload Photos and Videos
Now that you’ve taken all these great photos and videos, don’t you want to share them? You can do that in several ways:
Email. Tap Photos→Camera Roll to see your photos and videos; if you have the Camera app open onscreen, tap the thumbnail preview icon in the toolbar to jump to your collection. Next, hit the
 button, tap the thumbnails of the photos and videos you want to
send, and then tap Email. A Mail message appears with your files attached, ready for
you to address and send. The Copy option lets you copy and paste the file into a
message you’ve already started. (You can also use the button to select files for deletion out of the Camera
Roll.)
button, tap the thumbnails of the photos and videos you want to
send, and then tap Email. A Mail message appears with your files attached, ready for
you to address and send. The Copy option lets you copy and paste the file into a
message you’ve already started. (You can also use the button to select files for deletion out of the Camera
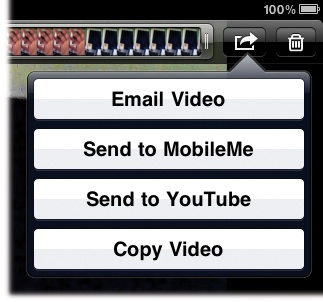
Roll.)Upload to YouTube or MobileMe. With a video clip open onscreen, tap the
button and select Send to YouTube or Send to MobileMe.Transfer to the computer. Connect your iPad to your PC or Mac and use the Import command in your photo-organizer program (like Adobe Photoshop Elements or iPhoto) to copy over photos and videos. Once you have the files on your computer, you can post them online.
Want to polish your work before sharing? Consider an iPad video-editing app (Edit Videos on the iPad) or photo-editing app (Edit Photos on the iPad).
Make Video Calls with FaceTime
Since the early days of science-fiction movies and TV shows, the videophone has been a staple of fantasy communication. Cheap webcams and teleconferencing systems made the fantasy real, but they’re so last year. For modern convenience, the iPad makes and takes video calls thanks to FaceTime, its built-in mobile video-chat app. It’s like a real-time talking picture frame.
To use FaceTime, you need an Apple ID (Chapter 7) and a WiFi connection (sorry, no 3G). You also need folks to talk to, namely people running around with fourth-generation iPhones or iPod Touches, fellow second-generation iPad owners, or folks with Apple’s FaceTime program for Mac OS X.
Once you have all that, getting started with FaceTime is easy:
Tap the FaceTime icon on the Home screen and sign in with your Apple ID. If you don’t have an Apple ID, see Set Up an iTunes/App Store Account for how to get one. You can also use a different email address for your FaceTime login.
Once you have your account set up, tap Home→FaceTime and tap the Contacts icon at the bottom of the screen. In the Contacts list, tap the name of the person you want to call, and then tap the iPhone number or email address they use for their own FaceTime accounts. (No contacts? See Maintain Contacts to get some and for another way to start a FaceTime call.)
When your buddy picks up the call, prop up your iPad so they can see you and start chatting. You see them, too. If the little picture-in-picture window of your face is in the way, use your finger to drag it around.

If you need to temporarily turn off the sound during a call (like when the baby starts
screaming), tap the Mute icon (![]() ) in the screen’s bottom-left corner.
) in the screen’s bottom-left corner.
Want to show your friend what you’re seeing without physically flipping the iPad around?
Tap the ![]() icon ion the right side of the toolbar to switch to the iPad’s rear
camera. Tap the icon again to return the view to you.
icon ion the right side of the toolbar to switch to the iPad’s rear
camera. Tap the icon again to return the view to you.
Take Portraits with Photo Booth
Remember those old-fashioned instant-portrait kiosks that can still be found in arcades or along the boardwalk? You know, the kind where you get a strip of four black-and-white shots for a buck, and you and your pals all cram together to make goofy faces for the camera? The second-generation iPad can do the same thing, but better—the pictures are free and in color. Meet Photo Booth.
Like its predecessor (part of Mac OS X for years), Photo Booth is a simple app for
taking your own picture, say, if you need a quick headshot for your Facebook page. You can
use Photo Booth with the rear camera as well; just tap the ![]() icon to switch back and forth between cameras. But for loads more fun,
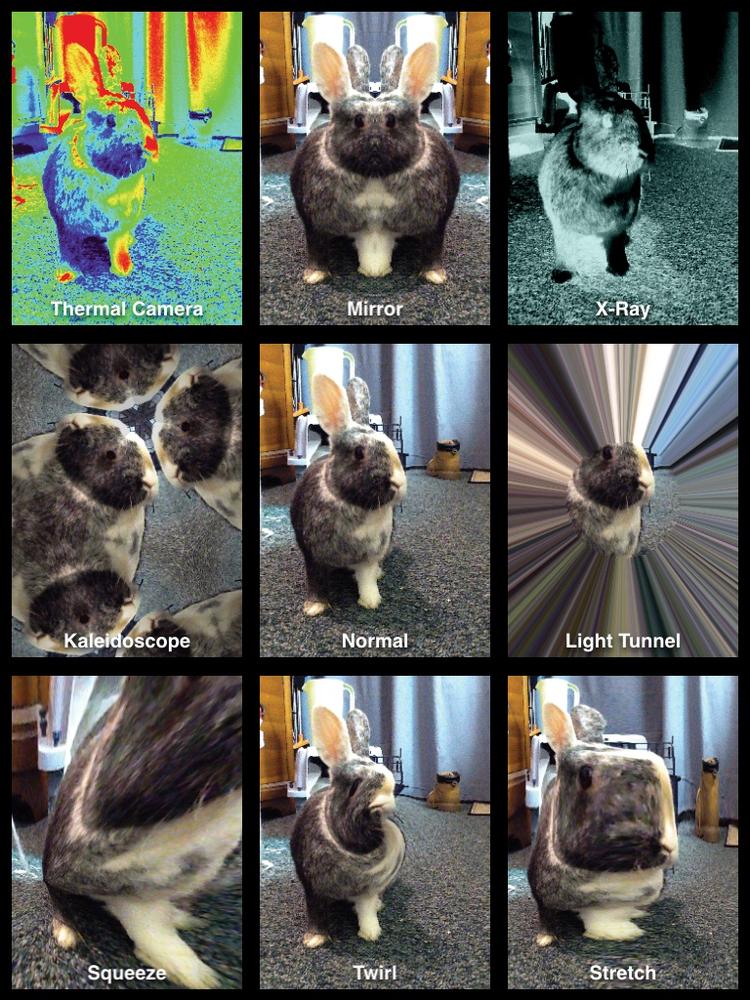
you can also add one of eight special effects to your photo, including several
funhouse-mirror style distortions, a thermal camera simulation, or even a creepy faux x-ray
filter.
icon to switch back and forth between cameras. But for loads more fun,
you can also add one of eight special effects to your photo, including several
funhouse-mirror style distortions, a thermal camera simulation, or even a creepy faux x-ray
filter.
Here’s how to get going with Photo Booth:
Tap the Photo Booth icon on the iPad’s Home screen.
You can take a regular photo, or you can pick a special effect. Tap the
 icon to see a preview of all the effects. Tap the one you want to
use. (If you pick one of the funky funhouse-mirror distortions, you can distort it
further by dragging your finger around on the screen.)
icon to see a preview of all the effects. Tap the one you want to
use. (If you pick one of the funky funhouse-mirror distortions, you can distort it
further by dragging your finger around on the screen.)

A small thumbnail version of your photo slides into the photo tray underneath the mail
screen. Tap the photo to see it full-size. Tap the ![]() button to email or copy the image. To delete a photo from Photo Booth,
tap its thumbnail in the photo tray. Then tap the
button to email or copy the image. To delete a photo from Photo Booth,
tap its thumbnail in the photo tray. Then tap the ![]() button in the corner of the thumbnail image and tap Delete
Photo.
button in the corner of the thumbnail image and tap Delete
Photo.
Copies of your Photo Booth pictures are also saved to Photos→Camera Roll, so you can share the pictures from there, too (Email and Print Photos).
Watch YouTube Clips
YouTube, which started in 2005, has become the spot to share and see video from around the world. While YouTube videos on the Web usually come in the Flash format, a technology foreign to the iPad, Apple convinced the site to re-encode its millions of videos into H.264 format, a much higher-quality rendering than Flash—and one you can play via the iPad’s YouTube app. Here’s how.
Find Videos on YouTube
The iPad is full of entertainment options, and its YouTube app is no exception. Tap the YouTube icon on the Home screen to see:
Featured. This list highlights videos that folks on the YouTube team think are interesting or worth your while to watch. Tap a thumbnail to see ‘em.
Top Rated. When someone watches a video on YouTube, they can give it a thumbs-up (“Like”) or a thumbs-down (“Dislike”) rating to reflect their opinion of the clip (this binary system replaced the old one- to five-star ratings). Tap here to see videos with the most upward thumbs.
Most Viewed. If you constantly get emailed the same videos, odds are they’re on this list. Tap the Today, This Week, or All (as in “of all time”) tabs to see. When you get to the end of the list, tap “Load 25 More” to load up the next set of vids.
Favorites. If you have a YouTube account (it’s free, and it also means you can upload your own clips), you can mark videos as your faves so you can find them easily in your Favorites list.
Subscriptions. Many organizations and celebrities have their own YouTube “channels” that you can subscribe to. Once you sign up, tap here to see the latest video dispatches from Oprah or the Queen of England.
My Videos. Tap here to see a list of the clips you’ve uploaded to YouTube (you need to be logged into your YouTube account to do so).
History. Like a web browser, the YouTube app keeps track of what you’ve looked at. Also like a browser: Tap the Clear button to wipe out the evidence that you checked out those skateboarding dogs videos again.
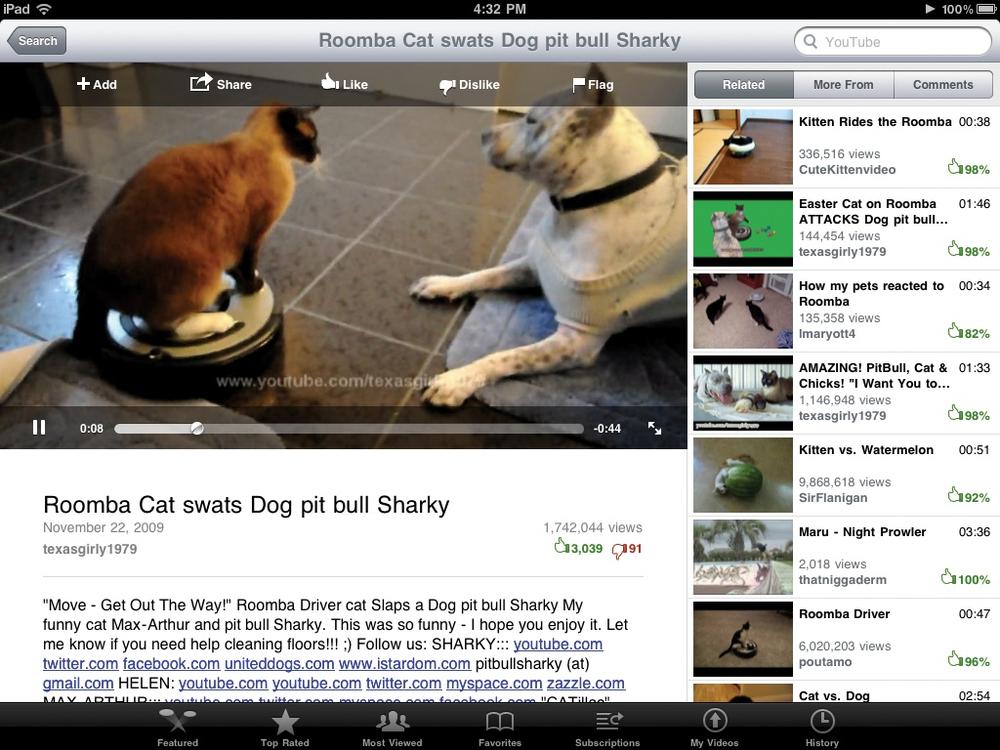
There’s also a search box in the upper right corner to seek out videos by keywords. Tap any video thumbnail to open a Details screen for that video, featuring a description, date, category name, keywords, the contributor’s name, length, number of views, links to related videos, and so on.
That same Details screen offers an Add button (![]() ) so you can add the video to your list of favorites. Tap the Share
button (
) so you can add the video to your list of favorites. Tap the Share
button (![]() ) to send a link to the clip by email. You can also Like, Dislike, and
“Flag as Inappropriate” selected videos.
) to send a link to the clip by email. You can also Like, Dislike, and
“Flag as Inappropriate” selected videos.
Control the Playback of YouTube Videos
To play a video, tap its thumbnail. You can watch it in portrait or landscape mode.
Tap the ![]() button to expand the clip to the screen’s width.
button to expand the clip to the screen’s width.
The standard playback controls (![]() ,
, ![]() ,
, ![]() , the volume slider, and the progress bar that lets you jump around in
the timeline) appear when the clip starts playing. After a few seconds, the controls
disappear and get out of the way, so they don’t block the picture. Tap the screen once to
make them reappear (or disappear again).
, the volume slider, and the progress bar that lets you jump around in
the timeline) appear when the clip starts playing. After a few seconds, the controls
disappear and get out of the way, so they don’t block the picture. Tap the screen once to
make them reappear (or disappear again).
YouTube videos can have black bars on the sides of the playback screen. To see a video
full-screen, tap the ![]() button in the top-right corner or double-tap the screen itself. To
beam the clip to your Apple TV with AirPlay, tap the
button in the top-right corner or double-tap the screen itself. To
beam the clip to your Apple TV with AirPlay, tap the ![]() icon. You can also watch YouTube on your TV with a cable connection
(Play iPad Videos on Your TV). Tap the
icon. You can also watch YouTube on your TV with a cable connection
(Play iPad Videos on Your TV). Tap the ![]() button in the top-left corner when you finish watching.
button in the top-left corner when you finish watching.
YouTube in the iPad’s full-screen mode offers two other icons on the control bar: On
the left side, the ![]() button, quickly adds the clip on screen to your YouTube Favorites
list. Tap the icon on the right, the
button, quickly adds the clip on screen to your YouTube Favorites
list. Tap the icon on the right, the ![]() button, to shrink the video down from the full-screen mode so you can
see its Details page.
button, to shrink the video down from the full-screen mode so you can
see its Details page.
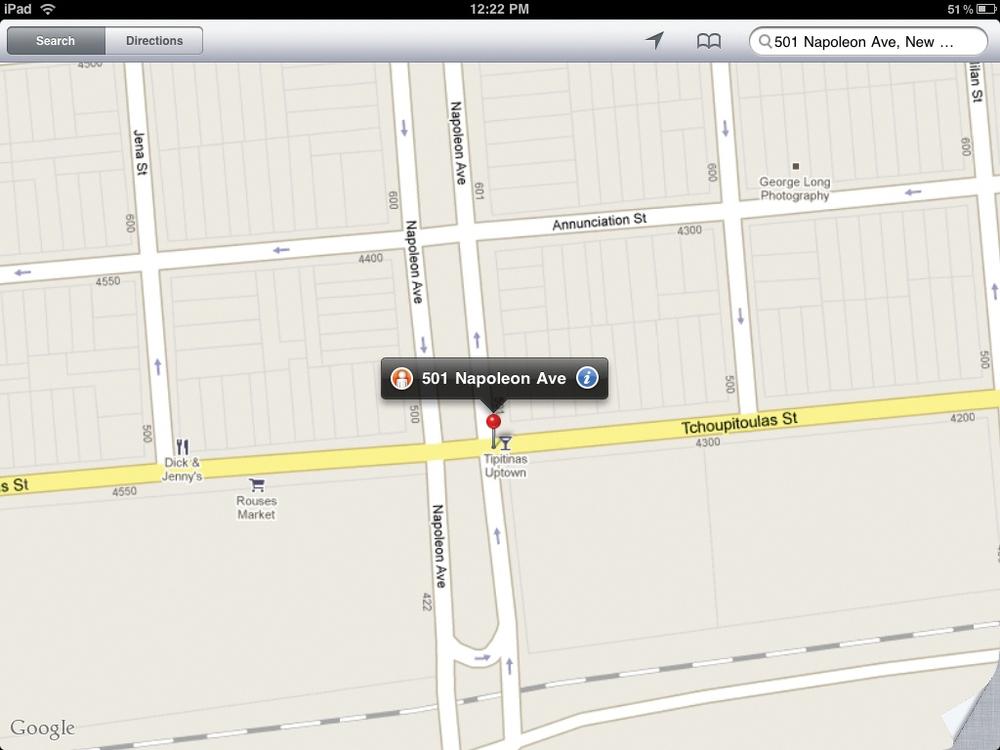
Find Your Way with Maps
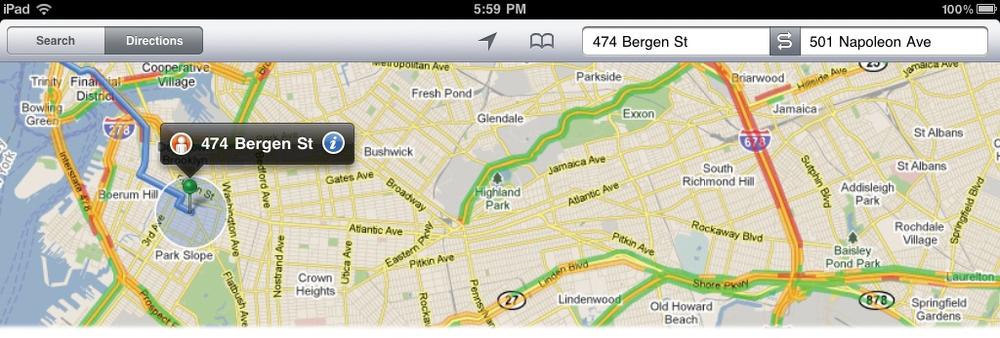
The iPad’s Maps app makes you forget all about those folded paper roadmaps that always end up stained and crumpled in the back seat of the car. Tap open the Maps app on the Home screen. Type any address into the Maps app—and you instantly see it on the screen, its location marked with a virtual red pin. All your usual iPad finger moves work on the maps, so you can zoom, scroll, pinch, and flick your way around the world.
Like Safari, though, Maps needs an Internet connection to pull its data down from the Web, so it’s not the best thing in the world for emergency directions when you’re lost in a bad part of town with only a Wi-Fi iPad. (If you ponied up the big bucks for a Wi-Fi + 3G model, you don’t have to worry about lack of an Internet connection, but you may still have to worry about getting mugged.)
To plot your course, tap the Maps icon on the Home screen. Here are some of the things you can do with Maps and a network connection:
Find an address. Tap the Search button. In the Address box at the top of the screen, type in an address—or tap the
 icon to call up your bookmarks list. Here, you can tap places
you’ve previously marked, see your recent locations, or map an address from your
contacts list. When the red pushpin drop onto the map, tap your
icon to call up your bookmarks list. Here, you can tap places
you’ve previously marked, see your recent locations, or map an address from your
contacts list. When the red pushpin drop onto the map, tap your  in the bar above it to get an info box for that address, like the
one shown on the next page.
in the bar above it to get an info box for that address, like the
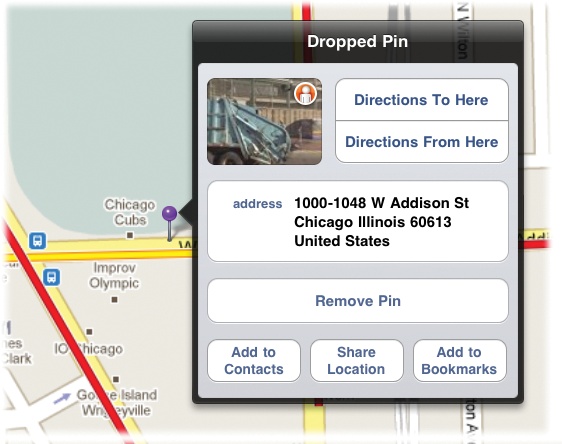
one shown on the next page.Mark the spot. Press and hold any spot on the map to drop a marker pin on it. If you miss slightly, press and drag the pin to the right address. Tap
to see the full address, get directions (to or from there), or
remove the pin. You can also add the location to your contacts or bookmarked places, or
share the address by email—very handy when you set up a group dinner at a new
restaurant. If the pin’s infobar has an  icon, tap it to see a photo of the location from Google Street
View that you can zoom, pan, and rotate 360 degrees; tap the map inset in
the bottom-right corner to go back to the regular view. You can plant a pin the long way
by tapping the bottom-right corner of the screen (where it looks like the map is peeling
away), tapping the Drop Pin button, and then dragging the pin around the map to the
right location. And you can mark your current location by tapping the
icon, tap it to see a photo of the location from Google Street
View that you can zoom, pan, and rotate 360 degrees; tap the map inset in
the bottom-right corner to go back to the regular view. You can plant a pin the long way
by tapping the bottom-right corner of the screen (where it looks like the map is peeling
away), tapping the Drop Pin button, and then dragging the pin around the map to the
right location. And you can mark your current location by tapping the  icon in the menu bar.
Pick a view. The Maps app doesn’t skimp on the scenery. Tap the bottom-right corner to see your available map styles: Classic (traditional cartography), Satellite (a high-quality photo from a camera high in the sky), Hybrid (street names overlaid on the streets’ photo), and Terrain (shaded elevations of the area). Tap Show Traffic if you want to see current road congestion and maybe take that antacid before you leave the house.

Note
Ever wonder what those green, yellow, and red lines actually mean when you look at a map of traffic conditions? The color-coding is all about the need for speed—or the lack of it. Green means traffic is moving at a rate of 50 miles an hour or more, and yellow means slower going, at 25 to 50 m.p.h. Red means traffic is creeping along at less than 25 m.p.h., so you may find some very crabby cabbies out there.
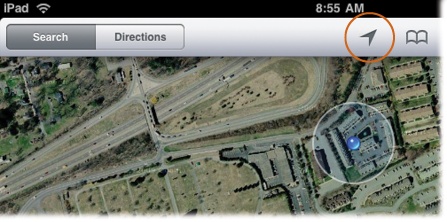
Locate Your Position Using GPS
Ever look at a map and wonder exactly where you are in relation to the place you’re trying to get to? Unless that map has one of those You Are Here arrows, you usually have to guess—but not if you have an iPad.
Just make sure you have an Internet connection and your Location Services turned on
(WiFi), too. Then tap the Current Location icon (![]() ) at the top of the Maps screen. The iPad drops a blue dot on the map to
mark your position to within a few hundred yards. While the Wi-Fi iPad doesn’t have a
GPS chip inside it like the 3G ’Pad does, it does have software that calculates
your position based on a big database of Wi-Fi hot spots and cell towers.
) at the top of the Maps screen. The iPad drops a blue dot on the map to
mark your position to within a few hundred yards. While the Wi-Fi iPad doesn’t have a
GPS chip inside it like the 3G ’Pad does, it does have software that calculates
your position based on a big database of Wi-Fi hot spots and cell towers.
You can even combine the ability to instantly find your current location with getting
directions to someplace else. Just tap the Directions button at the top of the screen.
Unless you’re offline, the iPad usually starts with your current location in the first box.
In the second box, type in a destination address or tap the ![]() button to get to your contact addresses. Once it has the starting and
ending points of your journey, the iPad pops up a blue bar offering driving, mass transit,
or walking directions (see the next page for more on getting directions).
button to get to your contact addresses. Once it has the starting and
ending points of your journey, the iPad pops up a blue bar offering driving, mass transit,
or walking directions (see the next page for more on getting directions).
If you want to use your current position and navigate your way Boy Scout-style, the iPad
includes a built-in digital compass. To use it, tap the Current Location icon once to get
your position, and then tap it again to activate the digital compass, which appears on the
iPad screen. To rotate the compass-point north, hold the iPad parallel to the ground. To get
back to regular map view, tap the Compass icon (![]() ) in the toolbar.
) in the toolbar.

If a message with a ![]() symbol appears on the screen as shown here, you need to calibrate the
compass, which is normal the first time you use it. Firmly grip the iPad and wave it in an
“air Figure 8” pattern to fine-tune its sense of direction.
symbol appears on the screen as shown here, you need to calibrate the
compass, which is normal the first time you use it. Firmly grip the iPad and wave it in an
“air Figure 8” pattern to fine-tune its sense of direction.
Get Directions on the Map
Need to find your way from Point A to Point B, or at least from Albany to Boston? To map
your route, tap the Directions button at the top of the screen. A two-field box appears. If
you don’t want to use your current location, tap the ![]() in the Start box and type in a point of origin. In the End box, type in
the destination address or tap the
in the Start box and type in a point of origin. In the End box, type in
the destination address or tap the ![]() icon and choose one from your list of bookmarked sites, recent visits,
or contacts.
icon and choose one from your list of bookmarked sites, recent visits,
or contacts.

Once the iPad gets the starting and ending points, it calculates how to get there by
car, mass transit (like train or bus), or foot. Tap the car, bus, or walking-person icon to
get a set of step-by-step directions. If you’re in the middle of nowhere, driving directions
may be all you see here. (If you need to reverse the starting and ending points of the trip,
tap the ![]() icon.)
icon.)
The iPad delivers your directions in the blue bar. Tap the Start button to get going. You can see each step of your journey in one of two ways:
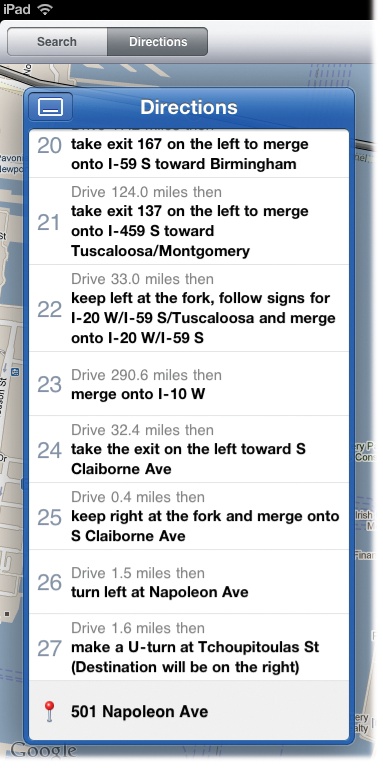

Unless you chose the mass-transit directions, you also get an approximate travel time for the trip. (If you did ask for mass-transit directions, tap the clock icon to get a list of transit schedules.) If you have an Internet connection as you go, the route can also update current traffic conditions.
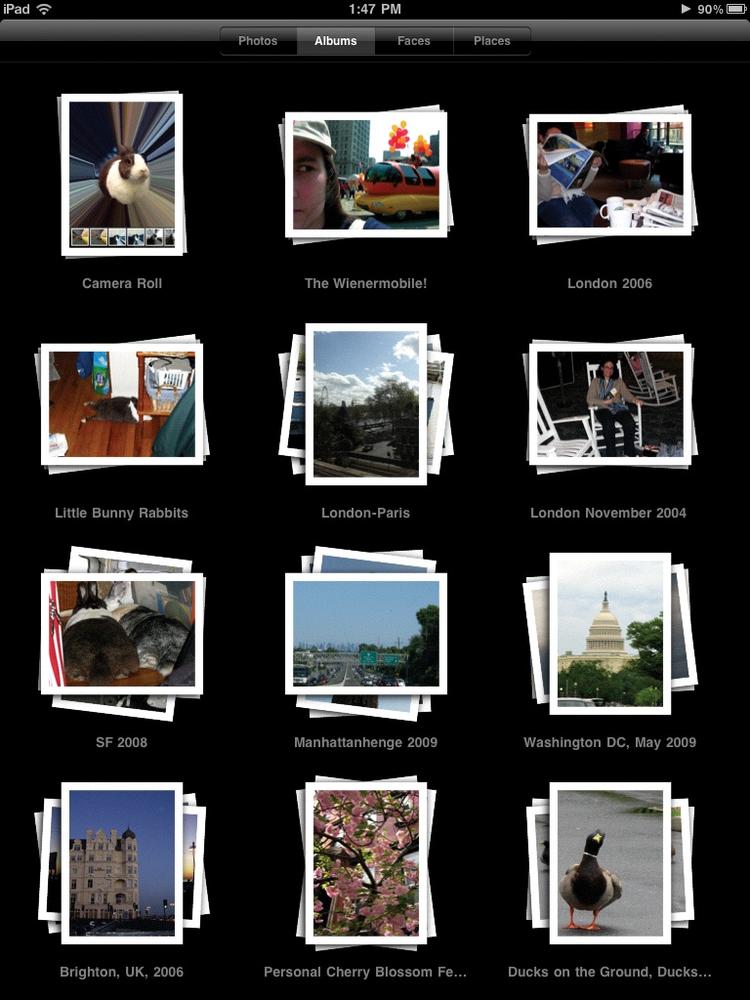
View Photos
All the photos you sync to the iPad from your computer, take with the iPad’s camera, save from email messages, web pages, and iPad screenshots (see the Tip on Tip), all live in the Photos app. Tap the Photos app icon (represented by a happy sunflower) to open it up and see what’s there.
After you get some photos on the iPad, this app takes care of the sorting for you. You’ll find photos that were in albums on your computer in same-named albums on your iPad. You can also see all your pictures in a loose collection by tapping the Photos button at the top of the screen.
Tap any photo thumbnail to open an album or the photo itself to full-screen size. Chapter 15 has all the information about getting pictures on your iPad, showing them off, making slideshows, and more. So if you’re a photography enthusiast and want flip ahead right now, this chapter understands.
Watch Videos
Tap the Videos icon to find all the movies, TV shows, video podcasts, and music videos you have on your iPad. If you use the iPad’s Home Sharing feature (Use iTunes Home Sharing on Your iPad), you can also check out the iTunes libraries of the computers in your Home Sharing network, too; look under the Shared tab.
If you don’t have any stuff yet, you can get video content in a couple of ways—download it directly to the iPad from the iTunes Store (Chapter 11) or sync compatible clips from your computer to your iPad (Chapter 14). And for the record, the Videos app is where your downloaded content lives; the YouTube app (mentioned earlier in this chapter) is for streaming cool clips from YouTube’s perch on the Internet. Videos you shoot on the iPad land in Photos→Camera Roll, though, as Shooting Videos explains.
Once you have videos, tap Home→Videos. The iPad sorts your collection by type: movies, TV shows, podcasts, and music videos. Tap an icon to play the video. In the case of TV shows, where you may have multiple episodes, tap the show’s icon and, on the following screen, tap the episode you want to see.
The iPad’s high-resolution screen shows off high-quality video files quite nicely. With a folding case or an extra pillow propped up on your stomach, you have a whole new way to watch TV in bed now—without having to dig around under the blankets for the remote control.

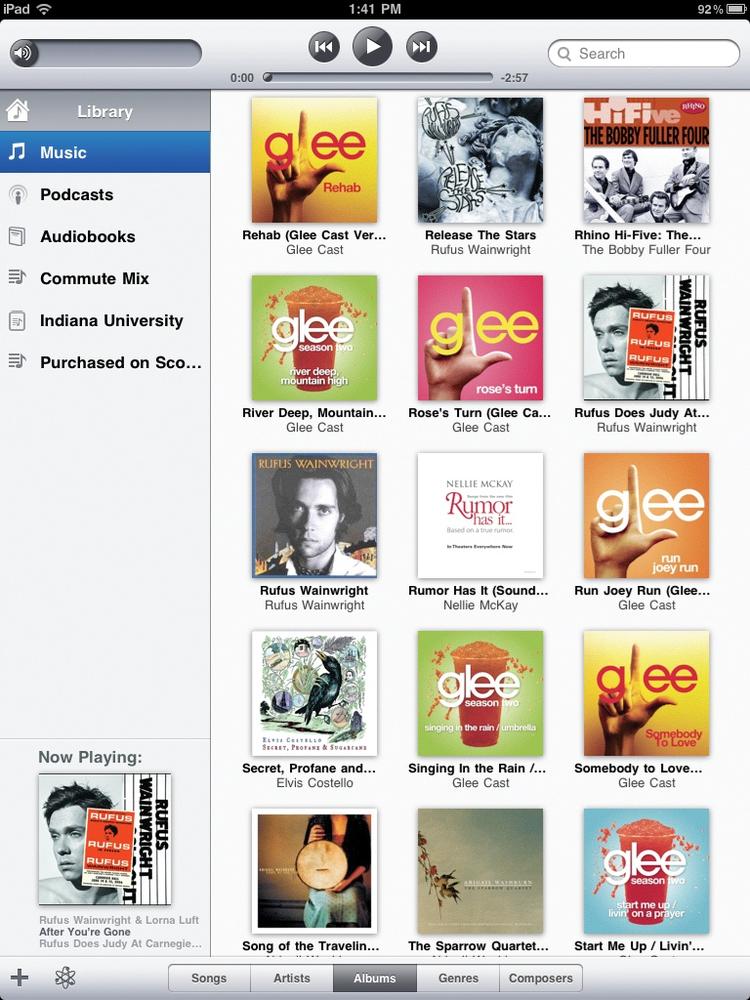
Use the iPad as an iPod
The original boxy white-and-chrome iPod from 2001 is one of Apple’s greatest success stories, and its legacy lives on with the iPad. To listen to music or see what tunes you have on your tablet, tap the orange-and-white iPod icon on the iPad’s Home screen.
The iPad’s iPod is an elegantly designed and organized app, made to help you find your music quickly, sorted by songs, artists, albums, genres, or composers. The items in your library (music, spoken-word podcasts, audiobooks, and custom-made playlists) appear in a neat vertical list along the left side of the screen, all awaiting your tap. If you’re tapping into your computer’s iTunes library with the iPad’s Home Sharing feature (Use iTunes Home Sharing on Your iPad), you see a gray Library bar at the top of the left column; tap it to get the goods.
If this all sounds perfectly fine but you don’t actually have any music loaded or shared on your iPad, take a stroll to Chapter 13 for further instructions. You can also download music directly to your iPad, right from the iTunes Store, as the next page explains.
Shop iTunes and the App Store
The purple iTunes icon and the blue App Store icon on the Home Screen are all about shopping. Some people will find this very exciting, the chance to buy fresh new things directly on the iPad, with no cables, cars, or crankiness involved. All you need is a live Internet connection and a working credit-card number.
For much more on the iTunes Store—where you can buy music, audiobooks, movies, TV shows, and download free audio and video podcasts—take a stroll to Chapter 11.
If apps are your thing and you want to find new programs to run on your iPad, you don’t have as far to go. Just turn the page to leave this chapter and move on to Chapter 7, which is all about the App Store.
Note
“Hey,” you say, “there’s another icon on the Home screen that wasn’t mentioned! What about Settings?” Settings is a collection of iPad set-up screens, and it gets an entire index all to itself. See Appendix A if you just can’t wait.