
Chapter 7. Shop the App Store
In the beginning—2003 to be exact—there was the iTunes Music Store. Apple’s perfectly legal online emporium sold songs for 99 cents a pop and quickly became a hit itself. The premise and the promise were simple: inexpensive entertainment you could instantly download and use. Just a few years later, the renamed iTunes Store added (and still sells) TV shows, movies, and simple arcade-style video games for iPods. And then in 2008, Apple added the App Store for iPhone and iPod Touch programs.
The App Store is where you download apps, or programs, that run on your iPhone, iPod Touch, and now, iPad. You can find thousands of apps, including foreign-language tutors, e-newspapers, restaurant guides, hurricane trackers, tiny word processors, and sophisticated handheld videogames, in the App Store, with developers writing new programs every week. It’s a hugely popular part of the Apple empire, with more than 10 billion apps downloaded as of January 2011.
With the iPad out for more than a year now, you can choose from more apps than ever—of the 350,000 apps that work on iOS devices, more than 60,000 were written just for the tablet. This chapter shows you how to get shopping by setting up an account in the store, buying and installing your first apps, and keeping them organized once you start loading up your ’Pad.
Go to the App Store
Remember when computer stores displayed shelves and shelves worth of software in colorful shrinkwrapped cardboard boxes? The App Store ditches the physical racks and crowds of people but still offers thousands of programs, neatly organized into 20 categories right on the other side of your Internet connection. Once you’re online, you can either:
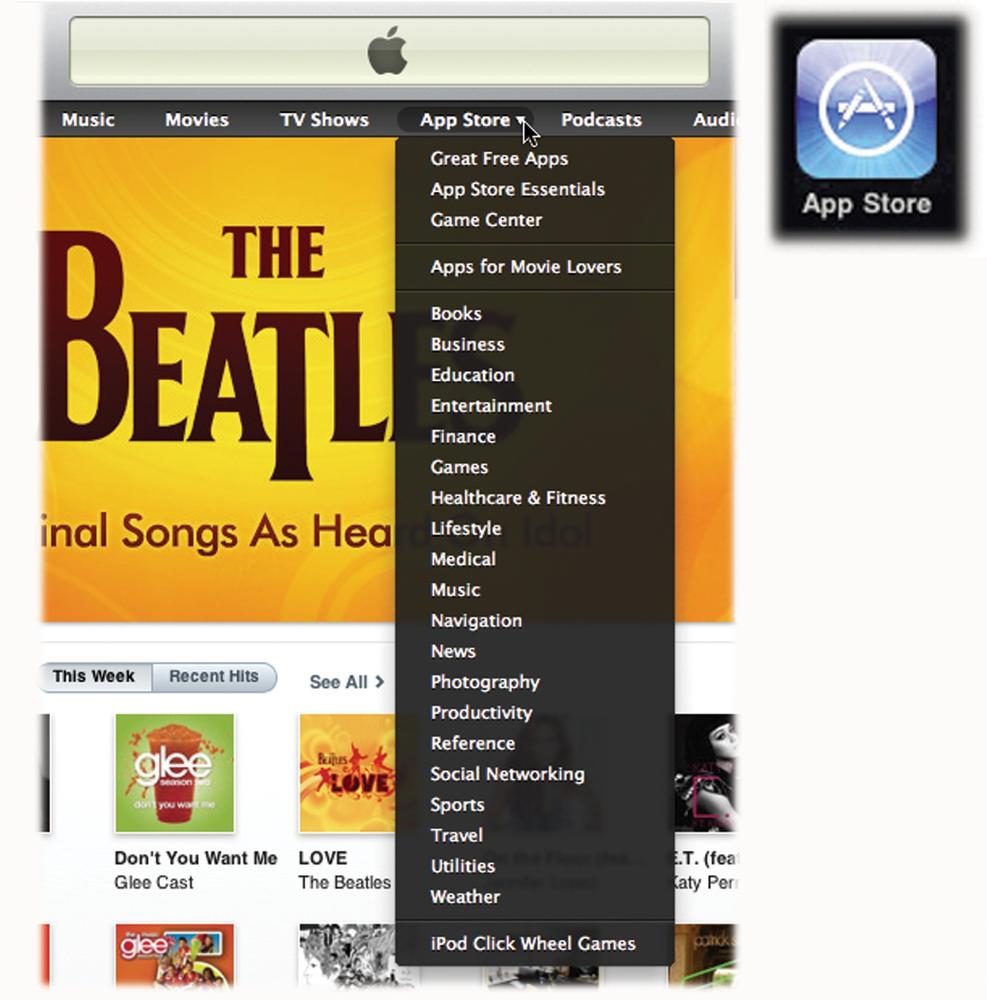
Click the iTunes Store icon in the Source list and then click the App Store link at the top of the screen. Or, if you’re looking for a specific category of program, like, say, an expense tracker, click the small triangle that pops up in the App Store tab to open a submenu of app categories and go right to the Financial section. (Chapter 11 has more about the music and video sides of the iTunes Store.)
Tap the App Store icon on the iPad’s home screen.
Either action gets you to the App Store. If you choose the iTunes path from the comfort of your laptop or desktop computer, you may end up with a bigger screen to browse the store’s selections—but you also have to take the extra step of syncing your purchases from iTunes to your iPad (Sync Apps and Games).
Tour the App Store
No matter how you get there, the App Store has plenty to offer your iPad. In most cases, you land right on the store’s home page, where Apple employees regularly spotlight new, timely, or interesting apps and games. You also see the list of top apps, both in the budget-friendly Free Apps section and in the more feature-friendly Paid Apps department.
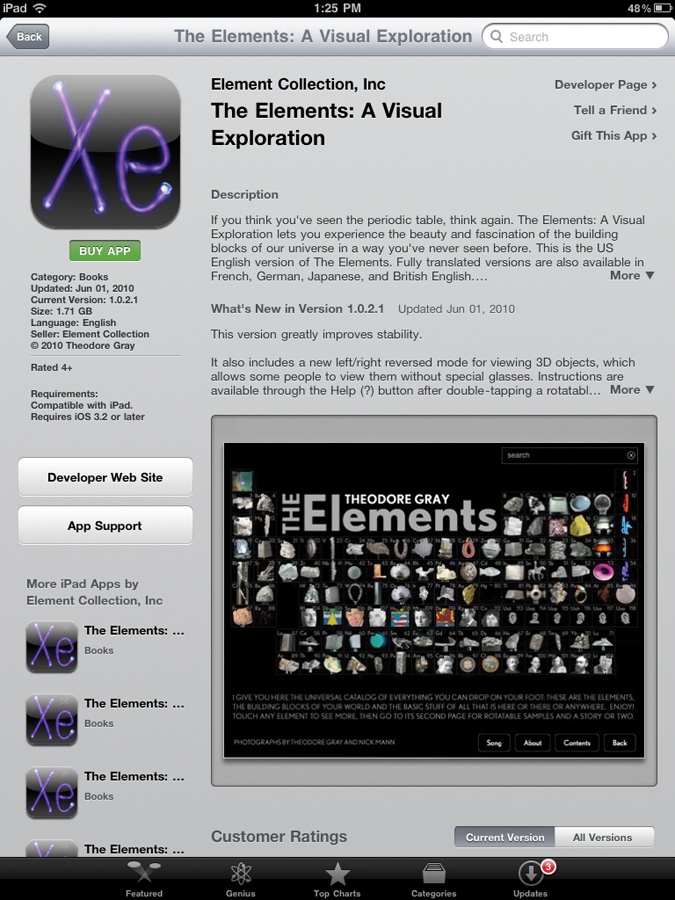
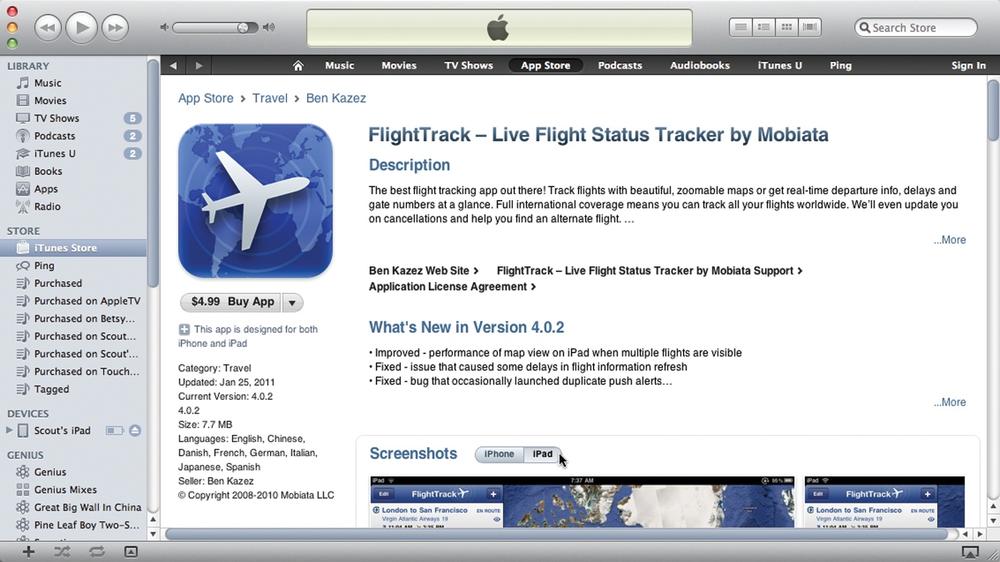
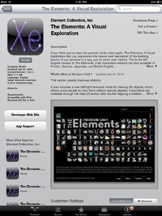
If you tap any app’s name or icon, you go to the program’s App Store page, where you can read more about what the app does. You can also view sample screenshots, read reviews from people who bought the app, and check out the app’s system requirements to make sure it’s compatible with your iPad model’s hardware and software. For apps intended for both the iPhone and the iPad, some developers give you a choice of screenshots to inspect. Next to Screenshots, click the iPad button (circled) to see just the iPad images.
Many games include an age rating to help parents decide if a game is appropriate (or not) for children. There’s also a Free App button to download the apps that are gratis, or a Buy App link if you have to shell out some simoleons. (If you buy an app, it gets billed to your credit card. Turn the page for instructions on setting up an account with Apple.)
Across the top of each app’s page, you’ll see a category listed, like Weather, Sports, Games, Photography, Music, and so on. You can click the category name to see similar apps if the one you’re looking at doesn’t quite fit the bill.
Set Up an iTunes/App Store Account
Before you can buy any of the cool stuff you see in the Store, you need to set up an account with Apple. If you already have one from previous purchases, you can use that name and password here—all your bills will go to the credit card you have on file with Apple.
If you’ve never bought any of Apple’s online products, like iTunes movies or prints from iPhoto, you need to set up an account before you can buy anything. To do so, click the Sign In button in the upper-right corner of the iTunes window, and then click Create New Account. (If you’re on the iPad, scroll down to the bottom of the screen, then tap Sign In→Create New Account.)
Then follow these three steps:
As your first step in creating an Apple Account, you must read and agree to the terms of the legal document on the first screen. This long, 27-page statement informs you of your rights and responsibilities as an iTunes Store and App Store customer. It boils down to two core points: Thou shalt not download an album, burn it to CD, and then sell bootleg copies of it at your local convenience store, and Third-party crashware apps are not our fault.
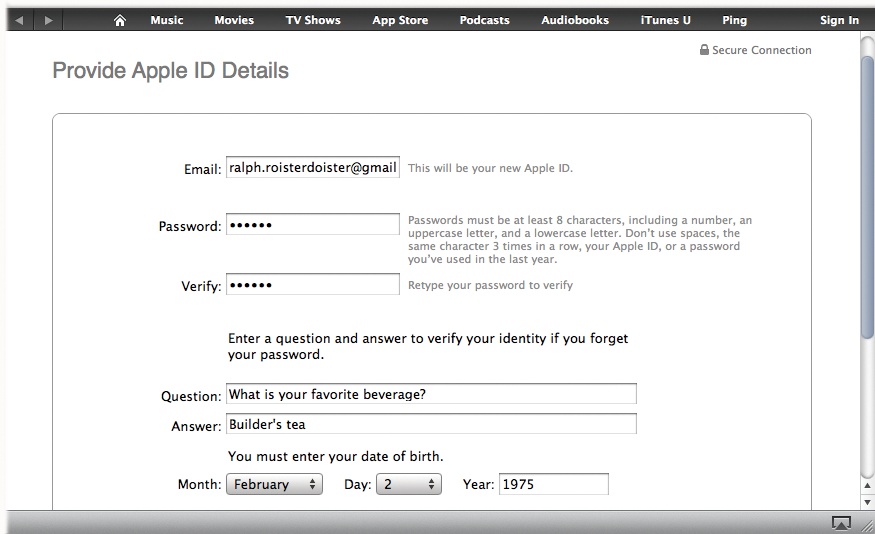
Click the Agree button to move on to step 2. Here, you create an Apple ID, password, and secret question and answer. If you later have to click the “Forgot Password?” button in the Store sign-in box, this is the question you have to answer to prove that you’re you. Apple requests that you type in your birthday to help verify your identity. (You must be over 13 to get an account here.)
On the third and final screen, provide a valid credit card number with a billing address. You can also use a PayPal account.
Click Done. You’ve got yourself an Apple Account. From now on, you can log into the App Store by clicking the Sign In button in the upper-right corner of the iTunes window.
Sign Up Without a Credit Card
But what if you just want to download free apps from the App Store? You don’t have to cough up a credit-card number, but you do need to make sure you’re in the App Store and not the main iTunes Store (where only podcasts are regularly free). In iTunes, click the App Store link on the main iTunes Store page. Once you’re in the App Store:
Find a free program you want and click the Free App button.
When the sign-in box pops up, click the Create a New Account button.
Agree to the “Terms and Conditions” document and then fill out your account name, password, and birthday information.
On the screen for payment options, click None.
Fill in your name and email address, and then click the link used to verify your new account.
When you get the Store’s confirmation email, click the embedded link to verify your account.
Once you finish up step 6, you get prompted to log into your account with your new user name and password. When you do, you land back in the App Store, ready to gobble up free apps for your ‘Pad.
Tip
Need to change billing or other information in your iTunes/App Store account? Sign into the store, and then click on your account name. In the box that pops up, retype your password and click the View Account button. On the account settings screen, click either the Edit Account Info or Edit Payment Information button.
Buy, Download, and Install Apps
Okay, you’ve found the App Store, maybe even created an Apple account ahead of time: Now you’re ready to start loading up your iPad with all the cool programs, games, and utilities you can fit on it.
Get apps from the iTunes Store. Click the App Store link on the main Store page and browse away. When you find an app you want, click the Free App or Buy App button to download a copy of the program to iTunes. You can see all the apps you’ve purchased by clicking the Applications icon in the iTunes Source list. When you finish shopping, connect the iPad to your computer, and sync ‘em up, as Chapter 11 explains.
Get apps on the iPad. When you’ve got a WiFi or 3G connection, tap the blue App Store icon on the Home screen and browse away. At the top of the Featured screen, you can see what’s new and hot. At the bottom of the screen, you can tap to see what the iTunes Genius thinks you might like, see a list of the most downloaded apps (Top Charts), and check out apps listed by category. When you find an app you want, tap the Free App or price button; the latter turns into a Buy Now button, so hit that. Type in your Store name and password (even if it’s a free application), and the download begins. After the program finishes loading and installing, tap its icon to launch it. Download times vary by app size. For example, the beautiful interactive textbook pictured here, The Elements: A Visual Exploration, is a honking 1.71 gigabytes—so give it time.
Uninstall Apps
Not every app is a five-star winner. One may turn out to be different from what you envisioned when you bought it or not live up to your expectations in other ways. Or maybe some of those bigger games and programs are just taking up too much of your limited iPad real estate. Some apps may even be buggy and crashy, and perhaps you want to just remove them instead of waiting for the developer to post an update (Update Apps).
Here are two ways to uninstall an app:
Remove apps in iTunes. Connect the iPad to your computer, and then click its icon in the iTunes Source list. In the main iTunes window, click the Applications tab. In the list, turn off the checkboxes next to the apps you want to remove and then click Sync to uninstall them. The removed apps stay in your iTunes library, but you won’t be carting them around on your iPad until you select them here and resync. Sync Apps and Games has pictures.
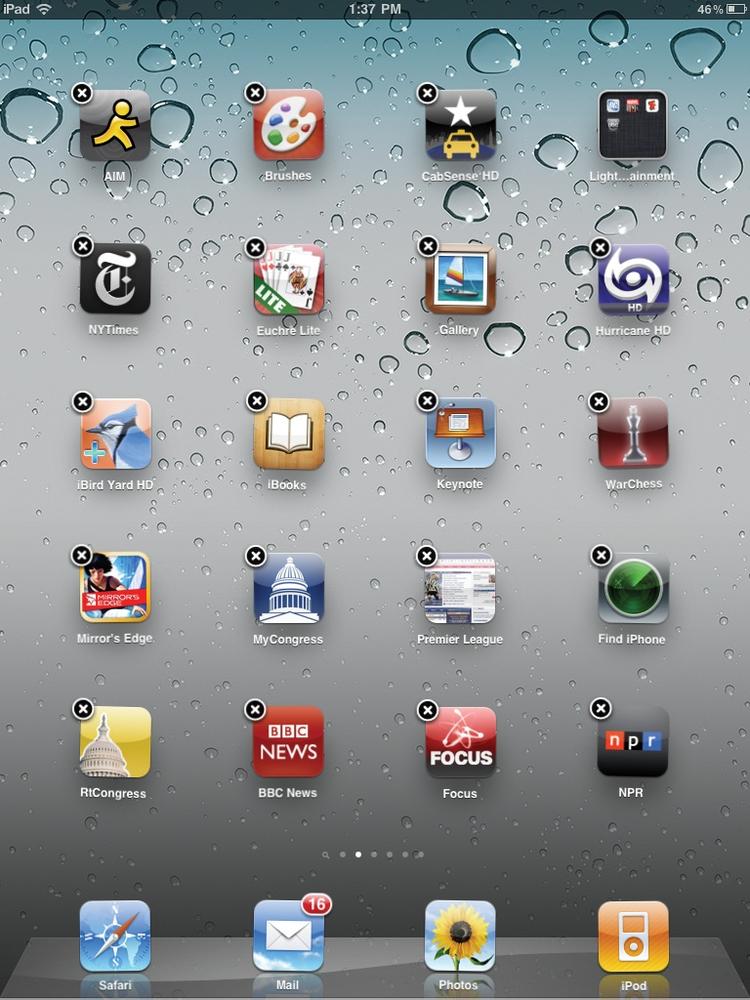
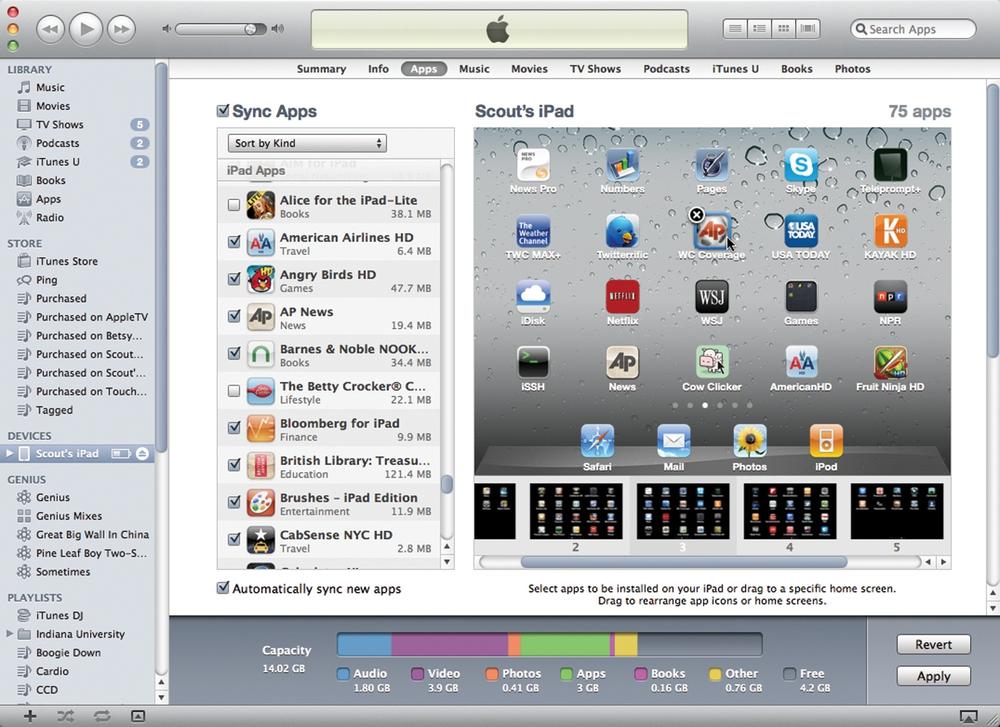
Remove apps on the iPad. As shown here on the Home screen, press and hold the unwanted application’s icon until it starts wiggling around and an
 appears in the corner. Tap the , confirm your intention to delete, and wave goodbye to that app.
Press the Home button to return to business as usual.
appears in the corner. Tap the , confirm your intention to delete, and wave goodbye to that app.
Press the Home button to return to business as usual.
Tip
While all App Store sales are final, you may be able to get a refund if an app is mislabeled or seriously doesn’t perform as advertised. It’s certainly not a sure thing, and you need to make your case to the iTunes Support folks calmly and clearly about why the app fails for technical reasons (“I just don’t like it” is not a valid excuse). Contact customer service at www.apple.com/support/itunes.
Search for Apps
Just as you can buy apps on either your computer or tablet, so you can search for them or specific types of programs through iTunes or the iPad. This comes in handy if you don’t know the exact name of the app you seek, or you want to throw a few keywords into the search box and see what comes up.
Here’s how to search:
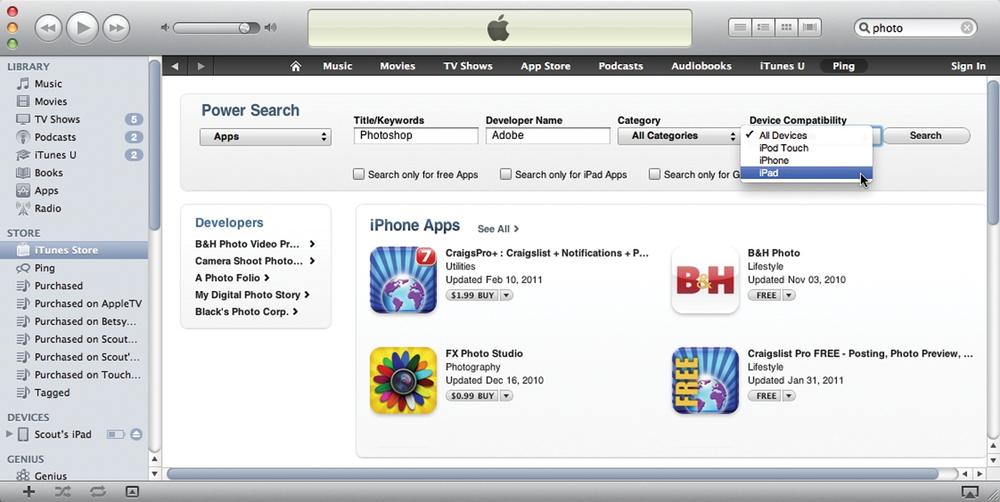
On the computer. The upper-right corner of the iTunes window has a nice little search box. When you’re in an iTunes library, typing keywords into the box brings up results from your own collection. But when you search with the iTunes Store selected in the Source list, your results come from the apps, games, music, and other items for sale in the online store. If you don’t immediately see what you want, click the Power Search button in the top-left corner to get a set of boxes (circled) that let you narrow your results even further—by developer name, category, or device.
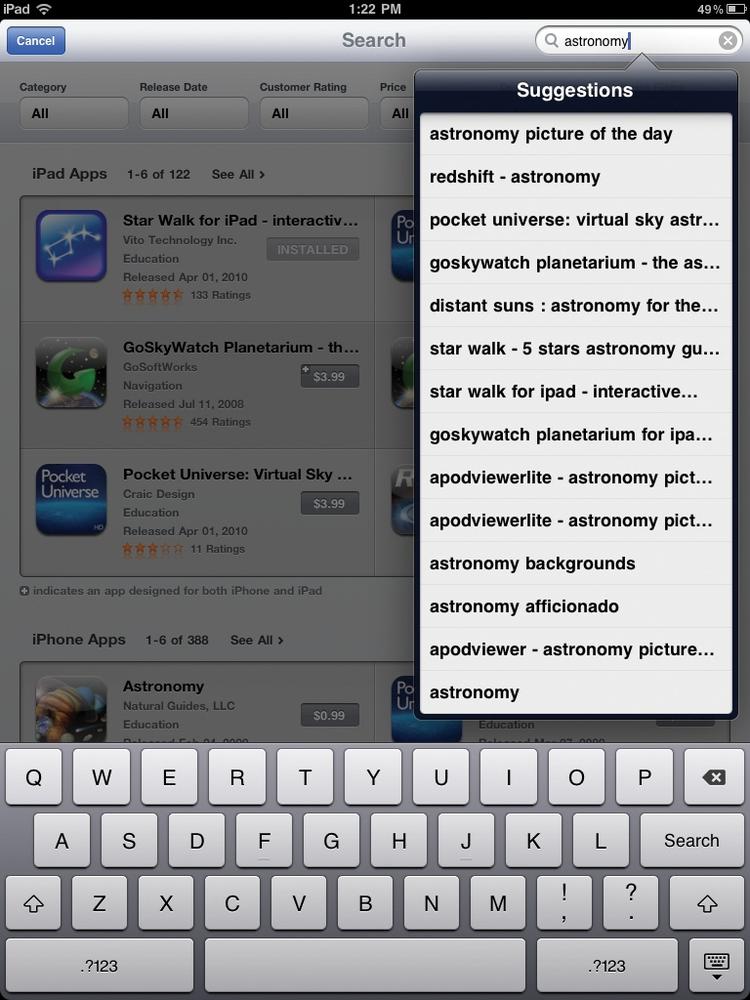
On the iPad. Tap the search box (
 ) at the top of the App Store screen to summon the keyboard. Type in the keywords for the app
you seek, and tap the keyboard’s Search button. The iPad matches what you type as you go
and presents a list. At the top of the results screen, you can filter the apps by
category, price, and other criteria.
) at the top of the App Store screen to summon the keyboard. Type in the keywords for the app
you seek, and tap the keyboard’s Search button. The iPad matches what you type as you go
and presents a list. At the top of the results screen, you can filter the apps by
category, price, and other criteria.
Once iTunes completes a search, click or tap an app name to get more information about it from its page in the App Store.
Scale Up iPhone Apps
The bulk of the App Store’s more than 350,000 programs are for iPhone and iPod Touch owners (for now, anyway). But don’t let that stop you from shopping, because most iPhone apps can run just fine on the iPad, so there’s no software shortage for the slab here.
And while iPhone/iPod Touch apps can run on the iPad, most of them weren’t designed for it. As a result, they may seem a little sparse on the bigger screen. Still, you can run iPhone and iPod Touch apps on the iPad in two ways:
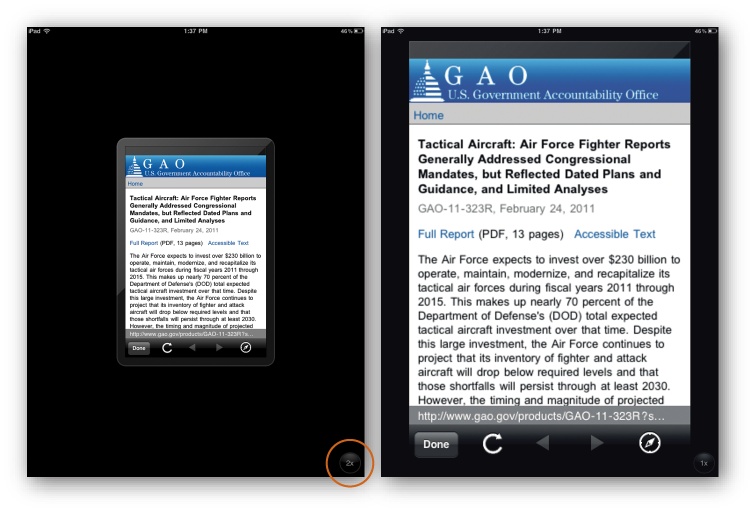
Run the apps at actual size. While this maintains the original look of the app, it looks kind of silly floating there in the middle of your iPad, like a tiny island surrounding by an ocean of dark screen. And you have to reach in much farther across the iPad to tap the screen buttons.
Run the apps at twice the size. If you don’t want to squint, you can super-size that old iPhone app—just tap the 2X button in the bottom-right corner of the iPad screen (circled). The iPad doubles each pixel in the iPhone app to scale it up to tablet size. Depending on the program, though, Hulk-ing up your apps with the 2X button can make them look a little blotchy and weird compared to running them at the size they were intended. But you do make use of your iPad’s expansive vista.
The longer the iPad is available, though, the more apps will appear written (or rewritten) expressly to fill its big glorious screen. In a year or so, the 2X feature may seem a quaint little kludge.
Organize Apps
Back in Chapter 1, you learned how to rearrange the icons on the Home screen of your iPad. And after reading the first few pages of this chapter, you may now have a ton of groovy new app icons all over your iPad—but not in the order you’d like them. Sure, you can drag wiggling icons all over your 11 pages of Home screen, but that can get a little confusing and frustrating when you accidentally drop an icon on the wrong page. Plus, that iPad screen is awfully large and you could throw your shoulder out dragging those apps such a long distance.
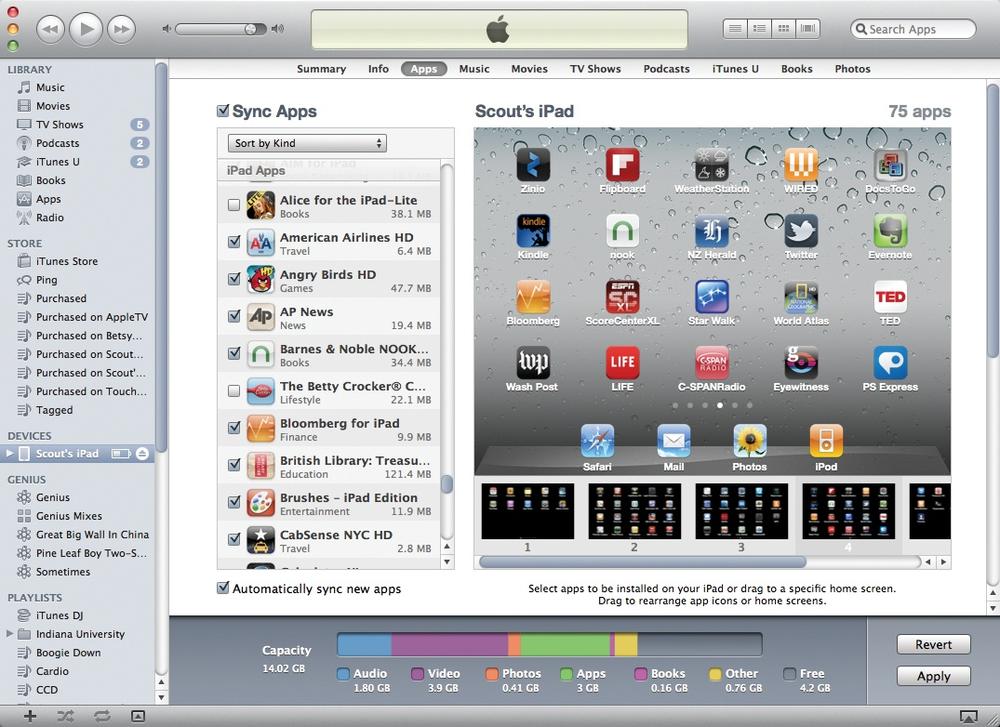
iTunes offers an easier way to fine-tune your iPad’s Home screens: You can arrange all your app icons on your big-screen computer:
Connect the iPad to your computer. Click its icon in the Source list.
Click the Applications tab. You now see all your applications—a complete list on the left, a giant version of your iPad screen in the middle, and individual pages to the right-hand side of or below the Big Screen.
Select the icons you want to move. Click an icon you want to move on the JumboTron and drag it to the desired page thumbnail below—iTunes recreates both iPad screen orientations so you can fine-tune the look of your screens: Landscape mode pages appear along the bottom, portrait mode screens stacked vertically on the far right. Hold down the Ctrl or ⌘ keys and click to select multiple apps. It’s much easier to group similar apps on a page this way—you can have, say, a page of games and a page of online newspapers. If you prefer grouping like apps in themed folders (Make Home Screen App Folders), drag them into the folder with the mouse. You can even swap out the four permanent application icons in the gray bar on the bottom of the iPad screen (either here or on the tablet itself) with other apps—and squeeze in two more for a total of six apps in the bottom row.
Click Apply or Sync. Wait just a moment as iTunes rearranges the icons on your iPad so they mirror the setup in iTunes.
But what if you have too many apps for the iPad’s limit of 11 Home screens? Even if an app’s not visible, you can find it on the tablet by flicking your finger from left to right on the first Home screen and typing in the app name in the search box that appears.
Adjust App Preferences
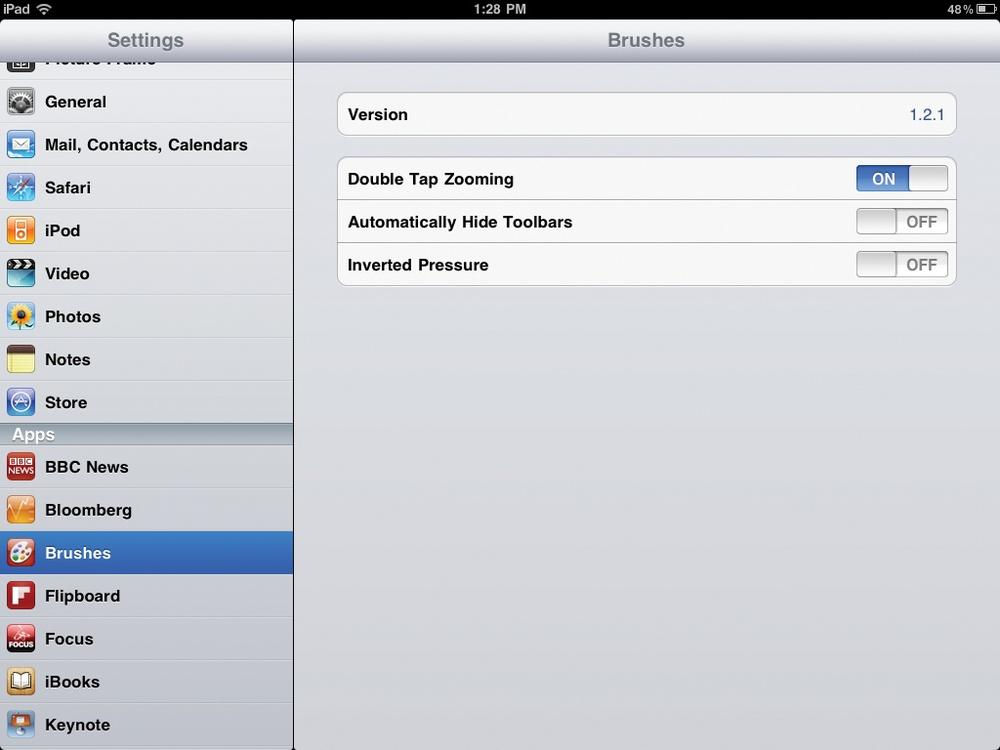
Many apps have all their functions and controls within each program; you can get to them by tapping Setup or Options (or something similarly named) while you run the app. Some apps, however, have a separate set of preferences in the iPad’s Settings area.
For example, your nifty little weather program may include the option to display temperatures in either Fahrenheit or Celsius and wind speeds in either miles per hour or kilometers per hour, depending on the measuring standards of your country. You set these app preferences by choosing Home→Settings and flicking all the way down the screen to the collection of individual apps. Tap the name of the app whose settings you want to adjust.
Tip
Want to keep your iPad in sync with all your App Store purchases? While you’re tromping around in the iPad’s Settings area, tap the Store icon on the left side of the screen. Here, you can turn on automatic downloads, which deposit a copy of any music, apps, or books you bought through your iTunes account onto your iPad, no matter whether you originally bought the item on your computer, iPhone, or iPod Touch.
Update Apps
When you see a red circled number on the App Store icon, you know you have some updatin’ to do. The number in the red circle represents the number of apps that have updates waiting for you to download. Updates usually fix bugs and improve program performance, and that may help wobbly apps stop crashing. Some updates include new features. All updates for a particular version of an app are free.
To see a list of which apps have an update pending, tap the App Store icon. Tap the name of the program you want to update, tap the Price button, and then tap Install. If you have multiple programs with updates ready, you can install them all in one fell swoop by tapping the Update All button. The update downloads after you type in your Store password. (Already in the App Store? The Updates icon at the bottom of the screen shows the number of updates; tap it to see them and get all the new stuff at once.)
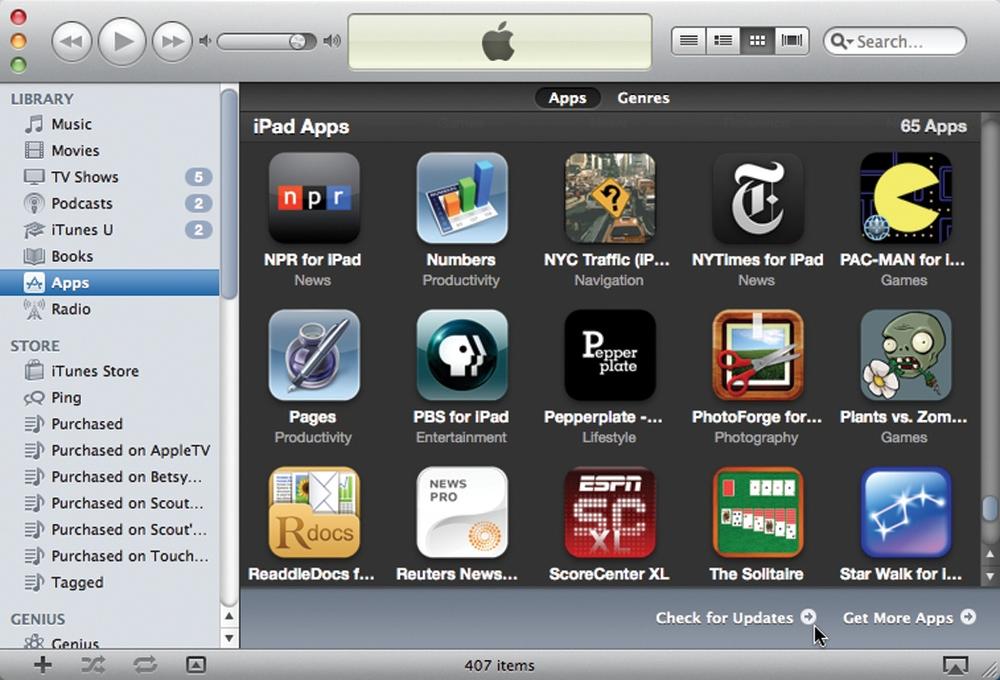
You can also check for app updates in iTunes. Click the Applications icon in the iTunes Source list to display all your downloaded apps, and then click the “Check for Updates” link at the bottom of the window. If you have updates, iTunes alerts you with a box and gives you a button to click to see a list of the apps. (The number in the gray circle next to Apps in the Source list also gives you the total number of updates available.)
When you view a list of the updates, iTunes gives you a button in the top-right corner to install all the updates at once, but you can also update programs individually by clicking the Get Update button next to each app’s name. Once you download the updates, sync the iPad to install them on your tablet.

Troubleshoot Apps
Most App Store programs work perfectly well at what they were designed to do, but things can occasionally go wrong. Maybe a little bug made it through the testing process. Or maybe an iPad software update changed the way the operating system interacts with the app.
In any case, you can take a few basic troubleshooting steps for apps that aren’t playing nice with the iPad:
Restart the iPad. If you just installed an elaborate videogame like Star Wars: Trench Run or some other complex application, it’s a good idea to restart the iPad (Apple’s iPad Troubleshooting Pages has the steps) to get all this new software off to a fresh start with the operating system—sort of like how it’s a fine notion to restart your computer after you install new programs.
Check for updates. Some apps may have been sold just a tad too soon. The developer, facing cranky customers and bad reviews in the App Store, quickly posts an updated version of the app that fixes the problem. Flip back a page for information on updating apps. (It’s also a good idea to plug the tablet into the computer and check for iPad software updates every once in a while; see Update the iPad’s Software to learn how.)
Note
Some apps are designed to work only with certain iPad features, like its global positioning system (GPS) or 3G network. Before you tear your hair out trying to figure out why your brand-new app won’t do what it’s supposed to, revisit its App Store page and re-check the system requirements to make sure it’s actually supposed to run on the iPad, Wi-Fi + 3G model or otherwise.
Remove and reinstall the app. Perhaps something tripped up the installation process when you first bought the app or a little piece of it somehow got damaged during a crash. If a certain app wigs out on you, try uninstalling it (Uninstall Apps), restarting the iPad (Apple’s iPad Troubleshooting Pages), and then downloading the program again from the App Store (Buy, Download, and Install Apps) to install a fresh copy. If it’s a paid app you previously purchased, you can download a new copy of the same version for free. (Just to be sure you know that you already downloaded this app, the App Store displays an alert box that asks you to tap the OK button to confirm your desire to download it again.) But a clean install with a new copy of the software just may do the trick if, say, your Facebook app bombs out every time you try to upload a photo.
Other steps to try include deauthorizing (Deauthorize Your Computer) and re-authorizing (Authorize Computers for iTunes and Home Sharing) your computer for purchases from the iTunes and App Stores, or reinstalling the whole iTunes program on your computer (Download and Reinstall iTunes and iTunes Updates). Sometimes, just logging out of your Store account and logging back in can resolve an issue.
If all that fails, it’s probably the app’s fault. You can, however, report your problem. If you’re on the iPad, tap the App Store icon, find the app’s page in the Store, and flick down to the part of the page where the Developer’s Web Site and App Support and buttons live. Tap Developer’s Web Site to see other apps from the company and get contact information, or tap App Support for technical help and information on this specific app.
If you’re logged into your iTunes Store account on the computer, click your user name in the top right corner. In the sign-in box, click the View Account button, sign in again, and click the Purchase History button on the Account Settings page. Click the “Report a Problem” button at the bottom of the page, and then click the arrow next to the problem program in your list of recent purchases. Now you get an electronic form you can fill out and send to Apple.
Tip
If you need help from a human at Apple, you can either call (800) 275-2273 or email them. From the iTunes Store’s main page, click the Support link. Your web browser presents you with the main iTunes service and support page; click any link in the Customer Service area and then, at the bottom of the page that appears, fill out the Email Support form. Live online chat is also available for some issues.