Chapter 2. Interact with Your iPad
These days, touchscreens are nothing new; you find them everywhere. They’ve been on automatic teller machines for years, and dispensing New York City subway fare cards for more than a decade. Some delis let you order up a turkey-and-swiss by pressing a touch-sensitive menu. So, in the grand scheme of things, the iPad’s touchscreen isn’t unfamiliar.
But using the iPad takes more than touch. You tap, you flick, you swipe, you double-tap, you drag, you press-and-hold. Which motion you make and when you make it depends on what you’re trying to do at the time. And that’s where this chapter comes in.
Over the next few pages, you’ll learn how to do the digit dance so your iPad responds to your every command. You’ll also pick up a few keyboard shortcuts and learn how to use your fingers to find stuff on your ‘Pad. So get those hands limbered up by turning the page.
Finger Moves for the iPad
The “brain” behind the iPad—its operating system—is smart enough to respond to a series of very different touches. The ones you make depend on what you want to do. Here are the moves:
Tap. Take the tip of your finger and lightly press an icon, thumbnail image, song title, or control you see on-screen. The iPad isn’t a crusty old calculator, so you don’t have to push hard; a gentle touch does the trick.
Drag. Keep your fingertip pressed down on the glass and slide it around to scroll to different parts of the screen. That’s how you adjust volume sliders and pan around a photo. A two-finger drag scrolls a window within a window (like the floating window that pops up over your Facebook screen when you call up your friends list).
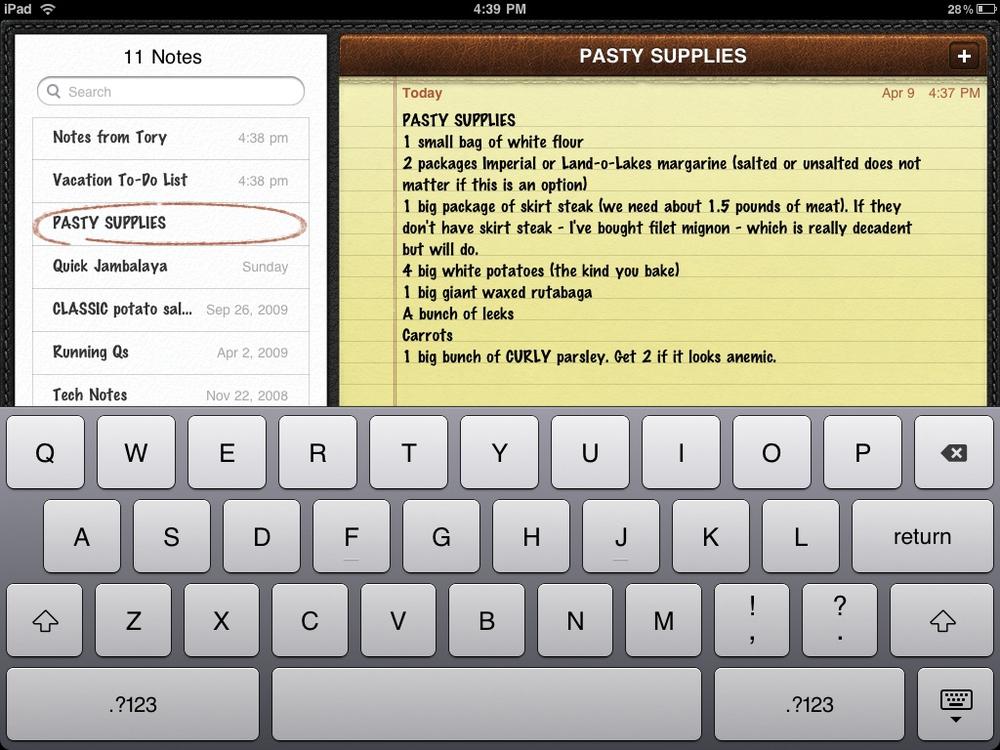
Slide. A slide is like a drag, except that you use it almost exclusively with one special control—the iPad’s Unlock/Confirm button, which sits in a “track” that guides your slide as you wake your iPad from sleep or confirm a total shut-down.
Flick. Lightly and quickly whip your finger up or down your screen and watch a web page or song list whiz by in the direction of your flick. The faster you flick, the faster the screen scrolls by. In a photo album, flick side-to-side to see your images parade triumphantly across your screen.
Finger Spread and Pinch. To zoom in on part of a photo, document, or web page, put your thumb and index finger together, place them on-screen, and make a spreading motion across the glass. To zoom out, put your spread fingers on-screen and pinch them together.
Double-Tap. This two-steppin’ tap comes into play in a few situations. First, it serves as a quick way to zoom in on a photo or web page. Second, if you’re watching a video, it lets you toggle between aspect ratios—the full-screen view (top right), where the edges of the frame get cropped off, and the widescreen, letterboxed view (bottom right), which movie lovers favor because that’s what the director intended the scene to look like.


Use the iPad Keyboard
The iPad has no physical keys—unless you buy the optional keyboard (see Add an External Keyboard). A virtual keyboard, therefore, is the standard way to enter text.
The iPad’s keyboard pops up whenever you tap an area of the screen that accepts input, like the address bar of a browser, a search box, or the text area of a new email message.
To use it, just tap the key you want. As your finger hits the glass, the light-gray target key confirms your choice by flickering to a darker gray.
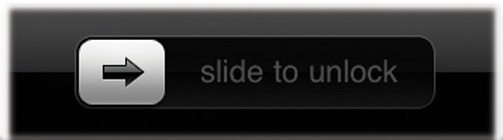
The keyboard works in portrait (vertical) mode, but it’s roomier when you go for the landscape (horizontal) view. The button with the keyboard icon in the bottom right (circled above) makes the keyboard go away. The keyboard has a few other special keys. They are:
Shift (
 ). When you tap this key, the normally clear arrow turns blue
(
). When you tap this key, the normally clear arrow turns blue
( ) to show you it’s activated. When you see the blue arrow, the next
letter you tap appears capitalized. Once you type that letter, the key returns to normal, signalling that the following letter will
show up in lowercase.
) to show you it’s activated. When you see the blue arrow, the next
letter you tap appears capitalized. Once you type that letter, the key returns to normal, signalling that the following letter will
show up in lowercase.Backspace (
 ). This key deletes in all kinds of ways: Tap it once to delete the letter
just to the left of the blinking cursor. Hold it down to delete in reverse, zapping each
letter as you go. Finally, hold it down a bit longer and it deletes entire
words instead of just individual letters.
). This key deletes in all kinds of ways: Tap it once to delete the letter
just to the left of the blinking cursor. Hold it down to delete in reverse, zapping each
letter as you go. Finally, hold it down a bit longer and it deletes entire
words instead of just individual letters. . Tap this button to insert punctuation or numbers. The keyboard
switches from alphabet mode to serve up a grid of numerical and grammatical symbols. Tap
the same key—which has now become
. Tap this button to insert punctuation or numbers. The keyboard
switches from alphabet mode to serve up a grid of numerical and grammatical symbols. Tap
the same key—which has now become  —to return to the alphabet. (Happily, there’s a much faster way to
get a number or symbol—touch and hold the key, and then drag your finger to the number or character you
want.)
—to return to the alphabet. (Happily, there’s a much faster way to
get a number or symbol—touch and hold the key, and then drag your finger to the number or character you
want.)When you’re using the numbers/symbols keyboard, a new
 button appears. Tap it to invoke a third
keyboard layout, which offers more obscure characters, like the # and % symbols,
bullets, and brackets.
button appears. Tap it to invoke a third
keyboard layout, which offers more obscure characters, like the # and % symbols,
bullets, and brackets.
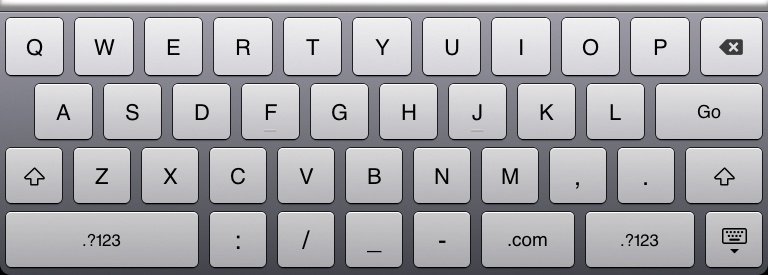
When you type letters into a web form (or anyplace that’s not a web address), the iPad adds a return key to the keyboard so you can move from one line to the next. This key morphs to say “Join” when you type in a WiFi password, “Go” when you enter a URL, and “Search” when you query the search box.
iPad Keyboard Shortcuts
As you’ve probably discovered by now, the iPad keyboard has to get a bit creative to fit all the keys you need on a small patch of glass. But let’s face it, when you’re trying to finish an email message, jumping around between keyboard layers to find an ampersand or apostrophe gets old fast. To help balance economy and efficiency, Apple built in a number of keyboard shortcuts and tricks to help you out.
Web addresses. When you type a web address into Safari, the iPad’s web browser, the keyboard helpfully includes keys for commonly used characters. For example, you get a slash, underscore, hyphen, and, best of all, a .com button (circled). Not going to a .com address? Press and hold the .com button to get your choice of .edu, .org, or .net, and slide your finger over to the one you want. When you finish, tap the Go button.
Instant apostrophes. The iPad fills in the apostrophe of many contractions for you, so if you type cant, the tablet corrects it to can’t.
Bad aim. Finger on the wrong key? If you haven’t lifted your digit off the screen yet, slide it over to the correct one and let go.
Punctuation. Apple’s bad-aim press-and-slide trick works in a couple of other places as well. Need an apostrophe instead of that comma key on the main keyboard? Press the comma key and slide. Need an ampersand but don’t want to tap all the way into the
keyboard? Press the key and slide over to it without taking your finger off the
keyboard—or having to switch back to the ABC keyboard.Accented characters. Need an accented letter, say, an é instead of a plain old e? Press and hold the e character to reveal a whole bunch of accented choices. Slide your finger to select the one you need. This trick works on most letters that take accent marks.
Auto-correction. The iPad’s dictionary tries to automatically correct typos and spelling errors as you tap along. If you want to accept the suggested correction for a word you just typed, hit the space bar and keep going. Don’t agree with the iPad? Tap the word to reject the suggestion. Proper nouns often make the iPad’s dictionary overeager to help, but if you reject its suggestions enough times, it eventually learns what you want. In some programs, words the iPad is still suspicious about get underlined in red; tap them to see alternate spelling suggestions. (If the constant corrections bug you, turn them off at Settings→General→Keyboard→Auto-Correction.)
Speaking of the Settings area, the iPad tucks away several helpful shortcuts there. Go to Settings→General→Keyboard to see them.
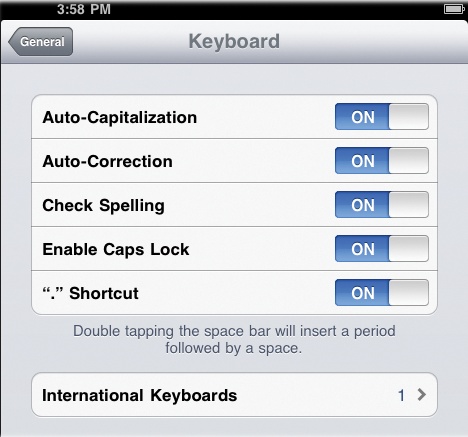
Auto-Capitalization. When you turn this setting on, the iPad automatically capitalizes the first letter after a period.
Check Spelling. The iPad flags misspelled words in Mail and text apps with a red underline. Tap the flagged word to see replacement options.
Enable Caps Lock. If you NEED TO TYPE LIKE THIS FOR A WHILE, flip on this setting. Now, when you double-tap the Shift (
) key, it turns blue and keeps capitalizing until you tap it again
to turn it off.“.” Shortcut. With this setting turned on, you just double-tap the space bar at the end of a sentence to end it with a period and move one space to the right to start your next sentence with a capital letter.
When you tap the International Keyboards option, you can add foreign-language keyboards. Turn the page to find out more.
Use an International Keyboard
If American English is your only language, you can skip these next two pages. But if, over the course of your iPadding day, you find yourself communicating in French, Spanish, German, Russian, Chinese, Japanese, Cherokee, Dutch, Flemish, Italian, Canadian French, or British English, you can add a keyboard layout that reflects the standards of those languages.
To give your iPad some global input:
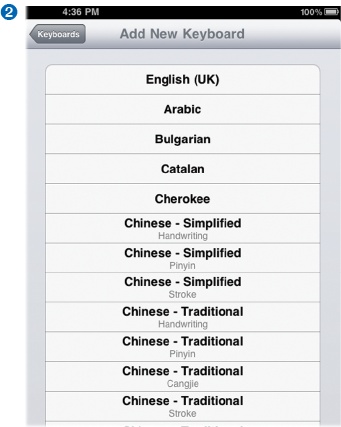
Tap Settings→General→Keyboard→International Keyboard and tap Add New Keyboard.
On the Add New Keyboard screen, peruse the list of languages and tap the one you want. “German,” for example, adds a German-character keyboard. The iPad includes the keyboard in your list of personal ‘boards at Settings→General→Keyboard→International Keyboard→Keyboards.
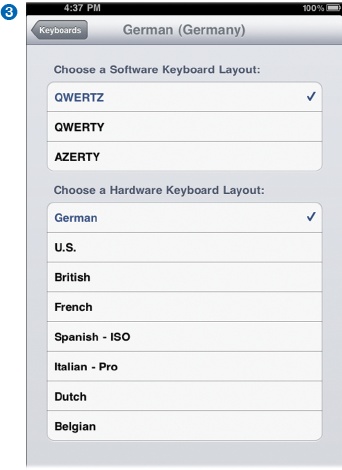
You get your choice of keyboard layout, too. To pick one, tap the language name in your list of keyboards. Here, you can pick the keyboard layout (QWERTY, AZERTY, QWERTZ, and so on) for the iPad screen. If you plan to use an external keyboard as well (or instead), you can select a hardware layout, too, like the one for a Bluetooth keyboard that uses the standard German character map or the Dvorak layout.
Once you add and configure your new keyboards, call them up when you need to leap into a memo in Dutch or Japanese.
You switch keyboards two ways:
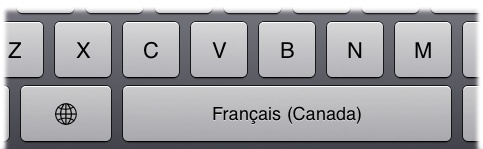
First, you can tap the key that has the globe icon (circled), just to the left of the space bar. With each tap, you cycle through your personal keyboards as their names flash on the space bar. Stop when you see the keyboard you want.
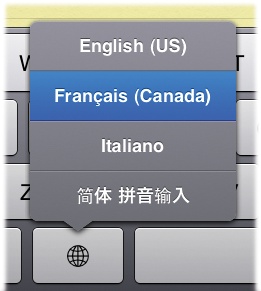
Alternatively, you can press down on the globe key for a minute to pop up a list of all your keyboards, then slide your finger up to the one you want.
Type away. When you want to switch back to English or to another keyboard language, go to the globe.
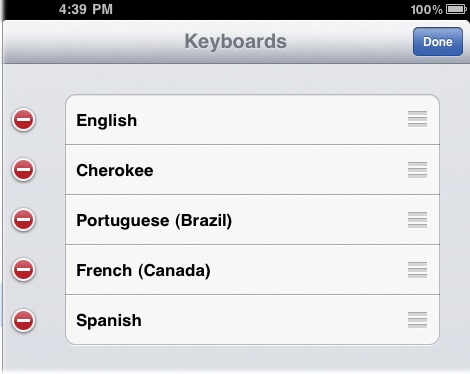
Delete a Keyboard
To delete an international keyboard you no longer want, choose
Settings→General→Keyboard→International Keyboard. Tap the Edit button above the Keyboards list, then tap
the ![]() next to the one you want to lose, and then tap the Delete button that
appears. To rearrange the order in which your keyboards appear in the globe menu, use the
grip strip icons (
next to the one you want to lose, and then tap the Delete button that
appears. To rearrange the order in which your keyboards appear in the globe menu, use the
grip strip icons (![]() ) to drag them into the desired new world order. Then tap
Done.
) to drag them into the desired new world order. Then tap
Done.
Note
The iPad offers several languages that use non-Western character sets, including Japanese, Chinese (Simplified) Pinyin, and Chinese (Simplified) Handwriting. “Handwriting on a keyboard?” you wonder. No problem for the iPad: When you select Chinese (Simplified) Handwriting as your keyboard option, your screen becomes a virtual touchpad where you can enter Chinese character strokes with the tip of your finger. The iPad sees what you’re doing and offers a list of matching characters you can choose from.
Cut, Copy, Paste, and Replace
The iPad’s ability to move text and images around within a document (or between documents) is useful, but it’s not the tablet’s most intuitive feature. And no, you can’t use Ctrl-C to copy something because the keyboard has no Control key. But never fear, here’s how you move text and images from place to place—or program to program:
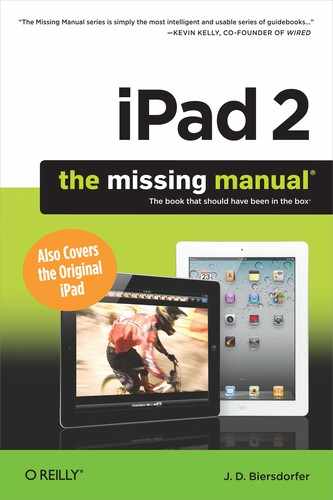
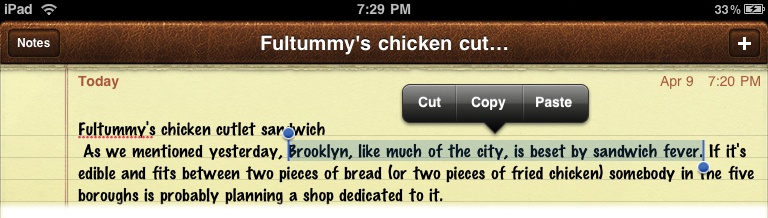
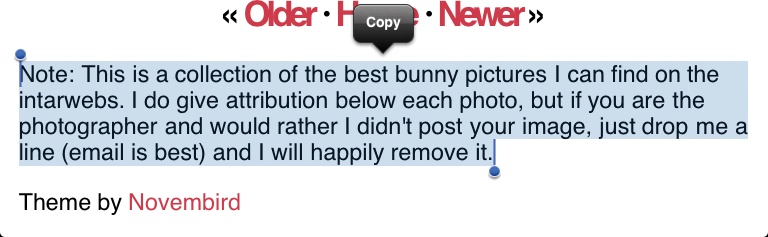
To cut or copy text that you can edit (like an outgoing email message or a note), double-tap a word to highlight it. A Cut | Copy | Paste | Replace box pops up. To select more words, drag the blue dots on either end of the selected word. Then tap the Cut or Copy command. (If you select more than one word, you don’t see the Replace option; the next page has more on that.)
For pages you can’t edit (like incoming emails), hold your finger down until you see a magnifying glass and insertion-point cursor. Drag it to the text you want to copy. When you lift your finger, a Select or Select All box appears. Select highlights the underlying word and displays the blue dots so you can include more text or photos. Select All highlights everything on-screen. Either way, lift your finger to get a Copy button. Web pages work a little differently: When you lift your finger there, you skip the “Select” options and go right to the Copy button, as shown above.
Tap the spot where you want to paste the text or photo to call up the Paste button. You can even jump to a different program; tap within it to paste.
Tap Paste to copy the text or pic into the new location, file, or program.
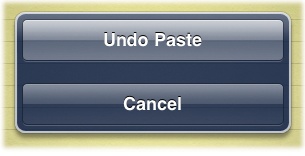
Make a mistake and wish you could undo what you just did? Give the iPad a quick shake and tap the Undo Paste or Undo Typing button that appears.
Just be careful when you shake that iPad—you don’t want to send your $500 high-tech tablet flying across the room because you pasted the word “celery” on the wrong line of a recipe.
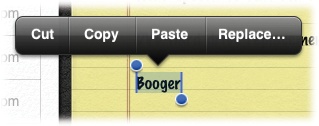
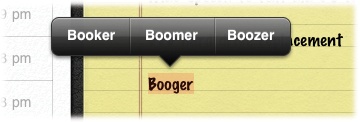
In addition to the Cut, Copy, and Paste options in files where you can edit text (like Notes), you can also replace a misspelled word with one that’s spelled correctly. Or you can replace one word with a different word altogether. To get the Replace option, double-tap or select a word on-screen. When the Cut | Copy | Paste | Replace box appears, tap Replace. The iPad offers up a few alternate words for you. If you see the word you meant to type, tap it to replace the text.
But enough about text—want to copy a photo or video into a message-in-progress or some other program? Hold your finger down on the screen until the Copy button pops up, as shown in the screenshot below. Tap the Copy button, create an email, and tap the message body to get a Paste button. Tap it to insert your image or video.
If you want to copy multiple items, like pictures out of a photo album, tap the
![]() icon in the top-right corner. Next, tap the photos you want to copy;
blue checkmarks appear in the corners to indicate your selection. Tap the Copy button on the
top-left side of the toolbar, switch to the program where you want to deposit your pics
(like a mail message under construction), and press the glass until the Paste button
appears.
icon in the top-right corner. Next, tap the photos you want to copy;
blue checkmarks appear in the corners to indicate your selection. Tap the Copy button on the
top-left side of the toolbar, switch to the program where you want to deposit your pics
(like a mail message under construction), and press the glass until the Paste button
appears.

Tip
The Notes program on the iPad is a handy place to stash text when you find something from a web page or email message you want to keep. If you use Outlook 2007 or 2003 for Windows or the Mail program that comes with Mac OS X 10.5.7 or later, you can sync your notes back and forth between your iPad and desktop computer. Just connect the iPad to the computer, click its icon in the iTunes Source list, and click the Info tab. Scroll down and turn on the Sync Notes checkbox, then click Apply.
Search the iPad
Once you get your iPad fully loaded, you may actually want to find something on it—a certain song in your music library, a calendar appointment you need to reference, or someone’s address. If you have 64 gigabytes of stuff on a bulging iPad, you may not want to wade around looking for a nugget of information. You can, however, shine the Spotlight on it.
Spotlight is the iPad’s built-in tool for introspection and self-searching. It lets you scan your iPad for words, apps, phrases, names, titles, and more. You can call up songs, appointments, email messages with directions to a house party, and all sorts of other things. You can get to Spotlight a few ways:
If you’re on your first Home screen, press the Home button to call up Spotlight.
If you’re a few Home screens deep, flick backwards from left to right until you pass your first Home screen and arrive at the Spotlight screen, where you can flick no further.
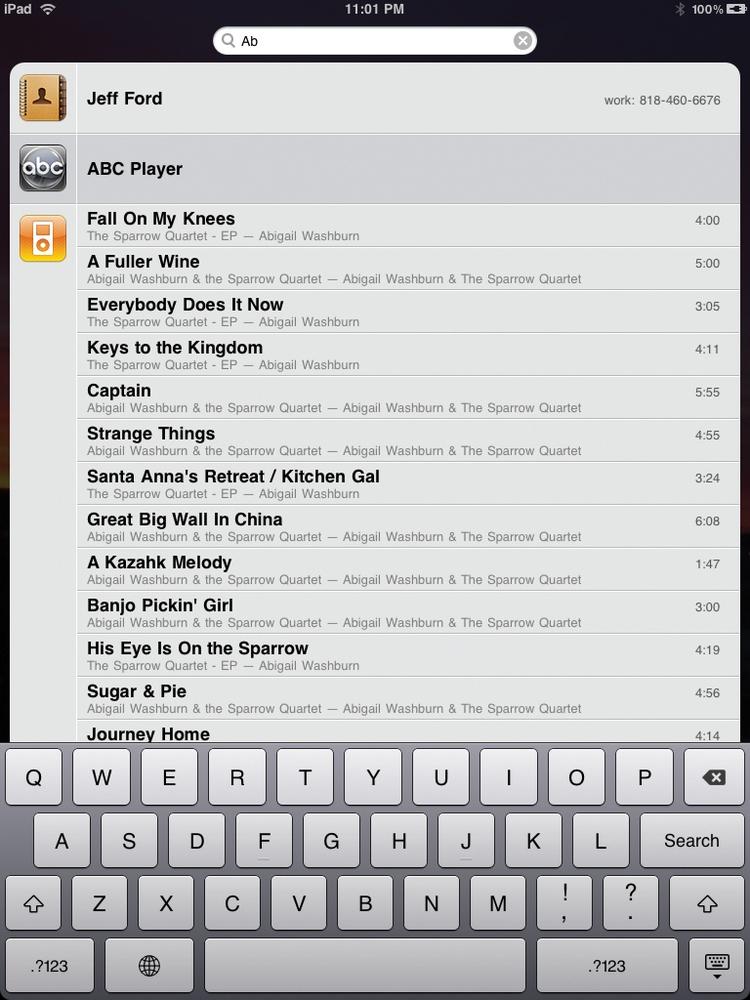
Once you’re on the Spotlight screen, type the name or words you’re looking for (“Doctor Lee” or “Harrigan” or “Gettysburg”). Spotlight begins to search even before you finish typing, and narrows the list as you continue. On the search results screen, tap any item to open it. In iOS 4.2 and later, you even get the option to search for your topic on the Web and Wikipedia with Safari. You can even launch an app from the list of results—which is a great way to fire up programs after you fill up your 11 Home screens with icons and don’t have any place to display app icons anymore.
Tip
Tired of songs by The Smiths popping up when you search for messages from your cousins—also named Smith? You can fine-tune your Spotlight search results to weed out certain types of files. Just tap Home→Settings→General→Spotlight Search and turn off the checkmarks next to items like Music or Videos.
Add an External Keyboard
It’s okay, you can admit it. You tried and tried and tried, but you just can’t deal with that flat-glass typing surface. Your fingers long for the tactile feel of softly clicking Chiclet keys, especially when you’re working on huge documents or programs that require lots of text entry.
If this describes you, fear not. You can get the comfort of a physical keyboard, and you even have a couple of options.
Bluetooth Keyboard
The iPad conveniently has a Bluetooth chip tucked inside it, so you can use the slab with a Bluetooth-enabled wireless keyboard, like the stylish $69 model Apple makes (shown here). To get the iPad ready for the wireless keyboard, choose Settings→General→Bluetooth→On. Then follow the instructions that came with your particular keyboard to put it into Bluetooth pairing mode—this usually means holding down a button until something blinks.
The iPad looks around for nearby devices, and should find the keyboard singing its
Bluetooth siren song. When you see the keyboard in the Devices list, select it and type in
any passkey numbers it requests (check your keyboard manual for them) to complete the
connection. The Bluetooth icon (![]() ) and keyboard name appear on-screen to announce their pairing. To go
back to the virtual keyboard, choose Settings→General→Bluetooth→Off or press the Eject key
on the Bluetooth keyboard.
) and keyboard name appear on-screen to announce their pairing. To go
back to the virtual keyboard, choose Settings→General→Bluetooth→Off or press the Eject key
on the Bluetooth keyboard.
iPad Keyboard Dock
If you want to power your ’Pad as you type, consider Apple’s combination iPad Keyboard Dock. It’s a full-size keyboard sitting atop a charging dock. You plug the power cord into the wall, stick the iPad in its charger booster seat, and peck away with the screen tilted at a comfortable viewing angle.
You can also connect the $69 iPad Keyboard Dock USB cable to your computer to do some syncing. With even more optional cables, you can connect the dock to your TV, stereo, or video projector. Visit store.apple.com to see the iPad Keyboard Dock and other accessories, like the plain iPad Dock, the Component and Composite AV cables, and the Digital AV Adapter.
Print With Your iPad
You pretty much have two ways to print messages, photos, and other documents from your iPad: apps or AirPrint.
The App Store (Chapter 7) offers dozens of utility programs for your iPad that make it possible to print files from your iPad to your home printer. Some may be more elegant than others, but odds are you can find something in the Store that’ll let you print for less than $10.
If you’ve never searched for an app before, Search for Apps shows you how; just type print into the App Store’s search box and go to town. When you find an app that appeals to you from its description and reviews, buy it, install it, and follow the app’s directions for printing.
The other way to print uses Apple’s AirPrint technology. This approach can be more expensive, but ultimately easier to use because the technology is built into your iPad—you’re not at the mercy of a third-party app.
The AirPrint option can be pricier is because it currently works with only about a dozen printer models—all of them made by HP. So if you don’t already have an AirPrint printer in the house, you have to buy one, which can cost at least $90. You can see the full list of AirPrint-compatible HP printer models at http://support.apple.com/kb/ht4356.
AirPrint will hopefully become more widespread soon, But if you do have a printer that works with it, here’s how AirPrint itself works:
Find an AirPrint-ready printer. If you just bought one to use with your iPad, follow the printer’s setup instructions for adding it to your wireless network. (You may have to upgrade certain models, like the HP Photosmart D110a, with a firmware update from the manufacturer; check the printer’s manual for specific steps.)
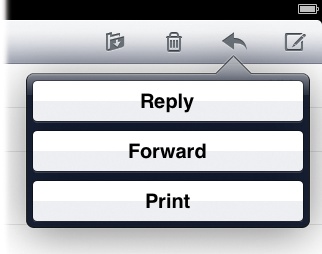
Pick a file on your iPad you want to print. AirPrint works with Mail, Safari, iBooks, and pictures from Photos and Photo Booth. Other apps from the App Store, like iWork (Chapter 10) and the note-organizing Evernote, also offer the Print option. With the file open, tap the
 icon and choose Print. (In Mail, tap the
  icon; in iWork, the Print command lives under the Tools
menu.)
icon; in iWork, the Print command lives under the Tools
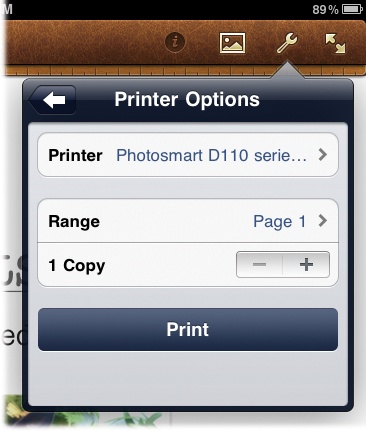
menu.)Tap Select Printer. The iPad searches the network for all the AirPrint machines it can locate and presents a list of the ones it finds. Tap the name of your printer in the list to select it.
With your printer now selected, tap the Printer Options arrow to go back to the main Print box. Tap Range to choose the pages you want to print. By default, you get All Pages, but if it’s a long web page or file, you can change that. Tap the - and + buttons to decrease or increase the number of copies you print.
Tap the Print button and listen for the sound of your printer whirring into action.
After you configure AirPrint the first time, the iPad remembers your printer and offers it as the default choice the next time you need to make paper.
Managing Print Jobs
Like other computers, the iPad shows you how many print jobs you have lined up to go through the printer. It also gives you the chance to cancel a particular print job if you change your mind—or realize you just told the iPad to print 12 copies instead of two.

To see what jobs you have in the print queue, double-click the Home button and swipe through the app panel until you see the Print Center icon (circled). Tap it to see a summary of the print job (or jobs). Tap the Cancel Printing button to stop a job and save that ink and paper for another time.
Tip
Have no plans to get an AirPrint-friendly printer and don’t want to deal with apps? The Web has its own collection of creative workarounds. One is Netputing’s AirPrint Activator for Mac OS X (netputing.com/airprintactivator), which lets iOS devices see and use a shared printer on a network; you can find a Windows version with a quick Web search. These shareware solutions often require some trust and technical fiddling, but often get the job done just fine.