Chapter 12. Master iTunes
As you can tell from the last chapter, iTunes is an important part of your iPad experience, because it brokers the transfer of songs, music, videos, books, personal info, and apps between your tablet and computer. In addition, it keeps a copy of all the digital goodies you buy and helps you organize your growing media collection.
If you’ve never had an iPod or iPhone before you got your iPad, you may not know what a powerful media jukebox program iTunes is in its own right. As this chapter explains, you can customize iTunes’ look, make playlists in all kinds of ways, change a song’s file format, adjust each song’s equalizer settings, and even back up your entire iTunes library to a set of discs for safekeeping.
So when it comes time to charge your iPad for a few hours, take a spin through iTunes.
Change the Look of the iTunes Window
Don’t be misled by iTunes’ stylized brushed-aluminum look. You can push and pull its various window parts like salt-water taffy:
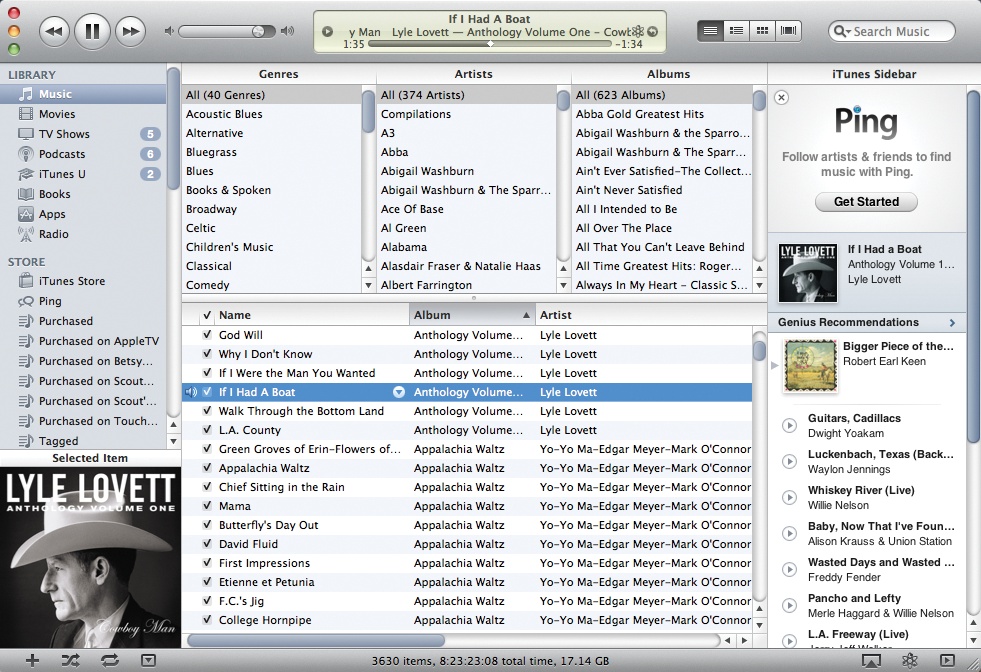
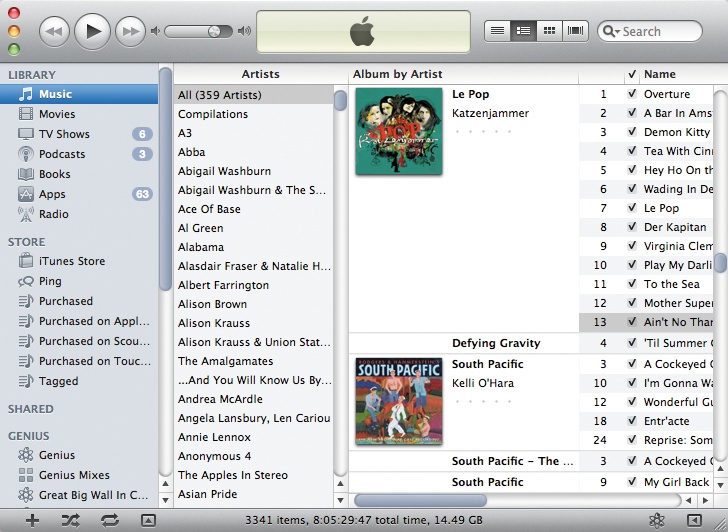
If you set the column browser to appear above the iTunes window, you can adjust the sizes of the panes by dragging the tiny dot (circled) at the top of the song list window up or down. (By default, the column browser appears on the left but you can change it by choosing View→Column Browser→On Top.) In either place, press Ctrl+B (⌘-B) to toggle the columns on or off.
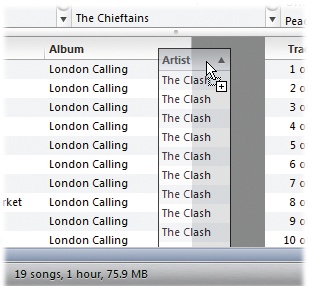
iTunes divides your main song list into columns that you can sort and re-arrange. Click a column title (like Name or Album) to sort the list alphabetically. Click again to reverse the sort order. Change the order of the columns by dragging them, as shown above.
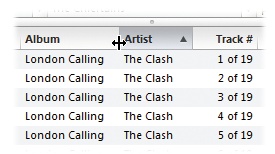
To adjust a column’s width, drag the right-hand vertical divider line (circled). You may need to grab it in the column title bar.
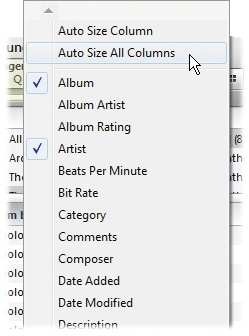
To resize all the columns so they expand to precisely fit their contents, right-click (Control-click) any column header and choose Auto Size All Columns.
To add (or delete) columns, right-click (Control-click) any column title. From the pop-up list of column categories (Bit Rate, Date Added, and so on), choose the column name you want to add or remove. Checkmarks indicate currently visible columns.
Change the Size of the iTunes Window
Lovely as iTunes is, it takes up a heck of a lot of screen real estate. So when you’re working on other things, you can shrink iTunes down to size. In fact, iTunes runs in three sizes: small, medium, and large:
Large. This is what you get the first time you open iTunes. (Hate the music hard-sell from the Ping sidebar on the right? Close the panel by clicking the square button in the lower-right corner.)
Medium. Switch back and forth between large and medium by pressing Ctrl+M (Shift-⌘-M) or choosing View→“Switch to Mini Player.”
Small. To really scrunch things down, start with the medium-size window, then drag the resize handle (
 ) leftward. To expand the panel, reverse the process.


Tired of losing your mini-iTunes window among the vast stack of open windows on your screen? Make the iTunes mini-player always visible on top of other open documents, windows, and assorted screen detritus. Open iTunes’ Preferences window (Ctrl+comma [⌘-comma]), click the Advanced tab, and then turn on the checkbox next to “Keep Mini Player on top of all other windows.” Now you won’t have to click frantically around the screen trying to find iTunes if you get caught listening to your bubblegum-pop playlist.
Change Import Settings for Better Audio Quality
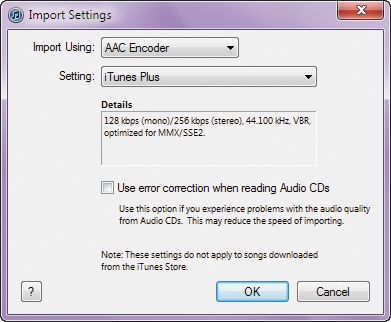
iPads can play back music in several digital audio formats: AAC, MP3, WAV, AIFF, and one called Apple Lossless. If you find your songs’ audio quality lacking, you can change the way iTunes encodes, or converts, them when it copies tracks from your CDs. iTunes gives you two main options in its import settings box. Go to Edit (iTunes)→Preferences→General, and then click the Import Settings button to get there. Your options are:
Audio format (use the drop-down menu beside “Import Using”). Some formats tightly compress audio files to save space. The tradeoff: lost sound quality. Highly compressed formats include AAC (iTunes’ default setting) and MP3. Formats that use little or no compression include WAV and AIFF, which sound better but take up more space. Apple Lossless splits the difference: It has better sound quality than AAC and MP3 but isn’t as hefty as WAV or AIFF.
Bit rate (beside “Setting”). The higher the number of bits listed, the greater the amount of information iTunes uses to recreate your song (in other words, your files take up more storage space). The advantage? Better sound quality.
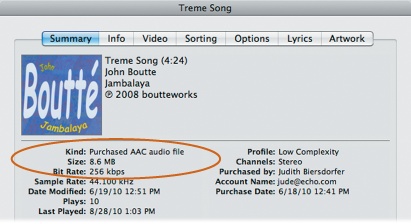
To see a song’s format and other technical information, click its title in iTunes, press Ctrl+I (⌘-I), and then click the Summary tab in the Get Info box.
Four Ways to Browse Your Collection
Instead of just presenting you with boring lists, iTunes gives you four options for browsing your media collection—some of them more visual than others. Click the View button at the top of iTunes to switch among them.
List View is iTunes’ all-text display; you can see a sample of it on Change the Size of the iTunes Window. Press Ctrl+B (⌘-B) to toggle on and off the vertical (or horizontal) panes that group your music by genre, artist, and album. Press Ctrl+Alt+3 (Option-⌘-3) to jump back to List View from another view.
Album List View displays an album cover in iTunes’ first column if you have five or more tracks from that album. (Choose View→Always Show Artwork to override the five-track minimum.) Press Ctrl+Alt+4 (Option-⌘-4) to jump to Album List View.
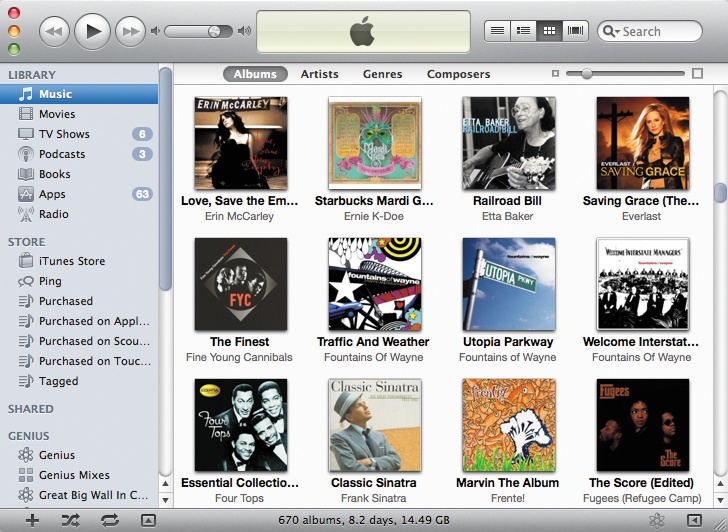
Grid View presents your media collection in a nifty array of album covers and other artwork. Adjust the size of the covers with the slider at the top of the window. Press Ctrl+Alt+5 (Option-⌘-5) to switch to the Grid.
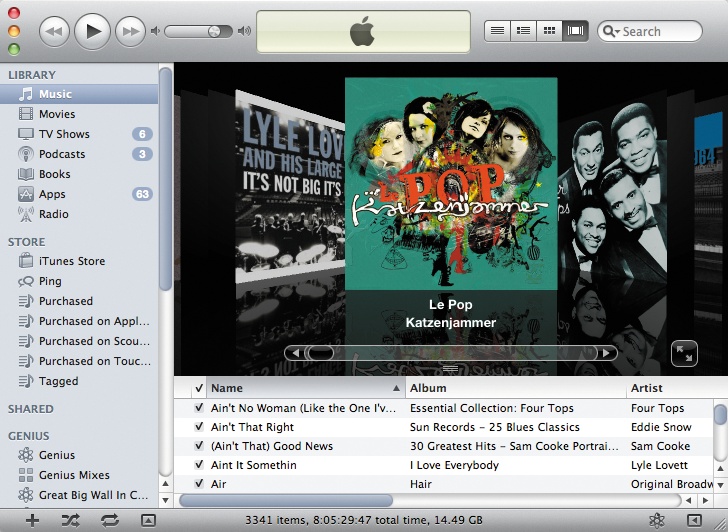
Cover Flow is the view for you if you really like album art. Your collection appears as a stream of album covers. (Ctrl+Alt+6 [Option-⌘-6] is the shortcut.) To browse them, press the left- and right-arrow keys on the keyboard or drag the scroll bar underneath the albums. Click the
 button by the slider bar to turn your whole screen into Cover View,
complete with playback controls.
button by the slider bar to turn your whole screen into Cover View,
complete with playback controls.
Search for Songs in iTunes
You can call up a list of all the songs with a specific word in their title, album name,
or artist name just by clicking the Source pane’s Music icon (![]() , under “Library”) and typing a few letters into the Search box in
iTunes’ upper-right corner. With each letter you type, iTunes shortens the list of songs it
displays, showing you only tracks that match what you type.
, under “Library”) and typing a few letters into the Search box in
iTunes’ upper-right corner. With each letter you type, iTunes shortens the list of songs it
displays, showing you only tracks that match what you type.
For example, typing train brings up a list of everything in your music collection that has the word “train” somewhere in the song’s information—maybe the song’s title (“Boat Train”) or the Steve Earle album (Train A Comin’). Click the other Library icons, like Movies or Audiobooks, to comb those collections for titles that match a search term.
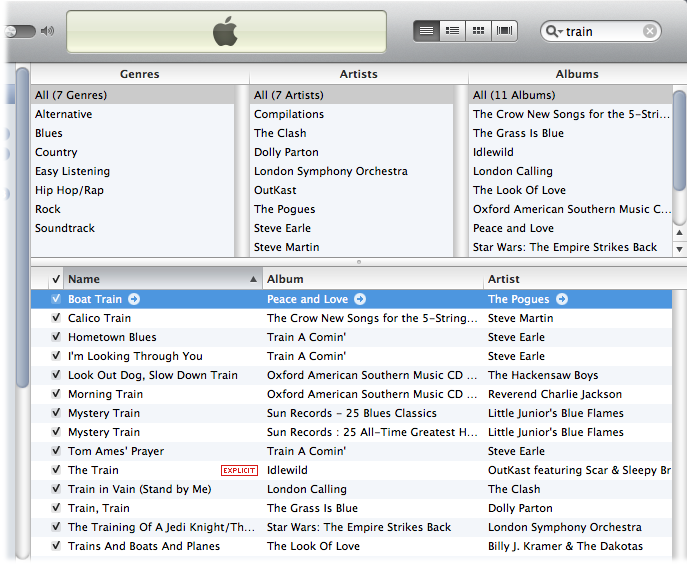
You can also search for specific titles using the iTunes browser mentioned earlier in this chapter. If you can’t see the browser pane, press Ctrl+B (⌘-B) to summon it. The browser reveals your music collection grouped by categories like genre, artist, and album (select the categories at View→Column Browser). Hit the same keys again (Ctrl+B [⌘-B]) to close the browser.
Tip
If you’re searching for music in general, why not see what your pals are listening to? Ping, Apple’s social-networking service in iTunes (Ping Your Way to New Music), lets you create profile pages, follow your friends’ musical tastes, and more; click the Ping icon under “Store” in the Source list or check out www.apple.com/itunes/ping.
Change a Song’s File Format
Sometimes you’ve got a song in iTunes whose format you want to change—you might need to convert a big AIFF file before loading it onto your iPad, for example. First, head over to Edit→Preferences (iTunes→Preferences), click the General tab, and then click the Import Settings button. From the Import Using pop-up menu, pick the format you want to convert to and then click OK.

Now, in your iTunes library, select the song you want to convert and choose Advanced→Create MP3 Version (or AIFF, or whatever format you just picked).
If you have a whole folder or disk full of potential converts, hold down the Shift (Option) key as you choose Advanced→“Convert to AAC” (or your chosen encoding format). A window pops up so you can navigate to the folder or disk holding the files you want to convert. iTunes won’t convert protected media: Audible.com tracks and older tracks from the iTunes Store that still have copy-protection built in. If you bought a song after April 2009, though, odds are you’re delightfully free of such restrictions, since that’s when Apple stopped copy-protecting music.
iTunes deposits your freshly converted tracks in your library, alongside the songs in their original format.
Tip
Although you intentionally created a duplicate of a song here, you may have unintended dupes as a result of home sharing, ripping the same album twice, or other accidental copying. To find these duplicates—and recover a little hard drive space—choose File→Display Duplicates. iTunes dutifully rounds up all the dupes in one window for you to inspect and possibly delete. Just make sure they are true duplicates, not, say, a studio and a live version of the same song. (To search for exact duplicates, hold down the Shift [Option] key and choose File→Display→Exact Duplicates.) Click the Show All button to return to your full music collection.
Improve Your Tunes with the Graphic Equalizer
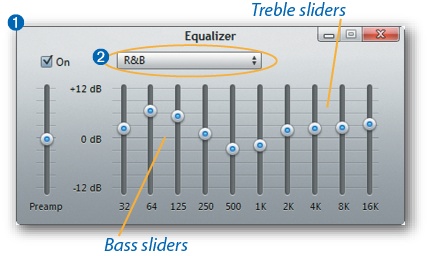
If you want to improve the way your songs sound, use iTunes’ graphic equalizer (EQ) to adjust the audio for the type of music you play. You might want to boost the bass tones in dance tracks to emphasize the booming rhythm, for example.
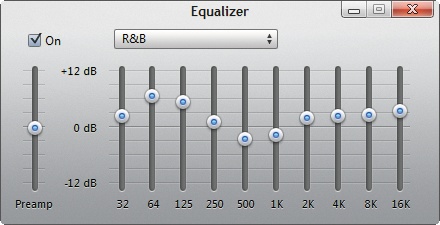
To get the equalizer front and center on your screen, choose View→Equalizer (Window→Equalizer) and unleash some of your new EQ powers.
Drag the sliders (bass on the left, treble on the right) to accommodate your listening tastes (or the strengths and weaknesses of your speakers or headphones). You can drag the Preamp slider up or down to compensate for songs that sound too loud or too soft. To create your own presets, click the pop-up menu (circled) and select Make Preset.
Use the pop-up menu to choose one of the canned presets for different types of music (Classical, Dance, Jazz, and so on).
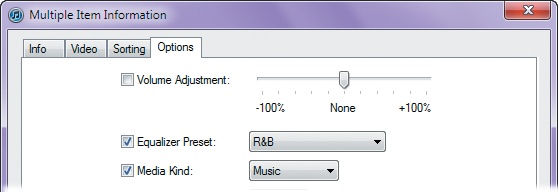
You can apply equalizer settings to an entire album or to individual songs.
To apply settings to a whole album, select the album’s name (either in Grid View or in the iTunes browser pane). Then press Ctrl+I (⌘-I) and click “Yes” if iTunes asks whether you’re sure you want to edit multiple items. In the box that pops up, click the Options tab and choose your preferred setting from the Equalizer Preset pull-down menu.
Note
Equalization is the art of adjusting the frequency response of an audio signal. An equalizer emphasizes, or boosts, some of the signal’s frequencies while lowering others. In the range of audible sound, bass frequency is the low rumbly noise; treble is at the opposite end of the sound spectrum, with high, even shrill, notes; and midrange is, of course, in the middle, and it’s the most audible to human ears.
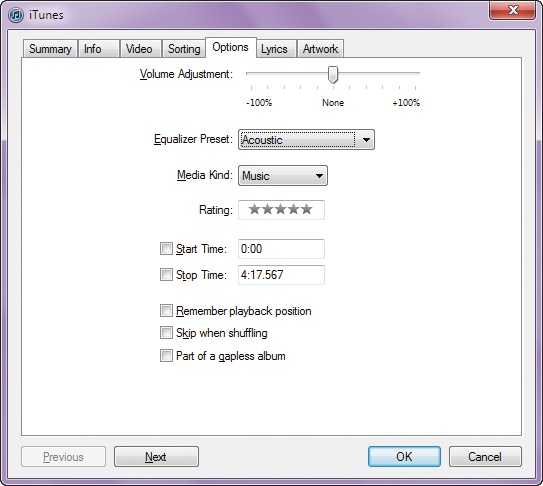
You can apply equalizer presets to individual songs as well. Instead of selecting the album name in the iTunes window, click the song name, and then press Ctrl+I (⌘+I). Click the Options tab and choose a setting from the Equalizer Preset menu.
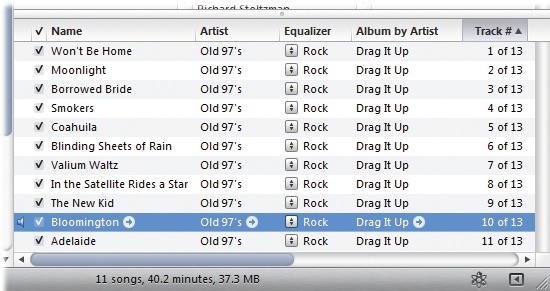
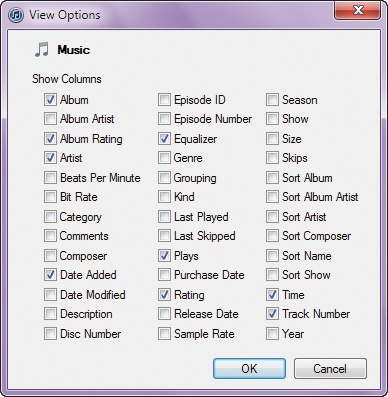
Finally, you can change the EQ settings right from your song lists by adding an Equalizer column. Choose View→View Options and then turn on the Equalizer checkbox. A new column appears in your track lists, where you can select EQ settings.
Tip
The iPad offers more than 20 equalizer presets you can use on the go. To set your iPad’s equalizer to a setting designed for a specific type of music, tap Settings→iPod→EQ. Flick down the list of presets until you find one that matches your music style, and then tap to select it. Your iPad now lists the preset’s name next to “EQ” on the Settings menu, and your music, hopefully, sounds better.
Edit Song Information
Tired of seeing so many tunes named Untitled in your library? You can change song titles in iTunes—to enter a song’s real name, for example, or to fix a typo—a couple of ways.
In the song list, click the text you want to change, wait a moment, and then click again. The title now appears highlighted and you can edit the text—just as you do when you change the name of a Word document on a desktop computer.
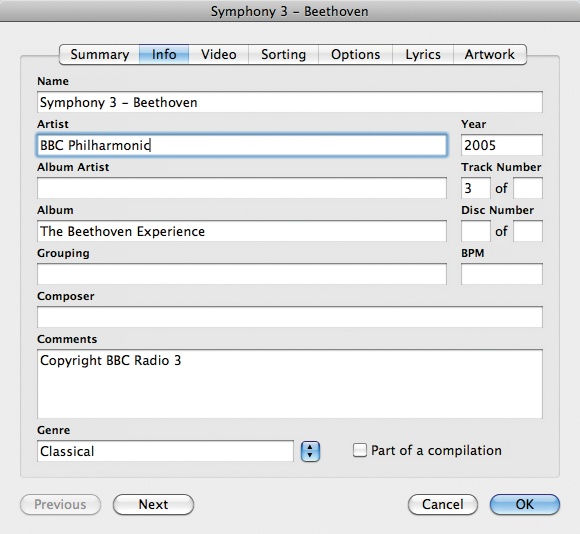
Another way to change a song’s title, artist name, or other information is to click the song in the iTunes window and press Ctrl+I (⌘-I) to summon the Get Info box. (Choose File→Get Info if you forget the keyboard shortcut.) Click the Info tab and type in the new track information.
Too much work? You can always try Advanced→Get CD Track Names and see what comes up, although the Gracenote database iTunes uses may not know the title if it’s something deeply obscure or homemade.
Tip
Once you have a song’s Get Info box onscreen, use the Previous and Next buttons to navigate to other tracks grouped with it in the iTunes song list window. That way, you can rapidly edit all the track information in the same playlist, on the same album, and so on, without closing and opening boxes the whole time.
Edit Album Information and Song Gaps
You don’t have to adjust your track information on a song-by-song basis. You can edit an entire album’s worth of tracks by clicking the Album name in the iTunes column browser (or on its cover in Grid View) and pressing Ctrl+I (⌘-I) to bring up the Get Info box.
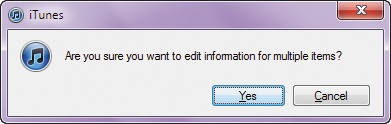
Ever careful, iTunes flashes an alert box asking if you really want to change the info for a bunch of things all at once. Click Yes.
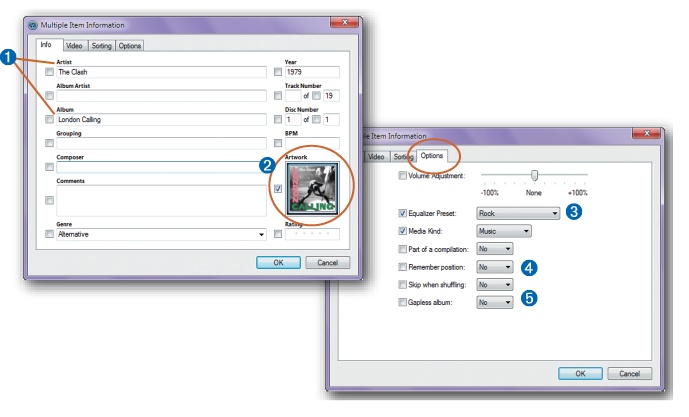
You can make all sorts of changes to an album in the four-tabbed box that pops up. Here are a few examples:
Fix a typo or mistake in the Album or Artist name boxes.
Manually add an album cover or photo of your choice to the whole album by dragging it into the Artwork box.
Click the Options tab and change the Equalizer preset for all the songs.
Have iTunes skip the album when you shuffle music—great for keeping winter holiday music out of your summer barbecue rotation.
Tell iTunes to play back the album without those two-second gaps between tracks by choosing the “Gapless album” option. (Perfect for opera and Abbey Road!)
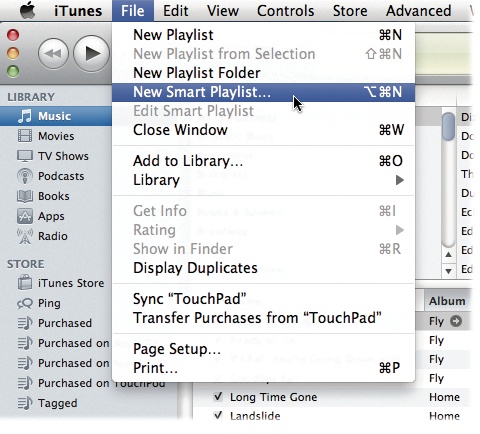
Make a New Playlist in iTunes
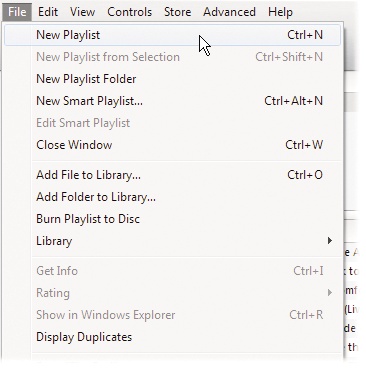
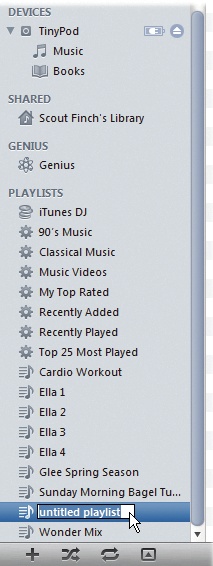
To create a playlist, press Ctrl+N (⌘-N). You can also choose File→New Playlist or click the + button at the bottom left of the iTunes window.
All freshly minted playlists start out with the impersonal name “untitled playlist.” Fortunately, iTunes highlights this generic name, ready for editing—just type in a better name: Cardio Workout, Hits of the Highland Lute, or whatever you want. As you add new lists, iTunes alphabetizes them in the Playlists area of the Source list.
Once you create and name a spanking-new playlist, you’re ready to add your songs or videos. You can do that in three ways, so choose the one you like best.
Playlist-Making Method #1
If this is your first playlist, double-click the new playlist’s icon in the Source list. You get your full music library in one window, and your empty playlist in the other. (iTunes may pop up an intro screen. Ignore it and go to step 2.)
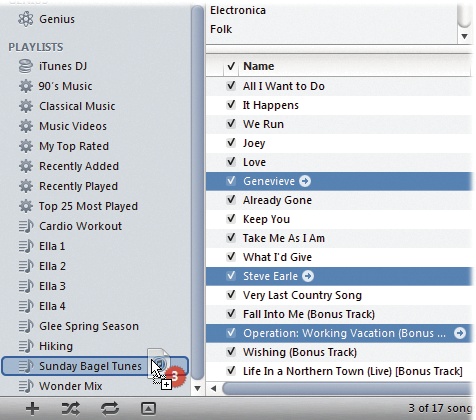
Go back to the main iTunes window and drag the song titles you want from your library over to the new playlist window. (Make sure you click the Music icon [
 ] in the Source list to see all your songs.) Drag songs one at a
time, or grab a bunch by selecting multiple tracks by Ctrl+clicking (⌘-clicking) each
title.
] in the Source list to see all your songs.) Drag songs one at a
time, or grab a bunch by selecting multiple tracks by Ctrl+clicking (⌘-clicking) each
title.
Playlist-Making Method #2
Playlist-Making Method #3
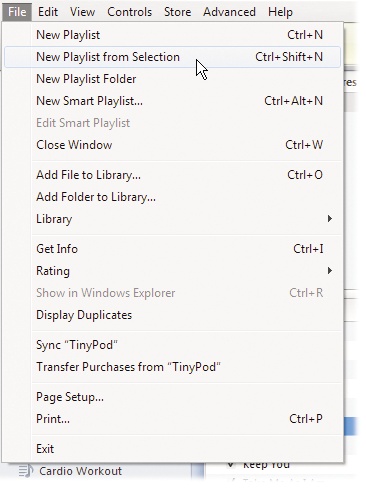
You can also pick and choose songs in your library and then create a playlist out of the highlighted tunes. Select tracks by Ctrl+clicking (⌘-clicking) the titles.
Then choose File→New Playlist From Selection, or press Ctrl+Shift+N (⌘+Shift+N). The songs you selected appear in a brand-new playlist. If all of them came from the same album, iTunes names the playlist after the album (but it also highlights the title box so you can rename it).
Don’t worry about clogging up your hard drive. When you drag a song title onto a playlist, you don’t copy the song, you just tell iTunes where it can find the tune. In essence, you’re creating a shortcut to the track. That means you can have the same song on several playlists but only one copy of it on your computer.
That nice iTunes even gives you some playlists of its own devising, like “Top 25 Most Played” and “Purchased” (a convenient place to find all your iTunes Store goodies listed in one place—and one to definitely back up to a CD or DVD; see Back Up Your iTunes Files to Disc).
Change or Delete an Existing Playlist
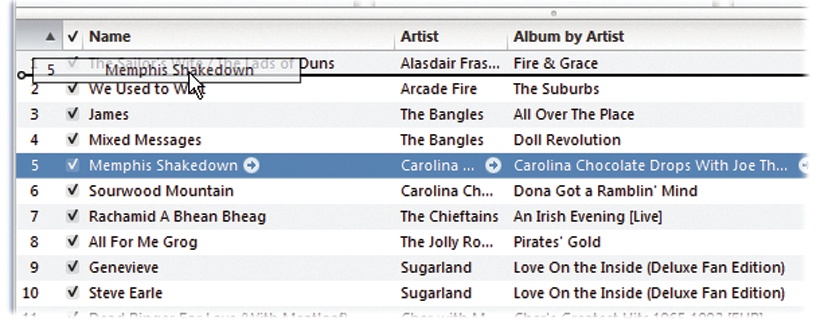
If you change your mind about a playlist’s tune order, drag the song titles up or down within the playlist window. Just make sure to sort the playlist by song order first (click the top of the first column, the one with the numbers listed in front of the song titles).
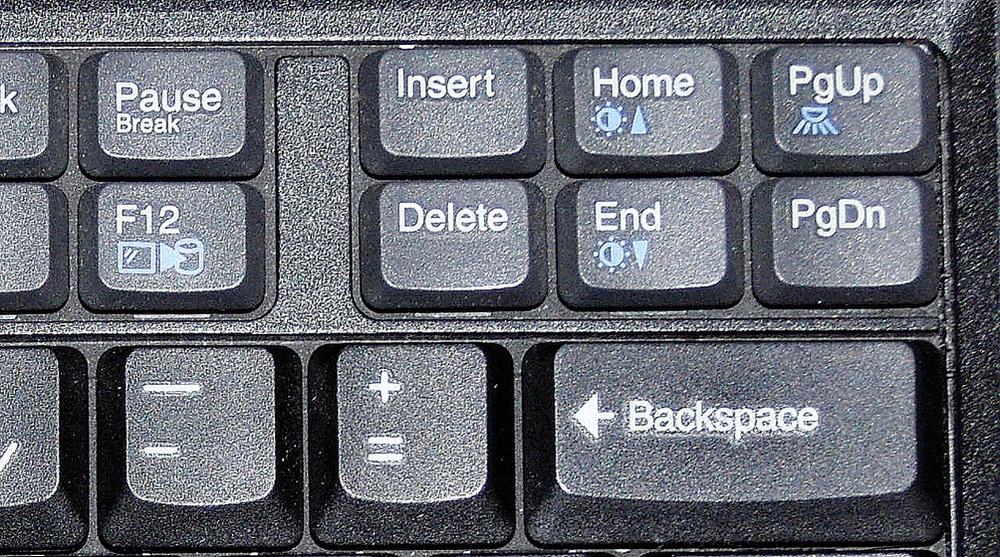
You can always drag more songs into a playlist, and you can delete titles if you your
playlist needs pruning. Click the song in the playlist window and then hit Delete or
Backspace. When iTunes asks you to confirm your decision, click Yes. Remember, deleting a song
from a playlist doesn’t delete it from your music library—it just removes the title from
that particular playlist. (You can get rid of a song for good only by pressing Delete or
Backspace from within the iTunes library; select ![]() under “Library” to get there.)
under “Library” to get there.)
You can quickly add a song to an existing playlist right from the main iTunes window, no matter which view you happen to be using: Select the song, right-click (Control-click) it, and then, in the pop-up menu, choose “Add to Playlist.” Scroll to the playlist you want to use and then click the mouse button to add the track.
To see how many playlists contain a certain song, select the track, right-click (Control-click) it, and then choose “Show in Playlist” in the pop-up menu.
When it’s time to get rid of a playlist once and for all because the party’s over, select the playlist icon in iTunes and press the Delete key. You see a message box from iTunes asking you to confirm your decision. If you autosync your iPad, the playlist disappears from there, too.
Make a Genius Playlist in iTunes
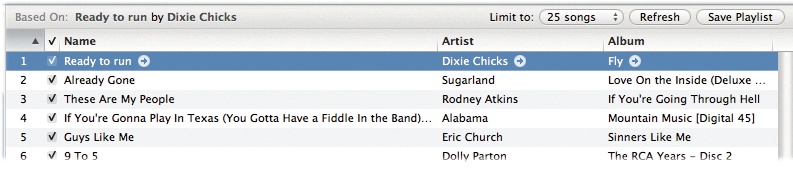
Playlists are fun to make, but occasionally you just don’t have the time or energy. If that’s the case, call in an expert—the iTunes Genius. With the Genius feature, you click any song you’re in the mood for and iTunes crafts a playlist of 25 to 100 songs that it thinks go well with the one you picked.
The first time you use it, Genius asks permission to go through your music collection and gather song information, and then it uploads that data anonymously to Apple. Apple’s software analyzes your information and then adds it to a big giant database of everybody else’s song info (to improve the Genius’s suggestions). After that, the Genius is ready for duty. Here’s the procedure:
Click a song title in your library.
Click the Genius button (
 ) at the bottom right of iTunes. If you’re playing the song, click
the Genius icon in the iTunes display window.
) at the bottom right of iTunes. If you’re playing the song, click
the Genius icon in the iTunes display window.iTunes presents you with your new playlist in a flash.
Use the buttons at the top of the Genius window to adjust the number of songs in the playlist, refresh it with new songs if you want a different mix, and—best of all—save the playlist permanently.
The Genius doesn’t work if it doesn’t have enough information about a song—or if there aren’t enough similar songs that match your kick-off song. In that case, pick another tune. If you frequently add new music to your library and want to get it in the mixes, inform the Genius at Store→Update Genius.
And if you have the Genius sidebar open as you listen to music, the Genius cheerfully presents you with a list of complementary songs that you can buy right there to round out your listening experience.
Genius Mixes in iTunes
Yes, the iTunes Genius feature takes almost all the effort out of making a play-list—all you do is click the Genius button. But if even a one-button click seems like too much effort, iTunes makes hands-off playlist creation even easier. Welcome to Genius Mixes.
The Genius Mix feature works like this: iTunes takes it upon itself to search your entire music library and then automatically compose (depending on the size of your library), up to 12 different song collections. Unlike a Genius playlist of tunes calculated to go well together, a Genius Mix is more like a radio station or cable-TV music channel based on genre. Depending on what’s in your iTunes library, the Genius could present you with a hip hop mix, a country mix, a classical mix, and so on. In addition, the Genius Mix creates up to 12 playlists at once, all saved and ready to play, unlike the Genius’s single mix that you have to save to preserve.
If you don’t already see a square purple Genius Mix icon (![]() ) in your iTunes Source list, choose Store→Update Genius. Once
activated, the Genius quietly stirs up its sonic concoctions from your music library.
) in your iTunes Source list, choose Store→Update Genius. Once
activated, the Genius quietly stirs up its sonic concoctions from your music library.
To play a Genius Mix, click the Genius Mix icon in the Source list. The iTunes window reverts to Grid View and displays the mixes it created, each represented by a quartet of album covers from tracks in the mix. Pass your mouse pointer over the album squares to see the name of the mix or click the squares to start playing music.
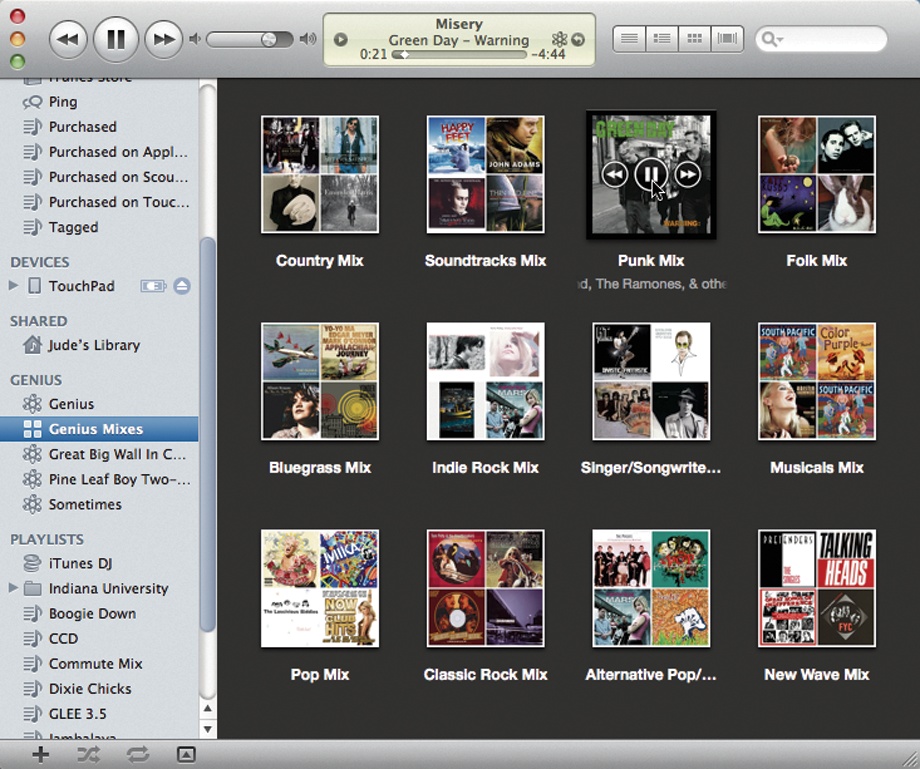
Like most traditional radio stations, you don’t get to see a list of what’s actually in a particular Genius Mix—it’s all a surprise. If you don’t care for a song the Genius included, hit the forward button or tap the right-arrow key on your computer keyboard to skip to the next track.
Genius Mixes can be another great way to effortlessly toss on some background music at a party, and you may even hear songs you haven’t played in forever. Want to take the Genius Mix with you? Sync it to your iPad (Sync Music).
You’re the Critic: Rate Your Music
Although there’s no way to give a song two thumbs up in iTunes, you can assign an album or each song in your collection a one- to five-star rating. Then you can use the ratings to produce nothing but playlists of the greatest hits on your hard drive.
If you assign an album a single rating, all the songs on that album get the same number of stars. If you rate just a few tracks on an album but not all of them, the album rating reflects the average of the rated songs—so an album with two five-star songs and a bunch of unrated tracks gets a five-star rating.
To add ratings, first make sure you turn on the Album Rating and/or Rating columns in the iTunes View Options box (Ctrl+J [⌘-J]).
Click the song you want to rate to highlight it. iTunes displays five dots in the Rating column (in iTunes’ main window). When you click a dot, iTunes turns it into a star. Now either drag the mouse across the column to create one to five stars, or click one of the dots itself to apply a rating (click the third dot, for example, and iTunes gives the song three stars).
Once you assign ratings, you can sort your song list by star rating (click the Album Rating or Rating column title), create a Smart Playlist (Smart Playlists: Another Way for iTunes to Assemble Song Sets) of only your personal favorites (File→New Smart Playlist; choose Album Rating or Rating from the first drop-down menu), and so on.
You can even rate songs on your iPad, and iTunes records the ratings the next time you sync up.
To rate a song on your iPad, start playing it and tap the small album cover in the
Now Playing corner to switch to the full-screen Now Playing window. Tap the screen to get the hidden playback controls to
appear, then tap the ![]() icon on the bottom right corner. The album cover spins around to reveal
the track listing. Swipe your finger along the row of dots above the song list to transform
those empty dots into critical stars for the track that’s currently playing.
icon on the bottom right corner. The album cover spins around to reveal
the track listing. Swipe your finger along the row of dots above the song list to transform
those empty dots into critical stars for the track that’s currently playing.
Smart Playlists: Another Way for iTunes to Assemble Song Sets
As cool as the Genius is, sometimes you want a little more manual control over what goes into your automatically generated music mixes. That’s where Smart Playlists rise to the occasion.
Once you give it some guidelines, a Smart Playlist goes sniffing through your music library and comes up with custom mixes based on those guidelines. A Smart Playlist even keeps tabs on the music that comes and goes from your library and adjusts itself based on that.
You might tell one Smart Playlist to assemble 45 minutes’ worth of songs that you’ve rated higher than four stars but rarely listen to, and another to play your most-often-played songs from the 1980s. The Smart Playlists you create are limited only by your imagination.
To start a Smart Playlist, press Ctrl+Alt+N (Option-⌘-N) or choose File→New Smart Playlist. A Smart Playlist box opens: It sports a gear-shaped icon (
 ) next to its name in the Source list (a regular playlist has a blue
icon with a music note icon in it).
) next to its name in the Source list (a regular playlist has a blue
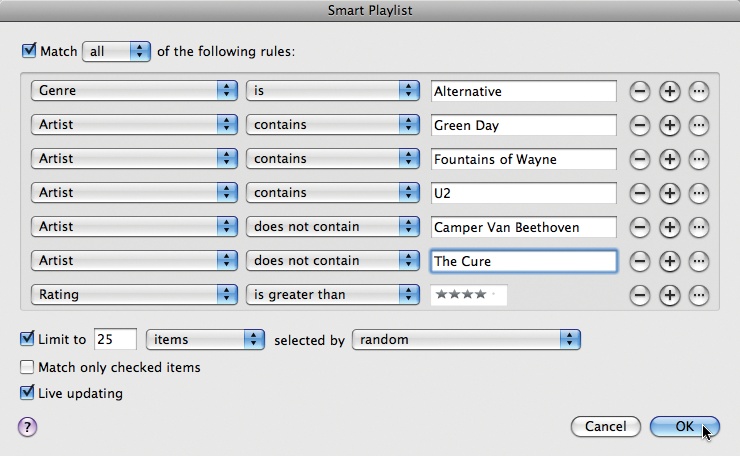
icon with a music note icon in it).Give iTunes detailed instructions about what you want to hear. You can select a few artists you like and have iTunes leave off the ones you’re not in the mood for, pluck songs that only fall within a certain genre or year, and so on. To add multiple, cumulative criteria, click the + button.
Turn on the “Live updating” checkbox. This tells iTunes to keep the playlist updated as your collection, ratings, and play count change. (The play count tells iTunes how many times you play a track, a good indicator of how much you like a song.)
To edit an existing Smart Playlist, right-click (Ctrl-click) the playlist’s name and then choose Edit Smart Playlist.
A Smart Playlist is a dialogue between you and iTunes: You tell it what you want in as much detail as you want, and the program whips up a playlist according to your instructions.
You can even instruct a Smart Playlist to pull tracks from your current Genius playlist. Just click the + button to add a preference, choose Playlist as another criteria, and select Genius from the list of available playlists.
Ping Your Way to New Music
Facebook, MySpace, Twitter, Tumblr, Flickr—if there’s anything the top social-networking sites have proved, it’s that people like to share stuff with their friends. And now there’s Ping, Apple’s very own social network designed to connect people who have a mutual love of music.
In case you had any doubt about what Ping is supposed to be, Steve Jobs himself described it as “Facebook and Twitter meet iTunes.” (While Ping was originally supposed to link with Facebook through the Facebook Connect service so you could easily update your profile with your Ping activities, a case of “unfriending” between Apple and Facebook prevented the partnership. So far, anyway.)
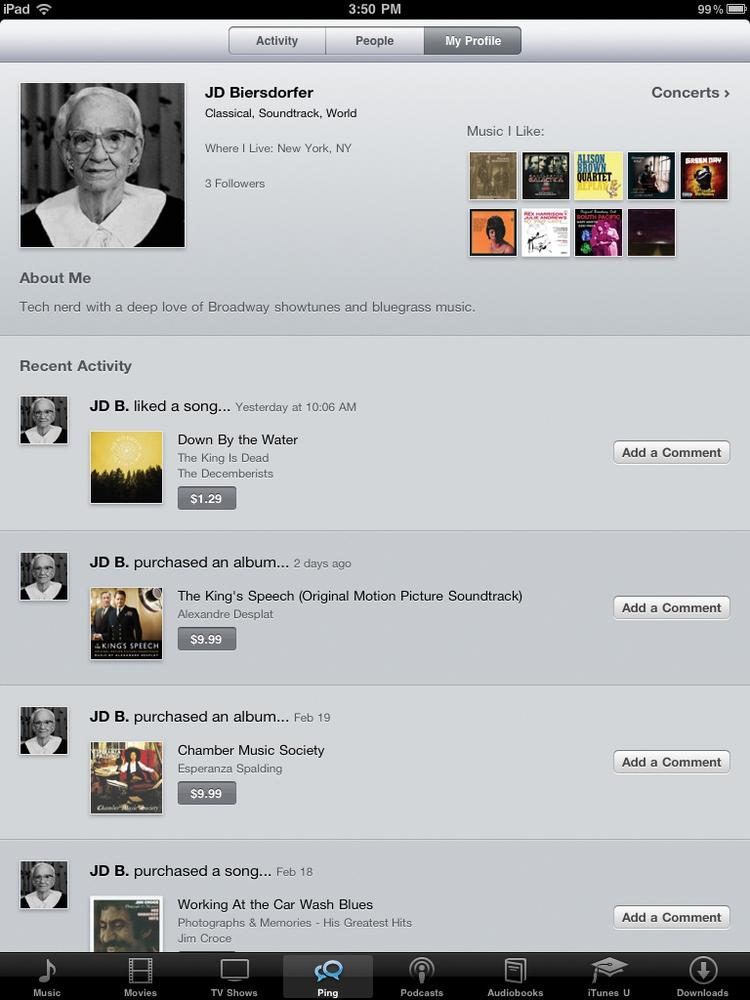
As with any social network, the first thing you have to do is set up your profile page, your own little part of Ping where you can list your favorite bands and artists, keep track of upcoming events, exchange notes with other music-minded pals, and hear samples of what your friends are listening to.
To set up your Ping profile:
Click the Ping link in the Source list. Apple doesn’t force all iTunes users to join, so you have to click a button that says Turn On Ping and agree to the legal disclaimer about using the service and privacy.
Fill in your personal details. Like most social-networking sites, you fill in your name, the city where you live, and other information. You can also add a photo to your profile page. Since this is a music-themed service, you can announce your three favorite genres of music on your page, too. You can tell as much or as little about yourself as you want, and even select up to eight iTunes tracks (complete with audio samples) to display on your page. People who follow you can read your info (they see your Ping status updates and iTunes purchases as you make them), and, in return, you can see theirs if you follow them.
Adjust privacy settings. As part of your profile setup, Ping asks how public you want to be so other members can find you. You have three choices. You can let everyone else on the service look at and “follow” your profile page—whether you know them or not, which is a good way to find new friends (and sometimes stalkers). You can also make your basic profile visible to others only after you give them permission to see it. And lastly, you can hide your page from everyone and just use it as a personal place to track concert listings.
Find friends. Once you set up your profile page and privacy settings, Ping encourages you to find other media lovers on the service. You can search for the email addresses of people you know and invite them to be your Ping friends. At the same time, your friends—and links to their Ping pages—appear on your own patch of Ping real estate.


When you get Ping set up, it works just like any other social network. You can post your thoughts on the current state of music—and read those of your Ping friends. You can sign up to follow bands and musicians who use Ping—to see what Lady Gaga, Yo-Yo Ma, and others are up to, for example. You can write your own album reviews, comment on friends’ pages, browse music news, and check concert listings for your favorite groups. You can click the Like button next to albums or tracks to publicly post your approval.
Items you buy in the iTunes Store get listed on your Ping page, too, so everyone knows what you’re into these days. If you’d rather keep your ’80s synthpop addiction a secret, hide your purchases by clicking the Remove button next to the item on your Recent Activity feed.
If you use the handy Ping sidebar to see what your pals are listening to, you’re not chained to the desktop for updates. On the iPad, tap Home→iTunes→Ping (right) to keep up with Ping things while you’re out with your tablet.
Ping isn’t for you? If you want to turn it off, click the Account link on the main Store page and log into your iTunes account. On the Account Settings page, click the buttons to either edit your profile (which you can also do from a link on your Ping page itself) or turn off Ping for good.
Set Up Multiple iTunes Libraries
There’s Home Sharing and then there’s home, sharing. Many families have just one computer. If everyone’s using the same copy of iTunes, you soon get the Wiggles bumping up against the Wu-Tang Clan if you have iTunes shuffling the music tracks, or when you autosync multiple iPads. Wouldn’t it be great if everyone had a personal iTunes library to have and to hold, to sync and to shuffle—separately? Absolutely.
To use multiple iTunes libraries, follow these steps:
Quit iTunes.
Hold down the Shift (Option) key on your PC or Mac keyboard and launch iTunes. In the box that pops up, click Create Library. Give it a name, like “Tiffany’s Music” or “Songs My Wife Hates.”
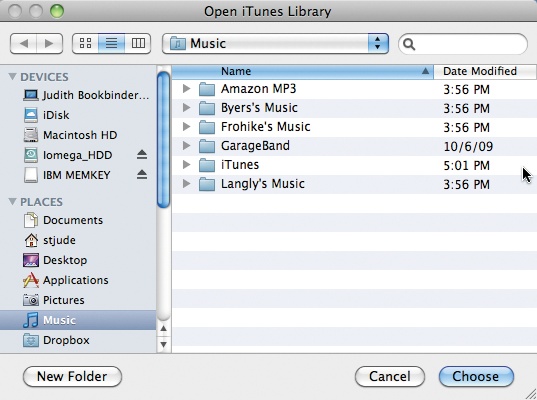
iTunes opens up, but with an empty library. If you have a bunch of music in your main library that you want to move over to this one, choose File→“Add to Library.”
Navigate to the music you want and add it. If the songs are in your original library, they’re probably in Music→iTunes→iTunes Media→Music (Home→Music→iTunes→iTunes Media→Music), in folders sorted by artist name. Choose the files you want to add.
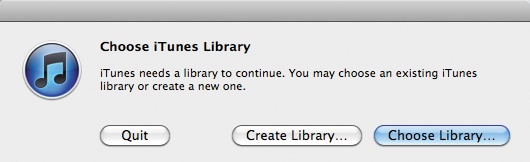
To switch between libraries, hold down the Shift (Option) key when you start iTunes, and you’ll get a box that lets you pick the library you want. (If you don’t choose a library, iTunes opens the last one used.) Tracks from CDs you copy go into whatever library’s open. And now that you have those songs in the new library, you can switch back to the other one and get rid of them.
See Your iTunes Purchase History and Get iTunes Store Help
Ever notice songs in a playlist or in your iTunes library that you don’t remember buying? Good thing that iTunes keeps track of what you buy and when you buy it. If you suspect that one of the kids knows your password and is sneaking in forbidden downloads or maybe that your credit card was wrongly charged, you can contact the Store or check your account’s purchase history to see what’s been downloaded in your name.
To do the latter, in the iTunes window, click the triangle next to your account name and choose Account from the menu. Type in your password and then click Purchase History. Your latest purchase appears at the top of the page, and you can scroll farther down to see a list of previous acquisitions. Everything billed to your account over the months and years is there, including gift-certificate purchases. If you see something wrong, click the “Report a Problem” link and say something.

If you have other issues with your account or want to submit a specific query or comment, the online help center awaits. From the iTunes Store’s main page, click the Support link. Your web browser presents you with the main iTunes service and support page; click the link that best describes what you want to learn or complain about. For billing or credit card issues, check out the iTunes Account and Billing Support link on that same web page.
Tip
iTunes 10.3 and later lets you re-download Store purchases made on other devices (like an iPhone) to your computer. Click the Purchased playlist in the iTunes Source list and click the Download Previous Purchases link at the bottom of the window to see a list of all the music, apps, and books you’ve bought. Click the iCloud icon, type in your iTunes password, and grab those files again.
Move the iTunes Music/Media Folder to an External Drive
Media libraries grow large, and hard drives can seem to shrink, as you add thousands of songs and hundreds of videos to iTunes. You may, in fact, think about using a big external drive for iTunes storage (and more iPad videos). That’s just dandy, but you need to make sure that iTunes knows what you intend to do.
If you rudely drag your iTunes Music (or Media) folder to a different place without telling iTunes, it thinks the songs and videos in your collection are gone. The next time you start the program, you’ll find a newly created, empty Music folder. (While iTunes remains empty but calm, you may be having heart palpitations as you picture your media collection vanishing in a puff of bytes.)
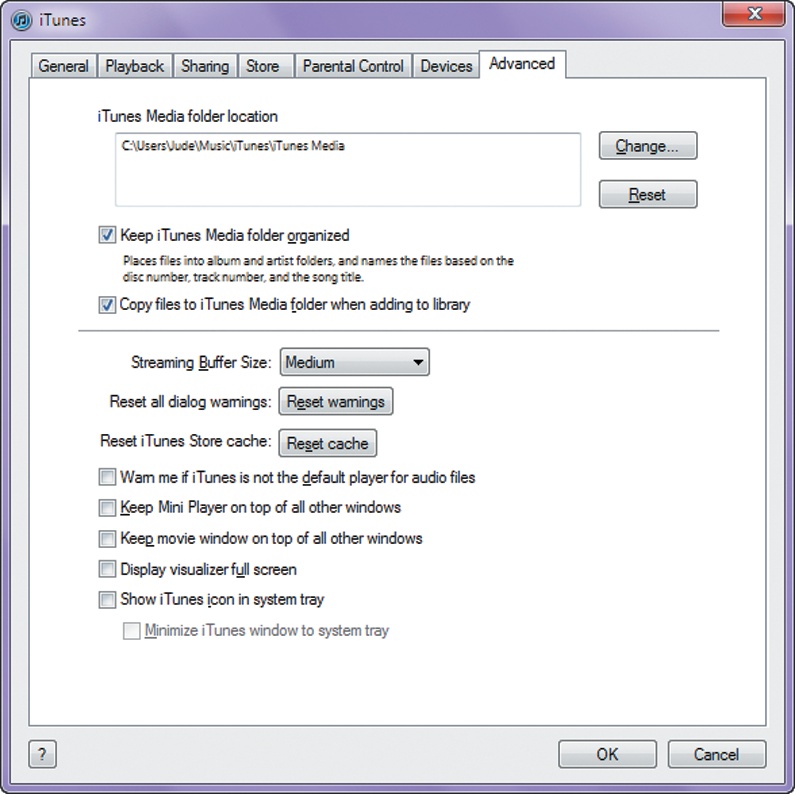
To move the Music folder to a new drive, let iTunes know where you’re putting it. Before you start, make sure iTunes has been putting all your songs and videos in the iTunes Music folder by opening the Preferences box (Ctrl+comma [⌘-comma]) and confirming the folder location. Then:
Click the Advanced tab and turn on the checkbox next to “Keep iTunes Music folder organized.”
Click the Change button in the iTunes Music folder location area and navigate to the external hard drive.
Click the New Folder button in the window, type in a name for the iTunes library, and then click the Create button.
Back in the Change Music Folder Location box, click the Open button.
Click OK to close the iTunes Preferences box.
Choose File→Library→Organize Library and then check “Consolidate files.”
Ignore the ominous warnings (“This cannot be undone”) and let iTunes heave a complete copy of your iTunes folder to the external drive. Once you confirm that everything is in the new library, trash your old iTunes Media folder and empty the Trash or Recycle Bin to get all those gigs of space back.
Back Up Your iTunes Files to Disc
If your hard drive dies and takes your whole iTunes folder with it, you lose your music and movies—and your iPad will be lonely. Apple’s new iCloud service lets you re-download songs, apps, and iBooks you’ve purchased, but you may have library items that are unavailable in the iTunes Store (or that you homeripped) that are gone forever. Luckily, iTunes gives you a super simple way to back up your files onto a CD or DVD.
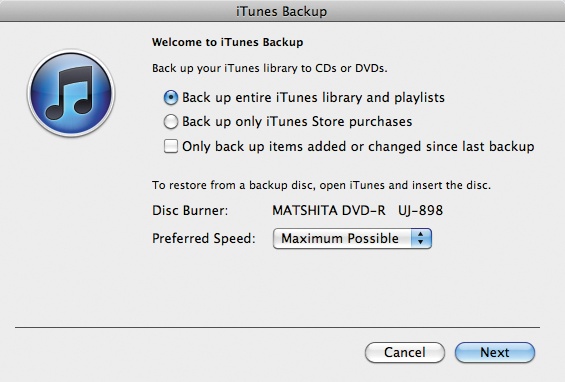
In iTunes, choose File→Library→“Back Up to Disc.”
In the box that pops up, choose what you want to back up—everything, or just items you paid for in the iTunes Store. Later, after you back up the first time, you can turn on a checkbox to back up only the stuff you added since the last backup.
Have a stack of discs ready to feed into your computer’s disc drive. Depending on the size of your library, you may need several CDs (which store up to 700 megabytes of data each) or DVDs (which pack in at least 4.7 gigabytes of files per disc). You’ll get nagged by iTunes to feed it a new disc once it fills up the current one.
If you ever need to use your backup copies, open iTunes and put in one of those discs to start restoring your files. Remember, there’s nothing really exciting about file backups—until you have to use them to save the day.