
Chapter 5. Keep in Touch with Email
Email is part of daily life. You wake up and check your inbox, you go to work and check it all day, and you come home and check it once more to make sure you haven’t missed anything. Today, the ability to compose, send, and receive mail on mobile phones means you spend less time in front of a computer, but still, there you are—hunched over a smartphone, squinting and pecking on a tiny screen.
The iPad changes all that. Now you can lean back on your couch, flip on the tablet, and read and write mail on a spacious 10-inch screen. No more terse, abbreviated messages inspired by a cramped little keypad. With the iPad’s full-size onscreen keyboard, you can compose your thoughts completely, without having to drag the laptop out of your home office and wait for it to boot up.
This chapter gives you a tour of the iPad’s email program, from setting up your mail accounts to hitting the Send button on that first message. And remember, when you’re done checking email, you’ll find movies, music, and that new best seller are just a tap away—and you don’t have to leave the couch, either.
Set Up an Email Account (or Two)
Thanks to its WiFi or WiFi + 3G connectivity, the iPad can grab your email out of thin air. Using it, you can read, write, and send messages so you stay in the digital loop of your life.
But to get your messages flowing into the iPad’s Mail program, you need to supply it with your email account settings so it knows where on the Internet to look for your mailbox. You do this in a couple of ways:
Sync mail settings with iTunes
You get email on your desktop computer, right? If you’re using a dedicated program like Microsoft Outlook or Apple Mail, you can copy your account settings over to your iPad without having to fiddle with server addresses and other arcane tech matters.
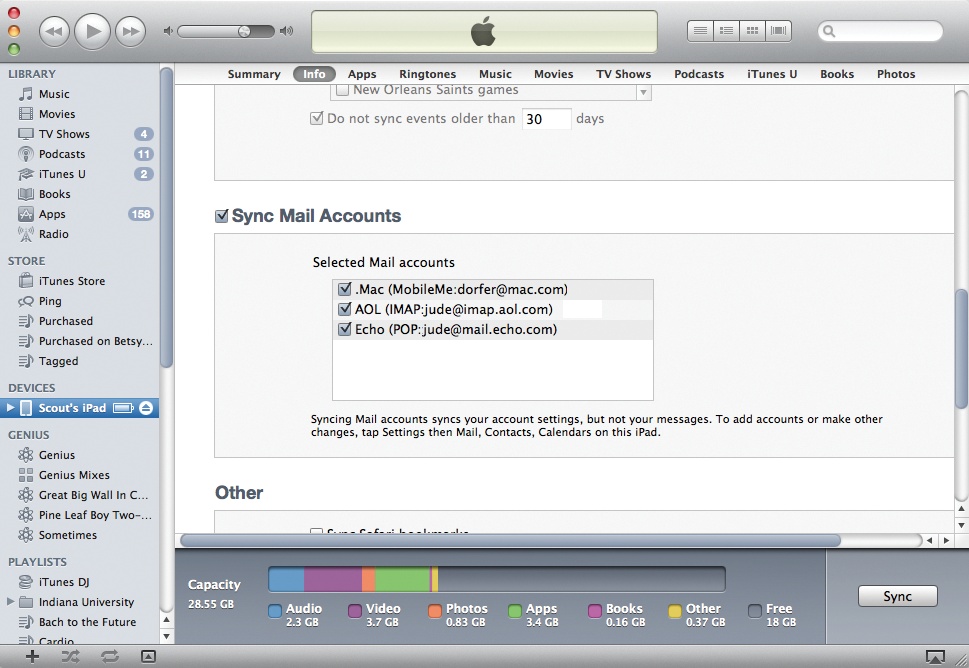
To do so, connect your iPad to your computer, click its icon in iTunes, and then click the Info tab. Scroll down to Sync Mail Accounts and put a check in the box next to “Sync selected mail accounts.” Pick the accounts you want to tote around on your iPad. Click Sync or Apply to copy the settings—but not your computer-based messages—over to the iPad, where you can now check for mail from your tablet.
Set up mail accounts on the iPad
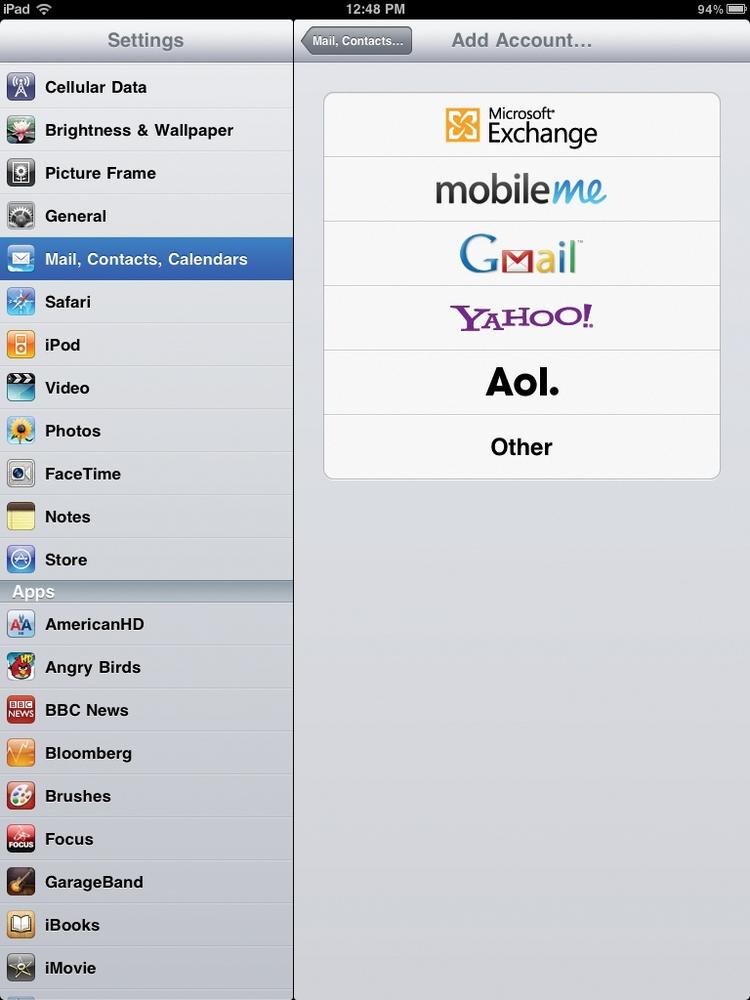
Tap the Mail icon. If you use Microsoft Exchange, MobileMe, Gmail, Yahoo, or AOL, tap the appropriate icon. If you don’t use any of those, tap Other.
On the next screen, type in your name, email address, password, and a brief description (“Personal Gmail,” say). If you tapped Other, be prepared to type in the settings you got from your Internet provider when you signed up for your account. This includes your email account user name, password, and the addresses of your ISP’s incoming and outgoing mail servers (which usually look something like mail.myserver.com and smtp.myserver.com, respectively).
If you don’t happen to know this information off the top of your head and can’t find the paperwork from your ISP, check the technical support area of its website for “email configuration settings” or “email server addresses.” Or just peek at the account settings in your desktop computer’s mail program.
Click Save, and the Mail program goes out and gets your new messages. Repeat the process if you have more than one account. (And you can always add more accounts later at Settings→Mail, Contacts, Calendars→Add Account.)
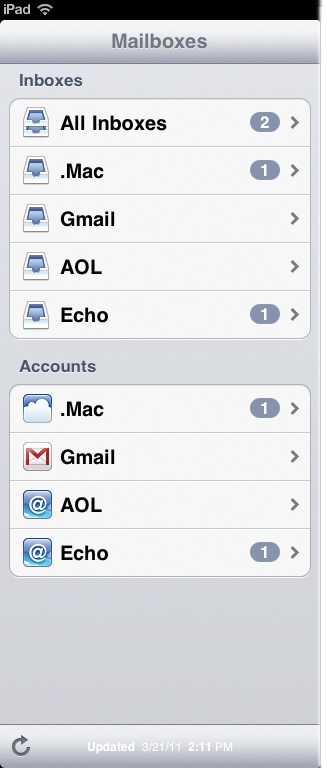
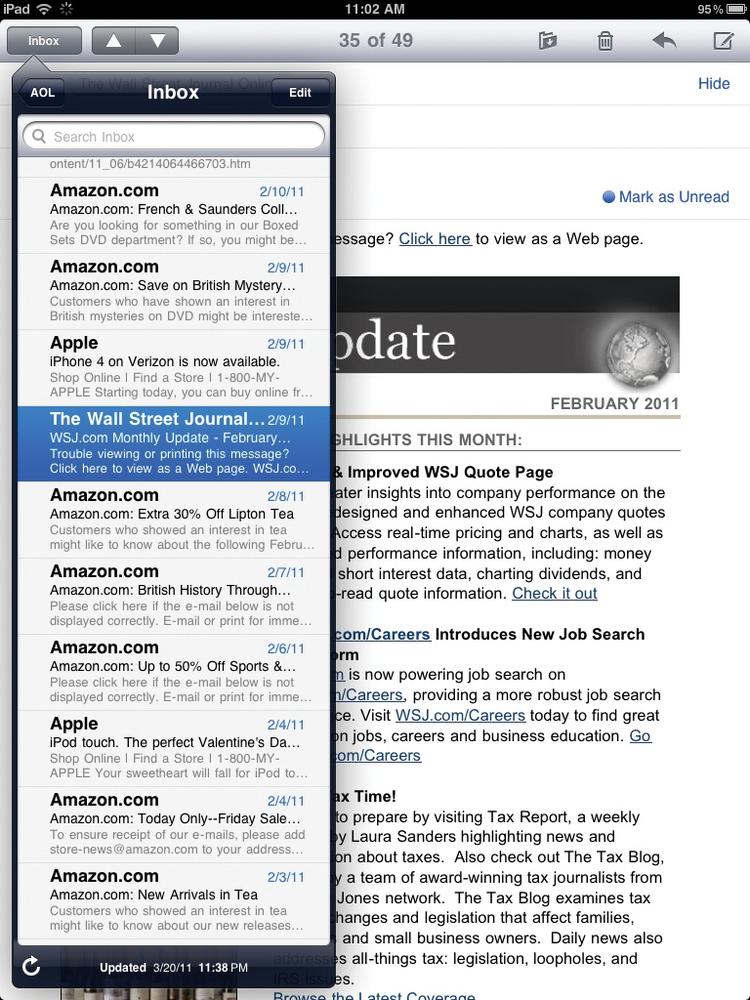
If you do have more than one email account, the iPad now (with iOS 4.2 and later) offers a unified inbox view at the top of the Mailboxes screen, as shown on the right. This means you can see all your new messages in every account at once just by tapping All Inboxes.
Of course, you can still check each inbox individually by tapping the account’s name. And if you want to see other mailboxes, like Sent, Trash, and Drafts, flick down to Accounts, tap one, and then tap the name of the mailbox you want to see.
Tour the iPad’s Mail Program
Once you get it set up, the iPad’s email program works pretty much like any other: You read messages, you write messages, you send messages. But instead of popping open overlapping windows for Inbox messages, messages you’re reading, and messages you’re composing, the iPad keeps things in tight formation.
You don’t have to click a thing to see your inbox along the left side of the screen and an open message displayed alongside it: Just hold your iPad horizontally. Your inbox appears as a vertical list, showing the sender’s name, the message subject, and a two-line preview of each message.
A search box lets you scan mail for specific keywords. A blue dot (![]() ) next to a message means you haven’t read it yet. A numerical gray icon
on the right side of a message preview (
) next to a message means you haven’t read it yet. A numerical gray icon
on the right side of a message preview (![]() ) refers to the number of messages in that thread,
or set of messages grouped together because they share the same subject line. Tap a message
preview in the Inbox to see the missive open up and fill the rest of the screen, complete
with message header, text, and attachments.
) refers to the number of messages in that thread,
or set of messages grouped together because they share the same subject line. Tap a message
preview in the Inbox to see the missive open up and fill the rest of the screen, complete
with message header, text, and attachments.
To reply to a message (or forward it on to somebody else), tap the ![]() icon. This brings up a fresh mail message with a copy of the original
below it, ready for you to write back—or fill out a new address to forward along. It also
brings up the iPad’s virtual keyboard for the heavy fingerwork.
icon. This brings up a fresh mail message with a copy of the original
below it, ready for you to write back—or fill out a new address to forward along. It also
brings up the iPad’s virtual keyboard for the heavy fingerwork.
If you find the screen a little too busy with all these window panes, hold the iPad vertically. This 90-degree move re-architects the screen—all the background boxes disappear, and the one message you need to deal with sits front and center, filling the screen, with a toolbar on top.
This streamlined toolbar doesn’t have a lot of room for button labels, so here’s a guide to those cryptic Dan Brown-ish symbols, generally moving from left to right along the screen:
 ,
,  (Previous Message, Next Message). When you have a message open on-screen, you don’t have to switch back to
the Inbox view to go on to the next one (or back to the previous one). Just tap the
button to revisit the message you were reading earlier—or tap the
icon to move on to the next message.
(Previous Message, Next Message). When you have a message open on-screen, you don’t have to switch back to
the Inbox view to go on to the next one (or back to the previous one). Just tap the
button to revisit the message you were reading earlier—or tap the
icon to move on to the next message. (Check Mail). Tap the button to have the iPad check for new messages and load your inbox
with fresh arrivals.
(Check Mail). Tap the button to have the iPad check for new messages and load your inbox
with fresh arrivals. (Move to Folder). Want to save an open message to a different folder (Drafts, say) within an
account? Tap this icon and pick the new folder.
(Move to Folder). Want to save an open message to a different folder (Drafts, say) within an
account? Tap this icon and pick the new folder. (Delete). Tap here when you’re done with this message for good—or if it was an
annoying piece of spam to begin with.
(Delete). Tap here when you’re done with this message for good—or if it was an
annoying piece of spam to begin with. (Forward, Reply, Print). When you want to respond to a message or send it along to another
recipient, tap the button and select its destination from the menu that pops up. (See
Print With Your iPad for information on setting up the whole
print-right-from-my-iPad thing.)
(Forward, Reply, Print). When you want to respond to a message or send it along to another
recipient, tap the button and select its destination from the menu that pops up. (See
Print With Your iPad for information on setting up the whole
print-right-from-my-iPad thing.) Compose New Message. Need to fire off a fresh note to somebody? Tap here to get started with a
brand-new, blank message.
Compose New Message. Need to fire off a fresh note to somebody? Tap here to get started with a
brand-new, blank message.
Read Mail
So how do you get started reading your messages once you get your mail accounts all set up? Like this:
Tap the Mail icon on the iPad’s Home screen. Unless you moved it, it’s in the bottom row of icons, between Safari and Photos.
If you’re connected to the Internet, the iPad checks all the email accounts you set up and downloads any new messages it finds.
If you’re holding the iPad horizontally (landscape mode), your Inbox sits along the left side of the screen. Tap a message preview to see it displayed in full in the middle of the screen. If you’re holding the iPad in its vertical position (portrait mode), the first or currently selected message fills the window; tap the Inbox button in the upper-left corner to see what else awaits you. If you’re in another mailbox, like All Mail, tap the mail account name in the left corner to retrace your steps to your individual mailboxes.
Work your way up and down the mailbox, either by tapping the message previews in the inbox or by using the
and buttons (Tour the iPad’s Mail Program) to scoot up
or down the list from the main screen. Tap the “Mark as Unread” button on a message if
you want it to appear as new mail so you can deal with it later.
File Attachments
Email messages often come with attached files. The iPad can open and display Microsoft Office and iWork files. It can also handle PDF, RTF (rich text format, a cross-platform text standard), .vcf (a Contacts file standard), and text files, as well as several photo and graphics file types, along with some types of video and audio files (as long as they aren’t copy-protected).
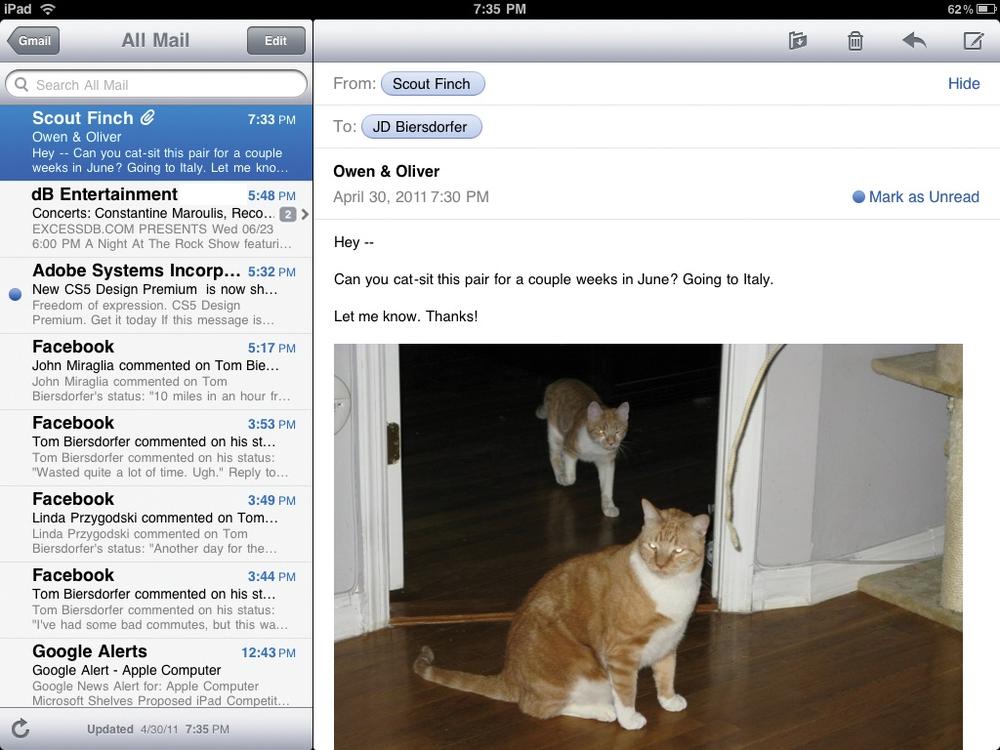
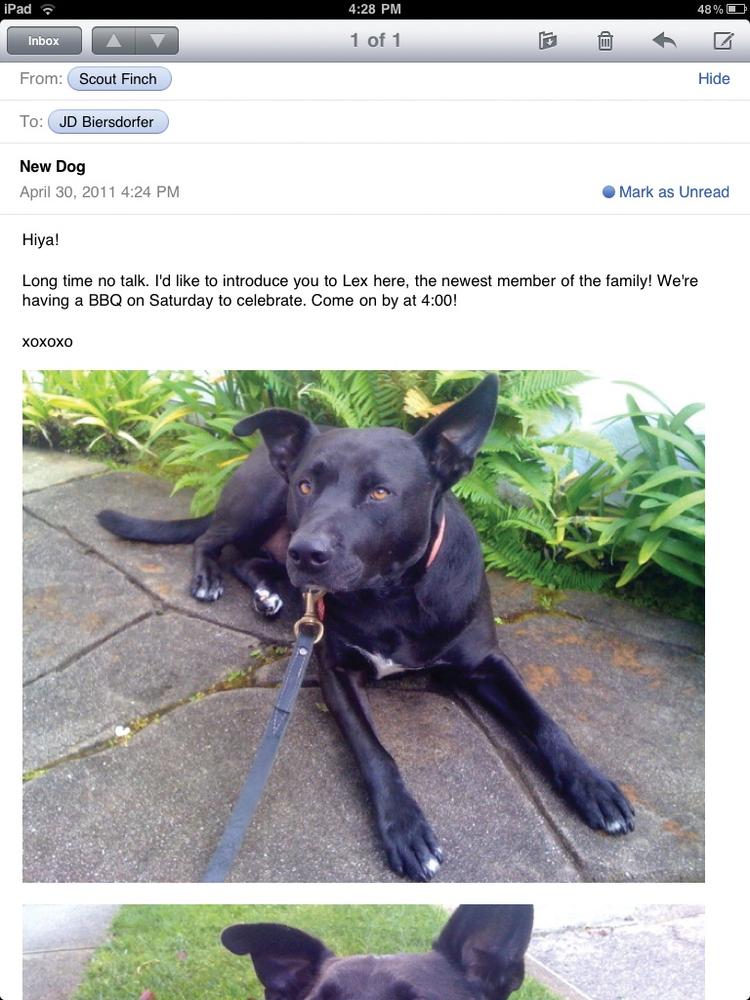
File attachments like photos usually appear open and visible in messages, so if someone sends you a few snaps from their vacation on Italy’s Amalfi Coast, you don’t have to hunt around for icons at the bottom of the message to tap a photo open—you get instant envy without any extra effort.
Some attachments—like word-processing documents, spreadsheets, and presentations—typically appear as icons at the bottom of a message. Tap that Excel chart icon, for example, and the whole spreadsheet pops open to fill the iPad’s screen.
Use Information in Messages
Ever notice how a lot of email messages involve setting up dinner dates, appointments, meetings, and other gatherings that use addresses and people’s contact info? The iPad’s Mail program knows this—and is ready to do something about it.
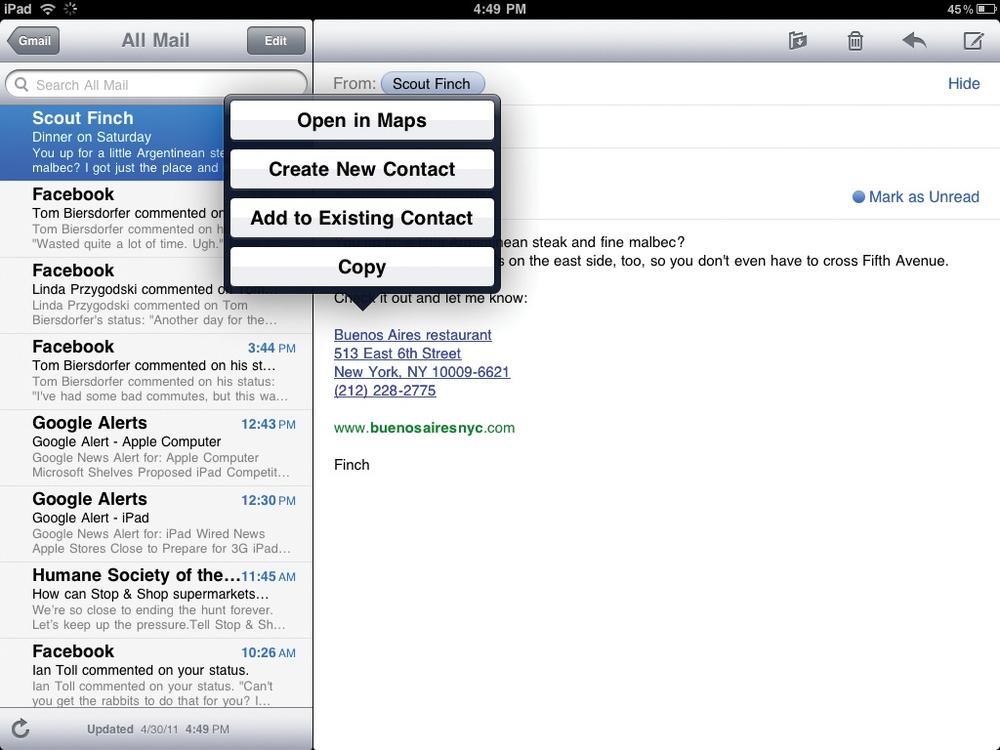
For example, say you get a message suggesting dinner at a new restaurant—with the address helpfully pasted in the message. If it’s an unfamiliar location, press down on it. The iPad recognizes this as a street address and turns it into a link. Tap it, and a box pops up offering four options—including the ability to see the address in the iPad’s Maps program. Now that’s service!
The other options include:
Create New Contact. If your sender includes personal information, like a name, address, and phone number, in a message, you can add him or her to your Contacts list with a tap
Add to Existing Contact. If you have the name but not the number of a friend or colleague in your Contacts file, you can add in the new info.
Copy. Need to move this information into another message or program? Select Copy and, when you get to the destination file, hold your finger down and select Paste from the pop-up menu.
If the message has an underlined date, time, or phrase (“dinner tomorrow”), press and hold that bit of text to get a menu option for adding it as an event to the iPad’s Calendar program. And now that you’ve mastered reading email, turn the page to find out how to write and send messages on the iPad.
Write and Send Email
When you’re ready to write—or write back—the iPad is there for you. If you’re starting
from scratch with a new message, tap the ![]() icon at the top of the screen. If you’re replying to (or forwarding) a
message you received, tap the
icon at the top of the screen. If you’re replying to (or forwarding) a
message you received, tap the ![]() icon and select Reply, Reply
All, or Forward. Either way, you get a new
message.
icon and select Reply, Reply
All, or Forward. Either way, you get a new
message.
If this is a brand-new message, tap the “To:” field at the top. The iPad keyboard appears for your text-entry pleasure. If the recipient is in your Contacts list (Maintain Contacts) or you’ve written to the person before, the iPad cheerfully suggests addresses and fills in the “To:” line on your tap. Filling in the “Cc:”(carbon copy) field works the same way. If you’re replying to a message, the address or addresses of your correspondents are already there for you.
Tap the Subject line and type in whatever this message is about. If you’re replying to a message, you can tap and edit the Subject line using the handy delete key on the iPad keyboard.
Tap the message body area and type your missive.
If you have multiple mail accounts, tap the “From:” field and choose the account you want to use here.
When you finish, tap the Send button in the top-right corner to fire off your note. Hit Cancel if you change your mind.
Tip
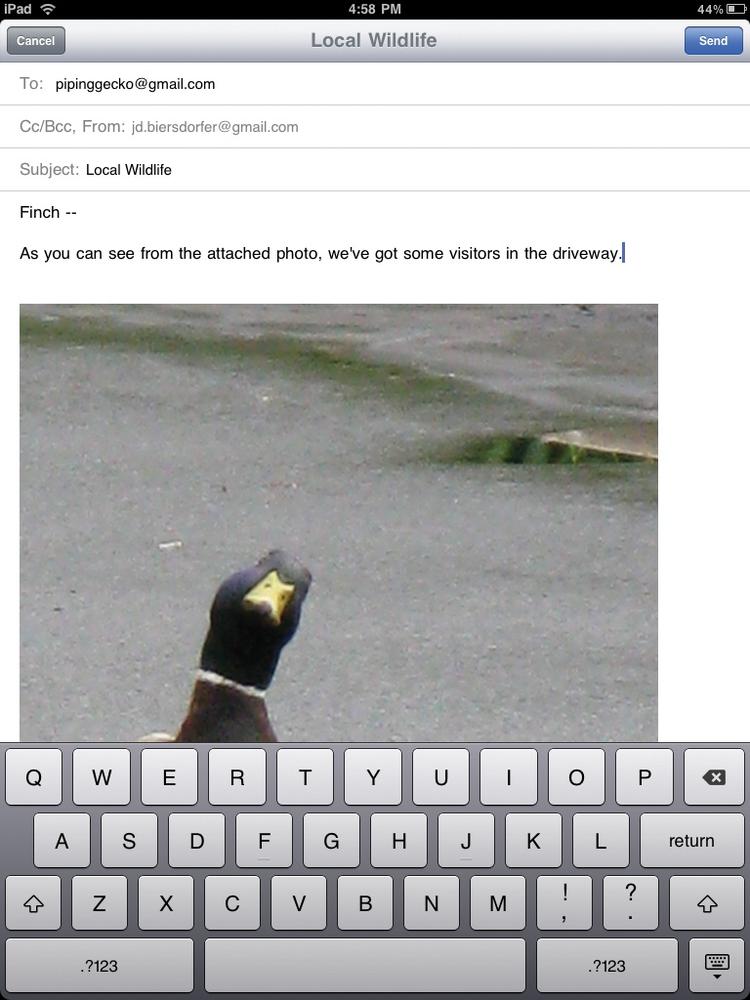
Want to email a photo? Bop into the Photos app from the Home screen and tap open the
album containing the image or images you want to send. Tap the ![]() icon at the bottom of the screen and then tap the photos you want to
mail. Then tap the Share button to create a new message with the images attached. If you
already have the message started, you can also paste in a pic.
icon at the bottom of the screen and then tap the photos you want to
mail. Then tap the Share button to create a new message with the images attached. If you
already have the message started, you can also paste in a pic.
Take Control of Your Email
Messages can pile up quickly, especially if you have several accounts funneling mail into your tablet. If you find yourself splashing around in a rising tide of mailbox flotsam, here are a few quick things you can do to get things back under control:
File messages in different folders. Some mail providers, like Yahoo and AOL, let you create your own folders to sort messages the way you prefer, like by topic or sender. If you had your own folders set up with the service before you got your iPad, the folders should be there after you add the account to your tablet. To file a message into one of these personal folders, tap the
icon and choose the folder you want to use as the message’s new
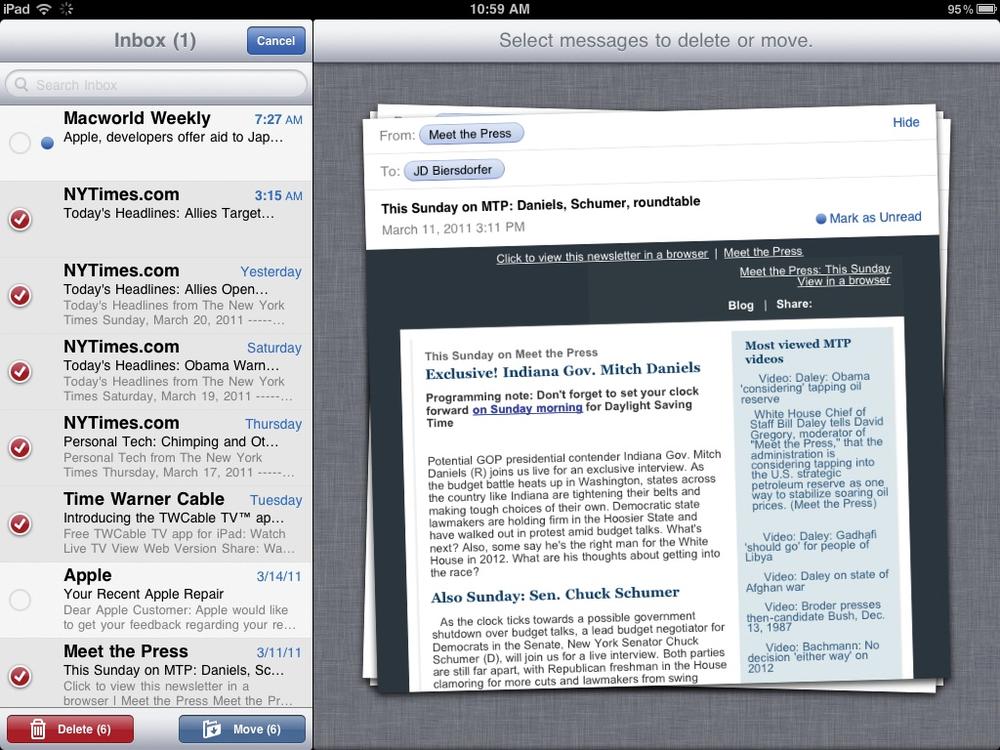
home.Delete all the junk at once. Zapping unwanted messages out of your Inbox one by one with a finger swipe is tedious, but there’s a faster way. Just tap the Edit button at the top of the Inbox pane. Buttons for Delete (
) and Move () appear at the bottom of the screen. In the message list, tap the
ones you want to either nuke or refile. Each message you select slides out into a “pile”
next to the Inbox list—these are readable versions, so you can make sure you aren’t
dumping messages you still need. Once you make your selections, tap the appropriate
button below to send all those messages to the same place at once: either the trash or a
different folder.Scan for spam. Want to see the messages that are personally addressed to you, either in the “To:” or “Cc:” fields—and not mail addressed to you and 500 other people from bulk mailing lists or junk-mail dealers? The iPad can identify your personal messages by sticking a distinct little
 or
or  tag on them. To turn on the tags, choose Settings→Mail, Contacts,
Calendars and flip the On switch next to “Show To/Cc Label.” Messages without these tags
stand out and make more obvious targets for the mass-deletion method described above.
The next page has more adjustments you can make to the Mail program’s settings.
tag on them. To turn on the tags, choose Settings→Mail, Contacts,
Calendars and flip the On switch next to “Show To/Cc Label.” Messages without these tags
stand out and make more obvious targets for the mass-deletion method described above.
The next page has more adjustments you can make to the Mail program’s settings.
Adjust Mail Settings
Like most programs, the iPad’s mail app comes with standard settings for things like the size of the text that appears onscreen. If you don’t like the way the type looks or you want to tweak the program in other ways (like how many lines of a message appear in the Inbox preview), take a trip to Home→Settings→Mail, Contacts, Calendars.
From here, you can:
Change the minimum font size. Unlike paper mail, you can easily make message print bigger or smaller for more comfortable reading. Size choices range from Small to Giant.
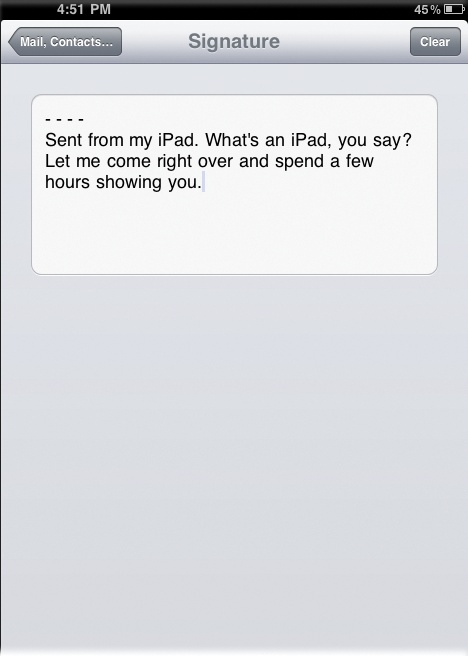
Add a custom signature. As with a regular email program, you can add a personalized tag at the bottom of each outgoing message. Popular signatures include your contact information or quotes from The Matrix.
Show more (or less) preview in your message list. Out of the box, the iPad’s mail program shows you a two-line preview of each message so you have some idea of what it contains. You can change this from one to five lines, or select None to turn off the preview entirely.
Set a default mail account. If you have multiple email accounts on your iPad, use this setting to designate one of them as your default account for all outgoing messages (and for messages you create by tapping mail links in other programs). Remember, you can always tap the “From:” field in a message to switch to a different account.
Load remote images (or not). Some people don’t like embedded graphics in a message, as they can transmit a signal to the sender that you opened the message. Turn off the images here.
Organize by thread. Hate threaded messages clumped together under one subject line? Turn off the threading (and those
 icons) here.
Delete unwanted mail accounts. Need to ditch an account because it’s become too spam-laden or you need to streamline things? Flick up to the Accounts section, tap the name of the doomed account to get to its settings, and tap the Delete Account button.
Webmail on the iPad
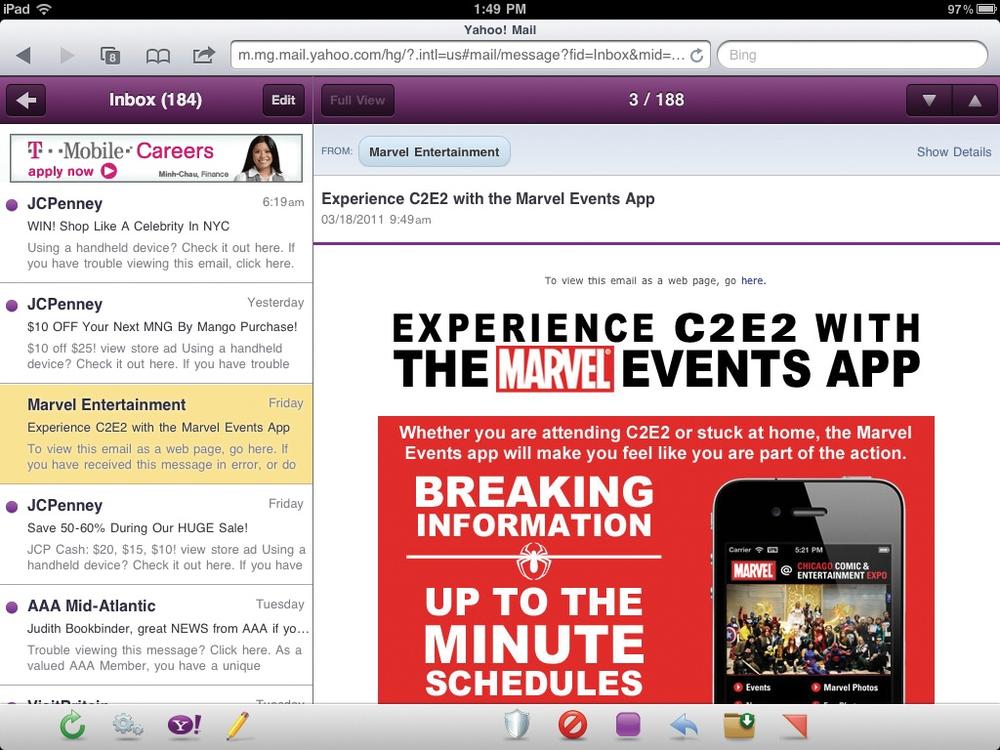
Despite the fact that you can get your messages on the iPad through its dedicated Mail app, that’s not the only way to monitor your inbox. As you may remember from the last chapter, the iPad has a nice, sturdy web browser. With it, you can check your Web-based email accounts (Yahoo, Gmail, Hotmail, AOL, and so on) by logging in through Safari. Doing it this way can be helpful if you just want to deal with your mail on the website it belongs to, no matter what device you’re using.
Depending on the service you use, you may find that it offers a mobile version of your mailbox when you log in through the iPad’s browser, like the Yahoo mailbox shown here. Some big services (like Google) even have their own free apps in the App Store, designed to make it easier to check mail, news, and other features on your iPad. Check the App Store and search for your service.
Note
To help you keep a copy of each message in your account no matter where you read it, Google turns the Delete button into an Archive button when you try to zap a message from the iPad’s Mail app. Instead of getting deleted from your inbox, the message moves into the All Mail area of your account, where you can still read it on the Gmail website or on other devices you use for Gmail. If you prefer to delete those unwanted messages, tap Settings→Mail, Contacts, Calendars, and then tap the name of your Gmail account. In the account’s settings area, tap the button next to Archive Messages from On to Off.
POP3 and IMAP Accounts on the iPad
Web-based mail—especially if it’s free—works for many people. But millions of others don’t use webmail for one reason or another, perhaps because they have accounts from their Internet providers, use employer-provided accounts, or worry about privacy and security. At any rate, these mail accounts are typically one of two types:
POP accounts. Short for “Post Office Protocol,” these accounts use an older messaging technology, but are still quite common around the Internet. The main drawback to POP is that it wasn’t really designed for checking mail on more than one computer (yes, it pre-dates the mobile boom).
Unless you’re allowed by your ISP to save mail on its server, a POP server transfers incoming mail to your computer (including your iPad) before you read it, which works fine as long as you’re using only that machine for your email. You won’t get a copy of that message when you log in from another computer because you already downloaded it.
IMAP accounts. IMAP (Internet Message Access Protocol) is a newer mail system that folks on the go tend to like much better than one-stop POP. Instead of downloading a message to just one machine and leaving it there, IMAP servers keep all your mail online. That means you can get the same mail from any computer (or trusty iPad). These thoughtful IMAP servers remember which messages you’ve already read and sent off. They also keep tabs on your other mail folders. (Yahoo, MobileMe, AOL, and Gmail all use IMAP, as do corporate Microsoft Exchange servers.)
Now for the bad news: Since all this mail roosts on the IMAP server, you need to deliberately delete old messages or your mailbox will eventually runneth over. On IMAP accounts that don’t come with a lot of storage, the server could start bouncing new messages when it gets full, annoying your friends. And you don’t want that.
No matter which kind of account you have, the iPad will work with it. You just need to have all the user account information for it.
Tip
Since you’re on the go, the iPad generally copies your IMAP messages to itself, so you can deal with mail even when you’re not online. If you want to direct these messages to a specific mail folder, you can. Open Settings→Mail, Contacts, Calendars→[IMAP account name]→Account→Mail→Advanced. On this screen, tell the iPad where to put draft, sent, and deleted messages.
Syncing your mail accounts with iTunes (described at the beginning of this chapter) is one way to get each type of account set up correctly on the iPad. If you skipped that step, you can do it the old-fashioned, manual way.
Start on the iPad’s Home screen and tap Settings→Mail, Contacts, Calendars→Add Account. On the next screen, tap Add Mail Account and then enter your name, email address, password, and an optional description. Tap Next to start working through the account-creation screens.

The Mail app attempts to pin down which kind of account you have (POP or IMAP) by your email address. If it can’t figure it out, it takes you to a second screen, and grills you for information like the host name for incoming and outgoing mail servers. At the top of the box, you can tap either IMAP or POP, to inform the iPad of your account type.
If you don’t have this information written down (or stored in your own memory bank), ask your Internet service provider or the office tech guru for help.